
iRJi
Smash Champion
- Joined
- Sep 9, 2008
- Messages
- 2,423

Table of Contents
Rules (Rules)
Introduction (Luc.1)
Abbreviations you must learn (Luc.2)
Why pick Lucario (Luc.3)
Lucario Strengths and Weaknesses (Luc.4)
Moveset in detail (Luc.5)
Combos and mind games (Luc.6)
Approaching with Lucario and how to stop approaches (Luc.7)
Playstyles: Passive vs aggression, and their benefits (Luc.8)
Advance techniques (Luc.9)
How to Recover (Luc.10)
FAQ (Luc.11)
Useful Links (Luc.12)
____________________________________________________________________
**Rules** (Rules)
These thread is to keep the organization of the boards at a maximum since people who are new like to travel through the boards and make/remake/revive threads, and post in the wrong sections. Please follow these rules given:
1) Please keep general chat discussions and spammy/flashy pictures in the general chat thread.
2) If you have a quick question to ask, please go to the thread title "Ask a quick question, get a quick answer" An example of a question that should be asked i the Q&A thread is:
IE: What Kind of controller should I use?
or
IE: What is a good secondary for Lucario?
3) Please review all the threads that are stickied for information regarding what you are looking for prior to making or posting something. In most cases, things that are generally asked on the boards have been answered before, so if you do some looking you might be able to find it.
4) No Flaming. This one speaks for it's self, and I will enforce this rule to the full extent of it. Mild flame and sarcasm is O.K. But anything beyond that will not be tolerated. This is the warning.
5) If you would like anything to be updated with information, post inside the thread that you want updated, and the person who is responsible for that thread will try to help you ASAP.
In the event that you can't get your question answered, these are people who can most likely help you.
iRJi
Ph1lny3
D. Disciple
Please try to reach them via. PM first. If you can't get in contact with them, then use an external messenger (AIM, MSN, etc)
Once again, welcome to the Lucario Boards, and as long as you follow these rules, you and everyone else will get along soundly. =]
**Abbreviations You Must Know** (Luc.2)
Aerials
Nair- Neutral air.
Fair- Forward air.
Bair- Back air.
Dair- Down air.
Uair- Up air.
Smash Attacks
Fsmash- Forward smash.
Dsmash- Down smash.
Usmash- Up smash.
Throws
Uthrow- Up throw.
Fthrow- Foward throw.
Bthrow- Back throw.
Dthrow- Down throw
Others
AS- Aura Sphere.
BAS- Baby Aura Sphere.
FCAS- Fully Charged Aura Sphere.
FP- Force Palm.
FPCG- Force Palm chain grab.
ES- Extreme Speed.
EA- Extreme Awesome.
DT- Double Team.
RDT- Reverse Double Team.
FF - Fast Fall
SH - Short Hop
FH - Full Hop
_________________________________________________________________________
Why Pick Lucario - Milln (Luc.3)
Well... Lucario is an appealing guy. The Lucario community as a whole is generally pretty chill and laid-back, so that's one reason one might want to main Luca; Just to be a part of the loving , albeit whacky, community. Everyone around here cares for one another and is very warm and friendly to new players and eager to help each person out as an individual. Lucario is also very well rounded as a character, having balanced matchups against the entire cast and requiring true skill, knowledge, and mastery to prevail. Lucario is a character that you can feel accomplished with when you reach professional status and have a few tournaments underneath your paw. There are also some people (like me) that feel like they get more tenacious when it appears that hope is nearly lost and seek a character or playstyle that they can reflect themselves in. Lucario caters to that magnificently with his Aura, growing in power as he takes on more percentage and can even turn an entire match around that would have been utterly hopeless with any other character in the game. Lucario has many lasting and far-reaching attacks that allow the abuse of a few of the game's mechanics, as well. Riolu's evolution is also able to perform well under many different styles of play so he can cater to a wide range of people and even use this to throw the opponent's patterns off mid-match. All in all, Lucario is a fantastic character of high caliber, and a wonderful choice for a main. If you decide on him, then, by all means, welcome to Lucario.
__________________________________________________________________________
Lucario's strengths and weaknesses - AuraSmash14 (Luc.4)
STRENGTHS
1.) First and foremost, our ridiculous Aura ability. Symptoms of aura power are increased damage on moves, Increased knockback on moves, Increased priority on moves, and Aura sphere size increased. When full power your AS will be as big as Bowser, and will be the Largest, strongest, most fear-inducing Projectile in the game.
2.) Lucario has a ridiculous ledgesnap range. For someone with as puny arms as him he can grab the ledge from about a 3/4 Lucario away.
3.) An awesome aerial game results from his floatiness and mildly good airspeed. he is the 6th slowest faller in the game and is ranked 17th fastest in the air. Being at home in the air gives him a solid chance against chars with a better ground game.
4.) He has several antiair options himself which allows him to go toe to toe with other aerial lovers. like jiggly, yoshi, Ness, and a few others. namely Usmash, Utilt, grab, FPgrab, Dair, and Fsmash works a bit too.
5.) Extremespeed can be curved as much as 90 degrees, that’s by far one of the most flexible 3rd jumps ever. it allows him to go over edgehoggers, avoid edgeguard attempts, heck it can allow you to make a tiny mistake without falling to doom. It can also cling directly to walls making ES an above average recovery, and make a small bounce when he curves into the floor. (yes Phil ive found a small use for your bounce, getting away from edge guarders.)
6.) His wallclinging abilities are nothing short of amazing. a full 3 seconds can be spent hanging out on a wall giving you a virtual time out from a brawl. His wall-jumps are also massive and he can climb UP walls for a long time. since it can be done from ES it is a necessity to learn, no MASTER this. (Especially on FD, it’s a lifesaver if you know you can’t reach the ledge.)
7.) He has a good ranged game what with Aura bursts and them refusing to go away until the opponent gets hurt. with proper spacing you can attack short ranged opponents and leave them to burn in aura fire. (Of course this is a bit exaggerated.. time those bursts well!)
8.) He can crawl under a couple of projectiles, pit's straight arrow, Samus super missile. ROB's laser, Diddy's peanuts,(note you can also duck under his leap thingy.) Luca's SHPK fire, And MK's and space animals Bair. (So long as not fast falled. TY MILLN!)
9.) Lucario can rack up damage pretty fast. He has several strings that can easily put 40% or so on your poor opponent. (Especially if there fat. Fair>FFnair>Dtilt> follow-ups, works awesome with Bowser.)
10.) He's wicked AWESOME! Besides, if the aura didn’t drag you in dear newbie, the community will. (Just don’t be a snob alright? be friendly and be nice, or you’ll get flamed.)
11.) Above average vertical launch resistance. (13th)
12.) He cant get chaingrabbed by anyone but DeDeDe and IC's
13.) Good Grab attacks. (Fthrow kills(If badly DI’d), Bthrow's good at low aura, Dthrow = traps and Uthrow= chains and Utilt spam.)
14.) FP flame can be reflected, but doesn’t hurt Luca!
WEAKNESSES
1.) Aura WORKS BOTH WAYS! If your ahead of your opponent you'll eventually grow weaker. =O
2.)Average vertical launch resistance. (16th)
3.) ES does no damage. (Stick to that wallcling people.)
4.) His arms are puny... Apparently grabbing with his ears is more effective than grabbing with his tiny arms.
5.) FP flame can be absorbed, or bucketed.
6.) for a nimble dude he's pretty slow.... Fsmash is now an aura wall instead of an attack, (too slow startup) and his closed range moves are easily beaten with fast jabs. (Learn to space)
7.) Easily juggled. Enough said.
8.) Relies too much on racking up damage. (however a luca ditto is going to be epic.)
9.) He is ridiculously weak at the start of a match. He has low priority, low damage and really low knockback.
10.) No Spike?!! Better hit them close to the ledge........
____________________________________________________________________
Moveset In detail - Milln and Philnye (Science!) (Luc.5)
~~~~~~~~~~~~~~
In the form of-
Attack: The name of the attack
Range: It's relative range according to Short, Mid, or Long. Short being a Mario jab punch, Mid being a Marth bair, and Long being a DeDeDe ftilt
Frame Data: The nitty-gritty stuff, most of it is pretty basic as of now.
Approximate Percent: All percent is approximate I'll give a Fresh maximum and a Decay minimum at the stated Luca percentages
Description: I'll try to describe it as best I can. =o This will also be my notes.
~~~~~~~~~~~~~~
1. Jab (A>A>A)


Range:Short
Frame Data:
1st Hit Box on frame: 6
2nd Hit Box on frame: 14-20
3rd Hit Box on frame: 20
Approximate Percent:
0%- 2/1/4 max, 2/1/3 min
70%-3/2/6 max, 2/2/5 min
170%- 14% max, 7% min
Description: The first two hits have almost no knockback, whereas the last kick will send them at a 75 degree angle away from you. The first and last hit strike behind, with the kick having a better reverse range than the first, which requires the opponent to be almost ON you. Another thing, The kick, will nick people from a little farther than it actually looks like it'd hit.
2. Dash Attack

Range: Short
Frame Data:
Hit Box on frame: 7
Complete on: 31?
Approximate Percent:
0%- 10% max, 5% min. Minus 2% for hitting at the end.
Description: Will almost always send them 100 degrees, which is behind you. Hitting at the end of the animation will yield a different knockback, placing them directly behind you.
Tilts
3. Forward-Tilt

Range: Mid-Short
Frame Data:
1st Hit Box on frame: 12
1st Hit Box out on frame: 18
2nd Hit Box on frame: 21
Completes on frame: 33
Approximate Percent:
0%- Hits twice for 5% each max, twice for 2% each min
70%-14% max, 6% min.
167%- 18.1% max, 9% min
Description: Sends them horizontally at low percentages and angles up to 45 degrees as percentages rise. Can be used to set up follow ups and shield pressure. Can be directed up, down, or forward
4. Down-Tilt

Range: Mid
Frame Data:
Hit Box on frame: 9
Completes on frame: 17
Approximate Percent:
0%- 5% max, 2% min
70%- 7% max, 3% min
166%- 9.8% max, 4.8% min
Description: Pops them up at a 60 degree angle away from you. Will never cause your opponent to trip like other dtilts. =\ However, at low percentages it pops them up enabling some followups.
5. Up-Tilt

Range: Short
Frame Data:
Hit Box on frame: 5
Completes on frame:15
Approximate Percent:
0%- 4% max, 1.5% min
70%- 7% max, 2.6% min
170%- 8.4% max, 4.2% min
Description: If you nail them with the aura only, they are popped up much further up. Its sweetspot has no effect on its percentage, but does on its knockback. Unsweetspotted it has poor knockback, enabling utilt strings if they don't DI, or some other followups. Hits behind you first, then above you, then in front of you.
Smash Attacks
(Note: These smashes aren't charged, I'm going to get to that at a later date)
6. Forward Smash

Range:Long
Frame Data:
Hit Box on frame: 22
Completes on frame: 32
Approximate Percent:
0%- 10% max to 5% min Tipped, 8% to 3% Untipped
70%- 17%-8% Tipped, 15%-7% Untipped
165%- 22.3% max, 11.15% min
Description: Sends them flying at a 45 degree angle away from you. Hitting with just the aura makes it much more powerful in both knockback and percent. Space it. Lingers as long as Luc is in that "Push" animation.
7. Down Smash

Range: Mid-Short
Frame Data:
Hit Box on frame: 17
Completes on frame: 28
Approximate Percent:
0%- 9% max, 4% min
70%- 14% max, 7% min
169%- 19.6% max, 9.8% min
Description: Launches them at a 40 degree angle away from you. Hits on both sides, so it's great if you're unsure. Comes out a few frames faster than Fsmash. As long as the blasts on his paws are there, there is a hitbox.
8. Up Smash

Range: Mid
Frame Data:
Hit Box on frame: 19
Completes on frame: 41
Approximate Percent:
0%- 8% max, 4% min
70%- 13% min, 6% min
167%- 18.1% max, 9% min
Description:Straight. Up. Has a quirky hitbox that hits farther behind you than in front. Also lingers for a very long time.
Aerials
9. Neutral-Air

Range: Short
Frame Data:
Hit Box 1 out on: 6
Hit Box 1 in on: 15
Hit Box 2 out on: 19
Hit Box 2 in on: 28
Complete on: 72
(Note: This move auto-cancels)
Approximate Percent:
0%- 8%/4%max, 4%/2%min. Number on the right of the slash designates the 2nd spin
70%- 12%/6% max, 6%/3% min
169%- 15.4%/7% max, 7.6%/3.4% min
Description: Sends them 30-ish degrees away with the knockback deteriorating for the second spin. Hits on both sides of you, and autocancels.
10. Forward-Air

Range: Looks Short, but is Short-Mid/Midish =3
Frame Data:
Hit Box on frame: 7
Hit Box in on:22
Completes on frame: 30
Approximate Percent:
0%- 4%max, 2% min
70%- 5% max, 2.4% min
170%- 7% max, 3.5% min
Description: Has almost none. Doesn't really send them anywhere until higher percents, in which case it's a 35-ish degree angle. This move is so beautiful. Combos into and out of itself and into everything. Awesome multi-purpose. Hits everywhere but above yourself.
11. Down-Air

Range: Mid
Frame Data:
Hit Box 1 out on: 4
Hit Box 1 in on: 10
Hit Box 2 out on: 13
Hit Box 2 in on: 22
Complete on: 34
Approximate Percent:
0%- Two hits for 5% and 6% max, 3% and 3% min
70%- 16% max, 7% min
168%- 22.3% max, 11.15% min
Description: Will send them anywhere except for downward based on where you hit them according to the circles you stomp out. It also seems to the be attack LEAST affected by diminishing returns. Why is this such a great move? =o
12. Back-Air

Range: Mid
Frame Data:
Hit Box on frame: 15
Completes on frame: 34
Approximate Percent:
0%- 9% max, 4% min
70%- 12% max, 4.6% min
168%- 16.8% max, 8.4% min
Description: This one is interesting. It seems that if you just do the move normally, it makes them fly at a 60 degree angle from you, but if you hit while fast falling it the trajectory changes to something much more horizontal. O,o Peculiar and worth looking into. Beast hitbox, too.
13. Up-Air

Range: Mid-Long
Frame Data:
Hit Box on frame: 10
Completes on frame: 21
Approximate Percent:
0%- 6% max, 3% min
70%- 10% max, 4% min
170%- 14% max, 7% min
Description: Directs your enemy straight into the sky. Great for Star KOs. About the hitbox? That Aura burst AND his entire body is one, even his tail. Enjoy.
Specials (B moves)
14: Aura Sphere Charge(neutral b)

Range: Very Short
Frame Data:
start tick on: 1
tick "activates" on frame: 52
Approximate Percent:
0%- 0.5% per tick
Knockback: Usually sends your opponent upwards, plus their DI direction. AND YES, IT GETS ITS OWN SLOT. >OOOOOO Shares Diminishings with Aura Sphere, but also clears them for other moves quickly, due to the speed of the ticks. Not a frequent move for actually attacking, but does have interesting properties (like reversing your horizontal momentum in a b-reversal fashion).
15. Aura Sphere(neutral Bx2)

Range: Very Long
Frame Data:
Hit Box on frame: 19
fully charged AS on: 120?
Approximate Percent:
0%- Uncharged: 5% max 2.5% min|Charged: 13%max, 6% min
70%- Uncharged: 8% max 3% min|Charged: 16% max, 9% min
170% (Uncharged cap): 10.5% max, 5.25% min
167% (Charged cap): 26.3% max, 13.1% min
Description: 45-degree angle of delicious. Will travel just under the full length of Final Destination.
16. Force Palm Grab(Side B up close)

Range: Short
Frame Data:
Grab Starts On frame: 9
Completes on frame: 26
Approximate Percent:
0%- 7% max, 4% min
70%- 13% max, 6% min
167%- 18.1% max, 9% min
Description: 70-degree angle. Shares Diminishings with Force Palm Flame
17. Force Palm Flame(Side B)

Range: Long
Frame Data:
Hit Box on frame: 25
Completes on frame: 28
Approximate Percent:
0%- Bulk: 7% to 3%|Tip: 5% to 3%
70%- 11% max, 4% min|Tip: 8% to 4%
164%- 12.4% max, 6.2% min
Description: Sends them pretty horizontally, actually. About 45 degrees, a little less. The tip of it is known to trip the victim fairly reliably at sub-70 percentages.
18. Double Team(down b)


Range: Can Counter from infinite, but the attack is Mid-long
Frame Data:
Hit Box on frame: 7
Completes on frame: 85
Invincibility Frames: 7-33
Approximate Percent:
0%- 7% max, 3% min
70%- 12% max, 7% min
169%- 15.4% max, 7.7% min
Description: Completely ignorant of whatever attack is used to trigger the counter, it deals a set amount of damage and knockback. Very, very situational move, arguably one of the worst of the counter moves in Brawl, especially since it doesn't contain an actual "counter stun". Launches them 80 degrees upwards. A fresh one will KO at reliable percents, noted in a handy chart here: http://smashboards.com/showthread.php?t=154555
19. ExtremeSpeed (UpB)

Rang--er... wait.. >,>
Grabs
20. Grab punch/Pummel/Grab jab(Press attack while holding the opponent)

Range: Grab
Frame Data:
Comes out on Frame: 3
Hitbox out on Frame: 4
Complete on Frame: 6
Approximate Percent:
0%- 0.5%
70%- 0.7%
170%- 1.4% max to 0.7% min
Description: None to speak of, but great for clearing your move decay. Notably very fast jab, but weakish.
21. Forward Throw

Range: Grab
Approximate Percent:
0%- 7% max, 3% min
70%- 10% max, 5% min
170%-14% max, 7% min
Description: Pretty nice, also receives the great boost from Aura. Sends them 45 degrees away, then the knockback actually tapers off to a more horizontal sending, which is why it's good for KO-ing with.
22. Back Throw

Range: Grab
Approximate Percent:
0%- 10% to 5%
Description: Also nice. Sends them a few degrees less than Fthrow, but doesn't receive a boost from Aura, relying solely on your opponent's percentage and DI skills.
23. Down Throw

Range: Grab
Approximate Percent:
0%- 10% to 4%
Description:Their DI reaaalllly affects this one. They can go anywhere, even straight up. Will not scale with Aura.
24. Up Throw

Range: Grab
Approximate Percent:
0%- 4% to 2%
70%- 6% to 3%
168%- 8% to 4%
Description: Hits them upward and they can't really change it. Barely sends them anywhere, though, enabling combos and followups and traps. Lucario is also a badass when he performs this move. This move does get a bonus based on your percentage.
25. Ledge Attack <100%

26. Ledge Attack >100%

*Attack Ranges (shortest to longest horizontally)*
Ground-based:
1) Up-Smash
2)Grab
3)Up-Tilt
4)D-Smash
5)A
6)D-Tilt
7)F-Tilt
8)Force Palm (side B)
9)F-Smash
10)Aura Sphere
1)U-air
2)D-Air
3)N-air
4)F-Air
5)B-Air
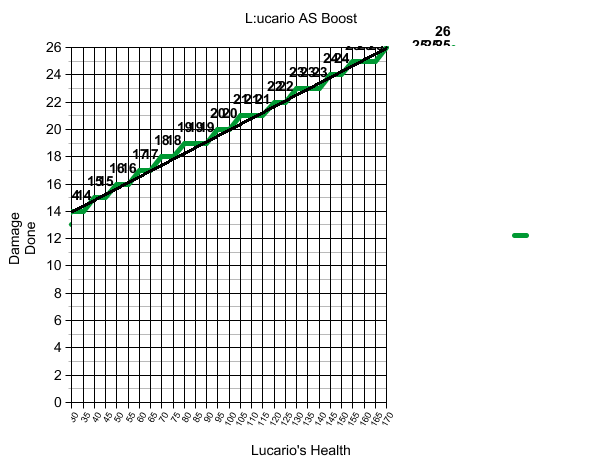
Boost Section
Rebonack graciously tested this thoroughly for us. You are encouraged to provide your own data for theory-backup or to disprove him.
Aura Boost: Damage For Lucario's moves - MythTrainerInfinity
First up is Lucario's Aura Damage Percent increases. Most of it is copy/pasted from my original post of it and some of the info you may already know, but for those who don't... This is useful.

The Aura damage increase beyond 75% slows down, also all unchangeable moves get a boost at 75%. Many of Lucario's Aura based moves have what I like to call "Aura Growth Lag" meaning it takes awhile for it to even start increasing much (ex. his Up Tilt doesn't increase in a full percent of damage until 45%). Some of the growth rates below 75% are rather strange, but it seems the ones after 75% are rather predictable.
Since some people like details... I tested this on in Training Mode (no move degradation, yay) on a character at 0% (healed after every move test). I did not include every little .1% of an increase because that would take me alone probably over two days non-stop (I love Smash, but that is ridiculous).
Other Data Interpretations
As you may already know 170% is the damage cap for Lucario's Aura (not like you'll always be surviving past that point anyway). The power of Lucario's moves at best double when he's at even stock with his opponent.
Did you know that Lucario's second Jab doesn't even do 3% when he's at 170%? You guys might want to consider just using A->Force Palm over AA->Force Palm because of less risk and it almost does negligible damage.
If tl;dr when you hit 75% with Lucario go to town damaging your opponent.
Aura Growth Comparison of moves (Ledge Attack omitted):
Initial damage 1%, peak 2%: Second Jab
Initial damage 2%, peak 4%: First Jab
Initial damage 3%, peak 7%: Third Jab, Forward Air
Initial damage 4%, peak 8%: Up Throw, Up Tilt
Initial damage 4%, peak 9%: Down Tilt, Neutral Air (Late)
Initial damage 5%, peak 10%: Aura Sphere (No Charge)
Initial damage 5%, peak 11%: Force Palm (Far)
Initial damage 6%, peak 12%: Force Palm (Middle), Up Smash No Charge (Late), Back Air (Late)
Initial damage 7%, peak 14%: All Three Jabs, Up Air, Force Palm (Close), Forward Throw
Initial damage 7%, peak 15%: Neutral Air (Begin), Double Team
Initial damage 8%, peak 16%: Back Air (Begin)
Initial damage 8%, peak 17%: Up Smash Full Charge (Late)
Initial damage 9%, peak 18%: Force Palm (Grab), Up Smash No Charge (Begin), Forward Tilt
Initial damage 9%, peak 19%: Forward Smash No Charge, Down Smash No Charge
Initial damage 11%, peak 22%: Down Air, Forward Smash No Charge (Tip)
Initial damage 12%, peak 25%: Up Smash Full Charge (Begin)
Initial damage 13%, peak 26%: Aura Sphere Full Charge
Initial damage 13%, peak 27%: Forward Smash Full Charge, Down Smash Full Charge
Initial damage 15%, peak 31%: Forward Smash Full Charge (Tip)
2. Back in early August we started discussing how to do this in AiB and with some tinkering around I figured out how to do it. (Major props go to Nubsta and Phil for bringing it up and inspiring ways on how to do it.)
So far there are two ways known to do a non-stall DAir that’s not out of hitstun.
1. Fast Fall Non-Stall: This is where you fast fall and buffer it into a DAir. If you inputted it correctly Lucario will fall slightly while using DAir. You can cancel the second hit if you’re close enough to the ground. Technically it doesn’t negate stalling in the air, but it slows it down.
2. Rising DAir: When Lucario’s shield gets hit by an attack and it isn’t perfect shielded there is a time when you can jump up and do a rising DAir, forward rising DAir, or a backwards rising DAir. From my tests I have noticed that this happens when you jump out of shield when it is being pushed back and then DAir. However, this will require more testing because the possibilities are very applicable. So far it seems like it is the easiest to do when your shield is hit with a higher shield knockback move (think Snake’s tilts and the like). Again this is a very awesome discovery that could really help us against characters like Marth.
3. WIP Projects that need help.
The rising DAir has a lot of potential and if someone could get some videos up of it to analyze and discuss that’d be awesome (as I lack the means to) and would be greatly appreciated. The FFNS DAir has some combo potential too.
What really needs help figuring out when Aura Sphere out prioritizes moves. To know when it beats a certain common move will help widen our options against it. The chart I made linked earlier in this post will make it easier to figure out.
So far we know…
10% Aura Sphere beats Mach Tornado.
*Marth's non-tippered FAir will get out prioritized by an Aura Sphere that does 20% (Lucario needs to be at least around 91%).
Marth's non-tippered FSmash gets out prioritized when an Aura Sphere does 22% (Luc needs to be at least around 117%).
*Note: I'm not 100% sure on this, but it seemed like the lower part of Marth's FAir had less priority (as weaker Aura Spheres hit), but I'd need the conformation for that. However, to be safe 91% and 117% should be key percents you should be noting when dealing with Marf.
Here’s some that John12346 found on AiB.
There are other things I’m probably forgetting, but this should be helpful and useful to Lucario’s developing metagame.
_________________________________________________________________________
Approaching with Lucario and how to stop approaches - iRJi (Luc.7)
Now that the basics are over, it’s time to teach you how to approach, and how to stop approaches with Lucario. This section is going to be decently short, because this are just in-game scenarios as well as it does not involve a playstyle. This is strictly just for knowledge purposes.
Lucario has moves and mindgames that are not only versatile, but safe. I will explain some scenarios, but each option to approach varies among the character that you are going against. Also it is appropriate to mention that it will also vary on your play style. Find your playstyle, and work with it to your feel it is perfect.
Approaching with Lucario. (Air game)
Landing behind your opponent is always a good option to have them off guard. If you attempt anapproach, SHFair to FFNair is always a promising combination. If your opponent shields the Fair, attempt to land behind them with a FFNair or an Air dodge. From there you have a few options.
If they are still shielding, you can attempt a retreating pivot grab. If you use a pivot grab, it gives you space just in case they decide to use a different option to attempt to make them safe, and will minimize the punishment options they can throw at you. Also a good option would to try to FP them. If they hold shield it will grab them, and if they try to spot dodge, they have a possibility to get hit with the 2nd part of FP. If you hit their shield with Fair, and decide that you don’t want to land near them, you can simply use your 2nd jump to retreat away.
Another option while landing behind them is to Utilt if they decide to drop their shield. Although it is not safe on block, it is your fastest move available while you are on the floor. Another option would be to jab them, and then follow up with a grab. Jab has follow ups and normally it is the better thing to do if you decide to attack since it’s safer than using Utilt.
On slower, and more bulky characters, Fair to Bair will work wonders (Ex. D3). If fair does not connect, Bair will push them out of the way to have you in a safer situation. Of course this is for people who have slower Option for people who land behind them, and it is not advised to do against characters who have a way of punishing it (Ex: Marth, MetaKnight) Although, it is a good option for mix-ups.
Approaching with Lucario (ground game)
Lucario’s ground approach game is a bit slower, but has almost the safe effectiveness as his air game if utilized properly.
Using Ftilt on characters with Marth’s range or less is a good option (meaning, that will cover a lot of the characters in the game). Ftilt on a lot of people will be safe on block if you space it properly, and will give you other options to follow up since they will have to find a way to get into your area for attacking. Jabbing people will also work wonders on people who get too close and hit your shield. Running into your opponents area and then shielding their attack (better if you Perfect shield) will open a plethora of options. If you Perfect shield their attack, you can grab, Fair, Jab to follow up and sometimes Dtilt to lead to other follow ups.
Lucario getting approached (Air game)
Proud to say that there are only a few characters in the game who can someone shut down Lucario in the air. Lucario when he is getting approached has one thing that many characters dream to have, Lingering Hitboxes. to pass Lucario’s Lingering hitboxes is tough, since they stay out so long, and for some of them you can attack with a different move while another hit box is out. This makes walling with Lucario a very good option.
Throwing Empty Fairs and retreating Bairs are a good thing to do. Bair’s hit box while you are retreating is safe, and while the hit box is out, you are moving away into a safer spot. Throwing Empty Fair’s while spacing will make your opponent try to challenge you, and if they miss that means they are open for a world of pain. An option after an empty fair is AS, simply because if they try to dash in, there only option will be shielding (Use for mindgames only). If they don’t perfect shield, you will have enough time to put yourself in a safer place. You can Dair after the empty fair also, if they decide to rush in.
Lucario getting approached (ground game)
Same thing applies with the lingering hitboxes discussed above. This is where AS normally shines. It creates a wall of projectiles that your opponent will have to either jump over, or shield until they get into range. You can also Ftilt here as a defensive option of they get to close, as well as Fsmash. Fsmash has IASA frames, so you are able to attack while the hit box is out. Normally Jabbing or Dtilting after the Fsmash is a good way to have you opponent off guard.
Like I said, this section is relatively short, because most of this is in game scenarios, as well as it varies between your opponent, and your play-style, But it doesn’t hurt to know a few out of the box options.
_________________________________________________________________________
Advanced Techniques - Hough123 (Luc.8)
Reverse Double Team
Reverse Double Team, (most commonly referred to as RDT), is a technique that allows Lucario to decide the direction that DT goes when hit. This allows the Lucario to go forward, as opposed to backwards when using DT. To do it, simply move the control stick in the direction you want Lucario to go in immediately after DT’s activation. If done correctly, Lucario should travel in the desired direction. A wall cling is possible out of RDT, allowing for recovery options if the opponent has a projectile.
Videos: http://www.youtube.com/watch?v=JtTrT...eature=related
Reverse Aura Sphere
Reverse Aura Sphere, (most commonly referred to as RAS or TAS for turn-around sphere), is a technique that allows Lucario to turn around right before an aura sphere. This technique also reverses Lucario’s momentum, which can be useful for recoveries. RAS requires precise timing, but is easily done consistently after practice. To do it, you have to flick the control stick in the opposite direction that you are facing, then start aura sphere. If done correctly, Lucario should turn around before the charge or shot.
Videos: http://www.youtube.com/watch?v=OEQsXWh0dVY
Extreme Awesome
Extreme Awesome, (most commonly referred to as EA), is a technique that allows Lucario to have no landing lag after ES, and also keep momentum. EA occurs when Lucario bounces off of a “ceiling” of a stage. (Such as the ceiling in Luigi’s Mansion.) Lucario can attack after the landing, allowing for unique spacing opportunities. To do it, simply direct ES into any ceiling at an angle, and land. ES can be done on most stages, but there are very few where it can be used practically. Still, ES can be a great way to surprise an opponent and space an attack.
Videos: http://www.youtube.com/watch?v=85vyBS6-bo4
Extreme Stop
Extreme Stop, (most commonly referred to as EStop, as to not confuse it with Extreme Speed or Extreme Shift), is a technique that allows Lucario to cut the length of his ES in half, allowing for you to trick your opponent. To do it, move the control stick backwards while using ES, then move it down. When done correctly, Lucario should have not traveled the full distance of his ES, and will receive no landing lag. EStop’s uses are, sadly, quite limited, and are very situational.
Videos: http://www.youtube.com/watch?v=85vyBS6-bo4
Extreme Shift
Extreme Shift, (most commonly referred to as EShift, as not to confuse it with either Extreme Speed or Extreme Stop), is a technique that allows for tighter angles when using ES. To do it, use ES in the desired direction and use the C-Stick to influence it. (NOTE: C-Stick must be set to Smash.) When done correctly, Lucario should go in a slightly different angle than usual. If you desire to wall-cling out of EShift, you must press Z to grab it or else you will use an aerial upon hitting it and plummet to your doom.
Videos: http://www.youtube.com/watch?v=85vyBS6-bo4
Extreme Bounce
Extreme Bounce, (most commonly referred to as EB), is a technique that allows Lucario to bounce forward off of the stage upon impact with the ground out of ES. This allows for safer recoveries. To do it, aim ES toward the ground mid-flight and immediately flick the control stick forward. When done correctly, Lucario should have a noticeable “bounce” forward. This technique is fairly new, so information is still being found about it.
Videos: None yet.
Ledge-Cancel
Ledge- Cancel is a technique that allows Lucario to bypass both a ledge-grab, and the landing lag of ES. Ledge-Canceling is done by aiming ES directly above the ledge. When done correctly, Lucario should land directly above the ledge with no lag whatsoever. Ledge-Canceling allows for zippier recoveries, and can trick opponents coming to punish an ES.
Videos: http://www.youtube.com/watch?v=swfieID18bY
Ledge-Jump
A Ledge-Jump is a technique that allows Lucario to wall-jump off of the ledge directly out of a ledge-drop. When done correctly, Lucario should jump off of the wall that the ledge is composed of. Ledge-Jumping can be used to trick opponents, and can be used in accordance with RAS to get back to the stage and charge an AS.
Videos: None yet. (Though I think I’ve seen one somewhere…)
(Infinite) Second Jump Recovery
(Infinite) Second Jump Recovery, (most commonly referred to as (I)SJR), is a technique that allows Lucario to gain his second jump back at least once with all of his aerials. To do it, you must use the desired aerial and use a second jump at the correct time. (Times can be found in the video below.) When done correctly, Lucario will regain his second jump if used. (I)SJR is not commonly used, but has enormous potential.
Videos: SJR: http://www.youtube.com/watch?v=Cb8nh...e=channel_page
ISJR: http://www.youtube.com/watch?v=zOfW7...e=channel_page
____________________________________________________________________
How to play aggressive with Lucario. - iRJi (Luc.9)
Before we start I would like to address this:
1) http://www.smashboards.com/showthread.php?t=173703 – Phil gets credit for this link, it’s useful. Read it.
Lucario to many is a well balanced character. And with the new tier list out, some of us felt like Lucario has been underrated. This however is due to the fact of our movement of the metagame. Lucario to many is a passive character, and with the current metagame moving as fast as it is, it seems like Lucario is falling behind. This is not his fault as a character though, it is our fault as a community to show his true potential as a worthy, competitive character. This will is my first small individual, but defiantly not the last contribution to the boards. I present the one of many changes that will help with Lucario’s everywhere,
Lucario has always been a passive character, mainly because his ground game tends to be a bit slower than others, but that does not stop him from being aggressive. This guide will go over:
1) The Basics
2) Traps/ Baiting
3) How to be the harasser, and not the harass-e (Evasion)
*The Basics*
Lucario, despite the fact of his long-winded smash attacks, can be a pretty fast character. The first thing to keep in mind while trying to move into your opponent is your character’s speed, and safety. You do not want to put yourself into a situation that may cost you damage, or put yourself into a situation that may cost you a stock. Some examples are, but not limited to:
Throwing F-air into the floor
D-airing your opponents shield
Landing in front of your opponent while he has the opportunity to damage you
Jumping off the map against a character that has a high possibility of gimping you
Basically you want to maintain speed, but at the same time leave yourself options for an escape route. Some suggestions to leaving yourself safe are:
Spacing
Landing behind your opponent
**Not chasing after your opponent when you know you are at a disadvantage for landing a hit**
Taking what deals more damage than trying to setup a mind game (ex: using D-throw over U-throw at low %’s)
The main attacks your will be using when you attack your opponent is F-air, Nair, AS, Utilt, Jab, and D-air. Some attack strings that I like to do commonly is F-air> N-air> U-tilt or F-air > N-air> Dash grab. At low %’s F-air > N-air will combo into another F-air> N-air.
*Resetting Yourself/Map Positioning*
The one thing important when trying to pressure your opponent is map control. If you control the map that you play, your opponent will have fewer options on what they can do to challenge you. *For most cases, controlling the middle of the map is the best idea.* When you control the middle of the map, you leave your opponent only a small window of movement and opportunities to do harm to you. It makes your opponent just a little more concerned about having themselves tossed off the map. This works best for neutrals and flat stages (IE: Smashville, FD, BattleField)
Now it comes to mind of “What happens if you are on an asymmetrical stage, Where the middle can vary?” And if that really did come to mind then good, if not its ok, that’s why I stated it. *If there is no middle to hold down, then the next best option is to hold where your opponent wants to be most.* Lets take for example that you are a Lucario player going against a Marth (sorry for the Marth talk, I play against him a lot since I’m in Pierce’s crew) and you are on frigate orphion, Marth knows that with the platform on the first form of the stage, it makes a good place to hold since he gets a tipper F-smash from the top. Also since there is no ledge on one side, he wants to hold down the left side so it is harder to abuse his recovery. That would be the place you would want to hold down from him getting to. If you pressure Marth (I still lol) to the right side where he has no ledge to grab if he gets tossed off the map, he will be more concerned about trying to position himself into a better spot.
*Traps/ Baiting*
Traps and baiting… One of my favorite things to do with Lucario is to trap and bait. When it comes down to this there are many possibilities. For anyone who is not familiar with the terms,
A Quick definition would look like this:
Brawl Traps and Baiting: To make your opponent “Think” you are going to do one thing and then completely do something else.
*Traps*
I’ll start with traps. When you trap your opponent, it leaves him in a bad position that locks out most of his options and resorts to retreating. One of my favorite traps is landing behind your opponent. When you land behind your opponent, you tend to get a good feeling inside saying “I got you now *****” Some things that could be done when you land behind your opponent are grabbing them, U-Tilt, Forward B, or to simply retreat and find another option. This option works best if you throw a fair at them and they shield it. What I like to do if they shield is F-air> fast fall N-air> Grab or F-air> Fast Fall Air Dodge> Grab (can be followed with other options mentioned) another simple trap is throwing a retreating Short Hop empty F-air > AS. Most people like to approach after a fair because there is a window to get hit if you miss, and that leaves them open for a nice AS to their mouth. Now here is the question “If the shield the AS, Wouldn’t they have time to hit you?” and for a while there thought that too, but I want you to keep this in mind. When you have a fully charged AS, and they shield it, they can’t come in range in time. In most cases if you get hit after doing it, its because you were in range of their attack to begin with. Here is the other property of the fully charged AS. If they are not in range and they PS it (Perfect Shield/ Power Shield) it leaves your Opponent in a freeze animation on the PS. What I mean by that is if they PS the AS, they will have a little bit of lag after it, while you are still dropping to the floor. If you don’t take my word for it, test it the worse thing that can happen is I’m wrong, right? Anyway back to what I was saying. The best thing to do after this option is to roll away, and setup your next plan for attacking them.
More to come for the traps section ^_^.
*Baiting*
Traps and baiting are close together in the same meaning, but have two different purposes. When I talk about baiting, I’m talking about forcing your opponent to air dodge. So this is separated from Traps because it’s a special kind of trap.
How to bait your opponent to air dodge:
This one is simple but yet complicated. Normally when someone is in the air unwillingly, they would want to get back to the floor as soon as possible. For most, people like to Air dodge past your opponent to go to the floor. This is where baiting comes in. The proper way to bait some one with Lucario is to not chase them, but to let them try to air dodge past you. What I find most useful to make them air dodge is to jump after them then Empty U-air, then when they try to air dodge past you D-air them. Another simple trap is to jump and again Empty U-air then fast fall into a D-smash (although this 2nd one is less reliable.) The 2nd option to baiting the air dodge is just jumping and waiting for them to do something. Normally when you wait they will try to pass you, the best way to punish with this option is just fast fall N-air.
*How to be the aggressor, and not the aggress-e*
In this current meta game, there are a lot of characters who like to take onto the offencive side. Most characters Lucario can play aggressive against them and come out on top, but some characters Lucario has a hard time dealing with when he is playing the aggressive roll. This section will explain how to help remedy that issue and come up with a solution to help Lucario come on top.
Some characters that Lucario has an issue to play against while playing aggressive is (In order of difficulty)
Marth
Mr. Game and Watch
King DeDeDe
Donkey Kong
**Possibly** R.O.B
Come of these characters above either have a better aggro game then you, or can punish you if you rush them.
To win some of these matchups, you need to know how to evade tough situations. Therefore, I will explain some proper ways to have evasion with Lucario.
*Lucario’s standard evasion method*
To many Lucario’s all over the globe, His standard evasion method is walling your opponent so they cannot come into you area. This method involves a frequent use of AS to pressure your opponent from approaching your “Bubble” easily. Moves and techniques that come into play while walling with Lucario are:
Empty F-airs
AS
F-tilt
Spacing F-smashes at full range (makes it incredibly difficult to punish)
Retreating Bair’s
Make sure that if you use this method you are spacing for as much possible range for all of yoru attacks. Mixing these techniques makes it hard for your opponent to reach you, and if they do come into your area, your best option is to retreat to an empty part of the stage and continue to use the same method. That’s Short and simple, right?
A video will be posted later for a standard wall in this spot. It shouldn’t be that hard to find one, since this “was” the standard way of playing. Yay for aggression =D
*Lucario’s Aggressive evasion method*
Now some of you might be thinking “How can you be aggressive if you are running away?” and that is a very good question too, unless you are running away to open a can of whoop-*** onto them. Every character has a weak spot, as well as an opening between attacks. That much information stated is what you need to know to pull this method off.
This Method is like baiting your opponent into a bad situation, but its you that is making the retreating option. The idea of this method is to simply run away (fun right?) Like I said, every character has an opening and every character as a weak spot. How you abuse that fact is key. When you are rushing, most people tend to space improperly. The whole idea is to space your opponent in enough range that he is not too far from you so when he is open up you can hit him, but to keep out of range so you do not get hurt. Let’s take Marth for example. (sorry again) Marth is a very fast character who can eat your hits, and not to mention he will trade if he has to with much delight in his soul since he hits pretty hard. Marth also has move that auto cancel into other moves and an amazing air and ground pressure game. Sucks doesn’t it? Yea… for Marth, you just learned a new way to abuse his open spots. In between fairs Marth has a open spot. If he is rushing you with F-air, move out of his range and then come back and attack him when his fair is over. Just an example, there are many other situations, but it’s a useful thing to state. Also I would like to add this Did you know fact:
Did you know that: Marth can’t short hop over you F-smash? Just saying…
This method takes some anticipation on what your opponent is going to do, but that’s not saying much. Almost every method in this game takes anticipation to pull off attacks anyways. =D
____________________________________________________________________
How To Recover - Ph1lny3 (Luc.10)
So I've been hearing a lot of miconceptions recently about how badly lucario's recovery sucks, and he's totally garbage offstage. "Just edgehog him, and ggs" some say, others are like "he can only wall jump, so just spike him or something". I've let it fly by, but recently it's been getting worst. While it is an imperative to discuss at highest levels of play what happens, there's a difference between OPTIONS and MINDGAMES. Most dismiss lucario's incredible "scrapes" of luck because he got lucky and didn't get hit properly, when in the reality of things, there's more to it than that. There are a few categories of lucario's recovering tools/traits I want to cover, but this will explain in due time why Lucario can make it and live with such an abysmal recovery.
1. Super floaty: Anyone who's played with lucario for the first time, the first thing I hear from him besides "OMG fsmash/dair is b0rk3n", is "Good grief he's got clouds for feet or something, he's so floaty". To be correct, he's about the 5th floatiest or so in the game, slower in fall speed than Peach and Marth. Floatiness actually affects a lot more things offstage than people realize. It allows lucario to do more aerials while aloft than most, and combined with dair allows for good control over his recovering game. This combined with disjointed aerial range compensates for average aerial movement, which allows him to get out of really icky situations. If a lucario realizes his tools and takes advantage of this, Lucario is actually a really tough bugger to gimp when he's not using Extreme Speed, as he can move away from an aerial and dair stall and jump while the opponent still has to suffer from the remaining afterlag of their edgeguarding aerial, and because of his floatiness, he doesn't suffer the problem of having to resort to "drowning survival behavior". What I mean by that is, many other characters have suffer from horrible jumps/fall mechanics (like Link), horrible warding tools (Ike comes to mind, as he can do only one aerial before he has to recover, so AD screws him over), or bad recovery distance (like Mario). Lucario has overall above average weight (about 16th heaviest), floaty, good survival DI methods (decently fast aerials, plus they have really low endlag/IASA/autoFF, and a really good second jump, which means by stats alone, there is much to be reconsidered besides looking at just "that lolzy upB" for how good lucario has it offstage. He outlives a large portion of the cast above him minus G&W, MK, Snake, D3, and Wario (these are including DI methods), so Lucario has got it made by stats.
Aerials: Our aerials are awesome. People really forget how good a lingering hitbox is. It says "AD doesn't exist". It also means you don't have to risk worrying too much about someone mixing it up by doing an empty hop, if you do things right, you can stall out pretty well via dair stall. Most characters that we wouldn't want to fair against, can always be outplayed by moving away from an aerial calmly -> dair stall and hop over, shoot BAS to slow him from getting off the stage or getting at you, or even turnaround BAS -> bair is a mixup that works somewhat well due to lucario's air time. Those who can't outrange us have it much worst, lucario's aerials are walls, and wasting time getting burned means lucario gets the window he needs. Dair also works really well when recovering from above the stage, nearly nothing competes with it if you use it right, plus allows you more control over mobility than most characters, nearly nobody has this kind of stall advantage for any character let alone ones that are similar in build to lucario. USE YOUR AERIALS, it gives you many more options than you think it does.
3. BAS: It's slow, something normally kind of bad onstage, because shield and Perfect shield ****. Offstage is an aberration. The slow speed of it is ideal for lucario's lingering disjoints and he can smear hitboxes all over if done correctly, what does this mean for the opponent? It's a complete mess. Lucario's biggest aspect is time when offstage, any time wasted by AD/shielding the BAS before attempting to go after lucario means lucario's chances have increased dramatically and is going to be onstage again and breathing with arguably one of the most frustrating walling/defensive plays. BAS if shielded onstage allows for you to even ES back to the LEDGE, depending on whether they PS'ed it or not. If they did, you still haven't lost much, you have a plethora of options. Oh, and if you really want to, you can stage-spike an edgehogging opponent with BAS.
4.Second jump: Good golly gastrointestinal disorders. This jump is a really good jump. Lots of height, length, and once again, MORE OPTIONS. The tip with this is, if you haven't used it to survive from a killing blow with survival DI, you'll want to save it. Using your jump immediately could cost you severely, but using your other options to harass will make your second jump possibly the only thing you needed. The natural height it gets is really good for dair stall -> DJ uair from underneath if you see your opponent is edgehogging, or fair/bair if from the sides. Additionally, you can even attempt to go underneath the stage by using double jump and ES and go all the way to the other side if he's got one side covered (like snake) and is attempting to seal it off by edgehogging. Additionally, you can always try for double jumping to another option that while is more predictable can be invaluable, wallclinging.
5.Wallcling: This is an underrated tool, and should be so: It's a somewhat last resort option and is very risky. At top levels of play, theoretically this is pretty problematic. However, in actual play I'll admit, I HAVE YET TO SEE A RECORDED MATCH, OR MYSELF GET KILLED WHILE WALLCLINGING. There's a great amount of things you can do while wallclinging, you can either bair, uair, BAS, or AD, which are probably your best options. Spiking is not a good option because of AD and how laggy most spikes are, and all the others are pretty decent for punishing an opponent period. Wallcling is that trick you save for last, because you don't want to be predictable with it, this is the sole reason it is so hard to read for most. In addition, you can double jump -> walljump on many stages that don't have wallcling, such as BF.
6.ES: The last thing a lucario can rely on when trying to recover, and arguably the most important. Extreme Speed on paper is horrendous, ranking along side firebird, falcon dive, and waterfall as some of the worst recoveries. ES has many complexities behind it that help it get better though. For one, there's how you land onstage. There are essentially four animations that lucario goes in for recovering, and each are important to remember. The first is the "air brakes animation" where lucario does a little flip/braces after landing, and this is the worst one to do. Second is the "hard bounce" animation, which while at first isn't much better than the braking, if you redirect lucario after the first bounce, you can gain more distance across the edge, and it will allow you to get just out of reach of most punishing attempts. The third is arguably the better and easier to do consistently, and that's the "glide". Lucario finishes Extreme Speed and has a nearly lagless ending depending on how much of the distance was left before he glides, it isn't noticeable, but it's there. He is fully ready if spaced properly, and to do so, I actually recommend judging ES's distance and trying to land at the very end of it, doing so will give you the least amount of commitment. This is also not to hard to do at least on a semi-consistent level. Last of all, there's the amazing Extreme-cancel, which is hard to do, but I'm sure with time will get easier as lucario's metagame progresses. You basically aim for just above the lip, but on the very corner. If done properly, Lucario gets NO LAG AT ALL, and can bound off immediately too. This is easiest to do on FD, but if mastered will theoretically negate many of lucario's landing problems. Here's the order of which landing method you will want, from best to worst:
1.Extreme-cancel
2.fully canceled glide
3.lagging glide
4.bounce across
5.helpless fall?
6.stationary bounce
7."Leg crippler", aka the hard brake
Another note (read VERY IMPORTANT), Going onstage may not be the best for lucario, but it isn't as bad as theorycrafters put it. Here's why:
If lucario has flown far enough away from the ledge back on the stage, the opponent has a limited punishment pool. The "oh you can just smash, gg" statement is a very false one, considering you have to have both a fast and long-ranged smash, and even then most of the time lucario has enough time to pull his shield up out of the lag. This means your opponent only has small window to fit a ledgehopped fair/longranged nair. Likely scenario =/= worst scenario, this is why this is good. On top of that, the fair sends lucario in only one trajectory 80% of the time, all the way to the other side of the stage. Lucario has a lot of room for letting DI/SDI affect it so he can aim high, and thus not be put in the predicament he was before, off the side. That being said, Lucario essentially has to "recover twice", it isn't actually an auto-gimp situation. Provided this may come across as "purely theoretical", but from what I've seen, the scenario is all too likely to happen, and lucario only dies when he's against a vastly amazing long ranged air game like marth/MK, or he was too high in percent to begin with and the opponent was a scrub for not killing lucario sooner.
There's also an unconfirmed, but apparent "Extreme Zip" that lucario can do. The details are unconfirmed, but it allows lucario to have no lag, and end up about halfway across the stage, which will make edgeguarding lucario near impossible. It's unconfirmed, but it could prove useful.
So in short, lucario looked from a narrow angle of "theorycrafting" is a sucky character with an abysmal "upB", but a closer examination reveals there's a lot more, ranging from his good options to natural benefits. Lucario may not be the best at a recovering standpoint, but a smart lucario player is able to minimize weakness.
____________________________________________________________________
FAQ- Frequently Asked Questions - FiZZ (Luc.11)
Index:
1)Beginners
2)Moves
3)Stages
4)Tournaments/ Players
1)Beginners
Q- How do you unlock Lucario in SSBB?
To unlock Lucario in Brawl you can either: Defeat Lucario in SSE with Metaknight, Complete 5 Target Tests with any character, or play 100 VS matches.
Q- Is Lucario a pick up and play character?
Lucario has some things that do not make a welcome doormat for the beginner, but he isn’t as bad as some people say he is.
Q- What controllers do the pros use?
The pros use the GC controller. The button layout by far is easier to use than the wii remote or classic controller.
2)Moves
Q- How long can Lucario wall hang?
Lucario can wall hang for approximately 3 seconds.
Q- What are good approaches for Lucario?
It really depends on what character you are playing. But the overall best way to approach is by a fair.
Q- What is Lucario’s fastest aerial?
Lucario’s fastest aerial is dair because it comes out in frame 4.
Q- Which throw is better for what purpose?
Fthrow for killing
Uthrow for combos
Bthrow and Dthrow for 10% and spacing
Q- What options do you have after A>A>?
A>A>FP, A>A>grab, A>A>A, A>A>Ftilt or Fsmash.
Q- Nair or Fair? Which should I use more?
Fair. Nair is only good since it deals more damage and it autocancels on the ground. Whereas fair is a better overall move.
Q- What are some good mindgames for a FCAS?
Some mindgames for a FCAS is that you could intimidate your opponents to the edge. You can also play aggressive and wait till your opponent screws up and then release the FCAS.
Q- Is B-sticking necessary?
No, B-sticking isn’t necessary. All it really is a fun little tactic you can pick up to try and get good at it, to show some class. But it does not separate the good Lucario from the bad Lucario.
Q- Does Lucario have one of the best rolls in the game?
Lucario’s roll is equal to the fastest roll in the game and it also has great distance compared to other rolls.
Q- How do you break the bad habits of rolling?
Simple. Change the L and R buttons to nothing or taunts.
Q- What is Lucario’s signature move?
Lucario’s signature move is the AS. The AS makes Lucario different from other characters and gives him an identity.
Q- What is Lucario’s best move to slow your momentum when knocked off the platform?
The move to slow down your momentum is fair not dair. Dair is only good when you are falling.
Q- Which is better for a setup to FP or grab? Jab>FP/Grab or Jab>Jab>FP/Grab
Neither. If the opponent realizes what you are going to do they will shut you down, simple as that.
Q- What is Lucario’s Down B?
Lucario’s down b is referred to as Double Team (DT). It is a counter move and to use it you must get hit at the beginning of the attack. DT is not liked by many people due to it being so risky.
Q- What are Lucario’s best punishing moves?
Lucario’s best punishing move’s are the AS and Dair. Both can be released fast and can easily punish any mistake.
3) Stages
Q- What are Lucario’s best and worst stages?
Best:
Yoshi Island- The wall-clinging here is very easy, the bigger boundaries allow Lucario to live longer, the platform is placed perfectly for camping tactics and SH aerial attacks.
Pokémon Stadium 1- This stage is AS friendly, the platforms here are ok but not great and the ceiling is decent.
Final Desitnation - The clear level plan make it easier for lucario to maneuver around. A very safe, and friendly choice on most occasions.
Worst:
Corneria- Has a low ceiling, the slope messes up Lucario’s AS.
Rainbow Cruise- The platforms make it horrible for characters with a double jump, can be killed early if near the side,
Frigate Orpheon- The issue with this stage is that it makes it easier to gimp lucario due to the lack of an edge for the majority of the game. Not one of his worse of all time stages, but it is still bad for him.
Brinstar - Despite the map being small and Lucario have a bit of an easier time to kill someone, the close quarters make it very hard for him to maneuver around. Most characters who have a faster moveset will take the advantage here against him.
4) Tournament/Players
Q- Who is the current best Lucario?
It really depends on who sticks with Lucario the longest.
")
Q- How can you prepare yourself for a tournament?
You can prepare yourself for a tournament by practicing, playing as many friendlies as possible before your tournament matches being, staying calm, rereading the matchup thread, playing some friends, a good night sleep and having a fresh mind.
____________________________________________________________________
Useful Links - FlameWaveK (Luc.12)
Tactical:
Frame Date: Assembly of frame data on Lucario's moveset
Official Lucario Playstyle Thread: Classification of Lucario's playstyles
Aura Sphere Priority: Shows when Aura Sphere goes through sh*t :D
Timber's Amazing Lucario Match-up thread Match-upsss
Picture, Video:
The Official Lucario Video Archive: Lucario's official video thread
Milln's Inner Fire videos: Milln's youtube account holding his Inner Fire videos
Inner Fire: Milln's thread/discussion on his Inner Fire videos
Player's corner:
Brawl Lucario Finder: Looking for another Lucario to play with? It's all in here
Old Stuff:
The Old Lucario Guide: The original guide to anyone wanting to play Lucario, not updated (as frequently)
The Old Lucario Guide - 2: A guide to anyone wanting to play Lucario (Outdated, but useful)
Assembly of Unfamiliar Information: Full of useful info on Lucario (such as attack frame data)
Inverse Matchup Thread: How other characters tend to fight us to help form a counter strategy
Lucario's Flaws: A thread about character flaws
Lucario's Worst Opponents: A discussion on opponents that give Lucario trouble in general
Use-
Lucario Stage Discussion: A discussion on good/bad tournament legal stages for Lucario
List of reasons why you should give Lucario a try: Self explanitory
Aura Energy: The Lucario Force: Lucario clan
Lucario chatroom: A place for Lucario players to kick back and chat!
Lucario Community Crazy Awesome Shirt Thread: A thread for Lucario's personal T-Shirt
Moveset Analysis: An in-depth look at Lucario's moveset including KO percents, knockback and launch info
Air Combos: A list of semi Wall of Pains with a deadly ending for each character - With videos!
Lucario Screenshot Thread: Lucario's official screenshot thread
Lucario Avatar Thread: Lucario's offical avatar thread

 , aside from EVERY character needing this, Lucario's second jump is quite large, (though still not yoshi size)