
Cheeri-Oats
Smash Lord
This is a project to really make the most of what Samus can do against a person in a shield.
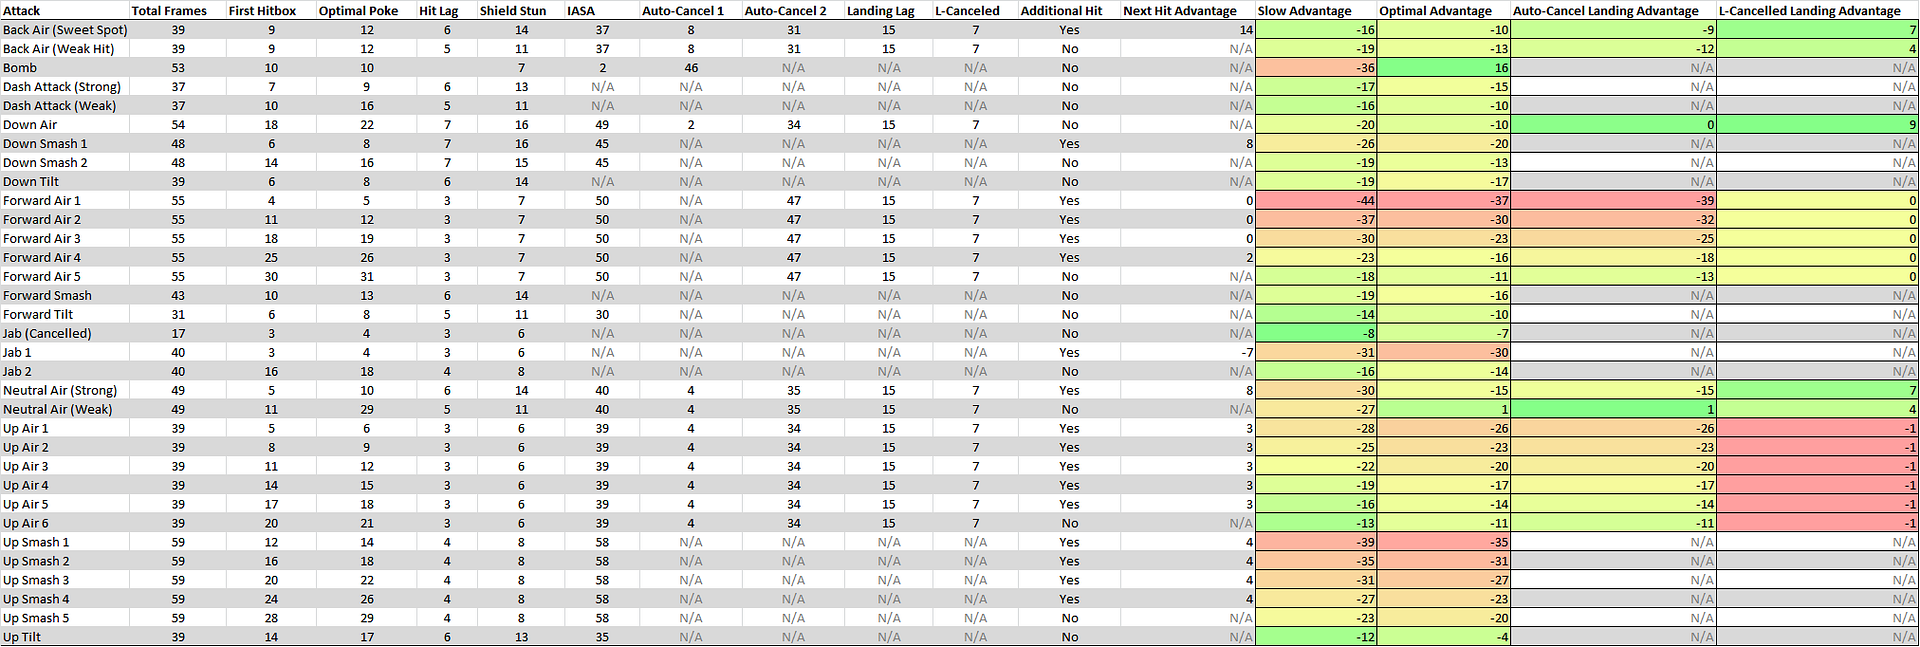
I was playing friendlies last night, and one area I noticed I desperately needed to work on was applying shield pressure. I remember bookmarking this thread ( http://www.smashboards.com/showthread.php?t=294336 ) and after re-examining the data, and thinking about the best way I can keep specific characters in their shield, I came up with the following spreadsheet.
![]()
Here is how you read it:
-------------------------
Basic Frame Data Info
-------------------------
This is the basic frame data info I collected and utilized for my calculations.
Attack: This is the attack's name. Names that have a number after them represent one individual hitbox for that whole move.
For example, Up Air has five hitboxes, and each one is named Up Air 1, Up Air 2, etc.
Total Frames: The total animation frames of the attack.
First Hitbox: The frame of the animation that the first hitbox appears in
Optimal Poke: The frame of the last hitbox of the attack that places the most distance between you and your opponent
Hit Lag: The frames of lag you and your opponent share upon a successful attack on shield.
Shield Stun: The amount of frames your opponent is immobile inside their shield.
IASA: "Interrupt as soon as" this frame comes up; you can crouch, jump, attack, or shield to interrupt the move on this frame.
Auto-Cancel 1: When an aerial can auto-cancel the first time, at any point before this frame.
Auto-Cancel 2: When an aerial can auto-cancel the second time, at any point after this frame.
Landing Lag: The landing lag caused by the aerial.
L-Canceled: The amount of frames of the landing of an l-canceled aerial.
Additional Hit: Does this move have an additional hitbox right after?
---------------
Advantages:
---------------
Advantages describe the relationship between you and your opponent and who can move first. A negative number signifies that an opponent is free to move, from their shield, that amount of frames. If it's a positive number, you finish all animations or lag from your attack, and you have that many frames to do whatever, while your opponent is in shield stun still.
There are very few moves in the game that give positive shield advantage, but many moves come close, and the closer to positive, the better the move is for utilizing as shield pressure.
*Colors in the Spreadsheet: Green means the move is the best option under the conditions of the advantage type, and red means the worst.
Next Hit Advantage: The amount of frames you have between the move and the next hitbox that will appear in the animation.
Slow Advantage: This represents that worst possible scenario in which you hit an opponent's shield. Not only do you hit on the earliest hitbox frame of the move, you do nothing to cancel using IASA, etc.
Optimal Advantage: This represents the best possible scenario in which you hit an opponent's shield. You hit on the last possible hitbox frame of the attack, and you cancel with IASA.
Auto-Cancel Landing Advantage: After performing an aerial, you hit on the last possible hitbox frame of the attack, and you land as soon as the second auto-cancel window is available.
L-Canceled Landing Advantage: You hit with the attack, and immediately land on the next frame into an L-Cancel.
-------------
Conclusions
-------------
I was a little surprised to find out that up-tilt is a viable move to shield-poke with. And I was not very surprised to find data backing our love of jab-cancelling to apply shield pressure.
To properly apply pressure with any aerial move, it looks like we're going to have to either attack up a platform, or below from a platform. It appears that on Final Destination or at any point the two characters are level, you should not be in the air attacking at all.
This also shows just how nasty bombs can be in applying shield pressure, and it helps that they are quick to perform out of shield as well.
-------------------------------
Some More Info / Warnings
-------------------------------
I know some of the data is off.
I don't know the exact frames of the strong neutral, and that will help a lot, considering it may make or break how effective the move is to pressure with.
I did not apply landing lag and the such to the slow advantage column, and there is still some math that may or may not be funky. I was a little quick to publish, so that I could get some feedback and see if this is a viable path to take in digging deeper into Samus.
For the future, I'd like to have a couple of diagrams and a few more spreadsheets that compare the advantages I have already calculated, with the actual options each character can perform from their shield.
As a quick example: Fox can shine from his shield in four frames, and between the first and second jab hits, there is 7 frames in which an opponent can do anything. A technical fox player could easily just shine you in between your jabs, and you wouldn't be able to do anything about it.
I hope this helps someone in the future, and saves them valuable trial and error time, I know it'll help me refine my practice, and I'll definitely start utilizing Up-tilt more, and consider where to counter-pick and how the approach in certain situations.
Thank you.
-------------
Sources
-------------
SuperDoodleMan's Frame Data: http://www.angelfire.com/games5/superdoodleman/frames.html
Hitbox / Hurtbox Images: http://www.bigprojects.net/sean/ssbmhitbox/frames/
Out of Shield Options Frame Data Thread: http://www.smashboards.com/showthread.php?t=294336
I was playing friendlies last night, and one area I noticed I desperately needed to work on was applying shield pressure. I remember bookmarking this thread ( http://www.smashboards.com/showthread.php?t=294336 ) and after re-examining the data, and thinking about the best way I can keep specific characters in their shield, I came up with the following spreadsheet.
Here is how you read it:
-------------------------
Basic Frame Data Info
-------------------------
This is the basic frame data info I collected and utilized for my calculations.
Attack: This is the attack's name. Names that have a number after them represent one individual hitbox for that whole move.
For example, Up Air has five hitboxes, and each one is named Up Air 1, Up Air 2, etc.
Total Frames: The total animation frames of the attack.
First Hitbox: The frame of the animation that the first hitbox appears in
Optimal Poke: The frame of the last hitbox of the attack that places the most distance between you and your opponent
Hit Lag: The frames of lag you and your opponent share upon a successful attack on shield.
Shield Stun: The amount of frames your opponent is immobile inside their shield.
IASA: "Interrupt as soon as" this frame comes up; you can crouch, jump, attack, or shield to interrupt the move on this frame.
Auto-Cancel 1: When an aerial can auto-cancel the first time, at any point before this frame.
Auto-Cancel 2: When an aerial can auto-cancel the second time, at any point after this frame.
Landing Lag: The landing lag caused by the aerial.
L-Canceled: The amount of frames of the landing of an l-canceled aerial.
Additional Hit: Does this move have an additional hitbox right after?
---------------
Advantages:
---------------
Advantages describe the relationship between you and your opponent and who can move first. A negative number signifies that an opponent is free to move, from their shield, that amount of frames. If it's a positive number, you finish all animations or lag from your attack, and you have that many frames to do whatever, while your opponent is in shield stun still.
There are very few moves in the game that give positive shield advantage, but many moves come close, and the closer to positive, the better the move is for utilizing as shield pressure.
*Colors in the Spreadsheet: Green means the move is the best option under the conditions of the advantage type, and red means the worst.
Next Hit Advantage: The amount of frames you have between the move and the next hitbox that will appear in the animation.
Slow Advantage: This represents that worst possible scenario in which you hit an opponent's shield. Not only do you hit on the earliest hitbox frame of the move, you do nothing to cancel using IASA, etc.
Optimal Advantage: This represents the best possible scenario in which you hit an opponent's shield. You hit on the last possible hitbox frame of the attack, and you cancel with IASA.
Auto-Cancel Landing Advantage: After performing an aerial, you hit on the last possible hitbox frame of the attack, and you land as soon as the second auto-cancel window is available.
L-Canceled Landing Advantage: You hit with the attack, and immediately land on the next frame into an L-Cancel.
-------------
Conclusions
-------------
I was a little surprised to find out that up-tilt is a viable move to shield-poke with. And I was not very surprised to find data backing our love of jab-cancelling to apply shield pressure.
To properly apply pressure with any aerial move, it looks like we're going to have to either attack up a platform, or below from a platform. It appears that on Final Destination or at any point the two characters are level, you should not be in the air attacking at all.
This also shows just how nasty bombs can be in applying shield pressure, and it helps that they are quick to perform out of shield as well.
-------------------------------
Some More Info / Warnings
-------------------------------
I know some of the data is off.
I don't know the exact frames of the strong neutral, and that will help a lot, considering it may make or break how effective the move is to pressure with.
I did not apply landing lag and the such to the slow advantage column, and there is still some math that may or may not be funky. I was a little quick to publish, so that I could get some feedback and see if this is a viable path to take in digging deeper into Samus.
For the future, I'd like to have a couple of diagrams and a few more spreadsheets that compare the advantages I have already calculated, with the actual options each character can perform from their shield.
As a quick example: Fox can shine from his shield in four frames, and between the first and second jab hits, there is 7 frames in which an opponent can do anything. A technical fox player could easily just shine you in between your jabs, and you wouldn't be able to do anything about it.
I hope this helps someone in the future, and saves them valuable trial and error time, I know it'll help me refine my practice, and I'll definitely start utilizing Up-tilt more, and consider where to counter-pick and how the approach in certain situations.
Thank you.
-------------
Sources
-------------
SuperDoodleMan's Frame Data: http://www.angelfire.com/games5/superdoodleman/frames.html
Hitbox / Hurtbox Images: http://www.bigprojects.net/sean/ssbmhitbox/frames/
Out of Shield Options Frame Data Thread: http://www.smashboards.com/showthread.php?t=294336
")