• Welcome to Smashboards, the world's largest Super Smash Brothers community! Over 250,000 Smash Bros. fans from around the world have come to discuss these great games in over 19 million posts!

    You are currently viewing our boards as a visitor. Click here to sign up right now and start on your path in the Smash community!

Rate that Smash concept! Day 7: Xion as Sora’s Echo Fighter

Yay or Nay?

  • Yay!

    Votes: 2 66.7%
  • Nay!

    Votes: 1 33.3%

  • Total voters
    3
  • Poll closed .

Perkilator

Smash Legend
Joined
Apr 8, 2018
Messages
10,530
Location
The perpetual trash fire known as Planet Earth(tm)
This is based on the “Rate That Character” thread in Ultimate’s Newcomer Speculation thread, only we won’t be rating chances or wants for playable characters. Rather, we’ll be rating concepts for Smash in general.

Opening Day: Yay or Nay?

For example, here some days I made up:

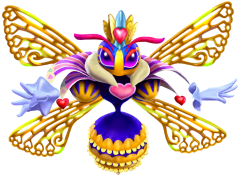
Day 1: Boss: Queen Sectonia
Day 2: Stage: Curien Mansion
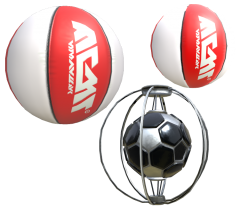
Day 3: Item: V-Ball (ARMS)
Day 4: Assist Trophy: Any Subspace Army enemy

Day 5: Event Match: Flayn’s Illness

So yeah, it’s basically Rate That Character, but we don’t rate anyone to be a playable character. However, this is opening day, so I’m going to do a one-off poll for today to see if people would be okay with this.

EDIT: Okay, after some thinking, I’m going to change the rating style; Uniqueness and Want.
 
Last edited:

Perkilator

Smash Legend
Joined
Apr 8, 2018
Messages
10,530
Location
The perpetual trash fire known as Planet Earth(tm)
And the poll is officially closed, with “Yay!” winning it. And with that, Day 1 officially begins!

Boss: Queen Sectonia
6A9C666F-A8F2-4256-AFB8-67F6B67F7CF2.png
Game of Origin: Kirby Triple Deluxe (2014)

What does the boss do?
-Teleport: Sectonia teleports twice to three times in a row.

-Silver Rod Shot: Sectonia fires three silve-blue shots from her silver rod (9% each, small knockback)

-Multithrust Rush: Sectonia slashes twice with each rod turned to a rapier (12% each, OK knockback), then flurries for two seconds before finishing with a dual slash (31% damage, far knockback)

-Dark Electric Shockwave: Sectonia uses her golden rod to summon dark electricity that moves from left to right for four seconds (14% each hit, OK knockback)

-Brightless Ringshot: Sectonia summons two rows of three small rings on either side of her (5% each, small knockback), and then summons two giant rings and travels to either side of the arena and tosses them (15% each, medium knockback)

-Antler Summon: Sectonia teleports away and summons five Antlers; two red Fire Antlers on the further sides (11% each, small knockback), two Blue Ice Antlers on the closer sides (13% each, OK knockback) that have a chance to freeze the player, and a Green Electric Antler in the middle (17%, medium knockback)

-Ruby Smash: Sectonia takes both of her rods and smashes the floor (24%, medium knockback) and two ruby pillars travel along the floor at moderate speeds (14% each, small knockback)

-Teleport Slash: Sectonia teleports around the arena leaving vague imprints before slashing with both rapiers (16%, OK knockback). On the final slash, she powers them up with dark energy and slashes very swiftly (27%, far knockback)

-Eye Stalks: Sectonia turns her rods into two rows of two eye stalks. They will either turn into mini-swords and stab the ground (14% each, OK knockback), stretch their leaves back and spin around (13% each, OK knockback), or fire lasers from the middle of the screen in random patterns of two lasers (18%, OK knockback)

Strategy: Sectonia is an elusive boss that loves to rely on subtlety. Watch every move she makes and use every time she attacks as a window for opportunity.


Setting/Intro: The same place where she is fought in Triple Deluxe, but on the ruby she summons in the second phase, with the Dreamstalk in the background. Her intro is exactly the same as in Triple Deluxe.

Defeat: Exactly as it is in Triple Deluxe, but she disappears for good.

Who fights this boss in Classic Mode?
-:ultdaisy: (Female ruler of a Kingdom)
-:ultroy: (Two Rapiers; plays a remix of Dark Emperor Hardin)
-:ultkingdedede: (Not very happy about what happened in Triple Deluxe)
-:ultolimar: (Giant bug monster)
-:ultgreninja: (Dark-type is weak to Bug-type; plays a remix of Battle! Champion Diantha)
-:ultbowserjr: (No Jr., she's not peach)

Main Music: Sullied Grace (New Remix)
 

thecursedside

Smash Rookie
Joined
Oct 17, 2019
Messages
10
Any Kirby representation at all is a plus (especially modern Kirby, since there's a lack of it), so this is definitely a want for me. As for uniqueness, I'd say it's pretty unique compared to the other bosses (with maybe the exception of Marx).
I can see everyone's classic mode except Jr., which I don't really get. Is it a reference to something from Sunshine or...?
A little tidbit, Pyribbit is the boss before Sectonia, so Greninja fighting her is pretty neat.
I'm assuming she'd be scaled up a bit like Marx, so maybe there'd have to be multiple rubies for the stage, similar to other stages from Royal Road.
Also, I could see Dark Pit having her as his classic mode boss. Both were spawned from mirrors after all (If you know the lore, Sectonia used to look much like Taranza, but was shifted into her new form by the Dimension Mirror). This even fits in with Dark Pit's created warriors theme.
Seems I've gone off track a bit, sorry. Point is, I think it's a neat concept. Good job.
 

Perkilator

Smash Legend
Joined
Apr 8, 2018
Messages
10,530
Location
The perpetual trash fire known as Planet Earth(tm)
Any Kirby representation at all is a plus (especially modern Kirby, since there's a lack of it), so this is definitely a want for me. As for uniqueness, I'd say it's pretty unique compared to the other bosses (with maybe the exception of Marx).
I can see everyone's classic mode except Jr., which I don't really get. Is it a reference to something from Sunshine or...?
A little tidbit, Pyribbit is the boss before Sectonia, so Greninja fighting her is pretty neat.
I'm assuming she'd be scaled up a bit like Marx, so maybe there'd have to be multiple rubies for the stage, similar to other stages from Royal Road.
Also, I could see Dark Pit having her as his classic mode boss. Both were spawned from mirrors after all (If you know the lore, Sectonia used to look much like Taranza, but was shifted into her new form by the Dimension Mirror). This even fits in with Dark Pit's created warriors theme.
Seems I've gone off track a bit, sorry. Point is, I think it's a neat concept. Good job.
Aw, thanks! My only criticism to your compliment is that Dark Pit already fights Galleom. I aimed to use fighters who only fight Master and/or Crazy Hand.
 
D

Deleted member

Guest
It depends, if it's like Ultimate's bosses, nah, they're quick fodder, brawl's were easy but you had them on screen for a decent minute or three depending on on how they fight. they somehow made Marx not as fun as he always was due to going down in seconds in Ultimate but if she was more like Tabuu or Ridley in Brawl that'd be perfect.

also you could add Sonic to that list and have Knight of the Wind play in the fight.
 

Perkilator

Smash Legend
Joined
Apr 8, 2018
Messages
10,530
Location
The perpetual trash fire known as Planet Earth(tm)
Day over.

Stage: Curien Mansion
3AA9F23A-250A-4B7E-AFAC-4978C1C79883.png


Game of Origin: The House of the Dead (1996)

Description: A mansion belonging to scientist Roy Curien. The scientist has gone mad and unleashed his horrible experimental monsters (mainly zombies) onto his own employees! And now, they lurch onto the battlefield, hungry for the first living thing that enters their sights…

Layout: The fight takes place outside the doors leading into the mansion. The main platform is the bottom of the stairs that lead to the main door, with two long sets of stairs on either side. These stairs are suspended over a moat that can be swam in.

Gimmicks and Hazards: Each of the suspended stairs have at least one zombie on them (sometimes two). When a zombie grabs a fighter, it bites them (10%) and tosses them aside (OK knockback). These zombies can be attacked, but they can only be knocked out.

In addition, one of HOTD1’s first three bosses (Chariot, Hangedman and Hermit) will jump to the center platform. Only one appears per match on this stage, and being stage bosses, the one that appears can be K.O.’d. Dr. Curien appears before he summons one of these bosses.

  • Chariot: Slowly walks around on the center platform and swings his axe (20%, medium knockback); his weak point is his body, which can be revealed by attacking the open armor spot near his right shoulder.
  • Hangedman: Sends an army of bats after the fighters (4% per bat, small knockback); he also sometimes grabs a fighter and drowns them if they don’t break free, instantly K.O.-ing them by chucking them into the moat. His weak point is his body.
  • Hermit: Spins a web around the stage that can immobilize fighters, and attacks any fighters on the central platform with its claws (13%, OK knockback); its weak point is its head.

Music:
-Main Theme - The House of the Dead (New Remix)
-Chapter 1: Tragedy~AMS Agent (The House of the Dead; New Remix)
-AMS Agent (The House of the Dead; The House of the Dead 2 Ver.)
-Chapter 2 and 3: Revenge/Truth (The House of the Dead; New Remix)
-Chapter 4: The House of the Dead (The House of the Dead; original)
-Theme of Magician (The House of the Dead; New Remix)
-Boss Battle (The House of the Dead 2; original)
-First Chapter: A Prelude (The House of the Dead 2; original)
-Dawn~Remix of Year Seventh (The House of the Dead 4)
-Final Chapter: Original Sin (The House of the Dead 2; New Remix)
-Theme of the Emperor (The House of the Dead 2; original)
-Prelude of Impatience~Chapter 0 (House of the Dead 3; original)
-Infiltration~Vs. Death (House of the Dead 3; New Remix)
-Theme of the Last Mystery (The House of the Dead 3; original)
-Bullet of Death~Gauge (The House of the Dead 4; New Remix)
-Boss Raid (The House of the Dead 4; original)
-Give it All You Got! (The House of the Dead 4; original)
-Vs. Mother (The House of the Dead: Overkill; New Remix)

Battlefield/Ω Form: The central platform near the stairs that lead to the main door. The platforms are based on the balcony where Magician Type-0, the first game’s final boss, is fought.
 
Last edited:
D

Deleted member

Guest
Sounds cool though rather out of place, then again Bayonetta and Joker are in the game so idk. that said your layout idea is very good, better than the standard battlefield shape that comes with most of the new Ultimate stages
 

Perkilator

Smash Legend
Joined
Apr 8, 2018
Messages
10,530
Location
The perpetual trash fire known as Planet Earth(tm)
Item: V-Ball (ARMS)
6DFACD6E-1DAE-4C5D-8273-CA480F844B2C.png
This, ladies and gents, is the V-Ball. It’s a bomb disguised as a volleyball, used for one of ARMS’ three mini-games. Here’s a taste of how it works in the game of origin:
So how would it work in Smash? Simple. It would keep bouncing for 15 seconds, and then the volleyball disguise would come off and reveal a bomb. Whoever Smashes it when it’s a bomb claims the item, and thus they’ll be unaffected by the explosion.
 

Speed Weed

Smash Master
Joined
May 16, 2020
Messages
3,598
Location
Portugal
Switch FC
SW-1814-1029-3514
well this is a cool idea
certainly more unique than the healing juice which is what people usually bring up
 

Perkilator

Smash Legend
Joined
Apr 8, 2018
Messages
10,530
Location
The perpetual trash fire known as Planet Earth(tm)
well this is a cool idea
certainly more unique than the healing juice which is what people usually bring up
Thanks! And with that, Day 4 (finally) begins!

Assist Trophy: Amy Subspace Army Character
B9973113-CD1D-44C5-BA1B-4345291F96AE.png

Remember the Subspace Army, and how they returned as enemies in Smash Run? Well, I thought that since there’s no place for them as enemies (although Galleom’s a returning boss in Classic Mode and WoL), I figured I’d take a fee members of the Subspace Army and make them the first Smash-original characters to become Assist Trophies later on.

-Tabuu: Knocks off everyone on screen with his Off Waves, but can only K.O. those at high damage.
-Poppant: Runs around dropping healing items and rocks
-Auroros: Dives into the ground after flying above its target; can be used a throwing item once it gets stuck
-Jyk: Floats around and attacks using a Hydro barrier. It can also follow up with one of two attacks:
>It can turn into a Zap Jyk and spin around (sucking in enemies) until it lets put a burst of electricity
>It can turn into a Flame Jyk and shoot out flames from its spikes, turning either from a T shape to an X shape or vice-versa
 
Last edited:

Speed Weed

Smash Master
Joined
May 16, 2020
Messages
3,598
Location
Portugal
Switch FC
SW-1814-1029-3514
also i feel like you might wanna move this to the ultimate general if you want this thread to be more active, that place has much more traction than forum games
 
D

Deleted member

Guest
Most assist trophies after brawl were either implemented lazy or are outright terrible. your Poppant idea is good though, i think Auroros should be an item itself. Tabuu is basically the same idea as the moon here, i think the only place for him is a boss.
 

Perkilator

Smash Legend
Joined
Apr 8, 2018
Messages
10,530
Location
The perpetual trash fire known as Planet Earth(tm)
Event Match: Flayn’s Illness
You: :ultbyleth:

Ally: N/A

Opponent: :ultridley: x4 (Giant, 1.4x launch ratio)

Stage: Gaur Plain

Difficulty: :starman::starman::starman:

Description: “Professor, Flayn has recently come down with a cold. Our medicine is scarce right now, and the materials needed for it are in a plain plagued by Demonic Beasts. Clear them out and safely procure the materials needed for the medicine, would you?”

Victory: All enemies are defeated

Defeat:
-:ultbyleth: is defeated

Music: Attack - Fire Emblem
 
Last edited:

Speed Weed

Smash Master
Joined
May 16, 2020
Messages
3,598
Location
Portugal
Switch FC
SW-1814-1029-3514
event matches are harder to rate, i'll admit, but it's at least a fun idea
 
D

Deleted member

Guest
Ehh, not a fan of this one, seems to close to your usual spirit battle, needs something to stand out like the events in Melee and Brawl. they had specific setups but this one is just opponent with upgrade, which, while plenty of events did, the spirit boards bled those concepts dry and it should go for more unique like the Pikmin flower one, the icicle mountain one where you reach the top, and so on, something not in normal gameplay with items on. some of the events even gave YOU the item powerup if you met requirements so you could finish the match. ideally, for the one you listed, it could be spiced up by like maybe summoning the infantry assist trophy to complete the match as "securing the area and waiting for backuo" or something, or wait a while and allies will arrive and you can finally weed the opponents out.
 
Last edited by a moderator:

Perkilator

Smash Legend
Joined
Apr 8, 2018
Messages
10,530
Location
The perpetual trash fire known as Planet Earth(tm)
Morning! Here’s out new lineup:

Day 6: My Bandana Dee Moveset
Day 7: Xion as Sora’s Echo Fighter
Day 8: Morgan as Robin’s Echo Fighter
Day 9: Boss; Grima
Day 10: Stage; Temple of Mila

Day 11: Free Echo Fighters and Stages as Gifts

And now…

Day 6: My Bandana Dee Moveset
Intro: Bandana Dee flies in on his parasol.

Stance/Idle 1: His idle animation from Return to Dream Land onwards.

Idle 2: Bandana Dee stretches his arms.

Idle 3: Bandana Dee admiringly glances at his spear.


Notable Palette Swaps:
-Bandana Dee (Dee-fault)
-King Dedede (Yellow/Red; wears the Spear ability hat)
-Meta Knight (Purple; wears the Waddle Dee’s sailor hat from Meta Knight’s Revenge)
-Gooey and Kirby (Blue with a pink bandana)
-Landia (Red with a Master Crown look-alike)
-Magolor (Cyan; wears Magolor’s hat)
-Galacta Knight (Pink with white face)
-Whispy Woods (Green; wears the Leaf ability hat)

Walk: Bandana Dee tiptoes.

Jog: His walk from the modern Kirby games.

Dash: His dash from the modern Kirby games.

Damage: His damage animation from the modern Kirby games.

Jump: His jump from the modern Kirby games; like the rest of the Kirby roster, Bandana Dee can jump up to six times. However, he is shown slowly falling down with a sloppy posture each jump.

Crouch: His crouch from the modern Kirby games.


Weapon of Choice: Bandana Dee always fights with his trusty spear, but he can also use a parasol and elemental magic as well.


Jab: Multispear Thrust; Waddle Dee slashes twice (6%, small knockback), and flurries with multiple spear thrusts (2-3% each, small knockback), and finishes with a straight jab (7%, OK knockback)
Forward+A: Spear Thrust; Bandana Dee thrusts his spear straight forward (8%, OK knockback)
Down+A: Slide; Bandana Dee slides across the ground (5%, small knockback)
Up+A: Skyward Thrust; Bandana Dee thrusts his spear upwards (7%, OK knockback)

Air+A: Bandana Dee rapidly spins his spear (9%, OK knockback)
Air Forward+A: Waddle Spear Barrage; Bandana Dee throws two spears in front of him (6% each, small knockback)
Air Back + A: Back Thrust; Bandana Dee thrusts his spear behind him (10%, OK knockback)
Air Up+A: Parasol Twirl; Bandana Dee twirls his parasol (11%, OK knockback); he can also glide with it by holding Up, somewhat like Peach’s, only it deals no damage.
Air Down+A: Moon Drop; Bandana Dee briefly spins his spear, and then drops down (13% with a meteor effect, OK knockback); he gets pushed up when he makes contact, just like the Links.

Dash Attack: Ground Thrust; Bandana Dee dashes a long distance and runs his spear through the ground, thrusting upwards at the end (12%, OK knockback)
Edge Attack: Bandana Dee thrusts on the edge (9%, OK knockback)
Get-Up Attack: Bandana Dee spins on the ground (8%, OK knockback)

Smash Moves
Forward+A: Aqua Shot; Bandana Dee flaps his parasol as water spouts out of it (16%, OK knockback)
Up+A: Chumbrella; Bandana Dee expands his parasol greatly (18%, medium knockback)
Down+A: Parasol Twirl; Bandana Dee spins his parasol on the ground as winds comes out of it (19%, medium knockback)

Grab: Bandana Dee summons a Beam with his spear.
Pummel: Bandana Dee stabs the target with his spear (2%)
Forwards+Throw: Capture Beam; Bandana Dee shoots a full Beam diagonally upwards in his direction (14%, OK knockback)
Down+Throw: Bandana Dee stabs the target into a burial (15%)
Back+Throw: Bandana Dee lifts up the target with his spear and tosses them behind himself (14%, OK knockback)
Up+Throw: Circus Throw; Bandana Dee spins the target around on his parasol and chucks them upwards (11%, OK knockback)


Special Moves

B : Power Effect; Bandana Dee selects one element from a menu to effect his attacks. The selection is like Shulk’s Monado Arts, in which Bandana Dee can switch elements on the fly.
B + Forwards : Spear Throw; Bandana Dee throws one spear at a time when B is tapped (5% each, small knockback). When B is held, Bandana Dee charges, and can either throw two (6% each, small knockback) or three at a time (8% each, small knockback)
B + Up : Waddle Copter; Bandana Dee flies around using his spear as a helicopter (21%, medium knockback); when used on the ground, the player has complete control of Bandana Dee’s flight, in which he can go in all 8 directions.
B + Down : Friend Summon; Bandana Dee throws a heart that summons one of two friends: Waddle Doo and Bronto Burt. Bronto Burt charges into enemies (4%, small knockback), while Waddle Doo uses his Beam ability (12%, OK knockback)

Final Smash: Megaton Punch; Bandana Dee punches up to two targets in front of him (8%), and the targets are into a cutscene where Bandana Dee jumps high into the air, and then punches the ground as he falls back down. The punch is so strong, it creates a fissure in the ground (55%, devastating knockback).


Gimmick: Power Effect Elements

-Blizzard: Attacks are slightly slower, but combos can sometimes freeze a target
-Bluster: Attacks are quicker and the attack power is multiplied by 1.2x, but with more endlag
-Sizzle: Targets could have a lingering fire effect that slowly raises damage, but Bandana Dee’s damage slowly rises the longer he’s left idle
-Splash: Bandana Dee is slower and so are his attacks, but the power is multiplied by 1.4x
-Zap: Attack power slowly increases with each combo (up to 1.5x), but Bandana Dee’s damage slowly rises little by little


Taunts
1: Bandana Dee looks around him, mimicking his artwork from Return to Dream Land.
2: Bandana Dee happily waves his arms.
1+2: Bandana Dee falls asleep, thinking about an apple.

Winposes
1: Bandana Dee’s win pose from the Megaton Punch minigame.
2: Bandana Dee spins his spear and raises it upwards, mimicking his summon animation from Star Allies.
3: Bandana Dee spins his spear and triumphantly plants the bottom end on the ground.

Applause: Bandana Dee’s losing animation from the Megaton Punch minigame.

Icon: Kirby series icon

Boxing Ring Title: Hero Among Waddle Dees

Victory Music: youtu.be/CEIwsGXvwfU

Kirby Hat: Bandana Dee’s…well, Bandana. However, Kirby only imitates Bandana Dee’s Side B.
 
Last edited:
D

Deleted member

Guest
Very good actually, aside from the beam stuff i think it's a pretty good and solid moveset, now not a big fan of gimmicks like the attack switch, but it's at least not too out there, sounds like it just pulls out a different attack rather than applying item effects or weird rng nonsense. which is good.
 
Last edited by a moderator:

Perkilator

Smash Legend
Joined
Apr 8, 2018
Messages
10,530
Location
The perpetual trash fire known as Planet Earth(tm)
Day 7: Xion as Sora’s Echo Fighter

I made a support thread for a character called Xion, from the Kingdom Hearts series, a while back. Here’s the rundown for today:

View attachment 271506
"Who am I? What am I... here for?"—Xion
https://www.khwiki.com/Xion
Debut: Kingdom Hearts: 358/2 Days (2009)
Under the guise of Organization XIII’s “Number XIV”, Xion was a replica of Roxas created by Organization XIII. Her purpose was to absorb Sora’s memories in case he and Roxas proved useless in collecting hearts. During her time in the Organization, she befriends Roxas and Axel, another member of the Organization, by way of going to the top of the Twilight Town Train Station for sea salt ice cream bars. However, later in the game’s events, she discovers her true purpose-to become a comeplete copy of Sora through Roxas and Sora’s memories-and tries to flee the Organization, but is forcibly brought back and reprogrammed to better serve for intended purpose. Sometime around the end of the game, she and Roxas have their final battle as Xion takes a monstrous form, warping from world to world to world until hopping back in Twilight Town. Xion is defeated then, and Roxas mourns her death as he absorbs her.

In Kingdom Hearts 3, Xion is brought back as a member of Xehanort’s second Organization XIII, but is won back over during the fight that happens in the Keyblade Graveyard. She appears at the ending of KH3 in a new outfit; a sleeveless double-buttoned, collared shirt and a black belt, with a short white skirt under the shirt and black boots that reach halfway to her knees with beige color to the upper fifth.
Given that she was meant to be a copy of Sora, I felt like she made the most since to be his Echo. Her fighting style is somewhat like Sora’s, but the moveset I had in mind for her had the aim to make her the Ken to Sora’s Ryu. As in, an Echo Fighter that strikes the balance between being a clone of one fighter and being their own completely.

Just for a compare-contrast setup, I’m going to post my hypothetical Sora moveset first, and then the one I made for Xion.
Intro: Sora appeared from a save point and gets into his fighting stance.

Stance/Idle 1: Sora holds his Keyblade near his right hip and looks around.

Idle 2: Sora rests his Keyblade on his right shoulder for a few seconds.

Idle 3: Sora bares his teeth in the direction he's facing.

Notable Palette Swaps: KH3 outfit, KH2 outfit, KH3 Guardian Form, KH2 Valor Form, KH3 Element Form, KH2 Final Form, KH3 Second Form, KH2 Limit Form

Walk: His walk from the games.

Dash: His run from the games.

Damage: His damage animation from the games.

Jump: High Jump and Doubleflight.

Crouch: Crouches with his Keyblade's end on the ground, holding it.


Weapon of Choice: The Kingdom Key, the Keyblade Sora starts his journey with.


A,A,A: Slapshot; Sora slashes twice, then follows up with an uppercut (14%, OK knockback)
Forward+A: Speed Slash; Sora slashes twice (4% each hit, small knockback), and then does a quick dual slash (13%, OK knockback)
Down+A: Sliding Dash; Sora performs a slide across the ground, slightly faster than that of Cloud (12%, OK knockback)
Up+A: Upper Slash; Sora swings his Keyblade upwards with both hands (10%, OK knockback)

Air+A: Magnet Burst; Sora briefly surrounds himself with an array of magnetic orbs (13%, OK knockback). Pressing A again, if necessary, sends these orbs flying out (11%, medium knockback)
Air Forward+A: Aerial Finish; Sora slashes forward three times (9%, small knockback), and then finishes with a strong slash (8%, OK knockback)
Air Back + A: Aerial Sweep; Sora slashes behind himself three times (11%, OK knockback)
Air Up+A: Hurricane Blast; Sora vertically swings around four times with his Keyblade (14%, OK knockback)
Air Down+A: Diving Strike; Sora dives down and strikes the ground with his Keyblade (15%, OK knockback)

Dash Attack: Prism Windmill; Sora spins Keyblade in front of him, protected by a shield of light (15%, OK knockback)
Edge Attack: Magic Flash; Sora lifts himself up and uses a flash of light that affects the area around him (11%, OK knockback)


Smash Moves
Forward+A: Strike Raid; Sora throws his Keyblade forward as it spins (15%, OK knockback). In Second Form, Sora throws his Keyblade three times (4% each, small knockback), and then the last throw is slightly stronger (18%, medium knockback)
Up+A: Ripple Drive; Sora swings upwards and summons a barrier of light with rectangular patterns (21%, medium knockback)
Down+A: Explosion; three orbs of light surround Sora as he thrusts his Keyblade down to the ground (22%, medium knockback)

Grab: Sora casts Magnet and binds the opponent.
Pummel: Sora crunches the opponent with Magnet (2.1%)
Forwards+Throw: Quick Blitz; Sora thrusts his Keyblade on the ground in a downward arc (14%, OK knockback)
Down+Throw: Fail-Safe; Sora spins once before tossing the opponent on the ground (13%, OK knockback)
Back+Throw: Merge; Sora spins around backwards before hurling the opponent in that direction (11%, OK knockback)
Up+Throw: Lunge n' Launch; Sora pushes the opponent forward and slashes upwards (13%, OK knockback)

Special Moves

B : Magic Selection; Sora can select a magic spell from his list (consisting of Fire, Blizzard, Thunder, and Aero). Once a spell is selected, it will stay on that spell until another is selected, which can be done on the fly.
B + Forwards : Sonic Blade; Sora thrusts forward four times, with consecutive button presses (6% each hit, small knockback)
B + Up : Airstep/Flowmotion; Sora travels in the pointed direction at the speed of light after releasing the button (holding it slows him down for six seconds). When he comes in contact with a wall, Flowmotion will activate.
B + Down : Ars Arcanum; Sora charges up and unleashes a flurry of nine slashes (19%, OK knockback)

Magic Spells:
-Fire: Sora shoots out a small fireball (9%, small knockback); this can upgrade to Fira, which surrounds Sora in a fiery barrier that cancels out projectiles (12%, OK knockback)
-Blizzard: Sora shoots three snowflakes (11%, OK knockback) that have a chance of freezing the opponent; this can be upgraded to Blizzara, which summons an icy wind that can freeze opponents (16%, OK knockback). Sora can tilt forward after pressing B to create an icy rail, which he can then jump on for a Rail Slide.
-Thunder: Sora summons a spark from his Keyblade that surrounds a fair amount of his surroundings (15%, OK knockback); this can be upgraded to Thundara, which shoots down lighting onto his Keyblade and forms a dome (18%, OK knockback)
-Aero: Sora surrounds himself in a windy barrier that halves damage taken, damages opponents upon a Prefect Shielding (7%, OK knockback) and reflects projectiles. The spell lasts for 18 seconds; this can be upgraded to Aerora, a mini tornado that Sora can use as an air boost, even in the air (20%, medium knockback)

Final Smash: Ultimate Union Ragnarok; Sora attempts to unleash Ultimate Form (Final Form in his KH2 outfit), and catches any opponents he successfully hits (8%). The trapped opponents are taken into a cutscene as Sora slashes them with hundreds of swords (32%), and finishes off with Union Ragnarok, with the Lux symbol showing as he fires it (16%) (56% total, far knockback).

Gimmick: Situation Commands; after pulling off successful combos, three arrows appear by Sora's HUD, one by one. Once a combo is successful with all three arrows, a command appears above Sora's icon, and pressing B will activate one of five attacks, four of which are Grand Magic. The -ra tier spells are obtained by using one spell consistently, and that spell will appear for a set amount of time. If your combos are purely physical, you will enter Second Form by pressing B. Second Form has slightly altered special moves, all of which eventually tire Sora out of Second Form.

-Fira is available from the start and its Grand version is Firaga, in which Sora summons a giant fireball that can travel offscreen when it doesn't hit any opponents (21%, medium knockback)
-Blizzara is available from the start and its Grand version is Blizzaga, Sora fires a giant icicle that freezes the first opponent it hits, and sends all others flying (22%, medium knockback)
-Thundara is available from the start and its Grand version is Thundaga, in which a pillar of electricity appears and combos any opponents above Sora (23%, medium knockback)
-Aerora is available from that start and its grand version is Aeroga, in which Sora summons two tornadoes that circle him, sending opponents flying (25%, far knockback)

-Stun Impact: Appearing for 17 seconds, Sora will briefly explode in a dome of light with a small electric effect, stunning anyone on the ground (23%, medium knockback)

Whenever you use a Grand Magic tier of a spell, that spell enters a 15 second cool down period.


Sonic Blade and Ars Arcanum receive a 5% attack boost, along with the following effects:

-Sonic Blade now has a final fifth thrust stronger than the previous four (18%, OK knockback)

-Ars Arcanum now slashes ten times, and then follows up with three final slashes (21%, medium knockback) followed by Ragnarok, which fires a cluster of energy shots (20%, medium knockback)

Only the -ra tier spells do not immediately cancel out Sora’s Second Form, as using either spell consecutively will activate a -ga tier spell as a Situation Command.


Flowmotion: Sora's answer to acrobatic platforming. Activated when he comes in contact with a wall after Airstep, Sora can use two types of Flowmotion attacks:

-Shock Dive: An AOE slam attack Sora uses when he uses Superjump (19%, medium knockback)

-Kick Dive: Sora attacks immediately after shooting off a wall, pointing his feet at the enemy as the Keyblade spins around him (21%, OK knockback)

Flowmotion's startup is indicated by a blue aura, while its fizzling out in a second is indicated by a pink aura. When Sora is using Superjump to recover, he will be left in free fall once Flowmotion goes away.

Lock-On: By shielding and pressing B, Sora can lock on to foes to better aim his magic. The yellow variant that appears on random foes is there when Sora doesn’t lock on, and the blue variant for when Sora DOES lock on is there as well.

Counter Kick: When Sora Perfect Shields, press A immediately after to slide on the ground and attack opponents multiple times.

Taunts
1: Sora wipes his nose and smiles.
2: "Yeah!" Sora raises his Keyblade high in the air.
1+2: Sora performs Break Time, where he spins around for a bit and says "ta-da!" as he puts his right hand on his hip and puts up his left hand.

Winposes
1: "That's the power of the Keyblade!" Sora's victory animation from KH1, whenever he wins a tournament in Olympus Coliseum.
2: Sora spins his Keyblade and sticks it firmly in the ground, smiling (based on one of his renders based on KH1 artwork of him).
3: Sora opens a treasure chest as he does in the games, and a Meow Wow comes out to cuddle-tackle him.

Icon: The heart in KH series logo.

Boxing Ring Title: The Key to Many Hearts

Victory Music: Sora’s theme

Kirby Hat: Sora's hair and necklace.
Intro: Xion enters from a Corridor of Darkness, and gets into fighting stance.

Stance/Idle 1: Sora’s signature fighting stance.

Idle 2: Xion bares her teeth, trying to make a serious face.

Idle 3: Xion disappears her Keyblade, and clinches both her hands behind her back.


Notable Palette Swaps:
-KH3 outfit (default)
-Roxas (Red/White)
-BBS Lea (Red)
-BBS Isa (Blue)
-Kairi (Purple/White)
-Naminé (White)
-Hooded with Black Coat (Alternate costume)
-Twilight Xemnas (Alternate white)

Walk: Same as Sora’s, but more lady-like.

Jog: Same as Sora’s.

Dash: Same as Sora’s.

Damage: Same as Sora’s,

Jump: The first one is a normal jump, then a High Jump with Xion rolling forwards as she jumps.

Crouch: Xion puts both her knees on the ground, putting her left hand alongside them.


Weapon of Choice: The Kingdom Key, Sora’s Keyblade.


Jab: Same as Sora’s (12%, OK knockback)
Forward+A: Guard Break; Xion performs a powerful forward slash that acts as weaker version of Marth’s Shield Breaker (14%, OK knockback)
Down+A: Same as Sora’s (9%, OK knockback)
Up+A: Same as Sora’s (11%, OK knockback)

Air+A: Aerial Sweep; Sora’s B-Air, but it hits all around Xion (12%, OK knockback)
Air Forward+A: Horizontal Slash; Xion slashes left and right in midair (11%, OK knockback)
Air Back + A: Circle Raid; Xion spins her Keyblade behind herself (13%, OK knockback)
Air Up+A: Same as Sora’s (12%, OK knockback)
Air Down+A: Finishing Leap; Xion pierces her Keyblade downwards, affecting an area around her (15% with a meteor effect, OK knockback)

Dash Attack: Dodge Rush; Xion knocks intro enemies while performing a Dodge Roll (8%, OK knockback)
Edge Attack: Same as Sora’s (12%, OK knockback)
Get-Up Attack: Counter Blast; Xion shatters a barrier around herself, nullifying any attacks that would get near her (14%, OK knockback)

Smash Moves
Forward+A: Same as Sora’s (16%, OK knockback)
Up+A: Same as Sora’s (19%, medium knockback)
Down+A: Vicinity Break; Xion sweeps the floor in a full circle (21%, medium)

Grab: Same as Sora’s, but with brackets of light instead of Magnet.
Pummel: Same as Sora’s (1%-2%)
Forwards+Throw: Same as Sora’s (14%, OK knockback)
Down+Throw: Same as Sora’s (12%, OK knockback)
Back+Throw: Xion zips around the target and slashes them (15%, OK knockback)
Up+Throw: Holy; Xion summons a pillar of light from below the target (13%, OK knockback)

Special Moves

B : Magic Selection; Somewhat the same as Sora’s, but each spell can only be used once before a 6-second cooldown.
B + Forwards : Sonic Blade; Same as Sora’s (5% each hit, small to medium knockback)
B + Up : Magic Hour; Xion launches herself upwards in a huge, multi-hitting pillar of light (22%, medium knockback)
B + Down : Event Horizon; The first part of this is based off Sora’s base Ars Arcanum, and is then followed by Xion summoning a small pillar of light (24%, medium knockback)

Final Smash: Final Form; Xion transforms into her Final Form from 358/2 Days, appearing in the background. She then fires one laser at a time for 14 seconds (18% each, medium knockback).

Gimmick: Limit Break; unlike Cloud, a 1-use Limit Break occurs when her damage reaches 100% (or when her HP is reduced to ¼ in Stamina Battles). Xion’s Specials (aside from Magic Selection) are powers up:

-Sonic Blade works how it does with Sora in Second Form.
-Magic Hour has Xion summoning a powerful pillar of light above herself (27%, far knockback), but she never goes up.
-Event Horizon has Xion surround herself with pillars of light that circle around her (29%, far knockback)

In addition, Xion’s spells are different from Sora’s

-Fire floats for a bit, homing in on targets for a multi-hit explosion (13%, OK knockback)
-Blizzard has two floating ice mines that slowly float around the stage, instantly freezing targets upon contact (15%, OK knockback)
-Thunder has electric pillars striking down in front of Xion after slight delay (18%, medium knockback)
-Aero has Xion shooting a gust of wind in a multi-hit ball (14%, OK knockback)

Taunts
1: Xion lightly flips her hair.
2: Xion points her Keyblade to her left.
1+2: Xion takes out a stick of sea salt ice cream and licks it.


Winposes
1: Xion steps on a dark corridor, getting ready to RTC (return to the castle).
2: Xion puts a seashell to her right ear.
3: Xion has her sea-salt ice cream on a rock, with visions of Roxas and Axel sitting in the air next to her.

Applause: Xion claps with a slight smile on her face in her default outfit, but looks the other way while clapping in her hooded outfit.

Icon: The heart in the KH series logo

Boxing Ring Title:
-The Heartfelt Puppet (normal outfit)
-Number XIV (hooded outfit)

Victory Music: A note from Vector to the Heavens.

Kirby Hat: Xion’s hair

Classic Mode: Faceless Shroud (Fights characters who almost fully hide their faces, sometimes in a hood)
Round 1: :ultlittlemac:(hooded wireframe) on Boxing Ring (Tunnel Scene - X)
Round 2: :ultrobin::ultrobinf: on Arena Ferox (Battlefield (Brawl))
Round 3: :ultmetaknight::ultmetaknight::ultmetaknight: (Normal, Dark and Galacta; free-for-all) on Fountain of Dreams (CROWNED Ver. 2)
Round 4: :ultsheik: on Gerudo Valley (Gerudo Valley (Remix))
Round 5: :ultgnw:x14 (horde battle) on :battlefieldb: (Tension Rising)
Round 6: :ultsamus::ultdarksamus: (free-for-all) on :fdb: (Escape - Metroid)
Final Round: Master (and Crazy) Hand (Vector to the Heavens)
Credits: Vector to the Heavens

Join today! We have endless free sea salt ice cream!

Supporters
Perkilator Perkilator
@fogbadge
@OnyanRings
@toonito
 
Top Bottom