Welcome to Smashboards, the world's largest Super Smash Brothers community! Over 250,000 Smash Bros. fans from around the world have come to discuss these great games in over 19 million posts!
You are currently viewing our boards as a visitor. Click here to sign up right now and start on your path in the Smash community!
It appears that you are using ad block :'(
Hey, we get it. However this website is run by and for the community... and it needs ads in order to keep running.
Please disable your adblock on Smashboards, or go premium to hide all advertisements and this notice. Alternatively, this ad may have just failed to load. Woops!
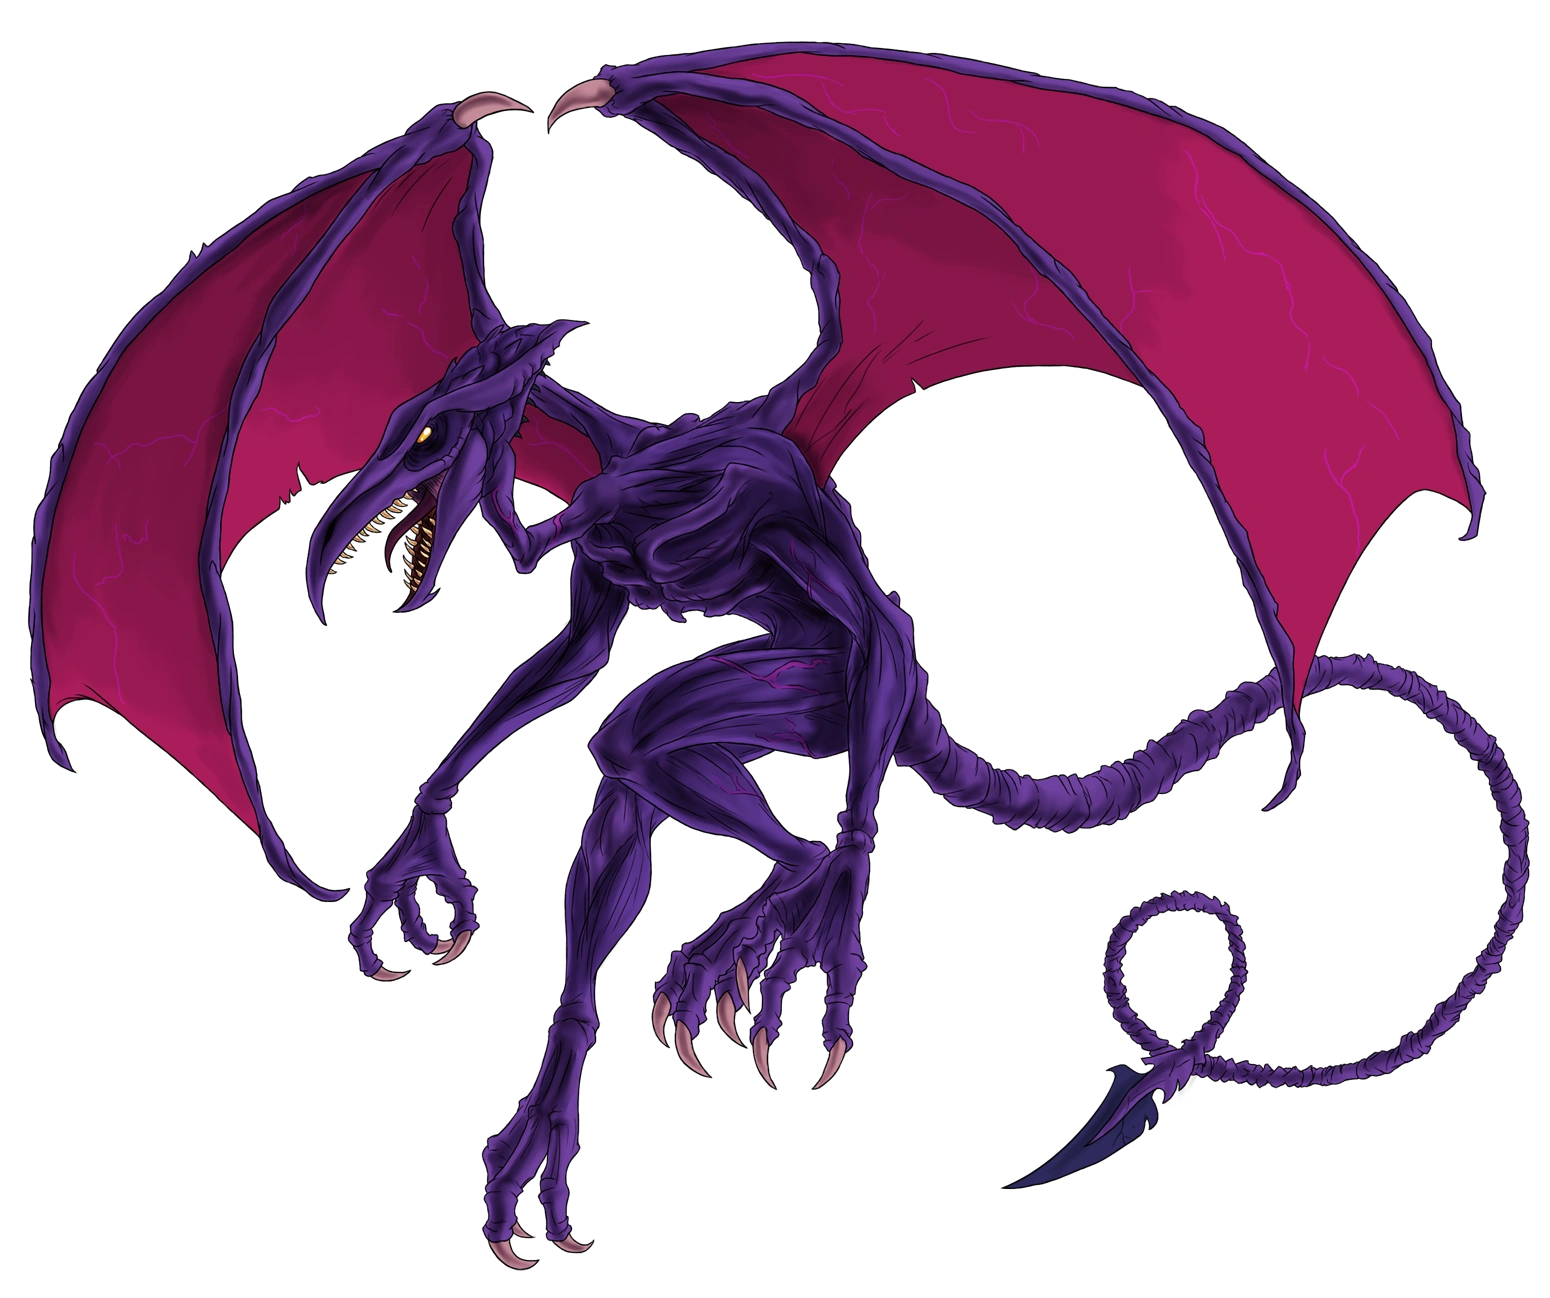
SSB4's 3DS version blessed us with a Magicant stage, and while it had elements from Mother 1 and 2, its general layout was based on Earthbound Begginings' Magicant, the pink one with whimsy details. Earthbound also has a Magicant, although one situated in Ness' mind, a giant whimsical land filled with trees, giant vegetables and smiling flowers, surrounded by purple water.
Since this MYMCU's storyline takes place inside the Chosen Four's minds while they're in a coma due to some bad Magic Cake, it makes mighty sense that one of the stages is Ness' Magicant!
In its normal form, the stage is quite simple really. There are three green pillar-like chunks of ground suspended a good distance away from the calm purple water below. At the start of the battle one platform will be off to the side while the other two are merged together. Any part of the pillar that isn't the top, which acts as a platform, will be pass-through by any player, and a player can pass through the top of a pillar if coming from below, although unlike your usual platforms you can't crouch to pass through them if standing atop them. While they're rather high when seen purely by the camera, the stage's top blast line is rather higher than usual, so from the range of the tallest platform you'll be KOing upwards at the same pace as in FD. All edges in pillars are ledges, unless if that side is directly next to a merged pillar.
The water here, while a thick purple, is still swimmable like Delfino Plaza water and the like, and if you stay in it for the same time as said water you'll sink down and drown miserably. Since the platforms are a good distance away from the water, to not make characters returning from the water have to go through the ordeal of using all of their recovery, and likely not even make it in the case of characters with bad recovery, the water here is maaaagic, and your first jump out of it will have a glittery effect alongside travelling 1.2x as much, so with just your jumps you can potentially return to lower platforms, although if you try going for the higher ones you'll likely still need to use recovery moves and may be punished.
As shown above in the image I stole from Legends of Localization, Ness' Magicant will shift its entire color palette every time you talk to someone there. In the Smash stage, the stage will change color every 30 seconds, with the next color scheme always being random. It can be a neat white and pink, a really ugly yellow and black, and tons of other palettes! When this happens, the stage will also randomly change the location of its three pillar platforms, rising some, lowering others, combining some and separating others! Sometimes a giant carrot, rock or tomato might even sprout up, similar in size to the tomatoes in 3DS' Magicant, acting as a solid part of the stage.
Every three or two cycles of colors the stage goes through, the next change in color will be quite a different one: alongside randomly changing the platform positions, all the vegetables on the stage will die and the sky will darken with thunderclouds, spikes will jut out from the water in the background and the water will rise to double its previous height and will start flickering colors. The stage has turned into the dark and nightmarish part of Magicant: the Sea of Eden!
The background will change to funky looking red waves similar to Earthbound's battle backgrounds as in the background a golden stage then rises, with a nightmare standing on it reminiscent of the Evil Mani Mani statue. These waves will help you know when this event will end, since they will disperse less the more time has passed. The statue won't do anything to our heroes, who are still duking it out to escape this dream world, but something much worse then swims into the stage...
A Kraken of the Sea! This mighty serpent who looks nothing like an actual Kraken will act as a sort of boss. A mighty creature with a head the size of Bowser and a body about as long as half of all the platforms in the stage combined, it will swim quite rapidly through the murky waters, and while when swimming it slithers along the water low enough for on stage players to not be hit. Once it stops in one side of the screen, it will rise up and open its bloody maw, then shooting out a stream of fire onto the stage, the size of Giga Bowser's, dealing a mighty 4% damage per second to any foe inside the flames with additional flinch. Most players would likely escape the fire's range by going to the other side of the stage, but the Kraken will spit the fire while also slowly angling it up and down as if you're playing Bowser and angling your own fire breath, and will angle the fire up then down before ending the move and returning to the water, swimming around it a bit, and popping up to attack again on the other side. If you're a plucky enough player, you can attack the Kraken while its still breathing fire at its rather slow pace to damage it. 30% and the Kraken is a goner, with its death accounting as a point or a stock for the killing player, with the Kraken disappearing until the next Sea of Eden. Sweet! You can also hit Kraken any other time, but when its spitting fire is the best time.
Should any player dare to fall into the water, the Kraken will speed up to the speed of Sonic's Dash and try to bite the swimming player for a devastating 30% alongside knockback that KOs at only 80%. It will stop this attack two seconds after the foe is out of water, and while you can easily evade it if the Kraken was in the other side of the stage before this move, if they were already close to you when you entered the water you're a freaking goner. Use the Kraken for your own good and knock foes away while the Kraken is in the general area! Any contact with the Kraken while its not attacking, or with any area that's not its head during its biting attack will deal ""only"" 10% damage with vertical knockback, although it can KO at 160%.
In a famous incident of wrong information, the Earthbound strategy guide once said if you defeat a Kraken in Magicant you have a 1/128 chance of finding a Gutsy Bat. This was very not true, as the Kraken will drop nothing on defeat and its the Bionic Kraken enemy which drops the item, an enemy only found in the game's final dungeon. In memory of all the poor children who passed hours beating Krakens in Magicant trying to get the Gutsy Bat, if you defeat the Kraken that appears when the stage becomes the Sea of Eden, theres a 1 in 128 chance it will drop on defeat a bat, specifically the Home Run Bat!
For the record, there's an option in the menu for disabling the Kraken from appearing in the stage, and so causing the Sea of Eden to only change the platform layout and the water height. This toggle-able option is of course called "Release the Kraken".
After the usual 30 seconds, the water will drain back to its regular level, the spikes will disappear and the Evil Mani Mani will sink back into the ground, the Kraken swimming away too if it wasn't killed yet. The flora will regrow and the stage will once again shift its platforms randomly! After the first encounter with the Sea of Eden, it won't show up until after 5 or 4 shifts in palette later, so unless the timer is really high or non-existant, you'll only really see the stage turn into the Sea of Eden once or on a rare chance twice.
OMEGA STAGE
Ness' Magicant's Omega Stage is pretty simple. The stage is simply two pillar-like platforms that stretch to the blast zone, with both standing at the same height for equal ground and now gaining solidity in all areas. As a neat aesthetic, one of these platforms will also be colored in to look like the snowy section of Magicant. The stage is a bit smaller than other Omega Stages, but is still big enough for a good skirmish. The water has been lowered to the point where it isn't part of the stage anymore, being now merely a pass through element near the blast zone, like the acid in Brinstar Depths and the water on Tortimer Island. The stage will still change color every 30 seconds, but the platforms don't change position, and the Sea of Eden skin is left out entirely. Overall a pretty jolly good Omega Stage, although the fact that the entire stage has grass in it can diminish its competitive use due to Smash's weird thing where grass has different traction than normal.
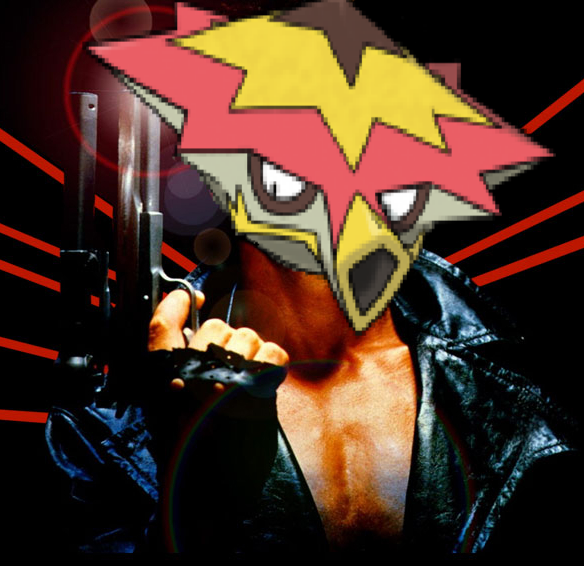
“Have you ever been kicked at the speed of light?”
Kizaru, “The Yellow Monkey”
Borsalino, better known by his alias “Kizaru”, is a Marine Admiral in One Piece. Not much is known about Kizaru’s own past, other than that he easily took down Arlong at one point. Kizaru is a rather relaxed man, appear completely calm in most situations, and not without good reason. His Glint-Glint Fruit powers give him power over light itself, including the ability to physically turn into light.
Kizaru is incredibly competent at fighting, despite his relaxed and rather absentminded nature. He tends to be sarcastic with his foes, taunting them as they fight. He is arguably the catalyst in Whitebeard’s death.
Glint-Glint Stats
Weight – 100
Run Speed – 2.1
Walk Speed – 0.7
Air Speed – 1.15
Fall Speed – 1.3
Kizaru’s stats are an odd bunch. Despite his rather heavy weight, he’s quick on his feet, as well as in the air. His walk speed is ridiculously slow, however, the slowest in the game. His jumps are fairly decent, better than anyone in his size and weight class has any right to be. His model size is slightly taller than Ganondorf’s by about a head. He is around as wide, however. Kizaru is probably the tallest character, compared to the base Smash roster.
Glint-Glint Specials Neutral Special – Arrow of Light
Kizaru walks, and even runs, around with his hands firmly in his pockets. When he takes one of them out, you know there will be some hell to pay. For this move, Kizaru points his fingers forward in a finger gun, as light energy begins to build in his fingers. He then fires out an arrow of light, much like the one from Zelda’s Final Smash.
The main difference in this one is that the arrow is significantly smaller, about 1/3rd the size, but it has a few more properties to it. For one, Kizaru can aim the attack in any of the 8 cardinal directions by holding the button down, fairly simple. Second, the arrow can be charged, like any good Neutral Projectile. You can hold the button for up to 15 frames before its is fully charged. No charge has the attack still do a reasonable 6% damage, but when fully charged it deals 12%.
As a projectile, the arrow is ridiculously fast, fitting, since its made of light. It otherwise acts similar to Zelda’s Final Smash, both in speed and distance. It also has a piercing effect, and can travel through multiple opponents if they get in the line of fire. However, the arrow doesn’t cause any knockback, instead locking the opponents into a brief moment of stun, around 8 frames of it.
The arrow is mostly used for Kizaru’s approach game, allowing him to quickly get into opponent’s faces to deliver a really heavy hitting attack. But, as a projectile, it is still definitely worthwhile, considering its speed and damage capabilities. You cannot use the attack multiple times in a row to stun enemies, as you will need to wait a full second in order for the effect to be applicable again.
Side Special – Sacred Yata Mirror
Kizaru holds both of his hands in front of his stomach, and creates a ball of light. The ball of light then fires off into a laser, which travels in a zigzagging pattern. Once the beam of light stops, Kizaru will vanish, the beam retracting until it reaches the point it stopped, Kizaru reappearing. In other words, Kizaru travels through the beam of light.
The laser doesn’t have a specified distance to it, something we’ll get to in a moment, but in its base form it will reach around 3.5 Battlefield platforms in a relatively quick span of time. The reason the laser beam doesn’t have a set distance is due to the fact that its measured in how many bounces it makes. The beam can create up to 5 of these bounces, represented by the laser changing direction in the zigzag pattern. Kizaru can have the laser bounce off of air, by the way.
The point is, you can control how far this move will travel. The first bounce will always hit the ground, but once it does, you will be able to control it. Kizaru remains still until the move is fully completed, which allows you to hold the special attack button down in order to increase the distance. There is some limit to it, as the beams can only travel upwards (or downwards) around three Ganondorf’s high before they automatically bounce off of air.
Of course, considering the trajectory of the bounces, this doesn’t seem… particularly useful, considering the usual size of the stages. Well, Kizaru can let go of the button to make it bounce on its own, and press it again to make that bounce, etc. However, this becomes more interesting when the laser hits an opponent, or a wall.
When a laser does hit either one, it will, obviously, bounce off of them in the opposite direction. This changes it from up and down to basically whatever directions you can manage if you get lucky. All rules for the move still remain here when either is hit. Damage wise, the laser will cause 4% damage, as well as rather mediocre knockback.
We’re not done yet. For the final bit involving the laser, if you want to prematurely end the attack, you can quickly double tap the special attack button to have Kizaru instantly travel through it. This is represented by a ball of light travelling through the laser, which has its own hitbox, dealing 10% damage and above average knockback. Unfortunately, this is rather hard to hit with, as it zooms through the laser at an incredibly fast pace, taking 1/4th of a second to complete, no matter how long the beam is.
Once Kizaru reaches the end, he will remerge at the end in a burst of light, acting as a final hitbox that deals 12% damage and above average knockback as well. The blast has decent range to it, but is nothing to really write home about. Its mostly a way to prevent opponents from taking advantage of the end animation.
Up Special – Speed of Light
Without any sort of animation at all, Kizaru vanishes in a burst of light, before reappearing a moment afterwards. This, as you might be able to tell, is like Zelda’s Up Special, but with a few key differences. For one, this attack is ridiculously fast, nearly instantaneous. It also takes a lot longer for Kizaru to reappear, approximately 22 frames pass before then.
The second major difference is that only the first part of the attack actually acts as an attack, knocking opponents back slightly with a moderately sized hitbox, considering Kizaru’s size. This deals 4% damage. When starting up the move, you can aim it in any direction, like most teleporting moves. After the invisible period has past, Kizaru will reappear three Ganondorf’s away from where he disappeared, with no active hitbox when that happens.
This is for a reason, however, as, by inputting select inputs will result in Kizaru instantly performing them out of the teleport, with half the start-up lag as the normal move. This specifically effects melee attacks, but it will be noted which moves will be affected. This is one of Kizaru’s most important moves, despite its rather simple function.
Down Special – Light Human
Kizaru lets out a dismissive chuckle, before bursting into a flash of light, transforming into a being made of light. Kizaru basically remains the same, except now made entirely out of yellow light, and with his massive coat missing. Kizaru can remain in this form for 4 seconds, as long as the button is held down, but can only move around at his dismal walking speed.
When exiting the move, Kizaru will enter some heavy end lag as he transforms back to normal, shaking his head in disappointment. This is remarkable long for end lag, but not without good reason. For one, while in this form, Kizaru is invincible to projectiles, as they go directly through him. The transformation itself has a lot of start-up lag as well, making it not useful purely for a way to dodge projectiles.
If an opponent attempts to attack Kizaru with a melee attack during this time, the Admiral will vanish, his signature “Oooh” echoing through the air, before he quickly reappears behind the opponent, and delivers a light speed kick to their back. Yes, this is basically a counter. This is remarkably quick, with Kizaru performing the kick before the sound clip even finishes playing. The kick has some heavy knockback to it, it’s actually one of Kizaru’s best melee KO moves, and also deals 14% damage.
If you quickly double tap the special attack button instead of holding it, a secondary effect will activate. Kizaru will transform into his Light Human form, before splitting off into a second one, creating a mirror copy of himself. After the copy is created, the actual Kizaru will return to normal. As the name implies, the mirror copy is the exact same as regular Kizaru, which copies him as he attacks and moves around, except it does everything in the opposite direction.
This basically gives you two Kizaru to play as, as well as giving you near absolute control of the stage. However, the copy can only exist for 10 seconds before it vanishes, meaning you’ll need to be quick in order to make full use of it. Another drawback is that, since this is a mirror copy, it can only really exist on the opposite side of Kizaru. When Kizaru passes over it, the copy will fuse back into him, which also activates the standard end lag of the move, but without Kizaru transforming back to normal. Just an incredibly prolonged upset headshake.
The copy also can’t be used as a shield, as opponents can directly pass through it without consequences. Projectiles also still pass through it as well. One way to avoid passing over the mirror copy is to use the Up Special, which the copy will mirror, and allow Kizaru to move over to the opposite side of the stage. The copy also follows terrain rules, instead of perfectly mirroring Kizaru, so gaps that exist on one side of the stage will still affect it. When a copy is destroyed by falling off into a blast zone, Kizaru will enter the move’s end lag, shaking his head.
If the Side Special is used, the mirror copy’s laser beam will follow it exactly, even if it has nothing to bounce off of. However, if the copy’s beam does manage to hit something, and bounce in a way that doesn’t match Kizaru’s, it will still be allowed to continue, creating its own, unique path. This can create some absolute chaos on the stage. Also, if the timer for the copy finishes while its in the middle of performing the Side Special, this will pre-emptively end the move for it, causing it to enter and travel through the beam, but not appear at the end. This does not affect Kizaru, however. The beams can also bounce off each other, in order to fully mirror itself.
Positioning means a lot when using this move, as the mirror point is the dead center of where you create the copy, meaning that it changes depending on where you summoned it on stage. For example, if Kizaru summons a copy near the edge of Final Destination, and then walks off across the stage, the copy will mirror him, and walk off the stage entirely. Sometimes this can be used effectively for certain effects, while most of the time its optimal to keep the copy summoned to the middle of the stage.
As one last note, the copy will always spawn behind where Kizaru is, so make note of which direction Kizaru faces when you want to summon one.
Kizaru doesn’t like to use his hands, preferring to handle most things with his legs. This is demonstrated in his jab, which is a fairly standard jab by all accounts. It’s a three hit combo, the first hit being a straight kick, followed by a second thrust, and then an axe kick. The first and second hits both have great reach due to Kizaru’s long legs, and deal 4% and 5% respectively. The final hit has less range due to it being a stomp, but is still comparable. The axe kick deals 3% damage, and only slightly knocks the opponent into the air.
This is perfect for following up with the final part of the attack, the infinite jab part. This has Kizaru thrust his leg forward rapidly, becoming a flurry of kicks in a cone shaped hitbox. Each hit deals 2% damage, but the opponent will most likely be knocked out before too long. Once the infinite part ends, Kizaru performs the finisher, a roundhouse kick that is fairly fast, and deals above average knockback, as well as 5% damage.
Kizaru can rack up a lot of damage via this move, but the final hit has some considerable end lag to it, making it punishable. This move can be used out of the Up Special teleport, but it will immediately segue into the infinite part of the jab as soon as Kizaru reappears, which you can keep going by mashing, obviously, but will automatically go into the finisher after only a few hits.
Forward Tilt - Ama no Murakumo Slash
Kizaru forms a sword of light in his hand, and slashes it forward. This move functions as a combo attack, with additional inputs activating two other hits. The second hit is a downward slash, and the final hit is a thrust. The first slash is fairly standard having slightly more reach than an average sword attack. It has considerable start-up lag as well, as Kizaru has to summon the sword first, which takes a few frames, and then swing it. The swing causes 5% damage, and on its own, deals somewhat average knockback.
The second hit has a bit less forward range due to its angle, but has better upper range. This also deals decent knockback, while also causing 6% damage. Finally, the thrust attack has better range than either of them, due to Kizaru moving forward a bit while performing the attack. This deals the best knockback of the three, above average, but only causes 5% damage. The knockback on a hit will be cancelled if you follow up with another hit.
When used out of the teleport, Kizaru will instantly begin the combo without any further input. While this sounds good, the attack does have bad end lag, as Kizaru will make the sword vanish, and he cannot move again until the attack has finished, making it very punishable.
As the mirror copy copies everything that you do, it can use this attack as well. There isn’t anything of note to its version, but some interesting effects happen when Kizaru and the mirror copy clash blades. When the blades clash, they will unleash a shockwave effect that has fairly massive range to it, being able to cover both of the models, plus around an extra half a Battlefield platform worth of distance.
The blades will also let loose a burst of blue light that streams out of them, and into an upwards cone shaped hitbox. This reaches upward well above Kizaru, easily going past the height a Battlefield Platform hovers by a bit. The stream of blue light behaves similarly to Bowser’s fire breath, as you can hold it to continue the stream. It starts off dealing rapid damage to opponents, starting at 3% damage, before slowly degrading to 1%, while its size also shrinks. This happens over the course of 4 seconds of continuous use.
Up Tilt – Amaterasu
Kizaru raises one of his hands up, performing a peace sign. His hand then suddenly shoots out a large burst of light around it. Despite Kizaru’s hand being relatively small, the actual hitbox of the move is fairly large, taking up around the top third of Kizaru’s model, and equivalent in other directions, forming a Star of David shaped hitbox. The attack has a bit of start-up lag to it, as it takes a moment before the light activates.
The star has a rather odd hitbox to it, which starts when the star appears, signified by a large shine that comes from it, launching nearby opponents up into it, causing 1% damage. This is then comboed into the star, which deals 4 rapid hits of 1%, before dealing a final hit that launches the opponent upwards and deals 3% damage.
The attack does change when used in tandem with a mirror copy, however. When use close enough to a copy, basically nearing as close as you can without overlapping them, the star will become much larger. It becomes around double its normal size, with the launching shine becoming larger as well. With the star powered up, it will deal twice as much damage, totalling at 16%. However, the end lag of the move is made worse, by Kizaru having to rub his eyes for a moment.
Down Tilt – Lightning Stomp
Kizaru raises his leg up, preparing to stomp down onto the ground. His foot lights up, and he performs the stomp, creating an AoE explosion effect around him. The explosion doesn’t activate until Kizaru’s foot hits something, giving them both very different hitboxes. First, the stomp’s hitbox, which is relatively quick, much like most of Kizaru’s set. Kizaru will stomp slightly forward, giving the attack some range to it. It deals 4% damage, and no knockback.
That’s mostly because, if an opponent is hit by it, they will instantly be comboed into the explosion effect. The explosion covers Kizaru’s entire width, as well as half a Battlefield platform on either side of him, and reaching up to around Kizaru’s knees. The explosion is relatively powerful, dealing 10% damage as well as dealing fairly decent knockback, capable of killing at 140%. The attack has some heavy end lag, as Kizaru can’t move until the explosion clears, which takes a bit.
When used out of the teleport, the stomp will activate immediately, cancelling out its hitbox, and cutting directly to the explosion’s hitbox. The lag on this version is significantly reduced, due to the cutting of the first hitbox.
Dash Attack – Double Kicks, huh?
During his dash, Kizaru lifts himself into the air, performing a spinning double kick, both of his feet lighting up. The kicks have great range to them, due to Kizaru’s long legs, but the attack will also traverse a fairly long distance as well, around 2.5 Battlefield platforms of distance before stopping. Kizaru’s legs become a spinning hitbox, which can deal multiple hits of 3% damage if the opponent gets caught into it. In total, it can cause 12% damage if the opponent is trapped for the entire time the hitbox is active.
Once Kizaru stops moving and lands back on the ground, he will perform a finishing attack, another straight kick. This is where the knockback of the attack comes from, dealing and is around equivalent with the finishing attack of his Jab. The final kick also deals 4% damage. This move can be used out of the teleport, but requires you to double tap and hold the control stick in either direction until Kizaru reappears in order to activate it.
The end of the move changes fairly drastically if Kizaru and his copy come into contact while using it. Kizaru will kick the clone, causing it to explode into a burst of light. This is the one of the few ways for a copy to be destroyed that doesn’t cause the endlag of the Down Special, mostly due to it coming in at the end of another move.
The explosion starts off around half the height of Kizaru himself, but as it continues forward it expands out into a cone shape, gradually becoming taller than the Admiral. This is very quick, lasting for only a few frames before it fades. As a hitbox, its fairly powerful, being able to deal decent backwards knockback, as well as 8% damage.
Kizaru rather lazily raises his hand from his pocket, and fires a quick beam of light from it. The beam is a fairly simple projectile, much like Fox’s own laser attack, only this is somehow even quicker, travelling a total of a full Battlefield platform within the time Fox’s laser takes to fire a much shorter distance. The laser causes 7% damage, minor knockback, and has a piercing effect, meaning that it can easily hit multiple opponents in one go. Fortunately for them, the attack still goes through some bad end lag, as Kizaru slowly puts his hand back into his pocket. This makes it so that Kizaru cannot rapidly fire the laser.
This is a Smash Attack, of course, so the move does change when charging, and it changes fairly dramatically. Light will begin to gather around Kizaru’s finger, and Instead of firing a small laser directly forward, Kizaru will instead aim a larger laser towards the ground 2.5 Battlefield platforms in front of him. Kizaru can hold the laser for a few moments, not dependant on charge, by holding down the attack button. The total time Kizaru can keep firing the laser totals at around a second.
While Kizaru fires the laser, he is locked in place, but he can control the laser, moving it across the ground anywhere from its maximum distance, to right in front of Kizaru. The laser moves fairly quickly in order to make that possible, since Kizaru just has to tilt his finger a bit in order to move it. The laser will only be activated once any charge has been put into it, while the projectile laser can only be used when no charge has been activated.
Damage wise, the laser is can deal 9% damage to 16% damage, not incredibly strong for a Smash, but the range makes up for it. The knockback for it is fairly decent, but it changes depending on how the laser hits. If the laser has fully fired, then it will deal above average knockback when an opponent touches it. If it is currently firing, and the tip hits the opponent, this activates a sweetspot, dealing heavier knockback, though no extra damage is caused.
As mentioned above, the move has incredibly bad endlag, making it incredibly easy to punish off of if whiffed.
This move has some unique effects when used with a mirror copy. If Kizaru and his mirror copy fire the laser projectiles into each other, they will meet in mid air, and burst into an explosion. The explosion has 2/3rds the range of a Bob-Omb explosion, though it is far more spherical than a Bob-Omb explosion. It causes 9% damage, and has decent knockback. It can be used as a way to quickly trap opponents in between you and your copy.
Another effect can happen when the tips of the charged lasers meet as well. In a similar, but slightly more laggy effect, the lasers will combine together and expand into a ball, before exploding outwards. This will instantly cancel out the move, but lead to arguably just as bad end lag. The explosion is similar, but confined to the ground, and much bigger, capable of covering the center of Battlefield by itself. This can deal 15% damage to opponents, with heavy knockback, but its highly telegraphed, and requires more finesse to pull off perfectly.
If Smashes are to be used out of a teleport, Kizaru must simply perform the input, and hold the button until Kizaru reappears. Only the projectile version of the laser can be used out of a teleport.
Up Smash – Teleporting Kick
Kizaru pulls back one of his legs, preparing it much like Luigi’s infamous kick taunt. The difference is that it begins to glow yellow, and he holds it there for the charge animation. Once the attack is unleashed, Kizaru will fling his foot forward in a flip kick style move. This is very quick once it comes out, and has good range to it considering Kizaru’s legs, as mentioned before. The attack deals 4-8% depending on charge, and has high knockback, which plays into the second aspect of the attack.
Before the kick’s animation ends, inputting the attack button again will instantly cause Kizaru to teleport next to the opponent in midair, and unleash a second roundhouse kick attack. This is remarkably fast, dealing 7-10% damage, as well as backwards knockback, specifically in a straight trajectory. This can be used as a combo set up with your mirror copy, as it will follow you as you teleport, and can lead to an easy extra hit if set up right. However, Kizaru can only pull off one aerial attack before he enters aerial lag, and can’t use another attack until hitting the ground.
In order to use the teleport effect, it has to be before the animation finishes, but only after the hitbox has finished. The hitbox of the kick ends as soon as the kick has reached half rotation in the flip, and any point after that is eligible for teleporting. Another point is that the glowing part of Kizaru’s foot, which goes up to around his ankle, acts as a sweetspot that deals more knockback compared to the rest of his leg hitbox hitting.
If Kizaru decides not to teleport, the attack has some bad lag to it as well, as Kizaru will tilt his head back, and let out an “Oooh”, reorienting himself.
This attack is great for use after teleporting, but it will never be as strong as normal, due to the teleport cutting out the charge, though it will also automatically activate the teleport effect. Hitting with the sweetspot out of this is the best way to make use of it, but also tough to pull off.
Down Smash – Ray of Light
Kizaru raises both of his hands up, the tips of his pointer fingers letting off a glow. He keeps them raised during the charge, and then quickly thrusts them downwards, his finger pointing to the ground. Suddenly, from the sky, two thin rays of light burst down on both sides of him, where he pointed his fingers.
The beams land around 1/3rd of a Battlefield platform away from Kizaru, and are basically infinitely tall, aside from them stopping at whatever ground is underneath them. They also don’t exist in the blastzone. The rays are fairly simple, smaller in size than Pikachu’s thunderbolt by around 2/3rds, but don’t deal knockback. Instead, they behave as passive damage dealers for how long they’re on stage, dealing 3% every 5 frames an opponent stands in one.
Charging the attack doesn’t affect how much damage it causes, it instead changes how long the rays remain on stage. With no charge, the rays will remain in place for a total of 3/4ths of a second, functionally acting as a fairly laggy normal Smash Attack. When charged to full they can be on stage for 5 full seconds, and will gradually travel across the stage at Ganondorf’s walk speed until the timer runs out. Due to how the move works, recovering opponents will just take a bit of damage instead of taking any knockback.
Due to the length of this move, Kizaru will be allowed to move around as soon as the rays begin to move. Kizaru can pass through the rays on his own as well, without taking damage. This allows him to play around and control the stage much better on his own, though a mirror copy can help him improve the move.
When two beams clash into each other (Something that can only happen with a mirror copy), the rays will begin to combine into a singular large beam. The beam becomes stationary in the area where they connect, becoming around twice as large as Pikachu’s thunderbolt. This version of the beam causes knockback, while dealing 7% damage on contact. The knockback isn’t very strong, but it can basically act as a wall. Kizaru can still walk through it, no problem.
As mentioned above, the rays only stop at the ground currently beneath them. This holds true as they move across the stage, shifting height as they cross over different platforms. When one goes off stage, it will continue downwards until it hits the blastzone. As said above, this cannot be used for gimping an offstage opponent.
When used out of a teleport, it will simply do the uncharged version, like the other Smashes behave when used out of a teleport. The end lag of the uncharged version is fairly bad, comparable to that of the Forward Smash’s.
Glint-Glint Aerials Neutral Aerial – Flash of Light
In a rather non-chalant action, Kizaru snaps his fingers, letting loose a quick burst of light around him. This is a fairly standard AoE aerial attack, with a fairly large hitbox due to Kizaru’s size. It comes out in a perfectly circular hitbox, which deals 10% damage, and fairly mediocre knockback. In other words, not amazingly interesting on its own.
The move is good for approaches, however. The attack comes out quick, with very little lag, making it a good attack to use when leaping into opponents. It also works well when paired with the teleport as a quick surprise attack.
Forward Aerial – Yasakani String of Jewels
Kizaru pulls his legs up a bit, and closes his hands to his chest, fingers in an “okay” sign. He then fires a volley of light bullets towards the ground. He fires around a total of 4 in a spread, each at a downward angle. Each light bullet causes 4% damage on contact, but its unlikely to get a combo string from them due to not causing serious amounts of knockback.
The bullets move fairly quickly, usually hitting the ground in under half a second, at least on a normal jump. Each bullet will spread depending on how far it travels, with there being no maximum reach. Each bullet is around the size of a 3/4th charged Super Scope shot. If used on an opponent up close, before the bullets spread outwards, they will be able to hit the opponent at the same time, with the damage total being 16%.
When Kizaru uses the move, he will be slightly pushed upwards and back. This gives him a chance to fire a second round of the light bullets, which will have a slightly different position due to Kizaru being a bit relocated. Kizaru can actually fire a third round of them as well, but after that he cannot use the move again until he touches the ground. Each consecutive use of the attack will lower the damage caused by each bullet by one, the second round only causing 3%, and the final round only dealing 2%.
The attack does have rather bad start lag, however, but this is mitigated somewhat by giving Kizaru a brief hovering effect before he fires. When Kizaru fires, he remains in the same position, letting him use the attack with very little lag in between each shot. The attack can also be used out of a teleport, cutting the lag, but also preventing you from firing multiple times.
This is Kizaru’s main form of comboing with his mirror copy, as its large range, and a storm of bullets from both sides, can cause severe damage for opponents.
Up Aerial – Ama no Murakumo Sweep
Kizaru summons the Ama no Murakumo sword, and performs an upwards sweep with it. The attack has some lag at the start, much like the Forward Tilt, but its slightly better. Kizaru swings the sword in a large arc, similar to Marth’s UAir, but with more range to it due to the Ama no Murakumo’s longer “blade”. The blade, on contact, deals 13% damage, and decent upwards knockback.
Similar to the Forward Tilt, when you and your mirror copy’s blades clash, it will unleash a shining blue light beneath the both of them. It functions nearly identically to the one from the Forward Tilt, with the hitbox of the light heading downward instead of upward, and a few other changes because of it being in the air. For one, due to the different hitboxes of the moves, once the blades clash at any point (Most likely during the last part), Kizaru will pull the blade back and then lock it with his copy’s, making it somewhat laggier.
As you hold the blade lock, Kizaru still remains somewhat bound by gravity, though his usual fall speed is reduced by an incredible amount, as he falls down at around the speed of Jigglypuff’s walk, the slowest movement in the game. Kizaru can keep this up until he touches the ground, where the move will instantly cancel out. Kizaru can of course cancel the effect out his own by letting go of the attack button, which will instantly put him into freefall.
Back Air – You’re Dying Now
Kizaru twists around in the air, swinging his glowing foot forward, and then spinning around to perform a kick. The kick is very simple as a hitbox, having better reach than most of Kizaru’s kick moves due to him actually putting more effort into it. When the kick hits an opponent, it will cause an explosion, causing 14% damage, and above average knockback.
However, if the move doesn’t hit an opponent, the glow from Kizaru’s foot will instead fire out as a laser beam, similar to the beam fired from the Forward Smash. This one behaves similarly at the start, being the same size and travelling at the same speed. When it hits an opponent, that’s where the differences come to light, as instead of a piercing effect, it will explode on contact. This deals 8% damage to the opponent, and slightly less knockback than dealt by the kick.
When two of the lasers meet (The other one shot by your mirror copy, most likely), it will activate an effect similar to when two lasers from the Forward Smash meet, but different. Its mostly a weaker version, with the explosion being slightly smaller, around 2/3rdsof the FSmash’s explosion, and only dealing 7% damage with less knockback. It is slightly quicker to expand, however.
The laser doesn’t fir out immediately, however, as the kick remains a lingering hitbox for a few frames before it activates. If the kick hits an opponent during that, then the laser will be cancelled. Used out of a teleport, the laser will fire out slightly faster than normal.
Down Air – Step Lightly
Kizaru raises his leg up, it starting to glow, and then thrusts it downwards. This kick has considerable range to it, but also covers a decent area, with the hitbox being roughly in the shape of a quarter circle. The kick delivers strong downward knockback, and deals 13% damage. Of course, this isn’t the only thing it can do.
Like the Back Air, if this move doesn’t connect, it will fire a laser beam. This beam is completely different, as it is not actually a hitbox at all until it hits the ground, where it will burst into an explosion. The beam will fire instantly once Kizaru’s leg reaches the exact bottom of its hitbox, by the way. The size and damage of the explosion is modified by how high Kizaru is in the air when the beam is fired.
The largest it can get is when its fired from the very top of the screen, where it can cover the entirety of Battlefield, but deals functionally no knockback, and 2% damage. The move can’t be used from a short hop, but the smallest it can get is around the size of a fully charged Super Scope, which can deal 20% damage and above average knockback, but is difficult to hit with due to the explosion only lasting for a brief moment.
The reason the explosion is like this is because Kizaru will use the explosion as a sort of stepping board. The explosion will always end up connecting to his foot when its fired, and gives him an extra jump. This is good for continuing an air combo, but is worthless when actually recovering. The laser will simply go off screen, and not cause an explosion. When used out of a teleport, the laser beam will activate immediately.
Glint-Glint Grab Game Grab & Pummel
As Kizaru doesn’t like to use his hands, his grab is a bit unique. He’s lift his leg up, and perform and axe kick, similar to the axe kick from his Jab. However, this one is much quicker and, obviously, functions as a grab. Opponents hit by it will find themselves locked under Kizaru’s boot, as he looks down at them dismissively. The pummel has him grind the opponent with his boot for 1%, in a fairly quick pummel.
The grab has decent range to it, as mentioned in basically every attack featuring Kizaru’s legs, which makes it pretty good for a grab. The interesting part of the grab comes from the fact that Kizaru’s copy can grab as well. This can lead to some interesting combo set-ups, which we’ll get into later. Due to how the mirror copy works, Kizaru will be locked in place if the mirror copy has grabbed an opponent, or vice versa, and have to perform the same animations before he can move again. The grab can be used out of the teleport, without much change to it.
Forward Throw – Amaterasu Flash
Kizaru kicks the opponent up into the air, directly in front of him, and then thrusts his hand into them, shining the peace sign in their face. This unleashes a bright flash of light, launching them and dealing 10% damage. This is Kizaru’s main throw, for a few reasons. For one, it’s fairly quick, and has decent knockback, being able to kill at 140%.
Second, the attack has a special effect to it. When the opponent is hit by the Amaterasu’s flash, they will become blinded. To go into it in more detail, all melee hitboxes are cancelled out for two seconds after the opponent recovers. Projectiles, however, are not cancelled out, and can still be used to damage. This status effect is signified by swirling stars around the opponent’s head, which vanish as soon as it wears off. The effect doesn’t fully activate until the opponent hits the ground
The opponent is launched off at a minorly upwards angle as well. At lower percentages, this can be used as a decent combo starter, specifically when used in tandem with your mirror copy, as the angle is perfect for quickly following up with an aerial, or ground to air attack.
The hitbox of the move actually remains in place when Kizaru or his mirror copy perform the actions without an opponent in their grasp. As such, Kizaru can blind a second opponent if the attack is timed correctly. Unfortunately, the attack only deals half the knockback it usually does. Without the opponent automatically being comboed into it, the flash has a fairly pathetic range, the opponent needing to be directly in Kizaru’s face in order for it to hit.
Up Throw – Light Show
Kizaru flips the opponent up with his foot, and performs a diagonal kick, his foot starting to glow. The kick deals 4% damage, and launches the opponent off at a set distance of 2 Battlefield platforms diagonally. As soon as the opponent reaches the apex of the launch, Kizaru’s foot will launch a laser beam. The beam travels, and then hits the opponent, causing an explosion that deals above average knockback, as well as 5% more damage.
The laser functions as a hitbox, similar to other lasers in this set, but of note in this particular instance is that the laser remains a separate hitbox as it fires. This means that it can potentially hit another opponent if they jump directly into it. The laser fires quick enough that it will hit the opponent in a ridiculously quick amount of time, making this move last around the same length as a normal throw.
The move remains similar when Kizaru or his mirror copy uses it without an opponent grabbed. The hitboxes are changed around a bit, however. Though they’re general size doesn’t change, the kick now deals less knockback, due to Kizaru having less leverage over the opponent. The knockback is reduced, making it much weaker, but the damage is boosted to 7% to make up for it.
The laser also changes. It has infinite range to it, like the other laser hitboxes, but the only other real change is that it deals 10% damage. Due to how the move works, this is the only laser that can’t be combined with your mirror copy’s.
Back Throw – You Have Now
Kizaru kicks the opponent up into the air, and then performs a roundhouse kick, knocking them behind him. The roundhouse deals 3% damage, and deals fairly mediocre knockback, not set like the Up Throw, however. After the opponent is launched, Kizaru will teleport after the opponent has hit the ground, and deliver a second kick. This second kick is a side kick, and deals 7% damage, while also continuing the move’s knockback. The kick has knockback far better than the first hit, on the level of a particularly good throw.
If the kick launches an opponent off the stage, Kizaru will teleport right before their able to recover, and deliver an aerial version of this move, which basically behaves the same. Once Kizaru performs the move, he will have access to his jumps and Up Special.
When used without someone in their grab, the attack remains similar, the hitboxes even remaining the same. Kizaru/the mirror copy will always teleport the same distance has the one who threw the opponent, as well as the same altitude, so it can be somewhat difficult to fully use, but remains a powerful tool if used right.
Down Throw – Executioner’s Stomp
For this one throw, Kizaru doesn’t need to even move the opponent in order to perform it. He lifts his leg up, his foot starting to glow. He then slams it down on the opponent, causing an explosion that launches them upwards, dealing 11% damage. This is Kizaru’s strongest throw, and most potent KO throw, but its rather laggy, taking a moment for Kizaru to charge up. During that brief period, he can be knocked out of the animation.
The explosion is large enough to hit other opponents as well. The hitbox mostly exists in front of Kizaru, covering a full Battlefield platform worth of space. The hitbox also goes up to Kizaru’s midsection, making it tall as well. This functions mostly into the version with no grab, where the damage caused is changed, with it instead dealing 15% damage, with the knockback at around the same level.
Final Smash
Ama no Iwato
Kizaru has the Smash Ball. How terrifying! His entire leg begins to glow with light energy, and he thrusts it forward in a rather lazy manner. His leg then fires out a terrifyingly large burst of light, a massive beam of it lead by a scowling monkey head. The beam is larger than even Samus’ Final Smash, though it has a similar form of hitbox, dealing rapid hits of 4%.
The reason why its so big is that Kizaru cannot actually aim it. It will instead only fire forward for around 5 seconds before ending. Once the beam finishes firing, Kizaru will return to his normal stance, and the opponents taking heavy knockback.
The goop-spewing leader of the Piranha Plants from Super Mario Sunshine turned walking spinoff punchline, it's Petey Piranha in the flesh...err, chlorophyll. Despite his ubiquity in the Mario series, Petey hasn't actually made a Make Your Move appearance in years, having last been spotted nine years ago "slapping people with backs of leaves" in the series' second rendition. Surely popular characters like that aren't supposed to take hiatuses -that- long, right? *gazes wistfully at avatar*
Anyhow, never fear, the diaper-clad fan favorite has upgraded from mindless boss to mindless playable character at long last!
Petey stands a Kirby taller than Bowser and is a little wider than Mario. With two midair jumps and aerial movement that would be useful were it not for his fall speed, the closest comparison to him in the air would be Charizard. In terms of weight, Petey is "statistically overrated" in that he'll survive longer than your garden variety (heh heh, because he's a plant, heh) light- and middleweights, but his floatiness makes him deceptively vulnerable to earlier KOs, especially when combined with his large, tubular shape that can come into contact with a blast zone quicker than a more compact character.
The majority of Petey's statistics are variable, based on his use or disuse of different attacks in his arsenal. Because Petey's size remains a constant no matter the direction the player decides to take his gameplay, there's more gravity to whatever statistical changes they bring about compared to your average buff.
SPECIALS
Neutral Special - Gastric Sludge Petey tilts his head back, making that howling noise from his boss fight as he prepares to spit up a brown goop projectile. One tap of the input will start Petey trying to hack up the sludge; after about half a second, he's able to do so with a second tap of the input, in the form of a Kirby-sized pellet he can aim straight forward (lands half a platform away), or diagonally down (at his feet) or up (travels in a sluggish arc, lands a platform away after a second and a half). Holding the input out a full second renders the goop ball twice as large, expanding its area of impact upon landing: a regular ball covers one-third of Battlefield with mud, while a larger ball covers double that.
Tapping the shield input can cancel the move at any point while it's charging, though Petey will have to start from scratch next time he wants to spit up sludge. The sludge lasts ten seconds before dissolving and deals 1% to non-Petey players standing in it. Though this goop won't stick to players, it can drag them along its trajectory unless they DI out with moderate difficulty. The slime can also screw with their mobility once it's landed: players who run on the goop suffer from greatly diminished traction, while characters who stay standing or attacking in one place for longer than a second will sink into a pitfall effect with a 'hit' cry.
Spitting up goop is one of a handful of ways Petey's statistics can change mid-match. One regular ball will cost him two points in fall speed and three in weight, as well as boost his jump height and ground movement by one point and his aerial movement by two. A large ball doubles the effect. At this point, he'll become a visibly skinnier Petey, rendering him him a far more mobile character...and one far easier to kill. He can capitalize on his newfound movement to catch up to foes dealing with his goop and other stage elements, maybe to spread a few more around, or to try fleeing from a foe once he's racked up a deadly amount of damage. Petey cannot spit up more goop and modify these stats further once he's reached maximum skinniness (or if you attempt to spit a large ball after a regular one) — if you try, he'll make a noise and smack his face with his leaves over 0.75 second — though he can certainly regain the ability plus weight if he so chooses.
Petey has super armor while preparing to spit, though if a player wallops him with an attack dealing 15% or more while charging, he'll collapse into prone, clumsily landing on his back, unable to react for a second. His get-up attack is a pretty handy one, in that he'll flutter his leaves to return to his feet, pushing foes back with 5% and a moderate wind effect — it's just that, when he's already a laughably large target, Petey won't want any more of a window than already exists for foes to heap on punishment. When he's lighter, Petey can recover from a prone state after just half a second instead, making the drawback draw him a little less back.
Down Special - Ground Guzzler Petey performs a pirouette, immediately burying himself into the ground with just his face popping up. Once buried, he'll start gaping his overlarge mouth, drawing in and swallowing sand, dirt or some obligatory cartoon logic substance from the stage. Foes within a platform of Petey on either side are drawn inward at Bowser's walk speed, getting chomped for 10% and vertical knockback KOing around 150%. Petey has the same super armor to attacks dealing below15% from his Neutral Special while swallowing; exceeding this uproots him onto the stage in prone as well. This effect is also triggered if Petey pulls in explosive or blatantly hurtful traps or minions (giant mousetraps and the like), though normal ones, he can devour with no issue. Tapping shield will cancel the move.
Each half second he spends swallowing, he regains the same stats he would have lost spitting up a regular ball of goop (see above). Should Petey start guzzling ground at his normal size or continue after he's regained it, he'll start to plump up, gaining stat boosts and decreases, respectively, in the opposite direction. He'll become a superheavyweight, capable of surviving quite a while (you'd start to be able to visibly knock him around in the upper 100s) — just so long as he stays over solid ground; his feeble jumps make metal characters look downright floaty at that point. As with losing weight, Petey cannot exceed maximum weight and will have a laggy animation if you try. Bloated Petey will also take half a second longer to recover from prone (for a full second and a half of vulnerability). Thankfully, he's not actually a bigger target (his idle pose has his bulk extending into the background, with his leaves constantly out at his sides), though that's still damning with faint praise as is.
There's definitely a strategic component to when you'll want to spit out goop and when you'll want to generate more goop by swallowing mud, given the ensuing effects it'll have on Petey's handling. The player can be more conservative out of the gate by swallowing to gain weight and then lumbering around to fortify a relatively small area of stage with goop and subsequent stage hazards. Others may instead prefer to continually spit up goop before regaining it, fluttering around the stage with more agility to cover a wider area (at least as long as the goop lasts). Varying shades of middle ground can allow the Petey player to adapt to different opponents, as can different tactics the player can implement using moves to come.
Side Special - Garden Variety Petey puckers up instantly, giving the player the opportunity to generate one of three plant-based creations, each a part of a three-stage minion. By default, Petey will spit forward a Nipper Plant with slightly more lag than throwing a Waddle Dee. Angling the move upward will cause him to spew out a trio of Nipper Spores at the speed of a Falco laser. And angling the move down will cause him to put his mouth to the stage, using the breath of life or something to generate a normal Piranha Plant over the time it takes Villager to plant and grow a tree. The number of minions Petey can have onstage caps at nine — for instance, he's unable to spit up more than one set of spores with three Nipper and Piranha Plants apiece onstage, at least until he or another character kills them off (he can swallow his own with Down Special to heal 3% and 5%, respectively, though the same move may be more practical when used to simply move these minions around).
Nipper Plants are Olimar-sized and hop around the stage (falling off edges) at half Ganondorf's walk, each with 15 HP. Coming into contact with one causes it to latch its little mouth onto your character's leg, dealing 2% per second and taking a unit off their movement and jump stats. Individual Nipper Plants can be swatted away as easily as a Pikmin, though they can be more of a nuisance in numbers, as is the case when Petey's Nipper Spores touch the ground. Spores are spat up two Ganondorfs and descend onto the stage over about five seconds. Each of the three spores can be destroyed by any damaging attack, often all at once, given their close proximity to each other. Their function is more as an aerial nuisance, as characters who come in contact enter a footstool effect, falling for half a second, likely to the ground below. It's rare that Petey will actually produce three Nipper Plants by way of spores, but he can increase his odds by spitting out multiple Spore sets; it'll take concerted attention from a foe to catch 'em all.
Piranha Plants, which can also be generated by a Nipper Plant remaining in contact with a goop-covered segment of stage for a full second, have 35 HP and are a little more annoying to dispatch. They'll chomp in place constantly, creating a close-range moderate priority hitbox of 5% to stun characters who mindlessly jump in to kill them off. In addition, if a character draws within a platform of a Plant on the ground, it'll lunge at them with Samus' grab speed (and lag if it misses). It'll hold them in place with 1.5 times the escape difficulty of a grab, gnawing for 3% per second. Characters cannot be held by multiple Plants at once (if Petey is skilled or lucky enough to generate two close together), though a foe may find themselves grabbed by two in quick succession if they get careless, or pitfalled if the Plant happens to grab a foe standing in goop. Not to mention, why Petey would just sit back and do nothing with a nice juicy target ripe for the punishing...
Up Special - Red Flower, Green Thorns Petey flaps his leaves down with a bark; a second later, a red-and-white speckled thorny vine rises from the ground a platform in front of him, one Ganondorf tall and a Mario wide. This bramble functions as a thorny barrier for Petey: other characters who come in contact take 3-4% and a bit of stun. Foes can deal 40% to a vine to destroy it, though unless the attacks can beat out the thorns' moderate priority, they'll take some damage in the process. Petey can have up to three vines onstage at a time, each vanishing after twenty seconds or if he tries sprouting another.
Petey can try smacking foes into a vine for extra damage, but given the sluggishness of most of his melee attacks, he'll more often find vines useful in messing up enemy spacing onstage. Characters can roll around a vine (if Petey isn't waiting on the other side, charging a Smash), though if the vine sits at the end of their roll, they'll take the stun. What's more, should Petey place a vine at the stage's edge, an offstage character would have to recover high and predictably over the vine — they'd otherwise have to repeatedly ledge-grab while draining the vine's HP or take a few hits being juggled over its top. Speaking of juggling, Petey also has the option to create multiple vines right next to each other, creating a thicker vine wall that can more reliably hit foes that land on, potentially two or three times if they're heavier or a fast-faller. Much like with recovering, foes also must be careful jumping over these, lest Petey await them with a devastating blow below. His more defensive alternative consists of spitting up or swallowing mud or minions as opponents fight their way through the vines using brute strength.
In the air, Petey cannot generate vines. Rather, his start-up animation flapping his leaves boosts him up twice the height of his regular midair jump. He won't enter helpless afterward but he may as well be helpless if he's resorting to this while offstage in a fattened state — twice the height of one of those jumps is more or less an aerial hiccup.
STANDARDS
Jab - Piranha Pirouette Petey extends his leaves and performs a quick spin on one leg, entering the move near laglessly. He can continue spinning indefinitely but has the cooldown of Spinning Kong whenever he stops. If the player holds the spin out, they can direct Petey from side to side at Ganondorf's walk speed. Opponents he touches take 7-8% and are thrown up into the air a moderate set distance, entering a footstool effect as they fall dizzyingly back to early. This can be an effective tool for Petey if he wants to put space between him and an opponent, but only if he doesn't become predictable. He can be hit out of the move at any time, and the priority decreases from moderate to low, progressing from his leaves up to his spinning head.
Dash Attack - Body Check Petey dips into the dreaded well of spin-off attacks, performing the body check maneuver present in Marios Superstar Baseball and Strikers Charged. With a woof, he lunges forward a platform, mouth open and neck extended. It's more or less a slightly laggier version of Bowser's Smash 4 dash attack, with one key difference: rather than knocking foes up, Petey will knock them to the ground into prone, dealing 15%. What the move lacks for in knockback potential, it makes up for with some of Petey's few options as a heavyweight k. ombo character. Should a foe try rolling away from Petey, he can pursue either with an F-Tilt or a second dash attack (or try cutting their escape off by bringing up a vine), while if they roll at him, a well-timed jab can send them spinning into the air. Used sparingly, this can be a real surprise to foes as one of the few uncharacteristically fast moves in Petey's repertoire.
Forward Tilt - Whirling Dervish Petey draws back for a quick quarter-second before unleashing a gray tornado, which travels forward a platform and a half at Dedede's dash speed before vanishing. Foes who come in contact with the Ganondorf-sized tornado are dragged along; they can actually DI along the forward trajectory of the tornado to escape early without much effort. If Petey's spaced a vine, a Piranha or Nipper Plant properly, though, this may not be ideal. Foes who hit Petey's leaf as he hurls the whirlwind take 10% and knockback KOing around 170%, though the wind itself deals no damage. This can actually come as a blessing in disguise, though, as Petey's tornado can pick up a minion and push it forward along the stage (even alongside a foe, allowing the minion to attack as soon as the whirlwind dissipates).
Down Tilt - Earthquake Petey lifts one foot and stomps the stage, creating a rippling earthquake effect a platform in front of him. Petey must endure the same end lag as Super Dedede Jump landing onstage, but the startup is variable. By default, it's about one-third of a second, but by holding the input, Petey will keep his leg up indefinitely — perfect to fake out a spot-dodging foe. Foes in the impact area take 5-6% damage and are stunned in place for about 0.75 second. It's not typically stun Petey himself can punish, but if he can freeze a foe right overtop some goop, he can earn himself a free pitfall on a victim (or ensure a Nipper Plant about to leave some goop completes the transformation into a Piranha Plant).
Up Tilt - Bellow of the Beast Petey tilts his head back and does his best Shrek impression, roaring into the air for 0.4 second. There's pretty minimal startup and ending lag on the move, so unlike a handful of moves, Petey doesn't have to especially worry about repercussions when throwing it out. A good thing, considering one of its primary uses: defending against kamikaze attacks from the air. Petey's roar covers a circular Bowser-sized area above him, dealing no damage but canceling the momentum of any characters within range. It can be Toon Link or Bowser trying to plummet down and ruin Petey's day, but just so long as he can time the move correctly, he'll get the last laugh. His Nipper Spores, however, are another story; they'll be send up three Ganondorfs if caught in the roar. Spamming the roar can definitely be counter-intuitive when getting the Spores to land is your aim, but as a last ditch option to save some from enemy aerials, it's serviceable.
SMASHES
Forward Smash - Piranha Swing Petey turns to the foreground while charging, pulling a leaf back and standing on one leg; upon release, he swings it a moderate distance forward at full force. "Slapping people with backs of leaves" doesn't begin to describe the power he packs; foes struck suffer 24-25% and diagonal knockback KOing from 65-40%. It would be a foolproof KO move if it weren't for some pretty tedious startup lag — about 1.5 times that of Ike's F-Smash, with an identical amount of end lag as Petey regains his balance. No doubt about it, it's a commitment for Petey to use, one that will almost assuredly end in punishment if he hasn't sufficiently bogged his foe down with some combination of goop, minions or an unwieldy situation landing onstage. If he has, though...*homerun music plays*
Down Smash - Head Banger The Mario Sunshine throwback uses a throwback from Mario Sunshine, lowering and swinging his head 360 degrees around his body, about a Kirby width to either side. Much like in that game, foes who come in contact with Petey's head are thrown powerfully backward, taking 17-18% damage. The knockback is akin to that of Jigglypuff's horizontal-launching D-Smash, but far more powerful — if Petey connects well, he can put an opponent in a dangerous situation where they might be too low under the ledge to make it back. Much like F-Smash, though, it's highly telegraphed; Petey takes about half a second to lower his head, swinging his head for as long as Wario's D-Smash before dealing with the same end lag. Situational use is pivotal, much like with F-Smash, though it may be a tad more handy in dispatching heavier characters with poor recoveries. At least if Petey doesn't actively get in his own knockback's way with poor vine placement.
Up Smash - Feeding Time Petey tilts his head back and jumps up a short distance, taking a bite with his gaping maw. Compared to his other two Smashes, this is far quicker, taking about the time of tapping Wario's Bite uncharged, but geared far more toward damage-racking than KOing. Foes caught in his bite take 8-12% and from one-third to a full second of stun; they'll also take 3-4% and be popped into Petey's bite if they're touching his jumping body.
Much like the Links, Petey can follow up with a second U-Smash bite near instantaneously, but unlike the elven warriors, the player charges this second bite separately from the first. Petey can also perform as many bites in quick succession as he can get away with, but pulling off any more than two is a challenge; more than three is nigh impossible. Unless Petey is near or at full charge, the foe will recover from their stun before he can bite again. This circles around to the move being most useful if the foe is sidetracked as Petey is about to strike, though more for reasons of charge than accounting for its lag.
AERIALS
Neutral Air - Petal Burst Petey tucks into a Bowser-sized ball, pausing for about 0.25 second before expelling the yellow petals around his head in a circle, akin to the Eggo-Dils from Yoshi's Island. There are twelve petals total, each being about the size of a Poke Ball and traveling out a Mario over 0.75 second before vanishing (in total, the radius is give or take that of a Smart Bomb blast). Each deals 2% and a bit of stun, similar to Mega Man's jab, which can help waylay an opponent pursuing him in the air. He'll have to pick and choose his usage, though, since once his petals are gone, it'll take spending one second on solid ground for them to grow back.
Forward/Back Air - Wing Wind Petey extends his leaves a moderate distance in front of or behind him, clapping them together with slightly more end lag than Wario's U-Air. Getting caught in at the clap at point-blank range means 14-15% and horizontal knockback KOing around 90%. The outskirts of the leaves, meanwhile, are surrounded by a wind hitbox, slightly smaller than a Kirby — this will push opponents back in the opposite direction with moderate force, though without any damage bundled in. Petey himself is also boosted back a platform; using these moves, he's able to jet around in the air to get around or escape, though probably not more than once or twice, given that he's not immune to gravity while clapping. Other uses can include pushing Nipper Spores horizontally across the stage with the ensuing wind, or even short-hopping the clap against a vulnerable victim (don't miss, though...the landing lag is pretty shameful).
Up Air - Crackling Belch Petey aims his mouth skyward and releases a horizontal burst of belch gas skyward over 0.45 second. Once the opponent hits the gas, they'll come to find out a nasty truth: any time a character hits the gas, it will double in size, in both thickness and length. This can be done up to five times. Needless to say, this creates a f**king overpowered moveset.
In actuality, Petey raises his head and belches, releasing a Wario-sized cloud of gas above him over 0.75 second. Opponents who come in contact with the gas take 5% and enter their helpless state; if they're caught near the beginning of the move, they'll more likely than not fall into Petey's open mouth. From there, Petey will go upside-down over one-third of a second before plummeting toward the ground or blast zone at Sonic's dash speed. They'll take 1-2% per second in his mouth and 15% plus vertical knockback KOing at 80% if Petey's head manages to connect on the stage with them inside (they can mash free with grab difficulty).
This two-part strike can function as a KO move for Petey off- or onstage. Shorthopping it against a foe leaping over goop or vines is at least not a guaranteed punishment for Petey if he misses (only about that of Bowser's U-Air landing), though neither Petey's mouth nor gas have much priority at all — he may very well eat damage instead if he goes after a foe who's not in helpless or footstooled state.
Down Air - Freefall Petey lets out a distress cry and instantly begins plummeting toward the stage on his back at Sonic's dash speed, flailing his leaves wildly — an exaggerated version of his reaction when he's sprayed to the ground in Sunshine. His leaves extend a small distance above and below his body, like some mutation of R.O.B.'s U-Air, dealing multiple hits of 3-4%. Once he lands, though, he'll enter a prone state, ripe for foes to punish. This is a situational move Petey can use to drag foes down with him offstage at times, and more often for him to drag himself down to cancel his momentum. Naturally, this won't be foolproof, given his prone ending, but if Petey's bloated with mud, he can potentially save himself as a last-ditch effort, especially if he can time the move to bring himself down behind a vine as soon as he exits hitstun.
GRAB-GAME
Grab - Devour Petey leans back briefly before taking a giant chomp down at the ground in front of him, taking slightly longer than Dedede's grab to do so but having a bit more range as well. His dash grab stretches that reach even longer, as he flutter-lunges forward to about the reach of Link's tether grab, though with embarrassing end lag slumping to the ground if he misses. Captured foes or minions are held in Petey's mouth, as he faces the camera with a grin on his face.
Pummel - Chew Petey's mouth visibly moves as it emits that shark chomp sound effect. It's about as fast as Bowser's pummel, dealing 2% to the victim. Petey heals 1% a pop as well, akin to Project M Ridley's pummel.
Forward Throw - Regurgitate Petey leans back and forcefully spits his foe horizontally across the stage in a foostool effect, dealing 5%. By holding the input before releasing, the player can charge Petey's spit as though he were pitching a fastball. Default range puts the victim a platform in front of Petey, while a fully-charged throw triples this distance. Perfect for hurling a foe directly into the range of Plants or a vine, though without any add-ons, it's not the best damage-dealer.
Back Throw - Spin Petey begins twirling around, foe in tow, with the option to cough his opponent out behind him at any point, dealing 3-4% and putting them into a dizzy state. The foe remains dizzy for a time varying based on how long Petey spun around. One-third of a second of spinning produces 0.33 of a second of dizziness for the foe, increasing at this rate for every 0.33 second Petey spins. No matter what, Petey will suffer that amount of end lag stumbling around. If he's grabbed a foe with higher damage, he'll have more freedom to spin around and punish victims himself, while if he doesn't, he's inviting punishment if he attempts the throw without any additional goop or Plants to restrain the released foe.
Down Throw - Swallow Petey gulps his foe down, dealing 5% initially plus 1-2% per second, as the foe's difficulty in escaping is multiplied by 1.5. Petey can lumber around with his foe engulfed ala Dedede after landing Inhale, having access to his other throws at any point to spit the foe out. Like with DK, this means most players interested in damage-racking will always want to swallow their victim before using a throw. This may change if positioning is their priority instead.
Up Throw - Header Petey spits his foe up vertically a Ganondorf, before entering a crouching pose. A split second later, repeating the input causes him to immediately leap up and slam his victim with a soccer-esque header. This'll deal 17% in a close-ranged hit that crushes his victim diagonally downward into the stage, bouncing them off for a hit KOing around 130%. The foe regains movement 0.25 seconds after being spit up, able to air dodge or jump away from the follow-up hit. Depending on where the throw is initiated, this more-or-less forced escape can result in a foe dodging down into some goop or away and into it, away from Petey, or even a short ways offstage if they want to avoid a certain spike. Though, they may have to contend with spikes anyway, should they fail to recover before Petey can recover from the 0.5 second end lag and bring up a vine at the edge.
FINAL SMASH
Final Smash - Goop Rampage Petey lets out an echoing bellow as a thorny flower encloses around him, boosting him up to near the upper blast zone. From there, the flower opens up, revealing Petey with an extremely bloated stomach. For the next ten seconds, Petey has the freedom to direct a stream of brown goop from the top down to the stage. Depending on the stage, Petey can coat sections or all of a larger area or continually spit goop at one portion of stage, relying on minions, vine walls or teammates to isolate enemies to that area for damage. Like with Neutral Special, Petey's streams of goop drag foes along, just with a much wider area of influence. In fact, if he so chooses, he can forgo coating the stage in favor of using the stream to push offstage foes down to the bottom blast zone for a gimp. Either way, once the Final Smash ends, Petey's flower lowers him back to the stage, restored to his default weight.
EXTRAS
Up Taunt - Carnivore's Chuckle Petey puts his leaves on his hips and laughs stupidly.
Side Taunt - Green Gangster Petey does that strutting gangster walk from Strikers Charged back and forth.
Down Taunt - Cage Match Petey looks to either side, as though questioning where his metal SSE cages went. Guess people shouldn't have ruined that surprise by triggering Sakurai with uploads of his boss fight to YouTube.
Entrance - Warp Pipe A warp pipe appears onstage, akin to the Bros., but instead of popping out, Petey gets stuck inside, thanks to his belly. He throws his weight down to shatter the pipe into pieces, landing on the stage.
Victory Pose #1 - Snooze Petey sits onstage, dozing with his head resting on one leaf. One of those pink balloon animals from Sunshine smacks him from offstage, waking him up and causing him to fly off in a rage.
Victory Pose #2 - Opera Singer Yes, that's for some reason a title Petey unlocks in Superstar Baseball. Anyhow, he simply skips floatily along the stage, tilting his head back with his mouth open as though singing.
Victory Pose #3 - Piranha Garden Petey flies around in a circle and lands, posing amid a circle of Piranha Plants.
Victory Theme - Mario Villain Petey shares the Smash 4 victory theme of his master, Bowser.
Loss Pose - Disbelief Petey kneels on his nonexistent knees, leaves on the ground as he shakes his head in shock.
The place where the Avengers first unofficially assembled, the Helicarrier is a flying airship and mobile HQ of SHIELD. Packed with enough guns to make a Battleship blush, these mobile fortresses can be anywhere int he word and carry out all sorts of missions.
ALPHA MODE:
The Helicarrier can be a dangerous place, soaring thousands of feet in the air and crawling with Quinjets and SHIELD personnel, its the last place you'd probably want to start a fight. That said, of course a scrap or two... or three inevitably occurs!
Taking place in the segment seen above at a diagonal, the Helicarrier stage is fairly large, being about 25% longer than Final Destination. This is broken up into a few sections however, consisting oft he following:
Runway: The middle~right side of the stage is a runway that leads to a ledge and a bottomless pit. On occasion, Quinjets will come and skid to a halt to become drop-through platforms on the wings, that is if they don't deal 15% to folks as they land or take off! The Quinjets are very telegraphed in that you see them long before they touch down in the background, and before takeoff you see the engines rev up with bright, red lights. Quinjets will stick around for about 30 seconds when they appear, and only two can be on a runway at once.
Comm Tower: Seen in the middle~left of the stage, the Comm Tower is actually a drop through platform overlooking what ends up being a ledge. SHIELD personnel are seen inside of the windows here, and will react to anything happening on the runway outside!
Turbine: On the far left, past the Comm Tower is one of the four massive turbines that keep the stage afloat! A ledge for all intents and purposes, falling into the turbine will spike foes down hard for 20% damage, and extends to the edge of the screen. Falling into one of these is essentially game over. Despite this, the turbine actually slows fall speeds over it until you actually touch the turbine, allowing for daring escapes!
Overall, this is a fairly flat stage though it can occasionally gain two extra, wide drop through platforms with both the Comm Tower and Quinjets behaving like BF platforms only 1.5x as wide. The left side is a "Fight Club" of sorts where folks may choose to abuse the powerful turbine, but the layered area of the Comm Tower provides plenty of escape routes for combatants and mitigates camping the area. Sticking near the Turbine, trying to B throw enemies into it can backfire easily though, as a baited grab can end up with you flying back down to earth!
OMEGA MODE:
The Helicarrier as seen from the front, essentially takes on your standard "Omega" form as it now behaves just like Final Destination, though you can still see all the action going on on deck! Fights will take place on the front most part of the runway seen here in the foreground as the Helicarrier flies over the earth, with the main command center seen below the stage. The sides of the Helicarrier are straight for about 2/3 of a platform's distance, before tapering down into sloped walls, allowing characters who like walls the best of both worlds.
The training grounds of the X-MEN, Charles Xavier build this ultra high-tech facility underneath his School for Gifted Youngsters in order to test and train the various powers of the X-MEN. Adaptable to most any scenario, the Danger Room will make or break those who wish to join the world's most elite Mutant super group.
ALPHA MODE:
The ever changing Danger Room has a few phases to consider when doing training sessions. A main platform about the size of 1.5 Battlefield platforms, as well as a main floor the size of Smashville are a constant, as well as the bottomless pit encircling the main floor. However the rules will often change mid match.
Notified by the observation room creating a flashing red light as well as a warning noise, the Danger Room will follow a set pattern not unlike Pokemon Stadium, even telegraphing the next danger with a holographic image in the background. The pattern of change is about 40 seconds of "normal" Danger Room, followed by 20 seconds of "Hazardous" Danger Room. Hazards are chosen at random, but will never be repeated twice in a row.
Forks: Creating a "floor is lava" scenario, the main platform in the center will have a device rise up from the pillar supporting it and expand with three rotating metal arms. Rotating at a rate of about 1 swing per 2 seconds, this is slow enough to actually land on the main floor then jump out of the way, or dodge/shield, but impact with the arms will cause the character to be violently launched upwards for 15% damage, able to KO at higher percents. The drop-through platform is prime real estate here, being safe from the forks and most likely hotly contested.
Laser Turrets: Two pairs of turrets will emerge from either end of the stage in the background. Characters standing on the outer edges of the stage will be locked on with green targets, as the laser turrets charge up a beam that deals 10% and paralyzes them briefly. Just before firing, the lasers will "lock on" to the specific location, allowing you to dodge if you are agile enough.
Holograms: The environment will change to a few different scenarios with their own hazards as well, using the Danger Room's holographic tech to change the appearance of the room yet retaining the same floor size and floating platform. These include:
A Skyscraper. The fight takes place on a rooftop where SWAT helicopters make occasional fly-byes, littering the floor with bullets for 12% damage and hit stun to anyone who does not take cover from the moving "sparks" of bullets along the floor.
The Savage Land. A tropical, prehistoric looking locale, the bottomless pits on the edges are replaced with Lava that behaves just like Norfair or Brinstar, roasting foes for 8% and popping them up on impact. Sometimes dinosaurs roam in the background!
Japan. The fight travels to a Japanese mountainside, outside of an ancient looking building. Occasionally, a Ninja will appear from a panel and try to attack with a sword strike! Making contact, the ninja's strike will deal 6% and medium knockback at the Sakurai angle. Ninjas can be dealt with by dealing 5% or more, deleting their hologram. There can be as many ninjas on screen as there are characters in the match, and on occasion the Silver Samurai will spawn! Silver Samuai's sword glows orange when in use, slicing in wide arcs for 18% damage that can KO easily at around 100%, and he takes 15% before disappearing.
These Five variations will put your reflexes and wit to the test each time you enter, be sure to be prepared!
OMEGA MODE:
The Danger Room's omega mode is essentially the "low" difficulty setting, turning off all hazards from the match. The stage will still occasionally transform to the Holographic versions, but this is only an aesthetic. Speaking of which, various X-MEN such as Shadowcat, Spyke and Magik, or X-MEN not currently in the match will make cameos inside the observation room in the background!
The name "Beast" may describe Dr. Hank McCoy's bestial exterior, but a man of rare wit lies behind the fur. For the times when his genius intellect isn't enough, Beast relies on his enhanced senses, superb agility, and unflagging courage.
ATTRIBUTES STATS: True to his nickname, Beast has stats befitting that of an animal! About the height of Ganondorf if standing straight up, yet much more thickly built, he boasts excellent physical attributes across the board. Beast can run, jump, drift through the air and fast fall and even crawl with the best of them, often on all fours when not in his idle pose! But don't let this fool you, despite his animistic appearance, Beast's true power comes from his intellect!
Weight:108 () Dash Speed:2.3 () Air Speed:1.3 (>) Fall Speed:1.65 () Gravity:1.15 () Jump: 45 Ground (~) , 40 Air ()
Rolls: Excellent Wall Jump:Yes, he can also wall cling!
POWER TYPE: CHARGE As Beast fights his enemies, he will begin to gain an understanding of the best strategy to take them down. Once his Power Meter is filled, he then gains a Charge of Inspiration!
|||||||||||||||||||||||||||||||||||
A charge power type has a relatively small Power Meter, filling up at a max of 35 Power, quickly building up as opposed to the other types as he only needs about 58% dealt to get a Charge. A somewhat traditional take on meters though, is that it then allows him to unlock superior combat abilities once filled for one-shot super abilities!
Power
Each character has a meter referred to as "Power". This fills as you play and is linked to various effects and special moves. In general, Power is gained via landing attacks as well as being hit, but the latter at a very reduced rate.
Power is gained equal to0.6x percent dealt with attacks that do not spend power, and 0.2x of damage taken / blocked. Characters often have other ways of gaining
CHARGEpower types are traditional power spenders in that once they have full meter, their specials and sometimes select other moves will be changed drastically upon use, and then spend all available meter.
With a total of 35 power points to build up, a CHARGE character needs to either:
Deal58~59% damage
Take/Shield175% damag
GUARD: Beast has a fairly standard block, holding both hands up in front of his face like a boxer as the bubble shield forms around himself. His acrobatic rolls and great movement are both great assets on the defense as well, so you usually won't see him bubbling up.
SPECIALS
Neutral B: Stun Grenade ---> Mutagen Reaching from behind his back, Beast exclaims "Aha!", or "This ought to do it!" as he pulls out a small, cylindrical metal object with a beeping red light on top. Thanks to his work with fellow X-man, Forge, Beast has access to an array of specialized gadgets and equipment for when he joins the team on missions.
About the size of a capsule item, this gadget behaves like one too as it is a throw-able item. By default, Beast will pull out a Stun Grenade to incapacitate foes, which upon impact with a surface will detonate for a mere 2-3% and create a Beast-Sized pulse of light and a soft bang. If a foe is struck, a noticeable "ears ringing" sound will be played as the foe goes into extended hit stun just as if they had been struck by Ryu's Focus Attack! This stun is on a set timer of about 40 frames, making it so that from a toss, Beast or his allies can easily follow up with most any attack. A foe struck in the air by the explosion, or if already stunned, will just take 2-3% based on if it was smash thrown or not, before being sent up and away lightly after an extensive hit-lag timer. If blocked, the explosion won't really phase the character due to the light damage but can still affect others in range.
While potent, the Stun Grenade is still a relatively fragile piece of equipment. Contact with a hit box will destroy it harmlessly, relying on a direct hit to detonate. If dropped on the ground it will only last for about 8 seconds before disappearing as well, allowing others to pick it up for their own use either against Beast or intentionally for his allies. There can only be 3 Stun Grenade items per Beast on screen at once.
If Beast has a full Charge available however, his tactics change as a larger, clear container housing a mysterious blue liquid, with a corresponding blue beeping light is produced instead! Explaining himself slightly, Beast will often say "This should put a stop to that nonsense..." or "Fascinating......" as he reveals the item, which is again a throw able item much like a capsule though about 1/4th bigger.
Upon impact with anything, the volatile solution of Beast's design will coat the same sized area as before but with a noticeable blue puddle / coating on any surface as well as a lingering blue smoke. While the coating is purely aesthetic, the gas from this chemical Mutagen is the real danger! An expert in genetics, this concoction once breathed in will firstly put the foe into a similar state of stun as with a Stun Grenade for 2-3% if on the ground, but in a coughing fit instead of the usual "hit stun" look. But more notably they gain a "fuzzy", blue, gaseous aura about them for the next 10 seconds as they are Mutated!
Well, specifically the mutation is sort of a misnomer, as it comes from the same formula Beast used to try and un-mutate himself... resulting in him becoming blue and fuzzy. He has had time to work out the kinks though as now the chemical cocktail is put to use by degrading the abilities of those it hits. Specifically, when mutated a foe will have the following values:
Damage Dealt: 0.8x Damage Taken: 1.2x Attack Speed: 0.8x Movement Speed: 0.8x Power Gain: 0.5x
On top of dealing 8% in DoT over the time period, this vastly de-powers the opposition! And don't worry about this only applying to mutants, Super Soldiers, Gods and even more Technologically inclined targets somehow are affected by the chemicals just the same. The Mutagen if applied will make all targets affected into sitting ducks as they are slowed, deal less damage, gain less meter and take more damage to the benefit of Beast and his team. Beast has nothing to worry about however, as although any sort of impact will cause the Mutagen container to explode, such as dropping it at his location, the gas will never affect him... that is unless a Beast from another dimension happened to throw their own version at him. If dropped, or detonated in general, the gas will linger for 1 whole second before fading away, able to be breathed in by foes who are not intangible via rolls or shielding at the time. This is a very potent tool if you have the meter for it, and should not be just tossed about lightly.
A great neutralizing tool in any situation, Beast will often have a Stun grenade in hand in order to defend himself from encroaching enemies, and buy himself time to think about the situation at hand. Or to simply dazzle the opposition in order to land a hit, something he may have picked up from Jubilee. He should not be too reliant on this however, as pulling and then throwing one of these grenades is not as fast as you'd think given how he takes the time to inspect it once pulled. Attention to detail can sometimes get you in trouble!
Down B: Forge Mine ---> Danger Room Turret Reaching behind his back again quickly, Beast crouches as he places a large, hexagonal device onto the ground with a flashing red light on top. Another invention between himself and Forge, this genetic land-mine will recognize Beast, but not others who cross it's path!
Lasting up to 16 seconds, Forge Mines can be placed either on the ground or in the air where they will fall down from his hand until latching onto a surface though they still have the same timer once dropped from his hand. Once triggered by contact with an entity with a different genetic make-up than Beast, an explosion of energy will erupt from the device that pops the foe up and away with mid-high knockback and 14% damage. While not especially powerful, the explosion is still about the same size as Beast himself and can score a KO off the top at around 180% if not sooner based on platforms and the like. Clever foes can of course dodge over the mine or shield over it to activate the explosion without harm to themselves, but of course this takes their focus off of Beast. Only one mine can be active at a time per Beast, and he must wait for the mine to either detonate or deactivate after 16 seconds to place another.
If Beast has a Charge available, he will instead place a similar looking device on the ground but with a blinking Blue panel instead. Upon impact with a floor / surface, the device will quickly expand as it digs two small pegs onto the floor on either side, opens the top panel and reveals a small, highly advanced looking Turret!
Straight from the Danger Room, this mobile turret is about the same size as Mario when fully expanded, and can be placed just about anywhere it can latch to. Lasting a decent 16 seconds just like with the Mines, but with it's timer starting once it is fully functional from the ground or air, the turret will begin firing at any opponents within a smart-bomb radius, able to pivot 180*. When firing, the turret will charge a small pulse at the tip of the gun barrel very briefly, before firing out what looks like a Falco Laser, and truth be told behaves very similarly. The beam will travel forever once fired, and on impact will deal 5% and a very tiny amount of knockback to enemies struck. Firing about once per second, Beast can easily follow up on stray blasts, though he himself doesn't need to worry about the lasers though, since the turret is of his own design and all.
Hits of 5% do not seem that bad, but over the turret's lifetime it can add up to a whopping 80%! Luckily the turning speed on the turret is not too fast, and foes can actually destroy the turret by dealing 25% or more to it. If destroyed, the turret will be uprooted and actually become two separate throwing items between the gun and the base, each dealing 8-10% based on if they are smash thrown or not, and can deal decent knockback at higher percents. Each can only be thrown once in practice though, as a second impact will cause the parts to crumple and fall apart. Beast can also destroy his own turret if he so chooses, but that is up to you whether you want to get temporary throwing items, or multiple laser shots to back you up.
If a Turret is out, you can still place Mines with the same rules and of course try to keep foes back with Stun Grenades. Camping is not really a strong suit of Beast however, as any ranged game he attempts is easily beaten by just encroaching hit-boxes or simple movement given the way the Turret works. Luckily, Beast has incredible movement that works with the projectiles rather than his projectiles allowing him to control space. You want to use his ranged tools to sort of punish foes for their spacing rather than "zone" traditionally, unless you have the Turret pieces to toss about but even then they are temporary.
Shield Special: Forge Barrier If Beast has a Charge available, he can also opt to use his Shield Special. Taking out a small, black box with various blue flashing nodes, Beast places it on the ground and presses a button. Upon activation a solid, holographic wall emerges!
About1.5 platforms high, and fairly wide into the Z axis to either end, this wall resembles a blue, holographic mesh. Projectiles will be stopped by the barrier in all cases, though it will damage the Barrier's HP which is equal to a shield. As it is damaged by attacks, it will change from Blue to Red to indicate it's stability before finally fizzing out and the small box it originates from breaks apart.
Anyone can pass through the barrier if they are moving slowly, this includes walking or drifting through the air, as it warps around them as they pass through harmlessly. If they travel at the barrier quickly by dashing, jumping directly at the wall, attacking or using a move that moves you, they will blocked by the wall of force. Rolls and Air Dodges can bypass the barrier as well, though it of course takes commitment to that option. Taking the aerial movement into account, Beast as well as others can actually Wall Cling and Wall Jump off of the Barrier! This expands Beast's area of coverage in a sense as he can use the wall to hang back for a moment before following through, or simply wall off an area that he can corner a foe against.
Barriers can be made at the ledge, but essentially any ledge option will bypass it to the other side, and Beast himself is somewhat limited trying to attack a foe coming up the other side of the Barrier as his attacks are also blocked. If a foe is cornered with Beast however, this becomes much scarier as he can use the Barrier again and again to gain advantage, though he must be wary of the same happening to him. Luckily, Beast has a very quick wall jump and his cling can ruin the momentum of his attackers. Barriers will last either until their 50% HP is depleted, or until 30 seconds pass.
Side B: Feral Poetry Deciding enough is enough, Beast snarls slightly as he lunges forward with both claws! Traveling about a platform's distance on the lunge, Feral poetry does nothing on whiff, simply allowing him to perform a quick command dash. In the air this can be done once per landing, but hitting a Wall will count as a landing as he transitions to his Wall Cling. Unfortunately, this can only be refreshed once, so you can Side B into a wall, cling, jump and side B again.
If any foe is in the way of Beast's lunge, they are struck for 5% and very high hit stun as Beast can then continue the combo in a variety of ways. Like poetry in motion, you can be a bit artistic in your inputs to perform a variety of branching follow ups:
2nd Hit:
B+Forward - A continued press of just the B Button, or Forward+B will follow through with another claw strike across the foe's body for 4% that pushes them forward slightly with set knockback of about half a platform.
3rd Hit:
Each option has 3 additional possible finishers, making for a total of 9 combos!
B+Forward - A simple, but effective 3rd slash of his claws with another step forward for 6% and medium-high knockback at the Sakurai angle. Total Damage from all three forward hits is 15%, and the last hit can either confirm into another melee combo / hit at low percent, or KO at around 160%+ given the knockback growth. Each of these forward options will also have Beast advance forward to meet the foe as they were pushed away, leading him to travel an additional platform's distance from the initial lunge.
B+Down -A slash down at the foe's legs with one claw for 5% as opposed the the wide, arcing slashes of the other Forward finishers, this sends the foe out at a low 35* angle with medium power. This sends the foe out with less power than the 3xForward option, but the angle can make a world of difference for pushing the foe towards the ledge or offstage.
B+Up -Reverse of the standard forward option, Beast performs an upwards slash of his claws across the foe's body as opposed to downwards. This quick slash deals only 4%, but pops the foe up and away at a 55* angle which can lead into aerials quite easily.
B+Down - Holding or pressing Down + B will cause Beast to run past the opponent to the other side, turning around after his rush deals a meager 3% and hit stun to the foe. In the air, this causes him to shift momentum in a sort of air dash that accomplishes the same thing.
3rd Hit:
Each option has 3 additional possible finishers, making for a total of 9 combos!
B+Down - With the enemy's back to him, Beast will unleash a flurry of strikes, ending with a final punch that sends them away for a set distance of about 1.5 platforms at the Sakurai angle. While this does not lead into anything from the final strike, all hits connecting will deal a solid 17%! Foes can of course DI out of this for lesser damage, but the DI mix-up of running past them can total up to 25% in one go.
B+Up -From behind, Beast performs a flip that launches the foe up and away with his feet for 7%. Sending the foe at a decent 60* angle, the knockback is such that it shouldn't really ever be a KO option outside like 200%+, but it will not lead to any combos either. Totaling at 15% damage, this is a decent option to regain stage control as you reverse positions with the foe you made contact with.
B+Forward -Reaching out, Beast will snag and throw the foe from behind with great force! Dealing 8%, this combo deals a total of 16% damage and can actually KO at around 135% or so at the ledge. Beyond that though, it has little utility aside from tossing the foe out and away from you.
B+Up - Tilting the stick upwards after the first strike will have Beast perform a hand-stand kick upwards that pops the foe up for set knockback and 5% damage. This has the least horizontal reach of any of his 2nd hits, though it is the most damaging.
3rd Hit:
Each option has 3 additional possible finishers, making for a total of 9 combos!
B+Up - Following up from his hand stand kick, Beast pushes off the ground and spins to deliver a tremendous, double-fisted uppercut! Dealing a solid 10%, this finisher adds up to 20% damage and can score KO's at around 145%~ish on most foes. This is potent, but has limited range that certain foes may be able to DI as he lunges straight up. This also leaves Beast in the air during end lag, able to land on lower platforms and dodge some attacks. When upwards options are done in mid-air, the end lag is such that he doesn't gain any real height from when he started the move.
B+Foward -Jumping up slightly to meet up with the foe he kicked, Beast performs a drop kick forward that will send them flying away for 9%. Similar to Mario or Luigi's Back Airs, this sends at a great angle and at very low percent may be able to be followed up on. At mid to higher percent, this converts to a very solid spacing tool to deal a decent 18% and push the foe away, though it won't really KO unless done decently off stage.
B+Down -From his hand stand, Beast takes a moment to leap upwards and flip above the foe, slamming his feet back down onto them! Spiking foes at a shallow diagonal down and away, this flip kick deals 8% and will send the foe towards the middle/end of a battlefield platform if performed from the center of said stage, for visual reference. If done at a ledge, the knockback could potentially KO at the right percent and poor DI, but the knockback of the spike is actually much less than it appears, usually ending just after the distance it'd take for the foe to smack the floor on most stages.
If you do not press anything after the first hit, Beast simply skids to a halt on all fours as the foe is then sent up and away at an angle from the first hit. This leads to nothing unless you have a Turret out that could take a shot or two at the foe, but the end lag is very bad for Beast compared to when the foe would exit hit stun.
Despite the 9 possible paths taken, you can infer the following from each branch: Forward combos generally allow for further combos and push the foe with you. Downward combos are especially damaging, but cannot be followed easily. Upwards combos can score KO's though are not good for much else. Choosing what path to take the opponent on is up to you as a player, but intelligent usage of this move can easily win the day with their various properties out of a lunge.
If Beast has a Charge available, the Feral Poetry will focus a tad more on the "feral" aspect. With a more animalistic growl, Beast will leap slightly further at 1.5 platforms, leaving a more distinctive blue trail behind him but otherwise behaving just like his normal Side B. His combos will also take on similar trails, with Forward being Blue, Upwards being Green, and Downwards being Red. Landing a finisher from your combos will then have a similarly colored "burst" around beast as they deal 1.1x the damage, and cause Beast to enter a Feral Rage!
This Feral Rage lasts for 10 seconds, and covers Beast's body and eyes in the color corresponding to whichever combo type he successfully landed. Landing a Forwards combo will cause Beast to gain a Blue aura, increasing his Run Speed by 1.15x, and his Damage / Jumping stats by 1.05x. A Downwards combo gains a Red Aura, boosting Damage by 1.15x, and his Run/Jumps by 1.05x, and Upwards grants a Green Aura that boosts Jumps by 1.15x and Damage/Run by 1.05x! In any case, his Feral Rage will boost all these stats, but the combo you aim for will ultimately decide which aspect is focused on. It can be a toss up depending on the match up as while you may want a certain boost, the combos available may not be the best suited for the character you are targeting. If you do not happen to hit the finisher of a particular combo, all stats are boosted by 1.05x instead.
While impressive, the stat gains do come with a downside too. In his Feral state, Beast will not be able to use any of his Tech Based Attacks! This includes Down and Neutral B, as well as his Down Smash, which becomes a new move all together. Luckily, the Feral Rage can be cancelled via Side Taunt at any time. When in a pinch, it can be a good option to "Unleash the Beast" as it were to forgo your technological and scientific advances in favor of some good old fashioned melee power!
Up B: Acrobatic Aristocrat With hardly any start up, Beast impressively leaps up, spinning while tucking in his limbs in an acrobatic display of athleticism! Reaching far enough to poke at the bottom of tall platforms, this can be angled either straight up or 45* forwards where he can again automatically wall cling like with Side B. If he does so, he regains one use of the Up B just like with Side B. Together this makes for a decent recovery on nearly any stage that isn't paper-thin, and grants him great maneuverability combined with his Barrier. At the apex of this leap, Beast will spin in place momentarily before entering special fall, adding a very small "hover" of sorts to the move before falling which can allow him to trick enemies when going for the ledge.
At any time as Beast is rising, before the "stall" at the end, his entire body will act as a grab hit box. Foes he comes into contact with will be snagged and held in place as Beast decides on his next move, having about the same window of time as his standard "stall" before picking an option by default, leaving Beast able to act freely once more, and thus Up B again and such. Inputting a Direction once you have the foe grabbed will allow Beast to instantly perform an aerial on the grabbed victim, bouncing off of them in the process! A Tap of B or A will input Nair, as will simply doing no input for a moment, and each direction coincides with the appropriate Aerial.
While each aerial (described below) will go into a bit more detail on the momentum altering aspects of this per move, there is one thing to note about Up B in regards to combos. Landing an Up B will put the foe you grabbed into a special grab timer vs you that lasts for exactly one second, meaning you cannot usually Up B the same foe twice in a row. If you Up B, launch the foe then strike with another move, this timer will be reset however, allowing you to be able to do amazing feats of acrobatics if you are creative!
If Beast has a Charge available, the lunge of Up B will be boosted slightly to be able to land cleanly on tall platforms, and the aerial he inputs for Up B will be boosted as well to deal 1.5x the damage with a special animation to boot, as well as no re-grab timer! This increase in distance and power on grabbed foes can be a potent combination, especially with the removal of the re grab timer, allowing you to Up B -> Charged Up B or vice versa for powerful strings of hits.
AERIALS Neutral Air: Wild Spin An almost identical animation to his Up B, Beast tucks in and performs a quick rotation that turns his whole body into a hit box briefly. An incredibly fast aerial, this normally strikes foes out at the Sakurai angle somewhat weakly for 6%, auto cancels on landing, and in general is amazing in all departments except for KO's and safety, being out prioritized very easily by basically anything that has OK range or lingers.
His basic option out of Up B, N air will take the foe for a ride as they spin around 360* with Beast before being sent out at the dreaded, 0* Semi-Spike angle right in front of Beast! This still deals 6% in the air, but contact with anything such as foes, objects or surfaces will deal an additional 4% per hit (the impact also damaging opponents the same way and smacking them away lightly) and causing the two to bounce and perform another spin before release. Done close to the ground, or near a barrier / other opponents this can net multiple hits and rack up a decent amount of damage especially with Feral Rage or a Mutation in effect! Though at base it can leave something to be desired.
Out of a Charged Up B, both Beast and the Opponent will freeze mid air for a moment longer as Beast snarls and sort of "charges" the aerial momentarily, complete with the smash-charge visual effects. Now dealing 9% at base, and 6% per impact, this Wild Ride can be incredibly detrimental if done in the perfect environment.
Forward Air: Lunging Kick Beast quickly extends a leg out fully, bashing foes for 8% and sending them out at a 40* angle with med-high power. A basic aerial, the kick can actually KO offstage reliably past 140% or so and lingers a decent 6 frames before becoming inactive, able to slightly Wall-Of-Pain foes combined with how he can keep bouncing off of walls to repeatedly strike. Compared to N air, F air has much more reach though is overall much slower to end, with the angle not being as combo friendly past low percents.
When done from Up B, Beast will fall forwards for a brief moment before kicking off of the foe, sending himself backwards. This version will end up with Beast slightly behind where he was when Up B was landed, but offer a tiny bit more knockback to F air, able to now KO at 135%. Not much, but it all adds up especially when you lunge out with a 45* angled Up B!
A Charged Up B will dive with the foe a bit longer as the move is charged up, the resulting kick sending the foe reeling for 12% damage. The knockback of F air is increased yet again, combined with the damage boost this can easily now KO at around 115-120% off a ledge! Combined with the extended dive distance and resulting push backwards that leaves Beast a good distance behind where he was when Up B landed, this is extremely safe to toss out off stage assuming you can land it. The backwards leap performed can allow Beast to Wall Cling to safety in both versions, though is obviously more pronounced off a charged Up B, often allowing Beast to go deep for KO's. If Beast lands during the dive, he simply performs the kick from the ground and actually will not move backwards, which can be beneficial at lower percents as he can follow up easier.
Back Air: Bestial Flurry Spinning around quickly, Beast lashes out with a close ranged kick for 5%, followed by a claw swipe as he continues the spin for another 5%, and then a final kick for 6% that sends the opponent outwards at the Sakurai angle away for mid-high knockback as he finishes the rotations. A very punishing aerial, this is technically his slowest due to poor ending and landing lag, though it also boasts the longest duration for intercepting foes air to air. You can generally string this together a couple times in a row at lower percents, or follow another aerial (N air) into this for good damage.
From Up B, B air will grab and swing the foe with each limb during the 3 part attack as Beast moves horizontally through the air with them! This travels a decent distance of about a platform backwards before the foe is released, able to smack into other opponents similarly to N air though they simply take the same hit as he performs to the grabbed victim. Upon release, Beast stays the direction he was facing and actually has greatly reduced end lag compared to normal, though it is still a little to be desired compared to other aerials. If he touches ground during this, he will simply continue the flurry normally and can even go off ledges.
A Charged Up B will increase the total damage to a scary 24%, which in turn increases the knockback of the final hit to go from "can't really do much off it" to "can KO offstage at around 140%". While F air is stronger outright, the distance traveled and damage dealt, as well as direction you caught the foe can obviously be big factors in B air's favor. Though unlikely, if you manage to B air somebody into or against a solid surface (IE a wall or Barrier), the foe will take an extra 2% per impact, and eventually be stage-spiked off the surface with a total of 30% taken!
Up Air: Beast Boot Flipping upside-down, Beast tucks in then performs a stomp upwards with both feet that grants some decent range and power. Dealing 10%, this strike will launch foes straight up with mid-high power similarly to his F air, though with more lag on both ends. This can be a good juggle given it lingers slightly like F air, and can even KO floaty characters around 150%+.
From Up B, the kick also takes on a similar property from F air as Beast is propelled downwards as he sends his victim upwards. Essentially initiating a fast fall, the knockback is increased very slightly to now KO at about 140-145%, with of course greater effect on faster fallers given they may now be in KO range. From this fall, Beast will also auto-cancel if he is in range of the ground allowing for near instant action, useful if he lands mid-kick as well!
A Charged Up B of course cranks up the damage and knockback to deal 15% as well as start KO's around 125-130%. More importantly though is the push downwards Beast gets from this kick, where if he touched ground during the momentary charging phase, or is within his own height from the ground as he fast falls off the push he will perform a hand stand and push off the ground to perform a free full hop! This is very useful for comboing into another Up B or just aerial in general as the end lag is converted directly into a means of chasing the foe vertically. Of course this won't be as reliable at higher percents, but with platforms it can allow many different follow ups at low to mid percent that can lead to KO's or at least stylish combos.
Down Air: Hand Stand Looking down, Beast quickly palms his hand down towards his opponent's head, using them as a launch pad! Given his long arms, this actually has good reach though is very short in duration similar to his N air. Foes struck will take only 6%, and be very weakly meteor-ed as Beast gets a vertical momentum boost that he can DI straight up, left or right. Equivalent to a short hop, Beast flips after a successful hit which can allow him to maneuver pretty much however he pleases as the foe is forces to quickly tech or be lightly bounced on the ground. If he does not hit the hand stand however, Beast still performs the flip for end lag which can be punished.
From an Up B, you can of course guess that Beast gets an even better vertical momentum boost as he pushes the foe further down. Using both hands this time, Beast gains more height and air speed as the foe is actually foot-stooled for 6%, traveling downwards for more time than the tiny meteor he usually performs and having a worse tech window upon landing. This is usually the best bet when just trying to recover with Up B, even if not the most rewarding from an offensive stand point.
A Charged Up B follows suit as the damage is boosted to 9% and goes back to being a proper meteor. This launches Beast even further up, equal to a free double jump and can actually KO foes at decent percentages. Fairly basic, this can be very potent both on and off stage as landing with this D air throw will bounce you and the foe off the ground, able to follow up with another aerial or Up B aerial, or simply send them flying down towards the blast zone.
SMASHES Side Smash: Feral Charge Taking a step back as he charges, upon release Beast will lash out with both claws in an exaggerated, overhead strike! Dealing 11-15%, at his fingertips, this can deal respectable knockback away at the Sakurai angle and can KO around 125% at the ledge. If he hits with the rest of his arms, they deal only 8-11%, and hardly any knockback acting as a sour spot.
With both hands on the ground after this initial slash, Beast can press A yet again to flip and catapult himself forward feet-first in a follow-up attack! Having a similar attacking arc, but now covering his whole bottom half as he flips over to kick out at foes, he still has a sweet/sour spot dynamic, but not as pronounced. His feet will deal 16-22% based on charge, with knockback at the Sakurai angle capable of KO'ing at around 100% cleanly, while the rest of his legs only deal 11-15% with similar KO power to the sweet spotted 1st hit. Despite being a a sour spot, the first part of F smash can be a natural combo into the second if not tipped, arguably netting even more reward!
Having a great deal of range to work with as he performs two arcing, advancing swipes, F smash is quite dynamic in that there are three risk/reward paths for beast to consider. The first is trying to just sweet-spot the first hit for a quicker, cleaner KO. This option is obviously safe as it has the least ending lag, but still is not as rewarding compared to the others. The second would be to try and combo the sour hit into the secondary hit, which usually is also the Sour spot though the combined strikes add up to more than either sweet-spots. Third, you can try to cover a lot of ground by aiming for the 2nd hit's sweet spot for a long range punish, which is obviously risky but very rewarding thanks to the power, though of course this can be very telegraphed from a distance.
Up Smash: Savage Somersault Crouching low as he charges, on release Beast performs a long-range flip backwards, striking foes with his feet in a large arc! Similarly to F smash, his feet and legs act as separate sour/sweet spots as he performs the flip, which is lengthy enough to cover a good portion of a platform from below as he kicks out his feet and flips over on his hands. His feet on impact of the first half of the flip will deal a decent 13-18% and knockback at a steep 80* angle, able to KO at around 130-140%. His legs however deal 9-13% damage and far less knockback, only popping foes up at the same angle and rarely KO'ing until around 180%. As the flip continues past the halfway mark, the entirety of his legs and feet share the same 9-13% hit, but send at a 70* angle behind Beast as a sort of "flub hit".
Just as with F smash though, Beast can press A at around the halfway point in order to attack again! Performing a backwards flip from a handstand, Beast travels backwards about a platform's distance total as his feet and legs take on the same properties as before, only hitting this time for 12-17% / 8-11%. The sweet spot dealing significantly less knockback as it KO's now at around 150-160%, but with similar range to make the overall coverage quite big.
As with F Smash, there are multiple ways to us this attack, though it is a bit different this time around. Performing a single U smash will keep beast relatively in the same spot, but actually has more end lag as Beast must complete and land from the stronger initial flip which can be punishable on whiff. Beast can choose to back off from foes with the hand stand follow up attack, which does have less end lag but at the same time has the commitment of the first and second flips as he backs away from the opposition which could be the same as going into end lag in some scenarios! On impact, a sour / flubbed First hit can potentially combo into the second flip, though this is not as guaranteed as with F smash due to how the hits work, but overall the range of both flips can cover a large area for foes coming down or past Beast.
Down Smash: Danger Trap ---> Feral Claw Slash Bringing a device out from behind his back like with his Down Special, Beast will fiddle with it as he charges the move, humming to himself as he does. The device resembles a black box with a glowing, horizontal blue stripe around it as he plays with it, before he finally crouches and places it into the floor below himself. Once implanted, Beast is free to move about, though the start up lag to this is rather severe at 30 frames even without charging.
Once planted, the device only shows the stripe and top half peeking out as it expands to be about the same size as a crate item is wide. With charge, the flat area will actually rise from the ground via a small pillar the size of the original box Beast created the trap from, up to about his own height off the ground! This varied height and duration of 16 seconds makes Down Smash a potent trap for those unfortunate enough to come in contact with the glowing sides. Touching this "Danger zone" will deal 10-14% electrical damage, stunning the foe very briefly before launching them away at a 50* angle up and away with set knockback depending on the charge, but about equal to 1-1.75 platforms up and away. This will not kill, but provide a constant threat to foes in range, though it is limited by both time and the amount of juice it has to shock trespassers with. A Danger Trap can only strike 6 times before it runs out of power and deactivates back into the ground and disappears, making the timer much shorter in a multi-man match, or versus a clumsy adversary.
Foes can get around this in two ways. The first, like with the turret is to try and destroy the Danger Trap. Only having about 20% HP, smacking the pillar supporting the trap or just smacking the top in general (when safe) can eventually wreck it and cause the device to become a smoking plate of metal. Like with Turret parts, this then becomes a throwing item for 8-10% damage that crumples on impact! Beast can also destroy this trap himself, though he probably does not mind it being around since the blue sensors on the sides are again tuned to his DNA and won't shock him. The second, perhaps less obvious means of getting around the trap is to stand on it! The Trap doubles as a platform as long as you do not make contact with the edges, allowing Beast and friends to gain a new vantage point if they're agile enough. Foes can do this too, but again they run the risk of touching the sides if they are not precise. This platform is solid for all intents and purposes of Beast's Mines and Turrets as well, so you can place either to gain added protection and area coverage on the Danger Trap, but just keep in mind that exploding Mines will damage the trap too. Placing a Barrier on a Danger Trap can also be useful for added height, as the pillar below can still block projectiles as long as the HP holds, and trying to walk past can prove difficult for most characters. If destroyed, anything that was not triggered or destroyed atop the Trap will simply fall to the ground and reestablish itself.
Like with his other placement abilities, Danger Traps can only be placed one at a time with another input doing nothing until the current Trap is dealt with or runs out of time. This cannot be used if he has Feral Rage active.
If Beast is in his Feral Rage, D smash is replaced with a double claw slash to either side! Raking both claws out and downwards towards foes with far less reach than his F smash, Beast roars as he tears into foes for 16-22% on his hands and high knockback at a low 40* angle outwards, before turning his hips to repeat the maneuver behind himself for 18-25% damage at the same angle and power! These swipes can KO very early, the back hit especially at around 90% or lower, but are very precise moves that hit really only to either side of Beast as he quickly attacks back and forth. In his rage, the slight damage boost makes this formidable compared to his other smash attacks as he "lets loose", but of course lacks the certain finesse of his acrobatic flips.
STANDARDS Jab: Improvisation Taking his long limbs into account, Beast will lash out seemingly at random with a punch or kick with each press of the A button for his Jab. Each strike here will deal 3% and very light knockback away from himself, able to combo into multiple hits up close, or keep foes within arm's reach. Every press is truly random too, though the effects and range of each hit are all essentially the same, aside from maybe an inch of height difference between punches, swipes and kicks. Similar to his N air, this is his fastest yet "weakest" option on the ground, able to combo well and be tossed out when in range, but basically anything trying to contest with it will win.
Side Tilt: Spinning Beast Bringing his arm and shoulder back much like we see in his image on top of the page here, Beast steps forward as his arms spin around twice in an angled lariat! Moving himself decently forward as he spins twice, both arms will become hit boxes for 5% per swing, with the first rotation merely dealing hit stun and the second actually knocking foes away with medium power at the Sakurai angle.
This is fairly long ranged due to the size of Beast's arms, as well as the wide coverage with the backwards hit that can send foes behind him at the same 45* angle. Traveling about 2/3 of a platform forwards, this is a decent punish or pressure tool alongside Jab, though it does not necessarily have the same type of safety due to longer ending lag. Though somewhat weak, the last hit forward of F tilt can still KO at around 160* or so.
Up Tilt: Hand Stand Spin Holding himself up off the ground from a hand stand, Beast crosses his legs, before kicking both legs out and spinning on his hands! Dealing multiple hits in a large area above the ground, aerial foes can be swept up for a total of 15% before a final hit sends up and away at a 70* angle to either end with medium-high power.
Similar in use to F tilt, this instead hits up high and stays in place to catch foes who may be say, on your Danger Trap or simply on a platform/in the air. The duration makes for a decent juggle tool, as does the wide area, but short or crouching characters can avoid this entirely and swat at Beast. He performs a flip back to neutral stance for end lag, which can also be punished. This can net KO's at around 170-180*, but honestly you are better off with an Aerial, Smash or Side B.
Down Tilt: Crouching Beast From a crouch, Beast holds himself on his hands as he swings his legs around once for a 360* leg sweep! Hitting in front of himself first, Beast will strike for 7% damage and send foes hit at a shallow 35* angle outwards with medium power. This initial hit is rather fast, actually coming out the fastest of all his tilts and while it cannot directly KO, the nasty angle can be useful for gimping recovering opponents.
The hit as he swings his legs behind himself will strike for 8% and actually sweep a character up and over Beast from behind at a 75* angle! This scoop will leave them reeling just in front of you in the air, where you can combo into an aerial, U smash or U tilt depending on the percents. The knockback growth is very small on this reverse hit, making it a tricky yet rewarding strike to land. Overall, this has little end lag compared to other tilts, though it shares the same weakness of having a somewhat long duration that can be punishable.
Dash Attack: Newton's Law Running on all fours, pressing A will have Beast dig his hands into the floor and with a grunt, sweep his legs under himself from behind to perform a powerful Drop Kick! An object in motion will stay in motion after all, and with Beast's fantastic movement this cannot be more true. The lunge will go a variable distance of about 2/3 to 1.3 platforms based on if he was simply dashing normally, or had is speed boosted by Feral Rage, with the latter of course being if he specifically boosted his speed stat. On impact, the kick behaves much like his smashes where he has a sweet spot on the feet for 13% as they initially kick outwards, which then gives way to the entire lower half of his body becoming a sour spot for 9%.
The sweet spot can net KO's around 130-140% as it launches victims at the Sakurai angle, whereas the sour spot doesn't really KO any time soon, and given the end lag where he lands back to neutral, is not too good for comboing either. Past the initial kick outwards, while traveling his lower half will transition into being entirely the sour spot for 9% damage, knocking foes out of the way as he barrels through. If done near a ledge, Beast will continue to fly out and can actually hold the kick for nearly double the normal duration as a sort of pseudo sex-kick! Seeing as there is no ground to come in contact with to stop his forwards momentum, Beast will stop the input after the new duration is reached, or if you let go of A / Jump. Combined with F air, this can keep a foe at bay quite handily.
THROWS Grab: Bestial Grasp Reaching out with both paws, Beast has impressive grab reach. In particular, his Dash Grab will lunge with a short hop that covers a great area, though it has rather punishing end lag if you miss. Luckily a Stun Grenade can open the door for many of his precise or risky hits if available. Beast's pummel has him squeeze the victim with his clawed hands tightly, dealing hits of 3% per press with an average pace.
If he so chooses, Beast can also use his grab on Turrets and Danger Traps in a laggy animation as he roots them out of the ground with a snarl! Once uprooted, the traps will become dangerous, slow throwing items that deal 15% damage and high knockback at the Sakurai angle. On impact with anything, the devices will break into their normal "broken" states and can be thrown in pieces yet again. This is a risky option as it takes about 30 frames to yank the devices out of the ground, but rewarding if you are able to find the time to go this route. Certain characters with tremendous Strength can also try and grab the devices from the ground...
Forward: Tumble Forward Beast rolls forwards with his victim, dealing 3 hits of 1% before finally booting them out and away at a 40* angle for 4% and set knockback of about 2/3 of a platform away. Traveling a decent distance as he rolls, the opponent will end up approximately 2 platforms from where they were in the lengthy animation with 7% taken for their trouble.
An excellent spacing option on it's own, the length animation is made all the better when you consider that Beast will be rolling the foe past any obstacles he has created! You can roll them into Mines, keep them in place for a shot or two from your Turret, into Danger Traps or even against your Barrier to keep them still, all leading to great damage potential depending on the situation.
Back: Flip Backward Leaping backwards about a short hop's height, and half a platform back, Beast will flip upside down before booting the foe out and away at a 50* angle for 7% damage. The knockback on this throw actually has growth unlike F throw, though it is somewhat low meaning it will not really KO any time soon, though past mid percent it will start tossing foes off stage decently.
B throw can be useful for aerial follow ups as the end lag actually leaves Beast airborne briefly, allowing you to Double Jump or Up B towards foes. Its also decent for just tossing foes offstage as well when you have your back to it, as per usual.
Up: Animal Superiority Leaping up with the foe, raising them overhead with a grunt, Beast slams them back down into the ground hard enough to shake the screen on their way back down! This impact will deal 12% to the opponent before launching them up and away at a 75* angle, strong enough to actually KO around 150-160% at ground level.
Beast can leap onto low platforms while performing this throw, in which case the KO percents change as well to match, usually going down by 10-15% on average. At low to mid percents, this can be followed up with an Up B or aerial as well for further damage, though the window is tighter than that of B throw. On their way down, the foe also counts as a meteor hit box for 8% damage on other foes.
Down: Feral Fury Tossing the foe down to the ground, beast then slams them with two punches for 2% each, before a final double-handed slam for 6% releases them from the throw at a 45* angle and medium knockback. Somewhat set like with F throw, D throw deals decent damage in place and sends the foe just far enough that you can catch bad DI with an Aerial, Up B or Side B, but otherwise requires a read or very quick reaction to follow through. Sort of your basic combo throw, you can often get another hit in at lower percents and still chase the foe down at mid-high, though it is less guaranteed.
SUMMARY: Brains, Brawn, and Class Beast is an interesting fighter to say the least. He certainly has the physical attributes of a dangerous brawler, but his traps, gadgets, and grenades grant him a dangerous layer of intellect that really brings it home.
In essence, Beast's game play will revolve around making the field into a Mobile Danger Room that he is better at navigating than his foes are. Between Mines, Stun Grenades and Danger Traps, Beast can offer a lot of passive stage control or control the reactions of foes else they get punished. ONce the foe slips up, he can easily close the distance and go to town with his various multi-hit tilts, quick aerials, or dangerous Up and Side B combos to really rack up the damage and finish stocks. Stun Grenades in particular are at least versatile and just dangerous enough to control a foe's actions when one is pulled, baiting a foe to open themselves up by swiping at the grenade, or being forced to shield else they get stunned can be a very potent mind game.
Building up Charges also makes for a "pick your poison" scenario for Beast, as unlike other characters he will automatically use a charge when able via his specials. Luckily, he gains charges very quickly needing only around 60% dealt to use one of his super moves, which each carry pros and cons. His Mutagen can change the pace of a game in one toss as it severely debuffs a foe , or even multiple foes for 10 seconds. You have to aim carefully though as if avoided, it can be a waste of power. A Turret of course offers 16 seconds of covering fire and actually gives Beast a ranged presence, something he sorely lacks but at the same time is somewhat random in how it chooses to follow opponents. It is better than nothing, at the least. A Barrier can add a large amount of defensive and offensive utility mid-match as you close off sections to fast movement or attacks, and can rebound off of it with your wall clinging abilities. Feral Poetry of course can deal great damage and send you into a Feral Rage, and Acrobatic Aristocrat can similarly lead to great damage and KO's from a distance, as well as both offering boosts to recovery with the latter being more-so when boosted.
Overall, Beast plays a patient game to make openings where he can abuse his foe's mistakes with clever follow ups and set ups. Use your Brain in order to use your Brawn, and you can really knock some sense into the opposition!
EXTRAS: FINAL SMASH : Mobile Danger Room The screen zooms in on Beast as he pulls out what looks like a radio controlled remote control, as he presses some buttons. A zip-line will then come from the top of the screen carrying a small bar, which Beast then hangs upside down from, puts on his reading glasses, and enjoys a nice, relaxing read for the next 10 seconds. As he ascends and fetches his book, Beast will often remark "I think it's time you had a proper lesson!"
As he hangs above the floor in safety, completely invulnerable to damage, various devices rain from the sky or spawn from the floor to create an experimental, Mobile Danger Room! Mines, Turrets, Buzz Saws that behave like short lived Hot Head items, Danger Traps, and more will pop out and make the stage a living nightmare for any foe who is not prepared. The damage is comparable to Olimar's "End of Day" where foes on the floor will often find themselves taking upwards of 60% from all the hits. Once the duration is complete, Beast will flip down to the floor stating "That should teach you some manners!"
Up Taunt : Beastly Roar Beast lets out a roar fitting a jungle animal that shakes the screen! If the taunt is Held, Beast will cough into his fist then say "Excuse me!". Side Taunt : Well-Read Beast calms down and takes out a book with one hand as he sits back, crossing a foot over his knee and displaying incredible balance as the book is placed into his foot to hold as his free hands put on some reading glasses.
The book will vary between "Hamlet", "A midsummer night's Dream" or "Romeo and Juliet", all by William Shakespeare. If Taunt is Held, Beast will even read a quote aloud that relates to the match:
Hamlet: “Though this be madness, yet there is method in't.”
“Now cracks a noble heart. Good-night, sweet prince"
“The (lady/man, depending on closest character) doth protest too much, methinks.”
Midsummer: “Though (she/he) be but little, (she/he) is fierce!”
“Lord, what fools these mortals be!”
“And yet,to say the truth, reason and love keep little company together nowadays.”
Romeo and Juliet: “Good night, good night! parting is such sweet sorrow, That I shall say good night till it be morrow.” “Do you bite your thumb at us, (madame/sir)?” “These violent delights have violent ends.”
Of course these are all laggy and easily interrupted, but at least when not held he quickly either remarks "Hrmm..." or chuckles to himself, before putting the book and his glasses away.
If he was interrupted as he was reading, being struck before he makes a quote, Beast can hold onto the book as it becomes a 1 use throwing item! The book only deals 3% and very light knockback, but that should show those ruffians to respect literature!
Down Taunt : Time for a lesson Beast stretches his arms and takes on the menacing pose seen at the top of this post and states "Prepare to be thrashed!" in his trademark, civilized manner.
Tony Stark : Opening his mask, Tony quotes back some Shakespeare to Beast: "Something is rotten in the state of Denmark... oh, it's just the smell of Wet Dog!"
Entrance : Blackbird The X-men's personal jet, The Blackbird, flies over the stage with Beast piloting it! After hovering for a moment, the hatch opens up as Beast drops out and the jet flies off on auto-pilot.
If he is in an indoor stage, he will instead be found hanging upside down from a zip line, enjoying a book before flipping over and landing just like he does from the Blackbird.
Cameo : Danger Room Not only can he not fly the Blackbird in the Danger Room, but he will often be the one manning the controls from the observation room if he is not currently in the match!
It's great to see you make another set with Wario, Brostulip, was not sure how long you'd take to get going this contest and I hope you do just as many as last time. I think this one is inherently a fairly difficult character and while it has issues I can see what you were going for with this moveset trying to capture the personality of Wario pre-WarioWare, Smash Bros and pre-Masters of Disguise too. It's hard to make a set for Wario that lacks any of these aspects, glorifies Land, but does not use the Land "hats", so settling on Wario World as the main inspiration at least seems correct. The general idea of using coins to increase Wario's weight and give him incentive to do extra stuff during attacks is also a fun concept, although I feel like even from the start letting the foe get the coins might have been a mistake. It does work into how coins work in Smash and it's kind of fun to incorporate the coins matches for some consistency, but it ends up feeling pretty weird that every character is basically made into a hoarder by Wario's playstyle. This seems almost intentional for the idea that Wario is extremely paranoid or greedy about his coins being stolen but honestly the first thing you might want to do to fix this set would be to remove the whole foes getting coins part and just make it that the coins can be destroyed or at least gotten rid of by the foe once they have them.
The other major problem with the set is it just has a lot of weirdly specific and overpowered effects. The most obvious examples that should just be removed are the neutral, side special and back aerial. The "persisting" effect of the inhale should just be removed entirely where it keeps going after being cancelled and it's pretty odd he can suck up random objects to count as coins. The side special lets him go into the background to dodge around solid objects, as this could easily break the game when he can go around certain parts of the stage that are meant to be broken off. A quick example of this is the Norfair stage where, ignoring the fact this stage's hazard is irrelevant when you shield, if he can just side special and dodge inside the little capsule safe space then the entire hazard is rendered pointless to him. Also stopping in the middle of the side special in something solid would seem to just break the game. The back aerial is extremely tacky, which should probably not be news to you as I get the sense this was pretty intentional and it is funny if somewhat over the top in its offensiveness (not as fitting here as on Conker sets where it felt appropriate). I also felt like some moves where he gets coins and for example keeps going up in his up smash or the general way he pitfalls his chest is a little awkward. I'd recommend just taking a look at all these effects and making sure they're at least consistently balanced.
Another problem is the way the chest is unlocked is way too drawn out and makes hitting around the chest to open it fairly superfluous. It doesn't feel very logical that you have to open the chest's lock and only then it will open. It would make far more sense if it instead could have the lock itself broken by attacks then it could be opened in almost no time, or let it then get hit open by basically any attack. The set assumes there'll be tons and tons of coins in play but the mechanics of opening the chest mean this is not actually going to happen, as it takes a full second to open the chest and while you have plenty of moves to attack it open, this assumes someone already unlocked it, overall just feeling a little cumbersome. Just to finish off I actually did like what you did with the throws and smashes for the most part, and while the specials were a little broken in areas I thought they made sense for the character. I did have to look up the PM Wario side special to really understand it fully but not going ot nitpick you for just referencing that. The aerials were a little lacklustre but not too offensive. Definitely needs a lot of work to be good though I can't fault you that much when you try and do a Wario set while cutting 90% of his tackier material.
Kizaru was another good set from you Bio. This is not the character I would expect you to do, considering that he is a straight up villain and his power is not even that wacky, but it's certainly a welcome addition to your strange and cartoonish style of characters. The set hasn't got the strongest playstyle when you start off on a projectile that's loosely used to try and pick open at the foe's defence and then there's a light move that lets you teleport around the stage, but is not all that relevant later in the set. The specials that are the most important are obviously the teleport and the mirror Kizaru. The teleport mostly is just used to cancel moves into and if anything in the set seems questionable for balance it is the tidbit that this halves any attack's start lag, and a lot of moves then let you cancel even more than that specifically, making it seem as though he'd just be spamming this all the time with no downside. I'd definitely make it so there is a downside, such as stacking the cut start lag and adding it to the end lag as the minimum effort change. It'd be nice if the set actually worked around this hypothetical version of the teleport, that would raise this set remotely high but requires a lot more writing.
The mirror Kizaru is definitely my favourite part of the set as I always liked this concept and the most recent sets that did it are very old now and fairly awful. This set does a couple of good things with it, by far the most fun the set has, when you have moves like the forward tilt that have the two Kizarus create an explosion when their swords clash. I wish the set was full of these kinds of interactions and much deeper ones than presented too, I would probably love this set, but as is it's mostly just okay. I do like that the balance mostly seems under control besides the one awkward part in the teleport, and there's a couple of cool things you do with lasers. Adding lasers together and the general theme of a fast kicker is certainly unique in MYM, and it's on the basic level one of your strongest put together sets. I did note for example when you asked about the up aerial, and seeing it in the set this is one of the more elegant but well put together moves that in the past you might have lazed out on. Not to say this move is especially memorable or anything, but it's well constructed. It's mostly just cool to see this character get a serviceable set that hasn't got a whole lot of flaws, and is pretty much what you'd expect, it could definitely rise a whole lot if you made some additions and balance fixes. Good work yet again Bionichute.
What a delight to come into the thread and see a new Kupa set with Petey Piranha. It's good to have you back, for however long it turns out to be Kupa, this set was truly enjoyable and not only for the up aerial reference. I definitely see the makings of a good set here and as you said, this set lacks any truly broken exploits but the balance isn't quite there yet. The set has too much stun basically, between the nippers or piranha plants (1.5x grab difficulty is a lot of stun), the goop that grabs you after 1 second (probably should just remove this) and his high amount of stun in moves like up smash that can stun for up to a full second. I think the problem here is also just that you're measuring in seconds for these effects, when a second is actually a long time in Smash 4, for example a Falcon Punch comes out faster than a second on frame 53 (60 frames is 1 second). Also just general things like the up tilt doing no damage is not really acceptable in concept, and even a weak yell could ostensibly do damage, even if you wanted to throw in some sharp leaves being spat out of his stomach. This move could be quite fun if the damage was effected by what he'd eaten from his own set as well. Another move that's kind of a problem is the mirrored forward/back aerial, it's better in this case to have a generic bair rather than mirror it to not make him too predictable in the air.
Other problematic moves would be the up aerial putting the foe into helpless and another grab difficulty to mash out of while in his mouth. It's a fun idea but I'd only feel it was that justified if the set did some other stuff I'll get to in a moment. Lastly the down throw is a bit too powerful as well as it makes the foe mash out at 1.5x their grab difficulty, compared to DK's forward throw that just continues the mashing from the grab, this is very powerful. If you were to do a Cargo style throw, you'd also want to go into more detail about the various options this can give with the up, down, back and forward throws this gives to DK, even if it's just a simplistic line describing the animation, whether it's a KO option, how it works after Petey moves around the stage. See all these elements could work well, but only if it was aware of the goop you've got earlier in the set. In fact my favourite part of the set is that the goop seems to "evolve" the nippers into piranha plants, and I wish the goop and other specials set up was used throughout the set. For example if Petey could splat the goop around with his forward smash wings or wind hitboxes, suplex foes into the goop. The vines in down special are sadly absent from the set too in the playstyle, simply existing when having a passively damaging wall seems to open up tons of options. You could even let Petey edit the path the vines take if you wanted to help it be creative. There's plenty of moves in the set to work off these elements, the goop eating, the minions, but it's fairly disjointed. Fortunately this is not too hard to make into a good set overall if you were interested after fixing up a few awkward moves and adding a back or forward aerial. Ultimately any drawbacks to the set weren't enough to stem my excitement reading the entirety of a new Kupa set in MYM19 and it's an awesome sight to behold.
The latest in the Joe Avengers/Marvel universe of sets, The Beast, and this one is quite a bit different from its predecessors given it has a "power" meter that forces you to use up all that you've built up on certain moves, forcing you to think out your next move. Pick your poison is a good term for it, and it definitely seems very in character for a thinker like Beast to have this sort of playstyle. I was happy with the specials and aerials, the aerials working well off the up special and barrier with techs, clings, combos, using up the charge in unique ways, it's almost like Beast is doing a complex string of moves if he manages to land a massive combo. It was neat as well that he can use mutagen on the foe to limit their options and open his own up in a zero sum game. Again very fitting that Beast is a high ceiling, low floor character for balance. I wasn't as enthusiastic about the throws, it seemed as though you might have been able to reinvent the throws from Ranger-M at least with the barrier to give them a little more depth.
So the mutagen was cool, the turret is balanced down now to a good strength, the down smash trap was pretty nicely done and the barrier is one of the more logical shield specials I have seen. It's certainly up there for your sets this contest especially given the character is mostly kicks and flips, not working too easily into a set, but not as hard as Cyclops. You really squeeze out all the character, going so far as to give him unique taunts based off Shakespeare which are pretty excellent by the standards of extras. Where I would say the set is a bit lacking besides the throws is that some of the melee isn't that exciting neither does it lend all that much variety to the playstyle, best examples being the forward smash and up smash. They both essentially follow the same structure of "do I press A to keep up the onslaught or stop?" which isn't that interesting, let alone when it's done twice. This hurts the set a bit when these are two of the core moves and he already has plenty of melee options in the aerials and tilts, maybe even remaking one of these and combining the forward and up smash could be a good idea? A flashier experimental forward or up smash would hardly be out of place here. In the end though, about as good as a set could be for The Beast! Keep up the good work, Joe.
Ladja Junior Agatio was a pretty neat read in my opinion. The character doesn't have a sea of potential with the power set, but what he can do was used probably to its fullest and the different uses for the magma and the fire were rather creative. The meteor is a pretty interesting projectile to build a playstyle around, and is a pretty solid move to start the set on. The use of a big projectile ball as the gravitator of the playstyle reminded me a lot of Smady's Ladja, hence the comment title, but obviously both are very different. The projectile has potential to be brought upon, although sadly the way the potential is used is the set's biggest downfall. We'll get on that later.
While Muno normally isn't the author to bring in very spectacular interactions between moves, Agatio has some very neat and sometimes plain awesome interactions with his meteor, although some I do admit seem rather shoehorned in, with the moves that pluck the meteor off the ground to have it roll on the stage not only seem a tad weird, but hard to visualize with the animation.
I also feel I should say that perhaps the fire cage was underutilized. Trapping the foe in place is not only pretty rad but very dangerous to the foe when against someone with giant powerful meteors, dragons and magma at his disposal, and Agatio could potentially have some more moves work well around or directly with the cage. I believe less than a hand's worth of attacks capitalize off of the cage, which is a shame since when the fighter can directly control fire and magma, he's just begging to do some kooky **** to the foe when their trapped in the stuff they have manipulation over.
The set's biggest complaint that Jamie and I have discussed in chat is that Agation's playstyle simply doesn't work with how the meteor is right now. After hitting the ground a meteor only sticks around for 3 seconds before the big bang, a very small time limit in the grand scheme of things for something like a trap, which means that combined with the attack's high damage potential you'll likely just reserve it for late game. The set, however, expects you and the foe to work around the meteor an awful lot. Not only can you only do the kooky interaction under 3 seconds, with most of those interactions coming from slow attacks, but you're also expected to grab foes with the grab via grabbing them while atop a meteor, something no foe in the right mind would do with the current meteor, since it not only explodes early but passively damages them! If you actually want the meteor to be used without just being a KO move, you should probably have it actually stay around for its properties to be exploited, with the damage per second stuff either being nerfed or removed entirely to still entice foes to consider the meteor a part of the battlefield.
Eyesick
Isaac is the better of the two when compared to Agatio. He's got a surplus neater playstyle that isn't as shallow as Agatio's, that's mostly just "watch out for meteor, also im a strong man". The interactions here are probably more important to the set and overall neater than Aggie's, and of course there's also the fact that, unlike Agatio, Isaac has no actual personality, so nothing is really lost when it comes to the Muno style of sets, which usually trade having a lot of characterization for a pretty hecking solid knowledge of the workings of Smash as a whole. The Muno style is also pretty neatly written and doesn't clutter with mumbo jumbo, so even if the choice and playstyle is rather generic, it's still a good read.
There isn't a lot to say about this set, and it's one of Muno's more solid entries throughout the contests in my opinion, my biggest complaint is probably that the lack of mumbo jumbo causes plenty of constructs to not even mention their size. Sure, the stalk of bamboo that comes out at a really weird angle that's in the Up Tilt has a size, but what about the DSmash, FSmash and the hecking DSpec??
The Down Tilt is also weirdly tacky by randomly having the plant come out of Isaac's... sleeve? When all of the other plants just come from the ground. Like nature intended.
The grab game brings a very interesting mechanic, but it's sadly very overlooked by bamboo shoot Up Tilts. Remote grabs are plenty fun, but when underutilized surely aren't. The big hand's Back Throw isn't even that special, which is really weird considering it has potential to be the most used and important throw since, you know, it throws the foe right towards Isaac. More could be done but you only talk about leading it into an aerial or something. I'm not mad, I'm just disappointed really.
haha butts
Despite the character in question being a stupid fart joke character, Bionichute managed to squeeze out very fun stuff from Silent But Deadly. I thought it was going downhill when it said the DSpec could have a really long radius, but not being a prick and actually reading the rest of the move led to a pretty neat gas dispersing move, and from there it went uphill! It goes like this until the Smashes or so, but it just stagnates, never actually losing traction or care into the latter moves. Old Bion sets usually lost a ton of traction after even the Specials, so its very nice to see this coming from the Chutey. In old Beon sets I'd just say the Specials were the best part, but here my favorite part of SBD is his melee game, which is mega fun, with interesting fast paced combo-like moves in an area where I just thought there'd be generic boring fast moves.
I feel like the Up Smash's wall wasn't too clearly explained, and I had troubles reading it, but for what its worth kicking off pieces of the cloud away sounds really fun, if physically impossible. The wall's 20 second timer is just excessive though, I know you're going for the approach of "lay this trap, then use it later", but something like Villager's Tree stays for only 10 seconds and its not like Villager can't leave his tree aside for the rest of the match.
The Down Aerial's bombs also randomly changing which creates a cloud just sucks man. Don't do this to me man.
are you still supposed to say mymcc in the post?? mycc,, whatever.
Power Type: Blaster Edited again for better clarity. The gist of the "Blaster" is that the power meter dictates the damage potential of certain moves, and using said moves drains it to act as it's own stale move queue.
Optic Blast Damage at base 5% -> 7%. Adjusted text to add more detailed descriptions. Full charged blast now pierces multiple targets. Concussive Blast Edited stunner time to be more useful. Cleaned up text. Optic Stream Reworked how rapid hits operate as well as the range of the move. Cleaned up text. Combat X-Pertise Damage boost on marked targets went from +1% damage to 1.1x damage.
Smash Attacks Thanks to extensive training, Cyclops can cancel any physical hit into an Optic Attack, even his smashes while in Mid Air!!!
F Smash is now "Optic Barrage", a signature move for Cyclops and has heavily edited angles that replace the old Up and Down smashes. U smash is now "Optic Sweep", a brand new attack! D smash is now "Optic Ricochet / Reverse Optic Sweep", a brand new attack that changes functions while in mid-air!
General Cleaned up whole set in reference to the wording regarding old smash attacks / other attributes
Iron Man: Deflector Shield Now only costs Power when broken, and is lag-less unless he gets it broken at 1 bar. this is meant to be a weak, "free" shield that a foe essentially smashes and allows Iron Man to act after the power cost. Arc Reactor The charge time / amount varies from 5 / sec, to 10/sec depending on current power. The less power you have, the faster you charge up. All Moves Now have a "Tap vs Hold" input method for spending power. Moves that had no powered version now have a powered input, except for jab. This allows Iron Man to choose whether he spends power or not, but in general you "get what you pay for". F Smash Sweetspot damage boosted from 13% -> 15% base damage. Beast: Feral Poetry Stats are boosted by 1.05x with no specialty if you miss the 3rd hit of the combo. Fsmash Sweet spot 2nd hit damage 14% -> 16% Dsmash "Feral Claw Slash" added as a new D smash while in Feral Rage.
PHASE TWO : SETTING THE STAGE
For the time being, Phase 2 will be extended until April 1st! Recap of the criteria below:
1) You must make at least 1 stage from your Universe, including it's size and general design and what kind of gameplay is expected on it. What kind of stage is it? Flat with walk offs, does it have walls, 18 platforms? Are the blast zones big or small? More importantly, what does it look like? Include a picture! 2) Your stage(s) must have an Alpha and Omega variant. A unique mechanic introduced in Smash 4 is the Omega Stage. Essentially a boring "Final Destination" clone of the stage, I think we can crank that up a notch by separating into Alpha and Omega stage variants:
Alpha stages are the "fun" version of your stage, which includes all the features such as hazards, guest characters and the works! This doesn't always have to be "crazy", but you have full license to experiment!
Omega stages are the "competitive" versions of your stage, which by no means need to be a Final Destination clone. Essentially this alternate mode should turn off any sort of hazards or the like for your stage, and possibly changing the layout slightly.
Alternatively, the Alpha/Omega stages can be drastic aesthetic alterations such as a traveling stage going to a vastly different location with different lighting, and so on. As always, good luck and have fun!
Your work on the Marvel project really is impressive, JOE, sticking pretty well to the two sets every two weeks paradigm you talked about to me with more consistancy than I would expect, and while some of these sets have had hiccups (Cap and Cyclops 1.0), they've actually been pretty slick so far. While I do still need to read Cyclops 3000, right now Iron Man stands as my 2nd favorite of them so far, although I see some obvious places to improve it. Oh, and I'm liking this character extras you're throwing in, as I do always enjoy seeing these appear in a set.
I am somewhat iffy on the Power mechanics here, mostly in that I feel like all of the moves requiring some amount of power is a bit much, and especially every time he turns on his Shield requiring a whole Block of it: Shielding is something any character is going to be doing a LOT in a match and the lagginess existing on Shield Special makes me worry he will frequently have less Power than the set expects of him. Personally, I also am not sure the mandatory power consumption is a good idea on at least some of the moves, and not because of the fact that I want to spam the Power moves, but rather because it feels quite bizarre that he cannot use the un-Powered moves if he uses Power!
While there were not that many egregious examples of this, the one that specifically popped up to me is Forward Tilt, as the unpowered version feels like it would be very useful for his game plan, and it makes little sense that Iron Man cannot use his LOWER POWER moves when he has MORE power. Iron Man gains Power and suddenly loses his ability to punch people? It is bizarre to imagine in practice, and while for many moves it would not matter, I feel enough would that this would be a reasonable method, maybe something like a Ryu-Tilt style Charge System? If you are worried about him generating too much Power without using his Shield Special due to this, halve the Power generation from these non-Power moves, say with the logic that because the Arc Reactor is a rather unique power source that it needs specific charging to fully generate Power.
Down Special's lock-on mechanism is a bit confusing and while I got it after a while, I feel it could be clearer, mostly in how Iron Man actually locks onto the foe/controls the cursor. I feel like Forward Smash is pretty weak when you consider it takes 1/3rd of his maximum power to use, when he is using a lot of small bars plus his Shield costs, and given the very potent sounding animation, it being a sweetspot and this, I feel it would be more appropriate if it KO'd at 125%~ or so from center stage and did some more damage. I feel like this set could use more Power generating moves, as Shield Special is decently vulnerable and most of his current Power moves are rather unsafe, which opens up the possibility of a bit much of a negative snowball, especially since again his Shield is constantly draining him.
While I don't have a problem with it per se, Jab has a lot of special qualities and conditions to it for what he gets out of it, and I find it odd he didn't have a specific Jab version for people lighter/smaller than him given how specific it went into. I was also pretty unsure about his armor shielding, which feels like it could hit the Paper Mario issue of being "defensive" but making him combo food...or could make him obnoxious to actually kill.
The good parts start with the pretty cool Up Special and Side Special. Tony actually fights in the air a lot in, for example, the Avengers movie, but it'd be odd if he was some super floaty guy all the time I imagine (Although not impossible). Giving him burst aerial mobility to allow him to zoom around foes and blast them is honestly really clever and while the aerials did not feel as good as Beast's they were still pretty nice, and it is rare to see characters go Aerials second AND make it work. NSpec/DSpec are fun moves and I enjoyed moves like Forward Tilt, Down Smash (especially with things like Dash Cancels and dances), Down Aerial (the best aerial to use the USpec/SSpec stuff for sure) and the Up Aerial. Few of the moves didn't feel, at minimum, competent.
The two things I would do if I wanted to improve the set a fair deal would be:
1. Remove the Shield-Power mechanic OR rework it a good deal to make it more optional or conditional, as it feels like it just wrecks his Power curve as it is and has a lot of unintended side effects, like really destroying people who use Shield + A to grab because they lose a whole block of power when they do this, not to mention it makes Iron Man incredibly weak to feints. It is probably weaker than a normal shield anyway due to being hilariously easy to break, even if he doesn't suffer shield break he still suffers SOME lag (stumbles) and a whole block of power. Of all of Iron Man's issues, this is the biggest to rework in some way.
2. I would find a way to work in non-Power versions of some moves into the set without having to go to almost no Power, due to some seeming quite useful and it feeling odd flavor-wise, at the very minimum I would do it with Forward Tilt as I feel him having the non-Powered Forward Tilt in more scenarios helps and deepens his playstyle. You could even potentially expand on what the non-Powered moves could do, which could help add something extra to the set.
Overall, though, an enjoyable example of a midrange character in action.
Butter Isn't Free You Idiot (Butterfree @UserShadow7898 )
The first thing I will point out about Butterfree is that the no trip thing isn't relevant, unless you are saying that effects cannot trip Butterfree, which would basically just exist to randomly give Butterfree an OP matchup against Diddy. If this is a Brawl set and specifically means random tripping, it should be specified. I also feel like there is probably an easier way to do aerial vs grounded states, but this is okay enough. Rage Power should probably just do 1.5x shield damage or something as just doing half the shield's damage on every hit is probably too OP, especially if it works on multihits.
The Silver Wind Down Smash is really cool, but I feel like it is far too situational, as it requires full charge, half the time to work and twice the dispel speed, I feel like it should just be full for both of those given the required 1 second of charge and then taking time still. Even if you try to just camp it, you can't cancel it ala Limit and it is very punishable, if anything I would suggest lowering the start or end lag as well. Maybe make it so half charge gives you the silver cloud with the half time/double dispel?
Finishing the set, I honestly didn't find all that much to talk about, the wind paths are interesting but for the most part it is fairly standard, spread the dust around style movesetting, with some fun moves to use with it like Down Throw. Its all solid stuff and I don't see much bad and I enjoyed it, but it just didn't stick with me much, but I also didn't really see all that much wrong. It was good to see you get a quick set out and its nice votelist fodder but I can't say I have much to talk about with it. Putting all the Powders on one move was good. Certainly much better than Riki, the last set with this kind of focus I can recall.
BKupa666
One of the biggest problems with Petey Piranha is massive potential for stunlock and infinites. This can be seen throughout the set, but in no move is it more prevalent than in the jab. The jab pops the foe straight up, then puts them into tumble as if footstooled. For whatever reason, the set says you should use this to make space… never mind that this is an incredible combo tool. It combos into aerials basically for free, but that's not the problem. The problem is that the optimal follow-up to this… is to hold the A button, leaving the foe to fall back into Petey's endless jab and suffer the same effect again. This can be continued indefinitely.
Now, there are a couple ways to fix this. One would be to simply remove the jab's unique knockback and make it more traditional, but that seems possibly a bit boring. Instead, you could make it so the jab has a different effect on airborne foes, so a foe who falls back into the jab doesn't just get popped up into footstool again. Personally, I'd suggest a mostly-horizontal launcher, so that it's actually good for making space. Now there's just one problem: Petey can move left and right during the jab, so with good timing he can move out of the way until the foe hits the ground and pick them up again. So, to prevent these shenanigans, you make it so it specifically won't hit prone foes. Not because the hitbox is too high off the ground or anything (as that leaves characters like Bowser and Dedede vulnerable to the infinite), it just specifically doesn't hit foes who are in prone. That way, it creates a tech chase situation rather than an infinite.
Classified as the Sludge Pokemon, Grimer appeared in the first generation of games as a pure poison-type inhabitant of polluted areas, born from raw sludge exposed to the light of the moon. As its body is a living mass of germs and rot, the ground left in its wake is rendered barren and unable to sustain plantlife. It absorbs gunk much like that it was born from for sustenance, and while moving, small pieces sometimes break off and form into new Grimers.
Grimer was also one of the Pokemon who received an Alolan form, a Poison/Dark type state with odd coloration and small crystals of solid waste formed on its body that resemble teeth. Brought in to help deal with the waste of the islands by feeding off of it, the region's qualities and its own gluttonous devouring of non-stop waste caused it to take on this state.
Grimer's stats aren't much to look at. Its small size would indicate a lightweight, but its low speed and passable durability say otherwise. Rather, it mixes its small hitbox and resilience to survive against stronger opponents, letting its toxic body do the work for it.
Its weight and maximum fall speed are comparable to fellow Pokemon Lucario, with gravity akin to Falco's. Its speed is on par with Pit in the air and Link while dashing. It also shares, roughly, Link's jumping ability; not great in the grand scheme of things, but excellent for a creature with no visible legs. In terms of shape and size, it's very close to Kirby.
When Grimer crouches, it reduces its height by half, leaking a puddle of ooze reaching out half a crate's width from itself in either direction. This puddle is not part of its hitbox, and is absorbed back into it when it rises from the ground through any means. It can crawl in this state, slinking across the ground at Robin's Walk Speed, the puddle slowly moving with it.
While crouched, its weight increases to be comparable to Donkey Kong's due to how strongly it clings to the ground, and it does not flinch from a hit that fails to do enough knockback to move it from the puddle it created (though this still ends its crouched state). Rising from its crouched state in any way causes it to reabsorb the sludge it had dispensed, though it leaves behind a residue of some sort (see the Neutral Special 'Forms' for details).
.~. Poison Touch .~.
To emphasize it again, Grimer's body is composed of toxic waste and germs. It can manipulate its own body to attack foes by poisoning them, inflicting all sorts of maladies, as well as causing them to suffer damage over time.
A foe fallen victim to its attacks suffer an ailment of its choice (selected with its Neutral Special) and take 1% damage every half second after, for up to 2 seconds after the last hit Grimer landed on them. This damage does not cause them to flinch, nor does it deal knockback or interrupt their attacks. Repeatedly applying Poison Touch to an opponent stacks the duration up to a maximum of 10 seconds, should Grimer hit them often enough, the timer appearing next to their damage percentage.
Touching Grimer or hitting it with a non-disjointed melee attack will also activate this effect, though only for 1 second.
.~. Specials .~.
.~. Neutral Special .~.
As its form is a rolling mass of germs and pollution, Grimer has several ways of inflicting varied ailments. On top of its default effect, Grimer's poisonous body carries a secondary effect it can apply, which can even intensify if applied to the same opponent multiple times. Grimer can only inflict this secondary effect through its hitboxes, and contact with Grimer does not apply the effect, though it can increase the duration.
It takes only 1 hit for an effect to be applied in its weakest state, and 3 additional hits for it to increase in intensity. The effect remains in place as the opponent continues to suffer from the effect of Poison Touch, but begins to decrease 1 step in itensity every second that the opponent spends without Poison Touch's effect. The effect ends when it would be decreased below the lowest intensity. The intensity can never increase beyond the third step.
By tapping the Neutral Special input, Grimer can choose which effect to apply using the directional buttons, returning to its default effect by tapping the special input again instead of a direction.
.~Default Effect~.
Grimer's default effect mixes the default purple of its attacks with a dark, murky brown. The opponent's damage percentage rises passively, 1% every second for every step of intensity. They take no hitstun or knockback from this damage,
At maximum intensity, the opponent will also suffer 1.5x the normal damage and 1.1x the normal knockback from attacks, weakened as they are by the poison.
.~Up Effect~.
Pale blue mingles with Grimer's attack hitboxes for this effect. Opponents are slowed by roughly 1/10th of their movement speed per level of intensity, making it harder to avoid Grimer's attacks or the poisonous areas it creates.
At maximum intensity, the victim will collapse and fall asleep on the spot. The sleep effect is identical to the one caused by Jigglypuff's sing, lasting for the same duration or until they are no longer at the highest intensity, whichever happens first. Upon awakening, the effect is completely removed, as if they avoided Grimer's touch and attacks entirely for the required amount of time.
As characters cannot fall asleep in the air, hitting this stage while airborne instead causes them to enter free fall for 3/4ths that duration (and like sleep, it can be ended early by hitting them).
.~Side Effect~.
Yellowish ribbons mix with the purple slop generated by Grimer's attacks. While active, the starting and ending lag of opponent's attacks are multiplied by x1.X, where 'X' is the level of intensity of the effect.
At maximum intensity, the opponent begins to flinch periodically, roughly once every 1.5 seconds. Grimer will have no trouble planning around the opponent's inability to act.
.~Down Effect~.
A sickly green accompanies the standard purple for this effect. The opponent's shield shrinks and suffers damage at x1.X the normal rate, and the invincibility frames granted by dodging is reduced by X/10ths, where 'X' is the level of intensity of the effect.
At full intensity, the victim's shield takes 1.5x the normal damage instead, the acidic qualities eating away at the opponent's defenses and leaving them frail.
By holding the Neutral Special input, Grimer can choose to change the form its poisonous body takes. These forms act as effects left by Grimer's hitboxes, though all can be cleared out with any opposed hitbox, and shielding, dodging, or other forms of invulnerability do not count as contact with them for the purposes of their effects.
.~Default Form~ (Sludge).
In default form, the sludge of Grimer's attacks sticks to a victim or spot they hit for 1 second before vanishing; this lingering sludge does no damage, but acts as Grimer's own hurtbox for the purposes of Poison Touch, allowing the passive effects inflicted to linger just a little longer, and act as a sort of semi-trap for opponents. This has the honor of being the only form that is produced outside of the final hitbox of Grimer's moves.
This sludge falls from where the hitbox ends at the same speed Grimer does naturally, clumping onto any surface or object/opponent it touches. Shielding or dodging can dislodge the muck early.
.~Up Form (Gas)~.
Smoke rises from Grimer's body, a putrid stench that warns of the shape its attacks will take. Sludge hitboxes leave behind a hazardous gas where the hitbox ends, rising upward at the rate of two pokeball widths a second. Extended contact with this gas- 2 seconds or so- not only extends the effect of Poison Touch, but applies a 'hit' for the purposes of inflicting or intensifying an effect. The gas disperses on contact with a ceiling or after 4 seconds pass.
.~Side Form (Acid)~.
Grimer's body begins to bubble and ooze more freely. Left by the final hitbox of its sludge-laden attacks is a thin acidic substance, which falls at twice the speed Grimer itself does and pools on the floor. Acid lingers for 4 seconds after the fact (or is dispersed by a hitbox). Any who remain in contact with acid for 2 straight seconds suffer a hit of 5% damage and flinch, which counts as a hit for the purposes of inflicting or intensifying an effect and Poison Touch.
.~Down Form (Solid)~.
Grimer's body becomes laced with a gray-ish tinge, its ever-flowing body becoming more cohesive. While in this form, sludge generated by its attacks harden into destructable objects at the end of the hitbox, impassable but possible to destroy with any form of damage (by Grimer, allies, and foes alike).
These objects will fall to the ground at Grimer's own fall speed if created in the air, and foes are pushed away and suffer half the damage of the attack that created them if caught underneath (being launched up through the mass if there is no spot they can occupy outside of it). This will act as a hit for Grimer's chosen effects and Poison Touch. Objects are not harmed.
Upon being destroyed, the rocky material turns to ooze again for a split second before vanishing, which acts as Grimer's hutbox for the purposes of Poison Touch and its effects.
.~. Side Special .~.
Clapping its arms together, Grimer's body shifts such that muck accumulates between the two 'limbs'. Upon release, Grimer hurls the sludge with all its might. Tapping the input merely fires off a smash ball-sized sphere of ooze, doing only 5% damage and flinching knockback. It travels a respectable pace and distance, a hair slower than Grimer's dash and roughly two battlefield platforms. The lag is minor enough that Grimer can snap off a quick shot, but enough that it cannot be spammed like Fox's Neutral Special.
Holding the input causes Grimer to hold its position, the ball growing larger and larger in its grasp. At full charge, the ball is comparable to Samus' fully charged Neutral Special in size and speed, taking a similar amount of time to reach this point. It does a solid 18% damage and above average knockback on hit, being one of Grimer's better KO options. At half charge, the ball also counts as two hits for the purposes of Grimer's effects; a full three hits (or one stage of intensity) if fully charged. The hit lag of the move increases with charge as Grimer overextends in its throw, double the base amount at full charge.
It can store this charge by the same means, and while holding the input, angling the control stick allows it to fire in any direction (even behind itself, causing it to turn around). It also has the means to reduce the charge time in the form of the lingering hitboxes its attacks leave; when in contact with slude, gas, acid, or solid waste left by its attacks (as seen in the Neutral Special), Grimer absorbs whatever portion it touches into its attack. For every Grimer-sized mass it intakes, it shaves half of the duration off. Not only that, but this adds any effect from the absorbed waste to the attack, making this a rare option for Grimer to combine multiple effects!
When it reaches the end or touches something other than Grimer or an ally, the projectile bursts, a wave of ooze flying out half again its size in each direction. Grimer can have only one projectile from this Special in play at a time; repeating the input causes any existing projectile to burst as if it had hit something or reached the end of its path. While it takes some time to prepare, Grimer's Side Special acts both as a potent set up and a solid finisher as needed.
.~. Down Special .~.
Grimer freezes in place, body turning gray with a sheen effect. It remains in place for a moment, only for this hardened surface to break away and reveal it just the same as always underneath. If it was falling when it used this input, it will halt in place for a moment, then resume falling shortly enough into the animation to remove its usefulness as a recovery option. Grimer can enter this state quickly, but the ending lag makes a poorly timed use punishable with minimum effort.
If attacked in this state, the opponent's hitbox will bounce off of Grimer's body, as if it had perfect shielded the move. The hardened surface cracks away from the blow instantly, causing some of Grimer's body to splash off of itself to hit a smash ball-width to either side from itself horizontally, and leaving it free to act without the horrendous ending lag the stance normally takes, giving it frame advantage.
This is Grimer's tool against foes that manage to get its slow and heavy shape in a corner, or those that try to blitz in against it so it won't have the chance to start applying its poison effects through various attacks.
.~. Up Special .~.
Grimer oozes profusely, stretching its sludgey arms upwards as the input is held. Releasing the input causes Grimer to swipe its arms downward, slapping against the ground in front of itself, the limbs rippling a moment before pulling back into itself.
This is a grab hitbox and teather recovery, Grimer latching onto whatever its arms touch at any point during the recovery and drawing itself close to it. If in the air, it bounces off of the opponent immediately after to gain additional height comparable to its second jump (this does not footstool the opponent). At most, Grimer can reach a full 1.5 battlefield platform lengths away with a full second of charge, or half a platform uncharged.
The impact leaves small traces of its body on whatever it hit, be it a ledge or platform or opponent, functioning much like contact with Grimer itself- with whatever added effect it has chosen for its Neutral Special at that moment. These traces take whatever form Grimer has selected using is Neutral Special. Opponents hit by the grab will suffer 5% damage and light downward knockback (to the point that calling it a spike is generous).
By smashing the input, Grimer can instead pull an enemy or item caught in its grasp towards itself. This version of the attack instead does 8% damage and moderate downward knockback, as well as launching Grimer a bit higher. However, the wind up for this version of the input is increased, making it harder to land.
.~. Closing Comments .~.
Not a work I'm as proud of as Butterfree, being made in a shorter amount of time and its central effects being cribbed straight off of the former, but I feel Grimer's means for bringing its effects into being and creating hazards would make for a fun core playstyle that would work out differently than Butterfree's more focused dust and wind attacks.
It is really fun to see you back, Kupa, and I really hope to see you make more sets: You died kind of fast after I got here, so I never got to see you in your prime. Unfortunately, though, your first set since MYM15 is one I must tear into some. It might be a good idea if you read some sets to get an idea of what modern day sets look like too, such as The Beast, Jr. Troopa, Fortis and Pain-Yatta.
First off, this set has stun. Oh boy does it have stun. Petey himself has an easy infinite on his Jab due to putting foes into the footstooled state and being able to be held out indefinitely, I believe unless they eventually manage to DI to the edge and fall off but at that point they will have taken something like 50%+ damage? And since it is set Petey can pull it out whenever and all match. Piranha Plants have 1.5 grab difficulty that is easily spammable, especially considering they are on fairly tanky minions with a high limit and the set implies they can go grab into grab on the foe, and the dreaded pitfall effect on goop. When you combine it with things like the Dash Attack prone, Up Smash further stun, Down Tilt stun and more, this set has obscene amounts of stunlocking that even if made to not be OP will create a horribly unfun gameplay experience.
The weight etc changing is made to be a thing in this set, but it is such a small thing it may as well not be a thing, with Petey's weight or other attributes rarely mattering in moves and Petey's heavier form is essentially useless with how easily it drops and memes like the fact that at full weight, footstool into Warlock Punch is basically a true combo. That can probably gimp him. Being light also doesn't help much, especially since despite the move's description saying that he gets thinner his size is said not to change in the stats. It feels like a total dead-end in how it is utilized and doesn't really add much of anything. Down Special also has pretty awkward animation.
Most of the Standards and Smashes don't have much playstyle relevance and odd effects. Dash Attack deals 15% as a strong hit with, in theory, up to a Weight 15 Size 11 Petey Piranha on them and...prones them? Very bizarre to imagine and the proning only works into Petey's fairly terrible playstyle of "stun the foe forever". Forward Tilt's suggestion to get out of it doesn't make sense to me as written, Down Tilt is an earthshaking stun move of some kind? Up Tilt not doing any damage is fairly bad and it seems like it wouldn't help you given end lag exists and they would just drop in front of you and smack you? There's really no reason this shouldn't do damage. Forward Smash is hilariously bad to land, it'd have almost a Falcon Punch worth of starting lag and ending lag, essentially the only reason it would ever function is because you stun the foe forever, which is a pretty dreadful playstyle pattern. Also, Forward Smash and Down Smash randomly gain a whole 1% damage from being fully charged, which is fairly memetic. Up Smash stun I am really not convinced isn't in some way broken, especially with aall the stun in the set.
Mirrored inputs were not considered all that acceptable even waaay back in like MYM13, so it shouldn't be much of a surprise that in MYM19 it still isn't liked. Note that even moves that might seem mirrored in game like Marth FAir/BAir actually do have different data, I think the only things that are basically cloned moves on the same character are Mega Man's lemons. Up Aerial is really OP by doing your best not to hit with the actual stall than fall and just making the foe go into helpless and what is up with this incredibly bizarre stall than fall aerial on an Up Aerial? I will say I did chuckle and love the Voldemort reference here, though. Down Aerial seems pretty useless and one of the few direct weight things in this set is this move, which doesn't do all that much except for suicides and is unusable if you increase your weight ever.
Finally, the grab game is the worst part of this moveset, with every non-Up Throw Throw being a stun move of some kind, Back Throw in particular being a hilarious stun throw that suggests stacking stun on it solely so that you can have other stun setups you have out stun the foe even longer. Forward Throw also doesn't mention if the foe can break out, potentially making it a variable distance throw with no issue that footstools and a supremely strong edge guarding tool when it also adds footstool. Back Throw technically doesn't either but since it has no cap can be inferred it must be breakout-able otherwise it would casually infinite by itself by just holding down the button. Down Throw isn't unique throw access like Kargo Karry but instead uses the same throws, meaning you stuff them in your stomach for a free 5% if you have time and that otherwise it is just a Pummel alternative.
Sorry to rag on this set so much but it just did not have much of anything to it, the best thing about it was basically just the idea of the minions naturally growing and evolving, but it isn't anything we haven't seen before and the end result is stun. This moveset's playstyle is basically entirely "stun and then hit them or stun them more", without even really any goop play shenanigans or weight shenanigans: Butterfree, certainly, is a better example of a set about moving goop/dust-like substances around. I would recommend trying to avoid stuns as much as possible in the next set you make, as them and wind hitboxes have been your biggest issue in this and your last set Skowl, I definitely think you can do better anyway, maybe a bit of reading and commenting will help? Still, good to see you post a set, even if I didn't like it.
Aqua Fortis
I actually hold the opinion that this is one of the best sets in the contest at the moment, maybe the best. The way the set damages shields in chunks and slices as opposed to just diminishing the size makes for a very interesting shield poke game, and really its explored about as heavily here as it really could be. That's the obvious highlight of the set to me, but focusing entirely around shields is a bit of a flawed approach given its one defensive option of a fair few, so obviously the set needs a bit more than just that. It accomplishes this with some fairly dynamic pits and slopes, which combine with her acid effects to create a variety of interesting pseudo-traps. It also lets her augment her approach with some surprisingly clever abuse of the slopes. It combines to make a very interesting aggressive character, one with a ton of variety and depth to her playstyle.
I actually specifically want to address Muno's complaints as I think they're rather unfair. A playstyle entirely based around shield poke, as I mentioned, is one that's ultimately just going to fold to dodges unless you throw in substance elsewhere, and I don't think the acid mechanics are especially overbearing. Acid in the foe poisons them, acid going down a pit is a hitbox, acid settled in a pit is a trap, acid can redesign the shape of the stage in large quantities, and it melts chunks out of shields. Once you get used to it doing these things, its not that hard to figure out what the set is going for. There's probably an inconsistency or two in the writing style which made things more confusing than they needed to be(I can't remember one of the top of my head) and if someone finds one it may be best to ask Roy to fix it. That said, I think the set largely achieves the depth it sets out to have, as its complex mechanics have a great deal of reward to them which provides a lot more to players that master this character than most anything else posted this contest.
On the grab game and characterization, I do think that the throw that restricts 7 whole inputs is a bit much, and while its certainly not something that's impossible to play around it'd be better at 4. Otherwise, I think given it takes a bit of effort to make these effects especially impactful, I think placing some restrictions on the opponent that will cause them to alter their playstyle without totally destroying it is a perfectly fine thing to do. The jump related one even feels kinda fitting to the moveset, and I love the brutal visual effects on the moves as I'm kind of a sucker for those. The character isn't a terribly flashy bombastic one like is fairly typical of MYM as of late, but the set does a lot to make her seem like a semi-emotionless war machine, and a fairly terrifying one what with those throw effects. Its subtle enough I can get why people would miss it, but that doesn't make it uninteresting. Not every character has to be over the top and bursting with color/charm, sometimes that can get kinda tiring if anything.
10/10-I happen to agree with Warlord on is that this tier should be reserved for my favorite moveset ever made. The title is currently held by Mr. Badd, so that is what you need to beat to get here. I will consider the corner case of having multiple 10 stars if there are multiple sets that insanely good out. 0 Movesets
9/10- These sets are my favorites in the contest and most complaints I have with them are incredibly minor. 0 Movesets
8/10- Unlike the above sets, there are usually some issues here, or the basis simply isn't strong enough to carry it to the higher tiers regardless of execution, but still a great set and a highly recommended read. 2 Movesets
7/10- Sets in this tier are good, but lacking in some aspect or another that brings them down from being great. They still manage to stand out from the crowd, however. 4 Movesets
6/10- The set in question is either somewhat forgettable or suffers from actually very major flaws, but is still overall above average and has most likely secured a spot on my votelist. 5 Movesets
5/10- I no longer like sets in this tier, but they're not necessarily bad either. Their good points are simply not good enough or their bad points drag them down too much to reach a higher tier. 2 Movesets
4/10- These sets are just bad, either failing to do anything remotely interesting or having some absolutely massive problems to counteract what good points they have. Probably still have redeeming qualities though. 1 Moveset
3/10- There's salvageable stuff in these sets, but it exists in very minute quantities. 3 Movesets
2/10- I won't say sets in this tier have no redeeming qualities, as that's not entirely true, but I'd say at this point I really hate the set, or find it too lacking in any substance for me to give it a higher score. 2 Movesets
1/10- Complete abomination of a moveset lacking in any redeeming qualities and likely having something notably bad about it to warrant this tier. 1 Moveset
0/10- I'm experimentally adding a 0 star to my rankings, which is more or less a statement that your set actually did something so unbelievably bad it kind of cemented its place in history as an example of what not to do. If its any comfort, I probably had a lot of fun reading it, but for all the wrong reasons. 0 Movesets
Aqua Fortis
8/10
Note: This was going to be a tiny bit lower, but Froy nerfed the DThrow. That move was pretty oppressive before and the set it was next to was fairly close competition for it.
Hotel Mario Roy
8/10
Genis
7/10
The Beast
7/10
Jr. Troopa
7/10
Butterfree
7/10 Admiral Kizaru
6/10 Isaac
6/10
Note: This set was near 7 and Muno did make edits to it, but honestly I was really hoping for something more akin to what sets like The Beast did with their air game. The air tech chase stuff feels pretty insubstantial and like the most minimal possible improvement. Iron Man
6/10 Turtonator
6/10
Painyatta
6/10
Captain America
5/10
Cyclops
5/10
Silent But Deadly
4/10
Note: My opinion on the set would be a fair bit higher, but we really need to know exactly when he can cancel the smashes so he can't just get these effects on frame one. Also, Forward Tilt seriously needs to be nerfed regardless, and the set could afford more clarity on how its poison mechanics work(AKA don't make them stack just refresh, because if they stack 14% on every hit is a nightmare)
Jestro
3/10
Agatio
3/10
Tracer
3/10
Note: This set aged very poorly for me, on account of bad characterization combined with a playstyle that feels much shallower than it looks on paper because it was too afraid to take any risks.
Wario
2/10
Note: I missed a few talking points on this set's flaws, such as the fact that the treasure chest mechanics are inherently awkward due to randomly making up inputs do something completely different while you're next to it, making stuff like tap jump and UTilt unusable. Not really sure why its necessary to have that as a function anyway, busting them open feels more appropriate for Smash. Also, I swear like every move in the set can cancel into each other, without really much logic as to why and it feels very broken. As such this set is a bit worse than I thought it was, sorry Brostulip.
Petey Piranha
2/10
Sombra
1/10
Note: I get that Muno fixed some things about the set, but its still a total mess and has the audacity to be honestly kind of pretentious.
Sorry for the late Iron MYMer this month...it seems we had a bit of trouble with the delivery of ingredients to this month's Iron MYMer. I shall congratulate all who entered the last month's...wait, did anyone except for JOE? Oh well!
Still, these ingredients aren't the freshest...I kinda worried about how toxic they seem to be. But the Iron MYMer must go on! Hmm...well, with them being so toxic...
Yes, this month's theme! It shall be...
Poison!
Pretty brilliant, no? If your ingredients are poisonous, simply make it part of the dish! For this month, the task is simply to make one set with a theme of poison, be it a focus on poisonous mechanic, a character where poison is a huge part of what they are, or you could even make someone who is anti-poison: A medic who rushes into the battlefield with antitodes and serums to cleanse it of filthy poisonous Muk! There's a lot of room here and if you feel iffy on your entry's fitting, feel free to ask me! I'm usually on the more lenient end.
Usually, it would end on April 10th, but that day I actually have something that will take up time and/or leave me feeling drained, so this Iron MYmer shall end April 11th.
Have a toxic March, everyone! Remember to report your noob teammates!
What’s that in the sky? It’s a plane! No, it’s a tank!? NO! It’s BLITZWING, FOOLS! Master of air and ground combat, Blitzwing is a jack of all trades, AND a master of all! At least, that’s what he wants you to think.
That’s not to say Blitzwing isn’t highly skilled, on the battlefield, he’s one of the best Decepticons out there. His mastery of air and ground is also second to none, but Blitzwing himself is no strategic mastermind. In fact, he’s a brash, loud, rude idiot who nearly every other Decepticon hates with a passion. He’s only kept around due to his prowess, which means that Blitzwing’s closest ally is the heat of war itself.
However, recently, Blitzwing has undergone an odd mutation. Different aspects of his personalities seem to come to the forefront, sometimes he has the ice-cold personality of a strategist, other times he’s a burning bundle of rage, and sometimes a raving loon who thinks he’s hilarious. With this mutation came the addition of unique ice and fire based powers, which have made him even more of a deadly warrior. One who thinks he’s worthy of the title of “Decepticon Leader”.
This, of course, doesn’t mention Blitzwing’s wonderful starring role in the classic Transformers episode “Triple Takeover”. In the episode, he (And his other Triple Changer “friend” Astrotrain) manage to take control of the Decepticons. It doesn’t go well. Blitzwing ends up taking over a football stadium, and taking advice from a football coach. The entire thing is hilarious in how stupid it is. Watch Blitzwing's entire role in it here!
Blitzwing’s appearance in Smash Bros. mostly reflects his appearance in the original cartoon series, rather than his latest (garbage) Generations toy.
Weight – 135
Dash Speed – 1.45
Walk Speed – 1
Air Speed – 1.25
Fall Speed – 1.95
It’s worth noting that Blitzwing’s Speed stat in his Tech Spec specifically refers to his Jet mode’s incredibly rate of Mach 2.7 travel, and not to either of his other modes. Anyway, Blitzwing stands slightly taller than Ganondorf, and as wide as Bowser, making him an absolutely massive target. Luckily, his weight surpasses that of even Bowser, making him a lot tougher to knock around, even with his size. His ground speed is rather lackluster, mostly coming from his large size, but his aerial movement is stunning, some of the best in the game. His first jump is decent, perfectly serviceable, but his second jump is pretty pitiable. Not exactly what you’d expect from a ground and air commander, huh?
Specials Neutral Special – Blitz
Blitzwing, in a surprisingly quick animation for his size, transforms into his tank mode, and fires out a single, purple laser blast from his tank turret. The blast is large, about 2/3rds the size of a Party Ball, and has infinite distance. It’s also rather slow, slightly faster than an uncharged Charge Shot. It is rather powerful, obviously, it’s a tank shot, dealing around 10% damage with rather harsh knockback that can KO at the early 90%s. The time the shot takes to fire is rather brief, comparable to a moderately charged Samus Charge Shot in terms of lag. There’s also a slightly longer end lag than start-up lag, as Blitzwing goes from tank to robot. Blitzwing CAN fire multiple blasts, however, by quickly pressing the special attack button a few frames after the blast fires. He can only shoot 3 before he has to switch back to robot mode automatically. With each shot, the damage lowers, going from 10%, to 5%, to 3%.
Now, if you squishies haven’t noticed, Blitzwing is a big honkin’ tank when this happens. The tank is large, as stated previously, about half as tall as Blitzwing’s robot form, and about 1.5 Bowsers wide. Due to it’s flat shape, it can actually be used as a platform by other opponents, which they can attack. Luckily, in any vehicle mode, Blitzwing gains 15% superarmor. Moves that deal under 15% damage will deal no damage, basically like punching a tank! If an attack that deals over 15% damage hits Blitzwing, he will be knocked out of tank mode, and into robot mode, though he takes half the damage and stun. It’s like trying to take out a tank with an energy slingshot, literally! He doesn’t retain the armor during animations where he transforms into a robot, however. Blitzwing can be instantly exited out of tank mode by grabbing him, however.
Anyway, the point is, by holding the special attack button, Blitzwing can delay his shot, leaving him in tank mode for a moment. During this delay, Blitzwing can adjust his angle, or move back and forth. Movement wise, his tank mode is slightly slower than his usual speed, and has a bit of a delay before changing directions. It also can’t turn around, and since the cannon will always be facing the direction Blitzwing was when he started the move, that might end up being a bit of a problem in some cases. He can, however, aim his turret up and down, going from any point between its original position, and facing directly upwards. Blitzwing can sort of aim in between shots, but the total amount of times means you need to be quick if you want to change angles. Blitzwing can only adjust his aim for a short while, however, about 1.5 seconds in total. You can just fire it off by letting go of the button, too. Blitzwing can also cancel out of the stall by quickly tapping the special attack button twice, causing him to enter the laggy ending animation.
Blitzwing’s tank mode has slight momentum based properties, interestingly enough. You’ll come across it rarely, due to Smash 4 not really having many slopes, but going on a slope will actually substantially increase the tank’s top speed. Not by a lot, but it is very noticeable, especially when the tank gains a large, purple aura in front of which end is travelling downwards. This shows that the tank has become a hitbox, which causes 7% damage, and buries opponents. The burial time is over instantly, but the opponent will remain buried until Blitzwing passes over them. Basically an aesthetics thing more than a mechanical thing.
So what, this is just a rather mediocre projectile, and a bunch of stuff about a tank!? Come on, Blitzwing can do better than that! So, what if you double tap the special attack button instead of just holding it? Blitzwing will catch on FIRE, of course! This mainly means tapping the button during the transformation animation, but double tapping is an easier way to describe it. This actually activates a brief hitbox that bursts from the tank model, slightly larger, and more ovular than the tank, but has high knockback that causes 6% damage. You can also hold the button down, which, of course, lets you delay the fire and aim. Since the tank is on fire, any opponent who now tries to stand on it will bounce off, taking 3% damage with fixed knockback that mostly just allows them to escape the burning machine. Wimps! C’mon, TAKE THE HEAT! Running them over with the tank boosts the damage to 10%, and instead launches opponents upwards.
This fire mode isn’t all blastboxes and fixed knockback, though, as the projectile has now been completely changed from the normal mode. Instead of a single, slow moving projectile, Blitzwing now fires a MASSIVE STREAM OF FIRE from his turret! This blast only reaches forward about 3 Battlefield platforms, and is actually taller than Blitzwing’s tank mode by just a bit. This means, of course, that it is very large. It behaves like a slightly weaker version of Samus’ Zero Laser, meaning that opponents who are hit by it will be stuck taking damage until it ends. The damage, in this case, is 2% every other frame, meaning that it totals up to 15%, for 15 frames of the attack. After the move finishes, any opponents who get hit by it will be launched at upwards, forward angles, which can KO at 80%. And yes, Blitzwing can aim this devastating blast. Master of ground to air combat!
This, of course, also comes with a price. The first back draw is that he can’t fire it multiple times, obviously. The second is hefty amounts of lag, both starting and ending. Starting lag wise, it’d ridiculously telegraphed, taking 20 frames to actually fire, while a large fire effect gathers around the turret. Ending lag wise, not only do you have to watch the already slow ending transformation, but you also need to sit through a slightly shorter animation where Blitzwing shakes off the flames, which also results in a brief hitbox, similar in both animation, and size to the one when he catches on fire. This hitbox, however, is more fitted for his robot mode, only does 3% damage, and has much less knockback. It’s basically a way to knock punishers off during the last handful of frames.
The other draw back to Fire Mode involves Blitzwing’s armor. For one, every 5 frames Blitzwing remains in Fire Mode, he will take 2% damage, which can total up incredibly quickly. For second, his armor is completely gone. Blitzwing has been blinded by his range, and is now forcing all his offense on the opponent!
Those two hitboxes, as well as the ending lag animation for it, are consistent across all moves relating to the fire, as well as another thing we’ll get into. So yeah, Blitz is a perfect ground-to-air projectile, with its versatile aiming, and its powerful alternative fire. Tank mode is perfect for approaches, also, with the super armor and hitbox once it goes down a slope. So get out there, and GET BLITZING!
Wait, what’s this? MORE STUFF TO EXPLAIN!? Yes, now that we’ve explained how Blitzwing’s tank mode works, we can get into another one of his gimmicks: Transformation Combos! Transformation Combos are very simple, they let Blitzwing freely go from one Tank Mode attack to another, removing any lag that came from the actual transforming part of the move. I mean, why would Blitzwing go from Robot Mode, to Tank Mode, back to Robot Mode, and then to Tank Mode if he’s already in Tank Mode? It also resets the time he can stay in Tank Mode, so that’s fun! The main problem is that it takes some quick reflexes to perform, as you need to input another move before going into the transformation animation. In the Tank Mode’s case, these moves consist of: Neutral Special, Down Special, Dash Attack, Down Smash, Down Air, Back Grab, and Down Grab. There are a few special cases here, mostly the Down Air and Grabs. You can only activate the Down Air while, obviously, in the air, which means you’re going to have to drive off a cliff to perform it. For the Grabs, you obviously can’t grab an opponent while in Tank Mode, so you’ll have to start out with those. We’ll get into those more later on.
There are two very major downsides to Transformation Combos, however. The first is that you can only use each attack once before you’re forced to go back to robot mode. And when you do shift back, it will take 1.5x the amount of lag it usually does when you end the move. The second downside is that you can’t enter Fire Mode while doing it. Fire Mode only covers one move plus the movement you get in Tank Mode. After that one move, no matter if you moved around or not, Fire Mode will end, and due to Transformation Combos cutting off the frames where you could reactivate it, that means you only get it once per vehicle shift.
Up Special – Alley-oop
In another quick transformation animation, Blitzwing transforms into his jet mode. He then rockets up, and performs a loop-de-loop. The loop-de-loop acts similarly to Meta Knight’s Shuttle Loop, in a pretty obvious connection. There are several hitboxes to this attack, the first being the actual launch, which is then followed by the loop, and then the continued rise afterwards. Each of these hitboxes deals 2%, with it usually being able to max out at 10% if the opponent is caught in it from the start. The launch will bring Blitzwing up around 2 Ganondorfs in height.
When Blitzwing reaches the apex of his launch, he will perform a small loop, and enter a glide. Yes, it’s the return of the gliding mechanic, but in a much different way. This glide is much more controllable than any from Brawl, as Blitzwing is able to turn around during it. He cannot, however, alter his trajectory like in Brawl, but the glide can be cancelled at any time by inputting any attack other than the standard A press. Blitzwing glides down at a fairly slow pace, comparable to Ganondorf’s walk speed, but aerial and downwards. It also moves forward at the standard glide speed. The jet behaves nearly identically to the tank, with its 15% superarmor. Though, it is a lot harder to grab.
Like the tank mode, Blitzwing’s jet mode acts as somewhat of a platform, around the same size, but without the turret to make it more complicated. Opponents can stand on it like any normal platform, though it acts as a solid, meaning opponents can still attack Blitzwing while he’s in jet mode. If you press the standard attack mode while in jet mode, Blitzwing will fire a missile at a downward diagonal angle. This missile is around the same size as Samus’ missiles, but looks more like a cartoon missile, with a color scheme matching Blitzwing’s purple and beige. The missile flies at the maximum speed of Samus’s missiles, and has infinite range. When the missile hits, it deals weak upwards knockback that KOs at 250%, as well as 3% damage. There can only be one missile fired at a time.
The jet mode follows the same rules as the tank mode does when it comes to Transformation Combos. It will flow into other jet based moves, but only during the gliding portion. This can complicate potential combos, but will leave you with a good amount of combo openers. The moves Transformation Combos apply to while in jet mode are Up Special, Side Special, Up Smash, Forward Aerial, Up Aerial, and Up Throw. Like with the tank mode moves, these will be covered later on.
Jet mode also has a similar effect to Fire Mode, this being Ice Mode. Its activated the same way, by double tapping the attack button during any jet based move. This has Blitzwing spontaneously cover himself in ice, with an icy aura coming off of him. This follows most of the trappings or Fire Mode, including the damage it deals to Blitzwing himself. Basically, if it applies to the Fire Mode, it is there in Ice Mode. The only thing keeping it from being a straight up reskin of Fire Mode is that the damaging hitbox around the tank is replaced with an ice surface effect on the jet. This acts like ice regularly does, but twice as slippery. If Blitzwing is moving in jet mode, the opponent will not be able to stand on him. It achieves the same function as Fire Mode’s flame aura, but without dealing damage.
Like the Fire Mode, the Ice Mode has an effect on every move attributed to it, which is every jet mode attack. For the Up Special, this only effects the move during the loop. During its brief movement, Blitzwing will fire off 5 ice missiles. The ice missiles look like regular missiles, but blue tinted. These missiles travel for around 1.5 Battlefield platforms before exploding on their own. The missiles, when they hit an opponent, deal 5% damage, and heavy, directly upwards knockback that Kos at 200%. They also freeze opponents, but this is a more cosmetic detail, as it only lasts until they reach the apex of the knockback. There is another effect these missiles can cause, but that will be covered in a moment.
While gliding, Ice Mode will remain active until another attack is used, or until Blitzwing enters out of it. When comboing into another jet attack, there will be a quick cosmetic animation of the ice breaking off of Blitzwing. When comboing into something like the Down Air, or any other non-jet based move, the effect will also be applied. But when the move finishes, Blitzwing will instantly go into the endlag animation (Which behaves like it does during Fire Mode, but with an ice effect), which also doesn’t ignore gravity. Be careful when using it.
Anyway, Blitzwing can still fire a missile while in Ice Mode and gliding. This is identical to the ones fired from the Alley-oop’s Ice Mode variation, but behaves more like the standard missile as a projectile. Though, it retains the upwards knockback and freezing effect, but applies it to the missile’s standard functions. The major application of this, and technically the Alley-oop’s frozen missiles, is to hit the ground with them. Doing this will cause the ground to freeze over, in exactly a Battlefield platform’s worth of ground. This ice behaves like normal ice, not the Ice Mode ice that covers Blitzwing’s jet mode.
Blitzwing can have exactly 3 of these on the stage at the same time. At first, there might not seem to be any major use to them, other than being cosmetic and kind of annoying. However, when using Fire Mode, if Blitzwing runs over one, it will result in creating a steam vent. Steam vents don’t do much, they don’t even cause damage, but they do launch opponents into the air. This can help play into Blitzwing’s air game. Steam vents take up around the same place as an ice patch, but also extend upwards around a Ganondorf. Hitting a steam vent will cause the opponent to be launched upwards at around half a Spring’s power. They vanish after five seconds however. The ice patches, however, do not disappear.
Side Special – Kickoff
Blitzwing quickly transforms into jet mode, and performs a barrel roll, dashing forwards. The animation of the attack is similar to that of Charizard’s Dragon Rush custom special, though the attack doesn’t behave much like Flare Blitz. Instead, Kickoff deals several hits to the opponent it collides with, without Blitzwing stopping in his tracks. The damage can total up to around 12%, with it dealing 6 hits of 2%. The final hit deals knockback that can KO at 200%, making it fairly weak.
Blitzwing can travel a total of 4 Battlefield platforms while performing this move, at a rather impressive speed. Its use as an attack is rather minimal, its true use factors into the Transformation Combo gimmick. It can be used a few different ways. The first is as a Transformation Combo starter, using it while in the air to start a quick aerial combo. The second, much more practical use, is to elongate your time as a jet. When using the attack, Blitzwing will travel directly forward, ignoring the jet’s natural downward movement for a moment.
The move changes a bit depending on whether its used in the air or not. On the ground, it behaves as described above. When used in the air, by pressing the attack button during it, the jet will drop a single bomb. This bomb resembles the one fired normally in jet mode, but it behaves much differently. For one, its dropped at a directly downwards angle instead of a diagonal angle. When it hits the ground, or an opponent, it will burst into a small explosion, 1/3rd the size of a Bob-Omb’s. This explosion, while small, is fairly powerful, dealing 13% damage, as well as upwards knockback that KOs at 100%. The problem with using this move is that Blitzwing will lose all speed he gained by activating it, instantly causing him to go back to a normal glide.
In Ice Mode, the attack becomes a lot more similar to Flare Blitz, but with an icy effect instead of a fiery one. It of course doesn’t deal damage to Blitzwing, Ice Mode already does that without an extra effect. The similarity comes in how the hitbox is completely changed, instead delivering a sharp blow of 10% damage with backwards knockback that can KO at 90%. This will instantly knock Blitzwing out of jet mode, however. While sweeping across the ground, Blitzwing will freeze up to 3 Battlefield platforms worth of ground, if he travels that long.
In the air, the bomb effect can be applied, but it is also significantly changed. Instead of dropping one bomb, Blitzwing will drop 3 ice bombs. He doesn’t drop them at the same time, but the next two missiles you fire will become the drop bombs. The bombs themselves are similar, but deal 18% damage, with upwards knockback that can KO at 80%. They will also leave behind an ice patch (Or replace one, if there are already three on the ground). The ability to drop three of these bombs with some accuracy is great, but it only remains active while in Ice Mode, meaning you’ll have to take more damage in order to use them.
Down Special – Long Bomb
Blitzwing transforms into a tank, and then fires a purple bomb from his turret. The bomb is fairly small, and football shaped, close to a 2/3rd charged Super Scope shot. It flies forward at a ridiculous pace, basically at the speed of Sonic’s dash. When the bomb hits an opponent, they will take 3% damage, and very minimal knockback. What the heck!? Why didn’t the bomb explode!? That’s because it’s a STICKY BOMB, you idiot!
Like the much-maligned Gooey Bomb item, this bomb also sticks to opponent. When attached to an opponent, it acts practically the same, even exploding after 6 seconds. The difference here is that the opponent can’t transfer it to a different opponent by walking past them. No, the opponent is stuck with this thing and they’re gonna like it until it explodes! When it does finally go off it deals 20% damage, as well as heavy knockback that KOs at 100%! The radius of the bomb is around as large as a Bob-Omb explosion, and can affect other opponents!
This seems a bit too powerful, doesn’t it? Blitzwing’s mighty power will DESTROY HIS ENEMIES! Unfortunately, this isn’t the case here. The opponent can get rid of the bomb by simply moving around, with the total amount of movement totaling 4x a normal grab difficulty. This is a difficult thing to fully pull off, of course, but definitely possible.
Blitzwing can also aim his turret, in the same manner he can during the Blitz. The bomb is effected by gravity, and will usually enter an arching arc when fired out of the turret at any other angle than straight. When fired straight out, the bomb will fly forward 3 Battlefield platforms. This distance still applies to the arching shots as well, which can travel longer distances by technicality, but Blitzwing doesn’t do math, y’hear!?
When Fire Mode is activated, the bomb is changed. Instead of purple, the bomb will now be on fire. It acts similar when fired out, complete with it following gravity on anything but a straight shot. The difference comes in when it hits an opponent. As soon as it does, instead of sticking to the opponent, it will instantly explode into a fiery blast! The blast is far more powerful than before, dealing 30% damage, with knockback that KOs at 70%!
The downside with this move is the fact that it takes longer to fire. While the normal bomb shot takes around the same time as the regular Blitz shot, the fiery Long Bomb takes far longer, around 20 extra frames. This not only increases the amount of damage you’ll take while in Fire Mode, but also makes it more telegraphed. When the bombs hit the ground, they can create fire patches, which behave similarly to ice patches, but deal 2% damage for every 10 frames an opponent stands in them. Like the ice patches, moving over these while in Ice Mode will result in steam vents being created. Blitzwing can have three of these on stage, separate from the ice patches.
We’re not done yet, squishies! While using this move, if the up direction is inputted quickly, Blitzwing will fire the bomb directly upwards! And of course, it remains effected by gravity. Blitzwing will also usually go back to robot mode before it reaches its apex. This means that Blitzwing can sticky himself if he wishes. The application of this is pretty obvious, basically turning Blitzwing into a walking time bomb for the next few seconds. When the bomb does explode, Blitzwing will take half the damage, but absolutely no knockback. He’s a robot made out of the strongest metals in the galaxy, not some flimsy toy robot! This only works in robot mode, with the bomb dissipating if he goes into either tank or jet mode.
This can still be activated in Fire Mode. When the bomb hits Blitzwing in this form, it will explode instantly, dealing the full 30% damage, but dealing no knockback. Why would you do this?? Well, Blitzwing will catch fire in his robot mode. For the next 6 seconds, Blitzwing is basically a walking obstacle, unable to be touched, and dealing the same damage the fire barrier usually deals. The downside of this is that, as soon as the fire barrier ends, Blitzwing will fall to the ground in a unique stun animation. This lasts for a second, giving opponents enough opportunity to punish him.
Smashes Forward Smash – Zone Blitz
Blitzwing leans over, making it so that his cannon turret faces directly forward. If he keeps that up’ he’ll have a bad back! During the charge animation, the turret gathers purple energy, and then fires off a blast. This move behaves similarly to Samus’ FSmash, with it mainly creating a blastbox directly in front of Blitzwing. The hitbox is much different, however, firing out as a cone shaped blast instead of a circular blast. The attack has rather awful start-up lag, around 15 frames after charging to fire, but the attack, at base, deals 18% damage, with knockback that can KO at 120%. The hitbox, for the base charge, isn’t anything impressive, reaching almost as far as 1 Battlefield platform, but not quite reaching it.
Of course, there’s the charge. When fully charged, the blast causes 17% damage, with knockback that KOs at 90%. The blast’s hitbox is also much larger, reaching out 2 Battlefield platforms. This might seem incredibly overpowered, but when at full charge, it will take 25 frames for him to fire the blast, instead of 15. When fully charged, Blitzwing also gains a mediocre amount of super armor, allowing him to take 8% damage before being knocked out of the animation. He’s put too much effort into this than to be knocked out by a single jab!
In addition to this, Blitzwing can also aim this FSmash. He can’t aim it directly downwards, he’s already leaning as much as he can, but it can be aimed at an upwards direction angle. This is activated by doing what you do on basically every character who can aim their FSmash, what do you want? Anyway, if timed properly, the angled version can make for an incredibly useful anti-air attack. You know, air to ground stuff! Zone Blitz is Blitzwing’s main KO attack when outside of a vehicle mode. It can be incredibly hard to use properly, as opponents can easily take advantage of it, but a well timed shot can change the game itself.
Up Smash – Jump Shift
First off, for Blitzwing’s Up and Down Smashes, they behave a bit differently than other Smash Attacks. They both start with Blitzwing performing his transformation animation into either mode, increasing the total start-up lag, before going into the charge animation. Second, this particular attack cannot be used during most parts of the jet mode’s transformation combo. The only move that can combo into it is the Side Special, due to it remaining on the ground.
Anyway. The attack has Blitzwing transform into his jet mode, pointed directly upwards. The jet takes up around a Bowser and a bit of model space. He then launches off, with a burst of jet fire. These both function as hitboxes. The jet itself acts as a carrying hitbox that reals multiple hits of 3-4%, with the damage totalling to 15-20%. The last hit of this hitbox deals the knockback, launching the opponent upwards at knockback that can KO at 200-180%. This is the weakest of Blitzwing’s Smashes, but it serves a good purpose as a combo starter. Once this finishes, Blitzwing will exit into his glide.
The jet fire that blasts Blitzwing off acts as a AoE explosion effect that reaches a quarter of a Battlefield platform away from Blitzwing’s already rather bulky jet mode, dealing a set damage of 10%, while also dealing backwards knockback that can kill at 250%. Still weak, but the main purpose of this is toe keep opponents off your tail while you use the main attack.
For Ice Mode, this attack doesn’t change for the main hitbox that much, boosting the total damage to 20-25%, with knockback that KOs at 160%. The real change comes in the jet fire’s hitbox, which instead changes to a blast of ice, rather than fire. The ice has a slightly extended hitbox, covering half a Battlefield platform on either side of Blitzwing, but now deals 15% damage with heavy upwards knockback that KOs at 120%. This also gives the opponent an ice effect, that behaves exactly the same as described before. The burst of ice also leaves behind 2 Battlefield platforms worth of ice patches as well.
Down Smash – Sweep
The details about the starting animation were covered above so LET’S GET THIS STARTED! Blitzwing transforms into tank mode, and charges up… something. The only indication is the tank turret twisting around a bit during the charge animation. When the attack is finally released, Blitzwing will spin around rapidly in tank mode, his turret pointing forward. This attack has a massive hitbox to it, due to the tank’s overall size, but the lag makes it very telegraphed, and there is bad end lag.
The tank deals rapid damage, like the Up Smash, but a bit more direct, with a vortex effect as well. The tank deals 4 hits of 4-6% damage, totalling up to 16-24% damage. Like most of these moves, the final hit is the one that deals knockback, which is capable of KOing at 130-90%. The tank has an added ability, as Blitzwing can briefly move while the attack’s hitbox existing. It’s the slowest movement speed in the game, and you won’t be able to get very far while using it.
This is something more useful when applied to Blitzwing’s momentum capabilities. During a Transformation Combo, if Blitzwing has gathered up enough speed, using this move will keep all of the momentum to it. This can have it be a good finisher to a combo, though the uncharged version will most likely end up being the one used, due to it having less start-up time.
In Fire Mode, the attack doesn’t change a whole much. Aside from the obvious fire effects, of course. Its damage output is raised to 5-7%, with knockback that can KO at 110-80%. However, it will leave a flame patch on the ground, two in total. The movement the attack can do is also boosted, as inputting a dash during it will cause Blitzwing to burst forward a whole 3 Battlefield platforms, meaning he can leave behind 3 fire patches. Oh yeah, and there’s also this move getting extra range being incredibly useful or something.
Standards Jab – Sluggo
Like most characters in Smash Bros., excluding losers like MegaMan and Wizzerd’s Sukapon, Blitzwing has a very standard jab attack. The attack consists of Blitzwing performing a right hook, a left hook, and then a stomp. The attack is mostly slow, taking considerable time for Blitzy to throw out each hit. The first hit, the right hook, deals 4% damage, while the left hook… also deals 4% damage. Who’d have thought. Both hooks are very similar, aside from their damages, each going forward considerably.
Thought, like most combos, the last hit is the one that deals knockback. The stomp is the most important part of Blitzwing’s repertoire. It deals a heavy 6% damage to the opponent, totalling the damage at around 14% damage, pretty good for a jab. Of course, its hard to do the full amount of damage with how slow the attack is, but whatever.
Either way, the stomp has far less reach than the hooks, but is a bit faster. The knockback of the stomp is directly upwards, and leaves the foe hanging for a few frames. Its capable of killing opponents at 150%, which plays into the part where this is a very good combo starter. As in normal combos, not vehicle combos. Though, any move that’s good for a combo is fairly decent for starting up a vehicle combo as well.
Forward Tilt – Spike
Blitwing pulls out his Cyber Scimitar (That purple blade thingy in his image. Are we really calling that a scimitar? Really?) and swings it in an overhead arc. The sword is large, thicker than a usual sword in Smash, but around the same length, hitbox-wise. Unlike most sword moves, this is also incredibly slow, taking almost 3 times as long to complete as an average sword user’s FTilt would.
The hitbox of the move starts as soon as Blitzwing swings it, going from around the midpoint of Blitzwing’s model to the end of its swing. This comes into play as a good anti-air move, as the sword is capable of dragging down airborne opponents if it hits them during the swing part of the attack. The sword will drag them directly to the ground, but only deal the move’s standard damage. Oh yeah, that’s 10% damage, by the way. When an opponent is dragged by it, they will take minimum upwards knockback that can KO at 300%.
The normal knockback of the move has it dealing much tougher upwards knockback, which can KO at 120%, fairly incredible for a standard! Oh yeah, it’s slow as scrap, which isn’t very good. The knockback is decent in both cases of it, allowing Blitzwing to either head into a ground attack, or into an aerial one. The move’s slow nature can be used to help surprise aerial opponents as well, considering how early they need to be hit with it.
Up Tilt – Pyramid Play
Blitzwing turns to face the screen, and braces himself for something. He then fires out a host of small missiles from his turret. He fires around 4 different missiles up 3/4ths of a Ganondorf, before they spread out, and fall back to the ground. The missiles spread out a bit, the first two landing directly on either side of Blitzwing’s model, while the other two travel a Battlefield platform away from Blitzwing, also on either side of him.
Depending on whether the missiles are grouped or not changes the hitbox of the move. When grouped together, the missiles form a large missile, around the size of a Super Missile. They form a single powerful hitbox, dealing 15% damage on contact, which causes an explosion. The knockback of this is also powerful, being able to KO at 130%, keeping in line with Blitzwing’s hilariously powerful moves. Unfortunately, the projectile travels slowly, around Mario’s fireball speed. This also keeps with Blitzwing’s powerful but slow nature.
The missiles that break off once they reach maximum height are much faster, more comparable to Mega Man’s buster shots, and are around half the size of one of Samus’ missiles. They deal a lot less damage, however, only causing 4% damage each, with knockback that can generally KO at around 250%. The explosion they cause technically acts as the hitbox, meaning that the hitbox still remains active once they hit the ground and explode. While the large missile will always cause upwards knockback, the small missiles will deal knockback dependant on their current direction. That basically just means backwards and downwards knockback.
The attack has some bad start-up lag to it, comparable more to a Smash Attack rather than a standard, but as soon as the missiles fire, Blitzwing can move around on his own. The main purpose of this move, like the FTilt, is as a decent anti-air move. Its somewhat more focused on this than the FTilt, as the missiles will usually be capable of bringing opponents to the ground. Its more erratic nature makes it less reliable at this than the FTilt, however.
Down Tilt – Slant
Blitzwing, from his crouching animation, pulls out his Gyro-blaster Rifle. Don’t ask me what it does. He then fires out a laser blast from it, which spins around like a drill. A projectile on a DTilt is fairly unprecedented, but trust me, this does play into Blitzwing’s playstyle. The projectile, being drill shaped, acts functionally like Blitzwing’s own personal Drill Arm that he can use whenever he wants. Of course, there are more limitations to it.
The blast is only around 1/3rd as tall as the Drill Arm, but is comparable in length to a Space Animal laser shot. It travels slightly faster than the Drill Arm, but also has a limited travel length, only being able to go 3 Battlefield platforms forward. The projectile still retains the Drill Arm’s multiple hit capabilities, but this, again, has a limiter on it. The blast can only deal 4 hits of 3% at maximum, but this will tend to drag opponents along for the entire distance if they let it. The attack doesn’t deal knockback, other than it dragging the opponent along.
By default, Blitzwing will fire the shot directly forward, where it hangs above the air by around a Kirby in height. If you hold the button, Blitzwing will figure out he can aim the thing too! While holding the button down, you can have Blitzwing aim it in four different directions, directly up, diagonally up, forwards, or diagonally down. Blitzwing can aim for however long he wants, and only fires the gun after the button is let go of. Diagonally down is completely useless for basically anything other than ledge guarding, but there are downsides to that.
The biggest downside of the move is that it is very much not rapid fire. Blitzwing can only fire one off at a time, and even then, there’s around half a second of lag before he can fire it again. This awful lag makes it generally useful for two things, approaching, and starting up airgame. The blast helps with approach due to Blitzwing being able to move around after it fires, but this mostly applies to the forward shot. The diagonal and upwards shots help with starting up airgame, as the stun can give Blitzwing enough time to head into a jet combo.
Dash Attack – Power Run
Blitzwing, during his dash, quickly transforms into a tank, becoming a brief hitbox as it slams into the ground. This is rather large, due to it being the entirety of the tank acting as the hitbox. This slam is powerful, dealing 10% damage, with knockback that KOs at 120%. But, the start up to it, like most transformation animations on Blitzwing, is laggy, making it unreliable as a KO move.
When the tank hits the ground, it will automatically slide forward, keeping all of Blitzwing’s momentum. This activates the tank’s passive speed hitbox effect as well, but only for a short bit. This is mostly the real purpose of the attack, with the slam hitbox acting as a hard to hit bonus. The momentum hitbox doesn’t last long though, and can’t be sustained by moving the tank forward.
Like all tank moves, Fire Mode can be activated during it. This functions in a few different ways. The first being that the slam becomes even stronger, dealing 15% damage, and being able to KO at 90%. The second difference is that momentum is sacrificed during this, meaning Blitzwing stops instantly when using the attack. This can help segue into Transformation Combo easier, however. The last major change is that the slam now leaves behind 2 Battlefield platforms worth of fire patches once it hits the ground.
Aerials Neutral Aerial – Student Body Right(& Left)
Blitzwing turns to face the screen, bringing all his limbs inward. He then splays them out, letting out a roar, as a massive burst of both fire AND ice surrounds him. The blast is fairly large, even for an AoE effect, managing to surround Blitzwing’s entire model, and 1/3rd of a Battlefield platform on all sides. The blast is split in half, fire on the right, ice on the left. Aerial positioning is very important on this move, as it changes completely depending on which side hits.
For the fire side, the attack will unleash a devastating 16% damage to any WEAKLING that the move hits. Its knockback is fittingly powerful as well, being able to KO at 80%. The ice side, however, will cause a much more subdued 13% damage, with an ice hitbox that freezes the opponents in a fairly standard Smash Bros manner. Its hitbox can only KO at 120%.
Both sides have utilities. The fire side is obviously an incredibly powerful KO move, while the ice side is more likely to be used combo purposes. The main problem with the move is it has incredibly bad lag on both ends. Start-up lag is the lesser of the two, with it only being somewhat noticeable, and the hitbox coming out fast afterwards. The end lag is pretty bad, with Blitzwing falling at least half a Ganondorf before being able to use another move in the air. The hitbox comes out fast, however, making it one of the more punishable moves in Blitzwing’s already punishable arsenal. The move can be used out of a shorthop, but the amount lag will still remain when Blitzwing hits the ground.
Forward Aerial – Flea Flicker
Blitzwing transforms into jet mode, aiming his nosecone diagonally downwards. He then fires a burst of missiles downwards as well, the force of the blast pushing him upwards a bit. Once the move ends, Blitzwing will enter his glide. The missiles themselves are comparable in size to the ones usable while gliding, but they are considerably different. They fly a bit faster, and only travel 2 Battlefield platforms before exploding.
Blitzwing will fire around 3 missiles in quick succession, leaving barely any space between each one. The missiles explode on contact with an opponent, dealing 5% damage each, with each missile having knockback that can KO at 160%. The attack itself is weak, but it can become very useful for racking up damages, or even just ending a combo. Its also by far one of Blitzwing’s best air-to-ground moves.
With Ice Mode activated, the move changes considerably. Instead of firing several missiles, Blitzwing will now instead fire a burst of ice diagonally downwards. This comes in the form of a cloud, with its strength still pushing Blitzwing upwards a bit. The range of the attack is reduced by a lot the cloud only reaching out half a Battlefield platform, though it covers roughly the entire front of the jet’s model. The damage is increased somewhat, with a single hit of 14% damage. It also deals similar knockback to most ice moves, launching the opponent upwards with a purely cosmetic ice effect. It can KO at 130%.
Up Aerial – Air Option
Blitzwing transforms into jet mode, and performs a quick loop. This behaves significantly differently from the Up Special, due to the loop being much smaller. In fact, the overall pattern is more reminiscent of a spiral, as Blitzwing will end the move slightly above where he started. Blitzwing will travel upwards around 1/3rd of a Ganondorf high, and end the move only slightly higher than where he started. The main purpose of this is that it allows Blitzwing to glide for much longer than normal, due to him being boosted a bit.
As a hitbox, it is quick, one of Blitzwing’s faster moves, but it only exists as Blitzwing goes up, making it short as well. It deals 12% damage, with knockback that can KO at 200%. Basically, it’s on the weaker side of things. The utility of it as an attack is mostly as a popping tool, capable of keeping opponents in the air much longer. Blitzwing can only use the rising effect of it once per jump, however, with each other time having Blitzwing perform a smaller, full loop.
When Blitzwing activates Ice Mode during the attack, it will behave somewhat similar to the Ice Mode variant of the Up Special. That is, during the loop, Blitzwing will fire off some ice missiles. The main difference here is that Blitzwing will specifically fire three of them upwards, at slightly different directions. The missiles behave like missiles elsewhere in the set, but deal 10% damage each, with the same kind of knockback as with other missiles, KOing at 140%. The main removal for this version of the attack is that the recovering aspect of it vanishes completely, with Blitzwing just performing a full loop. Using the normal version of the attack afterwards will also not result in the recovery part.
Back Aerial – Reverse
Blitzwing, leans backwards, his cannon starting to gather energy. He then fires out a blast, the strength of which flips him back into his normal position. This is one of Blitzwing’s more basic aerials, as it behaves similarly to the FSmash, though, obviously, a lot weaker. The blast itself is a lot closer range than the FSmash’s. firing with a much smaller cone shaped hitbox, reaching forward about half a Battlefield platform. The attack is still very powerful, dealing 15% damage, with knockback that can KO at 110%.
Of course, and I might be repeating myself at this point, but the main problem with this attack is how slow it is! While Blitzwing leaning over is fairly quick, the actual blast takes a bit to fire, with Blitzwing travelling a bit through the sky before it fires. Once it does fire, Blitzwing flipping back around acts somewhat as brief ending lag. The power of this move makes it mostly good for aerial KOs, and not much else.
Down Aerial – Checkdown
Blitzwing quickly transforms into his tank mode, and then stalls for a few frames in mid-air. He then crashes down on any pitiful fools below him, in a rather standard stall then fall attack. The hitbox of the attack is rather large, due to the tank being rather large, but the fall has a bit more start-up to it than most stall then falls, if only by a handful of extra frames. The attack will deal 16% damage to any pests it squishes, with its knockback acting as a meteor smash that can KO at 120%.
This is one of the better attacks to start a Transformation Combo with, as it can be used out of a short hop, and quickly transition to ground based combat. If the tank manages to hit an opponent while they are grounded, it will perform the cosmetic pitfalling effect. If Blitzwing doesn’t move off of the opponents, it will last 10 frames before the opponent pops out on top of Blitzwing, usually in his blind spot. Pitfalling the opponent will cancel all knockback, idiot, so try to hit opponents in the air!
Blitzwing can activate Fire Mode during this, obviously making the attack that much stronger! The move’s damage is upped to 19%, while it can KO at 80%. The main problem with it is that Fire Mode still deals damage to you while you’re in the air, and the pitfall effect will become active if Blitzwing hits an opponent on the ground. To make full use of Fire Mode’s power during this move, you’ll have to time it incredibly well. Also, when the tank crashes into the ground, it will create two fire patches underneath it, which don’t affect any opponent who was pitfalled beneath Blitzwing.
Grab Game Grab & Pummel – Statue of Liberty Play
Blitzwing’s grab is remarkably simple, much like Blitzwing himself! He performs a simple swiping motion with his arm, in a rather massive swing. It has a lot more range to it when compared to most normal grabs, due to Blitzwing’s already massive body, but it is also slower than most grabs, fitting Blitzwing’s style.
When grabs the opponent, he lifts them up into the air by their neck, or closest approximation. During this time, Blitzwing can activate his pummel, of course. It is also fairly standard, as Blitzwing will squeeze the opponent for 3% damage. Like all higher damaging pummels, this one is also slower.
Forward Throw – End Run
Blitzwing lifts the opponent up, and then slams them down into the ground, his hand still holding them. The then rushes forwards a bit, and tosses them up. This is by far the simplest of Blitzwing’s throws, leveling more like what Bionichute would normall do back when he wasn’t trying to be good! Basically, that mean’s its fairly standard.
The most unique part of the throw is the dragging part, as that’s the part of the attack that deals damage. Blitzwing will travel forward around two Battlefield platforms, or until he hits an edge, before throwing the opponent off. Depending on how far Blitzwing drags the opponent, the damage will change, with a full drag resulting in 10% damage. The actual throw part of the move is rather weak, at least for Blitzwing, being able to kill at 170%. The arc of the throw is kind of an upward arching throw as well.
Down Throw – Flat Route
Blitzwing lifts the opponent into the air, and then slams them into the ground, in an animation similar to a football player spiking the ball. The opponent, thrust into the ground by Blitzwing’s incredible strength, are instantly pitfalled. Though, like most cases in the set, this is purely cosmetic. Blitzwing then follows this up by transforming into tank mode, and grinding over the opponent two times, each hit dealing 4% damage. Once this is done, the opponent is launched off at knockback that KOs at 150%. The knockback activates as soon as Blitzwing finishes, during which he drives off the opponent. This allows the opponent to launch off, as well as letting Blitzwing move around if he wants.
The tank, of course, has a Fire Mode variant. It doesn’t change much, but boosts the damage to a more dangerous 14%, along with boosting the knockback so that it KOs at 100%. The main interesting point of this move is that, due to how activating Fire Mode actually works, you can’t just double tap the button during the start of the attack. Instead, you’ll have to wait until Blitzwing starts to transform. This applies to the next two moves as well. Fire Mode will also create two fire patches, one on either side of the opponent, but this still does not effect the opponent themselves.
Up Throw – Fly
Blitzwing tosses the opponent into the air, and then quickly transforms into jet mode. He scoops the opponent up in his cockpit, and then rockets up into the air. This throw is unique in that Blitzwing himself acts as the throw part of the move, with a fixed distance of 3 Ganondorfs into the air. Once Blitzwing reaches the maximum distance, the opponent will be launched out of him.
The launch has Blitzwing transform back into robot mode, dealing an incredibly low amount of knockback (Kills at 300%), while also dealing 3% damage, making it one of the weakest throws in the game. At most percentages, the attack will result in the opponent popping out directly in front of Blitzwing. This makes it fantastic as an aerial combo starter.
Like with most Transformation Combo based moves, Blitzwing can remain in vehicle mode after using the move. But, in this case, the move only ends once Blitzwing reaches his maximum height. This lets you carry opponents around in your cockpit for a bit, with them being able to escape at half the standard grab difficulty. Them escaping will also push them up, and recover their jumps as well.
The Ice Mode of this attack is incredibly simple. The opponent will simply take the amount of damage Blitzwing receives when in Ice Mode, at the same rate. This can rack up damage remarkably fast, especially if you go into a glide with the opponent still trapped. The downside is that, when the attack ends, the opponent will be launched downward into a standard aerial state, allowing them to easily get away, and also break away from any potential combos.
Back Throw – Out
Blitzwing lifts the opponent up, and slams them into his tank turret, head first. He then transforms into tank mode, and fires the opponent out, turning them into a living projectile. This is Blitzwing’s most powerful throws, since it is a tank. The opponent is dealt 14% damage, and is able to be KOed at around 100%, though this only applies to middleweight characters. How the opponent is fired, however, depends on multiple factors, the first being the opponent’s weight.
Weight is attributed in how the arch of the attack is handled, as well as the damage the opponent deals when it collides with another opponent. This can scale from 4% for lightweights, to 10% for heavyweights. Heavyweights tend to be shot a lot less farther than lightweights, however. Ugh, math sucks!
The second part that effects the move is how the turret is aimed. Like the Neutral Special and the Down Special, Blitzwing can aim the turret while this move is activated. This specifically acts like how the Down Special does when shooting out a bomb, with it affecting the opponent in the same way. The opponent, unlike a bomb, can escape from Blitzwing’s turret, at the same level of grab difficulty as the Up Throw’s cockpit hold. The attack will not do anything if the opponent escapes, but you can remain in tank mode and perform the rest of a vehicle combo if you wish.
When fire mode is activated, the opponent will catch fire as well, though this doesn’t apply the fire damage effect to them. Instead, it simply boosts the damage they take to 18%, at the exchange of the move taking a bit longer to fire. The opponent’s contact damage is boosted by 2% on all fronts. Once the opponent hits the ground, the fire effect will vanish from them, and instead turn into a fire patch.
Final Smash ZoneDefense
Blitzwing has the Smash Ball, and its time to unleash his ultimate play! ZONE DEFENSE!
The ‘con lets out a growl, causing a large scoreboard to appear. One side is labeled “Blitzwing” while the other side is labeled “Visitors”. He then transforms into tank mode, catching on fire, and begins spinning the turret around, firing fire blasts rapidly. They act like Long Bombs, though they travel at much higher, shorter arcs than a Long Bomb. While this only lasts 5 seconds, he fires a ridiculous amount, each causing 8% damage with high knockback. The tank, of course, also becomes a massive hitbox, behaving like it usually does while on fire.
After 5 seconds pass, Blitzwing will then transform into jet mode, and rise up to the top of the screen. During this, he enters flight mode, constantly dropping ice bombs onto the stage. These bombs fall fast, and there is plenty of them to go around! They behave basically exactly like the fire blasts from the tank section, only with an ice theme instead of a fire theme. Instead of the usual slipperiness of the jet’s ice form, it will instead have an ice themed version of the tank’s knock away hitbox.
So, what about that scoreboard? Well, with every action during the Final Smash, Blitzwing’s score will go up. He gets 1 point just for hitting the ground, 10 points for hitting an opponent, and 100 points for KOing an opponent. The “Visitors”, that being his opponents, cannot score, period. Once the attack finishes, Blitzwing will let out a line relating to his score, negative with a low score, and positive with a higher score. This does nothing, and is mostly just a fun sight gag.
Mimikyu, the Disguise Pokémon. It's not wearing Pikachu's costume for fun. It's the thing that he hates the most. Pikachu was in Smash since SSB64, so this make Mimikyu's hatred grow even bigger and ready to release it on anyone that cross his path. It's not here to make friends.
~ NOT-SO-CUTE ATTRIBUTES~ Mimikyu is small and light. It have the same size as Olimar. His biggest disadvantage is his weight, being light as a feather, same as Rosalina He is not fast on ground, having the same speed and dashing as Zelda. However, his air movement is pretty unexpected. Having an Air Speed, Air acceleration and Air Friction at the same level of Wario, plus a decent falling speed and gravity. His jumps are average. His attacks are stronger in terms of damage and knockback on the ground. Good grab game. He is hard to approach too. So we need to play rough here.
Mimikyu have a unique trait: his Disguise ability. This make him starting with a extreme defense that have 20% of stamina at the start of any battle. He cannot take damage and cannot be flinched until these 20% are given to him after the battle starts. It's just a small thing to give him some advantage. BUT he can still be grabbed and thrown. If he is hit by an attack that cause more than 20% it still not flinch until the Disguise wears off. A small blight occurs when the Disguise ability is off and will only return if Mimikyu loses a life.
~ SPECIAL SPECIALS ~
NEUTRAL
SHADOW BALL
His Shadow Ball works differently. His eyes will glow yellow, them a scarlet energy sphere will appear. It fly straight forward and moves very fast. It's not big in size, being half the size of its body on its maximum. Also, Pressing B one time doesn't make it start charging, you need to continuously press B to make the attack bigger and faster. He cannot cancel and save the charged Shadow Ball. Pressing B just one time and waiting 1.5 second makes him release a very small and slow version, that can come in handy when trying to approach opponents. Uncharged can deal around 10% damage, while charged at maximum can do 20% and a VERY high knockback for a small projectile.
SIDE SPECIAL AFTER YOU
A chargeable reflector. Pressing B will make him swing his fake tail, reflecting any attack or item back at the same power and speed. Holding B after 2 seconds will make his tail glow blue, and releasing B will make it swing it. If it hits something while charged, it will sent it back with the double of the power and speed. In physical terms, this attack have a short range. Uncharged can deal around 7%. The chargeable one is strong with a decent knockback and having a semi-spike angle, dealing around 15% of damage. Also, using it in air will make Mimikyu stops briefly before starting to fall again, and charging it will make him move slightly forward upon unleashing it.
DOWN SPECIAL ASTONISH
Mimikyu will glow with a ghostly aura. After that, you can choose the direction that he will dash. It can go up, down if on the air, straight forward or back, having only four options. It will move 5x his body size, moving fast as a dashing Sonic making an average range. It will stop after hitting someone or something. If he hits an opponent on the ground, it will make it dizzy, also giving some small amount of damage (6%). In the air it just flinch, but you can start attacking after the attack connects, making good combo opportunities. Don't miss this attack, it have a lag that leaves you punishable. Also, in air it gives you a flight momentum. Can be used for recovery too!
UP SPECIAL FAIRY WIND Mimikyu will start flying in a moon shaped angle, first going straight forward and ending it going straight up. It's fast! Comparable to Rosalina's Launch Star in speed and distance travelled, however he will stops when reaching his limit. It leaves a dust like effect behind him. This dust will slowly falls down and it can hurt opponents that makes contact with it. The dust can cause 2% per hit. If it hits somebody while he is flying, it will carry on opponents with him until he reaches the maximum point of the attack, giving some good damage (13-15%) and a little of knockback. It haves a very good flight distance, making it a very good recovery move.
~ FUN ON GROUND ~ NEUTRAL COMBO Mimikyu will swing its tail forth, back, and on the third attack it will glow blue and he will swing it so fast that this can multihit 10x opponents before launching them forward with a more powerfull swing. Fast and good range when the tail is glowing with the ghost aura. It can also hit above if close enough. Does not have much knockback. First two hits does 2% damage each, while his multihit can deal 1% per hit, making a total of 14% if all attacks connects
SIDE ATTACK COMBO One of his shadowy hand will come out and slaps to three times if pressing A. The third hit lift opponents up (but not straight up). Surprisingly great knockback for a side attack. Can deal a total of almost 12%.
DOWN ATTACK Swing his glowing tail down, sending opponents on a semi spike angle. Gives a whopping 13% of damage. Good for edgeguarding. It's not much an attack for combos.
UP ATTACK Think on Pikachu's Neutral Attack that is a straight headbutt. Here is the same thing, but Mimikyu will headbutts straight up with it glowing eyes. It comes really fast and hack good damage if you can catch the opponent near the body, so keep hitting them. it haves a set knockback, it's made for comboing. Each hit cause 2%. It's possible to hack up 24% damage here. Even better against heavy weights and bigger characters.
DASH ATTACK Mimikyu will do a headbutt while his body glows in his hatred ghostly aura. Haves a good knockback and deals 11% of damage.
FOWARD SMASH One of Mimikyu's hands come out slowly before moving REALLY FAST forward while his eyes glow yellow. It have a great range, more range than more of the swordsman in the game, and is Mimikyu's strongest attack in terms of knockback. It pauses the opponent in place for a second dramatically. Can deal 11% uncharged and deal 17% charged. Have fear for this attack. Charged it can kill around 55% on medium weights characters.
DOWN SMASH Mimikyu will glow with his ghostly aura, and then this aura will come down his body, unleashing a blue burst under his disguise around him. It will do the same amount of damage and knockback on both sides, dealing almost 20% fully charged, making this his strong Smash in terms of damage. It's have some weirdness attached to it, because if the opponent is hit on the left side, it will blast to the right, while getting on the right will blast to the left. Also, a hibox right under Mimikyu will send the opponent to the ground like a ball, making it fly straight up. Hard to hit with this hitbox. It's possible to meteor smash, so it's easier to hit with this on platforms. It deal the same amount of damage as the side hitboxes.
UP SMASH Both of his hands will come out in front of him while his eyes glows yellow, then with will scratch upwards, making his body twist 360 degrees in the process. Can deal up to 16% charged. It's have a good knockback, but not strong as his forward one. The angle the opponent is sent depends on the position it is hit. In front of him, the opponent will go almost straight up but a little forward. Near his disguise's face will sent them straight up, above it will sent them up but a slightly back. if a little behind Mimikyu the opponent will moves back greatly.
~ SWEET AERIALS ~
NEUTRAL His eye will glow yellow while his body will burst in his blue ghostly aura. Can deal 7% and can send opponents backwards or forward depending of the hitbox that connects. Have an average knockback but it's good since it covers his entire body.
FORWARD His eyes will show a sparkly light foward. It comes out fast. Have a good range and can deal 6%. It does have a poor knockback, but it can hit twice it it connects properly. It also doesn't give much lag when landing. It is Baby-Doll Eyes actually.
BACK His tail will hit 8 times in a row very quickly. It have heart effects around it. Each hit deals 1% and last hit haves a decent knockback that can kill around 100% near ledges. His best aerial in terms of knockback.
DOWN Both of his shadowy hands will start scratching downwards, scratching 5 times in total, each it dealing 2% of damage. Hits can connect each other easily. Last hit is a meteor smash.
UP Headbutts up with his disguise. His second strongest aerial in terms of knockback, but deals only 6-7% of damage. It's good since some of his attacks on ground lift up opponents.
~ CREEPY GRABS ~ Mimikyu's grabs consists of him putting his two shadowy hands out to try to hold opponents. It's have a surprisingly good range since his hands aren't common ones. But it's a little laggy, so beware.
PUMMEL While holding the opponent Mimikyu will burst his hatred ghostly aura forwards, dealing 3% per hit with an average speed attack.
FORWARD THROW Mimikyu will create a small shadow ball and will shot at the opponent. Have a goodt knockback and can deal 10% damage.
BACK THROW Mimikyu will play rough before putting his opponent on his back and swinging his tail glowing in ghostly aura. Is his strongest throw in terms of knockback, can kill medium weights at around 90% near edges.
DOWN THROW Mimikyu will put his opponent under him and will start bitting it four times, then the opponents is sent upwards slightly in front of him. Deals 12% total (creepy).
UP THROW Mimikyu does an uppercut punch with his shadow hand, sending opponents straight up. Deals 9% of damage and an average knockback, starting to kill medium weights at 140%.
~ FINAL SMASH ~ UNDISGUISE Mimikyu will burst his hatred aura around 4 times the size of his body in all directions. Anyone caught on this will suffer a cutscene of undecryptable terror. They will all be sent to a darkroom where they will see Mimikyu leaving his Disguise empty, and when they look back, they will see such a giant mass of malice with two glowing eye rushing towards them. After this cutscene ends, characters on the ground will have taken 40% damage and will be dizzed. while in the air they will be sent flying with the force of Mimikyu's forward smash. Also, anybody that reaches 100% or above will suffer from faint (the body will be lying on the ground like it was reached a 0 HP) leaving Mimikyu to kill it freely. So creepy, so playful.
Haha, welcome to Make Your Move! About time someone made a set for this iconic little guy, we need more Gen 7 Pokemon (only have Turtonator and the starters right now). The presentation here is charming and the GIFs are crisp (where did you get them from?), making for a fun little experience. But I must address the moveset itself, if you don't mind.
While not a huge issue, the set's wording can get a bit confusing at times, and makes it difficult to comprehend how some of the moves work as well as being contradictory on a few occasions (Mimikyu is described as having an advantageous weight stat despite being as light as Rosalina. I would imagine it to be heavier given it is slow). From my understanding, Shadow Ball has 1.5 seconds of starting lag and the ball gets bigger, faster and stronger as you mash B during that lag, though it's hard to tell. I must also point out the 1.5 seconds is a very, very long time to spend preparing a simple projectile, half a second would much more balanced. F-Smash is also a bit of a mismatch in more ways than one: the damage is low for a hard-read kill move (they usually deal like 25-30% on average). I didn't notice any other glaring issues with the numbering. That being said: as much as I like the take on the Disguise ability, being immune to hitstun is a bit hard to overlook, as it means you can punish practically any non-grab moves even if only for a little while. You could just make Mimikyu immune to damage? I also had trouble with smash times and numbering when I started out, so don't worry! It's something you'll get the hang of as you learn more.
The moveset here is pretty basic, but that's only fair given our contest has extremely high standards that have only gotten more strict over the years. If you're looking to commit yourself and meet these standards, I would suggest the development of a more coherent, noticeable and 'unique' playstyle. Every reasonably-balanced set will have a playstyle molded from its pool of moves, whether or not it flows together perfectly or fits the character like a glove, but here it is not put to the forefront and has to be pieced together by the reader - from what I gather, Mimikyu seems to be a defensive character given the projectile Shadow Ball, Side Special reflector and ranged F-Smash for punishes, but moves like the Down Special seem to suggest otherwise. For a more in-depth look on playstyle, I would strongly suggest reading other movesets in this contest (especially those ranked high on the "Rankings" compiled by ForwardArrow a few posts above), or even reading guides on existing smash characters as they generally all have coherent playstyles. Or you could watch guides, like these ones for instance which go in a lot of depth about smash mechanics and what purpose even the simplest of moves serve among other things. It's not something I can explain easily as of now.
The above paragraph assumes that you're looking to take MYM seriously, but even if you aren't, it's still cool! Every MYMer great or small has something to offer, and all contributions are appreciated - even if said appreciation may not always show. Mimikyu was a nice little outing, and make me curious for what we'll see from you next.
By the way, you're more than welcome to hop onto Skype and join our chat, more details in the OP (first post) where a portion of my influence still remains. More active MYM'ers like Jamie, Smady and Froy will give you advice and insight on movesetting, a fast-track to development, or you can just talk about whatever you like with them. Happy movesetting!
MYMCC: Once the Romero Roolpocalypse is over (that's been going for a long time, hasn't it?), we should all make Specials-only, Assist Trophy or Boss for a moveset we've made in the past...preferably a more outdated and terrible moveset from pre-MYM15. Or you could do a 3v1 boss addition to any moveset you've made, good or bad for masterpiece or memetic fun. If you don't have a long movesetting history or a lot of movesets to pick from (like less than 10), you can instead pick a moveset done by an inactive/dead MYM'er - essentially any MYM'er who hasn't posted in this thread - or just anyone you like if you're not sure. MYM'er List here. If you qualify for this, it means you can do Dr. Strangelove! Recommended you use a terrible set as the base and provide a link to it somewhere in the mini (some characters like Rool and Darth Vader have multiple sets), for maximum memetic mayhem.
Iguana is the evil counterpart to Lizard from the Expanded Lizard Lore, which doesn't actually exist. Iguana was formerly a man at the pinnacle of magic society, perhaps the greatest "magic scientist" who ever lived, exploring the fundamental laws of magic and how it can be manipulated in ways beyond imagining. His work laid down the foundation of magic university textbooks, including the ones Lizard spent hundreds of hours pouring over to get through magic college, as well as the groundwork of many new "magical technologies" that came up across society. What few know however is that Iguana is actually absurdly evil, and seeks to strip away the free will of the entire multiverse as he delves deeper and deeper into the nature of magic, to create a perfect combined universe dedicated to the service of him and a couple of his friends.
Life was going well for Iguana when he began the casting of a spell that would at least serve as a temporary holdout to ruling the entire multiverse, one that would strip magic away from the rest of his world using a massive catalyst stone he found. Unfortunately for him, his plans were interrupted by Lizard and the witch who turned him into a lizard, who formed an alliance to stop him after figuring out he was evil. Iguana casually killed the witch and showed Lizard how far superior he was in all forms of magic, but with the witch's dying breath she hit him with the same spell that she used on Lizard. This turned him into an iguana, which distracted him long enough for Lizard to destroy his catalyst and run. Now both out of a desire for revenge and to keep the knowledge of his evil deeds secret, Iguana and his minions pursue Lizard across the world, seeking to annihilate him for ruining his plan.
By the way, his real name is Schwarzen, if anyone was curious.
Unlike his tiny nemesis, Iguana is actually big enough to sort of fit alongside the smash cast, being extremely short but as wide as Wario. He's slightly lighter than Jigglypuff because while he's a bit fat as Iguana's go, that's not saying much compared to the rest of the cast. He is incredibly adept in the air, having a strong first jump and two jumps that resemble Ness' second jump that go considerably further and can be angled heavily to allow for some amazing aerial movement. Iguana has true perfect traction, able to stop on a dime. Unfortunately even with some magical enhancement, his stubby iguana legs don't carry him far, so he has rather underwhelming movement speed.
Minor thing, but its worth noting that when he's so short his crouch is pretty weak, just ducking his head closer to the ground. He does, however, have a crawl and a wall cling.
Specials
Neutral Special - Observation Stance Iguana floats slightly into the air and reclines as if sitting on a throne, with as smug of a facial expression as an iguana can reasonably be expected to make. He will do this for an initial 10 frames, and then as long as you hold the button afterward. During this time, if a character within one battlefield platform of him performs a move, he will commit it to memory. If you press an input that has been observed during or immediately(within 10 frames) after exiting this pose, Iguana will fire forth some red magic from one of his claws that will take a form that exactly copies the given move. If a grab is observed by this, Iguana will get access to all the throws that come with it afterwards. Iguana has nowhere to hide but he only needs to see five frames(or all of its duration if its less than that) of a given move to copy it, which can in fact be the end lag of the move.
By comparison to his counterpart Lizard, Iguana is not terribly interested in the opponent's techniques, and will only bother to remember up to five of them at a given time. If he tries to get a new one instead, he will forget the oldest one, and will also forget moves if he copied multiple of the same input, only remembering the more recent one on that input. He will however get all the properties of a given move as it was used however, such as taking an upgraded version if a character has the ability to upgrade moves, but he will not copy charge or buffs as he will need to apply those himself. He does have some alternative uses for these copied moves however, but we'll get to those later.
Iguana is not only aiming to observe the opponent's moves however, he's a far more brilliant thinker than his other counterpart and is looking for more than to merely copy his adversaries. As he observes in front of him, he will notice a Magical Instability about halfway down the opponent's body after 20 frames of observing them, and if there is no opponent within range he will instead notice one in the stage. After 30 frames of observing an opponent, he will notice one in the stage below them as well. These Instabilities appears as red dots on the opponent and are points which, when Iguana attacks them, will cause a far greater amount of damage than usual to his target. Specifically, he deals a bonus 3% damage on all his attacks that hit an Instability, with bonus knockback that comes with an increase in damage. The instability is unfortunately tiny(about as twice as big as Brawl Knee of Justice's Sweetspot) and if you hit with a wide area attack that hits much of their body outside the instability, it will not be activated, so precision is key.
The exciting part comes when you deal more than 15% to a given instability, it will split into two instabilities at new locations on their body. The exact result of the split will be determined by the hitbox that produced it, being specialized on a couple moves in Iguana's set. In any non-special cases, it will simply split off another one in the direction of the knockback, though if they were hit by a piercing attack from behind it will split to a point directly above and below the current one about 1/5ths along their body length. If you hit with an attack that specifically hits both these points(the body in between can also be hit in this case), it will instead add a nice 6% to the landed attack. The instability can split even further, but it will only last for a total of 8 seconds before all cases of it leave the opponent.
A stage Instability is generally about half a Kirby height underground(or just in the stage on a thin platform) and appears the same size as the other ones, but has a significantly larger hitbox that can be hit if you touch the surface of the stage above it. If 15% is dealt to a stage instability, it will cause an explosion 1.5x Wario's size that deals 17% and diagonally upward knockback that KOs at 100%. This explosion is fairly powerful and a useful hitbox by itself, albeit not one very good for hitting other magical instabilities. This has an important additional reward of blasting out the stage, as it will shoot out 5 small rocks slightly bigger than a Pokeball. Unlike Lizard, Iguana is too big to hide behind these rocks, and they just linger around the stage as constructs with 12 stamina each. That said, they will come in handy for many later moves in Iguana's moveset.
A stage Instability will proliferate into two more, each a battlefield platform away from the original. It will disappear after 8 seconds like an instability on a foe. If you want a deeper pit in a specific location, observing it twice will get you going in that direction instead of working off the split Instabilities, while split Instabilities will give you more rocks. Remember copied moves can hit both kinds of Instability, giving you additional reason to prioritize specific copied moves against certain opponents. All terraforming and rocks are reset on Iguana's death, and he also loses all his accumulated knowledge.
There is one final detail to this move. If Iguana sits in his observation stance long enough, he will form an incredibly fancy looking tiny throne beneath him to sit on. It is only created after 50 frames in observation stance, and for the sake of future interactions largely functions like a rock, albeit one that is a full Kirby size and has 30 stamina and deals 1.5x the damage and proportionately increased knockback when used in a hitbox. There are a few special interactions with it to make it more than just a simple easter egg, though the rather awkward creation process is going to make it less than absurdly convenient.
Side Special - Animate Construst Iguana raises one hand as rocks around the stage begin to fly toward him, as Iguana begins to assemble a minion out of stone to fight for him. If there's no rocks on the stage, he will simply express annoyance when nothing comes to his call. If there are, he will begin to assemble an animated construct to fight at his side. Iguana is far more competent than his sworn enemy at making these, given he's invested far more time into making them. Rather than just creating golems, he can create three whole types of minions, a mock lizard, a golem, and a dragon, depending on the amount of rocks invested. He has told down the input for a total of 2 frames for each rock added, and he will prioritize the closest rocks. They will not create a hitbox when assembling into your constructs. The throne can be used to make these constructs, and actually has very special properties in doing so.
With 1-4 rocks, Iguana will simply toss them away in frustration, shouting "I need more!" as he does so. 5-10 rocks will have him shout "Arise!" and create the mock lizard, a stone lizard shaped like his nemesis, though not complete with all the magic abilities. It is between Iguana's size and 1.5x as big, has from below even Iguana's weight up to Fox's weight, and has 20-35 stamina, depending on how many rocks are used to build it. It crawls around at Ganondorf's dash speed, patrolling an area 1.5 battlefield platforms wide usually, though if created in a pit it will prefer to stay in that pit and only patrol outside it occasionally. They have one jump that does not go especially high. As an easter egg, if he's fighting Lizard he will instead say "It's like a better looking version of you!" upon creating one of these.
The stone lizard, like all Iguana's minions, has a few attacks that are mapped to smash button inputs, for reasons we'll get to at the end of the move. The first is a Neutral Special which has it spit a pebble, which flies in an arc up to 1.5 battlefield platforms forward at a high speed and deals an underwhelming 4% and flinch. This is not an especially fast attack either, but it does have one useful quality to it. The mock lizard will aim it at Magical Instabilities on the opponent to deal higher damage, and with the intent to make more of them, with the split magical instability taking the direction the rock is traveling should that happen. This still would not be especially scary, but when the opponent has to deal with Iguana at the same time it can prove troublesome.
The stone lizard's jab has it flick out its tongue for 2 rapid hits of 1% and 2%, the later of which will knock the opponent back slightly. Its very fast, but not terribly damaging and lacks much range either. The forward tilt will have it perform a headbutt that it lunges forward slightly for, dealing 6%-9% based on size and underwhelming horizontal knockback that will only KO at 280%-225%. This is much laggier than the tongue attack but not especially slow, but still has disappointing range. The down tilt is a low tail swing that deals 3%-5% and a flinch, but is actually somewhat fast and long ranged and is one of the mock lizard's most spammed methods of attack. The Up Tilt will have it buck its head into the air for 7%-10% and upward knockback that KOs at 250%-200%, being the second most powerful attack the stone lizard has and also slower than the Forward Tilt. It also has decent vertical range all things considered.
The stone lizard's forward smash is its strongest attack, and has considerable lag to it as it rears up and extends surprisingly lengthy claws from its hands. It then lunges forward, dealing 6 hits of 1% before a final hit of 4%-8% and diagonal knockback that KOs at 220%-170% depending on charge at minimum size and 8 hits of 1% before a final hit of 7%-13% that KOs at 180%-135% at max size. It covers a surprisingly large area of half a battlefield platform, and actually has an interesting residual effect as well. When used, this move will cause 2-3 of the same rocks produced by your Neutral Special to fly out of the ground as hitboxes that deal 4% and a flinch behind it, capable of hitting if the initial attack whiffs. This is a nice side benefit and alternative means of generating rocks, though sadly its left in the AI of the minion... supposedly, anyway.
Aside from the lizard's Forward Smash, it can use all of its attacks in the air in the same way. This means they functionally occupy the Nair, Fair, Uair, and Dair inputs, and in the case of the Dair the tail flick will go below the lizard instead of horizontally. A lizard will crumble into 2/3rds of the rocks used to make it when its stamina is depleted, so you won't lose too many resources unless it dies offstage.
11-20 rocks will instead have Iguana shout "Arise!" louder and construct a golem, and a fairly refined one at that compared to the shoddy work of Lizard. It stands between Captain Falcon's size and 1.3x Ganondorf's, has 40-65 stamina, and has weight between that of Zelda and Wario depending on the amount of rocks used. Golems are considerably more aggressive than mock lizards and will actually try to pursue opponents, though they will tend to gravitate toward defending Iguana should the opponent already be dealing with an aggressive minion attacking them. They can move at only speeds slightly slower than Robin's dash, unfortunately, making them by far your slowest minion. It does however have two decent jumps, enough to get it relatively high into the air.
The golem's Neutral Special has it lift up a ground chunk out of the ground and chuck it forward, the chunk being fairly thin and between Wario and Bowser's width. It does not terraform the stage when it does so, and this move is incredibly laggy and not one its AI especially likes to use. When thrown, it functions like a drop through platform and will carry everything that was on top of it during the throw, while the sides of the chunk deal 12% and knockback that KOs at 165%. The exciting part of all this is that Iguana himself can ride this chunk, using all his grounded attacks aboard it, and of course any other part of your massive amount of setup can also take a ride. The golem will never throw any of your constructs off the edge, so no need to worry about that. The chunk can be destroyed if it takes 20% while flying through the air. When destroyed by hitting the ground or depleting its stamina, the ground chunk will drop 2 rocks, which will deal 4% and flinching while falling to the ground. The same hitbox applies to rocks that are on top of the ground chunk when its destroyed, and a throne will hit somewhat harder.
The golem's jab has it simply punch forward for 6%-8% based on size, in similar fashion to Ganondorf's Jab, except with slightly more lag unfortunately. It can angle this punch some however, and will do so to try and hit magical instabilities. The dash attack is more interesting, as the golem will roll into a ball and continue travelling at its dash speed for a battlefield platform, dealing 10%-13% based on size and mostly horizontal knockback that KOs at 160%-130%. It will speed up going down a slope and gain power as it does so at a rate of 4% per Wario height, as well as extending the duration by as long as its heading downhill. It will also slow down while going up the side of a pit, losing what momentum it gained. Obviously, the more Iguana messes up the stage the more potentially dangerous this rolling attack can become, but it has a decent amount of start up and heavy endlag. The golem will exit the roll and try to recover if it goes off stage.
The golem's next attack its Forward Smash, which has it wind up for a huge punch where some of its mass will shift into its fist, dealing 16%-22% and knockback that KOs at 115%-85% at minimum size and 20%-28% and knockback that KOs at 80%-50% at max size. This is a bit laggier than Dedede's Forward Smash, and not quite as powerful, but does have considerable range to it and is coming from a minion, making for a tremendous threat if Iguana pushes them into it. The Up Smash has the golem's arm break apart into shards and fire out at a variety of angles above itself before reforming. This is a high duration move but otherwise surprisingly fast for the golem, and deals 11 hits of 1% with a final hit of 3%-8% that KOs at 150%-120% at minimum size and 14 hits of 1% and a final hit of 3%-10% that KOs at 130%-100% at maximum size. It covers a decently large area above the golem too, but the end lag is rather bad despite the good start lag. The large amount of hits can allow it to set up for some evil scheme of Iguana's too.
The final attack the golems have is a laggy punch aimed for the ground on its Down Smash, dealing 15%-21% and diagonal mostly upward knockback that KOs at 140%-100% at minimum size and 18%-25% and knockback that KOs at 100%-65% at max size. It also causes a slight earthshaking effect around the point of impact that deals 7%-10% at minimum size and 9%-13% at maximum size and set moderate upwards knockback. How long it lingers depends on the golem's size and charge, between 10 frames at minimum size and charge to 45 frames at maximum size and charge. Given it hits nearly a battlefield platform around the golem, it lets them control space rather well, but keep in mind the actual punch is short range and though not as slow as the Forward Smash, its definitely not fast.
In the air, the golem will not use its Forward Smash, Down Smash, or Dash Attack, but will use its Jab mirrored to Nair and Up Smash mirrored to Uair. It actually can use its Neutral Special, but will have to sacrifice a portion of its body mass to do so, losing 4 stones worth of mass. If that's less than the minimum to make a golem, it cannot use this technique. On death, the golem will drop 1/2 the rocks used to comprise it, a bigger sacrifice than the lizard for a much better minion.
If you get a full 21+ rocks involved in the creation of a construct, Iguana will shout his loudest "Arise!" yet and follow it up with maniacal laughter as he forms his stones into a stone dragon. This beast is 1.3x to 1.8x Charizard's size, has 70-100 stamina, and the weight of Charizard-1.2x Bowser's weight. This caps out at 30 stones in regards to all factors other than stamina, after which each additional stone just adds 5 more stamina to the creation and nothing else. The dragon prefers to stay around Iguana as a rather loyal pet, lashing out at opponents who come near, though against high percentage opponents it becomes more inclined to pursue them as it smells blood in the water. It has a similar dash to Charizard that travels a bit slower, and a large first jump followed by 4 small ones.
The dragon has a larger movepool than its counterparts. The first move of which is its Neutral Special, which has it spit a stalagmite from its mouth, which deals 9% with horizontal knockback that KOs at 190% and pierces through targets. It travels in a much finer arc than the Lizard's pebble, but has a more interesting quality to it on top of that. It can actually split in mid flight into two smaller projectiles that deal 6% and KO at 240% individually, but 170% if they both hit at once. This split can occur a second time, each split taking 0.75 battlefield platforms of flight before it can occur, and now there are 4 projectiles dealing 4% each and a flinch. If they stack together however, the knockback will increase, up to being able to KO at 140%. The dragon's AI won't always split these, generally just going on when it thinks it would be a good idea. It's usually pretty smart about this, so don't get too worried.
The key thing to this particular projectile though is Magical Instabilities. As it has piercing properties, it can hit an instability on both sides of the opponent, adding 6% to the move by default. If there are multiple along one side, this can also hit multiple of them by splitting to hit two at once. Theoretically, if all 4 projectiles pierce to hit 2 Instabilities, this projectile can deal a horrific 40% and knockback that KOs around 55%, closing in on an instant KO. Its not even that slow! Of course it requires very specific spacing and a heavily split Instability to accomplish, but the dragon is pretty good at aiming for the maximum damage output. Even if you don't accomplish this though, for a minion this is a very good projectile and one of the more valuable contributions the dragon can make.
The dragon actually has a copy of Charizard's Up Special, but it goes stronger until it reaches max size, capping out at 1.5x the damage of the inferior dragon. Its Jab will have the dragon claw forward with one limb, dealing 7-9% in a jab noticeably faster than Ganondorf's with some minor diagonally upward knockback. It can actually combo into its Forward Tilt with it, which is a common the dragon's AI will do when fighting opponent. The Forward Tilt is a bite that deals 13%-16% based on size and knockback that KOs at 120%-100%, which has slightly above average lag but is a fairly threatening move especially as the dragon reaches maximum size. The range is better than on Jab, as well. The Up Tilt will have the dragon flap its wings above itself, dealing 6%-8% in a fairly spammable attack that also produces a weak wind hitbox above itself. Iguana and his minions can actually use this wind hitbox to boost their jump height, by the largest amount in Iguana's case and the smallest amount in the case of another dragon, with the lizards and golems in between. The Down Tilt is a low tail sweep that deals 9%-12% and upwards knockback that KOs at 185%-150% based on size, similar to the lizard's tail sweep but with far greater range and power.
The dragon also comes with a nice set of Smashes. For its Forward Smash it will lunge forward and smash into the ground in front of it, dealing 20%-28% and diagonal mostly horizontal knockback that KOs at 90%-65% at minimum size and 25%-33% at maximum size and knockback that KOs at 70%-45%. This is horrifically powerful, but the startup is as long as Dedede's Forward Smash and the end lag is much worse than said move's. In exchange though, the range is huge, especially with a max sized dragon, making this move absolutely terrifying when you consider its user isn't even Iguana himself. The Up Smash has the dragon slash twice above its head with its claws, dealing 2 hits of 7%-10% at minimum size with the second KOing at 160%-130% at minimum size, and 2 hits of 9%-12% with the second KOing at 110%-85% at maximum size. This is actually a very fast smash to come out, with lag on par with some tilts, making it a great anti-air move. The range is also good once again, due to the dragon's massive size.
The Down Smash will have the dragon roar and spin in a circle, dealing 14%-19% and surprisingly little knockback that only starts to KO around the 300% range. This does not vary based on size in terms of power, but gets other benefits. The roar however, will instruct minions within a battlefield platform to 2.5 battlefield platforms based on size of lesser status than the dragon(including smaller dragons!) to disassemble themselves into their base components, as the pieces of them will fly towards it. Normally the rocks will drag them toward the dragon for 1% and a weak push towards it each, but the throne will deal a full 8% and guarantee the following hit if it lands. The rocks will then turn into a maelstrom around the dragon that adds 1% to the attack for each 2 rocks worth of minions that were added, as well as giving a tiny bit more knockback. They will reform in their original positions with some lag after the attack ends, and the dragon's AI will use this attack pretty rarely, but its a nice combination attack for all of your minions.
The Up Tilt, Forward Tilt, Down Tilt and Jab are mirrored onto Uair, Fair, Bair(now hitting backward), and Nair respectively. The dragon also has a Dair where it slams its claws down below it for 16% and a spike on par with ROB's Dair, with moderately high lag but giving this minion the potential to actually gimp people, truly terrifying stuff. There is one sad aspect to the dragon, and that's that it will not give back any of the materials used to make it when destroyed. If you invest your efforts into this mighty beast, you better be able to get payoff from it.
Now I brought up that these attacks were mapped to specific inputs, and there are two reasons for this. First of all, Iguana can absolutely observe and copy attacks from any of his minions for his own use. The implications of this are obviously quite nice, especially with moves like the dragon and golem Neutral Specials. In the case of the dragon's Neutral Special, it has a slightly different control scheme under the player's control. Simply tapping it with a projectile out will have you shoot another projectile, while holding the button will cause a split after 10 frames. If you copy a minion's grounded move you do not also get the mirrored aerial, and vice versa.
The other reason you can use these moves is that the throne does something very special when used in conjunction with these rocks. It will actually become attached to the minion, either in the middle of their back in the case of the lizard or dragon or on their head in the case of the golem. If Iguana gets on the throne in either case, he will take control of the minion and ride it around, capable of using his own inputs as usual. However, during the lag of Iguana's attacks, the minion can perform its own attack, creating a terrifying two pronged threat. Being able to combine Iguana's own ingenious magic with the raw power of a dragon is a truly terrifying force, and is the main reason you would want a throne.
This is not totally without downsides, given most minions are slower and clunkier in the air than Iguana. This is made acceptable however, by the fact that Iguana will casually dismount them if they run out of jumps and he wants to jump again, using his first jump in the process. You can actually do this to make for some truly horrifying juggles and ground to air assaults. Using a dodge will also dismount Iguana from the throne and return him to his normal state. This is a potentially extremely powerful tool for Iguana, and one not to be underestimated, but keep in mind you do have to invest the long period to make a throne.
There are a couple unique corner cases in regards to the throne. The first of which is that if Iguana's riding a golem and it uses Dash Attack, he will dismount from that golem and let it go on its merry way. If a dragon uses Down Smash while Iguana is riding a minion, that minion will not be pulled in for the Down Smash's power boost. Lastly, if you dismount above a dragon it will use its Uair to make the potential for juggles even better as the AI actually knows the most dangerous thing it can do in that context.
Up Special - Flight of the Iguana Iguana tilts his head upwards as red magic circles around his body and he gains flight in a similar fashion to ROB's Up Special. Its actually superior to that move in most every regard, having a longer flight duration and higher speed, contributing to Iguana's powerful air game. The one downside is it takes longer to recharge, which can leave Iguana surprisingly easy to gimp if he overuses it, very bad considering how easy he is to knock around. Still, this is an extremely good recovery and pushes Iguana's juggling skills to even further extremes.
He can actually still use this move while mounted on a minion, but it will considerably tax him to make them fly along with him. Lizards will reduce his flight speed and distance to ROB's, Golems to slightly less than ROB's, and Dragons to considerably less. Of course in the dragon's case, this is on top of its strong existant recovery so its not terribly desperate for another one, but it does make a golem or lizard riding Iguana less agile than one that's dismounted. Still, it is very useful to bring the minion high into the air to have their air game compliment your own.
Down Special - Casting Stance This move has two components to it, the first of which is fairly similar to the Down Special of his archnemesis. Iguana's eyes spark with red lightning as he ascends into the air, functioning as a counter. If the opponent uses an attack on him during this time, it will be blocked by a magic forcefield as the lightning from his eyes will flood into their body, cancelling the attack. He will then, floating in the air, dish out a punishment based on whether the attack was tilted or smashed. If it was tilted, he will fire a bolt of lightning into their eyes to ban that attack, preventing the opponent from using it for 10-45 seconds while also dealing them 5%-10% and a brief stun. In the case of attacks with a movement component to them, such as recovery moves, it will not completely disable them, but the hitbox and any other effects of those moves will be negated beyond just the movement. Their body also takes 5% from red electricity when they do so, as additional punishment, but it prevents him from being too godly at gimping people.
If the attack is smashed, it instead will function more like a straightforward counter, as he fries their entire body with lightning and deals them 0.7-1.6x the damage and knockback of their own attack. You might ask why the numbers in this move vary, and that's because with this counter precision is key. The fewer frames between the eye flash and the actual hitbox being countered, the stronger it is, being strongest if you frame perfect counter it. Obviously that requires some incredible technical skill and prediction to pull off, but the rewards are pretty huge if you do, denying the opponent a move for 45 seconds or hitting them with a massively powerful retaliation. At worst, its a more versatile move than Marth's counter even if the actual hitbox is usually weaker, having a similar timing window.
Holding B will have Iguana fly up, lightning still crackling from his eyes as a spark of red energy forms between his claws. In this state he loses the counter hitbox and hovers a Wario height above the ground. From here, he will float for a second, during which you can input the moves you've copied. Inputting a direction before an attack will have, with the same lag of the attack, fire off a red sparking orb in the direction you chose. When it reaches an opponent or the stage, it will burst into the attack itself with most of the lag cut out, allowing you to turn any of the stolen moves into projectiles! Pretty powerful, but a bit limited by the fact that you lose access to the move after using it like this and the fact that you need to enter casting pose to do so. One thing to note is that this projectile is only created if you press Up, Forward, or Back as your direction, if you keep it directed down you get something different.
Down gives you the option to multicast, actually. You can input multiple attacks after pressing it as fast as you want and then, after some added start lag depending on how many attacks are put in(a small amount with two, a much larger amount with 5), all the attacks you've pressed will fire off at once, overlapping their lag and hitboxes. It will keep Iguana in lag for the duration of the longest move of the bunch, but this is still a pretty absurdly strong technique, though like the projectile variant you sacrifice all moves used in the multicast. That said, you can potentially perform some truly godly attacks, and the lag is mitigated when you're riding a minion to give you something to do during the charge up for this attack.
Finally, if you don't press a direction you can still input moves, either to have him perform them like in Casting Stance albeit with some unnecessary lag. Its usually worse than casting stance, but it can surprise people expecting the other options. However, if you're near a rock or construct, Iguana will do what Lizard always wished he could do and imbue that minion with the power to use the chosen input. Or well, in the case of the rock, cause a copy of that input to activate when the rock is destroyed, bursting from it as red magic energy. This sacrifices your access to that input, but lets whatever you gave it to incorporate it into the minion's own moveset for all that implies. There are limits however as each minion can only store so much magical energy, with the lizard able to copy two inputs, the golem three, and the dragon a total of four. Iguana remains king with his ability to copy five, would not make sense for his minions to be superior to the master in that regard. Still, you can potentially have more than five inputs copied if you distribute them among your minions.
The possibilities really open up when you mount a minion, as now the minion can use all the attacks you placed in it while you're in lag, supplementing its own moveset. If two inputs would occupy the same slot, the copied one is accessed by double tapping. With all this together, you can do some truly insane things, like ride on a dragon and use both its own surprisingly versatile moveset and several copied moves from the foe to badger them while Iguana prepares a massive mutlicasted attack, featuring all the greatest hits of his opponents moveset and those of his minions. Iguana truly is the pinnacle of mages.
Smashes
Before we continue, I should bring up that Iguana's Smashes are a bit different from a normal characters, mostly in how their charging works. Iguana has the ability to store the charge of his Smashes like Samus would her Neutral Special, able to cancel out and store the charge of these moves. This is worth noting because Iguana's Smashes cap at 110 frames of charge, considerably longer than the 60 frames of a normal, and similarly their power boost has a higher ceiling. They reach 1.4x the damage as usual at 60 frames, and 1.75x at full charge. Because of this high ceiling, Iguana's smashes are a bit weak at a base.
There's also one very special ability you can unlock if you have full charge stored on all your Smash Attacks. If you hold down a smash rather than tapping(or C-Sticking) it, Iguana will pour all his stored up power into one smash attack. This will unleash a super powered version of that smash, which is a very scary move on its own, but maybe not quite worth the time investment by itself. However, the supercharged versions of Iguana's smashes can do some fairly unholy things with proper setup, and there might be a way to make it easier on you. Plus if the opponent rushes in blindly to interrupt you, you can abuse Iguana's more predictive playstyle elements to punish them.
Forward Smash - Death Ball Iguana raises a pulsating red sphere of energy over his head, which he then throws forward as a projectile that travels 1.25-2.5 battlefield platforms based on charge. This is a somewhat laggy smash and for the charge up, the actual power is underwhelming. The orb will infuse into the opponent and deal them 10%, before exploding inside them for knockback that KOs at 170%. It starts out as big as Mega Man's Forward Smash projectile, but can grow to be as big as Samus' fully charged charge shot with full charge, as well as power to dealing 17.5% and knockback that KOs at 100%. This has similar properties to moves like Samus' charge shot and Mega Man's Forward Smash, but is not as efficient as the latter and versatile as the former due to only being usable on the ground and being laggier. That said, the store-able charge and good range of this projectile is not to be underestimated, even before we get into its various interactions.
The most basic interaction is that when the orb explodes inside the foe, it will rupture through all the magical instabilities in their body. This means the damage will be divided between all those points, meaning it can hit them without any fancy sweetspotting, making this your most basic move to split instabilities. The profit is not that great though, as only 1% is added to this move's damage per instability, and it contributes much less to each split the more instabilities are on a foe. For an example of how this would work, say you hit a foe with 5 instabilities with the uncharged version. It would deal 10% + 1%x5 = 15% to the opponent, and divide that damage by 5 to get 3% for the damage towards each instability splitting. The knockback is also altered by this, as a small jet of energy will come out of the opponent's body out of each instability. The knockback will go in the opposite direction of the general trend of the energy jets, so if say two were jutting out of the opponent's back they would be launched towards you. With one on each side, they would be launched upwards as nothing is containing the force in that direction, and with ones on the top and bottom they would be launched forward. The attack's default knockback is diagonally upward, which is basically what it will default to if the jets would cancel out.
This projectile travels at half the speed of Mega Man's Forward Smash by default, making it somewhat notably slow. This is not a bad thing as you can combo off it and the customizable knockback it provides more effectively like this. It also means you can grab it out of the air with Side Special alongside the rocks and not have said technique be hilariously impractical, which by the way, is a thing you can do this move. You can add it to your minions as a part of their construction, and if its inside them, they will be made a tiny bit more unstable. Depending on charge, this means they lose 5%-15% of their stamina(as in for an 80 stamina construct, it would lose 4-12 stamina) and in exchange get a 1.05x-1.15x boost in damage, as well as slightly decreasing the lag of all their attacks. When that minion runs out of stamina, it start to crumble briefly, before exploding 30 frames afterward for the same damage and knockback as the orb would deal exploding inside an opponent with no instabilities. The hitbox is 1.3x-1.5x bigger than the minion it was placed inside, which means it does in some ways become more powerful in a dragon.
For a bit more versatility, you can angle this attack up or down. Angling it up will cause him to launch it in a high arc, traveling slightly slower and going in a semi-circle towards its location, which still ends 2.5 battlefield platforms in front of him. This keeps the projectile out significantly longer, but makes it less practical as a hitbox against an opponent approaching you. Angling it down will make it explode right in front of you as Iguana slams the orb into the ground, dealing 1.3x the damage of its usual version without the special properties it gets from exploding inside an opponent. The orb's explosion is 1.4x its size, making it not totally impractical as a melee move though not ideal.
If you supercharge this Forward Smash, the actual lag of shooting the projectile will be reduced to a third of its normal length and the projectile will be 1.3x the size of Samus' charge shot and deal 22% and knockback that KOs at 80%. This is good on its own, but a bit underwhelming for the high price. What makes it so much better is that you actually get a second use of the Forward Smash in this overpowered state after you fire the first one, free of charge. It has a few improved properties, like causing the jets to continue to shoot out of the opponent for 3 seconds after the hit. This deals them 1% per second for each jet, meaning it actually deals more damage to weak points than a normal attack, scary indeed. The jets will also interfere slightly with the opponent's movement in that direction, moreso the more jets there are. This, for the record, can in fact basically gimp some recoveries for you, or just leave the opponent a very vulnerable target at low percents.
If a supercharged orb is placed in a minion, it will be flashing red and have energy leaking out of it. This indicates the minion will explode for 25% and knockback that KOs at 70% in a hitbox 1.5x its size 6 seconds later, and become hyperaggressive. It will relentlessly attack the nearest opponent with attacks that have significantly reduced lag and deal 1.35x their normal damage. While this minion is terrifying, it will be destroyed soon after its made, so you better make it count for all the investment you put in.
Up Smash - Laser Array Iguana raises a single claw into the air and fires 7 thin lasers in rapid succession, each dealing 2%-3.5% and covering a 75 degree arc over his head in total. The beams shoot out pretty far and give the attack good range, which is increased to having range on par with some lower distance projectiles at full charge. The knockback is dependent on how much damage is dealt in total by this lasers, if it hits for like 2%-6% total it'll be barely above a flinch. However, if you hit with the full 24.5% worth of damage, it should KO around 100%, which is fairly nice albeit somewhat underwhelming for requiring full charge and hitting pretty close to make sure all the lasers hit. That said, while the start lag on this is above average, the end lag is rather low, so its actually quite a solid combo starter if you don't hit with everything.
If you're looking for some real power out of this move, you should turn to your instabilities, because this attack has some of the highest payoff for having several on a foe. The lasers pierce through them and can easily hit several instabilities in one go. They're not likely to break them into more instabilities individually, but if some of them are already on their way to splitting this can finish the job. More importantly, since the lasers will pierce through the opponent and hit so close together and precisely, this can easily add damage from several instabilities at once, frequently getting a bonus 6%-12% while your typical move would only get 3%. The damage piles onto the knockback potential of this move too, with a fairly amazing scenario of hitting 5 weak spots with this move, that would deal 39.5% at full charge and KO around 60%. This is one of your greatest rewards for splitting magical instabilities on opponents.
If this move is supercharged, Iguana will instead shoot a total of 15 lasers in the same 75 degree arc. They're now packed so close together that the same laser can hit one magical instability twice, meaning this move can get 6% out of a single instability, let alone the absurd power it can get out of multiple. The lasers also now shoot out a whopping two battlefield platforms before they stop, giving this move some truly crazy coverage. That said, given the investment and the fact that you probably won't hit with the full brunt of this attack, it can come across as a little disappointing at first glance. However, once the lasers reach the peak of their height, they will actually brighten up and will come travelling back down with the same horizontal angle as before, now dealing 5% and weak knockback on hit. They travel at about 0.6x the speed of Falco's laser in this state, so its a bit hard to control them specifically but not impossible.
In this state, rather than piercing through whatever they hit, they will instead bounce off pretty much anything. Any constructs Iguana has out, Iguana's own projectiles including Forward Smash, minions or their various stone projectiles(though non-stone minions will not have the projectiles bounce off them or what they shoot out, but we'll get to those later), and even opponents and their shields after dealing damage. In particular, on contact with Iguana's body they will reflect off harder, increasing the speed by 1.5x and upgrading their damage by 3% and increasing the knockback they deal considerably. If two lasers collide with each other, they will produce an explosion 0.75x Kirby's size that deals 12% and diagonally upwards knockback that KOs at 150%. If a laser sped up by hitting Iguana is in this explosion it will increase the damage by 3% and raise the knockback accordingly. The lasers will pause in place before the explosion goes off for 5 frames, and if another laser hits them at that point it will add another 6% to the explosion and increase its size by another half Kirby's size, 9% if it was reflected off Iguana. Each laser can bounce a total of 3 times before it vanishes, and has a max of 3 battlefield platforms of range with one more added per reflection.
The super charged version of the Smash is either a powerful direct hitbox that scales incredibly well off magical instabilities, and if that doesn't work for you the attack will create some absolute projectile chaos all over the stage. Of course, how effective said chaos is will depend on you, if you just use it with no care in the world you'll hit the opponent or their shield with 1-3 lasers and be done with it. If you have good minion placement, position yourself well, and of course keep a good eye on the opponent though, this can be an unholy powerful move even used as the projectile clutter.
Down Smash - Earth Breaker Putting both claws to the ground, Iguana sends energy into the ground for some hefty starting lag, before it bursts out in a red explosion that deals 16%-28% based on charge, and knockback that KOs at 125%-70%. This covers an area half the width of Bowser uncharged, and scales to one Bowser's width with full charge, and about a Kirby height into the air. The end lag is above average too, but its not nearly as bad as the start lag of the move. This is Iguana's most basic KO move, it does not depend on any outside factors to work for that purpose and if you store charge in it, its actually quite effective at pulling out surprise kills due to its big hitbox. That said, its very telegraphed and punishable, and not a move you can throw out casually without expecting retaliation on your very frail self.
This move has a couple other uses, but the most basic of which is combining it with a stage instability. Obviously, this does more damage than required to break rocks out of the stage even uncharged, but also its worth noting that the instability will take about 8 frames to explode after the damage has been dealt. This means that it will cover the end lag of this move, and both hits will combo on a shield to absolutely wreck havoc on it. You can also use it to extend the range of the move to either side of you as well. It does have to be said that while the synergy is pretty good, you have to keep in mind that it doesn't make this move less predictable, if anything it makes it moreso as you have to use it near a specific part of the stage. Still, the pressure it provides around stage instabilities is worth noting.
The other interaction this attack has is with your stray rocks. It will simply knock the ones in the hitbox into the air, dealing 3%-5.25% as they fly up two Ganondorf heights into the air and one Bowser length forward from their initial position, before falling back down and ending two Bowsers away from the start. The rocks each do enough knockback per hit that the opponent is not going to get hit by more than 5, though that can still be 15%-26% as another thing to extend the range of this move. That being said, with a fully charged attack you can reasonably get well over 5 stones in there, more in the range of 9. If you have something to knock them back into the barrage(minions will do this if they can), you will net a really high damage value, never mind if the stones actually get knocked right into an instability. It lacks the precision and stacking knockback of said move, but you can get some fairly ridiculous damage values out of the rock barrage if you use it right.
The supercharged version of this attack creates an explosion that covers a full 1.5 Battlefield Platforms, deals 35% and KOs at 50%. Obviously this is pretty insane, and a few smaller explosions will go off in the area afterwards dealing the same damage as the uncharged version, 3 blasts in total. They're not exactly about to combo together and are scattered in a set pattern so people can definitely see it coming, but it still provides some nice end lag cover. That's a good thing because the supercharged version actually has higher end lag, so if the opponent can play around the explosions and the initial blast they can really punish you. The damage of rocks flung is rose to 6%.
The bonus of this version is the blast will now launch all your minions in the explosion as well, dealing damage and knockback based on their size. The smallest lizard will deal 10% and knockback that KOs at 275%, a max sized dragon will deal 31% and knockback that KOs at 55%. They do get put into some lag from the launch, though they don't take damage from it. The golem gets by far the worst lag, with the lizard getting an average amount and the dragon stabilizing pretty quickly. They make for pretty scary projectiles, and what makes it worse is that if they do manage to avoid them dragons and lizards will pretty quickly be on your opponents. Of course, golems won't so much and the opponent can still kind of punish you by smashing your golems and lizards. Admittedly, they're not as powerful as the initial hitbox, but they create a longer ranged threat to make it harder for them to punish the amount of lag you take afterward.
As a final note if you're wondering how Iguana would use this move mounted, it will channel down the monster's body before exploding in front at its feet, adding a bit of lag to the move but allowing you to reposition the blast with the rock creation's body as you move it around.
Grabs and Throws
Grab - Transmutation Iguana raises a claw and closes it, and red bolts of light will shoot out and ensnare opponents in a tether grab that is about the same range as Samus'. Some red lines will also go out and collect all the rocks and minions within a range 1.6x the actual grab range of this move, also pulling them in for your grabs and throws. For each of his throws except Up Throw, the lines will slip into the body of the opponent as well as all his constructs, which will cause a "transmutation", or change in the type of material Iguana is working with. He will use all or none of what he's grabbed, using none of it if you tilt the control stick in the given direction and all of it if you smash the input. He will not transmute his throne, as why would he waste something so valuable to him?
Pummel - Focus Iguana pulls in three of the rocks from what he's grabbed to the opponent while constricting them, dealing 1% in a fairly fast pummel. This actually does 2% if you do have the rocks necessary. This allows you to choose how many rocks from what you've grabbed you want to dedicate toward directly damaging the opponent versus how many you just want to change into the new material. If you have no stray rocks, he will take 3 out of one of the minions he's using for the throw, taking away 5 of its stamina and killing it if it has 5 or less.
Forward Throw - Transmute: Fire The lines flow into the opponent's body and set it ablaze, transmuting a small part of them into raw fire. This deals 4 hits of 1% before a final hit of 6% and knockback that KOs at 185% as their body bursts into flames, before Iguana simply telekinetically blasts them forward. The opponent will remain ignited for the subsequent 4 seconds, taking 1% per second and a flinch once every 240 frames, AKA a single flinch as the flames go out. This is a fairly high damage throw and the base knockback is nice for getting space, but really poor for any form of comboing. The knockback isn't going to KO until a pretty high percentage, but its not an awful KO throw at least. The extra flinch might be small, but it is a nice bonus you can capitalize on. If the opponent has their shield up or is in a dodge they won't get hit by it though.
Every 3 rocks you add to Transmute: Fire will increase the final hit's damage by 2%, also slightly improving the KO power though it'll never become that good without a large amount of rocks. There's a better throw to KO with anyway. The real incentive is of course that it strengthens the fire effect, raising the duration by 2 seconds to a cap of 10 with 9 rock and decreasing the period between flinches by 40 frames to a minimum of 80 with 12 rocks. While with only 3 rocks this isn't horribly disruptive, with 12-15 this is actually a pretty brutal status effect. Every 3 rocks past the 9 mark will increase the damage per second by .5%. Keep in mind that while this is a powerful effect, it is one the opponent can stifle with their shield and dodges to a degree, though it'll obviously leave them kind of predictable if they do that.
Now to get into the implications on your constructs, as this move changes your rocks into patches of fire, which are dropped in the same distribution as the rocks and are about the same size. They do 2% and no flinch, but will repeat their hit of 2% every 40 frames and it can add up fairly fast if the opponent is in contact with many at once. They vanish after 8 seconds, though every 3% dealt to a flame by anattck will reduce that time by 1 second. You can imbue copied inputs into a flame, and they will activate when the flame expires, making a time bomb-like effect. The opponent's flinch interval happens twice as often while they're standing in fire. Interestingly, investing fire in the opponent is not totally worthless for creating it on the stage, as they will shed a singular fire patch every battlefield platform they travel while the effect is on. Hell, they'll shed them faster with more investment, shaving off 1/6th of a battlefield platform required for every 6 rocks invested, down to one every half battlefield platform they move. This movement, can totally be through knockback, letting Iguana create a trail of fire traps by bashing the opponent around. If a fire trap is created in the air this way, it will descend very slowly to the ground.
These fire traps will stack with your magical instabilities in a curious way, they can rapidly wrack up damage on them and will do so if they overlap with an instability at all, rather than having to specifically connect with only the instability like in most attacks. They're fairly close to the ground though, so they will only hit instabilities low on the opponent's body most of the time. However, you can in fact get these fire traps in the air if the opponent leaves them there, at which point they fall at one third Jigglypuff's fall speed. If they split an instability, it will split upwards on the basis that heat rises. Another way to get fire traps into the air is launching them with Down Smash, where they will turn into fireballs that deal 1.5x the damage of flying rocks but vanish on contact, and once they reach the peak of their arc they will stop moving and slowly descend toward the stage.
Fire patches are not the only benefit from this move, as you can actually build out of fire with your Side Special or turn your minions into a new firey one with this throw. There is only one minion that can be made out of fire, a fire elemental, which is a humanoid monster made entirely out of dense flames. For the record if both fire and rock are around in the area, Iguana will just pick whichever quantity is greater in a battlefield platform radius to work with. The minimum requirement to make one is five flames, which will make one about Mario's height and much skinner. At 15 flames they'll be about as big as Ganondorf, and at the max size with 30+ flames they're 1.5x Ganondorf's height and as wide as Wario. They have 2 stamina per flame, making them generally easier to kill than your rock constructs, but move around at nearly Sheik's dash speed and have good jumps and air movement. They're very light, varying from half Jigglypuff's weight to about Mario's for a maxed size one. As minions they're very aggressive and will rush down the foe. As a note, while Iguana will say his usual "Arise!" with fire elementals with 5-20 fireballs, with 21+ he will instead say "Arise and let the flames devour your adversaries!"
Fire elementals will gain more attacks the more fire you add to them, at 5 or more patches of fire, 11 or more, and 21 or more, similarly to the way you get different minions out of your rocks at those values. At first it will have only a Jab, Forward Tilt, Forward Smash, and Down Tilt, but at 11 it will gain an Up Tilt, Neutral Special, and Down Smash, and at 21 will gain an Up Smash and Down Special. These inputs, for the record, will get mirrored onto aerials in specific cases to give him things to do in the air. The Jab has the flames on the elementals body flare up around it, dealing rapid hits of 1%-3% depending on size, with range about 1.4x the size of the current fire elemental. After the fire dies down it has a bit of end lag, but it gives them something that is a bit scary at close range being able to put the opponent into a pseudo-rapid jab. They can only hold this out for a maximum of one second, to prevent any weird exploits with trapping the foe between two of them. The Nair half-mirrors this move as it has a similar animation, but flares out to 1.6x the size instead and is a singular hitbox that deals 5%-16% and knockback that KOs at 330%-110% depending on how much depending on size. It has some actual notable lag on the front compared to the jab, but the coverage can get pretty huge with larger fire elementals.
The Forward Tilt simply has it throw a punch with about average lag on both ends, dealing 7%-15% and knockback that KOs at 280%-120% depending on size. This is about as bog standard as attacks come, though keep in mind it will have trouble hitting shorter opponents with a particularly big fire elemental... though at 11+ flames they will learn how to angle it, so unless they're crouching really close to the fire elemental this won't be a problem, and they have other attacks for that. This move is entirely mirrored onto Fair and Bair. The Forward Smash has it turn one of its arms into a flaming whip that deals 6%-8% and low never KOing horizontal knockback at minimum size up to 15%-21% and horizonal knockback that KOs at 225%-180%. This has sizable range that gets pretty huge as the fire elemental grows in size, but the power is not nearly worth it... unless you hit with the sparks at the end of the hitbox, which instead deal 10%-14% and knockback that KOs at 170%-150% at minimum size and 25%-33% and knockback that KOs at 70%-45% at max size. The Down Tilt has the fire elemental crush a fireball against the ground, in a move somewhat laggier than the Forward Tilt but with much lower range that deals 9%-20% and upward knockback that KOs at 240%-100%. It is mirrored onto Dair, but rather than crushing the fireball the elemental will explode it with slightly more lag, dealing 11%-22% and slightly decreased knockback, but angled down instead of upward.
Now we're getting into the moves acquired at medium size or larger, requiring 11+ flames. The Up Tilt will have the fire elemental lash its whip directly upward with good vertical range especially at larger sizes, but almost zero horizontal range to either side to make it much harder to hit with, though easier to specifically hit an instability with. It deals 5%-10% and low upward knockback depending on size, but like with the Forward Smash it has sparks at the end that deal 10%-24% and upward knockback that KOs at 190%-90%. This move is mirrored onto Uair. The Neutral Special has it throw a fireball, starting out a clone of Mario's fireball with considerably more lag that leaves behind a fire trap after it lands. However, at max size it will be a fireball that three times the size of Mario's and drops three fire traps when its used, and deals 14% and knockback that KOs at 200%. The lag is still as long as ever though, and the range will only go up to 1.75x the range of Mario's. It takes 21 fire traps to upgrade to producing two fire traps, and you have to reach absolute maximum size to produce 3. They tend to prefer to use these at long range.
Continuing the medium size moves, the Down Smash has the fire elemental explode in an attack with fairly massive range once the fire elemental reaches larger size, dealing 14%-19% and diagonally upward knockback that KOs at 140%-100% at the minimum size requirement up to 24%-32% and knockback that KOs at 80%-55% at max size. The start up lag is actually not too slow, but the end lag is enormous as the fire elemental puts itself back together. The fire elemental uses this move pretty rarely, mostly only to finish off foes that are within the attack's KO percentage and even then only when they're otherwise occupied with Iguana or another minion.
The final two moves, Up Smash and Down Special, are acquired nearing the max size of 30 fireballs worth at 21. The Up Smash has the Fire Elemental juggle 3-5 Mario fireball sized fireballs based on charge over its head for half a second, having each one go around twice in that period and dealing 3%-4% and a flinch. If the fire elemental is attacked during this move, it will drop the fireballs its juggling to the ground and have each one turn into fire traps. This is a low power attack as the fireballs will stop on contact, giving the move at most 20% at max size and charge, but it can't be punished easily as it causes the elemental to drop its fireballs to make even more fire. The end lag is also really low, letting it follow up on the fireball barrage very easily, and even if its DI'd out of Iguana can easily punish, though the start lag is high. The Down Special is something the fire elemental will use only when the opponent is in KO range like the Down Smash, and will cause it to start taking 5 stamina off its health per second as it flares up... and those 5 stamina actually mean its losing 2.5 flames worth of size and power per second. In exchange, it gains a really sizeable buff, halving all its lag and increasing its dash speed to Captain Falcon's. Since this has a lot of start lag it will only use it when far away from the opponent as well to start with, at which point it can easily close the gap... but the effect will quickly wear off once it reaches below the opponent's size. If its only a little over 21 fire traps used it will never use this attack unless Iguana specifically commands it too via his throne. Also, when the fire elemental hits an opponent in this state, it will cause fire to fly out, creating fire traps equal to the amount of damage dealt divided by 5 in a small area around where the opponent was hit. If Iguana copies this move, he will instead take some moderate lag to imbue his next attack with flames, before dealing an additional 4% on his next attack(on the final hit if it has multiple hits) and causing it to have the same fire trap shedding effect. Much less intense and more calculated in the hands of the master, but potentially just as devastating.
Fire Elementals have a couple extra properties worth noting. They don't drop the traps again once they die at all, but considering they can create more with a few of their attacks its not really a big deal. In addition, when launched with the supercharged Down Smash, they leave a trail as thick as their body is wide in the path of their arc, and deal 8%-24% and knockback that KOs at 195%-80% depending on size. The flame trail left behind deals 4%-8% and weak knockback away from it as it lingers for a second before disappearing. Thrones can absolutely be incorporated into fire elementals, allowing Iguana a chance to ride them like he would any other minion and combine their attacks accordingly. While not the most durable minion, Fire Elementals do pack a scary amount of power and are not to be underestimated.
Back Throw- Transmute: Acid Iguana swings the opponent behind with the red lines before letting go off them as they flow into the foe. A small part of them will be transmuted into acid, spurting out of the center of their body and dealing 9% and knockback behind Iguana that KOs at 150%. Without any other material, this does an acceptable job of being a KO throw. It also applies a weak but noticeable status effect to them, burning their skin and causing them to take 1.05x the damage from outside sources and proportionately increasing knockback. Increasing the damage of a move that deals 20% by 1% is not really a big deal, and the effect only lasts for 5 seconds, but the knockback boosting component can possibly matter for a slightly earlier KO, or just add an extra 3%-4% if you get off a really good string of hits in that period. That said, it borders on an easter egg, at least without any further investment.
Each 3 rocks added adds 3% to the move and the knockback will raise accordingly, letting it KO disturbingly early at the ledge with a sizeable rock investment as more acid blasts the foe. It also, more importantly, increases the strength of the status effect. Every 3 rocks increases the duration by 1 second and the multiplier to your damage by .05x, reaching 1.2x with 9 rocks or 1.3x with 15. This is a much more serious boost, and if the throw itself won't KO this can mean subsequent moves will much more effectively, or of course just net you some bonus damage on the opponent even if its not quite as good as the FThrow for that purpose. Also it stacks with the instabilities on the foe, so if an attack that deals 6% hits a foe through 2 instabilities with a 1.3x acid multiplier, they'll take 15.6% from an attack that would usually do very little damage, and greatly increased knockback if the base was more than like, a flinch. This would also cause those 2 instabilities to each split as they took 15%, making a total of 4 on the opponent. The stacking here can get scary... but keep in mind that's a 15 rock investment you need to get a multiplier that large.
In terms of the construct created, it will create a puddle of green acid half Kirby's width for each rock included, up to a maximum of 2.5x his width, a fairly sizeable trap. It deals 8% and weak upward knockback on contact, though with a wide puddle if the opponent lands in the middle they might end up getting hit a couple times, especially at low percents. This puddle can be splashed with attacks on its surface to create a weak hitbox that deals 5% in the direction of the attack's knockback, which has size varying on the knockback of the hitbox and won't hurt Iguana. The splash also deals knockback in the direction its flying, unsurprisingly, but it won't KO until like 400%. The hitbox's size depends on the damage of the attack used on it, maxing out at a splash a little smaller than Bowser if the attack deals 20% or more. This is primarily something Iguana will use more, but if you're stupid with your acid puddle placements they can hurt your minions, aside from the one made by the acid puddle who is actually healed by it equal to the damage it would deal. The puddle lasts 12 seconds, and each 8% splashed out will reduce that timer by 1 second, though this is only at max size. At each level below that, it takes 1% less splashed to reduce the timer by 1 seconds. Like with the flame, you can imbue a copied attack into a puddle and it will activate when the puddle expires, but only one copied attack can be put into a puddle no matter how much is invested.
The size maxes out at 2.5x Kirby's width, but it can absolutely get more dangerous with more rocks added beyond 5. Every rock past that increases the duration by 1 second and every 2 increases the damage of both static and splashed acid by 1%. This can make for a pretty scary trap, 25 rocks is a big investment but it deals 18% and upward knockback that KOs at 100% on contact and 15% and knockback in the direction of the splash that KOs at 130%. That might not come across like an incredible use of 25 rocks, but its also worth mentioning that the acid will gradually change from a green color to a red color, with a more volatile look where it visibly bubbles. It becomes fully red at 20 or more rocks, and at that point, it causes a plus .05x increase in the acid multiplier and refreshes its duration on contact with either the puddle or the splash. If they have no acid multiplier, they'll just get a 1.05x one that lasts 3 seconds, which means its very short duration no matter how many times you refresh it, but at least you can get one. Its mostly scary as a way of refreshing the one from the throw, however. Acid puddles launched by Down Smash will travel half the arc of a rock and deal the amount of damage they would statically plus a bonus 5%, making for a decent thing to launch but rather low ranged. Can cover the closer spots to Iguana if he's making a huge projectile barrage though.
As a final note on the pools, if a portion of an acid pool is picked up and throw on a ground chunk, it just gets divided into being on two parts of the stage and does not lose power, and the units of acid involved in the pool are equal to a percentage of what was in the original undivided pool equal to the percentage of its size that was used. Basically, if 40% of an acid pool with 20 units of acid was broken off, the original pool would have 12 units left and the new one would have 8 units.
Animating a minion from a puddle of acid is certainly possible, or even multiple puddles you have on the stage. It functions pretty similarly to existing ways of drawing the onstage elements into a minion, reducing the acid's potency based on how much is drawn out to create a minion, until it eventually will just remove the puddle from the stage entirely. A minion you have in the grab will automatically be turned into an acid minion with the equivalent amount of acid invested. That said, there is only one type, like in the Forward Throw, a blob of acid with a mouth, two limbs, and open holes in place of eyes to give it a rather eerie appearance. Its size increases the more acid comprises it, starting at about Kirby's size with 5 rocks worth of acid, and maxing out at 30 rocks worth of acid being only a tiny bit smaller than a max sized dragon. The rules for which form of minion you animate remain the same, with it prioritizing whatever construction element you have the most of in a battlefield platform radius. It has 4 stamina per rock equivalent of acid added, so 20 at minimum size and 120 at max size, though you can go over 120 if you somehow invest more than 30 units of acid even if it will benefit nothing else about the minion. Good luck getting it that far by the way. No matter what size they are, they can move at Ganondorf's dash speed and have one poor jump, and are extremely heavy. The minimum is Bowser's weight and the max is, in technical terms, 278 weight, so you're going to have to kill them by depleting their stamina instead. At the start, acid blobs will have a Jab, Up Tilt, Down Tilt, and Down Smash. 11+ units of acid will add a Forward Tilt, Forward Smash, and Neutral Special. 21+ units of acid will finally add a Up Smash and Down Special. Blobs tend not to do a lot of moving around and will generally stick around where they're summoned. Iguana will say "Arise!" in his usual fashion for blobs with 5-20 units of acid, but at 21+ he will instead say "Arise and dissolve those who stand before you!"
The Jab is a very basic move where the blob will spit a short ranged and tiny blot of acid in an arc that can go only up to a battlefield platform at full size, and one third of one at minimum size. That's a pretty terrible projectile range, but it comes out pretty rapidly, having a fire rate of about 4 shots per second and being able to be angled rather precisely. Each shot deals 2%-5% based on size and a flinch, but if the shots are angled for an instability, that damage can wrack up a lot faster, and they are smart enough to do that if one's on the opponent. The Up Tilt has the blob headbutt upward for 6%-14% based on size, as well as upward knockback that KOs at 280%-145%. Its actually pretty fast overall despite the blob's overall sluggish nature, but is held back by the obviously small range. Its mirrored onto Uair as well. Down Tilt has the blob slap the ground in front of it with one of its limbs, dealing 8%-19% depending on the size of the blob and diagonal knockback that KOs at 245%-100%, in a move considerably laggier than Up Tilt but having decent range in front of it. If the blob slaps an acid puddle with this, it will leak some acid into it and increase the potency of the puddle by one unit of acid. If the blob is attacked during this move the acid limb will fall off, meaning it takes an extra 5 damage but creates a two-four acid unit puddle on the ground depending on size, or adds two-four units if already on top of a puddle.
The last basic blob move is the Down Smash, which is a bit more bizarre than their usual fair. It will cause the blob to melt into a puddle twice as wide as it is, dealing 8%-11% based on charge and mostly horizontal knockback that KOs at 230%-200% at minimum size. At maximum size, it deals 19%-26% and knockback that KOs at 110%-85%. The blob can then reform at any point along the puddle during the end lag, defaulting to the middle but allowing you to push it in a given direction with the control stick if you're using this attack in some form or another. In addition, if it comes in contact with an acid puddle, the blob can move to any point along that puddle too. When it pops out, it deals 10%-14% and knockback that KOs at 190%-160% at minimum size and 23%-30% and knockback that KOs at 90%-60% at max size, and the knockback is entirely upward. This move has a lot of start lag, but low end lag, letting the blob continue its approach afterward. It also tends to be pretty smart about how it uses this around an acid puddle, abusing it to take shots from out of the enemy's melee range with Jab. This is pseudo mirrored onto Dair, as he will go into a stall then fall that deals 10%-20% and upward knockback that KOs at 150%-100% based on size, and then uses the actual Down Smash once it reaches the ground. It will only fall two Ganondorf heights though before it will just go back to its typical aerial pose.
If you have 11+ units of acid, the next set of moves unlocks as has been mentioned, the first of which is Forward Tilt, which is mirroed on Fair and Bair. The acid blob's mouth produces what looks like a huge tongue and licks in front of it, dealing 7% at the minimum size required to use this move to 13% at max size, while having range that reaches the range of Dedede's Forward Tilt at max size and still respectable before that. It also leaves the opponent dripping with acid for 4-6 seconds based on size, dealing them 1% per second and causing them to add 1 unit of acid to a puddle if they collide with one. It is a slightly slower move than some, but the thin nature of the tongue means its possible to swat into the opponent's instabilities at specific points on its swing. It deals diagonally upward, but more upward than horizontal knockback, but even at max size it will only KO around 300%. The Forward Smash has the acid blob lean its two limbs back before swinging them forward in a stretchy punch that at minimum charge has less range than the Forward Tilt, but at max has 1.4x as much. It however, deals more damage the closer they are to the blob. At point blank range, the minimum required size version deals 16%-22% and knockback that KOs at 120%-90%, and at max size it deals 26%-34% and knockback that KOs at 70%-40%. At max range, it only deals 5%-7% and knockback that will never KO at minimum size, and 13%-18% and knockback that KOs at 200%-160% at maximum size. This gives the blob some very nice ranged options to make up for its poor movement, though they get stronger with a faster moving blob.
The Neutral Special has the blob actually vomit out a portion of itself in a big, disgusting blob that looks a tiny bit like a heart, dealing 12%-20% based on size and knockback that KOs at 220%-150%. The blob will travel forward a battlefield platform and has quite a lot of lag, and will cost the blob 3 units of acid to use. While this might sound strictly bad, the spat blob will actually melt some of the opponent into it on contact, and then stick around on the ground for 4 seconds. The original blob monster will then try to reclaim it, and if it hit a foe successfully it will not only give those 3 units of acid back, but add 2 more. If Iguana uses this by copying it, he instead will get a poison effect on his next attack that will cause it to deal 1% per second for a number of seconds equal to the damage the attack dealt, effectively doubling its damage, albeit very very slowly and not hitting for any additional knockback. For the record, this attack is about a bit laggier than your average Smash attack, so its not exactly something the blob can easily land, but it lets the blob actively upgrade itself.
The final moves are only gained by getting the blob to 21+ units of acid. The first is Up Smash, which has the blob vomit a stream of acid up into the air, which goes up 2 Ganondorf heights at minimum charge and gradually increases with charge. Regardless of charge, it will deal 14% and upward knockback that KOs at 150% at minimum size and 17% and upward knockback that KOs at 110% at maximum size. At maximum charge, the stream of acid will fly all the way off the top of the screen, before returning down to earth 4 seconds later like a Pikachu thunder bolt, dealing the same damage and knockback. If it hits a blob of acid on the ground, it will not only create a splash of the acid, but instead of depleting it will add 2-3 units of acid to it depending on your size. The final move is Down Special, which functions a bit like Game and Watch's bucket, as the acid blob opens up its mouth to devour projectiles. It will not devour Iguana's own, but it will devour those of your minions if they fly past the opponent. It can store up to 4 before dumping them out in an attack that deals half the total damage of all the projectiles absorbed, and proportional knockback to its damage(20% KOs at 100% for example). This will also create a puddle on the ground which is worth 1 unit of acid for every 5% the total projectiles dealt, making it potentially a way for the blob to reproduce in a fairly bizarre fashion.
The blob can obviously be rode around like any other minion with a throne incorporated into its design, though if you're doing so your Up Special will be considerably less effective than it would be with an equivalently sized rock or fire minion. Launching them with a super charged Down Smash sends the blob half as far as a rock monster, but deals 1.25x the damage of the equivalent rock monster, and they won't leave trails like the fire variants. Blobs lack the raw speed and power combination of the fire variant, but make up for it with some unorthodox acid replication methods that can potentially outmatch the fire's proliferation and have plenty of techniques to make fighting them very difficult.
Down Throw - Transmute: Runestone Iguana slams the opponent to the ground and sends them sliding along it with the red lines, which imbue into the opponent and transmute a small part of them into a glowing purple stone with lines glowing through it. This deals 8% and diagonally downward knockback that KOs at 275%, though it can be rather nice at a ledge due to the great angle. If you're not abusing the ledge, the knockback is low enough that unlike Forward Throw and Back Throw this is actually remotely possible to work off for combos and whatnot, comboing into Jab and setting up Forward Tilt rather nicely for example though its not a true combo. Mind you the scaling is enough that it won't be very good at this past early-mid percentages, but having the horizontal setup to go with the vertical setup of your Up Throw is nice.
That glowing purple stone embedded into the opponent is not just for show. That's a runestone, and will remain in their body and function largely the same as a magical instability. Deal 15 damage to it, and it will break, splitting into a magical instability while leaving one behind where the opponent. This runestone will stick in the opponent for 8 seconds before falling out, basically functioning the same as a base as the instabilities observed in Neutral Special. That said, being able to setup the equivalent of an instability out of a throw is pretty great, especially when you factor in that Forward Tilt has a rather powerful interaction with instabilities.
If you invest more rocks into this, it will make the runestone bigger, and as such have a bit more stamina as an instability. It will increase by 5 for every 3 rocks invested, which on the surface sounds like strictly a downgrade as it prevents the standard Forward Tilt combo from splitting like you'd want. However, each rock improves the damage buff for hitting the runestone by 1% and makes it take up a larger part of the opponent's body, making it an easier target. More than that however, every 3 rocks means the runestone will split into an additional instability, with each of them pushed apart but centering around the point that a single instability would usually split too. This is a pretty fantastic source of instabilities, provided you're able to actually break it open, as the total amount of damage required will get high and if you don't do enough its a pretty big waste of rocks. That said if you invest 12 rocks and suddenly have 6 instabilities on the opponent from breaking it, Iguana is obviously going to be able to abuse the hell out of that with moves like Up Smash.
Your rocks will be transmuted to runestones, which look pretty much exactly like the one planted in the opponent and are the same size as your rocks. The problem here is they cost 3 rocks to a runestone, with any remainder of 1 or 2 rocks just being dropped back to the ground. Transmuting to a runestone lacks the kind of immediately benefit that transmuting to fire or acid does too, they don't have hitboxes and just kinda stick around on the stage, having 15 stamina each. They are not better any different than stones when used for the Down Smash as a projectile, either. That said, they do have an interesting property of not only reflecting Up Smash lasers off them, but not counting toward the limited number of bounces for some interesting bullet hell implications, especially to get more power boosts off reflecting off Iguana. If you imbue a runestone with a copied attack, the runestone will use it, and then send a copy of that attack to the nearest runestone with a little red jolt of energy. This means that you can keep reusing the copied attack as a trap, or perhaps keep getting a buff if you imbued it with a move that buffs you like the Fire Elemental's enrage ability.
The real excitement with runestones comes with the fact that they actually provide a number of passive buffs to Iguana when they're in the area. The first of these is that they improve your ability to charge your Smashes faster, shaving 10 frames off the time you need to charge for max power for each runestone in a one battlefield platform radius. Once you get to 5 runestones or 60 frames of lag, it will only reduce by 5 frames from that point forward, down to a minimum of 30 frames of charge required at 11 runestones. Mind you, that's a pretty absurd buff as it means accessing your supercharged smashes only requires a 1.5 seconds of camping, but there is no way any sane opponent is going to let you get to 11 runestones in an area of that size on a frequent basis. If they do, they sure as hell are going to destroy them far more easily than if you just invested in a high stamina minion capable f defending itself, though honestly using your superpowered Up and Down Smashes on that frequent an interval is so terrifying its at least worth trying in some matchups.
If Iguana jumps off the ground and into the air in an battlefield platform radius area of some runestones, they will send a small amount of energy out each into him. For every 3 runestones that do this, Iguana will get an extra jump he can use before he has to touch down for more, contributing further to his aerial game. These jumps are still only usable after the jumps done on a minion's back if you've mounted one, but its still a very powerful bonus that lets Iguana perform some aerial combos and setups he would never be able to otherwise. The next bonus is one that doesn't stack with more runestones, but having them out improves Iguana's observational capabilities, letting him see an instability starting at 15 frames rather than 20 as long as there's at least one within a battlefield platform radius of him, and then continuing on the usual 10 frame cycle for seeing more. Its a small bonus, but it makes instabilities just a bit safer to make overall, and will also technically let you get to the throne a little bit faster. Finally, if you have more than 5 runestones in that radius, Iguana will get a small but notable 1.1x damage on his damage dealt on all moves, including copied ones, and a slight reduction on base knockback with increased growth to allow him to continue comboing effectively despite the knockback increase.
Iguana can create constructs out of this, but they're not going to be new minions and any minions transmuted to runestones will just get broken down for runestones. No, the new constructs are a bit different and require a set amount of runestones to make, any more than necessary that are used just being dropped. If you invest 3, you'll get a flotation stone, a small floating runestone about 1.5x their usual size with a clamp on it that has 25 stamina. If you invest 5, you'll get a runestone cannon, a cannon similar in size to a Super Scope that has 35 stamina. If you invest 8, you get a crown the size of Kirby that has 50 stamina. None of these do anything on their own, but Iguana can carry them around and use them like items. When Iguana carries items the visual is him levitating them next to him, which is notable in the case of these as it means that they can be attacked and have their stamina depleted while he's carrying them. In addition, you can throw any of them like a throwing item, or just drop it on top of a minion like you would drop any item to equip the given item to the minion. The runestone's energies are partially dedicated to whatever role its fulfilling so as such, it becomes worse for channeling and makes the bonuses the runestones making them up give to Iguana weaker. That said, a flotation stone within a battlefield platform radius of Iguana still counts as two runestones for the purposes of buffs, while a cannon counts as three and a crown counts as four. Note that any given minion can only have one runestone item equipped at once, and equipping it with the runestone item adds its stamina to the minion's. As far as storing attacks in them, they function identically to a singular runestone in that regard.
When a floatation clamp is created, Iguana will simply say "How handy." While a flotation clamp is held as an item, it does not replace any of Iguana's inputs with anything notable, the only new thing being the option to throw it or drop it. Its main purpose is that while its equipped, the recharge time of Iguana's Up Special is cut in half, and he can fly 1.3x as far and 1.2x as fast. Its rather redundant with his added jumps from runestones on paper, but Up Special provides some precise movements your jumps don't allow for on their own, so it having its own buff is rather nice as an alternative to the one provided by the runestones on your initial jump. It also means your actual recovery when your not jumping off the ground is improved too, which is rather nice against opponents with strong gimping games that can combat you well in the air as well as giving you new approaches while recovering. Practically speaking it doesn't fix your hilariously low weight though, so you'll still die pretty easily.
Equipping this to a minion is pretty basic in functionality, it will give that minion one additional jump and solidly improve how good its jumps and aerial movement are. You can make dragons into aerial gods, or just give your oozes the ability to go into the air in general, which is a nice bonus. In addition, if you ride a minion with a flotation clamp attached, it will not weigh Iguana's Up Special down at all, so feel free to abuse that for all its worth. Throwing it as an attack deals an underwhelming 10% and always upward knockback no matter how its thrown that KOs at 200%, at which point the clamp will attach to the opponent. It will cause them to take 1.4x the upward knockback on the next attack they're hit by, setting them up for a strong aerial finisher or to get them very high with your juggling game. This does use up the clamp sadly, and is arguably not as powerful as the permanent effect it gives as a buff, but sometimes you just need to go for kills or juggles.
When Iguana summons the runestone cannon, he remarks "Such a finely crafted weapon!" The runestone cannon is a bit more powerful than the flotation device, but like it doesn't really give new attacks when equipped. At least normally it won't, but the cannon is spending its time charging as Iguana fights. It charges similarly to KO punch, every 25% Iguana takes or 8% he deals will charge it up by one unit, and it will can be fired by pressing A once it has 4. You can see these units as bars in the side of the cannon, and they will deplete by 1 every 8 seconds. The tip of the cannon will spark with energy once its reached maximum charge. Tapping A will simply have the gun fire a large blast of red energy in front of Iguana, hitting an area Wario's size in front of him and dealing 17% and knockback that KOs at 110%. For the buildup, it sounds underwhelming, but the ending lag and start lag are both very small and as such make it a rather scary sudden KO move in Iguana's arsenal. Holding A will instead have him fire out a stream of tiny bolts like a machine gun, each dealing 3% and adding up to 30%, with the final hit dealing knockback that KOs at 160%. The other hits just push the opponent back slightly. This has much more start and end lag than the other version, but reaches a solid 1.8 battlefield platforms and during the firing Iguana can adjust the angling rather precisely by pressing up and down. The precision makes this absolutely amazing for hitting instabilities... though you're forced to fire all ten shots which makes this all that much more punishable, but having a really long ranged version of Up Smash with more control and damage in exchange for less KO potential and more punishability as an option is pretty good, especially when at lower percents and instability counts this can get you very far.
Giving this to a minion will basically allow it to fire the cannon just as you'd expect it to, basically meaning it can use either version of the cannon fire as Iguana would once it charges up the cannon. Your minions prefer not to abstain from using the cannon much, being slightly less inclined to throw out the laggier longer ranged version especially if there are no instabilities on the opponent. Obviously, just putting the opponent in range of a minion with a fully charged cannon's short ranged mode is a good way to set up a KO because its so fast, but this is a fair bit more predictable in the hands of an AI minion than yourself and makes the low lag nature a fair bit less useful. That said, having an ally use the machine gun version from a range is a godsend, and a very powerful addition to any minion's arsenal provided they can charge it up. This is particularly nightmarish on bulky minions like the dragon and the blob, since they're just going to get beefed up enough to be able to use one of these attacks simply from the opponent wailing on them. While less high stamina minions won't get the same opportunity, they can still use this if Iguana sets them up for some damage. The minion's AI is in control of the cannon even if Iguana is riding it.
As a throwing item, the runestone cannon is identical to the super scope, which is to say its really not a very good item to throw at people. That said, this is only if the cannon isn't charged up. If it is, the cannon will instead explode in a blast of red energy one second after hitting wherever it was thrown at, dealing 28% and knockback that KOs at 60% in an area the size of a Bomb-omb blast. To prevent exploits with comboing or footstools, this only has half power if you Z-drop it, with the explosion covering a slightly smaller range and looking much less violent as well. This is immensely powerful, but not always going to work without some other form of support and uses up the cannon, making it a somewhat less practical option than the other two variations a lot of the time.
Upon creating a crown, Iguana will remark excitedly "A glorious crown fit for the god of this world!" The crown is a very powerful item, again functioning largely as something you hold onto rather than throw in terms of the benefits it gives. Throwing it IS useful though, because as a throwing item it deals quite a bit of damage, up to 21% when smash thrown. The knockback leaves a lot to be desired though, not KOing even on said smash throw until 180%. While its equipped to Iguana however, he gets a few very notable buffs. The first is a far greater version of the usual five stone buff, a 1.3x bonus to all his attack's damage, including copied moves, with a great deal of the knockback being invested into the scaling to improve his combo ability on top of this. It cancels out the usual 1.1x buff even if you do have the one runestone lying around to make it so, but this is far better don't you think? If you stack this with acid and instabilities you're going to absolutely destroy people, that much is for sure.
The other benefits are less directly increasing his power, but still quite dangerous. The first is when Iguana transmutes rocks to another material, he gets a much larger amount of product, producing 1.5x as much fire, acid, or runestone as before, also multiplying that amount in the minions that get turned into other types. This is magnified further by the fact that when Iguana breaks a stage instability like this, aside from dealing the obvious increased damage and knockback from the buff, he gets 8 rocks instead of 5. The last bit is a huge deal, as Iguana's weight gets a buff from the crown too. Specifically, it goes up to a 7/10 weight, making him actually quite hard to kill unless the opponent takes out the crown floating above him, which given its 50 stamina is not terribly easy. Suffice to say, this is a pretty powerful reward for your efforts, but at a cost of 24 rocks it needs to be, given it has to provide competitive value to a dragon or max power fire/acid elemental.
Giving the crown to a minion gives a pretty dramatic boost to them as well. The 1.3x multiplier as well as the other benefits get applied to their attacks, which in the case of some minions can be an absolutely monstrous result and brings less powerful ones up to speed, while adding a whopping 50 stamina to their health total. There are two other benefits to this, different than the ones you get from giving the crown to yourself. For one, it will cause all minions of the same type(with lizard, golem, and dragon counting as one type) and equal or lesser rocks/fire/acid units composing them to follow the lead of the crowned minion. This will mean that they will try and follow it around, basing their attack patterns around closing holes in the pattern of the stronger minion or abusing what attacks it manages to pull off. Unifying the AI of your minions has advantages and disadvantages, but its definitely stronger overall than them working on their own and when combined with a throne can give you some decent control over your horde.
The other ability, once again entirely controlled by the AI like with the cannon, is that a crowned minion can channel for 50 frames and summon a minion of the same type(dragons, lizards, and golems counting as one type) as itself, but with 10 less rocks/fire/acid units composing it. They can make a maximum of two subordinates this way, but putting a crown on say, a dragon, not only creates a buffed up dragon that commands your lesser stone minions, it also gives you two free golems for your effort. This is also the main reason to go over 31 units of any type, because that means you can actually have full input set fire/acid elementals or additional dragons being summoned by this ability, which is obviously completely insane. The setup requirement is high though given you need both a crown and a hell of a built up minion, but they do self-replicate to a degree so its not totally out of the question that this will ever happen, and honestly just giving it to a golem or mid-level fire/acid elemental is still remotely scary. If the minion has 15 or fewer units invested, you just get a 5 unit minion, AKA a minimum size lizard or elemental.
In summary, runestones are your utility construct, providing lots of useful buffs and overall improving the power of Iguana and his summons, but lacking any real power of their own. By comparison to the fire and acid throw which can sometimes be used to setup amidst some camping, I really recommend you only go for a runestone transmutation if you actually have the foe in your grab, given the immediate profit of the throw will be a bit less useful for defense.
Up Throw - Suffocate Rather than messing around with transmutation, Iguana just levitates the opponent up slightly and has the red lines around the opponent constrict around their throat. He will hold them up like this for a brief moment, before squeezing down on the binds in an attack that deals 10% and moderate upward knockback with almost no growth to it, so it will never KO until like 700%. Given how Iguana's brand of juggling works though, the knockback you're getting from this move is pretty ideal at low percents so you don't want it to scale, as it will set up for your Up Aerial very nicely. While it doesn't set up Up Smash perfectly due to the startup lag on said move, its not exactly awful for that purpose either if you don't get heavily outpredicted. Its a decent setup throw overall, and a delightfully evil one fitting of a very evil iguana.
Now, just because you're transmuting stuff doesn't mean what you've grabbed can't get in on the fun. Not with the rocks specifically, as for once they won't be used with this throw, but rather your minions. You see, they can all participate in this throw if you have them grabbed as well, basically giving each of them a single throw they can use. Well, by all, I mean the strongest minion based on the number of units involved in their creation will be used for this throw, and the others will just sit by. Iguana will do the initial constriction and deal 10% before the minion in question adds its contribution to the attack. If you just want the juggling setup and nothing more specific, you can just avoid using your stuff the same way you'd avoid a transmutation. Sadly since you can't retransmute fire and acid minions, they're just gonna have to sit this move out.
If you have a lizard you're using for this move, it will tackle the opponent into the air and grip onto their body. This deals an extra 6% and launches the foe with knockback that KOs at 225%. While the power's not great, the benefit is of course that now the lizard is in the air with the opponent, ready to continue attacking them. The knockback actually has its horizontal component determined by the lizard's position relative to Iguana, as the lizard will basically carry the opponent along its trajectory. This not only allows for some potential specific positioning, but the specific positioning is supplemented by having a lizard right there. Not as good for juggles as the default version, but this is a really nice way to set up the very potent potential effects of your Smashes instead.
The golem will just grab the opponent out of the chokehold and throw them into the air. This only deals 3%, though the knockback is actually a bit higher as it KOs at 190%. That said, the golem will throw something right after the foe, specifically a chunk of ground similar to its Neutral Special. The ground chunk will carry everything it could in that move, up to and including an acid pit or a smaller golem/lizard/fire elemental/acid blob. That's pretty nice, and gives it a lot more versatility than the lizard throw, but the lag on the throw is actually kinda bad and the opponent is not very likely to get directly hit by the chunk if they're not stupid or something in the air does not intercept them. The chunk throw can be angled very slightly actually, so if you make a good read its not exactly impossible to hit a smart opponent with this.
The dragon's throw is by far the most interesting, as it will pick up the opponent in its claws for a cargo throw similar to Donkey Kong's. At this point, Iguana can direct the dragon around, gaining control over its movement as though he was riding it. This is a bit crazier than Donkey Kong's equivalent throw when you consider that if you suicide with it, you're only losing an expensive minion and not a stock, and said minion is capable of flight so it can go places Donkey Kong cannot. This has four mini-throws that can be used out of it. Its forward throw has it toss the opponent up in front of its face for 2%, then headbutt them forward for 6% and weak horizontal knockback. Its back throw has the dragon throw the foe behind it and flick them with its stone tail, for another initial hit of 2% and a second follow up hit of 5% and low backward knockback. Since it hits the opponent against the stage on the ground, it will instead deal 9% and diagonally upward knockback that KOs at 190% in that case. The up throw will have the dragon toss the opponent up toward its mouth and bite down for a throw that deals 12% and upward knockback that KOs at 150%, but can be DIed away from so its not going to work very easily without a setup around it, though its potentially stupidly strong in conjunction with everything else about this move.
The down throw will have the dragon rake the opponent forward, descending a Ganondorf height and travelling forward its body width, or just kinda dragging the foe along the ground if the dragon's already grounded. This deals 5 hits of 1% if the opponent touches the ground, the last with almost entirely horizontal knockback that will KO at 275%. That said, any rocks, runestones, or fire it comes into contact with will hit the opponent when he drags them through, dealing 0.75% for each, and an acid pit will add 1/3rd of its damage if the dragon happens to drag a foe through it. In the air, it will just go forward and down that distance and stop if it doesn't hit the ground, though if it happens to bump into rocks/fire/acid/runestones in the air it will add their damage value to this move. The final knockback will increase greatly with damage added, and if you position this move around some rocks this can put on some serious hurt. All in all, the dragon throw is insanely versatile and lets you put the foe in basically any position on the stage you'd want, setting up for an unimagineable number of setups other characters with cargo throws could only dream of. You do need a dragon though, and those things are expensive. Still, there's a lot of potential use to even the mere lizard throw, so don't underestimate the minion options... or even the base throw, really.
Aerials
Neutral Aerial - Levitation Circle Iguana moves one of his claws as though he was snapping his fingers, and a small blade of wind comes out flies in a circle around him. This deals 5% and weak radial knockback in the direction the wind blade is traveling that KOs at 450%. The move is fortunately pretty fast to come out and end to make up for its weak power, and the radial nature of the knockback makes it pretty useful for starting and continuing all kinds of aerial combos. That said the wind blade will only cover a small amount of Iguana's body at a time, so it can be easier to interrupt than it sounds. Its also not very good at getting the opponent out of your face and if they control their aerial positioning well enough they can easily counteract this move. If you use this move above rocks, runestones, or fire, it can sweep them up as hitboxes that deal two thirds as much damage as they would as they would when made into hitboxes by Down Smash. Sadly the wind is not quite powerful enough to sweep up acid, and can only carry 3 units of any substance total. It will be shot halfway along the actual arc of the wind after being hit, so if the wind hit rocks directly below Iguana they will end the attack above him.
You can use this attack multiple times in conjunction with your powerful flight abilities to actually get your constructs further into the air. In fact, that's not the only reason to spam this move, as after use, the wind blade will die down... not completely. It will appear much more transparent and smaller, no longer able to do any more than the tiniest push effect, but will linger around Iguana for 1.5 seconds or until he lands. This is so small it really will not affect the foe's positioning much at all for all but the most specific hitboxes, and mostly just exists to signify the attack is still going. When used again with the wind still circling Iguana, the blade will flare back up to its usual status, but actually a bit stronger, gradually increasing in power each time you use it until you land. It caps out at dealing 13% and knockback that KOs at 190% radially... after a whopping 10 uses. That said, knockback that KOs at 190% radially in the air is actually pretty insane, given the power it adds to your ability to gimp and juggle simultaneously. After 0.75 seconds of not using Nair, its power will diminish, so you basically have to spam it only throwing in like 1-2 moves or dodges in between if you want to keep it at full power and if the wind blade goes away obviously the whole buff is lost. That said, if used intelligently this is a fast move with highly controllable knockback, both in terms of power and angle, which with the precision some of Iguana's tools allow him can set up some truly scary aerial play.
As you power up the wind, it will also increase its effect on your rocks/fire/runestones. At max, their power only becomes equal to that of Down Smash, but it only takes two stacks for them to do a full rotation around Iguana, and after that the effect becomes much stronger. Specifically, it will cause whatever was picked up to rotate around the point Iguana used the move for 0.75-4 seconds, functioning as an aerial trap. Aerial traps are pretty scary, as they give a ton of additional power to Iguana's potentially juggling or edgeguarding... though keep in mind that in the case of the later, it will refresh their recovery and the circling nature of the hitbox makes it rather inconsistent as a blockade. Its still powerful though, especially if you managed to store some copied moves in the things you blew into the air to make them considerably more threatening to try and fight around.
If used while riding a minion, the wind blade will circle the entirety of Iguana and the minion, which makes the blind spot bigger depending on the minion's size, but doesn't increase the overall duration. It makes it a bit less reliable of an option while mounted, but the bigger range and ability to combine it with minion moves is still fairly worthwhile. Plus, riding a minion can give Iguana more jumps to play off, which will make building up this attack to a higher level of power more feasible. It will also give you the ability to move around rocks and whatnot more efficiently with this attack.
Forward Aerial - Mana Crystal With a spark of energy, Iguana conjures up a crystal the size of a pokeball and then fills it with red energy, before chucking it forward a short distance. This technically qualifies as a projectile, but only has 0.6 battlefield platforms of range before the crystal just shatters. While its flying, the crystal deals 7% and weak horizontal knockback that KOs at 250%, and when it shatters it breaks into 6 tiny shards that each deal 1%, and the foe is most likely not going to be hit by all of them. However, due to the fact that the opponent will take multiple hits from the breaking it sets up rather nicely for Iguana's Nair for example. Also, its worth mentioning that since the shards are so tiny, it is fairly possible for them to land in an instability. Its something that you will have to get used too in terms of the tiny arcs each of them fly out at, but +3% per instability this hits is no joke as that can potentially mean it deals 24%. That's only going to happen on a foe absolutely covered in instabilities though, or one with 6-8 where the crystal is aimed insanely well. The crystal travels at a slightly downward arc, so on the back of a minion it is easy to overlap it with where that minion attacks.
This contributes to the main interaction of this attack, which is if it collides with another hitbox of Iguana's, the crystal will explode in a stream of shards, flying at the angle of the knockback of the attack. This deals 5% plus half the damage and knockback of the move, effectively letting you add an extra sourspot to your minions attacks, or in the case of moves that deal under 10%, a sweetspot. The range varies a bit on the amount of knockback the move does, but the stream will at most add 0.3 battlefield platforms of range to an attack. Since its a very thin stream, it can be used to hit instabilities with good aim, allowing you to land hits with attacks that wouldn't otherwise get that. Oh also, this can play off Iguana's various delayed hitboxes like his projectiles from the Smashes flying around the stage, or a copied move being released from a destroyed construct. This is a potentially very versatile move, just keep in mind the speed and power are kind of bad for a Forward Aerial, and given its slight impracticality as a melee move this is going to be one of the inputs you most want to have a copied alternative for.
Back Aerial - Tail Swat Iguana strongly prefers to fight using his magic as his physical body as opposed to physical prowess, partially out of a slight sense of humiliation from being forced into this form. That does not mean he'd never resort to it, as in this case its just more convenient than trying to cast a spell for the opponent behind him. Iguana swings his tail behind him in an arc from bottom to top, dealing 7% and low diagonally upward knockback. The range here really is pretty terrible given Iguana's small size is not exaggerated for the move, which is a shame as it otherwise the speed is not half bad. Since the knockback is partially vertical it makes for a rather poor wall of pain on paper, but when your recovery is so amazing you can kind of pull it off regardless.
For the last couple frames of the swing, the end of Iguana's tail will spark red, as he's not going to entirely let his inferior biology do the work his superior magic and intellect could. This raises the damage dealt to 11%, and changes the angle of the knockback a bit to being very slightly forward and a good amount upward. This small amount forward means that instead of just pushing foes into an awkward up and backward position away from Iguana, he can instead put them directly above him. The knockback is fairly solid, KOing at 175%, meaning it will basically always mean the foe is at the point you can rely on your sweetspotted Uair to deal with them rather than the two closer and less useful hitboxes. If you manage to land this hitbox on an instability, admittedly you won't actually break the instability due to the move being 1% short, a shame. That said, on the off circumstance you do that you convert the move to KOing more in the 140% range, which when combined with Iguana's juggle game means you can send the opponent to a disturbingly quick death... provided you actually land this in the ideal position. This is of course, demanding the sweetspot of a move that isn't very big to hit a tiny weak point on the opponent's body, and given the short range this isn't some hard to punish move. With practice though, this can mean a good Iguana can obliterate someone from a shockingly low percent off one juggle.
Up Aerial - Iguana Beam Iguana fires a thin cone of red energy out of one of his claws, having an impressive amount of upward range but being a relatively thin hitbox that will only hit foes directly above Iguana, barring at the end of the cone where the range widens out a little. This deals a variable amount of damage and knockback depending on where the foe is hit. Up close, it deals 3% and is punishable on hit until 200% and won't KO until 800%. That's pretty miserable, and the mid range is not exceptional either, dealing 6% and upward knockback that KOs at 290%. The sweetspot is at the end of the cone, which deals 11% and upward knockback that KOs at 200%, which is very strong in a juggle. This attack is a bit laggier than Nair so its true combo potential is not all there, but its still fast enough to be very efficient at knocking the foe higher and higher into the air with it.
It has to be said that the close range version of this attack does have one perk. If you hit just at the start of this move on an instability, you can actually hit specifically that instability which is not usually possible with this move. That will increase the damage of the initial hit to 6%, and increase the knockback so at mid percents it will combo into the sweetspot hit perfectly. Using both this very specific hit and the sweetspot are another major incentive to get yourself better aerial movement, as the juggling potential is already decent and becomes extremely impressive when combined with those factors. Copying a good Uair to supplement this moves weak points can make it even scarier too, or of course from the back of a minion to supplement it with whatever upwards hitting attacks it has.
Down Aerial - Descend and Smite Iguana swoops down as his body crackles with red lightning, descending toward the ground in a mostly stall then fall Dair that can be angled slightly to the left and right as he goes. The pace he descends at is similar to Sonic's Dair. He deals 9% and moderate horizontal and slightly upward knockback to whoever he hits while he falls, and this increases by 1% every Ganondorf he falls as more lightning accumulates around him. The knockback KOs at 220%, but can obviously go up as the move's damage percent does. For the record when used on the back of a minion, that minion will actually throw Iguana downward for the move, not participating in the stall then fall itself and allowing a way to dismount one of your minions and actually go below them in the process. This will also buff the damage a little bit, by 1% per 5 rocks/fires/units of acid involved in the minion in question, maxing out at a bonus of 6%, which means the move can potentially start out dealing 15% and potentially get even higher with some good height. The landing lag on this is pretty terrible, but it sends out two shockwaves to the side of Iguana with moderate range that deal 5% + any bonus damage added through various means, so it'll do 11% if thrown by a max size minion from close to the ground or the same if thrown by a mid-sized Golem from 3 Ganondorfs up. The upward knockback starts really low on the shockwave, but does scale decently with damage. The start lag is pretty short, so you don't have too much to worry about on that end.
By pressing A during this move, Iguana will point both his claws down and channel all the energy surrounding his body toward the ground in a burst that looks a bit like a red version of Pikachu's thunder. This cancels his momentum, and goes down a maximum of three Ganondorf heights. How much power this has is going to depend on how far it travels before hitting the ground though. If it goes the max range, it will only deal 2% + 1% for every Ganondorf height descended before cancelling into this. The knockback will basically be flinching regardless of how far Iguana fell. However the power will gradually improve, up until Iguana is only barely above the ground where the explosion deals 13% + 3% for each Ganondorf he descended, and while the base mostly upward knockback will KO at 165%, its going to obviously going to get much much stronger if Iguana fell 3-4 Battlefield platforms. While he has to be pretty close to the ground to pull this off, the actual blast on impact gets bigger the closer the attack is to the ground. At minimum its only a tiny bit wider than the bolt itself, at max it becomes 1.25x the size of Wario. The end lag if you cancel like this is pretty big though, so make sure you're careful with what you do when you cancel this move, and obviously this is quite telegraphed if you want to build up power for this move.
A nice little feature of it, however, is that runestones, rocks, and rock minions do count the same as solid ground as far as the endpoint of this move. This does not sound like a huge deal at first, but if you have a dragon flying through the air, the ability to get a more powerful hitbox out of this move from swooping down onto it is not to be ignored. More importantly, if you have rocks flying through the air for any reason this gives you a fair bit more options as to how you want to approach using this move on an opponent. It will never make it truly unpredictable, but given the knockback is upward being able to use it high in the air nullifies the fact that you're getting less distance to build it up.
Standards
Jab - Crystallize Iguana fires out a small crystal from his hand, before shooting many tinier ones as you hold down A. They resemble the one used in Fair but a bit less unstable looking, and the first one deals 3% and the subsequent ones deal rapid hits of 1%. This is obviously very fast, being a Jab, and has average range. The damage on this does not build up as fast as other jabs, but that said this move does have one additional thing of note to it. For the Jab finisher, he will snap and explode the crystals on the opponent, dealing 2% up to a cap of 13% based on how many hits you did beforehand. The knockback at base is non-existent, but at max it KOs at 170%. This gives it a high potential net damage output for the time investment, but you do have to land the last hit, which does require the opponent to be in somewhat close range to Iguana for the crystals to actually detonate, otherwise he'll just snap and see no results, much to his annoyance while giving slight end lag.
You do not have to actually use the finisher of this Jab combo, as you can instead just cancel into the start lag of anything else or even just moving. At that point the crystals will lose their energy and just cling to the foe. This will slightly weigh them down, decreasing their movement speed slightly for 3 seconds or until they use an attack. When they use an attack, it will knock the crystals off, at the cost of adding lag to the attack based on how many crystals were stuck to the foe. The same amount required to get the full power explosion, AKA dealing 10% with Jab, gives you the max of 7 extra frames of start lag. Obviously they can just wait out the three seconds being defensive, not get hit by the full strength effect of this, or just go for a fast attack, but the extra frames are actually pretty critical to Iguana even if its on only one attack. It makes it easier for him to copy it or predict and disable it, or just abuse the opponent's lag to set up an advantageous situation to break some instabilities. Iguana benefits perhaps more than even the average character from having any real prediction advantage over the foe, just do keep in mind this is a pretty small one that's mostly useful because the source of it is fast and easy to land.
Forward Tilt - Fortress Breaker Iguana raises a single claw and fires a thin red bolt of energy similar to Falco's laser in appearance. It deals 6% and mild hitstun, and will only travel a battlefield platform compared to the obnoxious space animal projectile, making it significantly less effective for camping. The start and end lag are still at the point of making it somewhat spammable, though not especially so as the start lag is not super short. You can also angle it up and down by 30 degrees, which can sometimes help the move hit instabilities though its not exactly giving you a wide variety of options for doing so. The laser slightly slows down as it flies forward, though the effect isn't an especially big one. The projectile goes through opponents and walls, which is notable for a couple reasons we're about to get too.
If you tap A while the laser's out for a follow up, there will be a very brief pause in the laser's movement before it explodes. If its already hit the opponent, the part of the body it has hit will flash before the explosion, which is something that the opponent will not have enough time to dodge due to the hitstun, but will technically be able to shield. This will deal an additional 6% and diagonal knockback that KOs at 150%, and a total of 12% and knockback that KOs at 140% off a projectile that comes out as fast as this one does is pretty insane. That said, there's a drawback, and that's the fact that if Iguana uses this version he suffers massive end lag, enough so that an opponent at low-mid percents might actually be at a slight positional advantage to Iguana despite taking the knockback from this. God help you if the opponent manages to perfect shield this, though regular shields take 1.5x the damage and a huge amount of shield stun and pushback, as this is an attack designed to penetrate defenses and destroy them from the inside. The extra option is interesting though, and once you reach the percent in Iguana's set this can KO, it is the fastest and most straightforward way to do so. It helps, of course, to have an instability or an acid effect on the foe, at which point you can start cutting the KO percentage to around the early 100%'s and maybe even down into the 80%-90% range off a really good setup. That makes the KO potential here pretty terrifying.
There are a couple other notable properties to the move, and one interesting one is the effect it has exploding inside an instability. While there's obviously the benefit of it being a two hit move and therefore hitting an instability twice, an explosion from within causes the instability to split somewhat more... violently than usually. It will actually create one more additional instability, off in the same horizontal but opposite vertical direction of the knockback of the attack. Given the damage adds up to over 15%, this is one of the absolute best ways to get an opponent started down having a large number of instabilities. When the opponent already has a few later in the process, there are moves that can get or contribute to more, but early on this is a pretty reliable way to start creating more weak points on the opponent. That is of course, provided you can hit the opponent at the right range and angle to get started, and while its easy to make the split happen if you do manage to screw it up, the punishment will obviously be rather severe.
The move's final piece of utility comes into play in how it interacts with reflectors and projectile absorbers. You see, Iguana has quite a bit of trouble with those kinds of moves given how projectile heavy his moveset is. If Iguana explodes this move on contact with one of those things, such as Ness' Down Special, Game and Watches' bucket or Fox's Reflector, it will shatter that ability entirely and cause the actual explosion to deal an additional 9%, with the knockback increased to KO at 100%. The move in question will then be disabled for a total of 15 seconds, giving Iguana free reign to abuse his projectiles to all hell against the poor sap during that time. This does require good timing to pull off and the opponent to use their anti-projectile measure when you use the Forward Tilt, so you have to be outpredicting or severely outpressuring the opponent to make this strategy work. Still, in those matchups, its a pretty useful clutch technique to rely on.
Up Tilt - Telekinesis Iguana's raises his hand and it glows in a similar fashion to Mewtwo's when using his Up Smash. In Iguana's case the particles are red and crackling with lightning instead of the purple, more cosmic look Mewtwo goes for. On contact with opponents it will cause them to spin in a loop for a brief moment, before being fire upwards and taking 9% with upward knockback that KOs at 215%. The lag is a bit awkward as Up Tilt's go, and its by far the worst of your upward aimed moves for juggling, but the range is a bit nicer than it looks. In addition, if you press A at any point during the loop, it will release the opponent at that point in the loop, reducing the damage to 4% and also slightly cutting the knockback, but still doing enough to provide a versatile spacing option. The end lag is also really short, and it should be mentioned that the strong control you have over the opponent's end position is pretty great for setting up breaks on instabilities, even if the move itself can't target them by nature.
Oh yeah, another useful thing about this move is that you can use it to redirect your projectiles that come into contact with it, in the same way that you'd redirect an opponent. Obviously, having the option to redirect the Forward Smash is a somewhat valuable option, but the real kicker is being able to redirect minion projectiles. Notably you can redirect things like the splitting stalagmite, an blob's heart, or a ground chunk from a golem, and all of these things have potentially very powerful implications of either keeping that projectile going longer or just sending it somewhere it wouldn't usually fly. This can also throw rocks, runestones, and fire, but only one at the power of an uncharged Down Smash for a distance of 1.25 battlefield platforms. That said, sometimes you have a copied move invested there, and sometimes you just want a direct and versatile way to re-position your rocks. On opponent's projectiles, this will still redirect them, but won't take control away from them so you won't get all that much mileage out of using it to block an opponent's projectile. That said occasionally you can send one at a rock with a powerful attack stored into it and break that open, killing your opponent in a very unorthodox and stylish fashion.
Down Tilt - Glyph Iguana sweeps his tail forward and seems to leave a trail of red energy behind it, dealing 5% and tiny knockback in a move that, while quite fast, is not absurdly so and the low range leaves a bit to be desired. Its a good shield poke though if nothing else, and can hit instabilities really low on the opponent's body. The interesting part however, comes from the residual effect. The ground he swept his tail across will glow red, brighter the more times he's swept it across. If he uses this over a rock, flame, acid pool, runestone, runestone item, or minion, that will instead glow red. If this is done three times, a magic glyph will appear above that particular object and 5 seconds later, a blast of red energy will fly out around the point you drew the glyph the size of Wario. This blast is telegraphed by sparks of energy flying off it 30 frames before it goes off. It deals 12% and knockback that KOs at 190%.
You can actually draw over the glyph some more to add details to it, increasing the power a bit each time up to a maximum strength of dealing 19% and having knockback that KOs at 110% in a 1.4x Wario sized blast. This requires you to use this move over the same thing 6 times... but what is worth mentioning is that no matter where what you drew the glyph on is moved, the glyph stays. So if you sent a rock flying through the air, it can explode with the glyph's power while its flying through the air, making all those flying rocks much more dangerous. If what the glyph is drawn on is destroyed though, the glyph will be negated and your work will be for naught. Still, its an extra bit of pressure you can throw into any of your setups to make them a lot scarier. In regards to incomplete glyphs, one you've only drawn the first part of will disappear after 7 seconds, but this increases by another 8 if you've drawn on it twice.
Dash Attack - Iguana's Fury From his dash Iguana surrounds his body in energy and lunges up and forward into the air, going up about Mario's height. The total arc he'll cover is about 0.75 battlefield platforms in length by default, and while he travels it he will deal 8% and horizontal knockback that KOs at 250%. However, while Iguana is in the duration of this move he is surprisingly controllable, able to be moved significantly up and down, though the amount up is going to depend on how far he's flown. He has a hard cap of being able to fly forward 2.25 battlefield platforms with this move, and can only go up to Ganondorf's height into the air if you absolutely push to the max possible height at any given time. The front of Iguana's hitbox can actually be steered rather nicely into an instability as you can bob up and down in the air to make sure you actually hit it... though 11% to a single instability is not a great reward. Still its not a hard move to land on one, especially when the lag's pretty easy to deal with on both ends.
As you're flying, you can tap A to cause Iguana to pull in an onstage construct within 0.3 battlefield platforms, though not targetting minions. If he pulls in a rock, it will break the rock around him into shards that add 2% to the attack, and proportionately increase the knockback. The same will apply if he pulls in a runestone. If he pulls in fire, he will add 4% to the attack, but not increase the knockback at all. If he pulls in acid, he will add 1% to the attack, but considerably increase the knockback to KOing at 175%. He can only bring in one of each, with the maximum potential power of this attack being to deal 17% and knockback that KOs at 110%, provided you have one of each type of setup to acquire. This is pretty awkward as it presumes you have not invested said setup in minions and gotten all four types out, so despite the move not being that absurdly hard to land and fairly versatile it won't usually be all that powerful. Still, its a nice little incentive for getting a particular type of setup out, and doesn't really cost a whole lot to use, though losing a runestone on this is a bit expensive for its specific effect. It will prioritize dragging in whatever Iguana doesn't have first, non-runestones second, and then whatever's closest.
If you hit an instability with this attack while you have drawn in constructs, they actually trigger a small special effect depending on what you hit the instability with. If there was rock involved, little shards of it will get stuck in the instability and every time the opponent is dealt damage in that spot, they take an additional 1.15x the usual amount of hitstun and a bonus 2% every time that instability is hit. If there was fire, the instability will burst with flame and three fire traps will come out of the opponent onto the ground in front of them, basically paying you back in triple. If it was acid, the instability will appear to have ooze and magic melting out of it, dealing 1% for 3 seconds, adding 1% every time that instability is split and increasing by another 3 seconds of duration every time the instability is hit. Finally, if you have a runestone surrounding you, the opponent will be effectively treated as a runestone for the next 7 seconds, in that they'll give the same buffs if Iguana is around them. This effecitvely makes the runestone invincible but only exist on a time limit. That said, it also will drain a bit of the foe's energy, reducing their damage by 0.9x and increasing their base knockback but lowering the growth rate. This will make Iguana a noticeable amount harder to kill than he was before, at least for those 7 seconds, a nice perk when he's so very frail.
Final Smash - Great Holy City
In the background of the stage, a structure of truly incredible scale rises up in the background, far away from the stage and appearing to be an entire floating city, made mostly of dark colored stones with a ring of mana around it levitating it in the air. From the city something will fly off the top of the screen, and then land on the stage as its revealed to be a giant golem twice the height of Ganondorf and as a wide as Bowser. It deals 25% and a powerful spike as it descends, and if it lands on the stage the final smash will continue as it begins to speak to Iguana. It will simply say "What do you request, Master?" at which point Iguana can put in three choices.
The first thing he can order is rocks, by pressing A. If so, the golem will open up its body and dump a pile of 30 rocks onto the stage, which Iguana can obviously use for his constructs. If he presses B, it will instead deploy 20 runestones. The process of both the rocks and runestones sliding out is a hitbox that deals 24% and horizontal knockback that KOs at 75%. Pressing anything else will have Iguana announce "I want this place wiped off the map." The golem will simply leave after the third request by rocketing off the top blast zone with streams of plasma coming out of its hands. It will leave after deploying the stones otherwise. It deals 10% and diagonal knockback that KOs at 175% as it leaves if the foe bumps into it.
If Iguana made the final request, 10 seconds later, 8 missiles made of stone and mana will rain from the heavens in a manner similar to PK Starstorm, each dealing 15% and diagonal knockback that KOs at 140%. Unlike the PK Starstorm projectiles they simply stop when they hit a target, however. After 20 seconds however, an enormous beam will be fired through the stage, dealing 40% and knockback that KOs at 50% and covering an area 3 battlefield platforms wide through the middle of the stage. So in summary, you can pick either a lot of setup, a lot of specialized but more powerful setup, or to just nuke the opponent after some delay. The choice is yours, at which point the city will fly off even further into the distnace, only to be seen again if Iguana gets another final smash.
By the way, even if Iguana is KO'd, the missiles and laser will still happen. The only way to avoid them entirely is to end the match.
Exiled to Midgard by his father Odin, the Norse god of thunder, Thor walks among humanity to learn humility. It's not an easy lesson for him, especially not when he's practically invincible and armed with the divine hammer Mjolnir. A founding member of the Avengers, he fights a constant battle with his trickster half-brother Loki.
ATTRIBUTES
STATS: Thor is an Asgaridan, and as such is much more strongly built than mere mortals. Standing a good head taller than Captain America, Thor is imposingly bulky with weight to match! Being godly, he also takes slightly less damage from all attacks with a 0.95x modifier. This is not much on the whole, but it adds up! This ends up to Thor becoming somewhat cocky in a fight however, not needing to dash about as he can shrug off hits a bit easier than most as well as grant diving punishment with Mjolnir, leaving him to be a bit slower in movement outside of his burst movement attacks.
Weight:112 () Dash Speed:1.4 () Air Speed:0.95 () Fall Speed:1.6 () Gravity: 0.09 () Jump: 36 Ground (), 35 Air ()
Rolls:Average Wall Jump:No
GUARD: Blockingfor Thor uses the standard bubble shield, as he simply puts up one arm to block attacks with his gauntlet.
POWER TYPE: CHARGE As Thor fights, his golden Power Meter will fill up a Charge of Godly Power!
|||||||||||||||||||||||||||||||||||
Only needing 35 Power to reach a Charge, Thor will often enhance his special moves into super versions multiple times per fight. If you thought his normal specials were mighty, wait until Thor puts Mjolnir's Might into it!
Power
Each character has a meter referred to as "Power". This fills as you play and is linked to various effects and special moves. In general, Power is gained via landing attacks as well as being hit, but the latter at a very reduced rate.
Power is gained equal to 0.6x percent dealt with attacks that do not spend power, and 0.2x of damage taken / blocked. Characters often have other ways of gaining
CHARGE power types are traditional power spenders in that once they have full meter, their specials and sometimes select other moves will be changed drastically upon use, and then spend all available meter.
With a total of 35 power points to build up, a CHARGE character needs to either:
Deal 58~59% damage
Take/Shield 175% damag
SPECIALS Neutral B: Mjolnir's Might---> Mighty Spark Speaking of, one of Thor's more important specials is Mjolnir's Might, a chargeable attack that puts a huge amount of power behind a mighty Hammer Throw!
As B is held, Thor will spin his hammer behind himself rapidly to indicate he is charging the move. This can be held indefinitely and cause rapid hits of 1% that eventually push foes up and away from Thor, and while charging his fall speed is cut by 3/4ths to allow him to float gracefully down to the stage. After about 1.5 seconds worth of charge, Mjolnir will glow blue to display that it is fully charged, crackling with electricity. Upon release, Thor will throw Mjolnir at enemies to show them it's power!
The damage, range and knockback of the move all alter with charge, with a basic tap of the input throwing Mjolnir only about a platform and dealing 10% damage, knocking foes away at a 50* angle and in general not being anything too special aside from a poke. At max charge this differs greatly as Mjolnir can be tossed 3 platforms away and smash into foes for 20% damage and high knockback at a shallow 30* angle, able to KO reliably at around 100% at the ledge or off stage. Mjolnir has Trample Priority at all times when thrown, and deals considerable shield push back and damage that makes a fully charged throw somewhat scary to try and block. The Trample Priority means that an attack will need to deal 9% more than Mjolnir in order to actually challenge it, so you need to strike Mjolnir with 19-29% in a single hit box!
When thrown, Mjolnir travels incredibly quickly and unlike Cap's Shield will always magically return to Thor's hand just as fast no matter where it travels either when it reaches max distance, or strikes the first foe in its path. This actually ties into the end lag of the move as Thor holds his hand out, frozen in mid air if not grounded, awaiting it's return. Thor cannot act until Mjolnir returns, making a whiff of the Hammer Throw rather risky, and being hit will interrupt his "end lag" stance, but not his ability to catch his hammer, which occurs even during hit stun. The returning Mjolnir will ignore enemies and obstacles as it homes in on Thor's hand, and has no hit boxes, in exchange Thor can act the moment Mjolnir reaches his hand. This makes the timing of punishing with, and punishing Thor's Neutral Special a bit tricky to grasp. Essentially, the throw is very quick with the start up being brief but enhanced by the charge up period, and the end lag is variable based on the time that Mjolnir is not in Thor's possession. When thrown, you essentially are not going to be stopping Mjolnir and your best bet is to avoid it, as it is not a true projectile meaning not even reflectors can stop it! However once thrown, Thor is vulnerable until it returns to him. As mentioned before, it only travels in a straight line and cannot be stored when charging, but trying to challenge the Might of Mjolnir is just asking for trouble.
With a Charge available, this move changes function to become Mighty Spark! Make no mistake, the move is still able to be charged by holding the B button, but now it always crackles with electricity and actually deals 1.5% per hit with electrical hit stun. Upon release, instead of throwing the Hammer, Thor points Mjolnir forward and hurls lightning at his foes! The lightning of Mighty Spark is in many respects the same sort of move as before, with range between 2-4 platforms based on charge, but with differing properties on hit this time around. With no charge time, spark will deal multiple hits adding up to 15% before sending the foe out and away at a 45* angle with more power than your average Neutral B. A fully charged Spark will reach out and deal an impressive 30% over multiple hits before sending the foe out at a deadly 25* angle, easily KO'ing under 100% if the foe has no floor to tech on.
The lightning bolts are thin, covering about the same vertical area as Mjolnir in flight, though their appearances vary in intensity of course with charge time. Mighty Spark not only deals more damage, but despite having more start up time as Thor makes an exaggerated motion to point the hammer out towards his foes, it has barely any end lag as Thor is able to act the moment the lightning subsides. This is of course much, much faster than waiting for Mjolnir to return to your hand, allowing you to display the true power of the God of Thunder! The lightning also deals considerable shield damage just as the normal hammer throw, with the added benefit of being a massive lingering hit box that can even catch spot dodges and rolls of those who merely did not get out of the way of the thunder's might.
Neutral B is your best zoning tool, but despite how scary it can be when fully charged it does come with drawbacks. As mentioned, shielding the regular hammer toss or dodging it nullifies the move, though of course you then have to race Mjolnir's return to Thor in order to get in a proper punish if blocked. It also cannot be angled, so when you see Thor charging up the toss it can be avoided preemptively by getting out of the line of fire. Thor can also hold the swing indefinitely however, so he can always bait your option in order to gather time to fully charge the throw and plow through any opposition in front of him. This rule of thumb applies to the Mighty Spark as well, essentially the best course of action is to make sure you don't even really try to challenge the area before Thor and instead work around his mighty attack. That said, anything that the thunderer can predict in front of him will be dealt with quite readily by either version of the move, leading to big punishes even off of half charged throws.
Down B: Summon Thunder ---> Mighty Tornado Not needing power to call upon Mjolnir's gifts, Thor raises the hammer high with one hand and strikes a pose as lightning crashes down and into his hammer!
Lightning bolts will be drawn towards the hammer in a large V shape that covers about 1.5 platforms near the top of the visible screen, (though if zoomed out enough you can see that the lightning is generated by storm clouds about 5 platform lengths above Thor's location), tapering down of course to where Mjolnir is held above his head. This has some start up lag before any Thunder begins to crash, but once it does you can hold the input indefinitely to call upon multiple, randomly generated thin bolts. These bolts will hit rapidly for multiple hits of 0.5% damage, each bolt actually hitting 3 times to total 1.5% per bolt, and sending foes weakly away at a 40* angle either left or right. This normally would cause foes to easily avoid multiple hits with DI, but the electrical stun applied to them assures that they will be taking multiple hits. In general, vs an opponent who is not a foolish oaf you can get around 12~16% per Down B if you catch them in the air where the bolts cover more of an area.
Most interestingly though, is that each bolt that strikes Mjolnir will also gain Thor 1 Power! At a rate of about 5 bolts per second, this can fill up a Charge in 7 seconds if uninterrupted. This can be even faster if you catch a foe in the lightning as the damage dealt also feeds your meter. Given that you could hit a foe 5 times in a second, the damage can add up to grant Thor about 9 Power / Second or even more if there are multiple enemies caught by your thunder! Unfortunately for the thunder god, Summon Thunder is rather unsafe unless you have a foe high overhead due to leaving Thor wide open from below, as well as having punishable end lag. If you have the space to either strike foes or charge up safely this can quickly rebuild your momentum for your Mighty specials.
Speaking of, if Thor has a full Charge when attempting to Summon Thunder, he will instead perform the Mighty Tornado! Holding Mjolnir up above his head and slowly spinning it in great arcs as it sparks to life for some start up, a sparking tornado of wind and lightning forms around Thor that resembles Metaknight's Brawl Tornado in size and appearance, though taking on a much bluer/whiter complexion. Basically anyone within Thor's reach to either side or above himself will be swept up by the vortex's, shocked and battered for 25% damage maximum as the Tornado grows in height to reach above a platform's height from the ground. The final hit of the Tornado deals impressive vertical knockback that can easily KO around 75~85% even from the ground, and even lower if he manages to catch a foe in the air. When finished, Thor has similar end lag to his normal Down Special of about 35 frames.
Catching opponents with the Mighty Tornado is a great deal harder than striking them with lightning, but much more rewarding. It has more start up time and much smaller hit boxes, but then again is incredibly difficult to escape if they are swept up early on. It helps that Thor has invulnerability from frames 1-15, and even halts all momentum he had in mid air, making up for being his shortest ranged special attack down from his longest reaching one. The invulnerability and momentum stall makes for a very nice defensive move, as the Tornado can be used as a counter of sorts or even a juggle as when you know a move is coming, you can summon the powerful vortex to your aid to punish the foe with style. Also of note is that as the tornado grows, powerful wind hit boxes will grow out from all sides of it to suck foes into it! While later on into the tornado you won't net as many hits, it will be able to suck in nearly anything within half a platform all around.
In either form, Thor's Down B is a great utility move that often is used more defensively than offensively as it punishes aerial approaches or just poor spacing in general. Be wary of foes attacking from the sides or below however, as disjointed attacks from the sides can still strike through the Tornado after the invulnerability frames, and attacks from directly below the Tornado can hit cleanly. Attacking Thor as he summons thunder is of course far easier from all angles except from above, where he almost never will be intercepted.
Side B: Mjolnir Strike ---> Mighty Thunder Holding Mjolnir to his side with both hands, leaning back as it charges with electrical power, Thor then cries out and leaps up and forward to deliver a screen-shaking electrical blow down towards the opposition!
This arcing, leaping attack will move Thor a distance essentially covering a 1x1 platform "box" as he leaps, granting surprising range from the ground. During his leap, Mjolnir Strike will hit in three phases with the first being the half platform or so as Thor ascends. During this time, his whole body is a hit box for about 10% damage that strikes foes away at the Sakurai angle with set knockback. This will not really lead into anything since it then transitions to phase 2, but it at least has invulnerability on frames 5-10 as he actually leaps into the air. Thor then comes crashing down with Phase two of the strike where he swings down Mjolnir and descends. Foes hit by Thor's body are still hit for 8% and set knockback sort of away from himself, but if they are struck by Mjolnir they will take 14% and be spiked downwards at a 45* angle instead! This can of course lead to a strong ground bounce, decent damage or more potently an off-stage spike. Continuing downwards through foes though, Thor will go into the third phase of Side B upon hitting the ground: a large explosion of electricity the size of himself that launches foes up and away at a 60* angle for 18%, able to KO verily at 90% at center stage!
Ideally you would want to hit the dive's sweet spot or landing hit box of Mjolnir Strike, which requires some careful spacing from a range. The leap Thor performs can be used almost like Little Mac in some respects as you can hop over certain projectiles then rain down your judgement on your camping adversary! While this has great range and power, it is a bit slow in that to get to the "good" parts, you need to telegraph the lunge with drawing back the hammer, leaping, then crashing down. From the Air, Thor will simply halt his vertical momentum as he draws back and swings Mjolnir overhead, before diving down right into phase two for up to a whole second! This aerial dive has Thor plummet downwards very quickly, the entire time acting as the phase two hit of 8% on the body and 14% on Mjolnir as a spike until either one second passes or he hits ground, which will transition to the landing hit box. You can still keep horizontal momentum during the start up as Thor swings Mjolnir overhead, and the dive will still grant great horizontal reach over the entire duration if done up high enough, able to go from one end of Smashville to the other if Thor double jumps and drifts forward. This can be hazardous yet rewarding offstage as well, as going for the spike can net nearly instant KO potential, but also risks gimping or even KO'ing yourself as well. Thor will transition to the dive if done off of ledges and platforms, and has no limit to how often he can Side B in mid air other than space. It is also technically possible to combo the Dive into the Landing hit box, but it is very rare as foes will often be ground-bounced, or tech away/in place to avoid the explosion.
Thor can also angle this dive by holding Side-Up or Side-Down, altering the trajectory by 15* either way to dive at a 60* downwards angle or 30* downwards angle. The downwards angle deals 9%/15% on impact, and the upwards deals 7%/13%, both adjusting for the increase of horizontal reach. This also alters the angle that foes are spiked at when they make contact with Mjolnir, as they are sent at the same 60* ~ 30* downwards angle. This can vary up what can be done with the strike quite a bit, and also mix up recovery somewhat though the end result for the foe is usually the same: they're going down!
If Thor has a full Charge at his disposal, Side B transforms into Mighty Thunder! Almost identical in start-up both in the air and on the ground, Mighty Thunder's key differences are to the dive and landing hits of the move. Starting with the ground, Thor still leaps up after swinging Mjolnir back, but at the apex of the leap he summons a bolt of lightning that strikes from the top of the screen diagonally behind himself to strike Mjolnir! The deals the same damage as a single bolt of Down B, but the main point of it is to charge up your strike to come. After being charged up, Mjolnir glows brightly as Thor then descends down to the ground where he slams down just the same as before, but on impact sends out a large wave of Electrical Energy! This current shoots outwards 1.5 platforms away and fans out to be 1 platform tall at the end, covering a huge area with multiple, simultaneous, screen-shaking bolts of electricity and the ominous sound of thunder rumbling from the impact.
Foes caught in this energy wave will take multiple hits, totaling to 25% before being sent out at a 45* angle that can easily KO at 70% or lower. The knockback increases the closer you are to Thor's impact with the ground, though at any point they will still take the full damage. Unlike with his normal Side B, the dive will drag foes down with you for multiple, spiking hits that add up to around 10%~12% depending on your angle no matter if they touch Thor of Mjolnir.
This carries over to the aerial version as you drag foes for multiple spiking hits which can add up to 20%~24% over 1/2 second of falling time, which can easily combo into the final hit or drag foes offstage and meteor them with ease. The spiking portion grows with knockback, allowing you to KO this way past mid percent on most foes if caught in mid air. While this does not have the sheer range of your normal Side B, the new dive is much quicker as it locks you for only 1/2 second down from 1, and allows you to intercept foes with added disjoint on each multi-hit for spiking. Upon impact with the ground, the normal explosion of thunder is created, but if you dive for the full length Thor will still discharge the thunder from Mjolnir while in mid air! Halting all of his momentum again, a circle of electrical energy about the size of Thor himself will emit from Mjolnir as Thor holds it down and forward with both hands, dealing 18% briefly to anyone in range and strongly spiking foes at the same angle as the dive. While this cannot generally ever combo from the dive itself, landing this final strike can be a guaranteed KO towards just about any foe offstage even at 0%! Both versions of the final strike have essentially the same ending lag as Thor readies himself from the huge power expenditure, which are both punishable just as the normal version is though with more general safety to toss out thanks to massive power and hit boxes.
In any case, Side B is important for Thor in order to punish foes, hard. Diving towards them over their attacks, or even off stage to send them to their doom, enemies should beware the Thunder God's reach! Few things can contest with the sheer power of the strikes with the strike pushing shields away and highly damaging them too, though thou must beware of the start up and ending lag of the lunge, as clever foes may react in time to hit you at either step of the attack.
Up B: Mjolnir Flight ---> Mighty Dash Looking skywards as he holds one arm up with a clenched fist, Thor spins Mjolnir down below and behind himself as he prepares this move. Essentially a clone of his neutral special, Mjolnir can hit foes for rapid hits of 1% that push foes out and away from itself and can be charged indefinitely, halving Thor's fall speed if done in mid air just like Neutral B again. Though similar, the drastic change of where Mjolnir is spun as well as Thor's pose should be a give away as to what comes next between a Hammer Throw, or Thor taking flight!
Just like with N spec, this can be charged for a "max" of 1.5 seconds for the effect despite being able to be held for however long you wish. Upon release, Thor by default will fly hammer-first anywhere between 1.5 platforms to 5 platforms straight upwards based on charge, though he can angle the move up to 45* forwards or back. Foes in the way of his flight will take medial knockback at the Sakurai angle away from Thor, being struck for 6%/5% at base if they are struck by the hammer or Thor's body, boosting up to 10%/6% at a full charge. While not common, the sheer range afforded by charging your flight can actually net Star KO's as you launch after foes struck up into the sky, and the 1/4 falling speed while charging allows you to aim the launch just right!
At the peak of his flight, Thor will stall mid air momentarily before going into his natural aerial state, falling down back into the fray and able to perform aerials and air dodge, but unable to jump or perform specials unless he is struck from the state or lands on the ground. Thor can perform Specials and even double jump if he starts Flight from the ground, though he cannot Up B again until touching ground or being hit. Speaking of stalling, Thor's stalling charge up time diminishes per use, going from quartering falling speed, down to reducing it by 1/2 after about 3 attempts. This limit is shared by your Neutral B's stall, but luckily a fully charged flight offers incredible distance even without his stalling if he is struck, allowing Thor multiple tries to zoom back into the fight.
With a full Charge at his disposal though, Thor can instead perform the Mighty Dash! Not needing any charge-up time, Thor spins his hammer swiftly before rising upwards by default at set distance of 3 Platforms while coated in an electrical aura. Anyone who comes in contact with Thor as he flies will take 15% and be dragged weakly with high electrical hit stun in the same direction that he flew, either upwards or a maximum of 45* in either direction. Upon impact with a foe, Thor is able to act immediately with any option in his arsenal without delay, comboing into double jump, aerials, specials, or even another Up B! Acting as a "free" boost into the air of sorts, even if you miss you will still retain the freedom to use specials, double jump and air dodge like your normal Flight, but with added end lag as Thor steadies himself from the dash.
Both a charged Up B and Mighty Dash also carry with them some useful Light Armor vs attacks for added safety and priority. As Thor is in flight, a good rule of thumb is that attacks that deal 10~12% damage will not phase him, and given his natural damage reduction that is more like 11~13%, aside from attacks that deal extreme knockback for their percent such as Cloud's finishing touch, or even the attacks of another Thor! While not necessarily as flashy as his other mighty specials, it is arguably the most reliable and potentially even the most damaging! While his other moves are more strictly for flashy KO's at very early percents, often killing well below 80-90% from center stage, Mighty Dash essentially guarantees a follow up aerial or special, which of course can then go into even more damage. At low percents, normal Flight can also behave like this with normal aerials, and both versions are great Out of Shield options. Standard flight is great vs cross ups as well due to Thor starting his hammer spin charge behind himself and can be held indefinitely! Mighty Dash shares this hit box, but only briefly and then the actual dash portion has a significantly bigger hit box surrounding Thor to compensate.
Shield Special: Mighty Punish If you have a charge available, you can always opt for his potentially most dangerous Mighty Punish command grab!
Grasping his foe by the throat with only slightly more lag than his standard grab, Thor hoists them into the air with rage in his eyes, before slamming them down to the ground for 5%, leaving the victim in prone. He then drops Mjolnir on the prone foe by extending his arm out, turning the Hammer's head right above them and simply letting go, pinning the foe for an additional 10%!
Once pinned, Thor then waits a moment as the screen zooms in on himself and the foe before the next part of the move, during which time you can actually input various taunts to damage the player's ego / psyche themselves:
Up Taunt, or no input, will cause Thor to point at the foe and say "YIELD!".
Side Taunt will have Thor cross his arms and say "Ye think ye can best the son of Odin?".
Down taunt will have Thor clench his fist before tossing it to the side, saying "Thou are not worthy...".
In any event, what follows next is a mighty thunderbolt that is drawn down upon Mjolnir from the heavens that is as thick as Thor's own body that deals a mighty 20% to the foe and anyone else in range as they are paralyzed for a moment! The foe, still stuck in place by Mjolnir's enchantment, is then helplessly fired as Thor calls Mjolnir back to his hand, and which point the foe is free to move about from the prone state.
Dealing a massive 35% total, Mighty Punish really can put the fear of God... or rather a certain God, into the mortals Thor faces! Not only does it deal tremendous damage, but leaving the foe in a tech chase situation after is simply brutal as Thor can read their option and respond with essentially anything. Unlike his other Mighty Specials this carries some inherit risk of actually missing or even being out prioritized though as the initial "hit" is simply a slower grab that characters can beat out or avoid. While you cannot challenge a Mighty Spark, perhaps you could get away with trying to clash with the Thunderer's grasp.
While not as versatile as his other specials such as Flight, the Mighty Punish does just as it says on the can and allows you to turn the tide of a match with one good read or reaction as you can convert to godly damage output!
SMASHES Side Smash: Put the Hammer Down A simple, yet effective attack, Thor will draw Mjolnir behind himself with one hand as he readies an impressive over-head swing down to the ground! Hitting in an arc starting just behind his head and swinging down to the ground in front of him, foes struck by Mjolnir can be hit in three different ways.
The first is in the first part of the swing from behind to just in front of Thor's head. Hitting for 16-22%, foes struck will be launched up and away at a 65* angle which sends them very far but won't really kill any time soon. Next, from that point on until he nearly hits the ground with his swing he will deal 18-25% and hit at the Sakurai angle, hard. The main portion of the swing can easily KO characters at around 100% at center stage, even lower if closer to an edge or with a smash charge. Or, if you land the ending part of the swing as it touches the floor, you can even meteor foes straight down! Swinging the hammer off a ledge at recovering foes can be quite a fruitful effort as they either get launched back out and die, or get meteor-ed down and die. Essentially, you do not want to be hit by this move (something shared by essentially all of Thor's moveset really...). Luckily for foes, F smash comes saddled with the typical heavyweight lag on both ends which makes it somewhat unsafe to just toss about, despite the range and power being well worth the risk.
A fun easter egg with F smash can also occur if you strike Mjolnir against anything that is tagged as "indestructible", such as certain Shields or armored moves when clashing. Upon impact, a large shock wave of energy is created that encompasses an area about 1/2 the radius of a smart bomb for 10-14% damage and weak-medium 45* knockback away to anyone not involved with the initial Clash, and causing both characters to stumble backwards. The clash is fairly laggy, for both parties, but it is technically safe vs other foes. Perhaps this could even be Cap-italized in teams?
Something else to note is that Thor's specials are not the only things that become mighty once he carries a Charge. If at maximum power, all of Thors moves that strike with Mjolnir will now have an added sweet spot as the head of the hammer carries a slight electrical glow! Dealing an additional 1% base damage universally, though with some exception due to multi-hits like with his Neutral Special charge, the hammer will deal slightly more damage and carry electrical hit stun if it did not beforehand. While not amazingly significant, it is a nice little boost overall and a nice indicator that Thor is ready to unleash his might at any moment!
With F smash in particular, Mjolnir will actually leave an electrical trail behind it's swing that behaves as an extended version of the beginning hit. The electrical trail will linger for essentially the attack's active duration and pop foes up and away for 16-22%, which adds additional safety to your otherwise sluggish F smash.
Up Smash: Godly Coil Bringing Mjolnir down to the ground in front of him as he charges, upon release Thor holds it aloft above his head with both hands, straight up high as it sparks to life with electrical energy!
Acting as a tall multi-hitting move, foes touching Mjolnir or the area just surrounding it will be struck with electrical shocks for a total of 14-20% total and medium-high upwards knockback.The hit box is a bit deceptive, as it is actually a circle that covers an area decently around Mjolnir's head which allows for a degree of safety vs aerial foes and even allows you to catch certain foes on the ground if they are next to you. Overall his fastest smash attack, it is much more of a combo oriented move rather than a KO move as the final hit really won't be ending any stocks until around 140-160% depending on the character. You are much better off sending foes into the air for continued damage from aerials or Down B.
With a Charge at your disposal, Up Smash will also coat Thor's body with electrical energy trailing from Mjolnir to the ground surrounding himself. Mjolnir's damage will be boosted to 16-22% total, while the rest of his body hits the dame way as before for 14-20%, though the two different hits can overlap with DI and so on. This is a decent boost to the overall size of U smash as it allows you to hit in a "column" of space as opposed to just above himself.
Down Smash: Mjolnir Quake Facing the camera, Thor drags Mjolnir around and behind himself before crying out and smashing it down into the floor to cause a mighty, localized earthquake complete with shattered earth and chunks of stage/dirt flying about for aesthetic effect!
Like many similar moves, D smash has two separate hit boxes based on spacing: the Hammer strike and the resulting "quake" hit box. Foes who are essentially touching Thor or are somehow under him will be meteor smashed for 17-24% and pretty sizeable knockback that can either KO similarly to F smash vs offstage foes, or pop them upwards to KO vertically at around 125~135% depending on the character. The quake portion of the move will hit a sizeable distance to either end, able to cover an area slightly larger than a platform, but only hitting foes standing on the ground and being a very brief hit box. Foes struck will be popped up and away at 75* angles for 15-21% to either end which easily creates space for the god of thunder, and has very low growth to keep the foe at arm's length no matter the percent. In between Up and F smash in terms of speed, D smash is usually safe on platforms or vs Get Up options / rolls to punish a wide area quickly and cover multiple options.
With a Charge available, Mjolnir glows with electricity as the quake hit box also dispels electrical currents into the ground! The electricity rises up into the air in a wave alongside the shock wave, able to strike aerial foes as well as deal electrical hit stun atop the slight damage boost. This grants that much more advantage upon landing the D smash compared to normal atop of being able to hit foes in mid air!
STANDARDS Jab: Asgardian Combo With a tap of A, Thor will swing Mjolnir close to himself in a simple, downwards arc that covers the area in front of himself quite nicely for 5% damage and light knockback. Another press of A swings Mjolnir back up for a repeated hit of 5% and light knockback, both hits able to combo at lower percent or at least decently wall enemies out at higher percents.
Another press of A after the second strike will convert into a rapid jab as Thor spins Mjolnir in front of himself just like with his specials! Like other rapid jabs though, this cannot be held truly forever since after about 6 spins Thor will perform an upwards swing that pops foes out and away with light/medium knockback. Overall, the rapid jab will often deal about 11-12% by itself with the earlier hits pushing the total to 21-22% at lower percent if the foe manages to stay put.
This is of course easier to manage with an electrical Charge, as the damage also gets boosted by about 3% on the whole alongside the added stun. Overall though you will often want to just use jab to "push" foes from you or convert into another move. It is overall rather quick with the first two swings covering a decent area and hitting at the Sakurai angle away which can indeed combo with jab-cancelling, and the rapid jab portion is not too shabby especially with the ability to Mash A to trap a foe who poorly spaced their own options against you!
Side Tilt: Mjolnir Swipe Taking a step forward, Thor performs a swiping, horizontal strike with Mjolnir out towards foes. Able to be angled up and down like most F tilts, the step forward grants considerable range to space out foes.
Hitting with Mjolnir's head is a sweet spot for 12% that sends foes out at a tricky 40* angle that sends them far enough away to start threatening KO's around 125% near the edge. Hitting with the rest of Thor's arm and down to his shoulder will only strike for 8%, popping foes up and away at a 50* angle with light/medium knockback which can be followed up rather easily.
This is generally his best spacing tool as well as a solid follow up for most of his combos. Land a close range aerial? Follow with F tilt -> options. Toss a foe with a throw? Follow with F tilt, and so on. A Charge makes it that much more reliable as the head now deals 13% with much more hit stun, allowing larger windows of combo opportunity, or simply push the knockback to KO a bit easier.
Up Tilt: Summon Wind Thor grips Mjolnir with both hands as he performs a large, swift arc from down in front to just above his head to not only launch his foes, but summon a mighty blast of wind!
The swing of Mjolnir hits similarly to his F tilt, dealing 13% / 9% based on hammer/arms, and knockback at a sharp 75* angle upwards with med-high power. You can even score KO's with this a bit earlier than Up Smash, though it sorely lacks the same combo-ability. You often will want to use U tilt to keep a foe airborne or at least put them there in the first place, something that can easily be done by the second portion of the move.
As you swing the hammer up, a gust of wind and dust whirls upwards at the same angle, covering an area overall similar to Mario's Up B, able to tickle the top platform on many stages. The wind is strongest near the ground, able to launch a foe up from the ground a platform height when standing, and about 1.25x that distance if they are airborne, tapering down to essentially stalling their momentum slightly at max range. This wind can be used for a variety of tasks, but it is best used defensively to alter the spacing of your foes given the rather massive hit box. With a Charge, small sparks also rise up in the wind, causing it to deal 1%, though still be just a wind box.
Down Tilt: Rapid Hammer From a knee, Thor spins Mjolnir counter-clockwise away from himself to rapidly dig at the floor below, spraying a machine gun like cone of debris!
There are two parts to the move like the rest of his tilts, with the incredibly quick-spinning Mjolnir being a solid, lingering hit box for 10% that pops foes away at a 45* angle with medium knockback. Lasting about 12 frames, you can catch quite a lot by just tossing this out. The chunks of debris launched from the floor cover an area in front of Thor about the same size of the spinning hammer's area, or about the same size as himself crouching. About 6 chunks will fly out at random, either at a low/mid/high angle from the floor, each striking for 1.5% for a total of 9% extra damage with hit stun. Combined, you can potentially strike a solid 19% in one go from a single D tilt up close, though the random nature of the debris and their overall weak priority means you'd often be hitting for 10% with the main spin.
Despite lingering quite a while and even hitting below ledges, D tilt is mainly useful for simply dealing damage and spacing the foe away. It rarely leads into much, even with the extra damage and hit stun of a Charge, so you would often want to jab, F tilt or grab at close range else you were covering an option with the lingering hit. The raw damage out put can still be very desirable as you can then try and follow the foe's next move by contesting them with a Neutral or Side B for even more power, something rarely accomplished with his much faster jab or F tilt!
Dash Attack: Asgardian Lunge While usually not too fast on the ground, Thor can summon a burst of speed with a tap of A with his Asgardian Lunge. Taking flight momentarily, Thor speeds with his hammer first in a classic, heroic pose as his entire front half becomes an active hit box. Behaving like a sex kick, the initial burst of speed can strike foes for 12/10% depending on whether a foe is struck by Mjolnir or the rest of Thor primarily, being sent out at a nasty 35* low angle with med-high power that can actually KO around 110% at the edge.
After the initial burst, the move lingers a good while as he deals 8/7% and light/med knockback at the Sakurai angle, which can be followed up. This behaves like a long ranged, extreme sex kick as only the very initial hit as he begins to move is strong, lasting only about two frames before essentially the whole moving part is the weak hit. If Thor encounters a ledge, he will enter into his aerial state with essentially no lag what so ever, which compared to the lag of landing from the short flight can be a great option. For example, you can dash attack towards a ledge to knock an opponent outwards, only to follow up with an aerial or charging a Hammer Throw to cover their options as you stall your fall speed.
AERIALS Neutral Air: Mjolnir Spin Facing the camera, Thor spins Mjolnir rapidly in front of him to cover himself in a large, multi-hitting attack that draws in the winds around him to keep foes close!
The spinning Mjolnir covers most of Thor's body, tucking his knees in to leave really only the very edges of his character model able to be hit cleanly as Mjolnir shreds into foes for multiple hits adding up to 12% damage. Lingering for quite a while, N air can be drifted in and out of situations to wrack up percent, keep foes at bay defensively, or simply threaten space with given it's very low ending lag. The light suction effect is welcome given that there is a bit more lag than you'd expect on starting the move, allowing Thor to space N air with a bit more range than meets the eye.
You will often want to land with a foe during this move as there is not really a final hit per say, and Thor can auto-cancel at nearly any time once the hammer is spinning. A Charge helps out here quire a bit as the hit stun allows to drag and pressure foes more effectively and can lead to pretty much any reasonably fast grounded option such as Jab, Ftilt, D tilt, Grab or U smash.
Forward Air: Hammer Fall Taking Mjolnir back with one hand, Thor performs a mighty, arcing smash downwards that covers a 180* arc in front of himself! His essentially bread and butter aerial, F air has huge range and three separate hits just as his F smash does.
Being considerably faster, F air trades the damage and raw power of F smash for the haste and range. broken into three parts, the first third of the swing will strike foes for 11%, sending them up and away with medium power at a 60* upwards angle that is great for combos. The next third will strike for 12%, launching foes at a more horizontal 40* angle, able to KO reliably off stage at later percents, or wall foes out reliably. Finally, the last third will spike foes down at a -90* angle for 13%, able to Gimp quite reliably, though not quite as potent as his mighty Side B of course.
Combined with F air, this will make up a majority of aerial interactions from Thor, though this more often leads into some... mightier moves. The angles and range provide great spacing to follow up with Neutral or Side B depending on the situation, and depending on how risky you want to be. Sending a foe out and away only to try and contest a Mjolnir Strike on their way to recovery is certainly a flashy way to show them who is truly a worthy warrior!
Up Air: Mjolnir Tempest Holding Mjolnir above his head, Thor spins the hammer incredibly quickly to create a lingering, large hit box that actively pushes foes away if they are not hit directly!
Like D tilt, the hammer is spinning so fast that it hits foes solidly instead of multiple times, again for 10% but pure 90* knockback upwards. Lasting for about 8 frames, you can catch many options with the disjoint and even air dodges when timed correctly! The wind whipped up by the whirling hammer also pushes foes up and away in an area twice the size with similar properties to your Up tilt, with the closer proximity producing a stronger push. Like all his wind attacks, such as N air, a Charge will add 1% damage but no hit stun.
Up and Down special combined great with Up Air to create a versatile juggling game for Thor where he can pop up and keep a foe up in the air where his lightning makes short work of their percentage. At higher percents, around 145~160% you can even KO with a raw Up Air from mid screen, though of course you can get even earlier kills after flying high with an Up B.
Down Air: Thunder Strike Circling Mjolnir around himself in an exaggerated, laggy arc as he charges up power, Thor faces the camera as he crashes down with both hands for godly meteor smash!
Dealing an impressive 22%, this can end stocks incredibly early and cause massive damage off of ground bounce combos. This naturally has electrical stun, and given the lengthy wind up and power will often guarantee amazing results if landed. This can KO a standing foe cleanly at 110% or lower on most stages with an un-techable ground bounce, and with a Charge becomes entirely un-techable even vs aerial foes as they are sent downwards for 23%.
Thor should be wary though, as there is considerable lag on both ends of the move, and upon landing. This cannot be short hopped due to the start up as Thor will land and cancel the attack before any hit boxes come out, though that could potentially be a decent feint. Combined with his natural fall speed leaning towards the more floaty spectrum, you can often use this or F air's meteors to greatly expand your punish game when combined with aerial Side B to catch foe's reactions on get up with extremely powerful follow up attacks.
Back Air: Swooping Hammer A simple yet effective attack, Thor holds Mjolnir out as he then turns mid air to perform a horizontal, scooping strike!
having decent horizontal and vertical reach, the momentum of his spin adds extra oomph to B air as Mjolnir's head strikes for a solid 15% and great knockback at a 40* angle. This can lead to quick KO's at around 100% near ledges or just off stage, but it requires precision as there is only a fraction of active time on the hit compared to say, Fair.
With a Charge, and from a short hop this can actually be a potent combo option at lower percents as Thor can auto-cancel the strike just after the initial scooping portion of the animation. While much shorter ranged this way, you can still get a great 15-16% damage and then continue your assault as Thor lands facing the foe instead of transitioning into end lag as he returns to his original direction.
THROWS Grab: Mighty Grip Reaching out with his non-hammer wielding hand, Thor grasps and effortlessly lifts his opponent up into the air! Having about an average grab length for his size, Thor can mash the A button to deliver mighty headbutts to the foe for 3% a pop.
If Thor is at maximum Charge however, his pummel will also gain electrical properties and deal 4% a pop as power surges through Thor, which can add up to a decent chunk of damage before a throw!
Forward: Godly Boot Letting go of the foe, Thor will swiftly kick them out and away with his mighty strength! A fairly basic, yet effective maneuver, Thor's kick deals an impressive 11% damage and sends the enemy flying out at a super low 20* angle, essentially a semi-spike that shoots them purely horizontally across the stage or off an edge. AT the ledge, this can KO around 125% despite it's low overall knockback growth as it still has impressive base knockback.
If it does not KO straight away, the angle is prefect for further assault by running out with aerials, Dash attack or Thrown Hammers. Something to keep in mind about Mjolnir's Might is that when thrown, you really cannot contest Mjolnir with it's trample priority, and even if clanked/reflected it harmlessly returns to Thor. After an F throw, a foe is locked in a situation where they either have to tech, be prone, land or recover back towards you, which grants ample time to begin charging up a toss. Based on their option you can vary your timing or even keep charging to mind game the foe into tossing out something risky only to take a 20-30% projectile to the face!
Back: Asgardian Piledriver Levitating slightly off the ground, Thor leaps back with his foe in a headlock an impressive distance, before elbow-driving them into the ground! At base, this will deal only 7% and pop the foe up and away at the 45* Sakurai angle behind Thor. This can set up into combos at lower percentages, often comboing directly into a Bair or reverse Fair, but past mid-high you will need a read to get anything.
This changes though when you take into account that Thor can DI the leap much like you can with jumping, able to go slightly higher up with less horizontal movement, further back with less height, or even off of ledges with the foe! You see, B throw's damage scales with the height the foe is dropped within Thor's grasp. From a stand still on a flat stage, a basic B throw will deal 7%, while an angled Up B throw will go higher and smack the foe down for 8% with slightly more knockback for spacing, and a back/down angled will go further backwards and pop them out for 6% and in general be a better combo throw. Piledriving off of an edge however is a bit more complicated as you gain much more potential height. In the same scenario as above, but on a battlefield platform you can deal 9/10/11% damage with B throw, though the upwards one would need to be at the edge of the platform else you just smack down back onto it. If done off a true edge, Thor will fall for upwards of 1 second with the foe, or about the distance from the ledge to nearly 1/2 way to the bottom part of Smash 4's battlefield before the foe is grab-released for 10% damage up and away from Thor. If you manage to go the full distance on a stage where there is a surface to land on, a max piledriver can deal upwards of 18% and can even KO!
Given that the foe is popped up and away if in open air, they can often survive the encounter but still be in a bit of a sticky situation. Thor can easily recover with Up B given his stalled falling speed when charging, and can plow through a greedy foe's attempts on turning the situation around, but at the same time he himself can go for broke and try to Up B into the foe for a stage spike, or attempt an aerial for similar effect. It is possible to suicide KO with this move on certain stages, but in general these are also stages with other oddities and are few and far between. Piledriving into enemies also creates a similar hit box and counts as hitting a surface, causing both foes to take a shared impact!
Up: Thunderer Hoisting the foe up higher with one arm, Thor charges his Up B before launching up and off the screen with his victim! Once off screen, thunder rumbles and flashes of light occur as Thor has taken the foe into the heart of a thunderstorm, dealing 8% right then and there before crashing back down to earth for another 8% and huge knockback at a 65* vertical angle.
This has tremendous end lag for Thor, but provides him with stupendous vertical KO power for his throw game to round out the horizontal and diagonal nature of F / B throw. Able to KO floaty characters quite easily at around 115~125%, if not earlier due to platforms, at Lower percents you may even be able to combo certain heavyweights or fast fallers as well but the timing is very tight. More often than not this is a great emergency KO option alongside his other throws that depend on the physics of your victim, though as with any time you send a foe airborne you can always Summon Thunder from the skies for added damage and power generation!
Speaking of, a Charge will boost the power of the thunder storm Thor flies into. The initial lightning hit box above the screen is boosted to 9% damage, as is the landing hit to put the total at 18% damage up from 16%. Furthermore, this time Thor is trailed by a bolt of lightning that can strike other foes as well for 9% and sharp 75* angled knockback, though this will never threaten to KO unless they are up at the top of the screen with him. Alongside his Mighty Punish, you definitely do not want to be within the grasp of Asgard's Champion.
Down: Down to Midgard Taking the dramatics down a few notches, D throw is another simple throw where Thor lifts the foe up overhead in both arms, before simply slamming them down to the ground as a meteor smash for 6%.
This creates an interesting trap foe Thor to take advantage of, as while the meteor is quite weak, a missed tech guarantees a ground bounce and thus ample time to start an aerial combo, or follow up launcher hit. If the foe techs, they are either right in front of you or rolling to either side, which can then be followed up with a read, or a Down Smash on many characters if they lack massive roll distance.
While his other throws are all flashy and powerful, this will often be a simple and effective solution to starting a punishing string of hits on foes as you keep them within arms reach. Once pummeled enough, a re-grab into one of his powerful throw options or special moves can guarantee a stock.
SUMMARY: God of Thunder The Mighty Thor sure lives up to that title, having only a few select moves that deal under 10% in one attack! His heavy weight, damage reduction, powerhouse ranged moves and even movement options / mighty projectile all cause Thor to be a true force to be reckoned with, though this is not without weaknesses.
While truly godly at a glance, Thor actually has a rather poor combo game outside of 2-hit strings, while at the same time he is quite vulnerable to combos himself. A large frame, great weight and poor moves to cover below himself in the air vs trades all make for a rough time for the Odinson when it comes to fending off attackers who manage to land a hit on him. That said, they have to of course win neutral vs Thor first.
Easier said than done, Thor's hammer attacks and brute power can often outright beat attacks head on, especially with his Neutral B tossing about a projectile that cannot really be stopped directly. Like many weapon users or heavyweights, the best bet for an opponent is to try and bait out one of Thor's laggy options and punish accordingly, but if they are not on point they can be sure to take a boat load of damage and be pushed straight to the edge. Once Thor gets his punish game going, a few tilts and aerials is all it may take to put the foe in a spot where one of his godly smash attacks, or even scarier Mighty Specials can finish them off. Thor is an expert at gaining power between the raw strength of his attacks often gaining him a full bar in only 4 or so hits, and his signature Summon Thunder down special. It is only a matter of time before he shows why he is revered as a God with a super powered special move to end a stock in spectacular fashion, be sure to work around his spacing and be one step ahead of the brash powerhouse!
You really have to be aggressive as Thor, playing into said brash personality to get the best results. Moves like Neutral and Side B require good reads or at least a ballsy attitude to send out in neutral, but the results are well worth it with quick KO power and massive damage. You will often be landing a few stray hits here and there, but each hit certainly counts as they all generally threaten foes towards the ledge where you can trap them with Side B or your various other meteor smash aerials. Despite his reach with Mjolnir, it is not quite as far reaching as say a sword or staff, making Thor operate best at a bit closer range, making him liable to be zoned out if he is not on top of clashing attacks or using his Dash Attack / Side B to close distance.
Overall, Thor is an aggressive, powerhouse heavyweight that can dictate the pace of the match by his mere presence. His frame traps and brutal super moves can make short work of any opponent, with the options to vanquish nearly any sort of foe he comes across. His confidence can often betray him as cockiness however, and being too aggressive can come back to bite the Thunderer as he is liable to be punished himself if his guard is down. Wisdom of when to unleash your aggression, and the humility to know when your options are best reserved or used are tough lessons to learn, but they are vital to become truly heroic as the Mighty Thor!
EXTRAS: FINAL SMASH : Thor's Wrath Zooming in on Thor as he hovers and spins Mjolnir around himself rapidly with a mighty shout, Thor will scoop up any foes within this zoomed in screen to begin a cinematic final smash!
Any foes who were close enough to be captured are taken into the sky in a mighty cyclone of wind, debris and lightning as Thor hovers above them menacingly, Mjolnir spinning and charging up power as the enemies he has trapped are battered and shocked for about 20~30% total damage each. After about a second, Thor will cry out:
"FOR ASGARD!!!"
As he shoots down a tremendous blast of lightning down the center of the cyclone that blasts foes out in all directions for another 30% damage, easily KO'ing off the top and sides at around 30-50%.
Up Taunt : Thunder Thor takes a serious tone as he slowly lifts Mjolnir to the sky, looking dead on at any foes before him as thunder slowly rumbles across the sky. This can be held indefinitely, causing thunder to rumble and the skies on the top of the screen to darken after about 2 whole seconds, though this is merely an aesthetic and will go away after about 4 seconds once the taunt is ended.
Side Taunt : Call Out Thor points his hammer forward, his caped back towards the camera as he calls out the opposition: "Yield now, and I will show mercy...". Like with U taunt, this can be held or tapped to either have Thor perform the above line in full, or simply say "Yield, villain!" with a tap.
Down Taunt : Mjolnir Mastery Thor smirks as he spins Mjolnir rapidly around himself in a display of finesse with his weapon. Like his other taunts, you can hold this out longer to have Thor even switch hands with another spin maneuver before going back to neutral.
Taking about 2 seconds each to perform, if uninterrupted Thor's taunts will actually grant him a golden aura around Mjolnir. This indicates that the next attack he lands will grant x2 the power it would have normally, and thus spend the aura! A neat Easter egg if anything, you should rarely be having the opportunity to be so boastful, but if allowed you can allow the power trip to actually come into effect.
Secret Taunt : Mighty Speech If you already have a full bar of Charge at the ready though, you can instead mash the taunt buttons rapidly, with 10 varied inputs within 20 frames activated Thor's Mighty Speech!
This super taunt spends your power, and bathes Thor in a golden aura that grants him 20% worth of Super Armor to any attacks as he says the following with dramatic gestures, and a flowing cape complete with weak wind box away from himself in both directions:
"HEED MY WORDS EVIL-DOER'S, IF THOU DOEST WISH TO CHALLENGE THE ODINSON, THOU WILL FACE THE DIVINE POWER OF MIGHTY MJOLNIR! NEVER SHALL THE GOD OF THUNDER RELENT!"
Once completed, with a flash of lightning in the background for full effect, Thor will retain the aura for about 5 seconds where all of his moves will deal an additional 1% and gain 2x power, with his damage reduction increased to 0.9x!
While the bonuses are nice, and do allow you to get back to full power very quickly and even stack the two 1% damage boosts, it is really short lived and really the speech should be reserved for the 10,000 swag points it generates for you to pull this off in a match.
Tony's Snark : Iron man pops open his mask and looks Thor over before taking on a dramatic posture; "Doth mother know, you wear-eth her Drapes?"
Entrance : Heimdall's Summoning A beam of light showers an area of the stage, and as it dissipates it reveals Thor, god of thunder! Complete with low rumbling in the background as he is being summoned, a rune is scorched into the floor below that fades away over the course of 15 seconds that is merely aesthetic.
Stage: Asgard
Thor's home town, the mystical land of Asgard is a playable location in AvX!
Asgard is a traveling stage that has the players shuttle around to various locations such as the Bifrost Bridge, the Training halls of the Valkries, Asgardian rooftops and even the mighty throne of Odin himself! Each trip has varied locales ranging from walk-offs to more standard platforming sections, but the platform that travels between the stations is consistently the same:
A floating, gilded platform with two floating platforms on either end serves as the hub while traveling, and also as the main stage for the static Omega Version of the stage. While in Omega form, the stage visits all the locales but only as backdrops, keeping the action on the main platform.
The overall stage is a bit wider than Battlefield, but overall has similar dimensions for it's blast-zones except for a slightly taller ceiling and shorter sides.
Global: All characters now have a Spoiler Tag to explain their power meter better. SWF makes spoilers kind of weird, but what can you do?
Iron Man: Arc Reactor now charges power at a rate of 15/sec to 5/sec based on current amount (less if more) Anti Tank Missile Damage 12->15%, Locks on after 20 frames instead of 60.
Thor: Neutral B text cleaned up. Mjolnir is not a projectile and cannot be reflected/absorbed as such. Stalling with Neutral B's charge is increased to 1/4th fall speed from 1/2 fall speed. Subsequent uses reduce this down to 1/2 fall speed after the 3rd attempt. Mighty Tornado Invulnerability on frames 1-15, added text on powerful suction effect Side B / Mighty Thunder can no be angled 60/45/30*, the spike hit boxes match this angle. Cleaned up text, falling times halved to 1 second / 1/2 second. Mjolnir Flight now allows use of air dodge and specials when done in the air (Except another Up B), and allows the use of your jump if done from the ground. Can always grab the edge. Stalling with Up B's charge is increased to 1/4th fall speed from 1/2 fall speed. Subsequent uses reduce this down to 1/2 fall speed after the 3rd attempt.
With a tap of B, Shovel Knight very quickly brandishes a gilded wand before firing a Kirby-sized fireball from its tip. This fireball flies straight forwards at Mario's dash speed, and has infinite range. Upon contact, these fireballs deal 6% damage and light shoving knockback that will not KO. If B is tapped again while the Flare Wand is still out, Shovel Knight can fire another fireball with almost no lag, for a maximum of three fireballs on screen. If B is held rather than tapped, Shovel Knight instead brandishes the Flareo Wand. This special Relic creates a large fiery blast shortly in front of Shovel Knight. This blast is roughly double the size of a Flare Wand fireball, and lingers place for roughly a second and a half. If a foe is hit, they are temporarily held in place until the fire blast fades away, which launches them with knockback that KO's around 185%. While trapped, the foe takes 5% every half second, for a total of 15% if the foe is held for the blast's entire lifespan. The Flare Wand is Shovel Knight's most simple and reliable projectile; not very powerful or impressive, but important nonetheless. One saving grace is the fireballs' size and limitless range. Meanwhile, the Flareo Wand is great for handling over aggressive foes. The Flareo Wand blast's size makes it a reliable damage racker, but it admittedly suffers from higher start lag than the simpler Flare Wand.
Side Special – Propeller Dagger
Shovel Knight draws another trusty Relic, the Propeller Dagger. After a very short startup, the Dagger drags Shovel Knight through the air at double his dash speed. He travels roughly a Battlefield platform before stowing the Dagger back in his inventory. If used on the ground, Shovel Knight flies just above the floor; in air he flies forwards at his current altitude, ignoring gravity until the attack ends. This can be used twice before Shovel Knight enters helpless. Upon hitting anything solid, be it foe or the stages, Shovel Knight bounces backwards and up. This can aid in recovery if he bounces on the edge. Hitting a foe does 7% and knocks them high enough to allow a second hit if it's still available. This move will not KO, but is great for mobility and recovery.
Up Special – Tow Anchor
Struggling slightly, Shovel Knight prepares the mighty Tow Anchor. After a short bit of lag, he throws the anchor in a high arc, landing about a Bowser length ahead of its takeoff point. However, the anchor drags him with it. The Tow Anchor is a very powerful projectile of sorts, dealing 15% and knockback that KO's at 150%. The high arc also aids Shovel Knight's recovery. However, due to the Anchor's weight, Shovel Knight experiences a hefty bit of endlag as he picks himself off the ground. Try and use this sparingly, as it's very possible to throw yourself off the bottom blast zone. Since Shovel Knight does not release the Anchor, reflectors have no effect on this attack.
Down Special – Chaos Sphere
From his unimpressive crouch, Shovel Knight unleashes the most unpredictable projectile in his arsenal. The Chaos Sphere is roughly Kirby's size and bounces wildly across the screen. It's speed and bounce height can be set by angling the control stick during the starting lag. The Chaos Sphere will follow the original trajectory on every bounce, even if it would defy physics. For example, if a Chaos Sphere is set to bounce at the speed of Mario's dash and up to Shovel Knight's own height, nothing can change its speed and height. Should it begin bouncing down a slope, it will not speed up nor change trajectory. Only one Chaos Sphere can exist at a time, and they last for roughly 7 seconds before fading away. On hit, the Sphere ricochets off the victim, resuming its original trajectory in reverse. This collision deals 10% and knockback that KO's at 180%.
Standards: Strike The Earth!
Jab: Shovel Knight performs a swing with his trusty Shovel Blade. This is a one-hit jab with surprising reach. Upon hit, this attack deals 4% damage and incredibly weak knockback that cannot KO. This jab's strength is in its low lag, allowing Shovel Knight to swing repeatedly at a respectable rate. If Shovel Knight jabs a projectile, the attack is redirected 45 degrees in the direction he's facing, meaning a projectile flying left would be deflected to fly up and right. This does NOT give Shovel Knight ownership of the projectile, it merely deflects it.
Dash Attack: From his dash, Shovel Knight launches forwards in a move very similar to Luigi's Green Missile. This move travels as far as an uncharged Green Missile. Upon hitting a foe or wall, Shovel Knight bounces away as he does with the Propeller Dagger. This move deals 8% and KO's at 190%.
F-tilt: Shovel Knight quickly punches forward with the Dust Knuckles. This move has a rather small hitbox, but has a unique movement mechanic. If a foe is within one character length, Shovel Knight is automatically pulled forward so that the move hits. Each punch deals very little knockback, so this move can chain into itself up to 4 times, after which the foe is launched too far away to combo. Each punch deals 3%, with the final hit KO'ing at 185%.
U-tilt: Taking inspiration from his victory pose, Shovel Knight thrusts his Shovel Blade into the air for a decent anti-air. Due to the awkward motion, this attack suffers some unfortunate lag. This attack deals 6% and KO's at 195%.
D-tilt: Shovel Knight roughly jabs the Shovel Blade into the ground. This kicks up between 3 Pokéball-sized rocks. These rocks fly forward in slightly varying arcs, creating a sort of "rainbow" shaped spread. If a foe is hit, they flinch and suffer 4% damage. However, being hit by one rock makes it likely that all the rocks will hit. There is no hitbox on the Shovel Blade itself, so be careful! Owing to its relatively low lag, this attack is great for damage racking and defending against aggressive attackers.
Smashes: Shovel Justice!
F-Smash: Shovel Knight quickly shoulders the Shovel Blade while charging. After a split-second of lag, he performs a lightning-quick slash. This slash hits instantaneously, dealing between 10-20% depending on charge. This Smash KO's at 175-155%, depending on charge. The slash also reflects projectiles at twice their original speed. However, this move suffers some very drastic endlag, making it dangerous to spam it. It's also worth noting that this move's hitbox does not last very long, making it easy for foes to punish an overzealous Shovel Knight.
U-Smash: When charging, Shovel Knight pushes the Shovel Blade into the ground with his feet. Upon release, Shovel Knight quickly flings a large chunk of earth into the air. This chunk follows the high arc of the Tow Anchor. Depending on charge, the chunk can be anywhere between one half to one Kirby in size. Spitting in the face of physics, larger rocks fall slower than small rocks; this makes a charged U-Smash dangerous for aerial opponents. Depending on the size, this move deals between 7-18% and KO's between 180-150%. U-Smash is great for anti-air purposes or for KO'ing foes, but the intense exertion gives this move some awkward starting lag. Thankfully, there is little end lag.
D-Smash: Upon charging, Shovel Knight simply begins flashing. On release, he jumps slightly into the air and pulls out the War Horn with a flourish. Once he hits the ground, he immediately blasts an earth-shaking note on the horn. This causes a large shockwave to radiate from the Horn. The blast of sound deals 12% and KO's at 180%. Charging this move increases its range. By default, the range is merely a character length away from Shovel Knight, but a full charge increases the range to two Bowser lengths away. Charging does not affect the move's damage or knockback. The War Horn destroys any projectiles caught in its blast, even Shovel Knight's own projectiles. This is a great area-of-affect move, but suffers from a bit of starting and ending lag.
Aerials: Azure Aerialist
N-air: Showing impressive gymnastic skill, Shovel Knight curls into a ball and performs a midair somersault. This acts as a generic get-off-me N-air, but is decently fast. This deals 5% and KO's at 200%. If Shovel Knight lands while doing this, he sticks the landing expertly, suffering no landing lag.
F-air: Taking inspiration from one of his many amiibo-exclusive abilities, Shovel Knight performs a diagonal "Divekick" with the Shovel Blade. This move acts somewhat similar to Bayonetta's After Burner Kick, but is slower and weaker. This move deals 5% and KO's at 185%.
B-air: Shovel Knight roughly jabs the handle of the Shovel Blade behind him. This move is very fast, but has limited range. This thrust deals 7% and KO's at 165%.
U-air: Shovel Knight brandishes a variant on his Propeller Dagger. This Rising Dagger pulls Shovel Knight upwards his own height. This does not put him in helpless, but can only be used once before landing. This deals 7% and KO's at 170% vertically.
D-air: Shovel Knight's signature technique. He mounts the Shovel Blade much like a pogo stick, with the blade pointing downwards. This does not change his fall speed or air speed. Upon hitting a foe, Shovel Knight bounces up a short distance before falling back down, still in the move. This deals 6% and light shoving knockback to grounded foes. With finesse, Shovel Knight can chase a grounded foe and rack up impressive damage. However, after three successful hits, the foe no longer flinches on hit, and can attempt to escape. Hitting an aerial foe causes a light spike effect. This move can be canceled by inputting any other aerial or special.
Grab: Shovel Knight takes a hand off his Shovel Blade and grasps forwards. This is decently quick, but with poor range. Dashing increases both the range and the lag.
Pummel: Shovel Knight slaps the opponent across the face as though challenging them to a gentleman's duel. Slow, but deals a respectable 6%.
F-throw: Shovel Knight releases the foe before quickly shoving the Shovel Blade into the ground beneath their feet. He then quickly flings his foe away, launching them away with 6% and knockback that KO's at 170%.
B-throw: Shovel Knight quickly shoves the foe behind him before thrusting the handle of the Shovel Blade into them. This deals a sharp 8% and KO's at 175%.
U-throw: Taking inspiration from a trusty Relic, Shovel Knight tosses his foe skyward in an arc identical to his Tow Anchor. This gives him a second to breathe. This throw deals 7%, but is a bit awkward to kill with.
D-throw: Shovel Knight releases the foe before quickly swiping their feet out from under them with the Shovel Blade. This deals 7% and trips the foe.
Final Smash: Catch Her
Shovel Knight looks skyward as the stage becomes bathed in white light. An arrow appears somewhere at the top of the screen. After 4 seconds, Shield Knight falls from this position. Should she hit the ground, she'll vanish in red smoke, ending the Final Smash and dissipating the white light. If Shovel Knight catches her, however, a massive flash of red light bathes the stage. This deals 50% to all foes, and causes a crumple effect much like Ryu's Focus Attack.
Extras: For Shovelry!
Up Taunt: Shovel Knight takes a Troupple Chalice from his inventory before quickly downing its contents.
Side Taunt: Shovel Knight embeds his Shovel Blade in the ground before pulling a map out and examining it thoughtfully. He then stows the map away and returns to his idle stance.
Down Taunt: Shovel Knight plants the Shovel Blade before leaning against it, taking a short nap.
Hey Professor Lexicovermis
, welcome to Make Your Move! Always pleasing to log on and see another newcomer hop onto the scene. Shovel Knight is a character many know and love, and from the moveset it's pretty readily apparent that you're also pretty fond of the guy – a lot of little quirks in the set seem to be based on the exact gameplay of the original Shovel Knight game. Definitely helps to have an appreciation for and understanding of the source material. At the same time, though, the set's biggest shortcoming throughout is how it clings too close to the game's original mechanics at times. While accuracy to the source material is admirable, there also comes a point where changes are necessary to help a character fit within Smash's engine and cast of characters.
The main example of this would be the many Jab clones throughout the moveset. In the original Shovel Knight, I gather, the basic "digging"-like attack could be used while standing, walking, or in midair. That's all well and good, but that doesn't mean that it has to take up so many inputs in Smash. Between Jab, Ftilt, Dtilt, Dsmash, Fair, Bair, and the beginning of Fsmash's charge, that's seven moves that are practically identical – or in the case of Dtilt and Dsmash, simply outclass the others via special effects to the point where there's no reason to actually use Jab, Ftilt, etc. This is accurate to the source material, yes, but there's also no other reason for it to be like this. With a character like Megaman, his Buster takes up three inputs because it's handy to have access to a projectile in the air or while walking. But with Shovel Knight, his Ftilt halts his walking momentum, so there's no difference between using Ftilt and just stopping your walk before using Jab.
Moreover, if these were replaced with unique melee moves, e.g. Ftilt is now a stab forward with the shovel or something (and Fair, Bair, etc are also unique), there'd be no detrimental effects. In fact, the set would benefit from decloning these moves, since the player now has more options to consider and thus more potentially interesting strategies to develop. For example, the aforementioned stab Ftilt could perhaps offer more reach but have more startup lag, meaning it's a bit riskier but allows you to poke from further away. This provides a reason for the player to consider whether to use Jab or Ftilt for a given situation, and of course the same goes for the other moves. Also, having the same move on multiple inputs doesn't make for the best read, and comes across as somewhat lazy.
The specials are pretty alright. Nothing too spectacular, but they mainly get the job done – although Chaos Sphere's random element is something I'd consider revising in favor of a more predictable mechanic. With a random bounce pattern, it's unpredictable to the foe, yes, but it also becomes a less reliable tool for Shovel Knight himself to use. Thus, there are fewer ways to actually take advantage of it compared to a predictable bouncing pattern; for example, if you know it'll bounce high, you can stick to the ground and throw out an attack of your own to cover both the air and the ground at the same time. Stuff like that. If you want to preserve the unpredictable nature, you could also have the angle be determined by the Shovel Knight player. Perhaps, by angling the control stick, or via some other input, you could control the Chaos Sphere's trajectory, similarly to Dedede's Gordos. The Shovel Knight player can play around the Chaos Sphere, but it still keeps that element of unpredictability to surprise the opponent, since the player can mix up which angle he chooses. The same basic idea applies to Dtilt.
Fsmash is another move that seems to be based on the original game in its charge mechanics, from the shorter charge time and all-or-nothing charge to the pre-charge hitbox and the mid-charge movement. While it is unique, there's also not much of a use for it in the context of the rest of Shovel Knight's moveset. Like, he doesn't have anything specific that benefits from him being able to move during the charge / having a pre-charge hitbox / etc. The effects are just kinda there, and come across as being inconsistent for the sake of being different. Also, while we're on the subject, Fthrow being a clone of Fsmash isn't ideal. Not only does it lead to less variety than a unique Fthrow would (like the Jab clones), but it also means that he has one throw which deals 20% and kills, and three others which deal only 4-6% and thus are not worth using in comparison to the incredibly strong Fthrow. Even if Dthrow can combo a little bit, the pitfall is too unreliable to be worth it, and Shovel Knight doesn't have any good follow-ups anyway.
Lastly, I should point out Dtaunt and Utaunt. Dtaunt, while mostly alright, could be a major pain for characters such as Ike and Ganon if it truly is usable as an edgeguard – mainly due to the unlimited duration. Utaunt is the main thing here; the extra effects are rather tacky. You could argue that they tie into certain moves, such as Dtilt for the luck one or maybe using the armor potion to charge Fsmash, but there's not really an overarching theme or playstyle here. Playstyle is pretty dang tricky to grasp in the first place, but a good way to get started might be to check out some of these videos for an analysis of playstyle within Smash itself. The first four videos, as well as the ones on Ike, Roy, Marth, and Link, are what I'd recommend watching if you want to dig a bit deeper into the concept of playstyle. Notice how often, the moves in a character's moveset are designed around a specific theme, style, or objective. You don't need to rush into this by any means, but it's worth checking out if you want to improve on this sort of stuff (as well as just being interesting to watch).
The main tips I'd give right now are to be more willing to change the character's gameplay a bit to fit Smash's engine (such as not making so many Jab clones), balance moves better in relation to each other and to other characters (such as Fthrow not being disproportionately more powerful than the others), and to more carefully consider whether a move's special effects are beneficial or detrimental to gameplay (such as the RNG elements and Utaunt). I would like to see more sets from you in the future, as your dedication to the source material does show here – the main thing now would be to improve how you adapt that to fit Smash's engine.
I'll add this to my rankings tomorrow, as well as fix the broken images probably.
Hey Professor Lexicovermis
, welcome to Make Your Move! Always pleasing to log on and see another newcomer hop onto the scene. Shovel Knight is a character many know and love, and from the moveset it's pretty readily apparent that you're also pretty fond of the guy – a lot of little quirks in the set seem to be based on the exact gameplay of the original Shovel Knight game.
Thanks for the critique! I'll probably be back with more sets, and I'll be sure to iron out things in the future! Think I'll "patch" SK with some of the changes you recommended; my creative juices are a-flowing!
In Honor of our lord and savior Knuckles, here is a new moveset:
Punch
A punch is when you curl up your fingers and thrust your ball-like hand forwards. It is a really old fighting technique and a way to get bullies off your back. You might be put in detention afterwards, but all that matters is that you broke that f***er's nose. Isn't that right, Johnny from 1st grade? ISN'T IT!?
Statistics:
Size: (Apple) It really depends on the character, but most fists are about the size of an apple. Considering that a bullet is really small and can kill a guy, imagine what damage the much larger fist can do.
Weight: (0.575%) Compared to the rest of the body, the hand does not weigh too much at all.
Fall Speed: (9.8 m/s^2) Same as anything else. If you cut a hand ff, it accelerates at this speed.
Jump: (Feet) Unless you are Lord Souther, you jump with your feet, not your hands, b-baka...
Running speed: (Ralph) Ralph.
Knuckles: (4-5) Wait, does the thumb have a knuckle. If it doesn't, we must make like the Yakuza and cut our thumbs off and feed them to our load and slavior.
Air Speed: (32 mph) It's just like getting hit by a train. In 1840.
Traction: (0.42) The coefficient of friction of human skin is about this much. I sceince gud
Gameplay:
It turns out! Safe victory! Of course, the strongest! (Deception you want to say, what you What's to stop it?) UNO deck! This is the last! Succession prize! (I cried, I always won a complete victory!) Power! Take the opportunity! at the border Hero! I do not want the voice of praise and applause Hero! Therefore we fight the mystery of evil. No one knows that he is who you are. Opponents closed, were close in the sky. I will never get back If I am a hero, I am ready to put a fist, a strong commitment to It turns out! Read! Honest! (What? I do not feel that you are not my opponent!) Justice! Power! It makes no sense to argue! (I will take away the wind-up! Evil! You say your prayers!) Power! Take the opportunity! Adrenaline is full! Power! Take the opportunity! I hit the power of technology discipline!Hero! One is that we are used to the stronger boys young Hero! I have overcome the weakness, has become stronger. No one knows that he is who you are.Increase the gods fist of the residents, only to progress Hero! I have not tried in a military hero, but you will break the mud!I did not give up. I imagine the future in my head When I wake up, go in the world today, and no doubt will rise No matter if you have to do something, no matter what measures Hero! I do not want the voice of praise and applause Hero! Therefore we fight the mystery of evil.Increase the gods fist of the residents, only to progress Hero! I have not tried in a military hero, but you will break the mud! Loan hero! I want to be a Ralph!
Specials:
Neutral Special (Captain Falcon): He just punches.
Side Special (Dark Pit): Dark Pit brings out his Electroshock Arm and charges forward with super armor, powerfully uppercutting the enemy. This move can deflect projectiles and sends them back at a 43 degree angle. Unlike Pit's Upperdash Arm, Dark Pit's variation sends the target flying at a lower angle and deals electrical damage. He is the best member of the Hot Topic Krew. His coconut gun can fire in spurts. If he shoots ya, you're apart of the KKK.
Down Special (Luigi):
Up Special (Dr. Mario): A jumping uppercut. It grants less distance than Mario's, but consists of clean and late hitboxes like Luigi's, which grants much greater KO potental compared to Mario's. Additionally, Dr. Mario's Super Jump Punch has the unique perk of allowing him to move himself in the opposite direction upon landing its clean hitbox, which makes it less punishable than Mario and Luigi's. Its clean hitbox KOs middleweights at 135% while near the edge. Dr. Mario is really an underrated character. He is secretly quite diabolical as a clone of Mario drawn from the intelligent side of his brain. He might be weaker, but he sure knows pressure points, making him much stronger overall. However, he lacks empathy and lead the evil villain resistance of Melee which ended up in Link being killed, creating the Fallen Timeline. Fortunately, he was put back on his shelf until he wasn't.
Standards:
Jab (Bowser Jr): Bowser Junior's Clown Car grows metal arms with boxing gloves on the end. This set up punches twice (3, 2%), followed by a flurry of punches (1% per hit) and a finishing punch. It deals impressive damage and knockback for a neutral attack, as it can easily deal around 20% and KO around 130%-150% at the edge of a stage. Quite nice, but loses many points due to Junior not punching with his own fists. This would not be the case if the Koopalings just replaced him. Lazy little...
Forward Tilt (Olimar): Olimar performs a wind-up punch of the Rocket Fist ability from Pikmin 2 (11%). It has impressive KO potential, as it KOs Bowser at 130% near the edge of FD. However, it is Olimar's only KOing option when he does not have any Pikmin and is his slowest attack, due to it coming out on frame 15. Honestly, Olimar's Pikmin are holding him back. He should just ditch the walking parsnips and sign up for boxing. He could easily take Tyson with an arm like that!
Up Tilt (Mii Brawler): Punches with an uppercut, similar to Mario's up tilt, though it does not spin the Mii around. Can juggle at low percentages. Banned in tournaments, this move is.
Down Tilt (Bowser): Bowser performs two sweeping, alternating punches while lying on his belly (14, 11%). It has a chance to trip at low percentages, but the first hit does not connect into the second hit past medium percentages. The first hit has slightly stronger knockback, while the second hit has slightly farther range, making it a decent KOing option near the edge. Much better than his claw swipes to be sure as well as his youngest son. The Koopalings are still his children and Pluto is still a planet dang it!
Dash Attack (Zelda): A double palm thrust that emits a blast of magical energy from her hands, similarly to Peach's dash attack, except it's magic, so it is a punch. Its sweetspot is located at its beginning. Can KO at medium to high percents near the edge. Best character in Hyrule Warios bar none.
Smashes:
Side Smash (Sonic): A wind-up punch. It has high knockback growth, deceptive range, and can be angled, making it one of Sonic's most viable KOing options. However, its low base knockback makes it better suited for KO attempts later rather than earlier. It also comes out on frame 18 and has 28 frames of ending lag, making it risky if used unwisely. It KOs at 116% from the center of FD. Originates from Sonic the Fighters. If you thought Meta Knight was broken, hoo boy you should main Metal Sonic from that game.
Up Smash (Bayonetta): Uses Wicked Weaves to summon Madama Butterfly's arm, which is used to throw an uppercut. It hits directly in front of Bayonetta, and thus leaves her vulnerable from behind and directly above, similarly to Paletuna's up smash. It has rather noticeable start-up, high ending lag and low priority, but it is her strongest attack, as it is capable of KOing middleweights around 100%. The Bullet Arts version fires one gun forward and one upward. It is based on the delayed punch Wicked Weave launcher. Fun fact, her hair moisturizer is made from the tears of K Rool fans.
Down Smash (Little Mac): He's not so notable when it comes to punching, so I'll save you the trouble and skip over him.
Aerial:
Nair (WTF): Assumes the Jackknife pose to attack with its arms and legs. The arm pose counts as a punch right? Right. It deals impressive damage when both of its hits connect, connects much easier compared to most of her attacks due to its fairly large hitbox. Altogether, these traits make it potentially his best combo starter when short hopped. Its most reliable combos are into her forward and up tilts from 0%-10%, with the former tilt being capable of leading into aerial combos when connecting with its leg hitbox, while the latter tilt can combo into their neutral attack. Beginning at 50%, it can combo into WTF's other aerials, which are effective even up to high percentages. In the event both hits do not land, it still has combo potential via its first hit, which can combo into a back aerial. Autocancels from a short hop. Exercise is key as long as you don't strain your neck. Then it's hell.
Fair (Mario): You know the one! A fist swing downward. When hit clean, it is a meteor smash with enough knockback to KO under 45% offstage. When hit early, while not possessing this feature, it can still KO at around 130% near the edge. However, it has slow start up (frame 16), high ending lag, high landing lag (26 frames) and is Mario's only aerial that doesn't autocancel in a short hop. This is the king of disrespect and will cause the player next to you to do this to your head IRL if you get it off correctly.
Bair (Ganondorf): A backfist. Relatively fast start-up with power that slightly surpasses his forward aerial, but has short reach. Has little ending lag with moderate landing lag. While it autocancels with a short hop, its high vertical hitbox and low amount of active frames makes it difficult to land on most grounded opponents, particularly those that are crouching. Very likely to take a stock at medium percentages if used quickly after a ledge trump. The sweetspot KOs middleweights at 103% from center-stage and at 77% near the edge. Ganondork. Ganondunk. He is married with Nana of the Ice Climbers, but I ship him with Jigglypuff. I'm right, your rong.
Uair (ROB): Rapidly rotates his arms upward, punching them multiple times. It is R.O.B.'s second fastest aerial due to coming out on frame 7, and it can auto-cancel with a short hop. It combos reliably from his down throw at low to medium percents and is a viable KOing option, as it KOs at 102% near the upper blast line. Also he ca kill the AVGN. Take that Superman!
Dair (Mega Man): Mega Man points his fist straight downwards and fires it downwards as a short-ranged projectile. The fist deals the most damage in the first few frames, but afterwards, it turns into an aerial-only meteor smash. It is based on Hard Man's weapon from Mega Man 3. Mega Man can move himself left or right slightly during the first few frames before launching the fist. Hard Man also has the best song in MM3. Fite me skrubs.
Grabs:
Grab (Pac-Man): Emits Boss Galaga's tractor beam from his hand. That's right, with the force of his punch he can suck in unsuspecting foes! Oddly, it consists of a series of three million hitboxes with no delays in between. This, along with its instant start-up and ending lag, makes it notoriously unpunishable, and it's often considered the best grab in the game.
Pummel (Kirby): The punch version of the Arm Throw from the Fighter ability. It is the third fastest pummel in the game and one of the best pummels overall. If you mess with him, he'll force you to listen to his song from Star Bomb. No one should need to endure that pain.
F Throw (Sheik): Xe elbows the opponent with xyr left arm, punching the opponent forward. Truly a top tier throw for xem.
B Throw (Pit): Pit spins around with the opponent in tow in order to perform a one-handed body slam...with his FISTS! At low percentages, it can combo into a dash attack, but has very minimal utility outside of this combo and dealing damage. Quite nice if you are into angles. He is not edgy though, as it is a cupcake.
U Throw (Greninja): The froggy thrusts arms straight upward, sending opponent upward. Can KO at high percentages, and is a good combo starter into up air at low to mid percentages. Cut the frog some slack, this is the best punch it can do.
D Throw (Yoshi): Spits the opponent onto the ground, punching them out of his mouth with his tongue. It has very minimal set-up potential due to its very high base knockback and very low knockback growth, as its only follow-up is an up aerial, although this requires a proper read. Yoshi Yoshi Yoshi Yoshi Yoshi Yoshi Yoshi Yoshi Yoshi Yoshi Yoshi Yoshi Yoshi Yoshi Yoshi Yoshi Yoshi Yoshi Yoshi Yoshi Yoshi Yoshi Yoshi Yoshi Yoshi Yoshi Yoshi Yoshi Yoshi Yoshi Yoshi Yoshi Yoshi Yoshi Yoshi Yoshi Yoshi Yoshi Yoshi Yoshi Yoshi Yoshi Yoshi Yoshi Yoshi Yoshi Yoshi Yoshi Yoshi Yoshi Yoshi Yoshi Yoshi Yoshi Yoshi Yoshi Yoshi Yoshi Yoshi Yoshi Yoshi Yoshi Yoshi Yoshi Yoshi Yoshi Yoshi Yoshi Yoshi Yoshi Yoshi Yoshi Yoshi Yoshi Yoshi Yoshi Yoshi Yoshi Yoshi Yoshi Yoshi Yoshi Yoshi Yoshi Yoshi Yoshi Yoshi Yoshi Yoshi Yoshi Yoshi Yoshi Yoshi Yoshi Yoshi Yoshi Yoshi Yoshi Yoshi Yoshi Yoshi Yoshi Yoshi Yoshi Yoshi Yoshi Yoshi Yoshi Yoshi Yoshi Yoshi Yoshi Yoshi Yoshi Yoshi Yoshi Yoshi Yoshi Yoshi Yoshi Yoshi Yoshi Yoshi Yoshi Yoshi Yoshi Yoshi Yoshi Yoshi Yoshi Yoshi Yoshi Yoshi Yoshi Yoshi Yoshi Yoshi Yoshi Yoshi Yoshi Yoshi Yoshi Yoshi Yoshi Yoshi Yoshi Yoshi Yoshi Yoshi Yoshi Yoshi Yoshi Yoshi Yoshi Yoshi Yoshi Yoshi Yoshi Yoshi Yoshi Yoshi Yoshi Yoshi Yoshi Yoshi Yoshi Yoshi Yoshi Yoshi Yoshi Yoshi Yoshi Yoshi Yoshi Yoshi Yoshi Yoshi Yoshi Yoshi Yoshi
Final Smash (Ryu):
A Final Smash that varies depending on range. At point-blank range, Ryu traps the opponent with the Shin Shoryuken, a three-hit combo that launches the opponent with an extra-powerful Shoryuken. Begins KOing at specific percentages for every character, much like Little Mac's KO Uppercutand Cloud's Finishing Touch. At any other range, who cares because it's not a punch. Real men, women, and lampposts punch stuff.
Palette Swap
I would mention different skin colors, but that worked really well for JonTron, so I'll spare you the controversy.
Taunt:
You guys can't make a better moveset than this even if you tried. You're all to busy thinking of how many summonable minions each character should have. Nintendo's advertising campaigns the past 5 years have been better designed than most of the sets here.
As I trekked along the streets of Japan, looking for the perfect body pillow to gift my waifu, when I notice some kid in a playground shout "Hey nice shirt!" clearly in response to my custom made shirt that was a poorly cropped image of Fox doing his shine. I come up to him and ask "Oh cool do you play Smash?" and he responded, saying he was the son of Masahiro Sakurai. Yes, indeed, Sakurai! Creator of classics such as the Kirby series, Super Smash Bros, Overwatch and Mad Professor Mariarti.
Knowing this was a once in a life-time chance, I set my plans for body pillow buying for another date and asked him straight up: "Will Smash be coming to the Nintendo Switch?" and he said "Yeah. It will also be released in the PS4, XBOne and Steam. Oh yeah, and Ridley is in it too". Fascinated and knowing my dear Make Your Move community would love to hear this news, I knew as the legendary son of Sakurai he would know all the inputs for Ridley. As I grabbed pen and paper, this kid, who told me his name was Jimmy, agreed to spill me the beans on one of the most anticipated fighters for the next game: Ridley.
Stats
The first thing I asked Jimmy was if, as memed about, Ridley was too big. He responded that Ridley was the biggest fighter in the game, clocking in at the size of Bowser. Plus the entirety of the Battlefield stage. Though if you turn Items off he'll just be the size of Bowser.
I asked about his other stats, and Jimmy said that since he has cool wings, Ridley is ninja fast but also heavy, since for Smash he has been redesigned to be a bit fatter in anticipation for the next Metroid game. He told me that Ridley's only weakness is that he isn't as cool as Charizard, and as such is killed by any attack from him.
Neutral Special: Fire Breath
According to Jimmy, as we all expected Ridley's Neutral Special is his Fire Breath, similar in vein to Bowser, Charizard and Mewtwo's fire breath (He noted that Mewtwo now has fire in every attack, and was also called Turbo Fire Mewtwo). Ridley's fire, however, is the strongest, because he's awesome and the fire is made of plasma. Alongside killing the enemy, the fire will also melt the stage itself forever. If you melt the stage enough the molten stage bits will also appear, which Ridley can eat to regain HP. By using a brand new Switch tasting add-on, the player can feel the taste of the stage too, and the taste changes depending on stage. Delfino Plaza tastes like water, Woolly World tastes like orange juice and Final Destination tastes like sulfur, just to name a couple few.
I then asked Jimmy what percentage this move deals, and he said he didn't know what a percentage is. Not wanting to anger him and end up not receiving the rest of the info, I didn't press onward, and just let him not say the damage, although he did say that all of Ridley's moves are super strong, unless against Sonic, where they deal no damage and just heal him due to his coolness.
Down Special: Minimize
To appease all fans, by pressing Down Special Ridley will shrink into the size he takes when items are turned off for the rest of the battle, although if he inputs this move again or when he's already in a smaller size he'll shrink into microscopic levels. This makes his hurtbox almost impossible to hit and makes him faster than both Sonic and the secret character Super Sonic combined, while still having all of his attacks have the same hitboxes as when normal-sized. By shrinking again, Ridley will enter the molecular level and can attack the foes atoms. If Ridley destroys all the foe's atoms they will die, and this is the only way Ridley can kill Charizard with no fear of his attacks, although it is very difficult due to Charizard having a good immune system due to eating his Flintstones Gummies. Its also incredibly tedious because you need to destroy every single one of Charizard's atoms, but this can go to your favor, since the Charizard player may just get bored and forfeit.
Side Special: Poison Spit
Pulling out of his lunchbox some sushi or whatever japanese people eat, Jimmy told me Ridley's Side Special had him spit poison at the other guys. This poison falls to the ground and deals a lot of damage to the foe alongside grossing them out, causing them to have the new grossed out ailment for the rest of the fight. Grossed out foes will deal less damage to Ridley and will always be pitfalled by his attacks because lol, but will be cured of the effect after beating the Elite Four 100 times.
Additionally, if Ridley stands on top of a poison puddle for 1 minute, he will become the hidden unlockable fighter Smash Daddy for the rest of the match, who's moves are exactly the same as Ridley's but have cool poison. The downside however is that Smash Daddy is vegetarian and so his gameplay is worsened due to eating things being an important part of Ridley's gameplay. Smash Daddy can only eat the molten stage bits if the stage has grass in it.
Up Special: Cool Arm Cannon
For his Up Special, Ridley's arm turns into a very cool and awesome arm cannon that shoots out lasers and stuff, although I forgot to ask Jimmy how do you shoot a laser. I did however ask him why it wasn't a recovery, and he said Ridley can fly forever so he doesn't need a recovery. Ridley's arm cannon is very cool, but after 1 minute it will explode and cause Ridley to lose his arm for the rest of the match. To counter this, you must place two AA batteries on top of your Nintendo Switch. The system will then absorb the batteries and use them to power up Ridley's arm cannon.
Standards
Jab: Metroid
Jimmy argued that his father needed to represent a character's series in their moveset almost seamlessly and in a well articulated manner that still follows the principles of Smash. As such, Ridley pulls out his series' mascot, the Metroid, and proceeds to put it on his head as a pretty cool hat.
Since Ridley fed the Metroid some Metroid Treats (not actually mentioned in-game), the Metroid won't attack him, and will only do cute honking sounds. Once you put on a Metroid as a hat it won't fall off, so on the basis alone of having a honking metroid buddy you'll want to input this move as fast as possible, but there's more: in case the player is short on double As, Sakurai thought well and made it so if your wearing a Metroid it will magically transfer energy into your Up Special's arm gun. This, however, isn't the preferred option, as 1 minute after a Metroid has charged back your arm cannon it will fly off of Ridley's head and dissapear away from the screen, then appearing 3 seconds later in real life; by then it's hungry and you'll have to fight it while still fighting your opponent in Smash. Metroids will try draining your life force by the head, which is almost guaranteed to kill you, but they're also weak to pointy objects, and their main weakness is ice. On record, if you throw a single ice cube onto a Metroid irl it will die instantly.
Still, if you have a weak throwing arm you'll probably die. Yeah.
Side Tilt: Lasagna
The lazy, lasagna loving cat he is, Ridley grabs out of hammerspace a delicious plate of lasagna, which he then throws forward. The plate of lasagna is thrown 3 SBBs forward, but will only heal the foe, although if they're lactose intolerant they will automatically be KO'd. If the lasagna is thrown on a Monday though, it will damage foes for enormous damage, fueled by Ridley's rage for Mondays. That's one sassy cat!
By using the Switch's taste add-on, you can not only taste Ridley's scrumptious lasagna, but you can also even slightly tell his secret ingredient: just a pint of ginger ale.
Down Tilt: Sword Swipe
Ridley grabs out his katana and lunges forward close to the ground, his sword pointed forward and his stance rigid and precise, due to his years in expertise with the blade. Alongside this he will utter some Japanese. Since he's fucking japanese you prick, Jimmy gave me the translation of what he says: "You deserve the death."
This attack is powerful, but since Sakurai is the balance master there's a side effect to it: if Ridley misses this move he will be enraged over disrespecting his masters with this meek attack, and will commit sudoku. By commiting sudoku Ridley will not only be KO'd but you'll be forced to complete a sudoku puzzle to continue the fight, something very tedious to for both you and your foe. This, however, has its uses, as you can pause the game by killing yourself via sudoku so you can deal with the rampaging Metroid in real life before heading on with the game. The metroid won't attack your adversary because they smell nice, so your foe will likely try to be hit by this move just so you can't deal with the Metroid and die horribly, just so he can get whatever the heck you get by winning a Smash tournament.
Up Tilt: Bite
Ridley bites upwards. Did you expect some zany side effect revolving around the comic relief of this Ridley moveset utilizing moves outside of the scope of the character while referencing MYM, Smash and other media products and in general playing off of the "my dad works at nintendo" trope? Well I got news for ya tootsy-roll, because guess what. Guess what. Ridley just does a bite. A bite I tell you. He tilts his head upwards and bites. Look, I'll even give you the percentages. 7%. It does 7% damage with mediocre knockback. It has bad starting lag and in general actually isn't good at all. That's life for you, you worm. Not every move is going to be a funny funny thing. Will you fight? Or will you perish like a dog?
Dash Attack: Hug
I had no idea what Jimmy was telling me for the Up Tilt, but I just rolled with it and jotted it down. Moving on to the next move, he took a breath from the rage from the last move to lay on me the Dash Attack.
Since Sakurai is an amazing writer, he has developed multifaceted characters for Smash for the Switch. We all know of Ridley as a cunning, vile, space dragon, but even he has his good side, that's why for this move he hugs the foe. This move is proof that Ridley deep down has a heart of gold and loves everyone, especially Samus' parents who he only killed accidentally. This will eventually lead to Ridley's redemption arc in Smash 7.
This move has a feature where it drains Rage from the foe. If a foe's rage is drained below the base, they will have negative rage and as such act friendlier with Ridley. They won't want to fight him anymore and the fight will end in a no contest, and Ridley and the opponent, now the best of friends, will now go on bingo nights together.
Smashes
Forward Smash: Federation Force
Taking a cue from Pac-Man, Ridley tackily uses his enemies in his Smash attack for no reason (but don't worry, its completely justified by it representing Ridley's roots in arcade gaming), spontaneously spawning a federation marine who, sized down to his chibi model from Federation Force, will shoot forward a generic beam, which is fast but not as strong as the rest of Ridley's arsenal due to not being as cool as his arm cannon.
If Ridley charges this move, the federation marine will stick around a bit and turn around, then beginning a game of everyone's favorite sport: Blast Ball! It is a very fun game and more enjoyable than all of the Metroid games combined. Two goals sprout on each side of the stage, and the federation soldier will begin the game by throwing the blast ball at Ridley. The blast ball doesn't deal damage at all, and Ridley can kick it around like a soccer ball item. If he can score 3 goals he will win the game and the marine will disappear. This won't damage the foe, but if you're good enough at Blast Ball you can distract the foe with your sick skills.
If Ridley beats 99 games of Blast Ball, the player will unlock a special demo for the next Metroid game: Metroid Federation Force 2: Other F.
Up Smash: Explosion
I know what you're thinking: "Wow Reiga, Ridley sounds so OP, Smash for Switch sucks!!!1", and I can understand that; I also thought the same. I told Jimmy at the time that even if he was cool as ****, Ridley being OP was unbalanced and made the game unfair. What he responded me with, however, surprised me, and to this day I hold it as an example of how smart Sakurai really is.
He told me that Ridley wasn't just plain OP, but actually incredibly balanced, because his Up Smash just has him do a raptor screech and then proceed to explode, losing a stock on the spot. This fact alone makes mastering Ridley hard, as one of Ridley's Smashes being useless impacts his whole gameplan. Oh yeah, he can still use his overpowered fire breath and lasagna and shrink to the atomic level, but not having a smash attack totally and utterly makes him balanced.
If you charge this move, the explosion will be big enough that it will implode into itself and become a black hole, bricking your system.
Down Smash: Ode to Jimmy
Jimmy started getting excited as he then shared to me what he says is both his and his father's favorite attack, wherein Ridley begins singing a beautiful song in homage to Masahiro Sakurai's great son, Jimmy Sakurai. This astonishing melody, sung in Ridley's deep opera voice, will damage all foes on the entire stage. Even Sonic is damaged by this, for the powerful lyrics about how Jimmy can beat you in CoD are too cool even for Sonic.
If you charge this move all the way through, Jimmy himself will appear, more specifically his Sonic OC, Jimmy the Hedgehog. He has super saiyan hair, a gun sword and is a three winged angel with heterocromia. He will run amuck with maxed out stats and a moveset so powerful the real life Jimmy couldn't even describe it. All foes would likely be vaporized in 2 seconds against Jimmy, although they have an advantage against Ridley if its past 7:30 PM, since by then its past Jimmy's bedtime and he's sleeping.
Aerials
Forward Aerial: Death Claw
I pressed Jimmy on for the rest of the set, but he strangely enough was already packing his japanese food to leave. I asked him about Ridley's Aerials and Throws and he confused asked "Wait, there's more???". Even if confused by Sakurai Jr.'s forgetting that characters have those inputs, I persisted in trying to squeeze this exclusive information, as I knew it would be adored by my buddies fat guy, arrowman, touhou guy, generic nintendo protagonist and jamie over at MYM.
Jimmy then told me, sweating a bit, that Ridley's "side air attack thing" is him doing a really cool claw swipe. It not only is very powerful, but insanely fast, because we can't forget that Ridley is indeed ninja fast. This slash is so powerful that it will tear through the foe and cause them to bleed, no matter if they're a robot, ghost or Sonic. The blood will cause them to receive damage over the next few minutes, and if they don't go to the hospital they will die. A bit of blood will splash onto Ridley's face and also his mouth, so you can taste it if you use the Switch's taste add-on. This is important of course if you're a vampire irl, as the boost from drinking blood will likely be what it takes to beat a match. The downside, however, is that if the foe has a disease that affects the bloodstream, both Ridley and the player will be infected.
Back Aerial: Ridley Waft
I then pondered to Jimmy what about his Back Aerial, and while he at first forgot there were different inputs for both sides, he still told me about the move to get on with it.
Like with Wario, even when Sakurai brings in elements not present in canon into a set its still very much for a good reason, and like with the yellow fat dude, Ridley farts because lol XD fartz are funnyz. Unlike Wario, Ridley farts behind him, which just happens to move him forward a bit, like with ROB's BAir, and by a bit I mean 2 Battlefields.
The fart is powerful, but can be even more powerful if Ridley has eaten the stage, as it will fuel his gas. This is especially potent if the stage is made of mexican food.
Neutral Aerial: Sex Kick
Ridley outstretches his arms, legs and tail forward and stays in that pose for a while, dealing more damage the earlier into the attack the foe is hit by Ridley. Naturally, I already knew the nature of this attack, and just before Jimmy explained to me the "extremely cool and awesome reason" why this move is actually Ridley's strongest and most playstyle important move, I asked him just to confirm if it was a Sex Kick.
Angered at my use of a naughty word however, Jimmy refused to tell me the rest of the move and moved on.
Up Aerial: Monolith Drop
Ridley simply drops the monolith on the ground in front of him, causing it to wobble slightly as it does so and deal 8% and low upwards knockback. Yldretch will immediately pull the monolith back into Ridley's hand with a tether, making this move actually quite low on start and end lag. Considering the monolith lands on the ground too, it serves as a fast and efficient shield poke, similar to Mr. Game and Watch's. Ridley does a number on shields in general, especially considering his Up and Side Specials, so being able to poke underneath it as a godsend. While his down angled Forward Tilt can technically function for that purpose as well, its not nearly as low hitting of an attack and will only matter on a shield with half or less health most of the time.
Despite its low power and the fact that the monolith is only a small distance behind him during the move's start up, this is actually a really effective move out of it for a couple reasons. For one, going under shields as a shield poke is a lot more threatening when you consider that its no longer a weak attack to just knock them out, it can become an actual serviceable KO move. Two, Ridley dropping the monolith will actually leave it behind him until he reaches the end of his knockback, gets hit by an outside force, or moves a battlefield platform. Yldretch will snap the monolith right back to him in a similar manner to the Up Special in that case, dealing 10% and knockback that KOs at 160% on the return trip. Given how good this move is against shields, dodging is one of the main options that can be used against it, so if you predict it right you can have the monolith coming back knock them away anyway. This makes for a very hard move to defend against, barring going into the air, in which case Ridley's scary Up Tilt and Up Smash can be used.
Down Aerial: Pogo Tail
One of Ridley's signatures moves is his famous pogo tail attack, which debuted in Super Metroid, and plays out exactly like in that game: Ridley outstretches his enormous tail to not only point downwards but be bent straight, then dropping straight downwards tail first onto the ground or blast zone, in your usual stall and fall. Its got meaty starting lag, and unlike a lot of stall and falls doesn't have any landing shock wave, but can gather some good damage, and like it names says, it shares Greninja's DAir's property of allowing him to bounce on top of hit enemies, although a good shield and Ridley is up for his money.
If a metroid is in your house ready to eat you, when Ridley performs this move, he will pierce right through the stage and into the blast zone, then appearing in your house by entering through your Switch like a Metroid does and attacking the Metroid that's pestering you, in an act of pure kindness because, again, as we've mentioned, Ridley actually has a heart of gold.
If Ridley weakens the Metroid enough, he will then eat it, something accelerated if he entered the real world while equipped with an arm cannon, as it will shoot ice cubes at the Metroid and kill it. After killing the Metroid, if your opponent has never played Ridley before, the space dragon won't recognize them and eat them on the spot. After this, Ridley enters back into the console and into the match.
Oh yeah and Ridley is up to size here, so good luck summoning a Bowser + Battlefield sized dude into your living room lol
Grabs and Throws
I asked Jimmy about Ridley's throws, but already sick from explaining over 30 minutes of almost everything about one of Smash for the Switch's new fighters, he packed his stuff and went away after telling me that my shirt actually sucked and he was joking before. I accepted it, as this prince of Smash regardless had already told me enough about how amazing the next Smash is. Who won't accept it, however, is MYM's leadership, which alongside smelling bad also doesn't allow sets that don't have throws, so for the sake of Jimmy's legacy I'm just filling the throws section with horse jokes.
Pummel
Q: What is a horses favorite state?
A: Neighbraska.
Forward Throw
Q: What do race horses eat?
A: Fast Food.
Back Throw
Q: What do you call a well balanced horse?
A: Stable.
Up Throw
Q: Where do horses go when they're sick?
A: The horsepital!
Down Throw
Q: What do you ask a sad horse?
A: "Why the long face?"
note: theres poison in there gimme mymer points fr*ck you
I gotta hand it to you guys, you've got some balls to create sets that are this garbage, especially on this most holy of days. Let me show you how it's done.
Now for my second April Fools Day set and...wait, it's over already? Oh well, may as well post it.
Sonic
A certain hedgehog from a certain series you just might have heard of. Unlike most hedgehogs, he's incredibly fast, the world's fastest hedgehog, who can run at supersonic speeds. Like most hedgehogs, however, he can't swim too well. Generally speaking, he loves being able to do what he wants and loathes being constrained. Holding still is something he would never consider. He's got a bit of an attitude but can't pass by someone in trouble. When he collects the seven Chaos Emeralds, he transforms into the mighty, god Super Sonic.
Gameplay:
Since the cast is made up of mostly regularly-proportioned people, Sonic stands out as one of the shortest characters in the game, about the same size as Parappa. Along with his smaller stature, Sonic’s blistering speed makes it difficult to land a hit on. He has by far the fastest running speed in the game and attacks really swiftly too. His moves center on attacking the foe multiple times with a myriad of weak hits and overwhelm them with his amazing agility. Unfortunately he has far fewer projectiles than other characters and an even shorter attack range, often requiring him to be practically touching the opponents. To make matters worse, all of his attacks yield an extremely low amount of AP, which when combined for his high AP costing specials makes it quite difficult to kill easily. When you do get the specials, they are great and can kill quite easily, but the issue is getting to that point in the first place.
Square Moves:
Neutral Square (Sonic Combo): Sonic’s regular attack sequence is a lot more extensive than in Smash. He does 4 straight jabs, 2 high kicks, and then a sidekick to finish it off. The kicks are the only parts of the move that have any significant knockback, so you could potentially only use the 4 punches into a variety of other moves at Sonic’s disposal.
Side Square (Sliding Attack): As Sonic is running, he slides along the ground using his antigravity power. He slides such that he does not lose any speed when running and can get back immediately to running when this move is over. It is best to continue on from here with a jump attack as it launches the enemy upwards.
Up Square (Sonic Upper): Borrowing a move from Sonic Battle, Sonic does an upward flip kick not unlike Fox’s up smash. This move sends the opponent high into the air, so follow up with the spring and some air attacks. It sends them higher than any other attack Sonic has, so try it for opponents not so proficient in the air
Down Square (Sweep Kick): Sonic knees down and does a sweep-kick. It is essentially a stationary version of the sliding kick, allowing for some more prompt follow ups. Since it is a stationary attack, the opponent has to be really close to be hit, making it harder to land as a result.
Nair Square (Humming Top): Making use of his signature trick form Sonic Advance 2, he does a spinning kick with such torque that he slashes the air around himself. This move lasts for about 2 seconds, locking Sonic into it for a long time. However, he has full control of his horizontal air speed in this mode, making him able to spin into opponents easily. This hits multiple times and at the end launches the opponent horizontally. It only launches if the last hit gets out however; if Sonic lands before the last hit of the move gets you, the opponent is not launched, allowing you to follow up with more attacks.
Sair Square (Sonic Kick): Essentially Sonic’s traditional back air, but he performs the kick in front of himself this time instead of behind. It is decently strong and can
Uair Square (Scissor Kick): Sonic twists himself upside down and does a scissor-split kick. This attack pairs really well with the spring headbutt and any of the tilted grounded square attacks. Additionally, it can set itself up with a homing attack well.
Dair Square (Sonic Rocket): This attack has two different modes depending on whether you tap or hold the button. Tapping the button will let Sonic do a quick kick diagonally downwards. Holding the button makes it identical to Sonic’s down air, where he does the same kick motion, but rockets downwards quickly.
Triangle Moves:
Neutral Triangle (Spin Dash): Sonic’s signature move since Sonic the Hedgehog 2. Holding the button will let you charge the spin dash. When you release the button, you will dash forwards while rolling. Charging will increase the speed and duration of the roll. Rolling into enemies will hit them many times without launching them very far. This makes it very easy to rack up a lot of hits on them. Unlike many portrayals, simply charging the spin dash will not produce a hurtbox for Sonic. He can turn around while spinning, but it will make him lose a lot of speed while doing so, often stopping the spin altogether unless you charge for a good while. The special function of Sonic’s triangle attacks is that many of them will be able to immediately link into each other without ending. While well-timed attacks can still hurt Sonic while rolling, Sonic is often moving so quickly it is difficult to get a good hit on him. When Sonic is already rolling, he cannot charge up another spin dash; he needs to wait to stop before he can do so again. You can also jump out of this, but it gets rid of the spin dash hitbox. Since it looks visually similar to the spin dash when jumping, you can use this to confuse and trick opponents, using mind games as to which type of attack you will continue up with. This is easily the most important move in Sonic’s set.
Side Triangle (Spinning Roll): Before Sonic could spin dash, he could duck and roll into a ball mid-run. While he is running, he does just that. Unlike the standard spin dash, this attack goes for a set distance before Sonic ends it with a somersault kick. This kick produces a good amount of AP by Sonic’s standards and moderately launches the opponent horizontally. If you are simply running, this is a good move to safely close in on the opponents, assuming you count for the moderate end lag. When rolling, this will always end Sonic’s rolling phase. You will gain a slight burst of speed before you start decelerating quickly and perform the somersault kick. Once again, it’s good for launching foes.
Up Triangle (Hammer Spin Dash): When not spinning, Sonic leaps up high into the air while spinning, landing a bit in front of where he once stood. Unlike the custom move of the same name from Sm4sh, you only continue spinning if you do this move from a spin dash to begin with. Even then, you lose a lot of speed upon landing. At this point, it would be best to end with a Spinning Roll. There is an even greater function of this attack though. Since it hits opponents into the air as you rise, you can cancel this move into midair triangle attacks as long as you are not touching the ground. This even applies if you used the standing version of this move! Use it to chase foes into the air more easily and strike them while they are flailing about.
Down Triangle (Spiral Spin): Sonic spins around in a circle striking those all around him. When spinning, this acts as a feint as you stop moving forward and will spin in a circle. If you spin for long enough in this mode, you will stop spinning. While in this mode, you can either continue spinning forwards, do a spinning roll, or a hammer spin dash. To continue spinning forwards, simply press triangle and you will immediately stop going in a circle and go forwards. The special thing about this mode is that you can travel either left or right from this circle spin. This will occur depending on which side of the epicenter Sonic is on. For example, if he is on the right and uses up triangle, he will do a hammer spin dash to the right. This attack is used to trick and feint the opponent with mind games.
Nair Triangle (Insta-Shield): This is another ending spin mode move. Sonic starts spinning a bit faster, with a barrier of sorts surrounding him. This barrier extends the hitbox of the attack, makes it more powerful, and gives Sonic a lot of i-frames to protect him from attacks. This is his safest attack by far, allowing him to leap straight into attack. This attack makes Sonic unable to perform any other actions until he hits the ground however, so use it wisely.
Sair Triangle (Air Spin Dash): Sonic bursts forwards in spin dash form. Since he cannot charge, it is quite a bit slower than the normal spindash, but is a safe option to use in the air. Like the spin dash, you can cancel this move for a variety of other triangle moves. Alternatively, you could land, hammer spin dash, then use this move again to continue “hopping” forwards until you hit wall.
Uair Triangle (Homing Attack): Sonic will stop in place, charging his torque before slamming into the nearest opponent. The homing is not perfect however and will leave Sonic open if you miss. If you hit an opponent, you can press triangle again to home into another opponent. Since you can hit a given opponent only once in a homing attack session, you can have a max chain of 3 homing attacks in a 4 person match. This is powerful by Sonic’s standards, launching the opponent far horizontally. Naturally, it also ends spin mode.
Dair Triangle (Bounce Attack): Sonic drops like a basketball and bounces off the floor. By rapidly tapping the triangle button, you can bounce up to 3 times. Naturally this ends the spin mode, but this can be used to knock foes onto the ground.
Circle Moves:
Neutral Circle (Sonic Wave): He spins in place quickly, which launches a soundwave forwards. This also launches Sonic diagonally upwards in the other direction, like a reverse hammer spin dashThis hits multiple times before sending the opponent horizontally. It is a decent projectile, but it is the only one Sonic has got. It has poor ending lag and somewhat slow however, so use it carefully when you are spacing yourself.
Side Circle (Sonic Boost): Modern Sonic’s signature move and also his most powerful. He burst straight forward at an amazing forwards. He has a hard time stopping however, and will fall prone if he runs into a wall, so it is dangerous for Sonic as well. Use this only as a combo finisher when not near walls.
Up Circle (Spring Headbutt): This is essentially Sonic’s Up Special custom that causes damage. It does not let Sonic go up as far as in Sm4sh since recovery is no longer an issue, but it can follow the opponent into the air after a Sonic Upper. For his other tilts, it is better to use a normal jump with an air square attack.
Down Circle (Sonic Wind): He performs a spinning breakdance maneuver similar to one of his taunts. This spin creates a cyclone around him that extends upwards thrice his height. It drags in opponents with its windbox, hitting them multiple times if caught in the wind. They are launched upwards as the move ends. The lag on this move is such that Sonic cannot follow up afterwards. He is quite safe during the move however, so use it if the opponent leaves themselves open. Alternatively, they may try to outrun the move’s suction, allowing you to take advantage of their confusion as they change running speeds.
Nair Circle (Sonic Storm): This is the same as Sonic Wave, except the wave goes diagonally downwards and Sonic is not boosted up nearly as much. Use this after bounce attacks or a Sonic Rocket to add a bit more damage onto the foe from a combo.
Sair Circle (Air Sonic Boost): Same as the grounded version, but in the air. Be careful with this one.
Uair Circle (Air Spring Headbutt): Same as the grounded version except the Spring falling acts as a very weak projectile. Since edgeguarding is not an issue, it is not useful for this moveset. Use this with a homing attack or scissor kick for best combo potential.
Dair Circle (Sonic Tornado): Similar to Sonic Wind, except the vortex goes both up and down two Sonic heights and Sonic spins around in a circle in ball form to perform this move. It hits multiple times if foes are caught and launches them horizontally. Try to use this move as a midair wall of sorts to control where your opponent goes.
Throws:
Side Throw: He pins the opponent to the ground and then Spin Dashes onto them, it launches them horizontally, but at a low angle such that they fall prone often.
Up Throw: Sonic heaves the opponent upward and sharpens his quills to stab them. It launches the opponent far upwards, but not as far as the Sonic Upper.
Down Throw:
He spin dashes around the opponent at supersonic speeds forming an air lock around them as they try to keep up. This makes them fall prone from a mix of dizziness and asphyxiation.
Supers:
Level 1 (Light Speed Dash – 150 AP): Sonic calls out, “Ready…” as he charges up a spin dash more quickly than usual as cyan light gathers around him. He then dashes forward a moderate distance in the bling of an eye. Anyone who crossed Sonic’s path dies on the spot. Since it moves so quickly, it can be used as the last hit of a combo even if the opponent is moderately far away.
Level 2 (Pink Spikes – 450 AP): A sentai-like announcer yells out, “SPIKES!” as Sonic transforms into a deadly pink buzz saw. This buzz saw follows the terrain, being able to climb on walls and the ceiling, albeit at a rather slow pace. If you press and hold triangle on the ground, you rev up a spin dash that allows you to move along the terrain faster than a normal spin dash. In the air, pressing triangle will make you do a homing attack, allowing you to close in on opponents more easily. This is good, as Sonic has lackluster air speed in this form. Anyone who touches Sonic dies immediately, so make use of the homing attack to kill anyone in the vicinity.
Level 3 (Super Sonic – 750 AP): He goes into a cutscene where the 7 Chaos Emeralds start spinning around him. He yells out, “Now I’ll show you…Super Sonix style!” He turns into the mighty golden Super Sonic. In this mode which lasts for 12 seconds, the song Live and Learn plays in the background. Sonic can now fly through the air at blistering speeds. If he so much as touches an opponent, they die on the spot. This is easily one of the best specials in the game, but only if you know how to control the speed well. Also, it is quite risky to get to this mode due to Sonic’s high AP costs and low AP attack yield. If you do manage to get it, you may just single handedly turn the tide of the game.
Customizations:
Costume:
· Modern Sonic (Blue, White, Black, Purple)
· Classic Sonic (Blue, Yellow, Red, Green)
· Costume Sonic (Race, Ice, Black Tie, Cheetah)
Taunt:
· He revs up his feet in the Super Peel Out pose and calls out, “You’re too slow!”
· He turns towards the player and waves his finger in a patronizing manner while grinning.
· He click’s his tongue in a patronizing manner while he does a flip and strikes a pose.
Intro:
· He spin dashes onscreen and strikes a pose.
· He stretches, then jumps up and says “Let’s dance!”
· Sonic’s flies his plane, the Tornado, and jumps out of the cockpit as it starts to go off screen.
· There are 2 Buzzbombers flying by, which Sonic attacks with a chain of homing attacks. He lands with his back to the camera, then turns around and smirks.
Outro:
· He pulls out the blue chaos emerald and says “Too easy, piece of cake!”
· He says “Call me again if you want a rematch”, then zooms off.
· Sonic zooms back and forth as he gives a thumbs up, saying, “Sonic’s my name, speed’s my game.”
· Sonic does his complicated breakdance maneuver from his S Rank victory screen in Sonic Generations
Loss:
· Sonic twirls around and falls flat on the ground.
· Sonic shrugs, says, “I’m outta here!” and zooms away.
· Sonic is sitting with his hand outstretched, eyes half-shut, and head shaking.
· Sonic is on his knees with his eyes closed as he punches the ground with his fist.
For the third phase of your MYMerverse, you will be fleshing out your world with a cast of characters who may not be able to be in the lime light: Assist Trophies!
1) You must make at least 2 Assist Trophies from your Universe, including a brief description of the character and what they do once summoned. Who is this, what significance do they have to the universe? What do they add to a fight? 2) Your Assists should interact with your characters in some fashion. The assists must know who the main characters are, I mean why wouldn't they? Include anything you like from a special audio clip / taunt, an attack interaction, somethign they only do on certain stages, the works!
"Hee hee hee! You know what they say: the bigger the explosion, the better the alchemist!"
Plague Knight Explodes Into Action!
Scientific Stats
Size: 6
Weight: 3
Ground Speed: 4
Jump: 4
Air Speed: 10
Fall Speed: 4
Traction: 2
Plague Knight makes heavy use of specially prepared explosives. Each of these explosives contains a unique Powder, which determines the type of explosion they cause. Unless a bomb contains Black Powder, only one of each type can be on stage. Attempting to create a new bomb of the same type will instantly detonate the current bomb. This Remote Fuse can help Plague Knight more precisely damage particularly evasive foes.
Specials: Prime Your Potions!
Neutral Special – Black Powder
With very little startup, Plague Knight tosses forward a small glass bomb. This bomb bounces twice before exploding. The bomb will also detonate on contact with an enemy. Up to three bombs can exist at once, and tapping B repeatedly allows Plague Knight to throw all three as rapidly as possible. On the ground, the bomb is thrown at a low arc, hitting the ground roughly a Bowser length ahead of Plague Knight. However; using this move in midair causes Plague Knight to throw the bomb down at a 45 degree angle, and at double the speed of the ground throw. This throw also lightly pushes Plague Knight upwards. This Black Powder bomb deals 6% and very little knockback. The Black Powder bomb is Plague Knight's main method of offense, being very quick and reliable.
Side Special – Fleet Flask
Plague Knight pulls out a fiery orange potion and quickly downs it, taking roughly half a second. He immediately breaks into a frenzied run, crossing the stage at double his normal dash speed. Running into a foe deals 4% to the foe and trips them. Plague Knight then bounces off of them, ending his mad dash. The Fleet Flask dash can be canceled by attempting to turn around, but this causes Plague Knight to experience some lag as he skids to a halt. This move is intended to help the somewhat slow Plague Knight escape from aggressive foes.
Up Special – Bomb Burst
Once this move is input, there is a very short window in which its trajectory can be set. Once this window ends, one of Plague Knight's bombs explodes in his satchel, launching him a good distance in the chosen direction at Sonic's dash speed. The explosion is rather small, but deals 7% and KO's at 180%. More importantly, this move can be used up to twice in the air. Much like Bayonetta's Witch Twist, the Bomb Burst does not consume Plague Knight's double jump. Thus, the optimal recovery is Burst-Jump-Burst. After the second use, this move simply cannot be used again until Plague Knight lands. This move does NOT put Plague Knight into helpless, and he can use any of his aerials or other Specials immediately after being launched. This move makes Plague Knight the master of aerial movement, but care must be taken to not launch yourself off the screen.
Down Special – Leech Liquid
Plague Knight's HUD boasts a small, green Magic Gauge. This gauge starts off full at the beginning of each stock, and is specifically used for this move. Once the move is used, Plague Knight downs a blood-red potion, suffering 1 second of lag. Plague Knight can be hit during this lag, canceling the move. This potion causes a sinister red aura to surround Plague Knight for 7 seconds. While this aura is active, all of Plague Knight's attacks deal half their normal damage.. However, every attack he lands will heal him for the damage dealt. Leech Liquid is designed to aid the somewhat fragile Plague Knight's survival. Once it is used, his Magic Gauge depletes. In fact, it slowly depletes as the Leech Liquid is in effect; this way, everyone can see how long the effect will last. To replenish the Gauge, Plague Knight must damage his foes. Once he has dealt 75%, his Magic Gauge refills completely.
Standards: Bombs Away!
Jab: Plague Knight quickly swipes with his Staff of Striking, dealing 2% and very little knockback. This move has limited range. However, the incredibly quick startup and endlag allow Plague Knight to very quickly repeat the Jab. Great for damage racking in a pinch.
Dash Attack: With nearly no startup, one of Plague Knight's bombs explodes in his satchel. The bomb imbues him with a purple aura and sends him somersaulting through the air in a very low arc. Plague Knight is completely invulnerable while the aura surrounds him, but it wears off once he travels two Bowser lengths. If used with plenty of space, this move launches him three Bowser lengths. Much like his Up Special, this move does not send Plague Knight into helpless if he launches himself off stage. He can act out of this move as soon as the aura wears off and he stops somersaulting. If Plague Knight hits a foe while covered in the aura, he deals 9% and no knockback. He simply phases through the victim, allowing him to hit multiple targets.
F-tilt: Plague Knight tosses forward a Cascade Powder bomb inside a Whirl Casing. This casing causes the bomb to fly straight forwards a Bowser length before boomeranging back to Plague Knight. This bomb explodes into a bright pink flame that crawls along the ground. This flame covers roughly two Bowser lengths before fading away. The bomb itself does 5%, while the flame deals 7%. Getting hit with the bomb knocks a foe back far enough that they can react to and avoid the flame, if they're quick. This move can be angled up or down.
U-tilt: Plague Knight unleashes a Sparkler Powder bomb in a Float Casing. These Sparkler Powder Bombs do not explode, instead emanating damaging sparks every half second. These sparks deal 6% and temporarily stun their victim. The Float Casing causes this bomb to rise up at an angle until it exits the screen. Unlike other bombs, these simply poof out of existence when the Remote Fuse is used.
D-tilt: Plague Knight quickly detonates a Tracer Powder bomb. This causes two green, Pokéball-sized fireballs to shoot across the stage on either side of him. These fireballs traverse the entire stage, much like a Hothead. They travel at Mario's dash speed and dissipate after 1 second. Should a fireball hit a foe, they suffer 7% and knockback comparable to one of Dr. Mario's Megavitamins. Using the Remote Fuse causes the fireballs to simply vanish harmlessly.
Smashes: For Science!
F-Smash: Plague Knight rummages about in his satchel during the charge. Once it's released, he lobs forward the Big Boom, a massive bomb. This bomb explodes in midair, creating a large plus-shaped explosion. A good visual is the traditional Bomberman explosion. The explosion stretches out roughly a Battlefield Platform in each cardinal direction. Thanks to Plague Knight's strange alchemy, the Big Boom's explosion pierces the stage. The Big Boom deals a frightening 20% and KO's as early as 160%. However, it suffers from some unfortunate startup lag, is fairly easy to see coming, and the explosion can damage Plague Knight if he's not careful. Charging this Smash merely changes the angle it is thrown at.
U-Smash: While charging, Plague Knight pours bright yellow Cluster Powder into a glass beaker. Once the charge is released, he lobs the newly finished bomb at a high arc. Once this bomb hits a foe or solid surface, it erupts into a series of small, tightly clustered explosions, the entire cluster covering an area the size of Kirby. Each explosion deals 3%, with the final explosion launching the victim away with knockback that KO's at 175%. Charging this Smash causes more explosions once the bomb is detonated. At minimum charge, 4 explosions occur, and 8 occur at maximum charge.
D-Smash: While charging, Plague Knight plucks bright pink Component Powder Bombs from his satchel. Once the charge is released, he quickly tosses the bombs to the ground in front of him. Charging this move changes its behavior. At minimum charge, Plague Knight only has time to find one bomb. This creates a bright pink explosion roughly twice the size of a Pokéball. This explosion deals 6% and knockback that KO's around 190%. At roughly half charge, Plague Knight throws down two bombs. This creates a pink explosion the size of Electrode. This explosion deals 12% and knockback that KO's at 175%. Finally, maximum charge has Plague Knight toss down three bombs. This causes a massive chemical explosion the size of Bowser. This explosion deals 20% and KO's at 155%. In addition, this massive explosion launches four projectiles; one in each cardinal direction. These projectiles deal 7% and negligible knockback. This move has a good bit of startup lag and end lag, making it somewhat difficult to kill with.
Aerials: Aerial Alchemist
N-Air: Plague Knight quickly crushes a handful of Sparkler Powder. This causes a large spark of electricity to surround his body for a moment. This pulse deals 6 rapid hits of 1%, and temporarily stuns grounded foes. Aerial foes are simply shoved away.
F-air: A special bomb bursts in Plague Knight's satchel, launching him very slightly backwards and firing a small projectile straight forwards. This projectile has infinite range, and deals 6% and negligible knockback.
B-air: Plague Knight swings his satchel behind him. Should he hit a foe, a small explosion occurs, dealing 8% and knockback that KO's at 175%. This explosion also propels Plague Knight forwards a short distance.
U-air: Plague Knight performs a rising thrust with his Staff of Surging. This takes him upwards his own height. This move can only be used once in the air. Should he hit a foe, they suffer 5% and vertical knockback that can KO as early as 170%.
D-air: Plague Knight quickly conjures a massive beaker beneath him. He then rides it as it plummets to the ground, where the bubbling chemicals within it detonate. This explosion covers an area the size of Electrode, deals 10%, and KO's at 165%. Do note: it is very possible to self-destruct with this move.
Grab: Plague Knight awkwardly grasps forward in a very short-ranged grab. Decently quick.
Pummel: Plague Knight smashes a random potion in his opponent's face. This deals 4%, and is reasonably fast.
F-throw: Plague Knight quickly downs Berserker Brew, a deep blue potion. Emboldened by the concoction, he then proceeds to wallop the foe repeatedly with his staff, dealing 11%. This throw does very little knockback.
B-throw: Plague Knight suddenly vanishes in a chemical explosion before reappearing behind his foe. He then bashes them over the head with his satchel, dealing 9% and leaving them prone.
U-throw: Plague Knight uppercuts the foe with his Staff of Surging. This deals 8% and vertical knockback that can KO at 185%. This throw leaves Plague Knight airborne.
D-throw: Plague Knight roughly drops the foe before casually dropping a Black Powder bomb on them. This deals 8% and light knockback. This throw can be used even if there are three Black Powder bombs on stage.
Final Smash: The Ultimate Potion
Plague Knight holds aloft the Smash Ball as glowing balls of energy fly out of each opponent. These energy balls quickly merge with the Smash Ball and morph into a rainbow potion in a massive, ornate bottle. This bottle hovers above Plague Knight for a moment before he tosses a bomb at it. This causes the Ultimate Potion to erupt into an absolutely massive explosion, big enough to cover 3/4 of Final Destination. This explosion deals 50% and KO's at 160%.
Extras: Hee Hee Hee!
Up Taunt: Plague Knight dramatically pulls a straw from his satchel and plunges it into the potion he carries. He takes a sip, then stows the straw away.
Side Taunt: Plague Knight jumps up and down, pumping his fists with glee.
Down Taunt: Plague Knight slowly waltzes about the stage, wandering back and forth. This taunt is endless, and can be canceled at any time.
•Gave PK some lag on the Side Special.
•The redundant Black Powder bombs have been replaced with other bomb types.
Mako Mankanshoku is a no-star student in attendance at Honnoji Academy and Ryuko Matoi's self-proclaimed best friend. Mako possesses boundless energy and seemingly perfect obliviousness to the world around her. The older child of a poor family in the slums, Mako's father is a sketchy back-alley doctor, her brother a gang leader, and her mom deceptively normal, it's understandable Mako grew to become such a character. Mako's modus operandi are scene stopping sequences set to a remix of the choral piece 'Hallelujah'. These segments are hyper-energized and visual pun-filled pep talks, often rejuvenating Ryuko's moxie.
When summoned from her Assist Trophy, Mako will assume the role of boosting her summoners morale. Mako will suddenly be at the forefront of the screen a la Nintendogs, rambling tirelessly about her summoner's great qualities while performing wild body movements. On top of this diversion, Hallelujah plays in the background and the fighter who summoned her will be immune to damage for the duration of the assist as a result of her pep-talk. This will last for a total of 10 seconds before ending, leaving everyone more motivated if slightly confused.
Mako acts quite a bit differently should she be summoned by a member of the Elite Four, however. Upon summoning, Mako will cross her arms on the stage as if about to perform a pep talk when a wardrobe plummets from the sky onto Mako. The wardrobe serves as a hitbox, dealing 7% damage with minor knockback. A moment afterwards, Mako will burst from the doors of the wardrobe, now decked out in a gorgeous two-star Goku Uniform that looks as though it's been on a very strange adventure. This is no longer Mako, this is now Fight Club President Mako Mankanshoku! Armed with a spiked baseball bate made from brass, Mako fights to keep her family out of the slums, chasing down nearby opponents and slamming them with her bat for solid hits of 11% with great horizontal knockback, able to KO from 85% and beyond. Mako is invulnerable during her assist, and will vanish on her own after 10 seconds have passed.
---
MAIKO OGURE
Maiko Ogure is a no-star student in attendance at Honnoji Academy. Friends with Mako Mankanshoku, she joins Mako and Ryuko on No Tardies Day, masquerading as an injured student who requires help to make it to school on time. As the Mankanshoku family attempts to get Ryuko's kamui Senketsu to her, Maiko repeatedly distracts the family from their goal by using Ryuko's assets on 'accident'. Eventually it is revealed that Maiko is actually unharmed and is Head of the Trap Department of the Disciplinary Committee, attempting to steal Senketsu to allow her to overthrow Satsuki Kiryuin. However, Gamagori overhears this plot and expels Maiko from Honnoji.
When summoned, Maiko will lie on the ground with a pained look on her face, grabbing her cast and complaining endlessly. For 15 seconds, Maiko will be on the stage, rolling in feigned agony for opponents to walk by her. Should they do so, Maiko will dramatically fall over, grabbing the foe for support. On applicable opponents, this will involve a comedic drop of their pants, but regardless the effect is the same, causing the opponent to trip. What a devious trap! Maiko cannot be harmed during this, and will simply vanish after 15 seconds.
If Maiko is summoned on No Tardies Day, however, her 'assisting' will be much different. Maiko will instead leap up with a crazed expression on her face as she pulls out a remote control. As Head of the Trap Department, Maiko is responsible for the majority of the devious traps laid out across No Tardies Day, and when summoned she will use this remote to crank up the intensity of the traps. For the next 10 seconds, the stage will scroll even faster than before, and the sides of the screen will be outlined by spiked panels. These spikes will damage and launch any fighters that are knocked into them, though ultimately prevent KOs while active. This limits the aerial mobility of most fighters and will quickly crank up the damage on assuredly everyone quickly over the 10 second span. Afterwards, Maiko vanishes and the panels retract back offstage as the scrolling slows down.
---
FIRST NATURALS ELECTION
To prepare for her Raid Trip, Satsuki established a new school event, the First Naturals Election. This event effectively removed all students' ranks and allowed upward social mobility by defeating the greatest number of students to attain new ranks. While Ryuko Matoi complained that this event was pointless and not an election at all. While this sort of natural selection Naturals Election could be a good opportunity to mix the leadership up, this is a show and by the end of the event five 'leaders' are seen: Ryuko as well as the Elite Four end the week as the top dogs. Both Satsuki and the writers use this as an opportunity for a tournament arc, and Ryuko goes on a whirlwind tour of buttkicking for the next few episodes following the First Naturals Election. Of course, Ryuko doesn't challenge the Elite Four willy nilly, and the four pillars the Elite Four stand atop are variable in size, with the height increasing for the number of students they defeated over the course of the week. Ryuko challenges them in order from lowest kill count to highest, going from Gamagori to Inumuta to Jakuzure to Sanageyama.
First Naturals Election has a very dynamic stage layout, consisting of any number of pillars in open space. The number of these mid-sized platforms is dependent on the number of combatants in the battle, ranging from 2 to 8 pillars. At the beginning of the battle all the platforms are at the same height, shown by the lowest pillar in the above picture, and each fighter spawns on their own pillar. As fighters deal damage, their own pillar increases in height slowly, raising a Mario's height for every 20% damage dealt. A KO will net double this height increase, not necessarily a reward for the dominant fighter but a way to create a dynamic battleground. The camera will focus on the lowest pillar as a sort of 'sea level' for the stage. As seen, the sides of the pillars are covered in painful thorns, which throw fighters off of them with high knockback, able to KO from 75%, and dealing 6% damage on top of it. This is a hectic stage full of chaotic action that constantly changes the combat dynamic!
Ω
In Kill la Kill, Ryuko challenged the Elite Four on a central platform, rather than the pillars surrounding the stadium. The Omega form of First Naturals Election takes this form, with a decently sized central platform surrounded by two harmless platforms elevated on either side of the stage. There are small gaps between the pillars and the main stage that fighters can fall on, but this stage provides a more accurate display of fighter skills on a consistently flat playing field.
LISTEN UP! Ira Gamagori is one of Lady Satsuki’s Elite Four, a top ranking three star student at Honnoji Academy, and is the Disciplinary Committee chair. Gamagori is a titan and consistently the largest character in the show. His connection with Satsuki started in Junior High, after Satsuki reveals her family has annexed his school, and later they are shown in a fight, with Gamagori refusing to kneel to her. Shortly after, they became good friends, and Gamagori devoted his life to protecting her, even delaying his graduation for 2 years so they would leave the school together. Strict and fanatical, Gamagori shouts nearly everything he says when it relates to Satsuki or the rules of Hannouji Academy. For the first portion of the show, Gamagori seems very antagonistic to the students, and in Kill La Kill’s first scene he mercilessly chases down a student who stole a Goku Uniform and crucifies them at the school’s entrance as an example. Gamagori also acts condescendingly towards Ryuko and Mako in the beginning, giving them an incredibly difficult time regarding rules. However, Gamagori acts the paladin and gives the two a ride after their scooter breaks down, as it is his honor-bound duty to ensure that the students of Hannouji Academy are protected. Some of the time.
Gamagori’s Three Star Uniform is the Shackle Regalia, and he dons the Shackle Regalia Persona Unleashed for his Smash debut. His uniform gains its power through sadomasochistic methods; as his Shackle Regalia, Gamagori can absorb being hit, causing his power to build up before releasing in his Scourge Regalia, which is capable of producing countless thorny whips among other tortuous devices.
STATS
Gamagori is imposing. Within Kill La Kill, Gamagori’s size can only be described as big and fluid, ranging anywhere from the size of a fridge to a building. Here in Smash he tends to be more consistent; Gamagori slightly edges out Ganondorf in terms of height, and is between Ganon and Bowser in terms of width, putting him pretty high up in terms of size. As his girth would indicate, Gamagori is heavy, though perhaps not as much as one would expect from someone so large, and weighs between Samus and Ganondorf, wavering on the heavyweight-super heavyweight line. A large hitbox with slightly disproportionate weight might seem easy to deal with, but Gamagori loves to be hit (more on that later) and appreciates his size. Gamagori also moves with a good amount of… discipline, not particularly rushing to get anywhere fast. His walk is a slow march at Ryu’s speed, and he can clock it in when dashing to just under Link’s run. His jumps leave a lot to be desired and are pretty close to Wario’s. Once in the air Gamagori will not stay for long, and will quickly drop to the ground.
IMPENETRABLE SHIELD
Gamagori’s Shackle Regalia amplifies his naturally rock solid defense, and both this and his devotion to protecting Lady Satsuki have earned him the title of Lady Satsuki’s Impenetrable Shield. In Smash, this manifests similarly to Bowser’s latent defense from flinching, and any similarly low knockback move will only deal damage to Gamagori, leaving him free from most flinch and stuns from such weak attacks. After all, Gamagori’s penchant for punishment has hardened his will, and the sting of such inconsequential attacks has no effect on him.
SPECIALS NEUTRAL SPECIAL - SHACKLE
Gamagori stands tall and proud as many rope-like tendrils erupt from his Shackle Regalia, with sudden speed but no hitbox. Rather than attack the foe, these ropes wrap around and mummify Gamagori in an animation that takes 40-some frames, during which he is vulnerable to attacks. Gamagori remains in this shackled form until using the move again, upon which his bindings will retreat back into his uniform. This animation takes the same as well, meaning Gamagori can be punished during it as well, though he will early always complete the animation during the startup and ending of the move. Gamagori must wait at least three seconds between using Shackle and unbinding himself, and between unbinding himself and using the move again. While bound like this, Gamagori is effectively immobile; he can still walk with tiny steps, but will be among the slowest of fighters in doing so, and his jump barely brings his girth off the ground. Additionally, Gamagori has no attacks in this state. Such discipline. He can still be grabbed in this state, but shackling Gamagori also greatly increases his weight, and takes very little knockback from all but the strongest attacks, even at higher percentages. The Shackle Regalia was designed to be punished, after all.
In fact, Gamagori craves being hit while bound, as this gives him immense strength the more he sustains. As Gamagori endures hit after hit, the Shackle Regalia will demonstrate its absorptive powers by bloating grotesquely with damage. Ideally, this image will disgust opposing players to the point of forfeit at the pleasure of a sadomasochist, but should this strategy for somehow fail this absorption is more than just aesthetic. As opponent attacks engorge the Shackle Regalia, Gamagori becomes increasingly more powerful upon his emergence from the uniform. The Shackle Regalia can withstand a whopping 100% damage dealt before reaching climax, and will be stored between uses of this form but will not carry over stocks.
Once the Shackle Regalia has suffered 100% damage in this state, the comically spherical uniform will explode, launching thorn-coated tentacles in all directions, which stretch out a full Gamagori from Gamagori. A brief but explosive hitbox, detractors of Lady Satsuki will be disciplined for a whopping 20% damage in retribution, and thrown outward with the force to KO as low as 65% damage. As one might suspect, such a devastating move comes with a tell, and right before bursting the Shackle Regalia will deflate for a few frames, signaling any rapscallions to clear out of the way. Additionally, Gamagori’s poor mobility makes trapping opponents with this more difficult, and projectile opponents can (studio) trigger this event from a distance where they are safe. Why Gamagori would use this strategy on a ranged character anyway is for him and him alone to know. After this move’s finale, the spiked ropes recede back into the uniform for later use, leaving Gamagori’s Goku Uniform empty on energy, so to speak. As dominating a move as this is, Gamagori will actually want to stay on the edge for most of this power, as the Shackle Regalia not only provides a powerful attack when stuffed with energy but also buffs this beefcake passively when unshackled, as the absorbed power is held between uses. In addition to statistical buffs, some of Gamagori’s moves vary with charge, and will be covered when relevant.
There are two levels of absorbed power for Gamagori, level 1 being between 1% and 50% and level 2 between 51% and 99%, though the buffs he gain are on a gradient within each level. With the first level, all of Gamagori’s non-special moves receive a .5% damage buff for each 10% increment Shackle has absorbed, starting at 1% [1-10% taken = 1% increase, 41-50% taken = 3% increase]. In addition, the base knockback of Gamagori’s moves increase, effectively shaving off 2% off killing range for moves in those same increments [1 - 10% taken = 2% less to KO, 41-50% taken = 10% less to KO]. Once Gamagori hits 51%, he bumps up to level 2, which has similar buffs but improved. He instead gains a full percent of damage per increment up to 99%, which ranges from 4% damage increase with 51% absorbed to the top end of the spectrum with an 8% total damage boost. Similarly, 4% is cut off of the percentage to kill, which at maximum absorption equals a total of 30% needed to kill. Oh and also Gamagori’s right gauntlet cosmetically catch on fire at level 2. Of course, there are no free rides, and the Shackle Regalia’s strength is expended as Gamagori disciplines his foes; the damage Gamagori deals with his non-Special moves is lost from his Goku Uniform’s supply, meaning he will have to subjugate himself to more punishment to recharge it periodically throughout the fight.
“Well, this is a terrible move; I can just not attack and this big dumb oaf won’t get anywhere in this fight,” someone cries from behind their controller. Dang, you’re right, Gamagori didn’t think that far ahead.
DOWN SPECIAL - DETENTION
Just kidding. Gamagori reaches behind him in a slowish motion, bringing out a smaller student, who falls something along the lines of Jack Naito, captain of the knife throwing club as pictured, in one beefy hand by the head. This delinquent has been held for detention for school inappropriate behavior and will struggle in Gamagori’s grip until dumped on the ground. Once on their feet, these ruffians have a meh 20% health each, and Gamagori can bring out up to three of these at a time. Armed with rundown bullwhips, these students are ready to attack. Gamagori. These students are miffed at the Disciplinary Chair for punishing them and will attempt to return the favor by attacking him. Their attacks are weak, each one only dealing 3% damage and virtually no knockback, allowing Gamagori to sponge the hits and ignore them. While they won’t target opponents they still are hazardous, as the whips are flicked from behind these students into the foreground and then in front of them, giving them the opportunity to strike nearby foes. They are on par speedwise with Gamagori who will be unable to shake them, but this is ideal. One detainee will deal little damage over time, but adding more may become overwhelming to Gamagori as he is nickeled and dimed by the students. Why would Gamagori bring students so lacking discipline? Aside from serving community service to become better citizens, they are very useful for powering up the Shackle Regalia if the opponents are gunshy about attacking. Instead, Gamagori can rely on his prisoners to beat him, all by Gamagori’s desire of course. Try as the opponent might, the delinquents will never bother with any other fighter, solely focused on taking down the Elite Four member and gaining their own Three Star Goku Uniform. Most of Gamagori’s attacks ignore the students, though some have special effects rather than dealing damage. Students will disappear should Gamagori be KO’d.
SIDE SPECIAL - BINDERS
Unfortunately, not every student is as receptive to punishment as Gamagori himself is, and so the Disciplinary Chair carries these thorned rings as a means of forcibly detaining insubordinates. Gamagori pulls one of these rings out, the size of Kirby in radius, but will sufficiently expand to encompass delinquents of any size. With a tap of the move Gamagori will hurl a ring with great force and a mighty grunt in a straight trajectory. Naturally gravity still applies to the binders and will start to descend after a platform past Gamagori until they hit the ground and disappear. They fly very similarly to the trophy stands from Subspace Emissary in Brawl, and also captures the foe it is thrown at, wrapping around them while simultaneously dealing 8% damage. The ring will attempt to wrap around the neck of the opponent if possible, but will settle for any place to reduce movement. There’s no limit to how many binders Gamagori has on the field, as he will discipline a whole army if he has to, and these rings will stick around the stage for seven seconds or until Gamagori loses his next stock. On their own, the rings deal no damage outside of the initial hit, but will affect some of Gamagori’s other moves as detailed later on.
What the rings will do is bind Gamagori’s targets, slowing the foe more for each ring they are held by. Each ring will lower a character’s speed by a scale of 1.1 times, allowing Gamagori to bring troublemakers down to 70% their original speed. The rest of the opponents’ actions are left alone; Gamagori still needs punished and proverbially and literally tying other fighters’ hands eliminates their ability to recharge the Shackle Regalia. While generically useful to practically all fighters, lowering the foe’s speed plays into several of Gamagori’s harder to hit moves, such as the climax from Shackle, and gives the lumbering Gamagori an opportunity to keep the foe close by. While there is little consequence to Gamagori hurling binders all over all day long, they deal little damage and outside of slowing foes only serve to disrupt opponents.
Gamagori can also hurl these to snare Gamagori’s disobedient students, giving them a chastising collar, and as with opponents can be stacked up to three times. This is one of Gamagori’s moves that does not actually damage his students, purely for utilitarian purposes. With one or two rings, the students will be slowed down similar to foes, but the third ring fully immobilizes these students, binding their neck, arms, and legs, leaving them at the mercy of Gamagori’s whip. Because the damage done to Gamagori can get out of hand in a battle, this is a good way to give the Disciplinary Chair a breather. Additionally, securing his students gives Gamagori some leverage in his other moves, as will be explained shortly.
Holding the move, rather than tapping, allows Gamagori to pull out a Binder and hold onto it. Tapping the move will have him throw it as normal, with slightly less startup, and holding it will have Gamagori put the ring away again.
UP SPECIAL - FLAGELLATION
When students break the system, Gamagori breaks out the whip. Tapping this input on the ground has Gamagori extend one spiked tentacle from his Shackle Regalia, and sharply crack it like a whip in the direction of the nearest target within a Gamagori radius, prioritizing opponents followed by detained students. Though not overly strong, opponents will remember the sting of the whip, which deals 4% damage with very minor knockback. Gamagori doesn’t want them missing out on any of their punishment, obviously. Once the whip has been used it will remain out hanging harmlessly behind him as long as Gamagori stays alive or until the opponent destroys it. These whips do only have 20% health, after all, and are pretty easy targets for opponents. The number Gamagori can have out at one time ties directly with the amount of damage the Shackle Regalia has absorbed. At 20%, Gamagori gains another whip, and this continues until 80%, giving him a total of five to maximize punishment. If Gamagori has less than the maximum number of whips he can with his level of charge, this move will generate a fresh one, while he will cycle through and whip with older ones if he has all of his possible whips extended. There is no gameplay difference between new whips and old whips, however. When used in the air, Gamagori will perform a short leap, about Little Mac’s first jump, before launching one of these thorny tendrils at a 70 degree angle upwards. This will produce a new whip if possible, and functionally acts the same as the grounded version but with a starting lift, and will latch onto ledges and reel Gamagori in if possible, his only saving grace from his plummeting girth.
By holding the move rather than tapping it, Gamagori will go into a torture frenzy, similar to pictured above, as the whips rapidly… whip in the direction held after the attack. The more whips Gamagori has out, the faster this move works, and will pelt opponents with the same 4% damage with a bit of push behind it. With only one whip out, this move functions identically to simply pressing the move over and over again, but without the satisfying press of the button each time. However, the whole point of this move is to perform a vicious onslaught of whipping, and at maximum whippage Gamagori will be striking five times a second! This is a great move on cornered opponents; those cowering against a wall will suffer the wrath of the Disciplinary Committee while those at the edge of the stage may be forced to jump by the coercive force of Gamagori’s whips. Gamagori performs a power stance while performing this version of the move; this gives some significant ending lag after the move ends while he returns to being an upright student, so he best not use this move recklessly.
Gamagori’s binders serve as targets for his whips; with multiple targets within whipping range, the Shackle Regalia will preferentially pick targets with the most rings around them, and for good reason. In addition to dealing the standard 4% damage, his whips will wrap around these rings, anchoring whoever the target is to Gamagori. Often, this will be accompanied by a deep, sadistic laugh. Until the whip is destroyed, the ring will not disappear automatically as it normally would. Anyone bound by this whip is thusly tethered to Gamagori, though with a good deal of flexibility. While the whip only has one Gamagori of range, lighter opponents will be able to travel two and a half Gamagori’s before the range restriction sets in, while the select heavier opponents than Gamagori can pass this limit and drag Gamagori around instead! Any attack that deals enough knockback to either end of the whip to travel the full radius of the whip will break it, as expected. While not very restricting, Gamagori can shave half of himself off that range for each additional ring around the opponent, limiting them to one and half at a full five rings. When a foe is released by any means from the whip, they will assumingly mutter some safe word to Gamagori and will be ungrabbable for three seconds, in addition to needing rerung with the Binders.
Gamagori can leash up as many targets as he has whips, up to five, though the held input of this move differs; rather than a rapid whipping motion, Gamagori will grab his whip with both hands and will drag opponents towards him. On the ground, opponents will be unaffected outside of the range from Gamagori being shrunken, and will not have any attacks or animations interrupted. The minimum range on these whips is Gamagori’s size away from himself, though with his massive arms he will have no trouble reaching foes at this range. Aerial opponents, however, will be yanked straight out of the sky to the ground, the impact dealing a weak 3% damage and flinch. This will not shorten the whip, which gives opposing players a choice on which fate is worse. It should be noted that if Gamagori has multiple targets bound and attempts to reel one in, he will grab all whips and pull them equally, meaning Gamagori must be ready to go all in during a free-for-all.
Gamagori can still switch to his Shackle Regalia while other characters are bound to him, and they will be quickly drawn into the Regalia and vacuum-sealed against his body as pictured above. This is incredibly uncomfortable for both opponent fighters and their players as the wrappings get tighter, attempting to strangle them. Foes take damage for every half second they are trapped, starting at 2% and doubling each time until they escape, though this maxes out at 8% and will cease dealing damage. Opponents can escape by mashing as with any grab, though this one has 1.5 times the normal difficulty to escape. The mashing is also visualized by the fighters struggling from within the Goku Uniform, and will even deal damage to Gamagori! In fact, while pinned against his nude body they can skip past his Goku Uniform and attack him directly! The struggling will deal 4% damage to Gamagori, but his Shackle Regalia will double the energy it absorbs from enemies within it, meaning that each use charges the uniform by an equivalent of 8% damage. This allows Gamagori to very quickly build up his power against the foe’s will, though should he pass his climax all bound fighters will be at the epicenter, preventing them from being struck by the final attack. Gamagori can release his detained prisoners at any time by unshackling himself, which will dump them back into the battle, and conversely he will be forcibly removed from his shackles if an opponent successfully escapes.
SMASHES FORWARD SMASH - THE PERFECT STUDENT
Gamagori opens his arms wide while charging this move, as his gauntlets shift into a mold not unlike an iron maiden. This mold is designed to shape nonconformists into the perfect student forcibly, typically as a last resort. With an obvious and laggy start up, release will have Gamagori slam the two halves of this mold together, pinning anyone between them. This is a strong move, able to deal between 16% and 22% damage and can KO at 70% at full charge. Gamagori will often shout a personalized statement of the target’s sins on hit (YOUR UNKEMPT FACIAL HAIR DEFIES HONNOJI ACADEMY'S DRESS CODE!), chastising them for poor behavior. This is laggy on both sides, making it not always the reliable option and allowing Gamagori to be punished in the bad way. His binders, however, can make up for this, slowing targets and making them generally easier to smash, and the same goes for binding them with his whips.
While opponent fighters are too strong-willed to be molded into the perfect student (pictured above), the delinquents that Gamagori brings are the perfect candidates to reshape into model behavior. Rather than dealing damage, this move will take Gamagori’s students and fully seal around them, as a puff of steam is emitted from the gauntlets. After a moment, they separate, revealing a perfect student with a new lease on life. These students are the same size as the delinquents, but now don a gorgeous One Star Goku Uniform and have had their loyalty aligned with Gamagori’s. Their health is reset as well, bringing them back up to 20%. No longer attacking Gamagori, their focus will be on helping to discipline the foe. Still armed with their whips, the one star students will seek out foes and pester them with cracks of their weapons, effectively the same as Detention but at a much slower rate, whipping about once a second. This gives the targets time to savor and appreciate their punishment, but from a technical standpoint also means they won’t be forever’d to death by these one star students.
Like the no star losers they descended from, these superior students can be snagged by Gamagori’s binders, which will slow their speed down as it normally does. While Gamagori can’t remove the rings from targets, his mold will destroy the binders upon hitting any target, meaning should he use three to fully paralyze one of his delinquents he will have a fresh start once they’ve been rehabilitated through this move. Why would Gamagori want to ring up his loyal students? Well, when a one star student is leashed to Gamagori, they will not be taken into Shackle unlike foes and delinquents. Instead, the students will drag Gamagori in the direction of the side of Gamagori they are on (if they are left of Gamagori, regardless of if they are facing forwards or backwards, they will drag in that direction). If there are multiple students bound to Gamagori, they will drag in the majority’s direction. The number of students tied up influences how fast he is pulled around, ranging between Gamagori’s walk speed with one and Falco’s with three. Should the students reach a ledge, they will turn around and being pulling from a stationary position, with the move only ending if there is no more room to pull, Gamagori unshackles himself, or if the one star students are defeated. This is a tradeoff; while bound, the students have limited range to attack foes, but give Shackle mobility. Gamagori can approach foes while essentially untouchable. This is especially true if Gamagori is tugged along right before bursting, making it difficult for opponents to evade the blast.
UP SMASH - LASH OUT
As though charging up a massive uppercut, Gamagori assumes a close-fisted squatting stance while charging this move. Upon release, Gamagori lifts one meaty hand into the air with great force, pointing up at a roughly 70 degree angle. Opponents will be struck for 14-20% damage. This can KO around 120% at full charge, though a fairly small, and precise range with limiting lag make this a hard move to utilize. Luckily, with any of his whips from Flagellate out he can help burst this move. Each whip he has out will lash out 10 degrees above the last, with the first whip striking 10 degrees above Gamagori’s hand. These whips are staggered, a few frames apart, and look pretty awesome with all five possible creating a mesmerizing arc of punishment. The whips are toned down a little bit, dealing between 10% and 14%, with a real blow to knockback starting to KO at 145%. After the initial move, Gamagori can cancel out of the whipping animation at any point by dodging.
What should happen with someone bound by a whip when this move is used? Gamagori will improvise and lash out with them, quickly striking with them like a weapon before returning to a normal battle stance. This can be delinquents, one star students, and even opponent fighters, and they will all increase the damage of the move to the 15% to 21% range, with a huge boost to knockback, able to vertically KO at 80%+. If an opponent is whipped upwards and hits a surface or other character, they will also take damage from the collision, though this is a static 6% with obviously no actual knockback. his is very threatening, but comes with a few caveats. First, there is significantly more lag on a whip which has bound a target, almost double the normal speed of a whip. Secondly, should an opponent be lashed upwards they will be automatically released at the end of the attack, kicking in their safe-word invulnerability to being bound again.
DOWN SMASH - THE RULES
Gamagori pulls out a small rulebook, rapidly pawing through the pages while charging the move. Once released, Gamagori slams the open book downwards for all to see, doling between 5% and 7% damage. Foes are also popped back a bit, though not by very much. After a very brief moment, Gamagori shouts at the top of his lungs some generic school rule, such as 'NO RUNNING' or 'BOW BEFORE LADY SATSUKI', and in the background behind Gamagori large red block kanji appears with a musical cue. Does this kanji restate the rule? Probably! The character is a bit larger than Gamagori on all sides, and while in the background will still function as a hitbox. The main strike of the move, the kanji will deal from 11% to 16% damage at full charge, and can KO at 115% and above. The lettering disappears after a fourth of a second. Foes may want to actually get in at the beginning of the attack, as even if they are hit by the book they will take less damage than the kanji portion of the move and, unless they are a fighter on the heavier side, will often be knocked out of the range of the second part of the attack.
Following the attack, Gamagori will continue to carry around the iron clad rulebook as an item which he can hurl at opponents. The book will deal a mediocre 5% damage, but for a free projectile that’s better than nothing and the damage is buffed by Shackle. Gamagori can hit delinquents from Detention with the book as well, and the sheer weight of the rules of Hannouji Academy will defeat them in one shot. Gamagori can also throw the book at one star students, but will not damage them. Rather they will catch the book and use it as a kind of insurance. A one star student will hold onto a rulebook indefinitely, and should an opponent hit them while holding the book, their mischief will be noted.
For each 10% damage the foe deals to a student bound to a rulebook, they themselves will take additional damage from attacks by a factor of 1.05. This stacks technically endlessly, but after three seconds of not damaging rule abiding citizens the damage boost will drop a level. The rules, as mentioned, are ironclad and provide armor to the students who hold them, boosting them from 25 HP to 35 HP. Though, with no means of recovery, there’s only so much trouble foes can get into. While the damage boost is nice, this is really to pressure foes into attacking Gamagori directly, as they are punished less directly and, if they can kill Gamagori, they will eliminate any students pestering them as well.
STANDARDS JAB - CRACK THE WHIP
Gamagori’s jab has him throw out two quick punches, one a straight forward punch and the other a rapid uppercut. Each punch deals 3% damage, with very little knockback, even after Shackle’s buffs. Gamagori can continue to use this jab, after which he will hold his arms forward as two thorny whips extend from his gauntlets. Gamagori then flails and flays with these whips incredibly quickly, similar to the image for Flagellate from above. The range on this move is much less than that of other whip moves, only hitting directly in front of Gamagori about half a platform. The whips start at 1% damage, and are certainly impacted by Shackle, but the fast hits will stale out pretty quickly regardless, plateauing back down at 1%. Gamagori can shred with his whips as long as his heart desires, and once done with the move he will perform a finisher by bring both whips down in front of himself. This final hit deals 3% damage and strong horizontal knockback, starting to KO from center stage at 140%. After the move, the whips retract back into their gauntlets.
FORWARD TILT - REALLY GIANT PUNCH
Gamagori throws a solid punch forward with his massive arms and leaning in with his whole body with quite a bit of range, roughly as far as Gamagori is wide. This range helps alleviate some of the starting lag the move possesses, keeping this staple from becoming obsolete. This punch veers down to the ground as it travels, and should it connect with a foe will deal 9% damage. The downward knockback will throw foes back up off the ground, and can start to kill around 145% damage. On its own, this move is slow and predictable, and only becomes a staple of Gamagori’s through the buffs provided in the set.
While the Shackle Regalia is at level 2 of charge, Gamagori will smash the ground with his titanic fist, creating a fiery shockwave in front of him. This shockwave travels across the ground very quickly, subsiding after about a platform’s distance. The shockwave is low though, low enough that most foes should be able to hop over it with no problem. When the shockwave does hit an opponent, it will deal out a tasty 10% damage and vertically throw them with the force to KO at 140%. Since the shockwave only exists at level 2 of Shackle, this is the move’s damage from 51% absorption to 60%, and will scale past that accordingly.
If Gamagori uses this and has any free whips lingering around, he will stab them in an arc in front of and above him. He won’t use whips bound to opponents or students, only those which are fully free. The first whip will shoot forward straight ahead of Gamagori, and the rest will line up sequentially above the first. The whips come out during the second half of the punch, and strike foes for 6% damage but high knockback, starting to KO at 130%. This gives this move a ridiculous number of potential hitboxes. Also the whips are great for catching foes who leap up to avoid the shockwave from this attack, and can even combo at low percentages off of the shockwave. This is a great move for Gamagori to throw out when he’s more established, covering a massive are in front of him with good damage and knockback, but earlier on he will be left vulnerable on misses with the laggy move.
UP TILT - SPIKED PUNCH
Gamagori interlocks his hands in front of himself and swings them up above his head. This swing is the initial hitbox; Gamagori hits opponents for 4% damage and pops them up into the air at all except very high percentages. After swinging his fists up, Gamagori pauses for a few frames over his head before swinging his hands back down. This second hit has more power than the first hit, and smashes into foes for 7% damage with a powerful meteor smash. The move leads into itself well, keeping foes nearby for more follow ups. There's actually fairly brief ending lag on this move compared to Gamagori's others, though his options for long combos are limited and usually just allows Gamagori to lead into a Smash.
If delinquents are nearby, Gamagori can keep foes close to him so they can feel some of his punishment from the no star students, as they whip much faster than the one star students that seek out opponents. Of course, this move is also a solid edge-guarding tool and in general is a safe move for Gamagori. At level two of Shackle, the second half of this move gains different properties in addition to the damage buff. The overall speed of the move remains unchanged, but after the initial hit Gamagori will swing his arms around to the side instead of overhead. While this has less of a hitbox, this sideways motion will launch opponents rather than spiking, and at the very start of Shackle's second stage buff will begin KOing at 125% damage.
This move can change if Gamagori has any free whips out as well. The first half of the move goes as planned, but Gamagori grabs a whip with his hands before swinging them up. This changes nothing in the initial hit, but the follow up hit gains a much longer hitbox, equal in length to Gamagori as one might guess. The whip gives great range at a decrease in power, with damage starting at 5%. The whip also will not spike opponents, but deal acceptable horizontal knockback that can KO starting at 155%. The whip tends to be useful at lower charges for Gamagori, adding a KO hitbox to a move that otherwise has none. However, at stage two of Shackle the sideways punch persists, causing Gamagori to crack his whip to the side rather than downwards. While the range of this is the same, the whip is only active at the end of the move, rather than the whole way being swung.
DOWN TILT - TITANIC STOMP
Gamagori lifts one of his legs up and, in a matter of 18 frames, stomps down onto the ground with great force. This is a fast, striking any opponents directly in front of the disciplinary chair for 7% damage and weak diagonal knockback. This move leads into others well due to the short knockback, and can be used to set up a stronger hit after disrupting an approach due to a very brief ending lag.
At Level Two of Shackle, Gamagori will perform the stomp as normal, but a circular shockwave around him will burst from the ground. The shockwave hits about half a BFP on either side of Gamagori, launching opponents upwards while hitting them for a starting 10% damage. The power of this move scales with Shackle's charge as with the Forward Tilt, and the vertical knockback can KO starting at 140% damage. This shockwave actually occurs all at once rather than traveling along the ground and reaches up to 1.5 times Kirby's height.
With free whips out, Gamagori will have the option to input this move multiple times before it ends. Rather than stomping repeatedly, Gamagori will cross his arms quickly and, for each tap of the input, will stab one of his whips into the ground in front of him. The whip reaches farther in front of Gamagori than the stomp itself does, giving some more range to the move, and can be used indefinitely. Each stab of the whip deals 6% damage with sharp knockback, able to KO from 125%. While the transition to this portion of the move is seamless, Gamagori does suffer from some ending lag after using the move, and unlike a looping jab this move has no special finishing hit.
DASH ATTACK - THE SHIELD
Gamagori brings his forearms in front of his face as he leans forward into his dash. Gamagori's speed picks up a bit as a fiery aura appears in front of him. A short range dash attack, this move carries Gamagori forward just under a BFP's distance, upon which he will stop on a dime. Gamagori's whole body during this move is a hitbox for 8% damage, with a sweetspot on his frontward facing arms for 11%. The act of slamming into the foe with such force will launch them backwards with great force, starting to KO at 110% from center stage. Hitting the foe with any part of Gamagori aside from his arms will deal significantly less knockback, keeping the foe close by.
At Level Two of Shackle, Gamagori's gauntlets will actually expand and create a whole spiky shield similar to the perfect student mold from the Forward Smash. This shield covers the entirety of Gamagori's front and then some, reaching from the ground to just over his head, turning him into a beefy snowplow of punishment. The damage and knockback on this move scales normally, but the increased sweetspot gives this move much more oomph. Additionally, the shield that Gamagori forms serves as an actual shield, blocking most projectiles and giving Gamagori superarmor on the front flank of his attack.
AERIALS NEUTRAL AERIAL - WHIPLASH
Gamagori lifts one of his massive hands above his hand as a whip extends from his gauntlet. Gamagori wraps his fist around the whip and forcefully brings it down in front of him. The action is pretty quick, especially when compared to many of Gamagori’s other moves. The fist itself is a weak hitbox, slamming on foes for 4% damage though it has a nice meteor smashing property that Gamagori can attempt to use to permanently punish offstage foes. The whip itself is an extended hitbox, stretching out about a fourth of a platform from his hand, and while it does not have the same spiking effect it does deal more damage, starting at 12% and increasing through Shackle.
In addition to the damage buff, the more Shackle has absorbed the longer this whip will be. This is fairly minor through the attack, adding another fourth of a platform for every 1-20% increment, until Shackle Regalia reaches 99% and maxes out at one and a half platforms in length. This is great for pestering foes from a distance, but the longer that this whip becomes the more lag it has on the end of the move as the whip retracts back into Gamagori’s gauntlet.
FORWARD AERIAL - DISCIPLINARY CHAIR PUNCH
Gamagori pulls one big fist backwards, pausing for a brief moment before launching a high powered punch forward in an animation very similar to a sped up Falcon Punch. With this punch, Gamagori will inch forward a bit, traveling about a fifth of a platform. Opponents will not appreciate being hit, with damage from this move starting at an impressive 15% damage, and knockback to match which can KO at 115% and above! As one might expect, there is a downside to this move, and that is that Gamagori will experience a good chunk of ending lag, leaving Gamagori open on whiffs.
At Level Two of Shackle’s buffs, Gamagori will use his flaming fist to punch, creating an even stronger appearance of everyone’s favorite bounty hunter. In addition to the damage boost, the punch will now travel further when used, boosting Gamagori to a whole platform ahead of himself. This makes it harder to avoid the move and harder to punish, as Gamagori actually travels a relevant distance now. While it can be used one time as a semi-recovery option, the move’s lengthy ending time make it impractical to navigate the air with.
UP AERIAL - OVERHEAD PROTECTOR
Gamagori reaches over himself and performs a backhand with one massive knuckle, swinging his hand in a 90 degree arc above him. This is one of Gamagori's quicker attacks and is a decent anti-air move, dealing 14% damage with nice backwards knockback that can KO at 140% and above, though improves with Shackle's buff. This backhand has sex kick properties gradually weakening it down to 9% damage at the end of the swing. However, at level two of Shackle's charge, Gamagori sheds this property in addition to the damage boost, dealing consistent damage throughout the entirety of the move.
With any numbers of whips out, Gamagori performs the only logical addition to this move, grabbing one and swinging it overhead. As stated innumerable times, this whip is a Gamagori in length and lags a bit behind Gamagori's hand, so foes are knocked out of the way of the whip typically if hit by the hand. The whip starts damage at 9% but possesses a reverse sex kick property, allowing it grow up to 14% damage at the end of the move. The knockback is greatly diminished as a tradeoff, however, and only starts KOing fairly high at 185% before any Shackle buffs. The whip actually gives an increase on the ending lag, also to help makeup for the increased range on the move.
BACK AERIAL - BACK BREAKER
Gamagori carries the weight of his punishment on his back, and uses this weight to give a powerful backwards thrust power. Gamagori doubles over as his massive shoulders and back expand just a bit bigger, a la the Super Mario fighters. This has very little disjoint as one would expect, but certainly makes the range up in damage, starting off at 15% damage. The knockback leaves a lot to be desired, only starting to KO at 160% and above, and while quick on the startup has ending lag on the lengthy side as he stretches out and cracks his back back into a position with an audible snap. On a successful hit, much of the spinal recoil is mitigated, so this move should be used at the right time for maximum benefits. But then again, shouldn't every move?
Gamagori gains more utility and range from the move when used in conjunction with his whips. Any of his whips, so long as they are not attached to opponent fighters, will splay out behind him like tendril-y wings. As mentioned numerous times throughout this set, these whips reach out from Gamagori by his own size, considerably adding to the reach of this move. The whips themselves deal less damage than Gamagori's back does; at a static 10% damage that does not scale with Shackle's punishment, there's certainly a trade-of. The whips do make up for it with sharper knockback at earlier percentages, always starting to KO at a consistent 130% damage. On top of that, any of Gamagori's students who have been snared are fair game for adding some bulk to this move as well, and boost the damage of these whips on a sweetspot to 15% damage with a knockback boost that allows KOs from 110% on. Both the naked whips and those adorned with students give this move an unfortunate lag boost, with the students clearly giving a bigger proportional recovery. The range tends to make for a safer move, however, giving a berth of safe space behind Gamagori for him to recover in.
DOWN AERIAL - AHAHAHAHAHAHA!
Stretching his arms out as pictured above, Gamagori plummets down chest first for a long distance; typically he will hit something solid or fall off the stage before running the range out on this move. As one might expect from the title, Gamagori laughs with hearty sadism while falling, eager to smash any misbehavers into the ground. Enemies of the rules are smacked by Gamagori’s massive hitbox for a nice 10% damage, though not typically a killing move. It is fast, as fast as Gamagori’s falling speed, meaning it can be great to catch foes unawares. Even better is that Gamagori can use this as a highly effective suicide move, as he can drag any foe he outweighs down with him if they are bound by his whip. Of course, Gamagori will always die first, breaking the whip, but at short ranges this should be enough to put opponents in a bad place for recovering, often leading to their demise as well. Gamagori should use this move strategy sparingly, only when the whip between him and the foe is close to minimum length and in a chaotic aerial fight offstage, as they will have far less time to react to a suicide tactic like this.
Should Gamagori hit the stage while falling, he will devestatingly belly flop and create a shockwave just around him which deals less damage at 8%. In exchange, opponents are popped vertically by this shockwave with enough force to KO at 125% and above. Unfortunately, it is difficult to recover from such a landing, and the move has incredibly poor ending lag, leaving him wide open on a whiff.
If Gamagori uses this move and brushes by a wall, he will reach out and grab the wall with his hand to slow his descent before entering a wall cling as he grips the stage with great force. Opponents who are tethered to Gamagori will fall past him and dangle beneath. While very situational, this can reverse the death order from a suicide tactic, ensuring the foe will die before Gamagori if they fall afterwards. As it has become relevant, should opponents be stranded in the air from Gamagori’s whips they will be considered endlessly jumping, and will not go into a helpless state from their own attacks to prevent any absurd stalling. Obviously, they will still be unable to use recovery moves repeatedly, unless it is the nature of said attack. Opponents who are left in this state for long enough, however, will have ample time to break their bondage and counterattack on Gamagori. Gamagori can only cling to the wall in this way for three seconds, as with most wall clings.
At level two of his Shackle Regalia, Gamagori will use his flaming fist and perform a downward punch upon reaching the stage. In addition to the increased damage and knockback, Gamagori will suffer much less landing lag, giving him a much better turnaround on the move. Additionally, Gamagori’s fall speed during this move is increased to that of Captain Falcon’s.
GRAB
Gamagori performs a simple but enthusiastic grab forward with a massive hand. On most characters, this results in Gamagori lifting them off the ground by their head, though he will settle for any variety of applicable manhandling. Despite the gravitas, this is a standard midspeed grab that serves Gamagori dutifully. Conveniently, the hand Gamagori grabs with is the same hand which ignites at level two of Shackle. In this state, this grab remains the same but faster, making it much more dangerous.
Gamagori's pummel is lengthy, as he uses his free hand to lash out with a whip extended from his gauntlet. The crack of the whip strikes foes smartly, dealing a sound 4% damage on hit which doesn't scale, and while nice damage the pummel comes out slow as expected, a duration of 30 frames. At level two of Shackle, the pummel does get a double whammy of a buff, both boosting damage up to 5% and increasing the speed it comes out to 24 frames. While this seems entirely unfair to enemies, this is actually a terrible way for Gamagori to spend his build-up, dribbling his buff away on ultimately inconsequential hits.
If Gamagori pummels a foe while holding one of his Binders in his hand, the initial pummel will be forcefully pulling the ring onto the opponent. This comes out a few frames faster than the normal pummel, and deals slightly increased damage at 5%. However, this action will never increase damage with Shackle's buffs, even at the second stage. Granted, this is essentially the buffed version of the pummel already, but Gamagori only offers so much with a pummel. Obviously, this is an effective way to get a binder or two on opponents if Gamagori lacks the competence to hit them with his Side Special, but trades off for a lower damage and range. Gamagori can grab his students in addition to opponents, allowing him to bind them as well, although they ought to be easier to hit than foes with the Side Spec. Thankfully, for both longevity of the students and for maintaining his build up, Gamagori's pummels deal no damage to his students.
FORWARD THROW - DOWN TO EARTH
Gamagori tosses the opponent 'gently' into the air in front of him, dealing no damage. Immediately following, while the opponent is floating in front of him, Gamagori brings both fists down in a powerful spike, hurling opponents back down to earth. This is a high damage throw, dealing one hit of 5% damage on hit and another 4% as the foe hits the ground. The foe will pop back off the ground a bit, giving Gamagori access to some follow ups such as his Down Tilt but this move lacks any serious killing potential outside of ledge plays.
At Level Two of Shackle this move gains a great buff to its power. In addition to the damage buff, the opponent is hit much harder, launching them off the ground vertically with the potential to KO from 125% damage and above. Of course, this limits Gamagori's ability to combo from this move.
A more esoteric use of this move involves throwing Gamagori's own students off stage as a projectile means of gimping recoveries. Gamagori can do this with opponents too but students are easier to work with and actually are applicable in a 1 on 1. When a thrown entity hits an opponent with this move, the latter of the two will be weakly meteor smashed down after taking a 6% damage and both will continue falling downwards.
UP THROW - TENDERIZER
Gamagori lifts the opponent above his head with one hand as he curls his other into a fist. In a moment Gamagori launches a punch into the foe, dealing 2% damage as he pulls his first hand back, preparing for a second punch. Gamagori continues this punching cycle for four further punches, a total of five which add up to 10% damage. These punches are lightning fast, all five taking the course of 20 frames to complete. This throw does not possess killing potential on its own, and does will simply fall back to the ground under normal circumstances, allowing Gamagori follow ups. Gamagori can perform this throw on his students, who will remain over Gamagori for the course of the attack. A combination of the student's hurtbox and Gamagori's disjointed arms can help block aerial approaches from opponents for a brief time.
With any free whips out, Gamagori will be able to input the standard input repeatedly, and doing so will have him continue attacking above him by stabbing the whips upwards as with his Down Tilt. These hits are slower than the punch and each one is considered its own attack with individual knockback. Each whip strike doles out 6% damage and will eventually push foes out of the attack. This can deal more damage or protect Gamagori for longer with his students, usefully extending the duration of the move as long as Gamagori desires. The more whips Gamagori has the faster this move goes.
BACK THROW - POWER THROW
Gamagori begins this throw with a wind-up, swinging whatever he has in his grasp around in rapid blurry circles. This spinning motion by itself will deal a non-scaling 3% prior to the actual throw. After this spinning Gamagori pivots on one foot and hurls his captive behind him with incredible force. The act of hurling the opponent deals an additional 8% which does scale with Shackle, and has incredibly high backwards knockback, able to KO at 95% before any Shackle buffs. Thrown foes who hit other opponents will serve as their own hitbox, ramming into others for 7% damage and decent knockback, launching the second opponent with force to KO at 135% and beyond. For each of Gamagori's Binders attached to the target who is thrown, the damage is boosted by 3%, maxing out at 16% damage, and the knockback scales up to knockout at 105%. However, the secondary impact will halt the original victim's flight, dropping them down in the air. Gamagori can perform this throw with his students, of course, allowing him to use them as potent projectiles. Missing with the students will likely throw them all the way offstage, backfiring and eliminating Gamagori's student body.
DOWN THROW - 40 LASHES
Gamagori drops the opponent prone on the ground in front of him, dealing an initial 3% damage. Following this first hit, Gamagori lifts one foot and grinds the opponent into the dirt for a second hit. The second hit deals an additional 4% damage and a weak bit of vertical knockback, typically leaving opponents open for more punishment from Gamagori. If used off a ledge, opponents will be dropped, though without any meteor smashing, with a 3% hit added on. On its own this is a simple throw that sets foes up well for some short combos, but as expected by the majority of this moveset Gamagori can bolster this with his sadistic sensibilities.
If Gamagori has any whips out, rather than stomping on the foe and launching them up a bit, Gamagori will pin the opponent under his boot. While holding them on the ground, Gamagori will lash out and whip the foe with each of his thick extensions. Each one hits for an additional 2% damage, adding a maximum of 10% damage to the throw, and the final hit will slap the whip with increased gusto, launching opponents at the Sakurai angle with the force to KO from 125% and onward.
FINAL SMASH UNRESTRAINED EGO BLAST
Gamagori has the Smash Ball and his muscles seem especially rippling!
In fact, his muscles take a face of their own in a very bizarre visage for the duration of this move. Gamagori accents this Final Smash by shouting 'FACE THE FULL FORCE OF MY EGO BURST!'. For the next five seconds, Gamagori will launch a glowing projectile in the shape of his face every half second, similar to Blastoise' Pokeball attack. Gamagori can aim this assault in a 180 degree arc in front of him. These blasts have endless range. Each shot will push Gamagori back a little bit from the recoil and with good reason, as each projectile deals a solid 20% damage on hit, often hitting multiple times on foes. On top of that, the knockback increases as the attack goes on, with the first shot starting to KO from 105% and the last (tenth) hit able to kill from 65%. Foes beware! After the attack ends, Gamagori regains his focus, asking himself 'Where was I?'
FLAVOR
Entrance - A pink Cadillac convertible pulls up to the stage out of nowhere, with Gamagori in the driver seat. As Gamagori exits the car, he lifts the vehicle with one hand and hurls it up off-screen. Gamagori is then surrounded by glittering stars as his school uniform is replaced by his Shackle Regalia. Boxing Ring Title - Satsuki Kiryuin's Impenetrable Shield Up Taunt - Gamagori crosses his arms and scowls, and a clear sound of a whip cracking is heard in the background, accompanied by a disembodied scream. Gamagori's frown quickly switches to a sadistic grin as he returns to fighting stance. Side Taunt - Gamagori pulls out a copy of Honnoji Academy's rulebook, pawing through it with a pensive look on his face for a few moments. Gamagori then nods his head and puts the book back away. Down Taunt- Gamagori drops on all fours in a quick motion, shouting 'I'VE BEEN A BAD BOY!'. This taunt lasts for a bit, nearly two seconds,and in addition to disrespect will actually give Gamagori charge on Shackle if hit during the taunt. Gamagori does not have any armor on this taunt, however. Victory Pose A - A close up of Gamagori's face is seen with a great grin on his face. Light emanates from a point behind him with the silhouette of Satsuki at the center of it. The camera pans out a bit and shows Gamagori holding a whip in his school uniform, cracking it with delight. Victory Pose B- Gamagori is seen in his Shackle form, whipping himself repeatedly. As he does so, his Goku Uniform expands outward, slowly pushing the other fighters' portraits away and engulfing the screen in darkness. Victory Pose C- Gamagori is seen lifting a barbell for the duration of the victory screen. Defeat Pose - Gamagori politely claps for the victor with a neutral look on his face. Victory Theme - 1:11 - 1:19 of goriLLA jaL
Ira Gamagori had a pleasant look upon his face as he strode through the park with his arms behind his back. Once the proud Mushroom Kingdom, the entirety of the land served as a memorial to the willpower of Satsuki Kiryuin. The castle at the centerpiece of the kingdom was pitiful compared to Satsuki's regime, Gamagori thought to himself, all the better a testament to our Lady's brilliance. Gamagori enjoyed his quiet patrols through the park, no disruptive chatter, no shrill birds, just Gamagori alone to his thoughts. Gamagori glanced at a nearby sign, nestled between two pristine benches. In bold red lettering, the sign read:
THE SATSUKI KIRYUIN MUSHROOM KINGDOM MEMORIAL DOG PARK - NO ALCOHOL -
- NO RUNNING - - NO LOITERING - - NO SOCIALIZING - - NO DOGS -
Gamagori nodded in approval of the rules. The sheer contradiction of the name and purpose of the establishment only reinforced the genius of Lady Satsuki's leadership. Gamagori continued his stroll, turning around a corner to find an appalling sight: the original mushroom headed citizens of the region were blatantly disregarding the rules of the park. Rage bubbled from within Gamagori as he took in the scene: Toads were playing, eating, walking on the grass, socializing, and worst of all had brought dogs into Satsuki's park!
Gamagori was engulfed in stars as his school uniform transformed into his Shackle Regalia Mk.II. Iori had designed this Goku Uniform for the Raid Trip, but Gamagori and his students had no problems defeating the guardians of this kingdom, two gaudily dressed plumbers who put up a weak resistance. Gamagori had been disappointed, not given a chance to test out his new Goku Uniform, but now all these ruffians needed punished for their crimes and Gamagori was eager to provide.
Characters: Ira Gamagori
This stage plays very similarly to the Mushroom Kingdom from Melee's Adventure Mode. The platforming is simple, though a few tricky jumps, and majority of the enemies are Toads who don't actively attack Gamagori. They will try to run away from Gamagori and have only 5 HP, almost any hit from the disciplinary chair being enough to send them flying. A few standard Mario universe enemies will appear too, Goombas and Koopas that act as they do in Smash Run. Dog-like enemies also appear in two forms; Chain Chomps, again functionally identical to the ones from Smash Run, and Poochies who will endlessly chase down Gamagori. The Poochies have lofty HP, 55 of it in fact, and attack with energetic leaps that deal 8% damage each.
Halfway through the stage Gamagori ascends a castle, where a mid-stage battle occurs. Gamagori is confronted by a Captain Toad and Captain Toadette tag-team, who appear similar to the Yoshi fight from Melee's Adventure Mode. The stage set here is a three-tiered walk off castle with plenty of room for fighting and building. The battle is fairly easy, and once both Captains have been defeated the screen unlocks and Gamagori can continue.
Following the battle, the distribution of enemies changes. The standard Mario enemies, the Toads, Goombas, and Koopas, are no longer present, though Chain Chomps and Poochies remain for this segment of the stage. Instead, an assortment of dog-based enemies form the gauntlet for Gamagori. Growlithes are common, chasing Gamagori down and attacking him with either quick bites for 5% damage or a burning flamethrower that deals a stronger 9% damage. Gamagori can likely take these hits and dish them back, as the Growlithes only have 15 HP. Some mongrels, similar to those from Fallout, are also present, and while only possessing 10 HP have a vicious bite, dealing 12% damage and beefy knockback. Stoutland, though rarer, also patrol this portion of the stage, and are balanced foes, possessing 35 HP and having a strong take down attack that deals 10% damage with fairly high knockback. While not explicitly an enemy, occasionally when Gamagori attempts to pick up an item an Annoying Dog of Undertale fame will leap across the screen, grabbing the item away and leaving on the other side of the screen.
The stage takes Gamagori up through Princess Peach's castle, and once he arrives on the roof, a cutscene takes over. Gamagori squares off across the roof from three figures, zooming in to reveal Fox, Duck Hunt, and Lucario, all standing their ground on the edge of the roof.
'ATTENTION RULEBREAKERS! UNDER ORDERS FROM SATSUKI KIRYUIN YOU ARE HEREBY SENTENCED TO EXECUTION!' Gamagori shouted at the collection of dogs, but was surprised by a lack of any sort of fearful response from them. In fact, their eyes were greyed out, almost looking possessed. Regardless, Gamagori returned to a fighting stance, ready to put these puppies down.
The battle takes place on a flat roof, resembling a wider Final Destination, and is a 1v3 against the aforementioned Lucario, Duck Hunt, and Fox. While the toughest fight of the stage so far, their AI is only around 6 or so, and are still fairly easily defeated. Once defeated, a second cutscene takes place, showing Gamagori standing victorious over the dogs. The victory is short-lived, however, as around the losers' necks spiked collars and leashes materialize, leading to a shadowy area behind a tower.
'MY DOGS!' a malicious voice howls from the shadows. A mountain of agitated flesh sprints from the shadows, revealing Lord Galf, the source of the illegal dogs. 'I'LL DESTROY YOU FOR THAT!' Galf is flanked by two more fighters, a large purple dog armed to the teeth with blades and a small retriever in a secretary's outfit, their leashes held by Galf. Gamagori readies himself for battle but instead finds himself ensnared by a painful spiked collar and is brought to his knees as his assailants approach.
Series representing: Newgrounds (given that he's the first Flash character to get his own video game released on consoles and stuff)
Debut year: 2004
Entrance - Flash Madness
A.H. appears on the battlefield via teleportation device from a Newgrounds short where Alien Hominid met the guy from the Madness universe.
Neutral Special - Fat Kid
Fat Kid is summoned and he hands A.H. a powerup that alters your standard blaster shots and grenade detonations for a limited amount of ammo. There are 7 powerups, and each of them have different effects for your shots as well as a shield. The laser is able to do slash damage and pass through opponents. The vaporizer doesn't exactly work all that well at vaporizing unless you're in a stamina bout, but they do work well with removing items. They're also weak but rapid. The flamethrower shoots out a stream that can do afterburn and turn human traps into ashes, but it also shoots out a comparatively weaker fireball. It also turns items into weak flame traps. The comet blaster is like a gun with stronger fireballs, but they absorb the weaker blasts in its path. The freeze ray is the reverse temperature version of the flamethrower, only you FREEZE your opponents. Another shot breaks them free of the ice. The slime shot can make opponents go slippery and turn traps into slip traps. However, this does have short range. Finally, the spreader does what it advertises: spreadfire shots. Note that others can kill the Fat Kid (with melee attacks instead of blaster shots), so make sure that doesn't happen. You can also only summon him once every 15 seconds.
DMG: Laser (10%), Vaporizer (3%), Flamethrower (16% for the stream, 6% for the balls), Freeze Ray (same deal with the flamethrower), Slime (18%), Speader (9% per bullet)
Side Special - Sentient Eye
The sentient eye appears to help A.H. It is able to fire vaporizing shots in one of 5 directions and hops around. Anyone of a big size (usually from consuming Super Mushrooms) can scare away the eye. Even without that, it can be picked up and thrown around by opponents. However, you are capable of taking it and shooting vaporize balls at your opponents like you were space Rambo. Although you are only allowed to shoot it 16 times before it goes away, and on its own, it stays for 10 seconds.
DMG: 8%
Up Special - Spaceship
A.H. gets in his spaceship. In it, you are able to fly around freely for 5 seconds. Press A to fire shots aimed in the direction you move in, or alternatively with the C-stick and B to use this tractor beam that lasts for 3 seconds apiece, carrying away opponents as well as strong projectiles and being able to drop them with ease. The beam is also able to lift up crates and barrels. Explosives will blow up after dropping them from a great-enough height. Drag an opponent up to your ship and you can them shoot him/her out in the opposite direction you go in. Now for what will happen at the end of your joyride. You will be hit by a laser from the FBI since they hate your extraterrestrial guts and, unless you escape your ship, take damage. Escape the ship, and it'll crash in a typical explosion that damages the competition. You can fly in your spaceship again after 10 seconds pass.
DMG: Shots (16%)
Down Special - 1 Foot Under
A.H. goes underground. You can use this for timely evasive maneuvers, of course. When underground, your head is seen poking above. Press B to poke your arm out. Move left or right to grab to a side. You are able to grab items, traps, and even opponents. The opponents grabbed will be in your place, plowed into the ground. Now, this sounds cheap, however like the game, you shouldn't stay underground too long (past 5 seconds) because you'll begin to suffocate, which will add damage constantly. Every 20% speeds it up, which can be risky if you're in a stamina bout. Press A to get out of the ground.
Final Smash - Abominable Snowman
A.H. shoots the chains off a yeti, setting it free. It thanks A.H. by setting him on his head, allowing for you to control him for the next 15 seconds. During the process, you aren't exactly able to jump, but you ARE able to move around without the worry of falling off a stage. Press A to punch. You can press it 3 times to do this short combo good for sending opponents flying. For an easier kill, move down and press A and the yeti throws a lower punch. Anyone who is caught in this punch is eaten alive, resulting in, you guessed it, instant KO. You also plow anyone you walk over into the ground. You can't kill the yeti because he'll just growl, which will result in him doing more damage to you. Instead, you are to hit A.H. if you want to rack up some damage.
DMG: Punches (20%, 19%, 32%)
Standard Attack Fare: Neutral Jabs, aerials besides neutral and back, and tilts - Laser Gun
*If you don't know the game he's in, A.H. is capable of blasting shots from his laser pistol. This is where Fat Kid comes into play, of course. Also, the down air allows for more air time.
DMG: 1% Side Smash - Charge Blast
*A.H. fires a charged shot from his laser gun. The longer you charge up the smash, the longer the stun will last from a direct hit.
DMG: 4-19% Up Smash, ground attack, pummel, and ledge attack - Knife
*A.H. comes with a knife as well, which means he can slice up his enemies. It's pretty basic fare as well for combos and stuffs.
DMG: 6-13% (smash), 3% (the rest) Down Smash - Grenade
*A.H. tosses a grenade. It has a shorter timer than Snake's grenades, fortunately, and it's your standard kablooey fare, so yeh. Like the laser gun's standard shots, the effects change with powerups provided by Fat Kid.
DMG: 14% Dash Attack - Lance Charge
*A.H. thrusts forth his lance from Castle Crashers. The tip of it stuns, so be careful around it.
DMG: 10% (everywhere else), 11% (tip) Neutral Air - Lance Spin
*A.H. spins his lance. This is mainly good for keeping up combos as it sucks you in.
DMG: 1% per hit for 5 hits Back Air - Chomp
*A.H. uses his sharp teeth to bite the opponent. It's not like Wario's bite, but it can make for a good kill move when opponents are at enough damage.
DMG: 7% Grab - Piggyback
*A.H. hops on the opponent's back for a ride. And no, opponents cannot move out of this, jsyk. Forward Throw - Strong Back
*A.H. first carries the opponent around on his back like in Donkey Kong's forward throw. After that, you can press A to toss away the opponent, plain and simple.
DMG: 7% Back Throw - Block Push
*A.H. pushes the opponent away, leading to him/her falling over in a comedic manner.
DMG: 6% Up Throw - Missile Master
*A.H. lets the opponent get blown away by an 8-bit Soviet missile.
DMG: 13% Down Throw - Repeated Stomping
*A.H. constantly jumps on the opponent, stomping him/her into the ground.
DMG: 3% per stomp for 4 stomps
Taunts:
Up: *juggles his blaster and a grenade*
Sd: *makes some alien noises*
Dn: *does a cute little dance*
Victory Options:
1. A.H. does his victory pose and Fat Kid's bus pulls up as he boards it, driving off.
2. A.H. proudly waves two foam fingers.
3. A.H. boards his ship, all fixed up, and flies off into the unknown.
Victory Theme: The fanfare that plays when you beat a level in Alien Hominid
Failure/Clap animation: A.H. sits down and cries tears of sadness like in the game over screen
Palutena's Guidance:
Pit: "Aww, that guy looks cute."
Palutena: "Oh, it's Alien Hominid."
Pit: "Alien...Hominid?"
Viridi: "He's one of the main big boys over at this website called Newgrounds. The thing that separates him from them is that he was the first Flash character to get a mainstream video game after millions of people played his flash prototype."
Pit: "So in a way he's amongst the indie game characters?"
Palutena: "Yes. And you may notice that he carries around a blaster."
Pit: "Of course, Lady Palutena."
Palutena: "That's his main method of getting rid of those that stand in his way. The shots can be upgraded by the help of a kid."
Pit: "I don't feel comfortable about shooting down a kid."
Viridi: "Well, you don't really shoot the kid, you actually have to give him the Subspace Emissary treatment."
Pit: "That doesn't help me feel more comfortable, Viridi. Besides, I'm sure I can deflect Hominid's shots with my Guardian Orbitars."
Palutena: "Well, don't be so sure you can hit him when they bounce back. He's capable of burrowing underground and pulling you in with him. There's also the matter of his spaceship which can abduct you. Luckily, he's weak, so you shouldn't have much trouble defeating him."
Pit: "Doesn't mean I wouldn't feel bad for him. I mean, just look at how adorable he looks."
Viridi: "Even the cutest things can bite, Pit."
Stage: Anywhere, USA
This is where the original game's first world takes place in. The blimp is movable, making it abnormal fighting ground. At times there will be FBI agents coming in sweeping away items and such along with some distracting you. Other times some cars will zoom by like in Onett, although if you move down you can hijack them. While you drive around, you run into an opponent, dealing consistent damage but little knockback just for racking up some damage like the prick that you are. However, the cars take 75% damage before they blow up, damaging the driver along with anyone within the blast zone.
Music selections:
*Alien Hominid - Title Screen
*Alien Hominid - The Urban 1
*Alien Hominid - Space Level
*Alien Hominid - PDA Game
*Castle Crashers - The Abduction
*WaterFlame - Race Around the World
*{Blaze}
*Newgrounds Rumble - The Portal
*Switch vs. Evil Dog Round 3
Note: Look up some of these songs as they are likely still on Newgrounds.
Palette Swaps:
*No Hat
*Fat Kid's Hat
*Flower Crown
*Native American Headband
*Wig and Pearl Necklace
*Soviet Headwear
*Aviator Headwear
*Prisoner Hat
It was a lot of fun reading Blitzwing, it had basically everything that I was expecting with all the transforming between jet, tank and robot forms. The set has a decent sense of balance when it can potentially turn into a vehicle, not underplaying this and implementing the full logical spectrum of power and defences you'd naturally expect. The set even does a good job of choosing what inputs to do these on, I remember an ancient set called Acid Seaforce did a similar concept but transformed into a jet on aerials. Really, that is the last set I can think of to even attempt this concept, in MYM5, so this has been a long, long, long time coming to see the whole concept of transforming done again, and in this case done right. The set deserves tons of credit for even doing this idea well. It's no wonder too, because it really takes a modern approach to balance to even do it without it being a horrible mess.
The set has its issues for sure though, mostly in the fact it tries to do too much. The fire and ice modes I never really thought achieved all that much on their own. The attempts to make it relevant later in the set just feel as though they'd be better suited to just focusing on how the far more interesting transformations work in the set. The transformations themselves while decently balanced, are far from perfect. I feel like this could actually be done more seamlessly if say, Blitzwing could transform on the fly and moves instead would change form mid-attack, or maybe he could transform at the end or beginning of attacks for an interesting trade-off? This is basically what the first special tries to do with that move alone by giving a trade off of slow punishing end lag, but could easily be applied across the entire set instead of fire/ice modes. Nonetheless, had plenty of fun reading this set and yet another good moveset out of you this contest, very nice work Bionichute.
GhirahildaMimikyu was definitely an interesting one, although it's obviously got plenty of room for improvement that Katapultar touched on. I do like the attempts in the special to outline how Mimikyu while like other Pokemon with his shadow ball is similar, but then in some minor ways he's different. The best part of the set for me was the shadow ball just for how its properties differ from normal. The problems with the set can basically be summed up as not making enough use of the Disguise mechanic, and lots of very short, under-detailed moves, without much purpose. I do have to say though, I like your unique visual style that's present here. If you wanted to make more sets I'd happily invite you to our chat on skype, hope you stick around.
There's no doubt that Iguana is the best set posted this contest and it doesn't take much of a reading of the set to see that is the case. I feel like this set is itself a reaction to how you see this contest thus far, not sure if it began that way but this is a behemoth of a set with tons and tons of ambitious concepts within it that takes a long time to completely digest. It's truly a worthy successor to Lizard's ambitiousness back in the old days but takes it really to a whole new level, and is probably your best take on the custom minion genre as a whole. There's just far too much in here to not say that, it's basically just as complex as something like Yangus with all the kinds of minions you can make, and the actual gameplay even more so given the elements of randomness inherent in Yangus' minions. It's a pretty big statement to make, dropping a set of this size and quality in the middle of a fairly dialed down Make Your Move 19, I definitely get the message loud and clear.
Besides just doing custom minions, the set has a nice, logical focus on other aspects that have evolved from Lizard, such as the "exploiting weaknesses." I feel like some mitosis happened between this and Acidloli, as the whole way shields work in that set is somewhat familiar, but this set really takes it to another level with all the cool stuff you can do to exploit all the weaknesses you can place in the foe. I do feel it could've gone a bit deeper at times, rather than just creating a lot of hitboxes to swamp all the weak points and such, some more creative out there ideas might've worked to truly elevate the set to your best. In the same way, I felt like you could've maybe put instabilities in the minions themselves. There may honestly be a bit too much going on in this set to ever really understand how it would function in game, with so many minions, room for instabilities, and all so loosely balanced around the very MYM idea of "if it ain't broke don't fix it" mentality. None if this is too bad, but compared to what is probably your actual best, Metireon, it's definitely not quite as well structured or balanced.
Where the set may be your best ever is the characterization and ideas behind most moves. It reminds me a little bit of Chakravartin with the unbridled creativity and on the fly ideas you bring up even in the aerials, making every move really jump out as unique and fun. For the character's sake, I do also really like this OC and his more malicious, less defensive playstyle compared to original Lizard. Ignoring how bad Lizard is as a set in modern day, it was far more defensive whereas Iguana has to actually go on the offensive a lot more to not get destroyed with his size, which is one of the most basic, but significant balance changes between the two. Iguana never really gets too much of a buff to his defences outside of riding his minions, but is done in a far more logical, balanced way too. Not only that but he gets a very nice pseudo-taunt of riding a throne on top of his minions. Really just the whole set seems extremely stylish and flashy to play, again lending to the great character and charm in the set. Really feels like a true evolution of Lizard without losing anything important, and surprisingly proves how well Lizard's concepts can be done in a modern set. This definitely inspired me a good bit just thinking on it some more and I think this set should age very well with all the effort put into the writing, balance and individual moves. Awesome work on this one FA.
Thor is yet another very solid set from you this contest Joe, and this one has one of the strongest playstyles of the lot. It's a very similar playstyle to Ganondorf in Smash 4, a character who can really wreck everything when he gets momentum on his side, but is very easy to punish if the foe takes advantage of all his slow moves and lagginess. In this case, this is meshed well with the character to get more out of the cocky and arrogant personality of Thor without making him go full villain, being sort of a dolt because of his brash attitude, it's all really well executed and put together. This is also one of the more straightforward sets so far, which makes sense, and there's not a lot of mistakes I could really focus on besides nitpicks like the special taunt or some of the sporadic uses of the charge. If I was to say one complaint it's that the way charge is used on say, forward aerial is a bit odd, there's no real rhyme or reason for every move to not use charge at that point in some way, and the set is not the most exciting or flashy so it's not like that'd be a bad thing either.
Compared to the others so far, I do think this guy has one of the stronger playstyles of the bunch. Maybe not as good as Beast's, but it could very well be in the top there. The only other complaint I could really levy at the set is the meter seems almost superfluous at points, with how unimportant its charge is to each move it's just there in the background. Though I suppose it's okay to have some characters who don't just revolve around their meter all the time, I think there definitely should be some who do. Anyway, this was another good one Joe, keep up the good work!
Hello Professor Lexicovermis
and what a name you have there. Shovel Knight was alreayd given a very ngood comment by Muno that I can't really hope to compete with especially as someone who has not played Shovel Knight. The set has a few odd points that I will just point out to help you with future sets. I'll be going backwards. For one thing, the throws deal very little damage, all between 4-6%, while Mario alone has a bthrow that deals 11% and a fthrow that deals 8%. The down throw pitfalling also seems very powerful and would probably lead to some cheesy combos/follow ups, and is not the best idea. I think in the pummel, you have the wrong idea saying he is doing something "uncharacteristic." I get that this is simply a turn of phrase, but really try and think of what IS characteristic instead when you make sets, as taking from Percy for the bthrow is equally kind of weird as inspiration. I know SK doesn't have much throw potential, but still, his shovel should lead to some obvious animations.
The aerial have low damage, but absurdly low KO potential. To KO near 200% with the back aerial, this would probably be one of the weakest back aerials in Smash 4, and the 300%/3% hitbox on the nair is just ridiculous too. It's also a bit weird to imagine someone as clunky in a suit of armour doing a somersault. From the smashes, I felt the fsmash was a bit boring, the dsmash was slightly too tacky but okay, I did actually feel the usmash was along the right tracks. This just needed a lot more description to be good. I'm not asking for you to jump in with a massive set right away mind you, just make these moves have more basic details as a start, because for example the usmash doesn't even list important details like the start or end lag of the move.
I would advise against doing "randomness" as in the dtilt. This is actually a fun idea for a dtilt, but when the rocks go in random arcs this would in practice be very hard to use effectively, rendering it pretty muted. It's also pretty weird how much stronger the dash attack is than all the aerials, and some of the uncharged smashes too. The specials have a decent set up for the rest of the set. In the end, I did like some of the ideas, mostly in using the shovel for what it was designed to do, but this is definitely rough around the edges. That's always going to happen on your first set however, I recommend you read some other, longer sets to get a feel for MYM. Welcome aboard. We're mostly on Skype.
At this point a bunch of memes were posted. Joke sets for a punch, Ridley, a PSABR Sonic set. Kiwi posted... something? Kay then.
Wow, I see you already did another set so quickly with Plague Knight. This guy seems very popular for Shovel Knight fans. This one has a lot more character to it and is definitely an improvement on Shovel Knight but a lot of the same criticisms apply, especially in terms of detail. For example the side special where Plague Knight downs a potion... the act of drinking a potion should he pretty long right? This would seem like an important detail, to figure out how much opponents would counter this by attacking him during start up, or in end lag after the dash is over. It also seems kind of OP when he can just cancel it any point by just turning around and no extra lag is given. I feel like the down special is also a bit too direct intepretating a potion to give Plague Knight such a weird healing/damage nerf effect but that I can let pass, so long as you have plenty of multihit moves in the set to make use of that effect.
It's kind of redundant to have more Black Powder bombs later in the set, literally the exact same but thrown at another angle. The down tilt projectile lasting 2 seconds is actually a very long time in Smash. That's longer than 2 Falcon Punch start ups. All the smashes actually do have fun ideas but again just not enough is said about them. In the least the up smash for example should say what "series of small explosions" really means to get some idea of the balance. I do feel like this set is at least better balanced than Shovel Knight though. You'd think that pummel could maybe imbue the foe with a status effect or something given what his own potions do to Plague Knight, but the throws here, not much to say about them besides that. Overall an incremental and not insignificant improvement over Shovel Knight. Definitely would like to read more from you in the future.
Gamagori next, and this set sure brought back a lot of memories of this series. The extras in the post before do a good job of surmising the series in a fairly neat way, despite only encompassing a few characters and a stage, it does a good job setting the stage for this "universe." One minor nitpick on Gamagori, I really don't like his "suit" and would've preferred if he just fought in his much cooler looking uniform with the other stuff being props, but that's just me really. This set is immediately quite impressive for how it deals with Gamagori's insanely obtuse mechanic from the series, even summoning a minion for self damage, now that's clever. The interaction on the forward smash is just as clever and downright amazing for the character. In general the character is done really well too, right down to the extras, which are obviously very extensive here and do a great job for establishing the character more. I forgot about his pink cadillac and that weird episode, fun to remember that. Did not expect Galf to show up at the end of that SSE segment, great stuff.
The set is really good I'd say even after the very strong opening. I like how you use his over-the-top, almost wrestler-like type of attacks throughout the set, emphasizing his strength and defensiveness for the sado-masochistic playstyle you'd expect. On one hand, he's a character who can take and dish out tons of punishment, but he can easily self destruct too considering how much damage he can deal to himself as well, and is really walking a tightrope all the time. Even his tertiary moves like the aerials tend to focus on giving more risk for reward, and it all comes together succinctly as a playstyle. It's shockingly accurate to the character considering how hard I used to think this set would be, it's not an easy character, but this is a very very good execution for sure. I am impressed, Slavic, as someone who has read all your sets since the beginning this is easily your best and I can say without any doubts this is one of the best sets out yet for MYM19. Excited to see what else you have, especially from the KLK universe!
Hi Rootspread
interesting to see a set for Alien Hominid in 2017, this takes me back, super old game at this point. And this even references Madness? I was never into AH much but I was big into the edge of Madness for a time back then. The first thing I will say for AH is that well, you need more moves frankly. It's not alright to just say all the aerials besides nair and bair, and tilts are the same shot from the blaster. Compare to MegaMan, he has a similar deal on his jab, ftilt and nair, but the nair is different, it has a muzzle sweetspot (stronger hitbox) compared to the jab/ftilt version, and obviously the ftilt has MegaMan move forward so is itself quite different. Just having like, 5 moves all be the exact same thing is a big problem.
While it's good you're aware of how broken down special could've been and stated why it wasn't quite that bad, it and up special can definitely be broken in effect. 5 seconds of free flight is a lot, and the tractor beam makes it sound like 3 seconds of stun basically, this is very OP stuff. The down special letting you hide underground as a rule is just not fun to play against even if it is attempting to balance itself with all the self damage as it just slows down the fight until AH gets out of the hole. After the start of the set it gets very simplistic as you say yourself, and while there's certainly some fun ideas here in concept there's just not much to comment on, though it at least was a fun read. I hope this is merely the start for your sets, but certainly is the best set I've seen for Alien Hominid regardless in my years of being in this community, so you shouldn't feel too bad about this fairly negative comment. Hope if you do read it you get something out of it.
Hello Professor Lexicovermis and what a name you have there. Shovel Knight was alreayd given a very ngood comment by Muno that I can't really hope to compete with especially as someone who has not played Shovel Knight. The set has a few odd points that I will just point out to help you with future sets. I'll be going backwards. For one thing, the throws deal very little damage, all between 4-6%, while Mario alone has a bthrow that deals 11% and a fthrow that deals 8%. The down throw pitfalling also seems very powerful and would probably lead to some cheesy combos/follow ups, and is not the best idea. I think in the pummel, you have the wrong idea saying he is doing something "uncharacteristic." I get that this is simply a turn of phrase, but really try and think of what IS characteristic instead when you make sets, as taking from Percy for the bthrow is equally kind of weird as inspiration. I know SK doesn't have much throw potential, but still, his shovel should lead to some obvious animations.
The aerial have low damage, but absurdly low KO potential. To KO near 200% with the back aerial, this would probably be one of the weakest back aerials in Smash 4, and the 300%/3% hitbox on the nair is just ridiculous too. It's also a bit weird to imagine someone as clunky in a suit of armour doing a somersault. From the smashes, I felt the fsmash was a bit boring, the dsmash was slightly too tacky but okay, I did actually feel the usmash was along the right tracks. This just needed a lot more description to be good. I'm not asking for you to jump in with a massive set right away mind you, just make these moves have more basic details as a start, because for example the usmash doesn't even list important details like the start or end lag of the move.
I would advise against doing "randomness" as in the dtilt. This is actually a fun idea for a dtilt, but when the rocks go in random arcs this would in practice be very hard to use effectively, rendering it pretty muted. It's also pretty weird how much stronger the dash attack is than all the aerials, and some of the uncharged smashes too. The specials have a decent set up for the rest of the set. In the end, I did like some of the ideas, mostly in using the shovel for what it was designed to do, but this is definitely rough around the edges. That's always going to happen on your first set however, I recommend you read some other, longer sets to get a feel for MYM. Welcome aboard. We're mostly on Skype.
Wow, I see you already did another set so quickly with Plague Knight. This guy seems very popular for Shovel Knight fans. This one has a lot more character to it and is definitely an improvement on Shovel Knight but a lot of the same criticisms apply, especially in terms of detail. For example the side special where Plague Knight downs a potion... the act of drinking a potion should he pretty long right? This would seem like an important detail, to figure out how much opponents would counter this by attacking him during start up, or in end lag after the dash is over. It also seems kind of OP when he can just cancel it any point by just turning around and no extra lag is given. I feel like the down special is also a bit too direct intepretating a potion to give Plague Knight such a weird healing/damage nerf effect but that I can let pass, so long as you have plenty of multihit moves in the set to make use of that effect.
It's kind of redundant to have more Black Powder bombs later in the set, literally the exact same but thrown at another angle. The down tilt projectile lasting 2 seconds is actually a very long time in Smash. That's longer than 2 Falcon Punch start ups. All the smashes actually do have fun ideas but again just not enough is said about them. In the least the up smash for example should say what "series of small explosions" really means to get some idea of the balance. I do feel like this set is at least better balanced than Shovel Knight though. You'd think that pummel could maybe imbue the foe with a status effect or something given what his own potions do to Plague Knight, but the throws here, not much to say about them besides that. Overall an incremental and not insignificant improvement over Shovel Knight. Definitely would like to read more from you in the future.
Thank you for the warm welcome! Indeed, my name is rather lengthy. I greatly appreciate your critique, as it gives me an opportunity to improve my sets. Please allow me to address some of your observations:
•I admit, I'm not intimately familiar with the average damage a throw should inflict. I can very easily change the numbers though.
•I can see how the D-Throw could be problematic; I'll try and think of a replacement.
•I actually have an idea for the Pummel that better fits SK's character. I'll have to think up a B-Throw, however.
•Again, I was unsure how powerful an aerial should be. I'll do some research and change the values.
•The somersault, as improbable as it is, is actually canon. Wearing a specific armor allows Shovel Knight to jump slightly higher, somersaulting the whole time.
•The smashes could indeed use more detail. I'll remedy that as well. How specifically can I improve the D-Smash?
•I agree that the random arcs are a bit much. I'll change that.
•I'll nerf the Dash Attack.
•I'll give PK some lag on the Side Special. This way he can't just flee scot-free without planning ahead.
•Leech Liquid behaves identically to the source material, with the exception of the damage nerf. This was intended to prevent it from being too powerful.
•The redundant Black Powder bombs can be replaced with other bomb types. I'll do some digging to see which powders would best fit each move.
•I'll have the Tracer fireballs vanish at the ledge.
•Again, I'll give the Smashes more detail.
•I considered a status effect pummel, but decided against it. I felt it over complicated the moveset.
All in all, simple changes that will improve my sets. Thanks again for the comment, and I'll be back! I have quite a few ideas knocking around...
Because the Poison Iron MYMer was posted late and I know people have stuff in the wings, the Poison Iron MYMer is being extended until April 18th, or one week.
But this month's Iron MYMer must continue and so I unveil this month's theme, as inspired by Katapultar...
Original Character, DO Steal
The theme of this month is simple: Make any original character for another person's OC series, related to it, or so on, preferrably in a way we can tell such as it having a set in Make Your Move, but if you can just get the person to say its from their stuff, thats fine too. Whether its the Expanded Lizard Lore, a return to the days of Spadefox yore or adding on to a UserShadow universe, there's plenty of space to go around!
This month's theme lasts until May 10th, so you have plenty of time to get those brains revved up on some unusual characters! Feel free to ask me any usual questions, yadda yadda, happy setmaking!
Liz is the witch responsible for turning Cyluth and his evil counterpart into a Lizard and an Iguana respectively. Born with a long, regenerative lizard tail that would always grow back no matter what, Liz was burdened with constant ridicule and inconveniences to her everyday life, often having her tail stepped on from behind among other things. Small afflictions like these were relatively uncommon in the developing world of magic, where hexes had been pushed aside for the more conventional forms of magic. A hexologist (essentially a doctor specializing in hexes) could presumably remove the tail for Liz, but her poor family could not afford the overly-expensive operation. Thus, Liz decided to study hexes and remove the tail herself.
Through years of bullying, Liz developed a tough, aggressive and quick-tempered persona to ward off the curious and cruel masses, becoming prone to violence when pushed. She had almost no friends in high school, instead preferring to cram hours and hours into the study of hexology and getting top grades to enter Harvard, the top magical institution in the world. Only there would she start to acquire her vast knowledge of hexes, and even create new spells for the sake of removing her tail (albeit with no success). Though unfriendly at first glance, she actually has a compassionate heart and a strong sense of justice, not going out of her way to pick fights unless they're for a noble cause...or she's just really, really angry. She dislikes having her tail grabbed and hates being addressed by her full name, as it sounds similar to that of a certain heinous child criminal. Anyone who does this on purpose may find themselves hexed if Liz can get away with it.
Liz initially hated her tail and dedicated her entire youth to removing it, but this changed after a certain life-changing event involving Lizard (detailed below). She now takes pride in her tail, and has committed herself to becoming a hexologist to help others with similar problems to hers...as well as becoming Cyluth's bride, if possible. She would eventually join forces with Lizard to foil Iguana's evil plans and transform him into his reptilian namesake, at the tragic cost of her life. She draws breath once again, however, through unknown means that have given her a second chance at life. Could this be apart of Iguana's plan? To have Liz alive so she can cure his reptile form, or something more elaborate? Or maybe a sick form of revenge to make her suffer? Or maybe just the merciful act of an onlooking god who couldn't bare to see her die?
Liz had no recollection of Iguana when she was revived, only to remember and be informed of his current status by one of his attacking minions who discovered that she had been revived. She would then be pursued by Iguana's minions in an attempt to silence her, being considered a very low priority compared to Lizard given how easily she was killed by Iguana. Realizing that her life was in danger of being taken again, Liz vowed to become stronger so she could take down Iguana once and for all, and to see her beloved Cyluth once again. Only with Iguana's death (or giving up his whole paranoid silencing attempt) could she get on with her life and fulfil her dream of becoming a professional hexologist.
Magic: a fantastical concept that existed since the beginning of time, known to only a select few. It was only during the mid 20th century that magic was confirmed to be real, and the whole world jumped on the bandwagon to reap all of its benefits. This was formally known as the Age of Magic, or just the Magic Age. It was beyond revolutionary: it drastically altered society to the point where physical labor became obsolete, and only those with magic could get anywhere. Who needed builders when you could just summon a big, strong familiar to do all the heavy-lifting for you? Who needed guns when you could just learn to expel energy from your fingertips? Who needed hospitals when you could just learn healing magic? And who needed conventional self-defense when you could just learn some basic offensive magic to blast assailants? Those who embraced magic were guaranteed success in the new world, while those who clung to the conventions of old would be left behind to rot in poverty.
Born as the only child of the Eird family come 1990, a time where society had fully embraced magic, Liz was named such because of a lizard tail she was inexplicably born with - was it a mutation from society’s new overuse of magic, emitting potentially harmful mana particles into the air, or was it something deeper? Either way, no cases like these existed prior to the discovery of magic, and while dozens of similar cases were reported globally they were not considered a huge deal, as virtually all of the mutations were reminiscent to hexes and could be cured like such…presumably. Not completely certain whether Liz’s tail could be removed, her parents named short for ‘lizard’ in hopes that she would not grow up to hate her tail, while also having a name that sounded like something a regular girl would have. No, they did know about the existence of that child criminal whose name rhymes with that of Liz’s name in full, he probably wasn’t born yet what with being a child and all.
The Eird family was somewhat poor and could just barely maintain a stable life, thanks to Liz’s father who worked out in the mines while her mother stayed at home to do the housekeeping. Mining was actually an important job in the Magic Age, to unearth formerly-insignificant rocks that were later discovered to be gemstones and what not that could be used to power an individual’s magic. Despite this, blue-collar workers like Liz’s father received a paltry wage for their long hours, as the greedy company (possibly owned by Iguana?) took a good chunk of their salary and paid it to the lazy magic-users who just had to blow up rocks or better yet create familiars to do all the digging for them. This was the dark, unjust side of the loved Magic Age: one where hard, physical labor was completely unrewarding as opposed to just learning some magic to whip up some minions that did all the work and you still got the credit for it. Kind of like a certain…contest. Nonetheless, Liz’s father just smiled and endured all the hardships for the sake of his family, a trait that Liz would emulate in her early years to endure the pains her tail gave her. Her father was supposedly a professional athlete before the Age of Magic settled in, but nobody cared for boring, “generic” sports when they could instead have exciting magic duels or humane battles with animated constructs like something straight from Pokemon.
The bullying of the tail began right from the start for Liz, who was forced to bear with it as the cost of removing it was something the family absolutely could not afford, even if they sold all their assets and lived on the streets. And that’s not even counting the cost of magic fares! Hexologists were crazy expensive, man. Not much was known about hexes during this time and age and even fewer people knew anything at all, thus the professionals always demanded an absurd price tag during this age. It didn’t help that hexes weren’t well looked-upon compared to other forms of magic, what with being ominous and all and not very beneficial in comparison, thus they were left relatively untouched while the aforementioned offensive magic and summoning were explored to death and beyond. With this, it was perfectly understandable that Liz wanted to become a hexologist so she could remove her own tail, and to prevent her parents from having to do anything extreme to earn the funds necessary for a check-up.
Despite bullying, Liz wore a smile in her early years and actually managed to live a happy, safe school life. She made a few close friends who helped to ward off the bullies and support her tail literally, keeping it from getting stepped on or from being jammed between the doors among other things. Unfortunately, this happiness would not last long. Inevitable class and school shifts between grades would separate Liz from her close friends, leaving her all alone in the new year. She would make new friends over time with each separation, but it never felt the same as the first time, with some friends even turning on her or just pretending to be her friend. As Liz went through this repeatedly, she began to smile less and the bullying she had been shielded from started to take full effect, isolating herself more to escape the pain. Her parents realized this, but they could do nothing to help much to their anguish. Left with no choice, the father took on a particularly dangerous job to earn the massive amount of money needed for Liz’s tail operation, hoping that the tail could be removed so she could live a happy, ordinary life come high school, without the need to study obsessively like she was as of recent.
The job in question involved being flown over to a remote area to mine for for lethal gemstones that were particularly poisonous to mana particles, rendering familiars and constructs useless when nearby and being fatal to those who frequently use magic. Only someone like the father could go in and cultivate the gemstones at all, but they still took their toll on him as all living creatures have mana flowing in their bodies. Eventually, he died, and while he made a lot of money on the job it still wasn’t nearly enough to pay for the tail operation. The Erid family stricken by grief, the dangerous job being undertaken for operation funds were disclosed from Liz, to keep her blaming herself for her father’s death. She found out anyway though, and a newfound fury was born within her – she was already on the path to becoming tough and ill-tempered to shield herself from the inevitable bullying, but this sudden anger just took it all the way. It probably didn’t help that her mother was forced to look for work to support what remained of the torn family (though the Eirds were fine for the time being thanks to the income received from the father’s fatal job), no longer being around to provide her daughter with words of console when she needed them. She was alone, and determined not to let her tail get in the way. Little did anyone know that the dangerous job given to the father was intentionally meant to off him, so what meager wages he was being paid could be assimilated back into the system to cut costs. Had Liz known this, she would have surely gone berserk, though it would have all been in vain at this time given her lack of combat skills.
Filled with anger, Liz’s high school debut started out with a bang – literally, as she viciously beat the first group of students to bully her on the very first day of school. This got her suspended for the very first time, and instantly earned her a bad reputation that would only get worse as she distanced herself from classmates in favor of studying almost obsessively. She received an earful from her mother, still looking for work at the time, and got into a shaky argument that ended with her running out of the house with the typical “I hate you!” you’d expect from typical angsty teenagers. Deep down however, Liz still cared for her mother and didn’t want her to go like her father did, while her mother could perfectly understand the spontaneous, violent behavior of her daughter. Ironically, the two would not reconcile for a while, as Liz would not return home later the next day and her mother had already found a job that she suddenly started. Having had time to think to herself, Liz decided to buckle down and study hard, so that she could gain a recommendation and scholarship to the esteemed Harvard Magic College, the greatest of all the numerous magic colleges that had been developed as of fairly recent. There, she could develop her hexology enough to remove her tail for good, and provide her mother with financial support through said generous scholarship. Liz knew and had developed a bit of hex magic through her intense studies for what little was known about them, but she had practically no knowledge or skills in more common forms of magic for her age group, partly because of her poor status but moreso being adamantly dedicated to the research of lesser-known hexes.
As the high school years passed, Liz quickly learned to control her tail to the point where she could use it to write and hold a book independently of her hands. This greatly helped her studies, both hex-wise and for achieving the stellar grades that were necessary for her recommendation to Harvard, surprising the faculty who initially saw her as a hopeless delinquent. A good thing too, because her violent ways continued outside of school. She couldn’t help it: she had no one to talk to most of the time, and had to expend her pent-up rage built up from the bullying somewhere. And what more productive way to take out your rage than on thugs and the like? Liz would get involved in all sorts of troubles to defend the helpless or just take out her rage on some shmoe who annoyed her. She initially lost far more fights than she won, but this only served to fuel her anger, and she refused to call the police mainly because she refused to let anyone step over her like they did in school. Displaying a rare gift for athleticism, fighting and dexterity – possibly inherited from her late father – Liz quickly learned to fight the hard way as she endured beating after beating from non-magic street thugs before putting them in their place. Fistfighting was vastly inferior to offensive magic and was massively looked down upon by the criminal mages that Liz would confront, but underestimating her was their undoing as she destroyed them with her unrelenting fury the instant they let the gap between them close. Mages were primarily ranged-fighters after all, they couldn’t afford to get caught in a scuffle where all but the most experienced were practically defenseless.
This was all before Liz learned to incorporate hexes into her fast-paced fighting style, upon which her combat abilities improved tremendously and she could easily keep up with the average mage, or their familiars for that matter. Nobody had ever thought to combine melee with hexes prior to this, with the latter considered to be useless for combat despite their nature of hindering victims for reasons that should be obvious at this point. There are 2 ways to place a hex on someone: either through direct contact or in the form of a weak, telegraphed and easily-dispelled magic projectile. The former method required almost no magic power to pull off and was difficult to identify, but no mage would be caught dead going out of their way for this in close-quarters, and there weren’t many hexes that had been developed at this time. Furthermore, you could only place 1 hex on a victim at a time through the 2 methods, and hexes were considered fairly weak in general so it was considered extremely inefficient unless you could pull it off several times through some speedy direct contact. Hence where Liz’s combat skills came into play, as she had the speed necessary to make full use of the hexes and she could even make use of her tail to hex targets.
Liz didn’t cause too much trouble in high school post-suspension, but a number of her violent episodes outside of school were discovered and she was suspended again a number of times. She got dangerously close to getting expelled on her final year, but with a bit of begging and the backing of her excellent grades she was allowed to stay and make it through to graduation…under the condition that she was not to cause any trouble outside of school for the rest of the year. Lasting a few weeks at best, this proved to be the ultimate test of restraint for Liz as she was forced to become the punching bag of various bullies who wanted revenge on her. She endured, and ultimately graduated and gained the scholarship she worked so hard to obtain, earning the highest grades of anyone in the school. The endurance test would prove useful for honing what little patience Liz had, as she would need every little bit she could get to make it through Harvard where she absolutely couldn’t afford to mess up. Little did she realize that fate had other plans for her, thank you very much Lizard’s original creator.
Making it into the college of her dreams, Liz swore to keep her anger in check, as she absolutely couldn't afford to get expelled. She settled down in the witches' dorm and got along surprisingly well with its eccentric residents, her tail getting a lot of attention for its unusual properties. She would study quietly while her tail reflexively blocked and soaked up any misfired hexes, going back to normal when it grew back. Through the advanced resources offered by Harvard, Liz's studies reached greater heights and she created many new hexes, but she mostly kept them to herself as they were mostly created to remove her tail and she didn't want to draw too much attention to herself - she just wanted to study. Though she appeared to get along well with everyone, she was not particularly close to anyone and did not open up about herself, becoming slightly more aloof over time.
One day, Liz developed a crush on the esteemed student Cyluth - ranked 2nd in the history of Harvard and beaten out only by a man who went on to become a lich lord after he graduated (I guess Iguana didn't attend Harvard, given it was established in 1994 and he's probably an old guy). It all started when Liz lost some important notes on her unreleased spells and one she was developing, only to be informed that a student named Cyluth had returned them to her room, going out of his way to brave the dangerous witch dorm despite being known to dislike hexes. He even complimented the notes for how well-written they were, namely a prototype spell that could be used to turn people into lizards, and noted that some of the spells written were unreleased and probably invented by the writer. The lizard spell in particular was a grand achievement in its own: completely altering the biology of something or someone was astronomically difficult, if not outright impossible, only seen once-in-a-blue-moon and something that not even Iguana could do - it's not like he invented every single spell in existence, after all. Having never been acknowledged this much for her work and grateful for getting her notes back, Liz suddenly found herself developing a crush on Cyluth - something she had absolutely never felt before, as the most she had ever interacted with boys her age before was in bloody brawls. Liz found herself neglecting her studies somewhat to observe Cyluth from afar, and eventually built up to courage to confess. She initially planned on confessing only when she had finally removed her tail and became a "normal person who could fall in love normally", but she learned that he was going to graduate in a week's time and that she no choice but to go through with the confession as is, or possibly miss her chance forever. She sent Cyluth an anonymous love letter and arranged for him to meet her alone.
Liz confessed her love to Cyluth, only to be turned down in a shockingly brutal manner that belied his humble demeanour. Turned out that his true self was actually that of a smug, arrogant and elitist jerk (he did place 2nd in MYM13 and get his own challenge, after all) that he displayed when he could afford to not keep up appearances, as we can't very well have an FA character who's a goody-goody after all. This gives him more of a character resemblance to his nemesis Iguana, who is secretly evil and hides this from society at large. Liz took this rejection EXTREMELY hard, and used her new spell to turn Cyluth into a lizard on an emotional impulse. The negative emotions she had been keeping in-check erupted, and she thought that Cyluth had rejected her because he thought she was a freak because of her tail, just like everyone else did in the past. Horrible memories welled back up, and she thought she could never fall in love so long as she had her tail. She ran away in tears and left Lizard stranded. The following day, everyone found about Cyluth's predicament, and Liz was expelled until she could come up with a cure for his condition. Not that it mattered if she did: she was now reviled campus-wide for hexing/crippling the top student - or at least that's how it looked to her - and she no longer cared for anything now that her first love was rejected. She was consumed by despair, becoming violent again and even worse than back when she was in high school. All while Lizard was smugly sipping on the champagne of Super Votes offered for his innovative ideas, using his new form to his advantage to create new battle strategies. That jerk!
Liz's destructive and empty lifestyle continued until she was unexpectedly visited by one of her former dormmates, who was more down-to-earth, gentle and understanding than most of the other residents. She came to update Liz on what was going on at Harvard, not that Liz cared in her current state. She then asked why Liz did what she did to Cyluth, believing that she couldn't have done it from rejection alone. Through some emotional counselling, Liz eventually opens up to her witch friend about everything she's been through in her life, and about what she was feeling when she hexed Cyluth. This surprises and shocks the witch a little, but she firmly tells Liz that she just cursed somebody with the hardships she experienced in her life (more or less), and that will only create more suffering. Furthermore, Cyluth has been robbed of his dream, and can no longer live life as a human. This brings Liz to a sudden realization: that deep, deep down, part of her studies were driven by a malicious desire to see others suffer what she had gone through, hence the creation of the lizard spell and other hexes that did not contribute to the removal of her tail. This disgusted her, especially given she had been vaguely aware of it but refused to admit it. She also realizes that her excess anger had actually been directed at herself, angry at her own weakness as a person, angry that a loved one died because of her..and angry that everything in her life thus far had all been done for her own selfish gain of ridding her tail. Even her acts of "selflessness" had been done for her own satisfaction. But no more.
Through her sudden character development, Liz decides to hold off her studies and stone for her sins by developing a cure for Cyluth, showing just as much - if not more - commitment than her standard studies. Unfortunately, the specific cure for Cyluth's whole, permanent transformation was astronomically difficult to devise, if not downright impossible. Normally, the effects of the spell are short-lived and those with a strong body/will like MYM characters can resist, only having a part of their body transformed, but for some reason the intense emotional trauma experienced by Liz while hexing Cyluth greatly enhanced the spell's effectiveness and made its inner workings far, far more complex than what most human minds can decipher, let alone fix. Or maybe her unique lizard tail has something to do with it? Not even the great Iguana could fix it as Liz would later discover, but then again he is probably not very good with hexes like Lizard. Liz tried and tried to come up a cure, but she could not comprehend the complexity of her spell, forced to give up. Everyone has realized by now that the spell is practically impossible to break, and that keeping Lizard from graduating and Liz expelled is completely unreasonable, especially when the latter is making an effort on the cure. Liz returns to college, only to find that Cyluth has graduated and is out exploring other worlds to "research" them (steal their moves), as graduating from Harvard gives you a permit to travel to other words and is otherwise impossible for civilians - Iguana's backstory has confirmed that a multiverse exists in the Lizard Lore, after all. Wanting to follow Cyluth to cure him, Liz studies hard and graduates from college after a few years, travelling to other words to find him and a cure for his condition.
Liz eventually finds an artifact that can cure any ailment while making its recipient immune to them, but she is attacked by a group of animated golems. Unable to damage their hard bodies effectively, Liz is nearly killed until she is suddenly saved by Lizard, who wipes out the golems with no effort. Reunited with Cyluth at last since that fateful day, Liz is hit with a flood of emotions, the most prevalent of them being guilt - guilt over what she did to him. Without saying a word, Cyluth looks towards Liz and then towards the broken artifact next to her crumpled body, damaged during the scuffle, deducing exactly what it is she intended to do. Then, surprisingly, Cyluth smugly proclaims that he is used to this form and doesn't want to change back, boasting about the many benefits it offers and the numerous spells he's been able to learn because of it. Shocked, Liz asks Cyluth whether he really doesn't want to go back to being human, but he says that he's too busy world-travelling for socalization to matter, and that the benefits outweight the downsides anyway - even if his body IS frail and can be crushed with the slightest mis-step.
Liz should feel relieved after hearing that Cyluth held no resentment towards his lizard form, but it doesn't feel right, that all her hard work turned out to be for nothing. Seeing this, Lizard offers some uncharacteristically consoling words, in his own indirect way: a great man once said that limitations breed creativity, that others grow strong through suffering, and that he has used that to grow stronger. He focused on what made him unique and how he could exploit it in battle, learning to hide in the debris he created from his blasts among other things. It sounds like a straight-up boast, but Liz senses that Cyluth is saying this to help her. It works, strangely enough. The burden and guilt cast upon her disappear, and she comes to realize something life-changing: that her tail is apart of and what makes her unique. Instead of focusing on removing that part of herself or drowning in thoughts of guilt, she should put everything she's learned to productive use. Smiling, Liz gives Cyluth a sincere "Thank you!" and says that she's finally decided what she wants to do with her life. She turns away, blushing and thinking to herself that she has fallen even deeper in love with Cyluth.
Later on, Cyluth eventually discovers that Iguana - the man he looked up to - is actually absurdly evil and seeks to turn the entire multiverse into a playground for him and his friends. He needs to be stopped, as otherwise Lizard won't be able to continue his quest to copy all the moves. Liz decides to follow Cyluth, as no one else would believe that the greatest magical scientist in all of the world could possibly be evil. They set out to destroy his massive magic catalyst stone, breaking through his minions and army of stone constructs standing guard. They confront Iguana, who is standing behind the magic stone in his human form (whatever that looks like) and doesn't even see the 2 mages as threats. His arrogance gives even Cyluth as run for his money. Liz rushes towards Iguana to lay a smackdown on him, giving Cyluth some much-needed set-up - this is how they broke through all of Iguana's minions. Unfortunately, the duo greatly underestimate just how powerful Iguana is: he doesn't even need to so much as move to generate a small but lethal blast next to Liz, blowing off her right arm and nearly half of her torso while sending her flying away to the side. He could have just blown her up on the spot, but didn't out of sheer arrogance.
"Confronting me with generic rushdown? Ha! Melee attacks are for poor people!"
Iguana then proceeded to combat Lizard and completely outclass him in every way possible, not even taking a single blow, and intentionally dragging out the fight just to toy with the graduate. A dying Liz witnessed all of this, vision fading and barely able to keep herself upright, as she lamented her fate.
"Am I...dying?"
"No, I can't die yet! I was just starting to get my life on the right track! I was going to become a hex doctor to help others! I was going to confess to Cyluth again and marry him! I'd convince him to want to become human again and cure him, so we could start a family together! I could...finally contribute some good to this world." Her head slumped, and the life faded from her eyes in despair. A moment of silence passed in her mind.
"...it's no good, huh?" On the verge of death, she gazed up towards Lizard and Iguana to get one last look at them. "With my death, Cyluth will likely never turn back into a human. He'll remain a lizard for the rest of his life." Then, with that thought, Liz realized something:
"That's it! There's just one thing I can do even now! I can still leave my mark on this world and save it!" She held out her remaining arm towards Iguana, using the last of her strength to gather a surge of powerful green magic energy before firing it off towards him. She intended to turn him into a lizard, just like she did with Cyluth, and knowingly exploited her emotional trauma to emulates its effects on Iguana.
"Please....work...for once....."
With that, her eyes closed and her life gave out, just before her magic would hit Iguana. She would never know whether it hit its mark, or even whether anything good would come out of the transformation. It was all up to Lizard now.
Had Liz survived these events and peace returned to the world, she would have gone on to become one of the leading experts on hexology, only right given the number of breakthroughs and hexes she made during her years of studying. She would struggle hard to earn the trust of her patients, in a time where hexes had developed to the point where villains were exploiting them for cons and malicious purposes that worsened their reputation in society. Whereas many hexologists were in it for the raw research, money or evil intentions, Liz was genuinely drive to help people, even going so far as to offer her services for free if necessary - having known full well the pain of not able to afford an operation that would have made her childhood a happier one. Whether she ended up marrying Cyluth or not remains a mystery, though the chances of such were slim. Perhaps she had matured further at this point and moved on?
Attributes~
Tall and slender, Liz physically resembles the pictured anime character except she has:
Red eyes
Reading glasses to represent her studious ways, resting over her windpipe and handles connected by a thread wrapped around her neck. She wears these while studying or taking important tests. It's unconventional in combat and risks the glasses being broken, but she wants to get back to her studying as soon as the fight is over - time's a-wasting.
A bland, stereotypical witch's hat with a small Harvard symbol pin stuck somewhere on the front, the former a requirement for identifying witches. This is the only piece of clothing that can be associated with her being a witch.
A high school uniform with a slit located on the side of a knee-length skirt for easy movement, and black steel-capped boots with laces.
When not casting magic or punching someone, she keeps one hand on her hip and the other clutching her witch's hat, to prevent it from being blown away by any pesky wind hitboxes. She takes great pride in this hat, surprisingly enough, as the badge signifies her admission into Harvard and the work she put into getting there.
Last but not least, she has her long, green lizard tail protruding from a hole in her uniform directly above her butt. This tail is long enough that it would stretch out a full platform behind Liz if fully-extended, but it is generally kept raised and curled-up halfway around head height. It drags along the ground behind her whenever she dashes.
The tail has its own hurtbox independent to Liz, to some degree. Struck, the tail is mostly-obliterated, and will grow back almost immediately in the exact state it was in before. Half the damage taken this way is transferred to Liz, a potential burden as the tail does not block projectiles or attacks unless it clashed with them, resulting in extra damage on Liz if the attack struck both her and the tail in worst-case scenario. Worse yet, the tail is completely vulnerable to being grabbed, even from a distance as Liz is pulled towards the perpetrator. If this sounds like a burden, that's because it is - now you can see why Liz wanted to remove her tail! At the very least, only a portion of the tail sticks out behind Liz when it's not in use, and it coils around her while she's shielding as to not be a burden.
Size: 7 (She's around 170cm tall)
Weight: 5
Ground Speed: 6
Jump: 6
Air Speed: 8
Fall Speed: 10
Traction: 3
Wall Jump: 8
Liz is faster and more agile than you'd expect a witch to be, and she's not even using magic enhancements! It's called being athletically blessed - you can thank me for that. She fights primarily with good old brawn from her human appendages and tail. She is surprisingly weak given she is only human, but she knows full well that simple melee attacks aren't good enough to challenge the diverse cast of MYM19, let alone her murderer: she's using her knowledge of hexes to imbue her physical attacks with cursing magic, apparent to onlookers and victims only when they connect. Without the witch's hat, she would simply resemble a generic high school delinquent with a tail sticking out from behind.
Liz has the ability to cancel the turning lag of her dash into any action she pleases, similar to Mario. Liz is used to turning around on a dime in response to something touching her tail, which happens often and usually results in the offender getting punched in a fight.
Specials~
Neutral Special ~ Hexxer Stance
Eyes closed and tail touching the nape of her neck, Liz holds a hand up near her chest as a dark, ominous and transparent mist pours out from it into her body, attempting to place a hex upon herself. You can now input any non-Special move to have Liz afflict herself with the status condition that move inflicts upon connecting (anyone remember Spadefox?), mist changing to a specific color to represent each individual effect - aerials done through the jump button and pummels throws done with Z or A + shield depending on your controller scheme. These are applied as soon as the stance ends or if Liz was attacked from it. The stance lasts for 20 frames and resets each time you place an ailment on yourself, effectively being a kind of end lag to encourage the placement of numerous ailments in one sitting. Maintaining the stance for a full second will halve the stance's timer down to 10 frames, and then down to 5 frames if maintained for 2 seconds to reduce the "end lag". Liz's hexes generally linger on opponents for a number of seconds equal to the damage the attack that triggered them dealt: these can applied to her within 3 frames for 2 seconds a pop, and stacked up to 5 times with the bonus of consecutive applications of the same hex only taking 1 frame to apply. Hexes on Liz will have their timers paused as well as any periodic effects like damage over time, though perpetual effects will still remain and hexes which activate when struck can still be triggered. By pressing B again during the stance, Liz will place a hex upon herself that multiplies the timer of the status effects currently afflicted on her (not affecting those placed later on) by 1.4x, always taking 6 frames a pop and can be stacked up to 5 times to make them last thrice as long.
By holding B when using this move, Liz will emit a black flash from her hand towards herself, covering her body in a pitch-black, wispy aura - this takes 20 frames. Liz has channelled her hex magic into her own body to improve her physical abilities to above-average levels, buffing her stats and the strength of her attacks. Her stats bar size are upped by 4, raising her dashing speed to a blistering 10 (roughly 2.4), jumps to top-tier level and getting air speed that outclasses even Yoshi (1.4). Her melee attacks deal 1.6x more damage and 1.4x more knockback, which might sound good but melee is weak and this barely puts it on average. The catch here is that Liz cannot use her magic while empowering herself, losing the magic-based properties on her attacks and having her Side Special banned for a full 10 seconds. Once that time is up, Liz's magic is returned but only at 1/3rd of its effectiveness, requiring 5 seconds to be gradually restored to its natural state.
Side Special ~ Lizard Magic
Liz thrusts out her palm to fire off her signature spell, a Kirby-sized green-and-orange energy ball that travels 2 platforms before disappearing and can be angled. This has moderate starting lag, but low end lag. The projectile starts out extremely fast but slows down into its travel, moving at moderate speeds halfway through and becoming extremely slow near the end to have a surprising amount of longevity.
Opponents struck by the spell sustain 3% (no hitstun) or 5% that KOs at 200% up-close, and are partially-transformed into a species of lizard fitting for their character. Cute characters become chameleons, scary characters become frilled-necks, Smadians get the salamander and Warlordians become a fat Komodo dragon. Liz is holding back from fully transforming her opponents, for now. Victims receive a lizard tail, growing a second tail if they already had one, and a somewhat oversized head that juts out in front of them. The tail functions like Liz's for the most part, except it doesn't coil around them when they shield and can potentially be poked at if their shield was small enough. The bigger head makes victims more vulnerable to grabs and shield-pokes from hitboxes aimed towards it, while also receiving an extra 2% and 1.15x more damage and knockback from attacks. The hex lasts for however much damage it dealt to victims with its hitbox (3-5% = 3-5 seconds) and scales with buffs or de-buffs, generally giving Liz little time to capitalize on it. If the hexed victim was Lizard or Iguana, they will somehow regain their human head (whatever they look like) that makes their hurtbox significantly taller, though you'll be hard-pressed to land this on the former without precise angling.
If the magic projectile hits the ground, it will explode into bits of goop that coalesce into a 0.5 platform-wide, lizard-shaped puddle of green slime within a second, but can be destroyed by enemy attacks before then. Anyone who steps over this puddle will be hexed with a lizard tail for however long they remain in contact with it plus one second afterwards, and have their legs and feet transformed into a lizard's, their newly-clawed feet making them slightly wider from below like with the lizard head. These legs enhance the speed and distance covered by jumps, rolls, walks, runs and dashes by 1.3x, and increase the power of leg-based attacks by 1.3x. You can also give foes a lizard head by knocking them into the slime, but they can't do the same to you. The slime pool disappears after 3 seconds or 5 seconds if created from a projectile in the first half of its lifespan, but the timer is halted while a character remains standing over it. Only 1 slime pool can be out at once, and you cannot create another one until the previous pool has dissipated. Tails count as their own independent entities on slime pools: they do not give characters lizard feet nor do they contribute to the timer while only the tail is touching the slime, only towards how long the tail lasts on foes. Enemy tails will instantly regenerate when destroyed.
By smashing the input, Liz will cast a spell that afflicts the target with her current status ailments fresh-up, even if it was inflicted by a different source. One ailment is inflicted at a time, starting with the earliest and cycling forward to the latest if subsequent hits are landed while the previous ailment(s) is still in-tact. Ailments based on damage inflicted take the % inflicted by the magic projectile into account. Getting several ailments on a foe through projectile spam is tedious work, but exposed to slime they'll suffer one ailment each time they step over it and another for every second they remain in contact. The ailment lasts for half as long when afflicted this way, but the timer is frozen while they remain standing over the slime. Some ailments affect the lizard tail independently from the character like with lizard slime, while others don't and treat it as a part of them standing over the slime. Liz can be affected by her own ailment slime, most likely refreshing the affliction she was under if it had worn off. If Liz casts this spell while not afflicted by any ailments, it will cause status ailments on the victim to last for twice as long for 3 seconds. Firing a spell into an existing pool will refresh or update it.
By holding B and using this move while dashing, Liz will place a protective spell over her feet and tail that protect them status ailments. This allows her to cross her own pools safely, and potentially time it so only the tail gets the effects of the slime.
Up Special ~ Tail Glide
The tail detaches itself and becomes an erect, makeshift surface for Liz to stand on, who kneels and infuses it with sparks of magic from her feet: this causes the tail to fly forwards as Liz uses it as a makeshift surfboard! Who needs broomsticks when you can just use your tail? This functions like a movement-based version of R.O.B's laser that aims diagonally up or down with back or forward respectively given the input it's on. The tail starts out at Ike's dashing speed with no hitbox for the first 0.3 platforms of its flight, only to suddenly accelerate to well past Sonic's dashing speed over the next 2.2 platforms before Liz flips off in style and enters helpless, receiving a good momentum boost to aid in her recovery and the tail continuing with its flight until it goes offscreen or hits something. If Liz crashes into the ground while surfing at an accelerated speed, the remainder of her recovery momentum will be transferred into a slide along the ground she can attack from - a powerful movement-based tool, but its set-up makes it fairly telegraphed. Liz cannot dash from this, but she can turn as though she were and actually perform a turn-cancel to great effect, able to retain half of her momentum while doing this.
The long, accelerating tail drags opponents struck by it for 14 hits of 1%, followed by good upwards knockback that KOs at 140% and serves as a solid finisher near the top of the screen. This is only if Liz was riding the tail however, otherwise it simply deals 8% that KOs at 200% as a decent stray projectile. Liz has another attacking and recovery option too: she can jump off the tail pre-acceleration to get a boost reminiscent to performing her first jump or short-hop without entering helpless, the tail kicked down wound-first as a projectile dealing 8% with sharp upwards knockback KO'ing at 190% - possibly starting an air combo at higher percentages or with weight-loss hexes. Both the jump and the kicked tail can be buffered with lizard feet, if you can somehow make the effect last that long. The new tail Liz grows comes out fresh and free of any ailments her previous tail was afflicted with, for better or worse.
If the detached tail hits the ground through either recovery option, it will burrow a portion of itself into the earth and act as its own entity, a bizarre makeshift vine/tentacle bunched up enough to match Kirby in size. The vine has almost no influence on its own, easily destroyed by opponents and doing nothing to attacks - not soaking up projectiles, grabs or even triggering hitlag. Within a platform of Liz, it will extend towards her and link itself with her closest body part until she's out of range: this does nothing unless the tail's root was connected to Side Special slime, in which case it will link Liz with the slime to provide her with its benefits. This "extends" the slime's range and lets Liz keep its effects for longer if she went for a full-on jump, but its timer is not paused. You can freely detach the plant from yourself with a bit of deliberate control-stick wriggling, after which it will not attempt to reattach itself to Liz unless she makes direct contact with it or she goes out of its range and then back in. The tail plant will disappear after 3 seconds if it wasn't doing anything.
By holding B when crashing into the stage out of accelerated flight, the planted tail will immediately wrap a quarter of itself around Liz's waist and function as a unique makeshift tether for the duration of her sliding. Once the tail is fully stretched out (0.75 platforms), it will keep Liz from sliding any farther for however long she would have done so for before snapping her back as far as she would have kept sliding - good for hit-and-run with the right set-up. You can even adjust the length of this "tether" by tilting the control stick sideways to make it shorter or longer. Shorter, the tail will simply wrap more of itself around Liz to potentially halve its length if tilted back all the way, whereas longer the plant tail will simply wrap itself around Liz's new tail to extend how far she can slide by up to 1 platform. If Liz was interrupted and launched out of her slide, the plant tail will keep her from flying any farther than a platform away from the root before snapping her back towards it, with similar rules to the slide snap-back and able to attack as the launcher's hitstun will have expired. If a Side Special projectile hits a planted tail, the slime will coat it and slide off to form a puddle per usual, this allowing for more precise positioning of it and keeping you from having to angle the spell downwards to make it.
Liz cannot enchant her tail to perform the rocket variant if she had the NSpec buff on her, but she can still jump off of it. Unlike the lizards, she doesn't -need- magic to recover!
Down Special ~ Hex Reversal
Liz adopts a defensive stance for a counter. Her tail counters attacks from behind on frame 3, faster than any smash counter, before proceeding to swing around and guard her from the front frame 10 in the shape of a capital D. This is a more "sensitive" counter that can punish careless, mis-spaced attacks, but the tail leaves Liz more vulnerable to grabs and extra damage from the front if spammed carelessly. Triggered, Liz will block the attack and paralyze melee attackers with a hex to pin them in place - even halting their movement - imbuing her fists with thick black magic before retaliating with an 8-directional sliding punch at breakneck speeds (forwards by default), a short, sudden shout as she does. The tail will not paralyze attackers when struck, but Liz is invincible to the move she countered, and if the attacker was overlapping with the tail they'll be knocked towards the direction of her attack if need-by.
The sliding punch covers 1 platform by default and can be influenced by buffs to go farther. A punch aimed straight up takes the form of an uppercut covering the same distance as Liz's first jump, while aimed straight down Liz can choose to fall beyond a platform's length by holding down the control stick. The latter performed on ground or not covering a full platform-length during the fall, the impact will create a black magic shockwave with a 1-0.1 platform radius. No matter what form it takes, the counterattack drags/holds opponents for 10 hits of 1% over one second before dealing minor radial knockback that's good for comboing (always letting them go a platform of the way from a falling punch), a surprising amount of hitlag on each hit giving the rush a deceptively long duration when hitting. Liz suffers frighteningly low end lag when not connecting with the attack, making it a fantastic approach combined with its blitzing nature to give her a much-needed answer against campers.
Each hit from the counterattack shocks opponents with a hex that transfers her earliest affliction (NSpec) to them fresh-up, the 10 hits passing her first 10 ailments with any more going into the last hit - in other words, connecting successfully will transfer all of Liz's ailments to the victim and put her in a good position to follow-up on them. If Liz has no ailments to pass, the hex will make ailments on the victim last twice as long for the next second per 1% taken. While attacking, you can make any input to have Liz cancel the attack early, good for precise positioning out of the movement or even applying earlier ailments onto victims while keeping the later last-digit ones on yourself, potent with good strategy. The only exception inputs are up or down when sliding horizontally, which will have Liz uppercut the foe or punch them downwards for a weak spike or into the ground where they are knocked into prone.
By pressing B to cancel the counterblow, Liz will go full-force to deal 10% and very high diagonal or vertical knockback, a reliable spacer if you need it. This KOs at 150%, and each ailment Liz had on her drops the kill percentage by 6% with no limit cap, potentially becoming a straight up OHKO if you can somehow get 25 ailments on yourself. As absurd as this sounds, do remember that these ailments will be mostly harmful to Liz, and that just having them on her is risk enough to justify the reward, on top of having to land the counterblow. Standing over slime counts as being afflicted with all its hexes, even if they hadn't all been applied yet. If Liz hexed herself and stood over a slime puddle that gives off that same affliction, they will overlap and count as being 2 ailments towards the counterblow.
Landing the counter will end the NSpec boost afterwards and immediately give Liz all her magic back, the buffs still applied to the punch. This makes the counter more worthwhile to land, in that it gives Liz a chance to get her magic back early should be need it.
Standards~
Jab ~ Pain Beater
Liz perform a straight-hook for 1% or 2% on the fist, followed by an optional boot forwards for 3% and low mostly-horizontal knockback that won't KO til especially high percentages. The first hit does very minor set pushback on the arm, while connecting with the fist opens up opponents for a potential follow-up - likely succeeding given its speed. You can mash A while performing the hits to have Liz step forwards when performing the kick.
By holding A, Liz will whip her tail out in front of her at breakneck speeds while the input is held down, covering a platform-wide area as tall as she is. Dealing 5 non-flinching hits of 1% every second, this has absolutely no lag whatsoever and Liz can shuffle back and forth slowly while whipping. Your tail is still vulnerable to attack however, taking 12 frames to grow back and resume whipping if it's destroyed, and is practically begging to be grabbed. This can be done immediately out of the punch or kick for additional damage, even out of the latter at lower percentages, but she'll be forced into that hitbox's lag afterwards. This can even be performed in midair, where Liz will likely have protection against grabs and she can fastfall past opponents to net a free hit.
Liz's attacking appendages are coated in blood-red lightning when they connect, a pain-amplifying hex. This curses the next non-pain amplifying hex that hits the opponent to deal an extra 1% per 1% they took: this not only increases the knockback they receive by an appropriate amount, it also raises the efficiency of hexes from moves based on the % they dealt. This caps at 15%. Unfortunately, 1% of this added damage is lost for every second it's not triggered and can potentially get wasted with enough time, but you can stack on more damage with consecutive hits of this hex. The nature of this hex works well with the Jab's various hitboxes that keeps victims close to you, and can make scoring KOs or launching easier for the generally-weak Liz. Hexing yourself with poison only takes 1 frame and is very risky nonetheless, but landing the Down Special counter will not only pass the ailment onto opponents but also enhance the hitbox's damage and knockback by the poison % lost over time. You can only hex yourself for a total of 10% at a time so the reward hit doesn't become too absurdly powerful, but there's no limit to how much it can stack on opponents.
Dash Attack ~ Mage Killer
Liz performs a fast and vicious flying knee attack with no magical assistance, going a platform in length while doing so. This is her preferred means of finishing off opponents in a right, smashing the jaws of cocky casters who think she is a slow, squishy witch - preventing them chanting incantations. The knee deals 10% and very strong 35* knockback KO'ing at 140% landed early on, or 7% with backwards knockback around halfway through. There is a weak hitbox right near the end dealing 4% and decent purely-horizontal knockback, good for pushing foes along the stage and into slime puddles. Unfortunately, the knockback scales very poorly, enough that the potentially-dangerous knockback angle can't be used to gimp until extremely high percentages or close to the ledge, and this part of the attack is highly unsafe against shields. This move has very little lag for a dash attack, making it spammable and all the more effective for pushing opponents, but only the knee is a low-ranged hitbox on Liz's body, and said pushing can get very predictable and easy for foes to intercept given it hits late into the attack.
Liz's tail is a hitbox for most of the attack as she whips it up slightly, though it's fairly impractical to hit with on its own. The tail deals similar damage to the knee in 60* form at the very root, 5% and below-average upwards knockback halfway or 4% with no hitstun if hitting from any farther away. The 7% knee portion will always knock foes into the middle hitbox, popping them up into the air and opening them up for an air combo.
While dashing, you can tilt the control stick to adjust the position of Liz's tail. An upwards tilt will raise her tail so it doesn't touch the ground, while a downwards tilt will have her form it into the shape of a crook towards her. This crook will catch small grounded objects like slime and cause them to be dragged half a platform behind Liz as she dashes, great for positioning the latter. The slime will afflict Liz's tail while it's dragging it, but you can just hold B for the protective spell if you want to avoid that. If Liz performs her dash attack while doing this, the slime will be immediately sprayed out in front of her on frame 1 (not hexing her body) and land directly in front of where the attack would end, potentially buffering the hitbox with the correct hexes. Carrying slime can work well out of a turn-cancel, placing it over a foe as they land (or you dashed past, if you can pull that off) and smacking them with a move of your choice.
F-tilt ~ Phantom Lash
Liz slides her grounded tail around to her front before swinging it up and back towards her, reaching out roughly 0.8 platforms ahead of her. As the tail is swung, Liz will pull it back inches so it slowly covers less distance into the swing, only reaching the tip of her hat by the time it comes back to her. This deals 6% that KOs at 185% or 1% and tiny set upwards knockback near the tip at the start, enough to place the average just off the ground by the time Liz can act as gravity kicks in, a precarious position for the victim, though it can vary with their size and gravity. Near-tipped later on, this deals 3% and low, purely-horizontal knockback that won't KO until 300%, while the tail at the very end deals 4% and backwards diagonal knockback that practically guarantees a true air combo from it if capitalized on, though it's hard to hit with. A reasonably spammable move with slight starting lag, its initial reach makes it good for poking, walling off opponents from the front and creating a follow-up upon connecting. The tail is actually safe on this move too, as ghost magic placed on it makes it immune to damage or grabs and effectively gives it transcendent priority - for better or worse.
An opponent hit by this is cursed to take a pseudo-ghost form, their body and and shield transparent all the while. Ghost opponents can occupy the same space as other characters, but cannot damage a target that is directly overlapping with their hurtbox - actually making it safe to dash (or side) past them to follow up with a pivot attack from behind. Liz will move through ghost opponents who blocked the first hit on her dash attack, positioning them for the tail whip at the end to lock them into their shield for a bit longer. On cornered foes shielding, Liz will end up overlapping with them as she has no ground left to traverse, putting them in a very difficult situation where they have no choice but to move away. If the hex was going to expire however, foes may end up choosing to shield against follow-ups and have Liz pushed back for some punishment when they return to normal, the shield almost always being safe as Liz cannot grab foes while she's overlapping them.
Projectiles will pass through ghost opponents or their shield without expiring, potentially dealing them extra damage (or any damage at all from a shield) if they had a lizard tail. This is especially useful with the Side Special, a good follow-up to this move's hitbox. You can hit a foe and make a puddle at the same time, or exploit the projectile's waning movement properties to catch them again if they rolled around and behind it. Finally, the lizard tail ensues that the spell will hit twice (and stack) upon connecting as it hits the tail as well, or makes it so that they'll get hit anyway even if they shielded.
Turning yourself into a ghost is not actually very beneficial, and is in fact dangerous as projectile-users can deal you extra damage through your tail. This even affects tails you plant, though that being said you can exploit this via a Side Special spell to both create a slime puddle on contact and still have it function as a projectile afterwards.
U-tilt ~ Hex Kick
Liz quickly swings her leg up in front of her to raise it aloft for an instant, tail wrapped around her exposed thighs and obscuring the area between her legs to hide her undergarments - almost by instinct. The leg deals 4% and decent upwards knockback that KOs at 200%, while the foot deals 2% and minor set knockback up and behind Liz at the start or juggling knockback near the end, the latter easy to follow up on.
This has a follow-up input, where Liz will slam her raised leg down for a vicious ax kick after a noticeable delay. This deals 8% and a solid spike that KOs offstage at 160%, and a sweetspot on the foot just as it comes down which deals 11% and will KO at 125% - amazing when you consider it can still be buffed to become absolutely brutal. Both hits are safe and strong against shields, the sweetspot dealing a large chunk of damage. The deadly sweetspot is nearly impossible to hit with however: it comes out too low into the kick to connect against any grounded opponent save for Lizard (it misses the hated Iguana, unfortunately), requiring strict timing against either offstage opponents or beneath you while you're on a platform. The ax kick will never combo from the swinging kick outside of hitting shielding opponents, but the weakness of the latter and the gap between the 2 hits lets shielding opponents act in-between and punish Liz. Through a good read or sliding out of the Up Special, it's possible for Liz to land the ax kick on grounded opponents without the first hit getting in the way. The impact of the ax kick will throw slime 1.4 platforms up into the air should it be struck or close-by, hexing targets while they overlap it.
The hex here takes the form of a faint, dark-purple miasma, and a black cat tail that sprouts from behind the victim (not a hurtbox, and placed above their tail(s) if they already have one). As you may have guessed from the tail, this attracts various forms of bad luck to the victim, albeit on a minor scale. Projectiles will home in towards victims weakly when they get within a platform of them, effective for steering a Side Special spell towards the ground, and attackers will be pulled towards them if their non-grab hitbox would just -barely- miss them, the most directly-useful benefit to Liz. Other cases of "bad luck" are increased slightly for the victim: stage hazards have a greater chance of spawning closer to them, good items (like the Smash Ball) won't spawn close to them as much, and chance-based effects on their attacks are affected slightly. The hex lasts for 1.25 seconds per 1% dealt, a bit longer than other hexes. Slime is hexed automatically when struck (not getting a cat tail of course), the only effect being that projectiles will be attracted to it weakly. This can stack with a victim's homing curse if they were overlapping/standing over it, projectiles prioritizng the latter if they were even slightly apart from each other.
Slime is attracted to unfortunate victims within a platform of it, or from anywhere if the pool was also hexed - something you can use the ax kick for after connecting with the sweeper kick. This will not occur with slime puddles that Liz or her tail were standing over, so don't worry about having them swept out from beneath you. Slime will fly towards its target at Ganon's running or dashing speed, and while doing so it will proceed to form into a Kirby-sized, liquid sphere over 1.2-0.5 seconds, sticking to and overlapping with the target on contact - automatically doing so if the ax kick hits them while they're standing over the kicked-up puddle.
Opponents engulfed in this sphere will not only suffer from its hexes, but will also be suffocated by it for 1% every second in damage that does not register counters. If the slime had lizard magic, the victim will get a lizard head and have their hands become scaly and lizard-like, but they revert temporarily when they extend their hands out of the sphere (even if their limbs were physically short enough to not do so realistically) and thus they receive no benefit from it. Instead, attackers get all the benefits when they put their hands inside the sphere: their fist-based attacks deal 2% more and have their power increased by 1.25x on top of that. This also buffs their grab timer, pummels, throws and item-throwing enhanced if they used their hands to do so, able to hold victims for an extra second. The sphere will collapse or seek out a new target if possible when the current victim's misfortune ends. Opponents can destroy the sphere by dealing it 15% to have it collapse back into a slime puddle, but it will just reform after one second and resume chase if possible. Opponents can break away from the sphere by dashing, jumping, rolling or using an attack that induces a notable amount of movement (as in something like Wolf's F-Smash doesn't count). If this was done on the ground however, the slime will stick to them and form a thin platform-long tether between them and the spot they were moving away from, halving their movement while they pull against it and until they break away, after which the slime snaps back and returns to being a puddle. The slime tether is 1 Kirby wide, relevant because other characters overlapping with the tether will receive its hexes and this allows Liz to get the lizard hands if she can put her hands into the tether - should opponents roll back, for instance. The slime tether can be triggered automatically by dealing less than a platform's worth of knockback to the victim encased by the sphere, any more knockback causing the slime to snap back towards them and for the sphere to follow them.
Hexing yourself for longer will make the misfortune upon you more noticeable, increasing the effectiveness of the projectile homing among other things. Having projectile home in you can help trigger your counter for what it's worth, and if you're willing to drown yourself in slime you'll be rewarded with having that slime transfer over to them if you can sic the effect on them with the counter.
D-tilt ~ Shock Sweeper
Liz squats in a manner reminiscent to a delinquent, tail coiled safely around her stomach. She has no crawl, but can instead extend her tail along the ground behind or in front of herself, partially or fully, and expose it to slime pools this way. The attack from this is a spammable foot poke dealing 1.5%, with light pushback on the leg or a chance to trip at the foot. This has no KO potential even if buffed, but it can lock opponents for a few quick hits at any percentage, and Liz can still move her tail while doing so. It's also great for poking shields from below, especially on victims with lizard feet. By holding A to input the move, Liz will instead sweep her tail across the ground and cover twice the length of her foot: dealing 7% that KOs at 175% up-close, 4% with good follow-up upwards knockback mid-way or 2% but no flinching from afar. This comes out slower than the foot, but is low on lag and is otherwise reasonably spammable.
Faint green bolts of magic form the basis for the hex here, shocking opponents for 1% every second and an immediate extra 1% whenever they grab you, are grabbed by you or touch your slime or planted tail. These extra hits can stack with multiple hexes for up to 5%, which are taken in 8 frame intervals while the foe remains in contact with the trigger. The hex lasts for 2 seconds on opponents. The damage here isn't too remarkable, but the extra hits can activate multiple times and will deal twice its value in shield damage (but not stun) if blocked. It's also good for punishing grabs, and will actually deal twice the extra shock damage if the tail was grabbed - both the tail and Liz's body acting as separate shock triggers. Slime and planted tails can be hexed directly to shock opponents who touch them, but the effect only lasts for one second on them. Tails can be shocked and hexed independently if they were exposed to a trigger construct, potentially stacking damage if the victim's main body was affected as well.
A shock hex takes 1 frame to imbue on Liz for up to 5 at once, damaging her all the same as struck victims. This is inconvenient for the most part and punishes Liz for grabbing or being grabbed, but it does have one unconventional use: the periodic damage can be used to trigger Liz's Down Special counter without needing to be struck. This is less safe and unreliable however, as the granted invincibility only works on the trigger hitbox and your attack will have a shorter duration without striking an opponent, making it far less likely to pass on most/all of your ailments. The damage can also get in the way of countering an opponent's attack and deny her invincibility, especially when standing over a slime pool or touching an enemy construct. The speed of the sliding punches is a great approach, however. The hex is short-lived for better or worse, though remember you -can- extend its timer to make it worth transferring to an opponent.
Smashes~
F-Smash ~ Splitting Blow
Liz throws out a fierce, angle-able roundhouse kick, dealing 10-14% at the leg or 11-15% on the foot with high base knockback, but very low scaling that won't KO any earlier than 200%. With strict timing, this has a follow-up input where Liz will pivot and swing her tail horizontally with angling properties, sweeping it along the ground if it was angled downwards. The tail extends a platform from Liz and deals 15-20% that KOs at 135-105% up-close, 13-17% mid-way or 7-10% and vertical knockback near the tip. The pivot ends with Liz facing the other way, leaving her tail exposed from the "front" and massively open to punishment if whiffed.
This is surprisingly slow attack for how weak it is, reminiscent to a heavyweight smash, but for good reason: anyone hit by any portion of it will be split into 2 copies of themselves! This copy remains behind (or pulled in a short distance in front of her if whipped) as the original is launched shortly into the end lag of her chosen attack, locked in hitstun for a moment before disappearing. Any damage or ailments afflicted onto the copy are transferred to the original, letting you get a free, quick hit on the opponent to even out the weak base power. You can even grab the copy, in which case the victim will be suspended in midair and held by an invisible force. Very powerful in the right situation, but it does have one downside: if an opponent shields this, they'll be split anyway for one second and can massively punish Liz for twice their usual damage! Note that you won't get a copy from the kick if you chose to follow into tail swing, and you'll get nothing if that swing didn't connect. Only one copy of a target can exist at once, and you can't duplicate a duplicate.
The swinging tail can reflect projectiles back with 1-1.4x (1.3-1.85x with the NSpec buff) their speed and power on your chosen angle, having impressive range compared to your average reflector. This comes out too slowly and leaves Liz too vulnerable afterwards to be used liberally, but comes with a few unique quirks to compensate. The hex splits the 2 projectile into 2 copies of itself, fired one after the other between a 0.5 second gap, or you can angle the control stick to fire off both at the same time on different angles. Unfortunately, both projectiles will disappear when one would dissipate prematurely and this generally prevents both from hitting at the same time, but used on a ghost foe they won't have this problem. If a projectile is reflected and a foe ahead of it was struck by the tail at the same time, the projectiles will automatically be aimed towards them and, if the projectile had homing properties, can potentially result in both hitting the target at the same time for twice the regular damage and knockback. A tail whip angled downwards can kick up grounded slime 1-1.4 platforms upwards while simultaneously leaving a copy behind, which disappears after one second and only serves to make it cover more area for a moment.
Hexing yourself with split magic takes 20 frames and lasts for 5 seconds, more restricted in usage than you'd expect to prevent it from being too crazy. Liz will split only when moving to leave a duplicate where she was standing: it does not respond to the input that triggered its creation, but will otherwise attack simultaneously with Liz to perform some unique attacking combinations during the single second it lasts for (this is not raised by the NSpec hexing). This could be anything from Dash Attack > copy Jab from a dash, directional Aerial > copy Tilt/Smash from a first jump or even being able to control the copy freely while flying during the Up Special, though it should noted that the copy will not stay around to finish an attack if it could not do so in time. This might sound like a hex you'd always want to apply to yourself, but it comes with the horrible downside of spreading your hurtbox every time you move, practically forcing you to attack right away if you don't want the clone to be dead weight. This makes rolling extremely dangerous and almost useless as the transferred damage will go through the intangibility, useful only later in when the clone can act. If anything, you can get a decent set-up out of this like forward rolling to surround an opponent - dealing them twice your usual damage and knockback if both hitboxes overlap them simultaneously - but the clone won't last long enough to sync up with all but the fastest of Liz's attacks, unless she had lizard feet to speed up her rolls.
U-Smash ~ Growing Pains
Liz gets on all fours like a beast and curls up her tail halfway, turning that portion into something of a makeshift wrecking ball and making it grow to Kirby in size through magic. She then swings her tail over and in front of in a hefty motion, tilting her head to move her hat out of the tail's way. The swung tail deals 11-15% and above-average vertical knockback that KOs at 190-160%, but there's also a sweetspot when it hits in front of Liz that deals 14-18% and pretty strong diagonal knockback that KOs at 150-120%, albeit slow to come out as the swing is not particularly fast. Getting grazed by the curled tail nets victims half as much damage and knockback. This is a somewhat decent defensive move for its duration, and is highly useful out of turn-cancel given it starts behind Liz with virtually no lag...if you don't mind leaving yourself open to punishment when whiffed. Better yet, use this out of a turn-cancel from an USpec slide to hit with both the swinging hitbox at the start and then the slam at the end as you move past the foe - dealing impressive damage to shields and able to hit a tail. The tail growth won't occur if the NSpec buff was active given it uses magic, leaving Liz with a much smaller hitbox. On the other hand, she can swing her tail much more quickly; letting her follow-up on the earlier hits more quickly, not be punished out of a whiffed turn-cancel and even catch frontal opponents off-guard with the move's unexpected increase in speed.
The magic imbued in Liz's bigger tail also makes targets bigger, growing giant over the span of 2.5 seconds and staying at full size for one second before suddenly shrinking back down to normal. Opponents receive all the bonuses of a smash giant when they reach full size or proportionally less, extremely powerful at its peak though foes won't have much time to use it - nor will they likely be in a good position to do so. It's a rare and seriously risky hex that foes can use against Liz if they turn the tables on her, but it also provides some amazing comboing opportunities, and remember you can time your attacks to hit the foe while they're at a certain size so you're not having to deal with the maximum weight increase. Your counter can be used to punish any predictable actions that would otherwise be dangerous to shield against, and furthermore landing the power blow will shrink foes back down to normal. Can't have their weight gain get in the way of that coveted KO, now can we? Growth-inducing slime will make characters grow only while they remain standing over it, good for letting them choose how big they want to be, and lets them stay giant for as long as they stand over the slime. Fully-giant characters will immediately shrink back down to normal when they leave the slime, however, and shrink back with the same effect in smash that interrupts any actions they were in the middle of.
Objects like slime and even tails themselves (if they're struck) can be enlarged, growing to twice their length over one second and staying that size for 5 seconds. A giant tail cuts the victim's mobility down to 70% from all that extra weight, and is also a bigger target for slime and grabs - now they know how Liz feels! The grab factor might seem overpowered in particular, but fortunately for the victim their tail will take a full second to grow back when it's destroyed from being attacked directly or they were launched. Slime spheres don't become any larger, but are twice as sturdy nonetheless through extra thickness, as well as being twice as long in tether and blocking the engulfed victim's projectiles if they dealt less than 5% or or 1/5ths of its current HP.
If a tail plant was struck, it will tremble for about one second before growing suddenly and tightly bunching into spiral-shaped, Bowser-sized mass facing the side it was hit from, taking this form only when shaken off if it was tethered to somebody. This construct isn't too sturdy: it has 10HP, and will block projectiles dealing the same or more damage than its current health or a decent amount of knockback, keeping Liz from walling off projectile-dependent characters like her nemesis Iguana. Even weaker attacks that don't destroy the plant serve to shave off 0.5 seconds of its 5-second giant timer per 1% dealt, and once that timer is up it will shrink back down to regular size over half a second. The plant mass doesn't obstruct opponents due to its thinness and can be occupied, but any projectiles fired from inside will be blocked off even if they destroyed the plant unless they had piercing properties. Opponents can be passed through the plant without penalty, unless they were knocked into it in which case they'll take 5% in damage that contributes to any hexes on the move that launched them. On unlucky opponents, the mass will attempt to adjust and unravel itself as far as could reach to hit them if they would go flying over it, but less damage is dealt this way (4-1%) due to the plant naturally having less mass to expose victims to.
You can set-up the tail plant from your Up Special tether slide to hit the tail you planted while doubling as a good offensive against opponents, while still getting the snap-back despite the growth extending the plant given the one-second delay before that happens. This is good, because Liz gets a few unique interactions with a plant mass. By moving through the front of the mass, it will unfurl to form a makeshift platform on a slight upward slant (70* angle), unravelling no more than 3/4s of its 2 platform-long mass. Liz is restricted to moving at half her regular speed while pushing through the mass, rolls only going half as far, and projectiles will travel along the tail to still hit Liz and eventually still balled-up mass at the end, so this is by no means a defense against them. Once Liz stops moving, the plant mass will spring right back into its spiral shape and push back anyone standing on it 1.5x farther than the length it was unravelled. This can be put to good use with your turn-cancelling, or better yet combine this with a clone: leave one behind as you dash into the plant mass, then quickly snap back to rejoin it with your turn-cancelled move of choice (preferably a quick move) to potentially lay a double whammy on nearby opponents in best-case scenario. You can also choose to jump or fall through the unravelled plant mass to avoid getting flung back, potentially pushing opponents back and possibly into the path of a clone you left behind to be struck by them. Just be careful, as Liz will be sent tumbling if the plant mass was destroyed while she was on standing on it, or will just be unable to reap its full benefits if it was made to shrink prematurely.
By crouching over a portion of the unfurled plant mass, even out of your dash or quickly enough from a turn-cancel, it will be pushed down to be positioned horizontal instead of sloped and can be stood over indefinitely this way. This will only work if there was ground beneath Liz to rest over, otherwise she will fall through the tail like a platform and it will spring back into its spiral shape to potentially push opponents away. By exiting your crouch, the plant will spring back up almost immediately before rolling into shape: this will bounce Liz up into the air more than thrice as far as the distance she dipped when pushing the plant down, not that great considering it's on a low slant. Liz is bounced by a 45* angle by default, but you can tilt the control stick backwards while crouching to go on a higher angle, up to 10*, or tilt forwards to go on a lower angle by up to 80* degrees. Attacking (Down Special, D-tilt) or performing any other actions out of your crouch will count as exiting it, cancelling that action mere frames into it given the slight delay that occurs before the springing. This allows Liz to throw out her counter and cancel it almost immediately; not that useful by itself, but amazing when you have a clone at the base of the plant to go through the entire action while you get to do something else. Just be careful: if the clone was grabbed when you committed to the crouch, Liz will get sprung up on the 10* angle and be left closer to the top blast zone, any upwards knockback received from the throw being boosted by 1.05-1.2x if it was done while she was sprung.
Hexing yourself with this takes 30 frames. This can give Liz a huge power boost, but it makes her a huge target for generally worse than other characters given her tail. It also creates blindspots in some of her melee attacks, like the Dash Attack and DSpec counter's punches which are now harder to land, ironic given the counter is easier to land as a giant. On the other hand, the U-tilt's deadly sweetspot is now possible to land on grounded opponents at full size, but you still need to connect at the foot for this and it is fairly predictable. Hitting with the counter while partially-giant will only make victims grow to the same size Liz did, but they stay like that for the same duration of the giant effect and this can be good for controlling their max size.
You can choose to specifically hex your lizard tail by tilting the control stick when applying it to yourself, taking 5 frames. On top of slowed movement, this increases the lag on Liz's tail-based attacks by 1.3x at full size (adding 4 frames onto the lag-less Jab tail lash instead), but they'll deal 1.25x as much damage/knockback when hitting from their default range, becoming less practical for speedy combos but more reliable for poking. Your counter will cover a wider area, but the tail won't register as a counter until frame 6 and doesn't swing to the front of Liz until frame 15, giving it a shorter duration. You can balance out the speed nerf with the NSpec buff if need-by, and even dip your tail in slime for an instant to make it grow slightly. Your reward for landing the counter from the burden of the tail is giving the foe a giant lizard tail, without needing to use the Side Special to do so.
D-Smash ~ Vertigo Wrath
Liz spins thrice on her heel to hit sweep the ground on either side with the full length of her tail, a dead-quick move dealing 3 hits of 3-4% and below-average diagonal-backwards knockback (KOs at 190-160%) when hitting up-close. Hitting from a distance nets you a non-flinching 1-1.4% a pop and gradually pulls foes in towards Liz, close to 1 platform if all 3 hits land. This pulls foes towards the main hitbox or in front of Liz if hitting from near the tip: this might sound bad, but there's actually a "sweetspot" on the tail portion in front of the main hitbox on the third hit that spins opponents around - even while shielding - making shieldgrabs impossible. On massive foes, this sweetspot can potentially overlap with the main hitbox to make Liz less punishable where she needs it. Opponents can resist being pulled in by shielding all the hits, but a shieldpoke can slip through and pull them in unexpectedly: on shielding ghost opponents, pulling them in at mid-range from a poke will leave them overlapping with Liz and unable to punish her. Sweeping your tail over slime will cause Liz to smear it around her and create a patch on the opposite side of her that can hex victims all the same, but it only stays out for long second before dissipating. Using this move while sliding will increase the pull to scale, so that it's not hindered by the movement and you can potentially pull opponents in from farther away.
This move is good for pulling opponents in, and is best used uncharged to catch enemies by surprise with its sheer speed so they can't react to it. You can't do that when charging the move, but that doesn't mean it's useless that way: charged halfway, the tail will actually get raised level to the stump to gain some different uses. It is high enough to be grabbed, a counter of sorts as the perpetrator is spun around to the other side of Liz and forced into their grab-release animation, tumbling if they ended in midair. This keeps her from being punished for the rest of her attack and can potentially lead into a follow-up if the grab was done late into her swing. The tail can also block projectiles and 12-15% worth of damage before being destroyed, not a hitbox for the rest of this move. This makes Liz vulnerable to powerful attacks as they can just mow through the pathetic priority on her main hitbox, but there is an upside: the second and first hit at full charge on the tail get the spinning sweetspot, and the third hit has its range increased to cover up to more than half the tail length while the second has half its length. It's not much, but it can disorientate opponents.
This move actually has a follow-up input to it. Here, Liz will leap 1 platform forwards with her fist reared back before swinging it down for a brutal haymaker as she descends, targeting an opponent in front of her if there was one within range. This comes out fast and can be aimed behind Liz by tilting the control stick backwards, albeit with slightly more lag as she needs to turn around. The fist deals a "strong" 13-17% with high base knockback that KOs at 150-120% when being swung forwards and down and again when it slams into the ground, though this second hit has too little range to connect from the first hit, not even on shields, only being a bonus hitbox at first glance. This deals a lot of shield damage on contact, but the harsh end lag makes it punishable even when connecting unless you used the tail swing to spin the victim the other way first. If Liz punches into lizard slime, her fist will temporarily become lizard-like on contact and become strong enough to shatter concrete, spraying debris in a low arc a short distance ahead of her to deal a-third of the hitbox's damage. This can potentially poke opponents through their shields if they were weakened by the fist swing, with a better chance to poke if they had lizard feet. If Liz's tail was struck before the swing, she'll get angry and receive a boost on the punch equal to the damage it took: a 1.01x power boost on the punch for every 1% it took as well as heavy armor around the start, capping out at a 1.15x damage boost and 15% heavy armor at full charge. At full charge, this turns into a 1.2x damage bonus and full super armor all the way if the tail was destroyed. This is a nice bonus, but it doesn't make Liz any less vulnerable to being interrupted during the tail swing or against shielding opponents.
Liz's fist places a unique spell on its victims, one that triggers a violent reaction from inanimate magic sources and gives them the impression of being sentient beasts. The center of a victim's shield will develop small teeth to bite into them, dealing them 1% whenever they put it up. Approaching projectiles within a platform of a victim will appear to develop teeth and open up wider as they draw closer, before suddenly biting down; dealing 1.3x more damage, knockback and even hitstun on contact, a projectile not flinching (like the Side Special) causing minor hitstun that varies slightly based on its damage output. The bite is timed to occur exactly where the targeted victim was standing when it was first triggered and will not occur if it hit earlier or later, though there is a slight residual effect on the bite after it occurs that occurs on stronger projectiles and is half as effective. The bite will ignore reflectors, but if the projectile was reflected before then the mouth will remain on standby and bite down by a victim struck by the projectile, making it possible for opponents to use their condition against Liz or other fighters exploiting it. The tail spin will not apply sentience on opponents, but it can curse their tails and will contribute time to the effect should it occur before X seconds of the tail's damage output runs out.
Slime will react to cursed foes or their tails standing over it. The pool will form a pair of monstrous pair of jaws that sandwich the victim from either side, taking one second to form a wall-like structure reaching 1.15x their current height. The teeth here inflict 3% on contact (no flinching) and are difficult to move past like a barrel, pushing them back to the center if they weren't moving, able to block 20% worth of damage before collapsing back into a pool for one second. These teeth will then slowly close in on the victim after one more second (or half as long if the teeth hitbox connected), and upon biting down will inflict 12%, strong upwards knockback that KOs at 160% and hexing the victim with all its status effects - sticking to them as they're launched if one of those ailments was the U-tilt attracting. After biting down, the slime will require a cooldown period of 2.5 seconds before it can form a mouth again. This is hard to hit with, but there are ways to make it easier to land. A slime sphere can bite down from anywhere if it's stuck to the victim (though it doesn't get the wall-like mouth properties), and slime will prepare to bite down as it is being attracted to a victim via the attraction hex or if it made contact with them in midair through being kicked up, the latter case causing the slime to wait on stand-by with mouth formed until the victim gets between it to close in on them. A giant mouth is twice as wide and more difficult for the victim to move through, has twice as much stamina and deals more damage on contact, but it requires 1.5x longer to form.
A sentient tail plant mass will form a creepy mouth with razor-sharp teeth to bite opponent near it, able to reach out a short distance if need-by. This deals 1% every 0.3 seconds in relatively harmless non-flinching damage, but every hit will apply a hex from any slime the tail was connected to, to do so at a more rapid pace than just standing over it. Overlapping with the mass will yield hits at twice the rate which deal twice as much damage for 12% a second overall, extremely dangerous if not dealt with as this will even wear down shields if they were held up. As tail plants can't be grabbed, this can force opponents to use a move that will actually trigger Liz's counter, lest they want to be nibbled alive. Sentient masses will bite opponents twice when they're knocked through one. Opponents hit by a sentient mass rolling back into a spiral will take 6% and hitstun as they're pushed along, leaving them open to attack for a short time - namely from a clone if you left one at the base of the plant.
A tail can be cursed independently by hitting it, a likely scenario if foes were spun around by the tail swinging and Liz punched their tail when they went to block. The tail will become hostile and develop a small mouth with sharp teeth at the very tip, gnawing at the victim's nape for several abysmal hits that only rack up that only rack up 0.3% every second. While the damage leaves much to be desired, the tail will "freeze" the victim for 2 frames every second it spends biting, pausing their current action and barely slowing them down but also extending the duration of any attacks they were performing somewhat. If the foe did not attack or get attacked for 3 seconds, the tail will prepare for a bigger bite over 0.5 seconds that deals 1% and turns them around, deadly offstage and possibly forcing a victim to recover more quickly before the effect can occur.
A bigger tail deals twice as much damage, freezes for 4 frames and deals minimal hitstun with the turning bite. If the victim was within tail's reach of a slime pool but not standing over it, that tail will stop biting them and link itself up with the pool to transfer its hexes to them from afar, albeit with a delay of approximately 1 second per platform length they were apart from the pool and subsequent hexes take twice as long to take effect. The tail also cuts the victim's movement speed down to 0.8x when they try to move away from the pool, and very, very slowly drags them towards it. Sentient tail plants will target opponents and are actually more effective than their own tails, dealing them 1% every second and not weakening the hexes pumped into them through slime pools they were connected to, also dragging them to the slime pool more quickly and stacking the hexes if they're end up standing over it. They have no turning bite however, and are easy destroyed with a simple attack. The tail swing from your D-Smash will hex tail plants exclusively. If a plant tail was connected to a slime pool and tethered to a victim hexed with sentience, that pool will proceed to form a mouth and tail will proceed to drag the victim in slightly quicker, said mouth waiting to bite them and not disappearing even if the tail was destroyed.
Like with the U-Smash, Liz can choose to hex herself or her tail with sentience. Placed upon herself, she'll be punished slightly for shielding and projectiles can deal more damage to her, but she can use the latter situation to her advantage with her F-Smash to reflect and split them to great effect, NSpec buff or not; sending the projectile back with the benefits of the teeth all the way. Items and constructs will also form tiny teeth to bite down by Liz for 1% when she touches them and per second she remains in contact with them, but this can be exploited to trigger your counter. The sentient lizard tail functions like it does on foes, but with a few quirks exclusive to Liz who actively makes use of it. From the DSpec counter, the tail will bite down on Liz's nape to inflict 1% and then bite her on the head for an extra 2% when she brings it in front of her, neither of these hits triggering the counter. You can't really logically counter an appendage formed on your own body, now can you? Fortunately, there is an upside in that Liz's tipped tail attacks will deal an extra 1% or 1/5ths more on each hit if the move had multiple hits. The tail will also go after foes from any angle when lashed out with the Jab, which benefits from the extra damage.
Aerials~
N-air ~ Witchroller
Liz curls into a ball and rolls in midair, tail wrapped around her vertically and perfectly-even with her spinal cord. The pointy witch hat is flattened and its rims bent to give way to the tail, but it is all to preserve it and it will spring back into shape afterwards. The rolling drags opponents along for 3 quick hits of 2.2%, before batting them away for very little knockback if one hit connected or decent base diagonal knockback KO'ing at 200% if all 3 hits landed. Landed on a grounded opponent, the final hit will launch them 60* if hit from the sides, diagonal-backwards knockback if hit from above or some very potent diagonal-downwards knockback if hitting from below, though the latter won't amount to much against a grounded opponent as Liz falls so fast that she'll only get one hit in before landing, just knocking them into prone if there was ground ahead of them. You can potentially land all 3 hits for the spike on a giant opponent or by very precisely dragging them down so they're touching the ground when the final hit lands, but seen coming foes can simply DI sideways during the multiple hits to position themselves for the 60* knockback. If Liz lands while dragging an opponent, they will either be knocked away early in midair or put into prone if they were grounded, and is surprisingly easy to trigger given Liz's high falling speed.
This move has a hidden sweetspot to it shown by a twinkle, at the very center of Liz's body on the first hit. Connecting with this triggers a sudden purple blast for some satisfying impact stall, dealing 12% and very powerful knockback that KOs at 140%, launching grounded opponents on a 30* angle and airborne opponents on a 70* angle. This deals a good chunk of shield damage, but is still punishable as Liz suffers noticeable landing lag out of the roll. Needless to say, this is easier to connect with on ghost or giant opponents. Liz also gets 5% heavy armor on the first hit of the roll plus 2/3rds of the damage she took (1.05x if self-inflicted) over the last 1.5 seconds: this makes the move a good combo-breaker combined with its speed, something Liz needs quite badly given how vulnerable she is to grabs, and can be used to tear through weaker hits or more with self-damage. Unfortunately, the position of Liz's tail during this move means she'll take 1.5x the damage (not knockback) of moves that reach her body, thus it's not wise to just spam this move. By tapping A when using this move, Liz will unfurl her tail to hit with it in a 0.5 platform radius as she rolls: this has a bit more starting lag than usual and deals 1.5% a pop with no dragging or knockback, but is good for locking opponents in place as you fall for a specific follow-up depending on their position relative to you.
Airborne opponents have the ghost hex placed on them when struck, while grounded opponents receive misfortune that can bode well with a slime puddle you landed on. Landing the sweetspot however, you'll get a particularly nasty hex and the one that is designated on this input, as a cross-hair overlaps with the victim. This is an "accuracy" hex of sorts, making it so the first move that hits the victim will automatically hit for the damage and knockback of its sweetspot/strongest hitbox no matter where it lands, without altering the knockback trajectory of the hitbox that actually landed. Your Side Special projectile will now cause knockback no matter when it lands, your U-tilt ax kick will always hit extra-hard and the U-Smash will get a power boost from hitting at the start. Oh, and your N-air will always connect with its deadly sweetspot no matter where it lands. This also causes lizard tails to transfer damage in full rather than just half, without using up the boost. Unfortunately, this boost only lasts for a quarter as long the hex (half of damage = X seconds), after which only half the difference between the sweetspot's damage and the landing hitbox is applied in boost and this gradually deteriorates until the hex wears off. You will likely not even get to utilize the full effect when landing the sweetspot, and will have to hex yourself to be in a situation where you can really make use of it. Aside from being more vulnerable to attacks like the Knee of Justice and projectiles that are stronger when hitting up-close, you will have to land the counter without being struck or else the effect will wear off and you'll have to apply it again. On the other hand, this can potentially make foes a bit more predictable if they're looking to exploit your self-imposed weakness, in which case you can just retaliate with your counter.
F-air ~ Reaper
Liz swings her knuckle up in front of her swiftly for a simple attack, dealing 4.5% and juggling knockback on a high angle that can combo into itself effectively at reasonable percentages. It lacks KO power unless you're near the top of the screen, thus you may want to use your Up Special as a finisher if you're gunning for that. Lizard hands and the NSpec buff make this a far more effective move as the foe is damaged and launched farther: the former can hinder the move's comboing potential as the foe's percentage climbs, but the latter actually increases its potential for combos through Liz's great movement buff, to the point where you can potentially balance out the lizard hands to devastating effect. You can even land this move twice in one jump from a buffered first jump involving both the NSpec and lizard feet. Of course, the opponent can DI to avoid all of this. There is a slight sweetspot on the full-raised fist dealing an extra 1% and greater base knockback on a 330* angle behind Liz, and a hitbox right behind her as she swings her tail into the background, dealing 3% and diagonal backwards knockback.
Liz's punch places a life-draining hex of sorts on the victim, as a tiny portion of their essence is absorbed into her. This heals Liz for 10% of the damage she inflicted (which is barely anything), heals her shield by 1/3rd of the damage and drains the victim of their shield by 3/4s of the % they took (3.75%), over the same length of time it would take to drain from holding out their shield. This damage naturally prevents the victim's shield from regenerating over time, and it will in fact not regain health even after the damage is done until 5 seconds afterwards or the victim puts up their shield. It might seem weird to have a shield-related effect on an aerial, let alone one that launches the victim upwards, but the self-comboing on this move lends itself well to the effect: placing the victim in a situation where they can't shield (in the air) can make it all the more surprising to see how weakened their shield is when they're grounded and can use it again, Liz benefiting from this greatly with her shield-poking moves. Unfortunately, you need damage buffers to make the pathetic base damage significant, but remember you can use your stinger Jab in midair to poke for that extra helping hand.
Cursing yourself with life drain will sap your shield over time by 4.9% per-tap, taking 1.5 frames a pop for a total of up to 10 times. It also heals opponents and their shield just like when Liz lands the hex, only they can benefit it way more due to likely dealing more damage. This is insanely risky especially if you went all the way, as your shield will stay at 1HP for longer if it took damage during the sap and miraculously didn't break, but the reward for landing the counter in such conditions is huge. Not only is your shield completely healed of all the sap, your victim(s) will have their shield dropped down to your amount prior to countering (if their shield had more HP) and be put in a position where shielding is suicidal for a while. You also get the nifty damage and shield-healing bonuses from attacks you land for twice as long as the length of time you were suffering from the hex: it takes 5 or so seconds for a shield to drain from being held over time, meaning you can net yourself up to 10 seconds of drain time if you went all-out - great for some longevity and healing off excess damage dealt towards your tail.
B-air ~ Scaly Wallbreaker
Liz throws out a dropkick from behind while simultaneously stabbing with her tail, the latter of which can be curved by up to 90 degrees This is a relatively short sex-kick. The kick deals 9-6.5% and solid 60* knockback that KOs at 155-180%, while the upper-half of Liz's body deals 5-3% with mostly or completely upwards knockback that can be used for juggling. There is an unconventional sweetspot on Liz's elbow as she thrusts it below her at the start of the move: this deals 6% with forwards knockback that KOs at 175% and a surprising amount of shield damage, able to mislead foes into dropping their shield for the body blow as this move normally just hits once.
The tail deals 10 non-flinching hits of 1%, even while overlapping with Liz's kick, and given its length it can be used to poke for short distance or even add some much-needed damage to the weaker kick by DI'ing into opponents. This move has noticeable landing lag, but low end lag so it's still very effective when short-hopped - becoming more potent with the NSpec buff to bolster Liz's air speed. It's a great move out of a short-hopped turn cancel given there's a hex we've yet to discuss, but foes can grab hold of Liz's tail should she get too predictable with this, or just casually poke it with any attack. It's much safer in the air where you're tail is much less likely to be grabbed.
If the tip of the extended tail was touching the ledge while it was vacant, it will pull Liz towards it and she'll hang onto it by the tail. This will almost never help her recover given it's a B-air, but it can aid her recovery from a gimp and lets her be more reckless with the leaping Up Special.
The hex on this move takes the form of thin red cracks, not appearing on victims unless they shielded. The cracks on the shield create an opening in their defenses, causing them to take chip damage whenever they block: taking half of the damage they blocked or a quarter if they perfect shielded it, as well as the full brunt of any status effects that move would apply. This caps at 10 seconds at any given time. This is a particularly powerful hex and the reason why the short-hopped tail poke is so tempting despite not dealing amazing damage, maximizing the time you can exploit it. It can make opponents hesitant to block your attacks, and if they get predictably aggressive as a result you can just throw up your counter. Combine this with the ghost hex and lizard tail to make your Side Special projectile even more terrifying.
U-air ~ Lightning Kick
Liz turns upside-down to forcefully kick straight up with an electrically-charged foot while keeping it raised for a moment, one hand clutching the rim of her hat to keep it from falling off. The kick here deals 10% and vertical knockback with good scaling (KOs at 160%) when it first comes out, launching skywards at the leg or being an electric spike at the foot. Hitting any later simply deals 6% and lesser knockback that's more suited to juggling. The electric hitbox on the spike is relevant, to a degree: electric hitboxes multiply hitlag by 1.5x for victims, allowing Liz to follow-up on it more easily than the foot hitbox to attack victims from above, good for comboing at lower percentages. This does not apply on the NSpec buff due to Liz having her magic locked, but you don't really need it due to the spike having more KO power. This attack has surprisingly low (but still existent) starting lag for a move with a spiking hitbox, though it's a bit hard to land because Liz moves through the air quickly.
If you held A when using this attack and were no higher than 1 platform off the ground, low enough that a part of Liz's tail would still be touching the ground, that grounded tail portion will merge into the earth through a hex until you let go of A. If Liz was in the middle of a jump, this will keep her from going any higher as she simply remains suspended for the remainder of its duration while leashed, allowing her to land the kick with greater precision where she won't be hindered by her movement. A spike from this can knock a grounded foe into prone with surprising ease (they can tech this, but the multiple hitboxes on the kick can make them unprepared for such), and if they were a ghost you'll be immune to their get-up attack should you land on top of them, limiting their options.
The hex from this is a dark cloud formed from the weak lightning magic, positioned above and slightly behind the victim. This cloud has a number of effects. It will rain continuously over the victim, making the ground slippery to greatly reduce their traction and increase the pushback they suffer when shielding to make your stronger attacks safer on shields. This rain also makes their shield shrink 1.2x faster when held, and damages their constructs for 3 hits of 1% every second or makes them disappear 1.3x more quickly if they didn't have stamina. On opposing constructs, this has the opposite effect in that it heals them and extends their timers. This lets the hex still be worthwhile on airborne opponents if they had constructs beneath them, and even then the tail counts as a construct that can transfer damage to them. Finally, wind from the cloud will blow victims forwards a short distance 15 frames into any grounded attack they perform (charging it doesn't count) or when its ending lag is triggered, follow-up attacks triggering this effect multiple times and continuous attacks triggering it every second. This is a relatively minor effect, but one that can mess up the spacing for laggier attacks and potentially ruin them, as well as potentially punishing attacks that rely on their range to be safe on shields. If the victim was over slime when being pushed, it will be carried along with them.
Hexing yourself takes 1 frame for 1.5 seconds with a cap of 5 hexes. Instead of being pushed forwards, Liz is pushed backwards: this can make her quicker attacks safer on shield, balance out a giant tail slowing her down or be exploited with the DSpec counter's range to a degree. It is particularly useful with the F-Smash, as you can exploit the rainy slippery surface to slide forwards while charging and then profit from the pushback for hit-and-run, getting this twice with the follow-up and still being able to hit with the tail given its reach. Unfortunately, this comes at the cost of suffering passive damage as the rain harms Liz's tail.
D-air ~ Draco Windfall
Liz performs a fierce divekick in your typical stall-then-fall format, as expected of someone so aggressive. This starts out strong with 11% and powerful mostly-upwards knockback that KOs at 150%, a fantastic kill move near the top of the screen even without buffs. This deals solid shield damage and 55* knockback when landed against grounded opponents, but the landing lag is horrendous and it's still punishable against shields anyway...unless you were positioned to land behind the victim, in which case punishment is far less likely and you can even hit their lizard tail for bonus damage if they had one.
The damage weakens and the landing lag scales to get less severe further into the fall, as Liz actually descends more and more slowly until her momentum dies out, these weaker hits being easier to follow-up on if the landing lag was triggered. The dropkick has minimal end lag finished in midair and straight-up has no landing lag if triggered at the very end of the fall (or close to it): this utterly guarantees a true combo should you capitalize on it, even against shielding opponents, but that's much easier said than done when you have to go through the slow, waning descent first, and there are plenty of blindspots on Liz's body while she's falling. This adds a greater degree of risk to divekicking foes from higher up, as whiffing this leaves Liz a sitting duck in the air while they're free to retaliate.
This move gets even more interesting with Liz's tail, a hitbox in its own right as it stabs in the opposite direction of her foot pre-fall and gets pulled along during the dive. Opponents touching the tail when the attack begins are dragged along with Liz for 10 hits of 0.75-1.3% for the first half of the dive, taking noticeably more damage when dragged closer-up, before the last hit shocks with noticeable freeze-frames and knocks opponents away at a 60* angle, said stun from electric damage covering the rest of the dive. If Liz lands before launching an opponent, they'll be knocked towards her foot and then unavoidably shot away horizontally: the closer-up launcher is extremely dangerous near the ledge and can KO from point-blank at 135%, but is naturally difficult to connect with. If the dive was interrupted by ledge-grabbing, opponents won't take any knockback and this can potentially open up the opportunity for a follow-up. This tail attack is a perfectly respectable use of the D-air that can combo out of the F-air or B-air most notably, catching opponents out of the air and keeping them closer to Liz where she wants them. It can even start a stage-spike if you dive beneath the ledge, just providing you didn't do this from too high up and could still recover. The tail is still a hitbox during the dive even if it fails to catch an opponent, but it only deals 1% and minor horizontal knockback on contact.
Liz is actually slowing her descent through some kind of wind magic (a hex, specifically), explaining the illogical nature of her fall. This means that Liz will straight-up dive full-throttle when empowering herself with the NSpec, not stopping and always suffering the harsh lag when she lands. On the other hand, she will always get the powerful hitbox and this makes the move more practical to use from higher up, to the point where it can potentially connect purely from foes being caught off-guard by its difference from the regular version. While the landing lag is harsh, you can circumvent it by diving into the ledge. There are no follow-up opportunities to be had with this version outside of using the tail, but given you've likely used the NSpec to start KO'ing that doesn't really matter.
The hex on this move is simple wind magic that makes the victim floatier, allowing for easier juggling and to better score vertical KOs. This is the same magic that Liz used to slow her fall. The floatiness is barely noticeable at first, but after a few seconds airborne it will take full effect and cut the victim's falling speed in half, thus you'll need to work to reap its full benefits. That's not to say the hex is useless on the ground, as the float timer will go up half as quickly in midair and reset when the victim touches back down again (or the effect wears off before then). The hex will actually only be applied by Liz's kick, and not the tail dragging or potential landing hitbox that follows from such. The floatiness would get in the way of offstage gimping, anyway.
Grab~
Liz performs a one-handed scooping grab, holding her victim by the collar so they're eye-to-eye with her and tail at the ready. Her other hand is formed into a clenched fist, ready to slug the victim at a moment's notice, but she will frequently alternate between that and opening her fist to manifest a weak hex from the palm - like she's deciding whether to punish her target with straight-up brawn or curse them with her magic. This comes out fast, but has short reach and a slightly long duration. The range is less of an issue against opponents with lizard heads, and comes with a unique grabbing animation as the victim is held level to Liz with one hand while the other is used to keep their mouth shut. Her dashing grab is a reverse-scoop with superior range, but a shorter duration and worse ending lag for whiffing it. Her pivot grab is very powerful and rivals Bowser's however, which is only fair given she is vulnerable from behind.
The timer on hexes is halted for both parties during the grab and then some, but their effects will continue to occur. If Liz and a clone both grab successfully at the same time, the latter will not disappear until the grab ends. If both Liz grab the same foe at the same time, possible by sandwiching them via a forward roll, they will take twice as much damage from the pummel/throws among other bonuses, though it's somewhat difficult and riskier to land than a normal grab.
Pummel ~ Manipulate Life
Liz punches her captive in the gut for 1%, or holds out her hand in front of their chest harmlessly if you held the input. Both are slow, enough that you'll only get time for one before a throw at lower percents, a shame given both variants imbue their own unique, potent hex. The punch hex is a spell to make the victim lighter, cutting their weight by 1 unit per 1% dealt and increasing the base knockback they receive appropriately, but the effect only lasts for 1 second before it wears off over half the time equal to the damage dealt. This might make the hex appear useless given the pummel's pathetic damage output, but both hexes on this input will actually have their timers increased by the total damage dealt through her throws, as well as any passive damage the victim happened to be suffering while they were being grabbed. The lightweight hex also treats foes as being 30 units "lighter" when calculating the speed of Liz's weight-dependent throws.
The "harmless" variant won't be so harmless when foes find out that Liz just put a stamina-draining spell on them. She likes using this to subdue foes mercifully when she doesn't want to kill them, or to bring superhumans down to her level. This weakens the victim's damage of their attacks by 5% (1/20ths) for every second they've afflicted with this, for a maximum of 80% over an insane 16 seconds after which any excess time on the hex will keep it lasting longer, before they regain their strength thrice as fast as it was lost. Needless to say, it's almost impossible to max this out without an absurd amount of buffering, but it's outright deadly if you can accomplish such let and exploit it. With high drain, the victim's weaker attacks will not even deal hitstun. Furthermore, the victim will take more damage, knockback and shield damage from attacks 5 seconds into the drain, half as effectively as the damage drain so they suffer 1.1-1.4x more damage, their shield a less safe option, and their mobility is cut just as effectively for what it's worth so they can't just run away. Imbuing this hex on yourself (hold Z) takes 1 frame for a max of 16 times, and landing the counter will transfer hex to the victim as is: a completely fair reward for high painful the risks are, especially with longer drains.
The 2 hexes on this pummel can be combined to great effect on a throw session as you launch foes a bit farther to stall for the drain, assuming you can pull them both off. Lizard hands allow for that with their 1 second grab-extension, but otherwise you'll need to wait for higher percents: you can try gunning for it earlier, but if the foe escapes Liz will be left with nothing given the nonexistent damage-output on the pummels...unless you had the D-tilt shocking hex applied to the victim to rack up damage to make the pummel hexes relevant. You can also double-up on the pummel with a clone; doing so will apply both the weight-loss and drain at the same time, regardless of how you input the move, as stacking them in one session won't do you much good.
B Pummel ~ Liz Service
Eyes closed in concentration, the tip of the tail glows with a warm light and taps a part of the foe to cure all of their status ailments, free of charge. Liz does want to become a hex doctor after all, she needs to show off this side of her once in a while. The cure isn't intended to help foes though, as the hexes are partially-absorbed into Liz to briefly enhance her abilities: this increases the damage done by her throw by 1% per-ailment, and strengthens the knockback of stronger throws somewhat. This has no limit cap, but the buff from 6 ailments will only be half as effective as the last to prevent it from becoming too powerful too easily. Useful for when you don't need the ailments on the foe anymore (or they're about to expire), helping to contribute some extra damage or buffer a stronger throw to be within KO percentage. It's even better on slime, where the hexes will be re-applied to the victim and you can potentially use this move again to re-cure them to get more power, though foes can still escape from your clutches.
If you held B when performing this, Liz will apply her NSpec buff to herself over the time it takes to apply her pummels. This is useful for obvious reasons, but it only lasts for 5 seconds as opposed to the usual 10 and the post-penalty still takes full effect afterwards. You can use this to effectively "cheat" by applying the other 3 pummels first however you wish, but you only have so much time before the victim eventually escapes that doing such is essentially impossible outside of them having obscene damage or you having lizard hands.
F-throw ~ Burning Assault
Liz lets go of her victim and proceeds to deliver a swift, yet brutal smackdown on them. She punches the left and right side of their face respectively, knocks them off the ground with an uppercut to the jaw and finally finishes by rearing back for a quick haymaker to the face, smashing it in as a slight *CRACK* sound is heard. This deals 3 hits of 1.5% followed by 2% and 60* knockback from the final hit, which is unfortunately less impressive than the sick animation would have you believe - it was just a swift smackdown, after all. The knockback is middling, not impressive enough for follow-ups or KOs (only KO'ing past 225% with no buffs), though it can help push for a potential offstage gimp given its knockback angle if you healed the victim of their hexes prior. This is Liz's least useful throw with no set-up, which is a shame given how cool it looks. Grabbing alongside a clone, both Liz will assault the foe in unison, multiplying the damage output and knockback by 1.5x.
This throw has a few non-hex quirks to compensate for its mediocrity, one being that you can angle to get a different attack. Angled downwards, the third punch will be an overhead swing that knocks the victim down into prone, sacrificing a bit of damage in exchange for a useful tech-chase opportunity. Angled upwards, the third hit will have Liz crouch down and boot her victim in the jaw, knocking them on a 30* angle for higher knockback and 2%.
This move also deals more damage if Liz had taken damage over the last second prior to grabbing and while holding her opponent, as the added anger from such fuels her violence. Half the damage she took from opponents and every facet of self-damage she took is added onto this move, taking the form of extra punches dealing 1.5% a pop with excess damage not rounding up to 1.5% being added onto the final hit. This damage output is not affected by buffs, nerfs or even a clone. Not only can this provide Liz with some monstrous and much-needed damage output, it can potentially throw off an opponent's DI/vectoring attempts through the unexpectedly-prolonged animation, even stall out time-based hexes like floatiness or what not, but not too badly as the move's animation will gradually get faster and faster with more excess punches to keep Liz from being locked into it for too long. There are no ends to the ways Liz can damage herself with her hexes (D-tilt, D-Smash tail, U-air) or receive it from opponents non-fatally (B-air, her own tail), and she can even double-up with a clone to take twice the damage from all that. It's probably best not to go out of your way for this however (you are still taking damage, after all), unless you really want to expand the timer on the hexes that come with it that badly.
If you held the control stick while throwing a victim with a lizard tail, Liz will grab hold of the end of their tail to prevent them from flying any farther than it can stretch out, not finished with them yet. She will then swing their tail downwards to knock them straight down for an extra 2%, bouncing them off the ground for yet another 2%, fairly decent upwards knockback and the chance to be knocked into slime that happened to be beneath them. This can be teched, but doing so will place the victim level to Liz and 1-2 platforms apart where she'll have a pretty good frame advantage over them. Performed near the ledge, the victim will be spiked for relatively decent knockback, not being fatal until they're past 170% on average. No matter the result, the victim is left with their back to Liz whereby their tail can be more easily exploited.
Foes struck by Liz have a red-hot fever cast upon them, a supernatural fever that causes them to flash orange and emit steam profusely. A fervent foe leaves a trail of fire wherever they or their projectiles go one second into the hex, knockback not counting towards this, as well as spreading fire with their attacks over 1.05x the area its hitbox covered per 1% it dealt. These flames linger for a short 30 frames, and deal 0.5% with no hitstun per second for every second remaining on the hex's timer (more timer = more damage earlier on) to the victim or their constructs/minions/allies. The flames will not damage the victim by default, but they can if they moved back into the trail. The fire strangely cannot trigger the victim's counters. Foes with a lizard tail will take damage anyway when they move forward, as the trail burns their tail for some admittedly minor damage, but worse yet the tail will generate its own trail that will burn the victim in full should they move backwards. The splitting hex makes this even deadlier as the copy left behind will automatically be burned by the trail. Slime will boil while in contact with a fervent victim, dealing 1% when touched/every second in contact, applying hexes twice as fast and increasing the power of its sentient hitboxes by 1.25x while making them deal fire damage.
Fire will not harm enemies of the victim or their constructs, unless said constructs revelled in damage like bombs or something crazy like Don Thousand's gate. The fire can strangely trigger enemy counters 10 frames into its existence, and will actually power up their projectiles once on contact: this increases their damage by half of the fire's, as well as scaling its knockback appropriately (if any) and making it 1.25x bigger - still very usable with Liz's Side Special. Once the fever has run its course, the victim will burn up and suffer damage equal to however long they spent fervent, potentially more if the drain spell was in effect and even if it ends at the same time (which it will by default). The fever lasts for damage = X seconds and can potentially last for an insanely long time if Liz had some rage on the throw, but there is a solution: half of the damage foes deal when burning will reduce the time they spend feverish. On the other hand, a quarter of the damage they receive will extend the timer, but no higher than the initial timer.
Giving yourself a fever is just asking for pain, as poor tailed Liz will get burned whenever she moves sideways. The damage factor works well into this move's rage factor though, and the inability to trigger your counter can be a good thing. Working at 2 seconds a pop for 10 seconds max (30 with the timer multiplier at max), getting feverish can allow Liz to rack up some absolutely absurd damage on herself together with pain amplification, electrocution and a clone, all of which you can apply to an opponent through this throw if you're willing to get EXTREMELY risky.
B-throw ~ Glacial Swing
Wrapping her tail around the victim, Liz gets on all fours and lifts them over her head, before swinging them around and launching them behind her afterwards. This is a tactic she employed back when she took out her rage on multiple thugs who ganged up on her, using one opponent as a wrecking ball to take out several others. Victims of this throw are launched far for 8.5% and 60* knockback that's especially potent from the NSpec boost, able to KO from around 130% and being her best kill throw - good from a pivot grab or when cornered. Victims of the swing are positioned just low enough to the ground that slime can affect them, and will be exposed to it 3 times in a row to great effect if there were any hexes that could stack. A victim with a slime sphere over them will hex other characters struck by them. The swinging of the tail forms a weak suction effect 0.6 platforms away from the swung foe on either side, pulling in nearby opponents or slime for what it's worth, and the victim has super-armor while swung so attacking them won't end the throw.
By holding down the control stick when launching an opponent, Liz's tail will detach from her and remain wrapped around the victim as they go flying, a fresh tail growing in its place. The detached tail constricts victims slightly for 1-2% every second (while gnawing them if sentient), flinching every 3 seconds, and will attempt to link its victim to any slime pools that are within range - possibly doing so while they're flying early into the launch or with a longer tail. The tail is surprisingly resilient and will not break until it's suffered 11-22%, leeching off a minuscule portion of the target's magic/life-force to better resist, or it can be shaken off but doing so onstage will just cause it to plant itself in the ground upon landing. Should this occur, the planted tail will target the victim when they get within range: not only constricting them and linking them to a slime pool it was placed over, but all the hexes that were on the victim during its stay will be imprinted into it, passing them through touch to potentially re-apply or even stack them. The tail is easily destroyed in this state, however.
With 2 Liz holding the victim, the copy will slide back out of range the instant the throw begins, and is allowed to hit the swung victim with any attack. Having an extra person to help swing someone isn't exactly helpful, after all. There's just enough time to land any of your standards (bar the U-tilt ax kick) or Side Special to apply their hex, though you'll almost certainly be using the Jab tail lash given how great of an opportunity you have and how it can enhance the knockback of the throw, not to mention just holding A when performing the throw will guarantee Liz to use it. If the clone was pushed offstage because Liz cornered a foe at the ledge or what not, she will be allowed to use her aerials instead of her standards and will defy gravity while doing so, but that is an extremely unlikely situation. She can still use the tail lash in midair anyway, so it's not too much of a problem.
The hex here resembles the fever and contrasts in element, being a supernatural, over-the-top cold. This generates a trail of chilly air with a variety of effects, lingering for a full second as opposed to just half. Allied constructs in direct contact with the victim or the air when first generated are immediately frozen for anywhere between 30-5 frames depending on their strength/how difficult they were to make, taking 1.6x as much damage when attacked or being instantly destroyed when attacked frames into their freezing. Ally projectiles can be frozen too, not being hitboxes and destroyed by any decent attack, and timer-based constructs with no HP can be shattered in their frozen state. This is useful for punishing more "active" characters who utilize constructs, especially those top-tier sets that are encouraged to fight alongside their minions like Iguana, though Liz will have do her part to actually exploit this effect. Constructs touching the frost later into its creation are simply slowed and weakened down to 50-85% of their usual effectiveness depending on how early they were exposed to it, lasting while they remain exposed before gradually wearing off over thrice the time they were exposed. This can affect opponents as well, but it's only 1/3rd as effective on them.
When chilled foes move through the air, even from being launched (the initial B-throw counts towards this), the frost they emanate will form into small pieces of ice that hail down on a steep angle when they stop moving/perform a different action. This hail lasts for half a second and deals 1% to applicable targets or 2% if they were a construct, even damaging the victim if they were caught in it and will not trigger counters. The damage is minuscule, and can be completely avoided through shielding, but it can add up through multiple hails being created and can cover a very wide area to very likely damage all of the victim's constructs at once. Unfortunately, the damage dealt from this cannot actually destroy a construct, meaning you will still have to deal the finishing blow yourself.
When a chilled foe is launched off the ground (B-throw doesn't count to this), the trail of air that is left behind will quickly form into solid, noticeably transparent ice. This ice gets HP equal to twice the damage dealt by the trigger move, but it loses 5HP after lingering for one second and 3% for every 0.25 seconds that pass after that, until it eventually crumbles harmlessly. Despite how this sounds, the ice actually only functions as a solid and takes damage from enemy constructs like traps, minions and projectiles to block them off completely. Anything else can pass through the ice as though it wasn't even there, save for the victim and their player-based allies who will shatter portions of the ice they move through harmlessly on contact. Essentially, you can use this to temporarily wall off minions and what not as further reward for knocking away their chilled master, or hex a minion to use it to create the wall to wall off other minions. Ice also has the secondary effect of breaking into chunks to accompany an attack that destroys it when struck by the victim's enemies, covering 0.2-1 platforms based on its power and dealing a quarter of the attack's damage without flinching. This will automatically connect if the move struck the victim as well and will contribute to the timer of a hex inflicted as a result, but you won't get a hex if only the ice chunk hit. Ice will also deal 5% to the trigger victim or their constructs when knocked through it.
Slime that gets touched by a chilled opponent will freeze over once they're no longer in contact, preserving it for 3 seconds or until it is touched again by any character. This frozen slime can be destroyed by the non-victim, and does not keep targets from sustaining its hexes if they had a tail plant connecting them to it. Slime touching the victim while airborne and kicked up will be frozen immediately and remain airborne. Sentient slime will be preserved in the exact state it was in, resuming where it left off if the victim touches it again; even if they were no longer cursed with sentience, in which case the slime will get its own independent timer. Only slime being attracted through misfortune will remain unfrozen, but will freeze if they get out of its attraction range.
By hexing the foe with both a fever and a chill at the same time, the fiery trail they emanate will be frozen while the frost remains, effectively doubling the fire's timer as it will take immediate effect on applicable victims who touch it. This helps to better capitalize on its projectile-powering abilities, as well as to punish opponents moving through the ice block to break it among other things. The hail that ensues from this turns into a firestorm dealing twice as much damage without depreciating from the flame trail, all the better for weakening constructs.
Chilled, tailed victims will find their mobility cut down to a faint 95% while their tail is exposed to the cold, and will have it freeze over instantly and have their speed cut down to 88% all the while should it be exposed to the cold for a full second - occurring automatically with frost generated unless the victim moved backwards. Unlike with the fever, a lizard tail will not generate its own trail of frost. Once frozen over, it takes a full 3 seconds of not being exposed to the cold for it to suddenly thaw out, potentially outliving the chill hex. A frozen tail is relatively inconsequential on its own, but struck by an attack the ice will break off in a spray to cover a radius 1.3x wider than the tail at the time. This deals 3% (5% on a giant tail) and no hitstun, but a very minor amount of forwards pushback that can aid in a few of Liz's longer-ranged attacks that can poke past victims to reach the tail: the Jab/N-air tail lash (cancel into a shield/counter to exploit the pull), D-Smash tail swing for an extra pull or B-air tail poke to pull victims in towards Liz's foot unexpectedly. Damage dealt by the ice contributes to hexes on moves that connect successfully, and can damage the victim's minions to stun them slightly if they can be stunned. The ice also contributes a minor amount of shield-stun, almost nothing on moves that don't flinch or enough to make the move safe on shields, even your risky F-Smash tail swing.
Chilling yourself, you don't have to worry too much about the anti-construct aspects of the hex, unless you're utilizing a tail plant, but you do have to be wary of the hail that can damage you and your tail, as well as having it frozen over. A frozen tail will contribute more harm to Liz when struck, and slows her tail-based attacks by 20% to the point where stacking this with a giant tail will cut your speed in half. A frozen tail is no stronger, but landed you'll get the ice chunk effect to deal extra damage on opponents and add some shield stun that gives these slower moves some coverage, thawing your tail in the process. This can potentially stack on a tailed foe to deal them 3% and then another 3-5% on their tail, dealing no additional shield stun but netting you a bit of inwards knockback when connecting. The chill can be annoying to deal with, but transferred you'll get the chance to knock opponents up off the ground with your counter to immediately create an ice wall to block off any potential minions they have.
U-throw ~ Blossom to Earth
Tail wrapping itself around the victim's leg, they are swung up as high as the tail can go and held high up for a moment before being slammed back down violently. The impact from this deals the victim 7% and very high base knockback straight-up, positioned perfectly for a F-air follow-up, but the knockback growth leaves much to be desired and prevents it from KO'ing until less reasonable percentages. A longer buffs this throw to deal 10% and 1.5x its base knockback. Having a clone backing you up increases the damage output by 1.5x and doubles the already high base knockback, to the point where with enough buffers and a decent percentage this could potentially be a surprising KO move. As with the B-throw, your swung victim can be used as a wrecking ball to slam into other opponents to deal them the same damage and knockback, only the knockback here is radial. There is also a sweetspot beneath the victim during the impact which deals a hefty 16% that KOs at 140%, hitting foes who were spiked by them while dropped if they didn't tech. This isn't something that will take effect outside of FFA matches however, unless you were fighting against a summon character like your hated Iguana in which case you can revel in crushing him with his own minions or vice-versa.
By holding down the control stick, Liz will detach her tail as the victim is launched and keep it wrapped around their leg, but this time she will have it plant itself to become a tail plant per usual. The difference here is that the tail forms a tether between the victim and the ground it was rooted in, keeping them being launched any farther it can stretch out and dealing them 1% per 0.3 platforms' length they would have kept flying as their body is stretched. Opponents can break this tether identically to the B-throw tail constriction, and when not destroyed it will get a print of their hexes to potentially pass them down again all the same. If Liz charges up a smash that was within attacking range of the plant's root, the tether will attempt to pull them down into its path half as quickly as the gravity and falling speed gained from becoming metal: this can mess up their aerials if their landing lag was triggered prematurely, a high possibility if they were aiming to destroy the tail plant through damage. Tethering opponents comes with more end lag than not.
Victims of this throw are subject to an odd choice of hex for the rough Liz: floral magic that causes flowers to grow spontaneously from their back and head. These flowers surround the victim with a soothing fragrance that gradually calms their rage over one second, good for a bit of in-battle therapy, negating the knockback bonuses they've receive from higher percentages that would make hits from them more dangerous when you'd go to finish them off - supplementing the nature of this throw's knockback and tether option quite nicely. The calming effect also weakens the foe's attacks very slightly, reduces their mobility, slows them while they're being launched and extends the time they can be held for, all for a mere 0.9/1.1x multiplier for what they're worth. The speed of their projectiles are slowed down to 70%, making them "trap-like" but also easier to counter and they won't actually last any longer than usual unless they had infinite range, indirectly nerfing their reach as well. Hitting a flower foe will cause the flowers on them whither and leave behind seeds that quickly fall to the ground: from both the seeds and the victim, new flowers will sprout after one second and take another second to apply their fragrance. A seed is automatically planted into the ground when the thrown victim is slammed into the ground. The fragrance of earthly flowers affects characters standing over them all the same as when sprouted on someone, except they heal 1% every second for up to 4% and restore shields 1.5x as quickly due to not sapping energy from their host to survive, and the effect wears off instantly when you leave contact so you can freely control the inherent downsides. Hexing yourself with plant magic takes 1.5 frames a pop up to 5 times for 3.5 seconds each, actually being decently useful for negating Liz's rage to make combos easier.
D-throw ~ Magic of Mercy
Liz gives the foe a somewhat pitiful look as she sweeps her tail to knock them behind her, willing to let them off easy this time around. She may be violent, but she still knows when to hold back and show mercy. This attack deals 3%, and low backwards knockback on a 30* angle that's prime for follow-ups from the convenient position you can best exploit your tail, as well as keeping the foe facing your back so you can better exploit their tail if they have one. The tail also curses the victim with the last 3 hexes they sustained from Liz through her direct attacks on those designated inputs or the Side Special projectile, not counting a hit from the counter, slime or anything else that can pass on hexes. Damage-based hexes can stack if you connected with them consecutively (which is easy enough with half her standards and aerials), but no more than twice, and non-damage-based hexes like splitting and growth will fortunately only occur once. If there were no hexes to fill in any slots, the victim will get the ailment-extending effect for 1-2x as long as the % dealt by this move. This isn't reliable for getting specific hexes on a foe, but the "randomness" behind it can serve as something of a surprise. Using this alongside a clone doubles the damage output to better serve the hexes, and gives you the option to knock opponents forwards instead of backwards by tilting the control stick forward, should you need to.
By holding down the input, Liz will point towards her thrown victim without facing them, holding them in place briefly with a hex. She then casts this input's real designated spell on them, which takes the form of a monochrome blast dealing an extra 2% and slight horizontal knockback that worsens this move's follow-up potential on top of extra end lag. The hex that compensates is time magic that speeds up hexes on the victim for X (5) seconds, making it so recurring/gradual effects are twice as fast but also disappear twice as quickly...assuming the hex hadn't already worn off by then. This works wonders with the drain magic, and other gradual spells like the shield drain, growth and floatiness among others. Self-hexed, it takes a surprising 6 frames to apply for 2 seconds and up to 5 at once, effectively working as a way to speed up said gradual spells to better transfer them more quickly in their prime.
This move has another, more hidden effect. Just as Liz is about to blast her suspended victim, you can input any move to alter the blast's hexing properties to match your chosen input, but the effect is not applied right away. Instead, this changes all hexes the foe would receive over the next 5 seconds into the one you chose, whether they be applied from any of your attacks or from slime. This opens up all sorts of new possibilities, like making it so all your attacks amplify pain so you can stack the effect within the time limit and then let loose with a super-powered attack, the nature of this move's knockback making it fairly easy to exploit this.
Playstyle~
Violent Lizard Witch
Liz is an aggressive fighter who doesn't need set-up time to get going, but her base power is weak and she lacks a conventional projectile. Used incorrectly, she will find herself being overpowered and out-camped by those mighty magic-users and superhuman monsters, quickly losing in trade-offs when her damage output is low and her tail can be exploited for extra damage. To even the odds, Liz will want to make use of her magic powers for what they're worth: applying several hexes at once through a string of combos, keeping opponents close to you for maximum output.
Overall, Liz is a high-risk fighter with her share of burdens, but with a bit of hard work, smart use of her hexes and unrelenting fury she can duke it out with the best of them, and maybe even save the universe from the evil Iguana.
FinalSmash~
True Lizard Magic
Liz casually raises a hand to her side and bathes it in a bubbly, overflowing, glowing greenish magic power, glancing towards it and saying this as she does:
"I wasn't going to use this spell here, but..."
Time stopped for this quote, Liz rears her bathed hand behind her slowly, that magic power channelled into her arm and flowing directly into her hand where it becomes fully concentrated, glowing more vibrantly than before and trembling. Finally, Liz thrusts her arm forcefully to cast this magic forth, accompanied with a loud shout to follow up her initial quote:
"YOU ASKED FOR IT!" (default quote)
"YOU'VE LEFT ME WITH NO CHOICE!" (reluctant quote, all opponents are heroic)
"SCUM LIKE YOU DESERVE IT!" (angry quote, all opponents are evil)
"READY OR NOT, HERE I GO!" (vs Lizard)
The spell that ensues from the thrust is a bigger, faster, flashier and of course stronger magic projectile than the one seen in the Side Special, as expected of a Final Smash. The first opponent to be hit by this magic is straight-up turned into a tiny lizard, accompanied by very high knockback that KOs at 100% should they be struck up-close - actually possible despite the long start-up given the time pause for the cinematic. Should the knockback from this KO the victim, they will actually respawn as a lizard, thus this is a worthwhile to land from your melee game. The magic projectile dissipates when hitting someone, unless they were a ghost in which case your F-tilt or N-air are great moves to use pre-fire to enable multiple opponents to be turned into lizards. Should Liz miss with her magic, she will either scowl and stomp angrily if her opponents were evil or sigh in relief if they were all heroic, hesitant to use the full extent of her lizard magic on them. If this hits an evil/neutral opponent, Liz will fist pump and smirk in an uncharacteristic, triumphant pose, a rare moment where she can actually be seen smiling. Liz has mastered her signature spell to the point where she can fully turn people into lizards without needing to rely on intense emotional trauma, though the effects are temporary unlike with Lizard and Iguana - but still more than enough to finish off weakened evildoers.
Lizard opponents have their size and weight reduced to the pitiful amount Cyluth had to endure throughout his reptilian existence, that being a size stat of .5 and being virtually weightless at .1, whatever that would translate to in Smash's weight units (6-7 weight units? Jigglypuff has a weight of "1" at 68 weight units, and 1/10 is 6.8 units so yeah). In other words, getting hit by virtually any attack with kill power will spell a lizard's end. Fortunately, the victim is far from helpless: in addition to becoming an annoyingly small target and effectively gaining grab resistance against most characters given their overly-short stature, lizard victims get to keep all their powers in-tact with surprisingly no drawbacks, even if they were a physical fighter like a boxer, aside from their range naturally being nerfed to scale with their size. Lizard and Iguana got to keep all their powers upon becoming reptiles, so why not other characters? The hex lasts for 8 seconds plus another 0.5 seconds for every ailment on the victim(s), the likes of which are paused for the duration of this Final Smash, and any KOs scored on a lizard victim will bypass any weird respawn mechanics like stock reincarnation as lizards have their defenses and immortality from their original form rendered null. Nonetheless, opponents should enjoy and try to take advantage of what benefits they receive from lizardhood: who knows, they might even ascend to true lizardhood and have their place cemented atop the Top 50!
If this spell is used on Iguana, he will be turned into an even smaller lizard comparable to his hated enemy. If Lizard was struck, he will actually be turned back into his human form, finally! Liz will cry tears of joy, though Cyluth doesn't look too thrilled given that lizard form was what made him successful in MYM13 - even though Liz was the one responsible for turning him into a lizard in the first place. Cyluth physically resembles a more adult Harry Potter with a blueish-green shade of hair, a Harvard college uniform (that's what he was wearing when he got turned into a lizard, after all) and minus the forehead scar, of course. The resemblance obviously makes sense, given I actually used a Harry Potter image for Lizard back in MYM13 when I actually did rankings once.
Gameplay-wise, Cyluth is a slightly taller Robin with noticeably less weight (82) and aerial mobility, as I presume that he was not physically-fit back when he was human like most mages. Cyluth's moveset is not much different from when he was a lizard given most of his moves used magic, except now he is too big to hide behind his rocks (not that he needs to anymore, they're useless now) and more importantly you can actually hit him properly! Not that Liz would want to do so, I imagine. Harry Pot-I mean Cyluth now plays like a proper character, no longer being broken to some degree though his way of fighting is still stuck in the past. This transformation is actually permanent, though to be fair it's a much-needed change to make the game more balanced, as now you can actually grab Cyluth and as such his counter is not invincible among other things. Plus, Liz would be heartbroken if all her efforts in restoring her beloved were for nothing! If Lizard is turned back into Cyluth and you won the match, Cyluth will be unlocked as an alternate costume for more fair play. Unfortunately, you're going to have to put quite a bit of work into actually hitting Lizard with the Final Smash given the projectile will pass over him by default, and even if you do hit it will all be for nothing if you hit him with the Final Smash again! Talk about restraint.
If there were multiple Lizards in the match or one wearing his alternate costume, hitting with the Final Smash will cause Liz to get angry as she realizes that she just hit an impostor. How dare they pretend to be her beloved!
Extras
Up Taunt ~ Study Session
The tail takes up pen and book and starts writing surprisingly fast, allowing Liz to fight and write at the same time! This is how she got into Harvard despite getting into a lot of fights, but it didn't always work out when her notes got destroyed in the process. Holding the input, Liz will sit cross-legged with glasses on as she reads a magic book, occasionally putting it down for a moment to hastily scribble some notes on a piece of paper for a double-up with the tail's writing. She never looks back to check on her tail, which is incredibly dexterous when it comes to writing.
Side Taunt ~ Provocation
Liz holds up a clenched fist alight with weak magic and shouts "Bring it on punks!", her tail moved to the background to perform a 'come here' motion in front of her. She is not careless enough to leave her tail exposed while taunting enemies.
Down Taunt ~ Practice Magic
Liz holds up a hand in front of her and places a mostly-harmless hex on herself, living through its effects before curing herself a moment later. The hex can range from growing animal ears/tail, changing the color of her clothes, minor queasiness, drowsiness, minor memory loss, muting, becoming invisible and much more. Liz knows far more hexes than her moveset lets off; she has been studying them her whole life, after all, not to mention she wants to become a hex doctor. If another character touches Liz's tail during one of the more harmless hexes, they will be hexed for a few seconds, serving no gameplay purposes aside from making them look and/or possibly even act funny. Liz may also hex herself with momentary vampirism, werewolfism or zombification; she doesn't employ these in battle because she dislikes the idea of turning somebody into one of these, only learning to do so so she knows how to cure them.
Win 1 ~ Street Punk
"That what you get for pissing me off!"
Win 2 ~ Time Out
"Don't worry, the spell will wear off in a few hours."
Win 3 ~ Fly Away
"I've wasted enough time with this pointless fight. See ya."
VS Lizard
"Are you sure you don't want me to change you back? T-Then maybe we could...start a family together? NO! Forget what I just said!"
VS Iguana
"You! Y-You may have killed me once, but this time I'll be the one doing the killing! I'll do this myself so Cyluth doesn't have to!"
VS Fortis
"Someone actually made you into this? That's so sad. I'm sorry, my knowledge doesn't lie in the realm of technology, so I can't help you."
VS Metireon
"I respect your noble ideals, but that thing is too evil to keep alive. One power-hungry, universe-threatening monster is more than enough for me."
VS Jecht
"My husband would never leave his family or go out drinking like you do...n-no, we're not actually married yet, but it's only a matter of time before it we are!"
VS Lord Galf
"You're a sick monster that needs to be removed from this world! How about I turn you into a lizard and show you just what it feels like to be stepped over!"
VS Garnet
"Y'know, I've never actually used a weapon in my entire life. I could probably use one efficiently with my tail, but then it would take too long to master and I'm not gonna compromise on my commitment to hexes. I want to help people in the long run, not kill them."
VS Grunty
"A green-skinned witch? I always thought those were just a bad fairy tale. I feel for you, being so ugly and lame, but I'm not about to play along with your little trivia games!"
VS Kristoph
"Are you the one who revived me? No, that can't be...you're supposed to be dead right now, just like me."
VS a Dragon or a Kupaling
"It's not a dragon's tail, it's a lizard tail. Come to think of it, it would have been pretty cool if had been able to turn Cyluth into a big, powerful dragon instead of a small lizard."
VS Avengers
"You guys are experts on saving the world from large-scale threats, no? Think you could defeat a certain evil iguana plotting universal domination?"
VS X-Men
"Sheesh, and I thought I had it rough with my tail. I'm a bit jealous you all got crazy superpowers from your mutations, but then again I can use magic so I guess it's even."
VS Kizaru
"You got your condition from eating a fruit? That's a new one to me. I'm glad I could still hit you with my magic-powered blows, or else I'd be done for."
VS Punch (no joke)
"I can't believe he sent a sentient fist after me of all things. Did he lose the respect of all his capable followers after I turned him into an Iguana?"
VS Bazuso
"If you're going to stand in my way, don't be so half-hearted about it!"
VS Gamagori YOUR GAUDY COSPLAY VIOLATES THE RULES OF HONNOUJI ACADEMY!
"My tail is not cosplay, you muscle-brained doofus! It's apart of my body, as you've clearly seen first-hand by now. I don't even attend your stupid school anyway, so stop yelling at me like I'm a student there."
VS Copy Character (Pre-Lizard; TAC, Ameno-Sagiri)
"Cyluth pulled off the copy thing waaaay better than you losers. What's that, you say you were doing it before him? What nerve!"
VS Copy Character (Post-Lizard; Skull Kid, Mr. Badd)
"You guys have no shame, ripping off other people's hard work and claiming it as your own. Just thinking about it makes me sick!" (lol hypocrite)
VS Banette
"You remind me of the dolls the other witches had on them back in the dorms."
VS Yutaka/Abnes
"I've heard of these kinds of incidents: some creep uses their knowledge in hexes to slow or halt the ageing of a young girl for their own sick pleasure. Don't worry, I'll cure you so you can live an ordinary life."
VS Luxord
"You remind me of this one lecturer from my college. He was so frustrating to deal with, it's a wonder he even made the top 4 in Harvard."
VS Keroro Platoon
"Another bunch seeking world domination? You guys don't seem all that bad though, so I think I'll let you off with a quick whipping."
VS Oogie Boogie
"For how much trouble I've gotten from my lizard tail over the years, I'm glad it doesn't influence my diet. Otherwise I'd be craving all those creepy bugs inside your body. Come to think of it, I wonder if -he- likes to eat bugs now."
VS Jeanne D'Arc
"If you call yourself a witch, then show me your hat! I hate it when people call it themselves witches and have nothing to show for it, just because it sounds cool."
VS Madolche Majeleine
"Desert-related magic? That's actually refreshing after all the hard theory and science I had to sit through in college."
VS Luke Atmey
"You're nothing but a dirty con artist! I'll smash your nose in so hard it'll match your crooked ways!"
VS Putata
"Another frog? Seeing you reminds me of the gangsters I used to beat up, but at least they didn't have tacky magic paintbrushes."
VS Minami
"Please put those balls away. They bring back bad memories of not being allowed to play sports because my tail would get in the way."
VS Salvatore
"Don't tell what to do, you battle-hungry hag! Why don't you learn some common sense so you can be a proper general?"
VS Nisa
"You're deceptively violent for a so-called "hero", aren't you? At least I get mad over reasonable things. You should have told me your little pet peeve, so then I wouldn't have had to beat the crap out of you."
VS Magic Knight
"No thanks, I don't need elemental magic. Learning the ins and outs of hexes is hard enough as it is."
VS Leviathan/Jormungandr/Bahamut
"You lot are lucky, being able to sprout your tails when you transform and not have them inconvenience your everyday lives. Come to think of it, that could be an interesting idea for a new spell..."
VS Funny Valentine
"I wonder if there's a parallel version of without a lizard tail? I wouldn't mind meeting her, if it didn't pose the risk of getting annihilated as you say."
VS Chou-Chou
"You're telling me that god is just some little brat? You ought to learn some humility, and I think spending some time as a tiny lizard would do just that."
VS Shinobu
"Your fighting style reminds me of mine: an unorthodox mix of melee and magic. That being said, you lack experience, and should really stick to one profession instead of changing on a dime."
VS Altis
"I'm pretty sure that there are no hexes for turning people into angels, or for changing them back as a matter of fact. If you're actions are doing good, but you claim to want to do evil, doesn't that mean that deep down you really want to do good? You should be more true to yourself."
VS Ryuto
"Jeez, you're pathetic. I bet Cyluth could beat you bare-handed if he were still human, and that's saying something."
VS Judge Nemo
"You want to destroy the world because you hate humanity? I used to hate everyone around me as well, but you're going way too far! You're just running away!"
VS Syrma
"You know, I'm really getting sick of all these arrogant people who go around calling themselves "gods". First it was that vile man, and now it's a bunch of a misplaced misfits."
VS Regina
"You're a surprisingly normal and decent person compared to all these other weirdos. I can see that you're strong, but try not to get yourself involved with anything that'll get you killed. Leave that kind of stuff to me."
VS Doppelganger Tsukika
"I see, so you were born with that monstrous strength. As convenient as it sounds, it must have made your childhood a painful one; I know first-hand how that feels. I'll do my best to devise a cure for you if that's what you want."
VS Doppelganger Shirogane
"Huh, I was expecting more of a challenge from someone of your appearance, especially when you call yourself a demon lord. Not that it matters to me; I'm just glad to be done with this fight."
VS Marina
"You would fit right in with the witches at my college, what with your constant experiments and the explosions that occur when they fail. Looking back, I'm surprised I even slept through all that racket."
VS Shallotte
"Wow, I didn't know that alchemy could be used to make those kinds of objects. They only ever taught our alchemists how to make gold and do weird transmutations with elements. Guess Harvard isn't the be-all, end-all hub of magic skills in the universe."
VS Kazuma Satou
"I'm normally a sucker for people with supernatural-related problems, but I wouldn't cure your bad luck even if it was a hex. You don't need magic to curse someone; many people place them upon themselves with their worldly desires or malice, and those are the worst, most incurable kinds of hexes."
VS Izuna
"You're like a bigger version of that undisputed brat, but at least you're not an egomaniac. Still, you're pretty annoying to be around."
VS Swordfish OC
"I can't believe I wasted my time on this bratty lunatic. I don't think even a taste-altering spell would feed some sense into her."
CHANGELOG:
12/4/17
NSpec's numbering reworked and more elaboration is added, first paragraph being rewritten to reflect this.
NSpec stance lasts for 20 frames instead of 10, and resets every time you place an ailment on yourself. This keeps the player from having to awkwardly make as many specific inputs as humanely possible within a very short 10 frames, and gives Liz some "end lag" that prevents her from entering the stance liberally. Being in the Hexxer Stance for 1 second will halve the stance's timer down to 10 frames and then again down to 5 after 2 seconds.
General ailments now take 3 frames to apply or 1 frame when applied consecutively, instead of just 1 frame each time.
Hexes have their timers and periodic effects paused while Liz is in the NSpec stance, though perpetual effects still remain and hexes that trigger when Liz is struck will still take effect. This is mostly to keep the initially-short timers of the hexes from being invalidated if you wanted to apply some more, and adds an element of risk to Liz going in to apply more. This works in with the stance having less "end lag" when held out for longer to encourage Liz to apply as many effects onto herself in one go.
Timer-extending aspect of the NSpec elaborated to take 6 frames a pop.
Elaborated that Liz keeps the hexes she's applied onto herself when struck out of the stance, as not mentioning it would almost certainly imply that she doesn't.
NSpec buff is applied to the DSpec counter when landed, instead of not being. This gives Liz a bit more of a reward given she needs to put a bit of work into landing the counter.


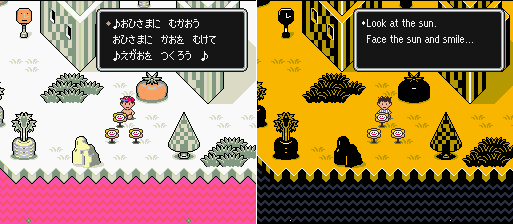


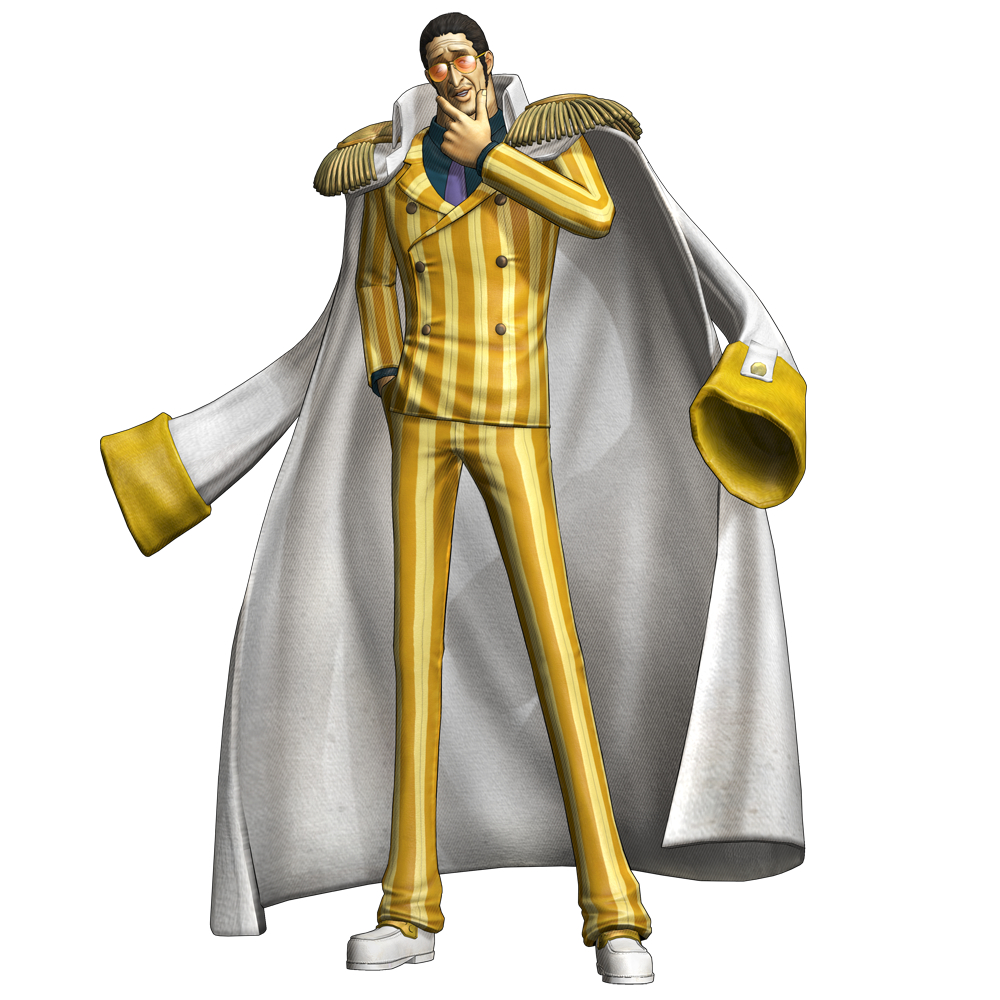
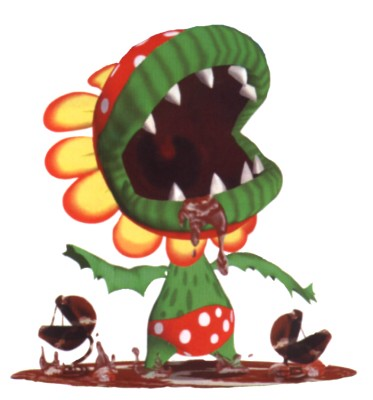


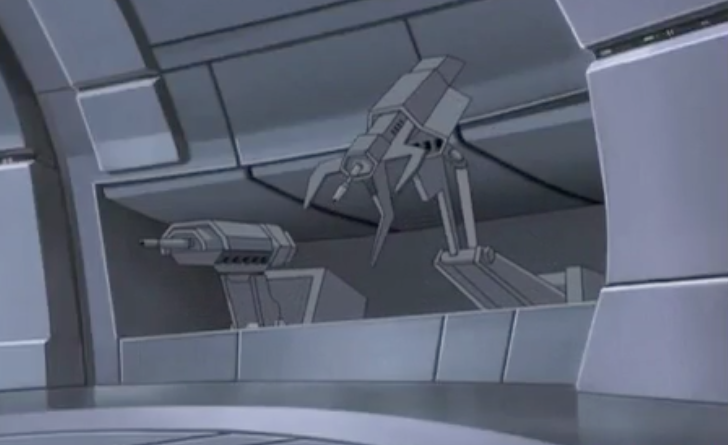


 )
)


_004.jpg/revision/latest?cb=20101205003002)