• Welcome to Smashboards, the world's largest Super Smash Brothers community! Over 250,000 Smash Bros. fans from around the world have come to discuss these great games in over 19 million posts!

    You are currently viewing our boards as a visitor. Click here to sign up right now and start on your path in the Smash community!

Make Your Move 18 - Top Fifty Is Posted!

Altais

Smash Champion
Joined
Nov 14, 2007
Messages
2,083
Location
Starbase, where no turtle has gone before.
Altais Altais I read the new version of Gunvolt, and I respect your attempt to fix my previous issue with it in that the air dashes and Up Special felt kind of unintuitive and easy to have blow up in your face. The problem is as worded, the Up Special is basically god mode with no real restrictions to it. You no longer lose EP, you have infinite recovery, and you basically just have to use another move as worded to reset it to full power. This gives Gunvolt the potential to infinitely stall, which is obviously something I'm sure you didn't intend. Even ignoring that I feel the Up Special gives a bit too much in the way of free benefits, it should probably have a lot of recharge period and/or do less things than it currently does. You did a nice job of fixing Side Special and not making me worried about the raw camping power of Naga Bolts. That said, I still think Naga Bolt shouldn't be on three separate inputs, with him having something separate for at the very least his Jab. I also noticed on rereading the set only really has one KO move, and said move takes up half his EP meter to even use and has more drawbacks on top of that. It would be nice if you gave him a couple more ways to actually kill people.
Oh dear, I was worried Up-Special would be overpowered. Originally, I only had it give Gunvolt infinite jumps/air dashes without it refilling his EP or giving him unlimited. That said, I think I'll undo that buff. Also, I considered making it so that if Gunvolt gets knocked out of the move, he won't be able to use it again until he lands or grabs a ledge. That said, I think I'll go through with that plan.

And I have to agree about the lack of kill moves. Looking back, that WAS Pit's major drawback in Smash 3; he could build up damage quickly, but landing the finishing blow was a real pain. That said, I might make Gunvolt's Smash attacks into kill moves instead of paralysing moves, and maybe make his aerials into something that can kill off-stage or near the ceiling.

The reason I gave Naga Bolt four separate inputs (idle, walking, running, and jumping) is because that's exactly how shooting works in his game, but I'll consider adding some kind of variety. In his game, Gunvolt had access to many other guns, not just Naga, that had different effects. For instance, one pistol, Orochi, fires bolts in a half circle. Another pistol, Technos, fires two diagonal bolts that crawl along the walls, floor, and ceiling. Mizuchi can fire bolts at different angles. Vasuki fires a round that will home in on additional opponents if it hits. That said, maybe I could incorporate those in some way.

Cheers for the input, and for taking your time analysing mine moveset.
 

Crystanium

Smash Hero
Joined
Apr 28, 2008
Messages
5,921
Location
California
Dark Spamus @der Rabe

The first thing to take note of with Dark Samus is, quite simply, that all sets should have a stats section, even if it just says "Dark Samus' stats are the same as Samus". Many clones and semi-clones in Smash Brothers have different stats from the original, such as weight, falling speed and what have you, so Dark Samus needs to specify if they are the same or if she is heavier, lighter or whatnot. Stuff like this is generally very important information as one cannot make a judgement on the characters stats/balance of them/whatever without knowing what they are.

This set does a lot better in giving information than some of the other newcomer sets, which is nice, but I would really like to see is some idea of lag on Dark Samus' Neutral Special, as the attack feels quite strong and I am worried about its power level if it is a faster attack OR not very punishable. Also, I would either try to cut the tentacle attack from the GIF or mention it is not in this attack, as I spent too long trying to figure out where it happened in the move. I would probably make Dark samus' Up Special come out a bit faster, but remove the invincibility, perhaps make it just super armor instead I feel. And for the Phazon Missiles, I feel like the non-freezing version's damage should be swapped with the Freezing version, which not only makes more sense with the KO power bit, but fits with the idea that the Phazon Missiles' freezing allows higher damage chance by striking the frozen foe vs. the gaurenteed damage of the normal Missile hitting.

Down Special feels very broken to me unless it is very laggy, because the defense it provides is really good, even if the 12 HP is not excessive, largely because merely touching them deals damage AND they block attacks to boot AND they can use some of Dark Samus moves, most notably the Neutral Special sounds possibly crazy with three out. I would change this move to either be more strictly defensive, removing the move-using part and giving it some kind of attack if you input Down Special again or removing the defensive part and making it a pure clone move, maybe something like making a 20-30 HP clone who follows you around and copies your attacks on, IDK, a 2 second delay or so? As-is the move feels very safe for its power. It also needs to have damage listed for what the Dark Samus clones can do, very important information. The animation for the Dark Samuses swirling around the main Dark Samus also sounds really awkward.

The standards feel, for the most part, pretty solid, although I feel I should note that priority is not really determined by frames, but by damage, so the stuff about that in Dark Samus' jab doesn't make much sense. Down Tilt also feels much more like a Down Smash and would probably fit more than the Boost Ball being Down Smash, and I'd like to see a mention of how much it Kos at. It would be nice if we had some idea of what Up Smash looked like without the video, as not everyone can watch them at all times, and the wording on it is somewhat confusing. It really should be a hitbox, presumably when the pillar first comes out. Forward Smash isn't bad but I am not sure why the logic for the burn damage doing 5% in 1 second is what it is, although actually doing the damage that way is not bad.

Neutral Aerial should list damage, if it is intended to do no damage than it should do damage. Up Aerial also needs damage numbers. Down Aerial needs more info, especially since not everyone has Samus' Down Aerial damage and such memorized. Please note that a 1 frame pummel is insanely Op as you can simply alternate A/Z to mash opponent for super speed damage. Every throw needs damage percentages and a bit more information on their uses, to be entirely honest. More information on how Dark Samus grabs should be added given most people will think it is a Samus style tether grab and this is very easy to miss: Most movesets give grabs their own input and I recommend doing the same.

Overall though, Dark Samus has a bit more of a sense of playstyle and numbers than many other newcomer sets, but it still has some rather severe numerical issues and the playstyle feel here is rather weak: I would like to see a larger expansion of how her general melee game is meant to play into her overall game. This does make me want to see more from you though, der Rabe, and perhaps see your thoughts on a set or two you may read. Hope to see more soon!
Thanks, FrozenRoy. The last thing I want to do is make a character too powerful and your input should help me generate some alternatives. I have been away for almost a week, due to personal problems. I don't have a laptop or desktop, so I'm restricted to a tablet, which doesn't like to load when there's too much on a page of a message board. It just kicks me out, so even if I return, it'll load for a bit before it kicks me out again. I think it's just the numerous images. I think I might go back and put my stuff in a spoiler tag to make loading for everyone else easier.

Starting off with the neutral special, this is simply based on the Assist Trophy of Dark Samus in Sm4sh. I decided to find out how much damage came about from it, and it wasn't far off from my original idea. I originally had it so that it caused 10% damage uncharged and 20% damage fully charged. However, after finding out that the attack does 21% damage from the Assist Trophy, I not only decided to get rid of the charged version, I also used canon to support this choice, since Dark Samus never charges the attack in the first place. Unless she is charging it when she raises her arm cannon prior to firing. If so, then I might just make a charged shot do 21% while an uncharged does 10.5%.

I was thinking that because the attack does that much damage, it just might be best allow the possibility to DI upward to not take as many hits. While the amount of damage seems high, I noticed that Yoshi's d-air does a ton of damage and he can get away with performing that attack whenever. Are these two comparable? Maybe not, but it's just an idea. I think what I could do is have it charge, or there could be a bit of a delay so that we see Dark Samus' arm cannon position upward before she shoots. This would give her opponent time to shield or jump out of the way.

As for Phazon Tendrils, I'll try to gif. that in a way so that only that specific attack is being demonstrated. Phazon Sphere having super armor sounds like a good idea. That way, Dark Samus could still receive damage, even if she's not hindered by whatever attack is wrought on her during that time. I like your idea on the Phazon Missile and Super Missile. I think this would also work well with the inverse relationship I have in mind.

Dark Echoes is pretty broken, I suppose. I'll get rid of them idea of them mimicking Dark Samus' attacks. I had the idea that they'd only cause a quarter of the total damage that Dark Samus causes, but I can see that this wouldn't make much of a difference in terms of being broken. I could perhaps make it function more like an Assist Trophy, but if that were the case, I'd only have one come out, rather than two. Its main attack would be Scatter Shot, but the attack would be to a lesser degree, maybe only causing 6/25 (24%) of the original damage, i.e., 5.04%, or just 5% damage. Perhaps it could have one of each attack with all damage reduced by 24%. It wouldn't harm anyone when it blew up. It'd just disappear.

I will continue to keep Phazon Tendrils as a KO move in spite of it being a tilt for two reasons. The first is the animation Dark Samus performs from the Assist Trophy is exactly the same as that of Samus' d-tilt. The second is that in Brawl, Samus' d-tilt was one of her KO moves. So I don't think it's out of the ordinary for it to be a KO move. However, just like the animation in both the Assist Trophy and Brawl, there is a bit of a cool down, so I think that could balance the attack. I'd probably say somewhere around 130 to 150% would be the earliest one could be KO'ed.

As for forward smash causing burn damage, it's only because it's a plasma attack. I'll work on more damage percent for the rest of the attacks. I wasn't aware that 1 frame for a pummel was OP. I thought Samus' pummel already worked that way. Perhaps there is some amount of FAF I'm not aware of, or perhaps she doesn't have a hit box of 1 frame. I'll have to check. For now, with the time that I have, I'll edit Dark Samus.
 

MasterWarlord

Smash Champion
Joined
Aug 24, 2008
Messages
2,902
Location
Not wasting countless hours on a 10 man community
LORD GALF


Galf is one of the many lords from Fist of the North Star. Largely all of the evil lords obsess over something that they value over human life, and Galf is the original one whom all the later filler lords like Morgan are based off of. In Galf's case, it's dogs, and he will kill anybody who severely harms a dog through becoming the target for ring toss, or the "lesser" penalty of becoming one of Galf's dogs. Galf and his underlings will "talk" to the dogs to determine what the villager's penalty should be, while blatantly interpreting their barking as whatever they want. These are not little puppy dogs being defended, they're vicious, and Galf is horribly offended that villagers would be pretentious enough to come up with the excuse of "defending themselves". As cruel and bizarre as all this is, Galf manages to have some actual real world basis, being inspired by Tokugawa Tsunayoshi, the dog shogun, whom flooded the streets with sick dogs and executed those who harmed them.

Galf's cruelty can easily be seen as comedic due to its over the top nature, and his character is absolutely played for comedy in his "fight". The incredibly overpowered protagonist of Kenshiro very casually defeats him, and Galf whimpers as begging for his life and asking what is going to happen to him. After being told the nature of Kenshiro's powers and that "he is already dead" (going to die in a few seconds), he asks for his most loyal dog to save him only to be urinated on in response before he dies.

STATISTICS
Size: 12
Weight: 11
Traction: 9
Falling Speed: 8
Jumps: 7
Aerial Speed: 5
Ground Movement: 2.5
Aerial Control: 1

Galf is stupidly large, standing 2.5x or so as tall as a regular human in his source material. Granted, nearly every antagonist in Fist of the North Star for some reason is freakishly tall, so it stands to reason to size him down. In Smash Bros, Galf is only 1.2x taller than Ganondorf, but his frame is still just as wide as Brawl Bowser’s awkward posture due to his extreme obesity, making him a much more juicy target than if he was just tall.

Galf can summon dogs with his Down Special, and he will get angry if they are attacked for any reason. Upon one of them being hit, Galf's slow movement speed will increase to an above average one at Marth's speed for the next second, visibly having a pissed expression on his face and getting a slight red tint. If Galf attacks within a second of the dog being hit, the starting lag of his next attack will reduced by a third. If the foe hits the dogs more than once, this will simply refresh the duration of Galf's anger.

If the dog is killed, though, Galf will get even more visibly angry than before. When outright enraged, the anger lasts 1.5 seconds and increase his dashing speed to Sheik's, while making the starting lag of his next attack be decreased by two thirds if done within the rage's duration. While enraged from a dog's death, Galf will ignore dogs being hit so they don't overwrite the effect from a dog dying. In addition, Galf will gain 8 frames of superarmor the moment a dog dies no matter what he was doing, along with getting the ability to act out of hitstun during those 8 frames as his main answer to being combo food.

Foes can avoid the greater rage of Galf by knocking dogs off-stage, Galf isn't the smartest of villains after all. If knocked off stage/a walk off, Galf will not register the dog as dying, only if the dog's HP is depleted down to 0. Because of both this and his comboability, Galf will often want to fight alongside his dogs - attacking both at once can often be a bad deal for foes.

SPECIALS

SIDE SPECIAL – DOG COLLAR

While the spiked dog collars are Galf’s primary melee weapon of choice, in this move he uses them as a projectile. Galf will take out the collar and get ready to throw it in a motion comparable to a frisbee. This is an unstorable charge move, and doing so with no charge will make the move very fast but have Galf just drop the collar in front of himself. The range of the move varies wildly over the single second of charge, though, potentially traveling the entire distance of Final Destination. The projectile is heavily affected by gravity and will hit the ground at the end of its arc, and Galf’s massive height means that the projectile will start pretty high in the air.

The dog collar deals 5-8% and knockback that kills at 300-200% on contact if it hits a foe from the sides, which is what is most common. If Galf manages to play ring toss to make the collar actually land on top of the foe, though, the collar will become fastened around their neck as they immediately take 10% with a flinch. Galf’s height actually works to his advantage in order to land the “sweetspot” of this attack as he rains down the dog collars against taller foes such as human sized and up, but he also runs the risk of it whisking over a short foe's head. Just keep in mind that the range of the move varies wildly based off charge and the collar will lower to hit the ground at such a rate that it hits the ground at the end of its trajectory, making short range tosses quite effective against them.

Once a collar lands on the foe, they will take 0.5% per second from their tight dog collar, and any of their attacks that hit it will deal 1/12th of that attack's damage to themselves. The damage return feature will not round up damage and is perfectly willing to deal damage in miniscule decimals, so it's doubtful it'd deal that much damage during the collar's regular 5 second duration, though it can be made to last longer through use of Up Special.
 
Last edited:

Reiga

He sold diddy for a switch
Joined
Dec 8, 2014
Messages
1,256
Location
White Noise
3DS FC
1461-7646-7368

Alexia Terrez
(Reference still WIP)
Since her childhood, Alexia Terrez was never the luckiest girl around. While at the time of her birth her home planet XT-43 was an up and coming human colony in the intergalactic scale, things went down hill once miners discovered enormous quantities Yinzite, a then unknown metal that was soon learned to be a great material in the foundation of space-ferrying ships, which revolutionized the space ship market and marked a new era of space transportation. However, Yinzite ore is almost always formed alongside an additional very fragile ore: Sivrium. Usually this ore was ignored during mining, easily being shattered into dust blown into the air, which while years ago was just known as harmless "Yinz Dust" by local miners, the lack of regularization and other planets at the time with the ore, and the ore's abundance made it so the dust accumulated and spread through the planet, covering most of the planet in clouds of Sivrium dust. And while even then technology was advance enough that many had air purifiers in their home, the same couldn't be said about outside of their houses, as the planet's entire western hemisphere's air was now toxic, causing anyone to go outside to need to use gas masks have they not want to get sick, or at worst die, with most gas masks not even lasting more than 3 hours or so.

Alexia's family was poor, and couldn't move out of the planet or even out of the contaminated zone, and had to stay at what had become a wasteland with only miners and few people who stayed. Alexia was born with psychic powers, a common occourance at this point in history due to humans intermingling with many other intelligent lifeforms. Unlike many other psychics, Alexia's ESP could only affect one specific thing, that being Cosmic Power, a rather rare chemical that's a building block in many planet resources utilized mainly by the Galaxy Wide Police Force for weapons for public safety. Due to Sivrium containing small quantities of Cosmic Power, that ends up amassing to a lot when you consider it's flooding the atmosphere, Alexia soon learned how to repel a good quantity of Sivrium away from her, which while still not enough to let her stop using her gas mask, she could now pass a couple days out in the open without suffering the consequences.

With a young and bored mind with not a lot of moral weight, Alexia started to travel around her planet's wasteland for as long as she could, scavenging away everything she could find left behind and soon learning to engineer everything she needed. By her teenage years, Alexia's psychic powers were strong enough that she could stop using her gas mask, but with all the mechanical upgrades and additions she added from what she salvaged into it, it ended up becoming a staple to her wardrobe. Bored out of her mind and after scavenging everything she could find, Alexia finally put all she learned about engineering to the test, and out of the Yinzite that ruined her planet, she made a spaceship and got the hell out of there.

Out in the vast, intergalactic world out there, Alexia tried to fit in with the rest and carry on a normal life she thought she always desired. She tried becoming an engineer, and while her techniques indeed were, quite surprisingly for all the others, quite great, her rowdy and aggressive nature and bad social skills made working with her hard, and she eventually gave up. With nowhere to go in life, Alexia then remembered how the bigshot government was the one who majorly screwed over her planet and her life, and after soon learning all the other atrocities they had done, and decided to oppose this ruling, becoming a rogue who would at all costs try to stop the government and stop them from ruining other lives, including protests in the shadows, vandalizing and even murder.

Due to her life in her original planet, Alexia Terres became one of the most well known and one of the greatest rebels in the galaxies. Her scavenging and engineering origins made her a very resourceful person when in stealth, being able to easily adapt to places and even screw around with high technology in facilities, Alexia is even thought to be one of the prime suspects in hacking Project 107 into being useless.
Alexia's Cosmic Power bending abilities also came in handy, from stealing quantities of it in dust form, she could then use them greatly both in offense and resistance, being able to solidify them into shields, make use of them in attacks, or even as simple smokescreens. Things shifted to next gear when Alexia managed to steal from a bunch of intergalactic fat guys the tampered Galaxy Needles, a great offensive weapon that with Alexia's powers is even greater, with possibilities of being bent, called back and even augmented using aditional Cosmic Power dust.

Now surrounded by infamy, Alexia was eventually scouted to join and possibly lead the galaxy's strongest and biggest rebel group, which had recently lost their leader. While Alexia's loner nature and individualistic wantings made her prefer not to even formally join the group, she did strike a deal to gain a small quantity of the money they looted and a good chunk of their looted Cosmic Power dust, though in trade of needing to show up in cases of emergency during rebel attacks. Alexia's current plans are unknown, but what we do know is that she's joining Smash, bringing in her interesting weapon and adapting wits!


Stats
Height: Marth
Weight: Corrin
Ground Speed: Wii Fit Trainer
Aerial Speed: Bowser Jr.
Fall Speed: Robin
Traction: Samus

As you can tell from her reference image, Alexia has a pretty slim figure, though just from the weight from her weapons, hidden flasks of Cosmic Power and all of that, Alexia is actually heavier than you think, with a weight comparable to Corrin's and almost classifiable as heavyweight tier, even if very low on the spectrum. While Alexia is decently heavy, such weight is distributed pretty equally through her body, so she can still run pretty fast, already being a pretty nimble rebel who has to sneak around places quickly. The same can be said about her air speed, which is also pretty decent, though a bit slower, her fall speed is however rather slow, which can be pretty nice with how much good weight Alexia has behind her.
In general, Alexia has a very balanced range of stats, though her heavy loot makes her more slanted towards being a tad slow but with some good weight behind her. Not a lot of change in speed between moving on the ground and in the air makes her easy to adapt to cover ground, which gives her a brutish style of play that while unable to really overwhelm the foe with quick reflexes, can indeed overwhelm them by simply being good at surviving and getting them close to you.

Additionally, should Alexia use a non-disjointed move utilizing the Galaxy Needles that deals more than 9% damage at once, and hit an energy-based projectile, such as a Mario Fireball or Bowser's Fire Breath, Alexia's psychic energy will be directly and quickly tethered into it via the needles. The mythical Cosmic Power, found only few star years after humans started colonizing other planets, can be present in just about anything non-organic, but in microscopic levels. However, in the case of energy-based matter, the quantity of Cosmic Power, even if still very small, is still noticeable! As such, when Alexia hits an energy projectile, the kind the PSI boys can absorb, she'll use this fact to her advantage and seperate the Cosmic Power in the projectile, disintegrating it into only small particles of energy that share their color with the projectile. Still concentrating a good chunk of her psychic powers onto the Galaxy Needles themselves, Alexia won't be able to stop the particles' momentum, and if they were moving projectiles, the particles will still move forward, but now not damaging Alexia, who can still move after her move ends.
Alexia will make the projectile divide itself for about 3/4 of a second, which is still enough time to nullify a thrown out projectile and avoid it, which is great against moving projectiles that aren't very spammy, like Mario's Fireballs and Falco's lasers, even if it isn't much effective against stuff like Bowser's Fire Breath and traps. This special trait's main flaw, however, is that Alexia's move has to deal 10% damage or more, with most of her moves of that ilk having possibly bad startup and/or endlag, which means that when blocking a silly projectile like a Fireball from the Mario Bros, which she probably has other means to deal with, she can end up open to the foe itself, which makes this trait best really used against high grade projectiles which you can't just easily avoid, like a fully charged Thoron or Charge Beam.

Specials

Neutral Special - Needle Shot

Alexia gets close to the ground and extends her right arm forward, hand clenched into a fist and with her Galaxy Needles also facing straight forward. Alexia also uses her left arm to flick her gas mask down to cover her face before using it as support on the ground. With a good aim thanks to the machinations enhancing her old gas mask, Alexia then clenches her fist more, pressing a button close to the grip of the weapon and shooting forward one of the purplish pink plasma needles, which will be launched straight forward at quite the quick speed of Toon Link's run, dealing 5% damage to the foe with some slight horizontal knockback.

By charging the move, Alexia will hold down the button on the Galaxy Needle, causing all the needles, bar the middle one, to angle themselves towards the middle one, doing a ">" formation as Alexia then releases the button the moment this happens regardless of if you continue holding the button, in general giving the charge a short duration for its ilk. Doing so then launches the needle cluster forward, though at a decreased, more comparable to Mario's speed, dealing however an increased 7% damage, which will knock foes horizontally for a KO at 170%, with some freeze frames as it hits the opponent before the needle disappears into the air.

What makes this move special, though, is that you can utilize Alexia's psychic powers with it! A few frames after a needle is launched, about by the time it's an SBB and a half from Alexia, it will gain an additional pink aura around it, and if Alexia presses the Special button again, just like with Duck Hunt no matter where she is and what she's doing, she will then pull the launched needle back to her telekinetically, a pink tint filling her forehead. Though this isn't your usual psychic tug, the launched Galaxy Needle will steer backwards, still having its needle-y point facing as before, at a speed a bit faster than before, homing into Alexia and changing its vertical distance from the ground during the way back to reach as best as possible right back at Alexia, at which point it will niftily substitute another needle, which dematerializes once the new needle comes! Foes hit by the needle will now receive 7% damage and know get knocked horizontally towards the direction its going, KOing foes at 180%, with the first hit's low knockback making it then possible for a foe hit early in the needle's life cycle to be pushed back by the needle before being knocked by it coming back!

The same deal goes for the charged version of the Needle Shot, as you can still call the needles back and have them rush right back at you at a speed now only a small bit slower than a regular shot's, dealing 8% damage, which combined with a hit from the needles beforehand can rack up a total of 15% damage, with the needle's second hit KOing foes at 165%. What makes this version different though, is that if you call back a needle cluster after it has hit a foe and during the attack's freeze frames, a factor that you probably oh-so didn't even care much about when you read about it, the needles will still get pulled back towards Alexia, but will also take the foe with them, now in an impaled state similar to the one found in Corrin's Side Special! By doing the same button mashing used to escape a grab, foes can escape from being impaled by these needles at early percentages, but even then, if they were impaled early on in the needles' life cycle, they can potentially not even be able to escape! After the needles get back to Alexia, substituting the new batch of needles created once all the original needles were shot, the foe will barge right into Alexia before falling to the ground, stayed in a downed state like in Snake's Down Throw from Brawl, which is pretty great for Alexia, who can then tech chase the foe and in general also snag the foe next to her, keeping in line her in her face playstyle, while the faster uncharged needles are still pretty great since they still knock the foe into Alexia, even if not directly, and with way more speed, making it less predictable.
 
Last edited:

Nu~

Smash Dreamer
Joined
Jun 22, 2012
Messages
4,332
Location
U.S., Maryland (Eastern Time, UTC - 5hrs)
NNID
EquinoXYZ
Altais Altais
Crash Bandicoot
Nu~ Nu~ Its fun to see someone get so experimental early in their career with stuff like the unique shield mechanic and rather wacky attacks like Nair. I think however that you pushed the envelop a little too much with a lot of the animations in this set. I'm not opposed to using props, there's definitely a time and a place for them. However it has to be said this set goes too far with them, using some very random things that really feel out of place with him randomly summoning them. The aforementioned Nair brings out something that is basically just used as a level gimmick, which feels about as awkward as having Mario summon one of those bubbles from those annoying Mario Galaxy levels to ride around in. Though it has to be said, there are far more extreme examples of this in the set. Summoning a random mummy enemy from the game or using the knight's sword attack is pretty ridiculous, as is having Crash just straight up die to attack with his ghost. Crunch being summoned in the Up Throw for the sole purpose of doing a stronger punch than Crash could've done himself is probably the worst of it. There's a few things that seem very questionable gameplay-wise too. Neutral Special creating a randomized wind hitbox is just going to make for frustrating gameplay a lot of the time as there's no real way for the Crash player or opponent to play around it properly. And while I don't think the shield mechanic is inherently a terrible idea, I really hope you meant its 1.3x as durable as a shield rather than having 1.3% health when it has that downside. In any case, you have some interesting ideas but I think you're going to need to refine them a lot if you want to become more competitive.

.
To clarify, I did mean 1.3x durable shield.

Your critique is that Crash's moveset can get a bit too ridiculous and random at times...but that is the entire point of Crash's moveset as a whole. I wanted to emphasize crash's insanity and unhinged personality.
Only Crash would be crazy enough to use his own enemies as attacks or use his own soul to damage opponents. While nuetral air doesn't exactly bring back memories for people, it does serve the overall purpose of the moveset; its wacky and unique.
The windbox on his nuetral special is another personification of this; it's meant to be completely infuriating and random. Control and logical sense is the exact opposite of what I was going for here. I want people to go "WTF!?? Did he actually just use snakes as nunchucks?? Why did I ascend into space after that tornado??" because that's the spirit of crash games overall.

People love him because he's the wackiest member of the 90's mascots. He isn't boring old "Everyman" Mario or speedy "dude with a tude' " sonic. He's bat**** crazy crash. I went crazy with the attacks but it was all to serve one vision of the character in his entirety.
 

Munomario777

Smash Master
Joined
Nov 18, 2014
Messages
3,253
Location
Charleston, South Carolina
3DS FC
0387-9596-4480
Switch FC
SW-8229-3157-8114
To clarify, I did mean 1.3x durable shield.

Your critique is that Crash's moveset can get a bit too ridiculous and random at times...but that is the entire point of Crash's moveset as a whole. I wanted to emphasize crash's insanity and unhinged personality.
Only Crash would be crazy enough to use his own enemies as attacks or use his own soul to damage opponents. While nuetral air doesn't exactly bring back memories for people, it does serve the overall purpose of the moveset; its wacky and unique.
The windbox on his nuetral special is another personification of this; it's meant to be completely infuriating and random. Control and logical sense is the exact opposite of what I was going for here. I want people to go "WTF!?? Did he actually just use snakes as nunchucks?? Why did I ascend into space after that tornado??" because that's the spirit of crash games overall.

People love him because he's the wackiest member of the 90's mascots. He isn't boring old "Everyman" Mario or speedy "dude with a tude' " sonic. He's bat**** crazy crash. I went crazy with the attacks but it was all to serve one vision of the character in his entirety.
While it's admirable that you tried to represent Crash's zany personality and cartoony style from his original games... this wasn't really the best way to go about it. By trying to make Craah the craziest character you can, you go outside the boundaries of what makes Crash who he is. While yes, the set is unpredictable with things such as fsmash and sspec, this also makes it feel less and less like a set that was made specifically for Crash. He never uses a sword in his games – for the most part, Crash is apart stomping, spinning, that sorta thing. For him to use a sword from a random enemy from his games feels very out-of-character, like if Mario were to swing the Master Sword or something.

Crash also never teams up with a mummy, as far as I'm aware – and even where he has been shown to team up with Crunch (I assume), it still feels odd to have another character do all the work in part of a moveset that's meant to be centered around Crash. And I have a hard time believing that even Crash would kill himself just to attack; if anything, I imagine he'd lack that kind of forethought. Also, stuff like the randomized windboxes in Crash's spin move aren't the best thing to have, since it's harder for the player to develop a plan around them. For example, sucking a foe into the spin to deal damage is harder when it has a 50% chance of doing the exact opposite of what you want it to.

While giving Crash random props may be tacky and out-of-character, there are certainly other ways to convey the zany aspect of Crash. Personally, a route I might take is to give Crash ludicrously high aerial speed and mobility, as well as making his spin attack propel him even faster in midair. He could also have a lot of low-startup attacks, making his body movements feel unpredictable, and his motorcycle could be another quick burst-of-speed move. This way, Crash feels unpredictable and crazy because of his ability to get quick bursts of speed, and change his movements on a dime. By implementing Crash's personality through the way he plays rather than the way he looks, you can get a much more elegant portrayal of Crash, and one that makes sense for the character.

This is not to say, of course, that all props are bad. I mentioned Crash's motorcycle earlier, but another good weapon for him to use could be his fruit bazooka, which you do make use of in the set. To play up Crash's insane nature, though, why not make the fruit explode on impact, giving Crash some aesthetic wackiness in addition to his crazy movement? I also like the use of crates in the moveset, and I can definitely imagine their explosions making Crash feel like a truly insane character – though it'd also be good to play this up more in the move's description. Overall, I like your general idea of playing up Crash's zany, cartoony nature, but I think that the execution could be handled better.
 

Davidk92

Smash Cadet
Joined
Aug 28, 2016
Messages
49
Davidk92 Davidk92 The new Laharl is vastly easier for me to comment than the old one, and I appreciate your willingness to go back and add a lot more detail to the attacks. I may have been a little harsh on the initial posting as its not like there was no effort there, you had a pretty nice load of extras, but I'm more experienced with commenting the actual moveset than providing feedback on things like assist trophies and whatnot that most MYM people don't bother with. The actual set seems like a pretty functional implementation of Laharl, with a few somewhat cool moves in there. I particularly liked the Prinny move, it seemed like something that would be pretty interesting to try and play around for both parties, but it would probably be a lot better if you removed the random chance element from it to just explode whenever. Makes it a lot less skill based than it could be. I will say I'd like it if you were willing to experiment a tiny bit more on standards(more in the sense of trying different effects than different animations), though you at least tried something pretty unique with the Down Smash. Also, putting Specials first would be a good idea, as it allows you to center the moveset a bit more around those moves to create a stronger sense of flow and playstyle, as I assume you made the moves pretty much in the order they were presented in the set. Also while its a small thing, I greatly appreciated you using Hades in the Palutena's Guidance conversation. I wanted to see him used in one in the actual game so bad, he's much more fun than Viridi for this kind of thing.

Also for both of you, you mind just editting the original post and linking it to us to say you've updated it? That clutters the thread a bit less than your current message, with how many images we have to load per page nowadays.
Thank you for the feedback. I'll keep it all in mind.

Part of the reason the standards may be lackluster in comparison to the specials is possibly because I simply added info to the description of the standards from my original set, while I felt the specials required more in-depth exploration and as such I rewrote them from scratch. As such I'll try to expand on the standards when I make my next set.

I'll also give the new order a try for my next set. When I make a set, I usually get a basic idea of what I want to use whether it's the specials I want or the playstyle I feel fit the character, and then I go through my template in with whatever feels most natural to the character/playstyle. As such, while I may have an idea of the specials I want, I almost always come up with the standards, grabs, etc. in the order of the template. Hopefully altering the order will make this a bit easier as you say.

And of course, Laharl's a demon. How could I not include Hades in the Guidance? :demon:

Finally, I'm VERY new to this website, and am still getting used to the mechanics. As such, I apologise for posting the moveset twice as opposed to editing the original, I will do so from here on.
 

JOE!

Smash Hero
Joined
Oct 5, 2008
Messages
8,075
Location
Dedham, MA


FINALE:
THE COMMUNITY


After a solid month and change, the end of the MYMini Challenge is here! To wrap things up, I will be leaving the final submission period until the End of MYM 18. You all have the following criteria for the finale:

1) Finish up any last touches / playstyles on your sets.
2) Write a match-up for at least 4 other entries of the mini.
3) Write up a comment to each other entry besides your own that makes sure to touch upon the entry as a set, and how the entry evolved each week with how it followed / tackled the criteria.

The MYMini Challenge is all about spurring up activity for the Community after all, and the last week should definitely encourage us all to get together as one and reflect. As such, everyone who did not participate is free to comment as well as these will be the finalized sets!

The following participants are welcome to catch up this week as well:

Slavic Slavic
@Plazzap
Reiga Reiga
FrozenRoy FrozenRoy
@Katapultar

As always, good luck and have fun!
 
Last edited:

Munomario777

Smash Master
Joined
Nov 18, 2014
Messages
3,253
Location
Charleston, South Carolina
3DS FC
0387-9596-4480
Switch FC
SW-8229-3157-8114
Imagine a world of pure darkness.


Easy, isn’t it.


Far from any world charted by man, a desolate, barren rock with no illumination save for the stars of other, more fortunate planets light-years away. A planet with coves, secrets, and hidden beauty, but tragically, with no light to illuminate it. The humans here adapted to perceive using their other senses and even developed a relatively advanced civilization, but the rich colors and stunning vistas hidden by the shadows went to waste.

One day, however, those from other planets became curious as to what could be lurking on the dark planet of legend. A ship descended from the skies, the first light the planet had seen in centuries – well, that would be the term used if not for the planet’s lack of a sun by which to count the years. The travelers were stunned to find the planet’s natural beauty which is normally shrouded by complete darkness, but the lack of natural light and their dwindling power supply meant that they were only able to capture one picture of their white flag planted in the newly discovered territory, with a lone red dot in the center. Waterfalls, hundred-mile-high cliffsides, and floating rock formations fill the frame. To this day, this sole photograph is the only glimpse that we have of that planet… save for one other souvenir.

The light from the ship’s engines nearly blinded the planet’s inhabitants, but piqued the curiosity of one native. Due to the planet’s darkness, she was able to board the ship undetected. She remained in the shadows, staying completely out of sight until the ship arrived back on the Eastern Islands. Defending herself from the unknown outside the ship with an improvised Rope Kunai and wearing a blindfold to protect her eyes, she was fascinating to all who saw her. Her original name is a mystery – she has never revealed whether she even had one – but upon hearing about the alien and the tale of her homeworld, the residents of the area dubbed her Yomi Mekura.


Yomi, despite being a modern legend and all that, is predictably a bit of an outcast. She was quick to learn human language and adapted somewhat to the presence of light, but despite pretty much being a human, her being an alien is not her most appealing trait. Yomi has never allowed anybody to take her picture – whether this is due to her shyness or the fact that nobody ever turns the flash off, it is not known.

In her free time, Yomi hones her combat skills, in preparation for… something. Nobody knows exactly what she's preparing for. While Yomi may seem reserved or introverted, and is indeed a mystery to most, the few who get to know her see her true colors. Despite her backstory, she can be surprisingly light-hearted at times, but she is very serious when it comes to defending her new home – or avenging her old one – whenever necessary, and trains hard in preparation for whenever she is needed. …That said, she’ll still lift up her blindfold and take a peek at her opponent in one of her taunts, and isn’t above having a bit of fun in a battle where the stakes aren’t as high.

In combat, Yomi wears a garment reminiscent of traditional ninja attire, complete with mouth-covering scarf as well as glowing yellow highlights. The black suit also has sheets of exotic, glossy, dark-grey metal that act as a sort of armor plating (though they don't cover Yomi's entire body; think of them as more of a shin-guard type deal). Those who visited Yomi's planet brought back some of this material from the mysterious world, and while their original intent was to research it or perhaps sell it, the crew (well, most of the crew) thought it best to give the material to Yomi. In addition to looking rather sleek and being very difficult to break, this material also secretes an amount of dark-grey smoke at all times, shrouding Yomi in the mystery and darkness of her homeworld as well as making it harder for opponents to read her body movements. Of course, the smoke does not obscure Yomi entirely (the yellow highlights show through the smoke), but it can make some of her movements harder to follow. The metal also has magnetic properties, and due to its connection to her homeworld, Yomi can control the magnetism as well as a few other properties.

In addition to the ninja garb, Yomi almost always wears a blindfold when in battle. While her eyes have adapted to Earth’s light over time, Yomi is still more comfortable using her other senses. This gives her a unique advantage in battle, as not only do Yomi’s opponents often underestimate her, she can also sense that which others do not, and lurk in the shadows without impairing her perception. By picking up on the opponent’s subtle body movements, Yomi can predict their next move and dodge it with her agility, but this requires her to first become familiar with her opponent.

Yomi’s physical abilities are befitting of a ninja. She is very quick on her feet, can leap great heights, and falls quickly to keep things moving. However, Yomi’s slender frame makes her easy to launch, her individual strikes can lack in terms of power, and if caught off guard, she can take quite a few hits before regaining her bearings. Sensing things without sight has its disadvantages… (though it may be more due to her falling speed)

Yomi specializes not in tanking or parrying hits, but rather in sensing or predicting where her opponent is about to strike and then dodging the attacks with great flexibility. Yomi’s crouch is both low to the ground and quick to start and end, and her jump is the perfect height to, when combined with her quick fast-fall, jump right over a foe’s attack and retaliate.

Yomi has access to a wall-jump, wall-cling, and crawl. Additionally, by smashing / flicking a crawl input (diagonally downward on the control stick), Yomi can slide across the ground a short distance while crouching, about a SBB in length. It is a mystery how she performs this technique, and ever since 2001, nobody has ever been able to replicate it without resorting to illegal self-modification. Regardless, the slide allows Yomi to advance whilst dodging under a foe’s attacks, and retaliate. However, this technique should not be spammed, as there is lag, no invincibility frames, and performing another slide before the previous one finishes leads to diminishing returns in terms of distance. Instead, it is best to save this for use as a trump card, to catch the foe off guard or extend combos. It can also be used as a fake-out by dashing at the foe then sliding backward, or as a way to circumvent the skidding animation when you want to perform moves out of a dash.

Performing the slide input in midair causes Yomi to perform a brief air-dash diagonally-downward, like a Melee air-dodge in some respects (except at the end of the dash, Yomi keeps her momentum). This can be used to transition from midair to grounded movement with a slide, like a waveland, acting just like the grounded version. This is also a good mobility tool when in simple open airspace, and leads to confusing movements when combined with platforms. Another use for this air-dash is to punish attacks when combined with a jump, as leaping over an attack and performing an air-dash straight at the foe can give Yomi perfect positioning with good spacing, and is quicker than a fast-fall as it can be used before the peak of the jump.

Yomi’s jump, crouch, and slide, as well as universal techniques such as perfect-pivoting, are all faster than a simple spot-dodge or roll in terms of performing an attack after the dodge. However, since they are just mere hurtbox displacements, they can each be beaten by different types of moves – crouch and slide lose to low attacks, jump is foiled by anti-airs, and perfect-pivoting away can be punished with a long-ranged attack, or simply waiting for Yomi to come back into range. So while they are harder to use than a traditional dodge due to a lack of invincibility, correct application of these techniques makes them much more powerful tools. Sense attacks, dodge attacks, punish attacks. This is the fighting style of Yomi Mekura.


When Yomi first created her signature weapon, the Rope Kunai, it consisted simply of two blades attached with a rope, MacGyver style. They could be used as traditional kunai, or as a whip-like weapon by gripping one blade’s handle and swinging the other. Now that she has access to better materials (i.e. isn’t just scavenging this thing together), it’s possible to employ some more advanced tactics. The center handle, the ends of the ropes which connect to the center handle, and the blades of the kunai are all made of the same metal found on Yomi's garment, thus emitting the same smoke. By using Neutral Special, in a short animation, she can control the magnetic properties of the metal and switch between two combat styles: one where both daggers are attached as seen above (default), and one where the magnets are turned off, separating the two kunai from the center handle. As a visual indicator, the attached style has the rope glow yellow like the highlights on Yomi's garb, and when separated, the handles of the actual daggers instead have this glow to them. (The handle attaches magnetically to Yomi’s metal plating when the daggers are being wielded separately. Also, to clarify, the ropes wrapped around each kunai stay attached to the blades even in separate-dagger mode; the ropes simply detach from the center handle itself via the magnetic material located at the handle-end of each rope.)

Each of these two modes has a different set of attacks. The separate-daggers style has quick, short-ranged strikes that are excellent for comboing, simple kunai slices and stabs that are swift and deadly. The attached style allows for wider range by swinging the rope and kunai like a whip, with the blade itself acting as a sweetspot while the rope in between deals little damage at all, and the handle being somewhere in the middle. (The smoke emitted by the metal serves as a visual indicator for these sweetspots, like Marth's tipper trail.) The attached style is excellent for long-range play and feeling out your opponent’s habits from a safe distance, whereas in CQC, separate daggers are often your best bet for capitalizing on the foe’s quirks.

Using Neutral Special mid-attack can also be beneficial. During one of the detached style's stabbing attacks, pressing B and making sure that it's held when Yomi connects with an opponent will cause her to let go of the dagger, leaving it embedded in the opponent. Yomi can only deploy one kunai at a time; when attacking with a single kunai (which has the same attacks as the separated style but less damage), holding B will have no effect. A kunai will deal 1% per second while stuck in the opponent. However, a foe can knock a kunai out of their body like a Pikmin to counteract this (either a single hit of 10% or multiple hits adding up to 20% will do). After being knocked out of the foe's body, the kunai will drop onto the ground like an item. It can be thrown to deal 7~10% depending on whether or not it is smash-thrown, and travels in an arc similar to Toon Link's arrows. There are also other applications for embedding a kunai in an opponent, but more on that in a sec.

During one of the attached-kunai style’s wide swings, pressing B with no directional input will instead cause the dagger that Yomi is not gripping to detach mid-swing, flying through the air as a projectile! It deals 2/3 of the attack’s damage as well as a bit of knockback, and can be caught like one of Diddy’s peanuts. The kunai will also become embedded into the surface it hits (but will fly right through an opponent), and opponents can pull it up but with a laggy animation. Slinging a kunai like this allows for a variety of angles depending on the attack and timing, and is also good for throwing a kunai mid-combo. If a kunai is thrown offstage or otherwise leaves the screen, it will appear in Yomi's possession with a "puff" of the grey smoke, and Yomi will be in detached style.

Even if one of Yomi's kunai is out as a projectile or embedded into something, she can still change stances; a tap of B will activate the magnets, pulling the deployed kunai right back to the center handle and transitioning into attached mode. The kunai will act as a hitbox on the way back (6% and knockback similar to Tink’s returning Boomerang), and can even bring an opponent along with it if it’s embedded in the foe! When Yomi presses B, the "jerk" will deal 5% and low knockback in the direction of the pull, though the magnetic pull does not prevent a foe from performing actions after the initial tug. But this goes both ways, allowing Yomi to land an attack on the opponent as they’re pulled in. Alternatively, bait your foe to knock the kunai off with an attack, and punish their choice of attack! By the by, if the opponent dashes away or otherwise makes it so that they stay in place / move away from Yomi despite the magnetic tug (including taking knockback, though the pull will cancel most knockback the foe had prior to the pull), the dagger will break out and return to Yomi like normal, dealing 5% as it forcefully exits the foe.

If an opponent has caught one of Yomi’s kunai – or pulled it out of the ground in a slightly laggy animation – tapping B allows Yomi to retrieve it right out of the foe's hands, and this can also neutralize a kunai that the opponent has thrown at Yomi. But in the latter case, Yomi will need to repel the dagger rather than attracting it, and the animation is laggier. Thus, the opponent can punish this.

The unique attributes of the Rope Kunai can get a lot of mileage on the battlefield. The wide-arcing swings of the attached style are excellent for covering space and attacking at a distance, and its ability to sling the kunai as a projectile comes in handy too, but the sweetspot at the blade still requires precise spacing. Meanwhile, the quick, swift strikes of the separated kunai are excellent for getting in quickly and racking up damage by chaining moves into each other as well as by embedding the kunai into the foe, but lack range. A good tactic is to use the wide-arcing swings of the attached style to feel your opponent out and pick up on patterns and habits, and then use the separated style in order to capitalize on these habits with quicker, slightly stronger attacks and more vicious combos. Yomi’s movement options also mesh nicely with both of these styles, as they can either get her far away enough to hit with the sweetspot of the attached style’s attacks, or bring her into close-quarters for detached kunai strikes. Speaking of movement options, Neutral Special's low lag makes it a great tool for B-reversing.

Down Special

While Yomi's fighting style changes drastically based on which form her weapon is in, her Down Special stays consistent. She makes the metal on her ninja garb concentrate its smoke into one area, gathering it as a ball in her hand – the rest of the metal stops producing smoke during this one-second-max charge, as it is all being channeled into the ball. Yomi then tosses the smoke downward at a 45* angle like a smoke bomb, causing the smoke to explode and expand into a rounded-square-shaped cloud 1.5-3 SBB wide and tall depending on charge. If the move is charged at least 1/4 of the way, there is also a hitbox at the initial blast which deals 5~13% and moderate knockback that, when charged, instead KOs at around 150% from center-stage.

Simultaneously, Yomi leaps backward at a 45* angle, traveling 2.5~4 SBB diagonally with the leap. Yomi deals no damage with the actual jump, but has a few invincibility frames at the very start of the leap. Additionally, pressing B or A during the jump has Yomi perform an attack with her kunai, towards the point where she was just standing. In attached style, Yomi extends the long-ranged kunai rope downward in a stabbing-type attack, dealing 5% and low downward-forward knockback. If the button is held and the kunai reaches the ground, it will become embedded, and Yomi will pull herself down to the ground using it, with low lag after reaching the ground (though this is still possible to punish).

If both kunai are being held separately, Yomi will toss one kunai downward in a similar fashion, dealing the same damage but embedding itself into the ground like normal. The added force of this throw makes it so that it can also become embedded into the foe, something that cannot be achieved by simply slinging the kunai. With only a single kunai, she will perform the same type of attack as the attached style, but with less reach, and thus significantly less chance of embedding into the ground. However, this can be done on platforms. Additionally, Yomi can use her air-dash after the leap, which while slower to activate than the attached style's tether (as you must wait for the IASA frames to start), is consistent across all the styles, and allows Yomi to perform an action before landing. Yomi's ability to leap back with invincibility frames and then counter with an air-dash or kunai attack makes this move a useful pseudo-counter, but depending on Yomi's choice of retaliation, it can be punished accordingly, as the tether has lag upon landing, the other two follow-ups have lag in midair, and the air-dash -> aerial tactic is punishable like a normal aerial approach.

Of course, this move is a good mobility tool with its invincibility and ability to attack the point of origin, but its main distinctive feature is the smoke cloud. The smoke lasts for four seconds before fading away, and up to two clouds can be onscreen at a time – creating a third causes the older one to fade away. The cloud of smoke deals 1% to opponents every two seconds as a minor thing, but this is not its main application. While it does not entirely conceal the opponent, instead leaving a silhouette, it does conceal Yomi thanks both to Yomi's connection with the smoke as well as the additional smoke secreted by the plates of metal. While in the cloud of smoke, she is practically invisible. However, when Yomi lands an attack or is hit by one of her opponent's moves, her silhouette appears for a split-second, along with the yellow glow of her garb's highlights. Her crouch / other forms of dodging are completely concealed, as are her whiffed attacks (save for audio cues). The camera movements do not give things away either, as it stays focused on the whole smoke cloud if somebody is inside it (i.e. treating the smoke cloud as the player in terms of zoom / etc). This gives Yomi the ability to give the opponent her blindness, and take advantage of her other senses to see the foe even through the darkness. It's also a handy way to hide Yomi's kunai that are embedded in the ground, making it harder for the opponent to plan around their positioning / pull them out of the ground. However, it is important for Yomi to be able to keep track of the position of both herself and the kunai.

It is also possible to reposition the smoke. Any of Yomi's attached-style swings will work, and for opponents, any attack with a hitbox that moves a lot during the animation will do the trick, such as a flip-kick or sword swing, as will moves with visible spinning / etc in the animation such as Pikachu's nair or bair. And of course, windboxes will also work. Like with Rosalina's Luma, it is important for the opponent to know which moves affect Yomi's smoke (as well as when to focus on clearing the smoke and when to focus on avoiding Yomi's actual attacks), and for Yomi to choose her stance wisely depending on whether she wants the smoke to move.

In midair, the move is a bit different. Yomi still throws a smoke bomb and leaps backward, but since the smoke bomb does not hit the ground immediately, it can possibly hit an opponent instead. This will create the smoke cloud wherever the opponent happens to be, which can be used to create a cloud in midair. Otherwise, it acts mostly the same, though the distance traveled by the smoke ball diminishes its charge – 1/4 of the charge is lost every 1.5 SBB traveled, meaning that if it travels 6 SBB, it'll act like the uncharged version in terms of damage / cloud size even if you charged it all the way. It won't diminish any more once it becomes the uncharged version, though.

Overall, Down Special is useful for evasion and tricky tactics. The leap itself can get Yomi out of sticky situations and allows her to counterattack from above, whereas the cloud conceals her movements and makes it hard for the opponent to dodge her attacks / land their own. To use this move effectively, however, the player must learn how to see the unseen and keep track of their own movements, just like Yomi herself. And of course, staying unpredictable is of the utmost importance, as invisibility is useless if the opponent knows that you'll always throw out an attack.

Side Special

Yomi's other two special moves change more depending on her current stance. For example, Side Special with attached kunai has Yomi grip one kunai and throw the other one forward, with barely any descent to its arc as it travels its distance of 3 SBB. Yomi can perform a tether recovery using this move (but it won't automatically aim to the ledge), or even grapple a wall Melee-style, out of which she can wall-jump or wall-cling. In terms of attacking, the strike does not act as a command-grab, but it does embed itself into the foe. Upon making contact, Yomi will yank the foe back towards her ("get over here!"), having greater force than the magnet does due to the physical rope. As such, it deals 7% and also prohibits the opponent from acting. When the opponent gets close, Yomi by default uses the kunai that she is holding to stab the foe, dealing 6% and low upward-forward knockback, great for comboing. There is endlag to this move, as Yomi cannot act until a bit after the kunai is retrieved, with similar ending lag to a Hookshot. One use for this move is to extend combos that would otherwise be out of reach. Alternatively, use it to attack a foe from within a smoke cloud, as it can be harder to punish (but still possible if Yomi gets predictable, as it's easy to shield and punish due to endlag).

You may have noticed that Yomi performs the follow-up stab "by default." In fact, using a different input, you can perform a different follow-up action! Holding up causes Yomi to perform the stab at a more vertical angle, sending the opponent upward. Holding down causes a semi-spike that sets up for edgeguards or tech-chases, while holding back foregoes the stab entirely and just allows the opponent to fly behind Yomi as she suffers less endlag (still dealing 2% from the kunai coming out from the foe's body). Tapping forward on the control stick while the opponent is being pulled in causes Yomi to sprint forward while attacking with the kunai, dealing more forward knockback and 8% of damage instead of 6%. While it has more ending lag and knockback which may make it worse for follow-ups, the extra movement helps for bringing the foe across the stage, such as towards the ledge. Every option is useful for different combos, but Yomi visibly shifts when a direction is held in preparation for the attack, so the opponent can tell which way to DI, or tech in the case of the downward variation.

Beyond directional inputs, different button presses also cause different effects. If shield is pressed while the foe is coming toward Yomi, the kunai will come out of the foe's body prematurely, dealing 2% and allowing Yomi to perform a different follow-up at the cost of the foe being able to act and potentially escape. The foe can act relatively soon, but they may also panic and throw out a predictable escape option. The "yank" deals minor knockback, similarly to pulling a foe in via the magnets. Moving on, pressing B during the initial long-ranged strike, like with the swinging attacks, causes Yomi to release the kunai mid-attack, sending it forward as a projectile. This is an easy way to throw a kunai, but can only be performed early in the attack (so if you miss, pressing B isn't a get-out-of-lag-free card). Finally, holding grab as the opponent comes close will have Yomi grab the foe instead of performing the stab, but more on Yomi's grab game later.

In the separate style or with a single kunai, this attack becomes very different. Yomi performs a command-dash forward with kunai extended forward to hopefully stab an opponent (dealing 4~8% depending on kunai count as well as low upward-forward knockback). The dash is very quick, traveling 3 SBB at Falcon's dash speed, and Yomi stays very low to the ground somewhat similarly to Little Mac's dash, able to avoid some attacks. Hitting early on in the dash allows for follow-ups as the movement allows Yomi to chase the knockback, but it's still not terrible to hit at the end as this is a very long-ranged attack option with relatively low ending lag. So even if the foe is knocked too far away for a combo, it's still a good way to pressure the foe, especially if you have the foe impaled with a kunai for the magnetic pull. However, if shielded or dodged, the ending lag is enough to punish with a quick option. By the way, if holding both daggers, Yomi can embed them into a foe like any other separated-style move – that is, by holding B.

In midair, Yomi dashes diagonally downward instead, at about a 35* angle (as in, a bit shallower than 45*). This gives her a long-ranged air-to-ground option, covering more distance than an air-dash but also having less flexibility (Yomi can perform anything out of the air-dash). It's not as useful for recovery as it might be without the angle change, but comes in handy when recovering from above the ledge, especially since it can sweetspot the ledge at the very end. The dash can also be ledge-canceled, making for some crazy combos if a stage has platforms (or, more situationally, at the ledge). And of course, it's a good way to punish an opponent's move after dodging it with a jump. After using Down Special, Yomi can perform the command-dash to land further away from her point of origin, which is handy for throwing off the opponent.

Up Special

Yomi's final special move, Up Special, also varies depending on her stance. With both kunai attached to one another, this acts as kind of a standard tether recovery. It extends upward and at a 20* forward angle with the same range as Side Special (3 SBB), and it deals 8% of damage as well as moderate upward-forward knockback. This is a solid anti-air, and can grapple to ledges for recovery. However, there are some differences between this and both Side Special and other tether recoveries. Firstly, holding B will charge the move for up to 3/4 of a second, extending the range to 4.5 SBB and increasing the damage to 11%. Holding a direction during the charge will change the direction of the tether, able to go up to 45* to either side.

The main unique feature of the move, however, is that by holding B after the kunai is thrown, it will become embedded into the foe. Unlike Side Special, Yomi will instead pull herself up towards the foe, performing an upward kick similar to Corrin's pin that deals 10% and KOs vertically at 130% if the move was started from the ground. The more the move is charged, the more damage the kick deals, up to 14% and KOing at 100%. This is a solid anti-air option, and the opponent cannot act during the animation, so it's a guaranteed follow-up. However, charging the move also adds ending lag and duration to the move, as the longer distance means that it takes longer for the rope to both reach its apex and also to fall down. Thus, the opponent can air-dodge and then punish with an attack if Yomi uses this move recklessly.

In separated style, Yomi leaps upward the same height as Luigi's Super Jump Punch, performing an upward strike with the kunai on startup in order to deal 3~6% and set upward knockback. If B or A is pressed, Yomi can land a follow-up attack much like Air Slash. Yomi stabs downward with the kunai, knocking the opponent downward and dealing 5~10% (as well as the option to embed a kunai into the foe by holding B). With one kunai this is not likely to kill, but with two, it's a pretty strong spike! Yomi can prevent the helpless state after the move ends by successfully hitting an opponent with the follow-up attack (it actually propels her slightly upward if landed), but the move cannot sweetspot the ledge at any point. To compensate, by performing the follow-up attack near a wall, Yomi can embed the kunai into the wall, similarly to Corrin's pin in some ways. She hangs from the kunai while also putting her feet on the wall, and pressing up, B, or A has her leap upward the height of her normal jump, able to perform an attack or another action. Pressing shield, down, or away will cause Yomi to let go, which will also happen after a second passes. Whatever Yomi chooses to do, she will pull the kunai out of the wall, so she has them on-hand. This is an unorthodox recovery move, and is obviously more useful on some stages than it is on others. Whatever the stage may be, however, those who try to gimp Yomi should be scared of the meteor smash!
 
Last edited:
Joined
Jul 7, 2014
Messages
583
Location
New South Wales, Australia
NNID
AwesomeCauliflwr
3DS FC
0576-6167-0092
Well I haven't been here in a while. Thanks for MasterWarlord and Smady for convincing me to come back. Heres my moveset for Globox from the Rayman Franchise. I've been sitting on this for a while and I'm pretty proud of it. let me know what you guys think.
Globox

Weight: 107 (Same as Wario and Ike)

Height: A bit taller than Link but not as tall as Ganondorf

Speed: Wario

Jump: Wario


Specials

Down B - Rain Dance - Globox summons a rain cloud to appear a ganondorf above him by doing a rain dance. The rain will come down so heavily it will damage opponents. The rain cloud can stay where it was summoned for a while and Globox can move around while it is active.


Up B - Bubble Burp - Globox burps a gigantic purple bubble that he can then climb onto and rise up on top of the bubble. The bubble can be blown by globoxe's side b and can be used as a projectile. If it hits an opponent it can pop and hurt them.

Custom Up B - Floating Globox - Globox inflates himself and he floats for a while,to get back on the stage


Neutral B - Snore - Globox falls asleep in the middle of battle. He then lets out a mighty snore with a circular energy wave radiating off of him. This does 5% damage and paralyses opponents.

Custom Neutral B - Rest - Globox heals himself by sleeping. It takes a couple of seconds to heal 10%


Side B - Blow - You can hold the side B button down to suck in air but if you let go it will stop charging. It takes 6 seconds of holding down to fully charge the move and it acts like the gust bellows but not nearly as powerful.

Custom Side B - Globox throws one of his many children at the opponent. They can grapple on for one then they jump off only one can be out at once. A bit like a combination of Diddy Kong and Olimar's Side B.


Grab and Throws

Grab - He shoots his tongue out like a frog to grab the opponent and they go inside his stomach

Globox puts on a disgusted face before any of his throws as he spits the opponents out

Pummel - He squeezes and punches his stomach

Forward throw - Globox rears back and then spits the opponent forward at a frightening speed

Back throw - Globox turns his head around and spits the opponent out, more damage than forward throw but not as fast.

Down throw - He spits the opponent onto the ground and they launch up.

Up Throw - Globox looks upwards and spits out his opponent.


Smash Attacks

Up Smash - Globox whips his huge tongue around in an arc above him. It goes back and forth once. A good move for hitting enemies above, not to much lag.


Side Smash - Globox charges up winding his arm and then his hand becomes large and he slaps it in front of him like in rayman legends.


Down Smash - Globox Sits down with his two feet to his sides getting ready to launch them both to the sides. As he gets ready his feet spin around wildly.


Tilts

Side Tilt - Globox kicks in front of him making his foot bigger while his other foot is on the ground.


Up Tilt - A 3 hit combo where globox slaps above him with one hand, then the other and then his hand gets bigger and slaps above him again with a more powerful hit.


Down Tilt - Globox performs a small jump and goes back down bum first performing a small ground pound


Other moves

Jab - globox slaps 2 times in front of him and then spins around and hits sideways with his tongue

Dash Attack - as globox is running he spins around with his arms spinning outwards with him. A good attack.

Ledge Attack (Under 100%) - Globox flips and spins around wildly at the edge of the ledge

Ledge Attack (Over 100%) - Globox hoists himself up and then does a huge chomp that hits the enemies.

Get Up Attack - Globox Kicks both feet to his side as he gets up


Aerials

Up Air - Globox does a slap above him as his hand is big. Good range and good for roof and star KO's

Back Air - Globox looks behind him as he does a huge kick with his foot behind him. the move comes out quickly and is one of his best moves

Neutral Air - Globox slaps in front of him with his foot slightly behind him. His whole body turns into a hurtbox

Down Air - Globox plummets down head first causing a bit of a shockwave. This is a very powerful move and Globox will have 2 seconds to recover from the small concussion he gets while looking dizzy in the ground.

Forward Air - Globox makes a sickly face and spits out plum juice in a stream in front of him. This does damage in a similar way to Mario's scalding Fludd.


Miscellaneous

Down Taunt: 10 of globoxe's children trample him. As he falls over he looks up at the screen smiling.

Side Taunt:Globox flexes and smiles at the screen.

Up Taunt: Globox shouts in fright with his mouth wide open, hands against his head and enlarged eyes far above his head.


Idle Animation 1: Globox holds his guard with his fists up like an old fashioned fighter

Idle Animation 2: Globox shoves his arm down his throat and picks out a lum. it flies away


Entrance Animation - Globox jumps in, looks around then smiles.


Crouch: Globox squishes himself in a way that is the same size as Kirby and Jigglypuffs crouch.
 

JamietheAuraUser

Smash Lord
Joined
Jan 11, 2010
Messages
1,196
Location
somewhere west of Unova
Trace

Trace is a young, up-and-coming bounty hunter. Like most of his type, he recently graduated from the academy (because all anime settings have an academy for whatever the setting's main combat-related profession is, and because I'm unoriginal) and the dual Echo Concussors he wields are of his own design. The guns' tractor beams and melee secondary fire help make up for his own lack of physical strength, with the tractor beams in particular being ideal for restraining targets.

His outfit matches his weapons' colour scheme, tending towards light greens, blues, and yellows. He wears a jacket somewhat reminiscent of that worn by Sora from Kingdom Hearts, but light green instead of edgy black, and beneath it is a long-sleeved shirt of a more intense blue than the rest of his outfit. He also wears a long, flowing scarf of a light green-yellow colour, because you can't have a speedy anime character without a cape or scarf flowing behind them to emphasize their acrobatic movements. Lending a touch of non-fantasy to his outfit is a pair of simple blue jeans, which are also rather light in colour. The whole ensemble contrasts his rather normal, brown hair, though the cut is still a bit anime (think perhaps similar to Kratos Aurion from Tales of Symphonia, or Cloud's Advent Children costume).


Statistics:

Weight: 5/10 (95 points)
Height: Pit
Walking Speed: Mewtwo
Running Speed: Meta Knight
Aerial Speed: Cloud
Ground Traction: Falco
Aerial Control: Falco
Ground Jump Height: Cloud
Midair Jump Height: Cloud
Short Hop Height: Sheik
Fall Speed and Fast-Fall Speed: Zero Suit Samus
Gravity: Ike

Trace has generally quick, but not top-tier movement in all respects, with the exception of his relatively low gravity. This low gravity is beneficial to him, as it allows him more airtime to leap over foes' heads and strike from above. His short hop isn't especially low, but he's adept at striking at low angles from the air regardless so it doesn't much matter to him.

Movement abilities: Wall jump, ZAir

For his ZAir, Trace extends one arm forward and fires the tractor beam from his Echo Concussor in that hand. The tractor beam's reach is only half a stage builder unit, though, so it's not much of a tether. As ZAirs go, Trace's is somewhat unique. Like other tethers in Smash 4 and Brawl, Trace's ZAir will home in on a ledge if there's one within its very short range, in order to not subvert player expectations too much. Unlike other tethers, however, Trace's ZAir will latch onto walls as well and pull Trace towards them, at which point he transitions to a wall cling. Against foes, Trace's ZAir serves as a command grab that deals a token 3% and minor flinching and pulls Trace towards his foe and/or his foe toward him depending on who's grounded/otherwise attached to a surface and who isn't. If neither Trace nor the foe is attached to the ground or a wall, it will tend to leave the foe behind Trace. There are no guaranteed follow-ups from Trace's ZAir, as it leaves Trace with only a minimal frame advantage.

Trace's wall cling behaves a bit differently than other wall clings in terms of control. To perform a wall jump from the wall, press the jump button. To perform a midair jump from the wall, hold toward the wall on the Control Stick and press the jump button. To drop off the wall, press the shield button. Additionally, Trace can use many of his special moves and aerials during a wall cling. Trace's ZAir is an example of such a move. When using ZAir during wall cling, Trace extends the tether away from the wall out to its usual range. He can transfer from one wall to another wall within range in this manner, and it retains its usual command grab properties. Aside from the difference in how it's initiated, the difference in controls, and the additional options Trace has from it, Trace's wall cling behaves like other wall clings in Smash 4.

Like many other unarmed/dual-wielding characters in Smash 4, Trace's animations mirror between directions instead of him turning fully. All move descriptions thus assume that Trace is facing right.


Special Moves:

Side Special: Echoed Blast
Trace grabs a foe in front with his left-hand Echo Concussor's tractor beam and pulls them close (the grab has a bit of range to it due to the tractor beam, like Lucario's Force Palm grab did in Brawl), then begins charging energy into the gun in his right hand which he also holds up against the foe's midsection. This energy buildup takes just over 3/4s of a second, during which time you can repeatedly tap/press and hold B to pause the charging in order to rapidly discharge melee blasts into the foe for 2% damage each. If you spend the entire time blasting instead of charging, you can get off 6 blasts. After this charge/hold period ends, Trace quickly switches from tractor beam to melee blast with his left-hand gun and fires a single blast for 3% damage, then discharges the energy gathered into the right-hand gun. The right-hand gun's final blast deals 4% and pathetic Sakurai Angle knockback if no time was spent charging at all, up to 10% damage and KO power from around 120% if the entire hold period was spent charging instead of building damage.

With Echoed Blast, Trace can customize the move for KO power, raw damage, slightly less damage but GTFO knockback, or most anything else. At very low percents, Trace likely won't be able to combo off of the uncharged version, so it may be worthwhile to build a bit of charge even at the expense of some raw damage simply to guarantee follow-up opportunities or even prevent yourself from being punished on-hit vs. especially heavy characters such as Bowser, whose weight prevents the attack's knockback growth from being sufficient if Trace doesn't build any charge. (Because really, 19% damage isn't worth eating 11.5% from Bowser's jab combo in return.) As a counterpoint, you can extend the move's combo potential at higher percents by spending less time charging and more time blasting in order to reduce the knockback and keep the foe nice and close.

In terms of startup, the grab comes out a couple frames later than Lucario's Force Palm, and missing the grab results in a total move duration of just over 5/6ths of a second, so this move is highly punishable to whiff. If the grab succeeds, however, the move has relatively little endlag, but you usually can't combo into another Echoed Blast (or at least, not a grounded one).

If Trace activates Echoed Blast from a wall cling, he'll release his grip on the wall to do so, leaving him airborne. When Echoed Blast is activated in the air, the initial tractor beam is angled 45° downward, but covers a somewhat wider range than it looks like it does in order to avoid janky misses. Trace holds the foe directly below him upon grabbing them, and the knockback angle changes to a Meteor Smash. Additionally, the duration of the hold is reduced to just under 1/2 a second, and the potential damage is decreased accordingly, with the charged final hit dealing only 8% and having the knockback reduced to match, and Trace only being able to get a maximum of 4 blasts off if he doesn't let the final hit charge at all. If Trace lands during the move, he immediately ends the hold to unleash the final two blasts, and the knockback angle changes to 75° upward and forward. If Trace lands just as or immediately before the final blast connects, he can Meteor Smash the foe after they touch the ground, which can be great for combo potential if he manages to tune the charge appropriately. (The goal, of course, should be to get the knockback just low enough to not send the foe into tumble and thus not make them bounce or let them tech, so you get extended hitstun like the first hit of Snake's FTilt.)

Possible quotes when Trace lands this move:
"Echoed… Blast!" "Ka… BOOM!"

[13–19% on the ground, 11–15% in the air]


Neutral Special: Recurrence Fire
(Grounded)
With the first tap of the B button, Trace steps his left leg forward slightly and fires 4 successive shots straight forward from the Echo Concussor in his left hand. These shots travel 2 Battlefield platforms at the speed of Fox's lasers, with a similar rate of fire to boot. Each shot deals 1% damage and flinching on a hit. He then steps his right leg forward slightly during endlag and the move ends there.

Unless you press B during or immediately after the initial barrage, in which case Trace will step forward a character length and fire a series of 4 shots from the Echo Concussor in his right hand. These shots have the same properties as the ones from the first barrage. For the endlag, Trace spins forward another character length and then spins both guns in his hands. It should be noted that only the first half of this spin forward is actually endlag, and if Trace acts out of it while still moving forward he will retain his momentum. This allows Trace to get better initial forward movement from a jump, slide forward slightly with a jab combo or tilt, or even shield while sliding forward slightly.

Possible quotes when Trace uses this move:
"Recurrence Fire!"/"Bang bang bang!"/"Take this!" "And another!"

[4–8%]

(Aerial)
With the first tap of the B button, Trace angles his body forward and downward in the air and fires 4 shots from his right-hand Echo Concussor at a 30° angle downward (essentially over his head due to how he's positioned) while doing a flashy spin. These shots have the same traits as the ones in the grounded Neutral Special. This move also gives a slight boost to Trace's upward momentum, but only once per air trip. Frame data is similar to the grounded version, and just like the grounded version, Trace can perform a follow-up attack with a second press of the B button. Unlike the grounded version, this follow-up attack varies based on Control Stick input.

Control Stick Neutral:
Trace repeats the initial attack, but spinning the opposite direction and firing with the left-hand Echo Concussor. Provides a slightly bigger boost to vertical momentum than the initial attack and has longer endlag.

Control Stick Forward:
Trace flips forward through the air, his arc covering a bit over a Battlefield platform in distance forward. As he does so, he fires four shots from his left-hand Echo Concussor at various angles downward that converge on a single point in the centre of the arc. The shots have the same properties as those used in the initial attack. Has relatively high endlag, but autocancels if Trace lands after firing the final shot. Trace ends the move facing the opposite direction from how he started. Can cancel into ledge-grab.

Control Stick Back:
Trace fires four shots from his left-hand Echo Concussor at a slightly shallower angle than the initial attack, while moving upward and backward in the air about a Battlefield platform in distance, as if being pushed by recoil. The upward momentum applies only once per air trip, but the backward momentum applies regardless. The shots have the same properties as those used in the initial attack, except for longer range on each successive shot to ensure that they can all hit the same distance from Trace's initial location despite his backward movement. Can cancel into ledge-grab.

During the initial attack, there's a chance Trace will shout one of "Recurrence Fire!", "Tracer Fire!", or "Bang bang bang!", but there's also a chance he won't. If he doesn't, he'll shout "Acro Bullet!" during the follow-up attack.

[4–8%]

(Wall Cling)
Used from a wall cling, Trace fires 4 shots from his Echo Concussor at a 30° angle downward away from the wall. These shots have the same traits as the ones from grounded Neutral Special.

[4%]


Down Special: Prism Barrier
When the B button is released, Trace uses the tractor beam function of his right-hand Echo Concussor to draw from his belt one of two devices that resembles Fox's Reflector. He places the device in the air in front of him, about a jab length away, then fires a shot at a button on the centre of the device. The button changes from glowing blue to glowing green, and from the device expands a light green forcefield in the shape of an elongated hexagon (it's the shape of a TIE Fighter's wing). This forcefield serves as a wall, and is tall enough that Trace can just barely leap over it with a single jump on the ground. If placed in the air, the barrier is centred with Trace, while if Trace places it on the ground, the lowest point of the wall touches the ground. If Trace inputs the move while standing close to and facing one of his barriers, he'll deactivate the device and put it back on his belt. This has the side effect of preventing Trace from placing two walls too close together.

Trace's barriers deal 6% damage, flinching, and a weak push effect to anyone overlapping them as they're placed. They function as solid walls, but are too thin to stand on. Barriers have 12 HP; when a barrier loses all its HP, it shatters and the device that generated it flies back to Trace's belt. Barrier devices regenerate 2 HP per second while not in use, and if a barrier is destroyed it cannot be deployed again until it regenerates to full HP. The button on the centre of the device glows red instead of blue while it is unable to be used. A barrier loses 6 HP whenever someone wall jumps off of it, or exits a wall cling from it. If someone touches a barrier while taking knockback, both they and the barrier take 6% damage. Shots from Trace's Echo Concussors heal his barriers when hitting them, instead of dealing damage to them.

Because the move only completes when the B button is released, Trace can easily perform a turnaround Down Special, as the "hold" stance he takes still allows him to turn. As noted above, Trace has only two of these barrier devices. He cannot place more barriers if both of the devices are in use/in cooldown from having been destroyed. He can still enter the "hold" stance for the move, but it will cancel without him doing anything when he releases it. This can be used to turn around in midair. The "hold" stance can also be cancelled by tapping the shield button, in a manner similar to Cloud's Limit Charge. If Trace inputs Down Special while using his wall cling to hang onto a barrier, and inputs toward the barrier before releasing the Special button, he can deactivate and put away the barrier, putting him into a normal aerial state. This is his only way to exit wall cling from a barrier without causing damage to it.

If Trace inputs this move and holds the B button for a full half-second, he'll destroy his active barriers. This is his only way for him to deactivate his barriers from range, but comes at the cost of the obvious 6-second cooldown before he can put either of them up again. If he does this while clinging to one of his barriers, he won't destroy the one he's clinging to, but will destroy his other barrier if it's up.

Possible quotes when putting up a barrier:
"Prism Barrier."/"This should do."/"Here!"

[6%]


Up Special: Ether Wisp
Trace takes a stance as if he's about to start to sprint while the B button is held, for up to 1/3rd of a second. If used in the air, Trace stops in place during this charge period. There's a bit of startup before the charge period starts, as well. When the charge period ends/the B button is released, Trace dashes in the direction the Control Stick is pressed, traveling at about the speed of Ike's uncharged Quick Draw. If no direction is pressed, the move simply cancels. The distance of the dash is one to two Battlefield platforms depending on charge. For the first third of the dash's distance, Trace is intangible as if during a sidestep or roll. From two thirds of the dash's distance onward, Trace can cancel the dash into any action, and will retain his momentum if that action would normally allow him to do so. If Trace allows the dash to go to completion, it has no endlag. If Trace dashes into a wall with this move while airborne, he'll initiate a wall cling. Can cancel into ledge-grab at any point after the first third of the dash.

Trace's Up Special does not put him into helpless fall, but he can use it only once per air trip. (He cannot refresh it by initiating a wall cling.) Using it from the ground does not consume this use. If Trace has not used it that air trip and did not use it from the ground to initiate that air trip, he may use it from a wall cling once per air trip in addition to its normal use. Initiating the move in the air without inputting a direction to dash in still consumes its use, however, in order to prevent stalling.

Possible quotes when activating this move:
"Ether Wisp!"/"Go!"
(Or sometimes, mercy of mercies, Trace will activate the move without saying anything.)

[no damage]

At least one Special must be directly related to the Special Mechanic from Week 2.
(Up Special, Down Special)

At least one Special must include a Stance Change of some kind. This doesn't have to be a whole "mode swap", but even a temporary phase where you enter a counter state, held mode like a reflector, mini game like dancing blase or something would work here.
(Neutral Special [air], Up Special)

At least one Special must be Chargeable, either manually or passively.
(Up Special)

At least one Special must be Produce an Entity other than a Projectile / Spawn the Main Weapon. This would be like how Link can spawn a bomb or Zer0 makes a hologram.
(Down Special)


At least two Specials must Vary Greatly in the Air vs Ground. This can be as simple as an extreme angle change or something more drastic.
(Neutral Special, Side Special)

At least two Specials must be primarily a Direct Attack with the weapon in some fashion (Usually the Core Special).
(Neutral Special, Side Special)

At least two Specials must Aid in Recovery in some manner. Not necessarily a recovery move, but it can add mobility.
(Neutral Special, Up Special, Down Special)

At least two Specials must Have a secondary Input either with an Optional Press (Air Slash) or a Smashed version (Homing vs Power Missiles) or Tap vs Hold effect (Ryu).
(Neutral Special, Side Special, Up Special)
 
Last edited:

Munomario777

Smash Master
Joined
Nov 18, 2014
Messages
3,253
Location
Charleston, South Carolina
3DS FC
0387-9596-4480
Switch FC
SW-8229-3157-8114
arr


TETRA

Tetra be the darin' cap'n of the pirate crew from Zelda: The Wind Waker, with darin' feats an--

*ahem*

Talking like a pirate... check. Thematic one-day set... check. Getting my free donuts... eh, that can wait.

Anyway, happy Pirate Day mateys! Here's a quick one-day set to celebrate the occasion. Tetra is one of the main characters of The Legend of Zelda: The Wind Waker, and while she may have a secret identity, Tetra won't transform in Smash. Instead, Tetra will put both her gear and her wits to the test in the fight against Nintendo's finest!

Oh, and this also qualifies for the iron memer, how about that.

STATS
Tetra is quite agile in battle due to her small frame (and despite her short legs), which may be one of her greatest advantages. Being about as tall as Toon Link, Tetra also shares similar agility as well as his wall-jump, but with a slightly faster dash as well as increased falling speed (resulting in a bit of a shorter jump). Tetra is a bit lighter than Tink and obviously lacks a shield, but her faster falling and dashing speeds, as well as increased traction, make her maneuverability a greater asset for avoiding hits.

SPECIALS

Neutral Special - Pistol Shot
Tetra raises her pistol, pointing it upward like in the header artwork, and then aims it forward and fires a single round. The shot travels extremely quickly, dealing 7% and moderate-high knockback. The lag on this attack is relatively low, but the drawback is that the next time the move is used, Tetra goes through about a 2/3 of a second of lag as she reloads, instead of firing. So while the move is quick and powerful, it cannot really be spammed. However, this move can be charged with identical mechanics to Bullet Climax, including the charge time and ability to shield-cancel the charge. The charged bullet deals 10% of damage; the shield-canceling makes this an excellent pressure tool.

This move has another unique property. By holding B during any move, Tetra can fire her pistol at the end of the attack, similarly to Bayonetta's Bullet Arts but using the properties described above rather than rapid-fire Fox lasers. Each move has a different angle, but it's generally designed to follow up on the attack, guaranteed. If your opponent DIs, though, you'll have to aim your shot accordingly, by inputting the same DI using the control stick. Weak attacks don't have this issue, since the effect of DI is negligible. This can also be used to fire at different angles than nspec offers even if you don't hit anything with the actual attack, but it should be noted that doing this adds about 1/4 of a second's worth of ending lag to the attack. Also, Tetra cannot charge the bullet when using it out of a move like this.

Side Special - Grappling Hook


Tetra whips out the Grappling Hook item from Wind Waker, throwing the hook forward in a ranged command-grab. It reaches about 2.5 SBB forward, having relatively quick startup lag but being rather laggy to end. Upon landing the grab, Tetra pulls the opponent in, transitioning to her grab state. In midair, Tetra instead opts to deliver a horizontal slash with her cutlass, dealing 9% and semi-spike knockback that launches the opponent a decent distance at a low angle. Near the ground it sets up for a tech-chase, and in midair it can be very effective against foes who happen to be recovering. Also, Tetra can of course hold B to use the pistol following this slash. In midair, the opponent and Tetra will be pulled equally, varying based on weight – so grappling Bowser has Tetra do most of the moving, whereas Jigglypuff is much easier to pull without Tetra moving as much. If the opponent is grounded and Tetra is airborne, Tetra will always be pulled to the opponent, whereas if Tetra is on the ground, she always stays firm. Using these different variations can help with combos and stage positioning!


Inputting another non-special move while the foe is being pulled in will have Tetra yank the roe back, sending the opponent into weak knockback towards her along with 2% of damage. With the opponent flying towards her, Tetra then performs the attack that you inputted. There is a bit of a delay, so slower moves might not quite connect. Additionally, the foe is guaranteed to be able to air-dodge before the move connects; jumping and attacking are often too slow, except for moves with really high startup. However, Tetra can read the air-dodge and punish with something like a charged smash attack during the air-dodge's landing lag! And if the opponent tries to jump away while you charge a smash attack, then just use a quicker move instead. By following through with the move normally instead of canceling it into another attack, a bonus effect of this move is that Tetra will steal any item held by the opponent, similarly to the weapon's use in Wind Waker. It can also be used to snatch items that are just lying on the ground.


Up Special - Bomb Blast


Tetra pulls out a bomb and lights the fuse, holding it below herself. It explodes after about half a second, dealing 15% and a spike to opponents below Tetra as well as propelling her up about the height of Doc's Super Jump Punch. After that, Tetra will pull out the Sail from Wind Waker, gliding down with it similarly to Skyward Sword's Sailcloth item. This has no hitbox, but Tetra can fire her pistol by pressing B during the glide, and even aim it using the control stick. It has recoil to it (movement, not damage), meaning that aiming it downward can even be used to gain a bit of height! This can be handy for deterring foes, and Tetra can also cancel the glide into a helpless state by tapping down on the control stick.

Down Special - Barrel


Tetra pulls out a wooden barrel, holding it above her head. Summoning the barrel has a hefty bit of lag, but it has a variety of applications. Firstly, it's still possible to move and jump / double-jump while holding the barrel. Tetra can hide in the barrel by crouching, lowering it to cover her body completely, and can also "crawl" whilst hiding. The barrel breaks either after a single attack which deals 11% or more, or multiple hits which add up to 20%. Tetra is protected whilst hiding in the barrel, but the attack that destroys it also deals half of the normal damage to Tetra. Pressing B has Tetra place the barrel in front of her, having the same stamina as described before. Attacking the barrel with some knockback will launch it / send it rolling like the barrel item, dealing 15% and KOing at about 90% at the edge. Tetra can also throw the barrel by pressing A (and optionally a direction), having these same properties. By the way, the barrel can also be picked up by using this move again, or by pressing the grab button (foes can pick it up using grab, behaving like a normal barrel).

While on the stage, the barrel acts as both a platform and a wall. It can be used for wall combos / extending strings vertically; knocking a foe into the barrel will cause it to slide across the ground a bit, though, preventing infinites. Tossing a barrel up will cause it to trap any foes caught underneath, and they can break out similarly to Yoshi's egg. Tetra can land a follow-up with this, but due to the egg-like properties, a proper combo isn't likely unless Tetra deals enough damage to break the barrel. If Tetra grapples a barrel, it follows the same rules as opponents do. If the barrel is grounded and Tetra is in midair, she can even use it as a grappling point to maneuver around the stage! Shooting the barrel, on the other hand, has a different effect. The second shot causes the barrel to explode, dealing 15% and KOing at around 100% from center-stage!

The barrel is quite a useful tool, all things considered. It can be used as high ground, a way to perform wall-combos, a powerful projectile, protection, or even a way to trap your opponent! It's laggy to pull out, though, so you'll have to choose the best time to spawn it. Tetra generally benefits from resourceful thinking: have a barrel out, and use it when the situation calls for it.

STANDARDS
Jab - Cutlass Combo
Tetra starts by performing a downward slash with her cutlass, dealing 3% of damage and taking a step forward. The second hit is an uppercut-type swing, dealing 3% and low upward-forward knockback. This jab is quick and has decent range and damage, and the follow-up with the pistol also helps out. However, it may be beneficial to follow up with another attack, as that can net you more damage!

Forward Tilt - Sword Combo
The first hit of this attack is a lunge forward with the cutlass, similar to the stabbing attack from Wind Waker. This first hit deals 4%, and the follow-up depends on the direction held. Holding up has Tetra leap up and perform a wild spinning attack, dealing 5% of damage and knocking the opponent a good distance into the air. It can kill at around 180%, and is also good for setting up a juggle (especially with the pistol follow-up knocking the opponent further upward). The normal variation is an overhead hacking attack, similar to a jump slash but without the jump. It deals 7% and KOs at the edge at 140%, and deals the most damage. However, the pistol follow-up is slower on this attack, meaning it won't actually connect at higher percents. Finally, the downward variation resembles the Spin Attack again from Wind Waker, a single, wild spin with the cutlass that deals 5% and high semi-spike knockback. It can set up for tech-chases, with similar application and aim to the pistol to sspec. This move is slower to start than jab by a good margin, but has good reach and a variety of follow-up options.

Up Tilt - Handstand Kick
Taking a break from sword attacks, Tetra kicks upward and performs a handstand, similarly to Fox's up tilt. This deals 5% and low forward-upward knockback. Additionally, Tetra exits the handstand by performing essentially a full cartwheel, meaning that she moves forward during the attack. This allows Tetra to follow up more easily on the move, as she chases the foe's knockback automatically. At low percents, a standard or aerial may be your best bet, whereas at high percents, a shot from the pistol is the only real way to follow up.

Down Tilt - Low Cut
Tetra, while crouching, performs a quick, low, wide swing with her cutlass. The attack deals 5% and low knockback similar to Meta Knight's down tilt, and is also about as quick. It's an excellent poking move, with speed and range to make it safe, and can also be used in combos, or even to extend jab-locks! If the opponent tries to shield after your dtilt, why not go for the grappling hook?

Dash Attack - Roll
Tetra performs a quick somersault across the ground, just like the maneuver from Wind Waker. It deals 7% of damage and moderate upward-forward knockback, with a combination of the knockback, low endlag, and the speed boost making it good for landing a follow-up. You can shoot the pistol forward if you want, but it's better to just perform another attack first. In classic Zelda fashion, Tetra will automatically jump a short-hop's distance into the air upon rolling off of a ledge, making aerial follow-ups that much easier! This also works for platforms, of course.
SMASHES

Forward Smash - Pistol Blast
Tetra aims her pistol forward, building up magic-like energy in it. Upon release, the pistol unleashes an explosion in front of Tetra, covering a good area and dealing 14~20%, as well as KOing at the ledge from 100~70%. There are a couple of catches to this move, however. Firstly, it uses up the bullet from nspec, so you can't spam the move at all. There is also some ending lag to this attack, and since it uses up the nspec shot, the pistol cannot be fired after using this move by pressing B to cover your endlag. Using this move without your pistol loaded will just create a small windbox, which can be good for gimping at the ledge sometimes. Also, if you do have your pistol loaded, this attack can cause a barrel to explode in one shot!

Up Smash - Skyward Slash
Tetra grips her cutlass with both hands, performing a powerful upward slash in front of her. The attack is quick for a smash attack, dealing 10~14% and KOing vertically at around 120~90%. It sets up nicely for juggles and has good reach, but firing the pistol after this move can make it a more effective KO tool, similarly to Falco's up throw in that sense. It'll kill at around 100% uncharged this way, which is a nice thing for Tetra to have at her disposal. However, this attack does have some ending lag.

Down Smash - Double Bomb
Tetra pulls out two bombs, fuses lit, and performs an attack similar to Mii Gunner's down smash but with bombs instead of arm cannon shots, and without the two hits comboing into each other. The attack deals 14~20%, KOing at 100~70% at the ledge. The blast radius of each bomb gets bigger when charged, but there is a sourspot near the edge of the blast that only deals half the damage and low knockback. This move is also a bit laggy. However, the pistol shot at the end of the move is actually aimed upward, meaning that opponents have a harder time punishing Tetra from the one angle that the move doesn't normally hit.
AERIALS

Neutral Aerial - Low Cut
Tetra performs a horizontal slash with her cutlass, but angled 45* downward. The slash deals 6% and moderate semi-spike knockback. The move's unique attack angle, decent range, and good speed make it effective at covering certain situations, and its semi-spike can also lead into tech-chases or edgeguards. The pistol shot is fired straight forward, allowing Tetra to hit foes who manage to get above the attack.

Forward Aerial - Wide Swing
Tetra leans forward and swings her sword in a wide arc in front of her, covering a lot of vertical space. The attack is rather quick, dealing 6% and low semi-spike knockback. It's good for carrying an opponent across the stage, but the semi-spike means that the opponent is going to go down eventually. It's still good for its own type of combo though, especially since the pistol shot is at a good angle to follow up.

Back Aerial - Water Shot
Tetra aims her pistol backwards, turning her body slightly, and fires a bullet made of water behind her, like the ones used in many of her moves in Hyrule Warriors. The bullet travels as far as the Mii Gunner's forward air, dealing 5% of damage and low knockback. As the move is already a gun-based attack, Tetra cannot press B to follow up with another shot; however, this move, being a water projectile, does not use up Tetra's pistol charge, at the cost of being a bit weaker. One of the main uses for this move is actually mobility, as like with the Mii Gunner, Tetra's bair has recoil which allows her to "gundash" through the air at high speeds. It's excellent for extending a combo that you normally wouldn't have the speed to keep going!

Up Aerial - Skyward Stab
Tetra stabs upward with her cutlass, similarly to Toon Link's up air but with only one hand, and also no lingering. It's quicker to end, but the hitbox doesn't linger, so it's better for rapid-fire juggling but worse at catching air-dodges and such. The move deals 8% and moderate upward knockback, the pistol shot for this move being aimed straight up to follow up on this move. This move can chain into itself with the help of platforms, or even Tetra's barrel as high ground!

Down Aerial - Stomp
Tetra stomps downward with one foot, dealing 7% and a relatively weak meteor smash. It can KO offstage at higher percents by itself, but the pistol shot is aimed straight down and adds a more powerful spike to this move! On-stage, while the spike can be teched, if the tech is missed (or if the opponent is already prone) it can be great for comboing out of the bounce due to the low lag on this move.
GRAB GAME

Grab - Grab
Tetra's grab is fairly average, without a lot of lag and good reach. For her pummel, Tetra spins her pistol with her finger in the trigger guard, hitting the opponent as it spins. This pistol whip is rapid-fire, and deals hits of 1%. Also, this goes without saying, but Tetra's throws are compatible with her pistol mechanic. Alternatively, pressing B during the grab state causes Tetra to fire the pistol point-blank, dealing 9% and keeping the opponent in the grab state. This can be handy for tacking on an extra bit of damage before a throw, but causes you to miss out on some other opportunities.

Up Throw - Leaping Slice
Tetra holds the opponent up in the air and performs a leaping upward slash with her sword, launching the opponent up a short distance and dealing 6% of damage. This throw has low lag, so it can be used to combo; at higher percents, it may be best to use the pistol for a long-range follow-up.

Forward Throw - Leaping Kick
Tetra performs a kick on the opponent with great force, leaping backward like Cloud's forward throw. This throw deals 8% and semi-spike knockback, sending the opponent sliding across the ground, and into a prone state at high percents for tech-chasing. The semi-spike is useful at the edge for setting up a gimp such as dair. As for on-stage uses, the tech-chase can be followed up on in a few ways. Depending on the distance, Tetra can use grappling hook, the pistol follow-up, or a melee attack to punish.

Down Throw - Bomb Cover
Tetra leaps up into the air with the opponent held, throwing a bomb to the ground. Simultaneously, she holds the opponent below her, the end result being the bomb exploding on the foe and launching them up into the air to KO at around 130%, as well as dealing 10% of damage. At low percents, it's a good combo throw, particularly since Tetra is in the air at the end. And at high percents, it's obviously great for KOing. Perhaps standing on top of a barrel could be beneficial for the extra height?

Back Throw - Wrap-Up
Tetra wraps her grappling hook around the opponent, making them unable to move. She then throws them backward along the ground, dealing 3% and sending them sliding a short distance. Tetra grabs one of the ends of the rope, causing it to uncurl and spin the foe around as they move away from Tetra. At the end of the rope, the foe is dealt 4% of damage and weak knockback at a 45* angle, upward and towards Tetra. This is good for comboing, and the pistol shot has Tetra shoot the foe after they're launched at the end.
MISCELLANEOUS

Final Smash - Catapult


Tetra got the Smash Ball! She pulls out another barrel, but this time she slams it down onto an opponent's head, open end facing down. The opponent is knocked out (and dealt 10%), and when they awake, the barrel is on top of a catapult, ready to fire! The cutscene shows the catapult launching the opponent, dealing 35% more, and when it ends, the knockback is similar to that of the Blue Falcon.

Playstyle - Resourceful Comboer
Tetra is a very combo-heavy, agile character. Her attacks link into each other very nicely, even if their individual damage is low. Tetra's pistol also helps extend hits, but the tricky part is knowing when to reload. Tetra has a variety of ways to perform a tech-chase, and her pistol, grappling hook, and mobility are just the tools needed to punish. Tetra's kill moves aren't the best, but with a loaded pistol, moves like dair and usmash become that much more potent. Tetra's throws are also handy, with tech-chasing, a KO throw, and a couple of throws that are just good for plain ol' comboing.

Tetra's barrel also plays a large part in her gameplay. The player must be resourceful with the barrel, using it whenever the situation calls. Using it as a platform, wall, trap, protection, grappling point, or projectile whenever needed requires some good awareness, and Tetra's kit meshes rather nicely with the barrel overall. It can block off options during a tech-chase by acting as a wall, extend uair strings, and even be exploded by stray pistol shots! Overall, Tetra's myriad of tools make her good at comboing, but her main weaknesses are her gimpable recovery, light weight, and reliance on laggy barrel spawning and pistol reloading. With that said, Tetra is still a formidable force, and is ready to take on the best that Smash has to offer!
As always, feedback is greatly appreciated, and I hope you enjoyed the set! :)

Like what you see? See some more over at my Make Your Move Hub! :D
 
Last edited:

UserShadow7989

Smash Journeyman
Joined
Aug 13, 2007
Messages
306
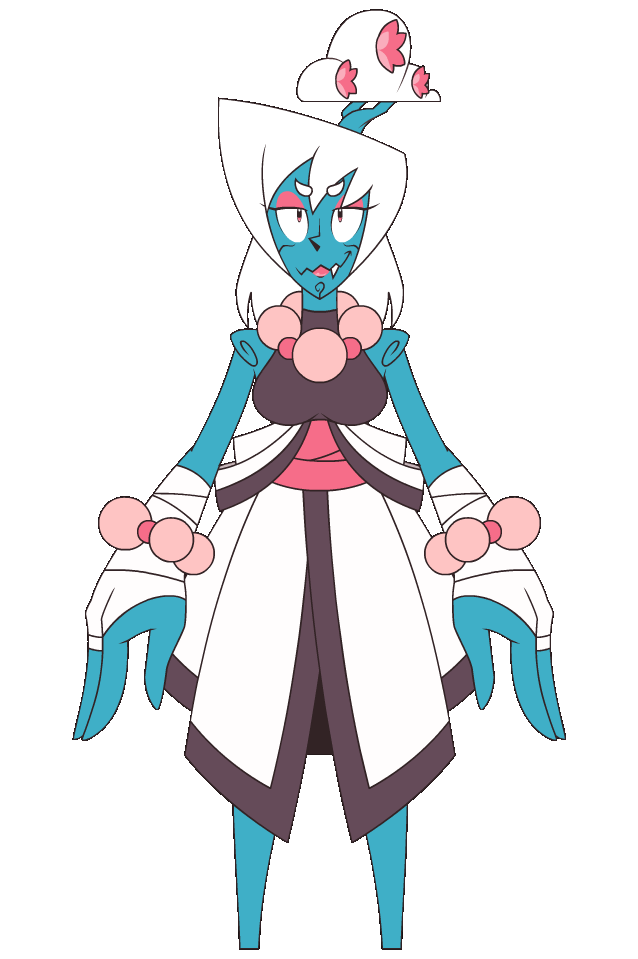
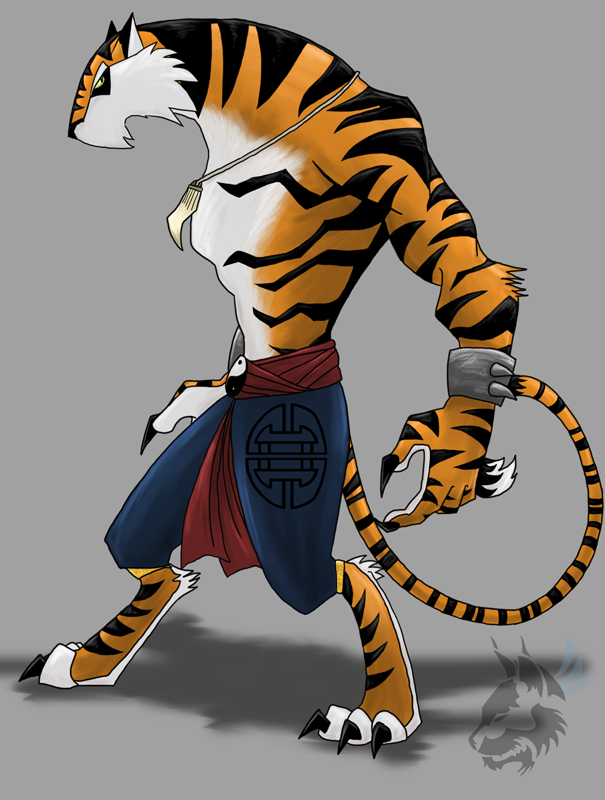
MYMini 2 Week 3 Entry:


Knightly Witch Garnet

(source: 
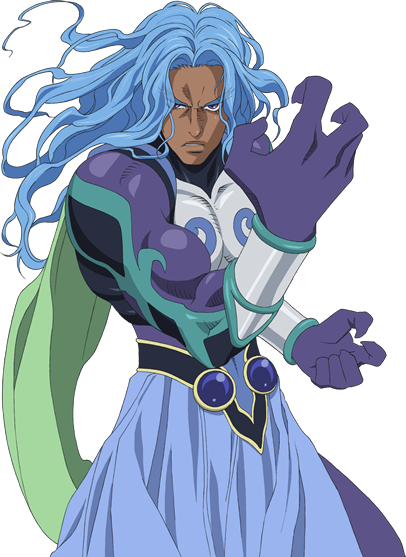
http://www.renders-graphiques.fr/galerie/Jeux-video-3-autre/Princess-Etrian-Odys-96975.htm , based off of one of the Sovereign class designs from Etrian Odyssey; ignore the sword and the emblem.)


. . . Though born to a family that can trace its lineage back to nobility, Garnet came in a time where the caste based system of old had long since ceased to be, and never once yearned for the reputation her name used to carry as her grandparents did. Instead, she took to the family business like a fish to water, learning to forge both decorative pieces and practical tools alike.

When they discovered she had been studying fire magic to further hone her skill as a blacksmith, her grandparents cooked up the plan of enrolling her in a prestigious academy of magic as a way to give the family name clout again. Though she and her parents were resistant to the idea, Garnet eventually caved to the demand to prevent her family from fighting, and decided to look at it as a chance to further her talents and learn new things.

Before being allowed to go, she was tutored to act refined and dignified in the presence of others; a facade she's been careful to keep up in public, and one that has given her a reputation for snootiness among other students. Despite some initial hurdles, Garnet has thrown herself into her studies, though with far less aptitude for magic than for working metal.

. . . Garnet's preferred spells revolve around manipulating objects more than elements. Her specialty are spells of calling and motion. She can call her creations to her, and imbue them with magic to control them indirectly, with the aid of runes she has engraved within them. This focused study has limited her in comparison to her classmates, but combined with her excellent craftsmanship and her training, she is able to utilize a variety of tools at once, and with greater precision than her peers.

The pale blue aura her spells generate, and her ability to move inanimate matter with just a gesture, has given her the unwanted title of "The Haunted Witch". As much as she disliked the lifestyle she had been forced to take, she took pride in what progress she made as a witch, just as she took pride in her ability as a blacksmith. To hear her talents indirectly attributed to some sort of ghost possessing her drove her to her wits' end.

To rid herself of the name, she took to adding decorative flair to her work and training with her equipment, even wearing ornate armor when in public. She crafted her wand, the Mithril Thorn, to further this image with its rapier-like appearance and distinctive rose-like appearance when used as a focus. It was all an attempt to spread her preferred title of "The Knightly Witch", and all with limited success.

Her workaholic tendencies and social pressures started to catch up to her. The split in focus between repairing and further increasing her stock of tools, studying magic, and trying to train herself with the equipment, means she has improved little in all three. Things probably would have worsened for her... if not for an incident at the academy right as she was starting to slip, presenting a new opportunity to earn acclaim.


Stats:

Traction - 8 (10)
Size - 8 (8)
Weight - 7 (9)
Gravity - 6 (7)
Jump - 6 (5)
Fall Speed - 5 (6)
Dash Speed - 4 (3)
Air Speed - 4 (3)
Special: Crawl, Crouch, Hover

. . . Garnet's statistics lean more towards being a middleweight than a heavyweight, but ultimately she sits on the line. In terms of body shape, she is a little shorter than Samus, and a little thinner. She has some longevity that contrasts with the stately airs she presents, sharing Samus' resilience, Lucina's fall speed and aerial mobility, and a pair of decent jumps in the vein of Pikachu's.

Her dash speed is also in the same league as Samus', being a bit below par, while her walk speed is far more impressive- just a little slower and more controlled. She moves with short, smooth strides in a fencing stance, matching Peach's dash. As a result, she can re-position herself well in the middle of a melee, excellent in light of her mid-range strategy that lets her attack from far, near, or anywhere in between.

Lastly, she can hover briefly in the air by holding the jump button as Peach can, though only for 3/4th the time the princess can, in exchange for her greater air speed.

. . . As for the numbers in parenthesis, Garnet has the ability to access a far more proper set of armor than her "casual" wear as needed, described in her Down Special- when wearing the full plate, her weight increases to be just shy of DK's, her dash speed is comparable to Peach's with an equal drop in walk speed, her fall speed and aerial mobility worsen to match Corrin's, and her jumps are more like Ike's.

She becomes a hair bigger in each dimension, but on the bright side, the presence of remotely reasonable footwear over her form over function armored heels gives her a major improvement to traction, letting her stop on a dime and launch into her dash without a hint of delay.


Special Mechanic: Mithril Thorn

. . . As outlined above, Garnet wields many kinds of weapons, often several at once through the control of her magic runes. However, the most important of them all is her wand, Mithril Thorn.

When holding one of her summoned weapons, she keeps the small weapon sheathed at her side, her off (right) hand on its hilt when not attacking. However, some of her spells produce a lingering effect that require both a magic focus and control runes at hand; while one or more of these spells are active, Garnet waves Mithril Thorn like a conductor would wave their baton, the weapon glowing bright red and green.

These spells 'halt' when Garnet performs an input that uses Mithril Thorn, resuming once she recovers from the attack's lag and continues the proper motions where she left off. Duration, timing, and all effects of the spell are suspended on frame 1 of the input and resume the frame the input ends. For the same reasons, they will similarly halt when Garnet is incapacitated by any form of stun. She will continue the motions passively otherwise, having learned to weave these spells by second nature.

With a summoned weapon in hand, she can maintain the effects of those spells while attacking with that summoned weapon, at the cost of increasing that attack's start up lag by 1/4th from multi-tasking. This allows Garnet to adjust the timing of certain effects as she uses her standard inputs to better capitalize. Throwing a weapon does not have increased lag, allowing Garnet to quickly swap between using Mithril Thorn and one of her lesser creations at her leisure.


Specials:

Neutral Special - Call to Arms:

. . . Garnet waves Mithril Thorn in front of herself, the magic focus glowing brightly. Three icons appear over Garnet's head when the Special input is pressed and held: a dagger in the left, a lance on the middle, and a spiked tower shield on the right. Garnet waves Mithril Thorn as she weaves the magic needed, a purely visual effect if not for counting as using Mithril Thorn for her mechanic.

While holding the Special button, she can choose between the icons with the control stick, and releasing the button summons the one currently highlighted (defaulting to the dagger). Doing anything else causes Garnet to cancel out of the selection and into her new action without any effect. Even before the icons appear, Garnet can adjust her selection, removing quite a bit of the wait once the player is familiar with the Special.

. . . The weapon bursts out in front of Garnet as a hitbox, pointed end away from her, hovering just within her reach until the player hits the Special button, Standard button, or any other button. It will remain positioned exactly this way in relation to Garnet until the player makes their choice, moving with her if she falls or is pushed along.

If the Special button, she launches the summoned weapon as a projectile with a thrust of her wand, a slight delay telegraphing the attack and letting the player adjust the angle as with Yoshi's Up Special (the weapon rotating in place visibly). If the Standard button, she grasps the weapon and equips it, dropping any item she was previously holding in the process. If any other button, the object drops to the ground and Garnet cancels into the new input. Whichever she chooses, Mithril Thorn is then free to maintain her spells once again.

. . . A summoned weapon inflicts the damage and effects of its associated Forward Tilt attack if it hits during its appearance, and acts as if thrown with a smashed input when used as a projectile. Garnet suffers little lag on either end of the summoning process, the only delay being however long it takes for her to select her weapon. Only three copies of each kind of weapon can exist at a time per Garnet; summoning a fourth causes whichever existing copy that Garnet hasn't interacted with the longest to vanish. If Garnet is KOed, her summoned weapons vanish with her.

For simplicity's sake, both for writer and reader (and hypothetical player), each weapon's inputs are the same regardless of which character holds it (adjusted solely for things like the wielder's height affecting how high off the ground a hitbox would be), and which direction it is thrown. Each weapon and their associated inputs and specifics are described below:

Dagger

. . . Light and quick, the dagger deals very fast hits and offers the wielder some mobility options, but lacks reach with its hitboxes and deals little damage. It is, however, one of the most effective weapons when thrown; the dagger flies half again the normal distance of a thrown weapon and hits for an okay 4% damage (6% smashed), making it a great projectile attack when summoned and thrown through the Neutral Special (hence being the default). They can't be rapid fired nearly as fast as Fox's blaster, but the damage and presence of actual hitstun compensates plenty.

Upon striking the ground when smash thrown, it lands such that the blade is embedded into the ground or surface it strikes. Picking it up takes a moment longer in this state, akin to lifting a heavy item like a crate, for anyone who isn't Garnet- aside from simply making more, Garnet teleports her creations to her hand when picking them up in roughly the same time it normally takes to pick up an item, regardless of their state.

This also means the dagger's hilt is sticking out of the surface, though this serves no direct purpose aside from being a visual indicator and making it stand further from the ground.


Neutral A:

. . . The wielder makes a quick stabbing motion with the dagger, doing only 2% damage and having little reach. However, this move comes out extremely fast, and can be repeated endlessly by hitting the A button again before the wielder has fully fallen back into their neutral stance. The hitstun of this move minimal, and stales quickly, but is enough that it can land three or four guaranteed hits before staling prevents it from continuing further. It's an ideal interrupt in close combat and a tool to chain some faster inputs together.


Forward A:

. . . A short, lunging stab forward. The wielder moves roughly 3/4ths Kirby's width from where they started, trading a little speed compared to the Neutral A for better reach and a quick movement. The stab deals 5% damage and pushes those hit by the very tip of the move's reach (a sweet spot) back slightly.

During the latter half of the end lag is a short window to repeat the input before its lag would end normally, letting a player 'poke' their opponent back twice before the positioning prevents further pushes, or even dart back to a safe distance by attacking in the other direction. Following up with the Neutral A is also very viable when a second consecutive use of this input leaves the player close.


Dash Attack:

. . . The wielder abruptly lunges forward half a battlefield platform, blade out to their side as a hitbox dealing 5% damage and light knockback. They pass through any other characters in the way, though not solid barriers. The hitbox being slightly in front of themselves during this swift movement also allows them to move through destructible terrain that would be broken by the attack.

This attack has more ending lag than normal for the dagger's kit, leaving the wielder at a very small frame disadvantage. To compensate, the wielder can turn around with a held directional input during the ending lag, or hop a roughly Kirby's width back or forward by tapping the directional input. This is not enough to allow the wielder to repeat the Dash Attack before the foe can attack, but does allow them to evade.


Forward Smash:

. . . A simple, quick stab to the midsection. This straightforward stab is fairly quick uncharged, but unlike the above inputs, this does not move the wielder around to compensate for its short reach. What it does do is actually reasonable damage at 14-19% and middling knockback.

If the attack strikes the foe during an attack, a rune on the dagger flares bright red, and they are briefly stunned- long enough to leave the wielder at a frame advantage. This is one of the more useful moves on the dagger, allowing the wielder to punish a mistake with several fast, damage-racking moves. It still requires some careful play to pull off due to its reach.
Lance

. . . With its long and thin hitboxes, the lance is ideal for keeping out of arm's reach of an opponent and making it difficult for them to approach. It can deal decent enough damage and knockback as well, but its length and the power behind each thrust leave it a slow weapon that is ill fit for fighting off someone within range for their own melee.

The lance deals a respectable 9% when thrown, or a shocking 13% if smash thrown. It travels a bit slower than normal and only the tip counts as a hitbox, but it has the same range. Like the dagger, it embeds itself into whatever solid surface it touches when smash thrown and is treated as a heavy object for the time it takes opponents to pick it up.

. . . More importantly, however, the lance's shaft acts as a physical barrier when the weapon is sticking out of the ground- a thin wall that can absorb 10% damage before falling over, blocking attacks (but not movement), and is usable as a fall-through platform if one is able to stand on it. While stuck in the ground, it counts as an object instead of a summoned weapon for the purposes of Garnet's magic.


Neutral A:

. . . The wielder braces with the lance, tip flashing briefly as they assume the position, then return to their neutral stance. The lance's tip acts as a very brief hitbox at its full reach, dealing a very nice 8% damage and mild knockback, but the window is very short and the hitbox precise.

. . . The intended thrust of this move (hah) is to either hold the A button, causing the wielder to hold the lance such that its tip is a lingering hit box (5% damage and flinching) they can angle up or down within a 90 degree cone with the directional inputs, or to tap the A button, causing the user to perform a weak thrust for 4% damage and flinching that hits the area between them and the spear's reach (its tip at the very end being a sweatspot as outlined in the first paragraph).

All attacks with this input are unfortunately slow, further hindering their use on the offensive, but still being workable against a foe on the approach.


Forward A:

. . . An exaggerated thrust with great reach at the expense of speed. During the wind up, the wielder can adjust the angle of the attack with the directional inputs, letting them strike an opponent on approach from ground, air, or even below the wielder's platform.

The lance's tip is the only actual hitbox, though it passes quickly through the intervening space between where it starts and where it ends as a sour spot dealing 4% and light knockback. The tip proper deals a more sufficient 7% damage and medium knockback, the distance it creates covering its ending lag nicely. This is the lance's main tool for controlling space.


Dash Attack:

. . . From the lowered position the lance is held in as the wielder dashes, they swing the weapon upwards as they come to a halt; this attack does not have the full normal reach of the weapon, but covers a full arc instead of a thin line, and is a single hitbox from start to finish that deals a respectable 9% damage and mild upward knockback.

It is also a tad quicker than the other options, allowing the wielder to follow with a properly angled Forward A or by chasing the opponent into the air to utilize their aerials.


Forward Smash:

. . . A strong, telegraphed thrust, aimable as the Forward A is, but defaulting to hitting straight ahead. The lance's tip at the end of the thrust is again the primary hitbox, doing a commendable 18-25% damage and above average knockback, but is a sour spot at half the damage that pushes the foe slightly back during the brief moment it travels to that point and the few frames shortly after that it remains a hitbox.

It does have one trick, however: the lance does double damage to shields at any point in the attack, runes flaring to life on contact that surround the lance's tip with an orange glow. It's not likely to ever hit an aware opponent's shield, but the fact it makes using the shield to approach dangerous is a helpful quality in and of itself.
Spiked Shield

. . . Unlike the Dagger or Lance, the Spiked Shield is meant more as a defensive measure than an attack. It stands slightly taller than Garnet unarmored or equal in height when she's fully equipped, and is a Pokeball's width, not counting the spikes extending from the front an equal distance. It is a heavy object like the Crate or Party Ball for most characters, though like her other weapons, Garnet will teleport it to her hand when lifting it to ignore the additional delay.

. . . When thrown, the shield only travels half the normal distance, landing in a standing position. It acts as an obstacle with the properties of its Neutral A active at all times. If hit by an attack that exceeds 10% damage or an opponent sent flying by an attack into it, it falls over and loses its effects. It can also be pushed around like a crate. It deals 6% damage in flight, opponents pushed back at the rate it travels on contact (making multiple hits possible when smash-thrown).


Neutral A:

. . . The wielder holds the shield in front of themselves and braces, ducking their head and bending their knees to hide behind it as best as their size allows if taller than it. Moving into the shield when braced deals 4-12% damage, depending on the combined speed they and the shield are moving when they touch it (damage capping at Captain Falcon's Dash Speed), and pushing the victim lightly back.

. . . While in this state, the shield protects the holder from hitboxes that would pass through where it stands, reducing the damage by 10%, to a minimum of 0%; hitboxes that have their damage nullified are negated fully. The wielder can move back and forth at their walk speed in this state, but will not turn around.

Moving the shield in and out of position is laggy, and an attack that deals enough damage to get through still inflicts all non-damage effects normally (such as knockback and hit stun). Grab hitboxes will also circumvent the shield.


Forward A:

. . . Setting one leg forwards, shield in front, the wielder performs a forceful shove with okay reach, 6% damage, and respectable horizontal knockback. It's one of the better reach options the shield has, and while a little slow to use off the cuff, can be performed more quickly from the Neutral A stance by tapping the directional input. Either way, it has some ending lag as the wielder pulls the shield back, preventing an easy follow up.


Dash Attack:

. . . The wielder ducks their head behind the shield, slowing down as they lose visibility of what's before them. Besides the shield acting as a hitbox that deals 8% damage and mild knockback, it serves the same purposes it does in the Neutral A input during this moment.

They move at roughly their run speed, rapidly slowing towards their walk speed as the A input is held. If held long enough to reach their walk speed, they will seamlessly transition into their Neutral A stance. The shield's hitbox degrades into a sour spot dealing only 4% damage and a weak push back effect at the half-way point.

. . . Tapping the input merely causes them to swing their shield in front of themselves and then return it to their side, regaining their lost speed or letting them perform a different input with minimal hassle.


Forward Smash:

. . . Taking a moment to brace the shield in front of themselves and duck their heads, gaining the protection of the Neutral A input, the wielder charges forward upon release, shield front with their arm braced against it, moving from their starting position at their dash speed for half a second or until they reach a ledge.

This charge deals 17-24% damage and strong horizontal knockback, decreasing to 13-17% and middling knockback shortly after the charge starts, and ending with the wielder coming to a stop and adjusting their footing for noticeable ending lag. The hitbox itself has poor reach, compensated for by its wielder's movement.

Side Special - Spectral Fire

. . . Flourishing Mithril Thorn, Garnet conjures a pale, blue, Pokeball-sized flame. Garnet remains in place for the duration of this input, directional controls moving the small flame at Ganondorf's dash speed as she waves her wand. Entering this stance in the air briefly slows her fall to compensate. She can end it at any time with no lag by performing some other input, the ghostly fire left floating in place, waiting to impart its effects.

A single attack or a collision with a solid platform disperses the flame without fanfare, causing Garnet to exit her stance as normal. Hitstun also ends the input. When it hits a foe, it will do 4% damage, stuns them briefly, pushes them back slightly, and causes them to drop any item they're holding.

By smashing the input, Garnet can instead wreath Mithril Thorn in this fire, performing a quick, aimable thrust once the flourishing animation ends. The thrust deals 8% damage and then applies the effects of the fire hitbox to whatever it first touches, but if she misses the thrust, she retains the flames around her weapon for 3 seconds or until she hits with an attack that uses Mithril Thorn as a hitbox.

. . . Contact with objects conjured by Garnet causes the fire to spread over the entirety of that object instantly, lingering as a hitbox with that object's shape and the projectile's normal effect. It's the weapons Garnet summons that are the main target for this effect. In addition to the normal effect on an object, a ghostly hand forms within the fire and wraps around the grip of the weapon, pursuing opponents carefully and continuously.

The hand's attacks have their lag increased by 1/3rd, and their damage, knockback, and hitstun decreased by 1/6th of the normal amount. Being a spell, it is incapable of attacking while Garnet is performing her own inputs or stunned, and will freeze mid-attack and lose its hitbox qualities until her input is finished.

The hand has 20% stamina and moves at Ganondorf's dash speed by default, being based off his movement speeds for the purposes of all effects. It is able to attack with any of that weapon's associated inputs. Attacking the hand inflicts no knockback, but stuns it for double the normal length of time, meaning Garnet cannot sit back and let her ghostly spells handle the battle for her. Stunning the hand causes the flames of the weapon to fade until it can move again. Effects that destroy the weapon it holds will also destroy the hand.

. . . Garnet has a hard cap on the number of effects from this input at a time; she can have up to three lingering flames, three burning objects, and one animated weapon. Creating a new effect past the cap causes the oldest effect of that type to vanish, and she can choose to dismiss an effect by grabbing it like she would an item (leaving her holding the formerly animated weapon if she removes the effect from one). When Garnet is KOed, like her summoned objects, the flames disappear.


Down Special - Steel Shell

. . . Thrusting at the ground before her with Mithril Thorn, Garnet channels magic into the wand to form a glyph where it touched, a more complex version of the spell she uses to summon her weapons made for a larger object. If in the air, Garnet halts in place shortly as the glyph appears at Mithril Thorn's tip.

From the glyph appears a set of full-plate armor slightly taller than Garnet. If on the ground, the armor shoots forward a Kirby-width with one metal gauntlet extended in a long-reaching punch. If airborne, the suit remains rigid and falls as a hitbox. Either attack deals 15% damage and mild horizontal knockback, but at the very bottom of its 'airborne' hitbox, the armor has a sweet spot that will spike its victim down.

. . . The armor remains on the stage as a solid obstacle with 30% stamina that's visually indicated by it becoming more worn as it takes damage. Hitting it affects it like a character with weight equal to Garnet's, though it remains rigid and will not stand if knocked down. Using the Down Special input with the armor present causes the armor to vanish laglessly, returning whence it came.

If it was dismissed or knocked off stage, Garnet can resummon the armor with this input, the armor reappearing with whatever stamina it had when it was removed, +4% for every second it was not in play, and -20% if it was knocked off stage. When Garnet herself is KOed, the armor vanishes with the rest of her creations, and its stamina is reset.

. . . Garnet can repair the armor by holding the input, energy flowing into the glyph as she does so. Both Garnet and (if present) her armor glow a faint white, the armor repairing its damage 1% at a time, at a rate of 4% per second. The brightness of the glow shows the armor's current health compared to its starting value and maximum of 30%. She can hold the input indefinitely, only summoning or storing the armor upon release, and can cancel out of this stance to heal the armor without manipulating it.

. . . Hitting the armor with a Spectral Flame from Garnet's Side Special (or vice-versa) animates the armor to serve her. It acts like the animated weapons, including counting as one for the effect limits, with the following exceptions: the armor shares the stats in parenthesis under Garnet's statistics, and takes knockback normally.

The armor takes hitstun normally from any attack that deals more than half its remaining stamina, while having super armor against attacks that do less than that. It can be destroyed the same ways, or KOed traditionally. It gains the burning hitbox that overlaps with its hurtbox, and all the qualities of it. It also freezes in place when Garnet performs an attack using Mithirl Thorn.

It has two default attacks; a mediocre punch usable in the air or on the ground for 8% damage and light knockback, and the slower punch it uses when summoned on the ground. Garnet will want to equip it with the weapons she summons, granting it the inputs of those weapons. It will drop whatever it is holding to grab a summoned weapon thrown at it, and Garnet can take that weapon away by trying to grab the armor.

Regardless of its moveset, it suffers the same increase in delay and weakened damage the hands do, counting as an instance of the Side Special flames/hands when animated for all purposes. In terms of behavior, the armor lacks the free flight and knockback immunity of its sibling minions, and has its AI adjusted accordingly; it will try to keep clear of ledges (and the blast zones in walk-off stages), and will prioritize recovery if ever off stage for any reason.

. . . Of course, armor's intended purpose is protecting its wearer. By smashing the Down Special input, Garnet summons the armor around herself and gains its statistics and situational super armor quality. If within a battlefield platform of the armor while it is already summoned, Garnet instead 'summons' herself into the armor.

While wearing the armor in this way, damage from attacks is divided evenly between her and the armor's stamina, with any in excess of the armor's stamina being received by Garnet (the damage split being applied after the super armor check). If she is equipped with a summoned weapon, any weapon held by the armor is dropped where it stood, otherwise Garnet will equip whatever weapon it was holding. If a suit of armor is destroyed while worn this way, Garnet takes a small amount of additional hitstun.

Using the input again removes the armor from Garnet, storing it away. If the armor was animated when Garnet dons it, the effects linger until the armor is destroyed or they would be removed by Garnet using her Side Special enough times, though she is in control of the armor. If she stores and resummons an animated armor, it returns to play animated, again so long as it was not destroyed or de-animated by the limit for Side Special effects.


Up Special - Reversed Calling

. . . A rune flairs to life on Garnet's chest plate, magic energy swirling around her weapon. In this state, Garnet briefly stalls in the air, or receives grab armor on the ground, gaining super armor for the short window in either circumstance. The player has a moment to input a direction for Garnet's recovery to move her. Tapping the directional input instantly adjusts her aim in that direction, while holding it gradually adjusts her aim.

The direction picked (defaulting to straight up) with a second press of the special button or a full second wait, Garnet hurls her current weapon as though with a smashed throw. Wherever the weapon hits, Garnet teleports, hand grasped around the weapon when she reappears. Pressing the special button again causes her to teleport before the weapon hits something, letting her control where she teleports a bit more finely.

Garnet does not enter free fall after using this input. Indeed, she suffers next to no end lag at all, letting this move double as a surprisingly fast approach that she may attack out of. However, the rune on her armor and the energy around her weapon continues to crackle and spark, and will do so until she reaches solid ground and stays there for three seconds to let the excess energy leave her.

. . . Things are a bit different if she has only Mithril Thorn in hand, or if she uses this input again before letting the above effect end. Her wand generates an aura of energy much like her armor and secondary weapon, the input functioning much like it does above. Garnet instead throws Mithril Thorn as she would a battering item, a projectile doing 8% damage on hit.

When she teleports to Mithril Thorn this way, she enters free fall afterwards, all spells dependent on Mithril Thorn halting until she exits this state. Mithril Thorn's runes are much finer in craft due to her efforts and does not have a cool down like the above version of this input, but it has longer lag as Garnet shakes the energy from her wand, preventing her from properly following up with a new move.

. . . Lastly, there are a few special circumstances. If Garnet hits her armor with this move, she teleports into it laglessly and equips the weapon thrown with little lag, even if she threw Mithril Thorn. If she is on the ground and smashes the input, and she hits something that is not rooted to the ground or part of the terrain, she pulls whatever is hit to her current location. This includes things such as an animated weapon or her armor (teleporting inside it as the above), or an opponent- again not suffering the lag or cool down.


-----

Updates from the previous entry, for quick reference:
-Neutral, Down, and Up Specials added.

-Mechanic now explicitly states that spells pause when Garnet performs an input that utilizes Mithril Thorn, from frame 1 of the input to the final frame of lag of the associated input.

-Increased Garnet's size slightly (originally slightly taller/wider than Lucina, now slightly shorter/thinner than Samus).

-Forgot to mention she can crouch and crawl. I added in the ability to hover briefly in the air, like a lesser version of Peach's.

-Side Special's effect can now be channeled through Mithril Thorn's hitboxes by smashing the input.

-Side Special now specifies that lingering flames will still retain their effects- both as a hitbox and if they contact a summoned object or weapon made by Garnet.

-Summoned hands now base their movement speed off of Ganondorf's, usually using his dash, instead of always moving at his Run Speed. The change to these specifics was to account for some of the summoned weapon inputs.

-Side Special's been rebalanced; the original intent was to have any combination of three effects at once (I.E. possibly 3 weapons at once), but I decided to adjust the limits for balance and simplicity- three lingering flames, three burning objects, and one animated weapon (due to the power of the weapons as minions, even balanced towards weakness with them in mind). The debuffs to its attacks are now set instead of based off of number of effects.

-Due to the length of some inputs and sections, I've begun segmenting the moves using a double space and bolding and underlining the first letter at the start of a paragraph that describes a different aspect of the input/section from the last to make it easier to reference/read through.

Entry Requirements:
(x) At least one Special must be directly related to the Special Mechanic from Week 2.
-Side Special
-Up Special (Mithril Thorn, Air)

(x) At least one Special must include a Stance Change of some kind. This doesn't have to be a whole "mode swap", but even a temporary phase where you enter a counter state, held mode like a reflector, mini game like dancing blase or something would work here.
-Neutral Special
-Side Special (Smashed)
-Down Special

(x) At least one Special must include a Direct Effect on the foe, such as DoT damage, a stun, an effect that only occurs on a certain hit or the like.
-Side Special
-Up Special (Smashed, Grounded)

(x) At least one Special must be Chargeable, either manually or passively.
-Down Special
-Up Special (Mithril Thorn, Air)

(x) At least one Special must be Produce an Entity other than a Projectile / Spawn the Main Weapon. This would be like how Link can spawn a bomb or Zer0 makes a hologram.
-Neutral Special
-Side Special
-Down Special

(5/3)


(x) (x) At least two Specials must Vary Greatly in the Air vs Ground. This can be as simple as an extreme angle change or something more drastic.
-Down Special (attack portion).
-Up Special.

(x) (x) At least two Specials must be primarily a Direct Attack with the weapon in some fashion (Usually the Core Special).
-Up Special.
-Side Special (smashed).

(x) (x) At least two Specials must Aid in Recovery in some manner. Not necessarily a recovery move, but it can add mobility.
-Up Special.
-Down Special.

(x) (x) At least two Specials must Have a secondary Input either with an Optional Press (Air Slash) or a Smashed version (Homing vs Power Missiles) or Tap vs Hold effect (Ryu).
-Neutral Special.
-Side Special.
-Down Special.

(x) (x) At least two Specials must Have a Sweet/Sour Spot in some manner.
-Neutral Special (weapons).
-Down Special.

(5/3)
 
Last edited:

JOE!

Smash Hero
Joined
Oct 5, 2008
Messages
8,075
Location
Dedham, MA
Week 3's Deadline has been moved to this coming Monday due to the Lizard Contest also eating away at this week's time.
 

MasterWarlord

Smash Champion
Joined
Aug 24, 2008
Messages
2,902
Location
Not wasting countless hours on a 10 man community
HIP EDGY 90s MASCOT

Just because Crash has actual personality compared to Mario doesn't make his appeal being "lol so random". Yes, he is crazier than the others, but it more amounts to his environment than anything he personally does. Anything involving him directly amounts to basically a bunch of gags like his varied death animations which obviously don't translate into attacks (Unless it's this terrible moveset's usmash).

You summon a random enemy that has no significance to Crash for his Side Special because it's "wacky". You bring out as many random props as possible, including his bazooka, kart, the sphere from the GBA games, his surfboard, and even a -sword- from random generic enemy #3289. These are placed on completely random inputs that aren't Specials, and despite how much you are desperately drawing for potential the moves themselves remain generic. Something like the sphere or bazooka might not be the worst idea if it was on a remotely fitting input and actually given enough depth to add something to the moveset instead of being thrown in to make the lesser inputs more "exciting".

Crunch and Coco are summoned for one throw each, poofing in and out of existence to do attacks on Crash's behalf. Having other characters which could obviously have movesets do things instead of the character you actually picked is very bad. If a moveset for one of them would later be added, the move becomes awful if the playable version's in the match, and without it just comes across as insulting to both characters involved. The character being summoned being given such an incredibly minor role is offensive, and the summoner sitting and doing nothing while others do the work for them is also fairly dumb. If they are theoretically there, why do they only help on these arbitrarly chosen moves? If you insist on summoning actual characters like this within a set (Not just a minion like a Waddle Dee), you're better off making them full on minion assist trophy like characters with their own AI and attacks, and you generally need a better justification for summoning them than just being allied.

An example of a character it is acceptable for Crash to summon is Aku Aku due to him constantly being with Crash and functioning as more of a powerup than his own fighter, and I actually like what you did conceptually with summoning him on the shield. If you played off of it more instead of summoning random props, this could've been a more fun moveset with a more coherent playstyle. That said, the fact you haven't fixed the typo of the shield having 1.3% the health of a regular shield is pretty awful and makes Crash unplayable as is, especially when he instantly dies when the shield dies.

TRUE CONSERVATIVE DQ REP

Slime is a set that has very little detail or numbers on anything. The pictures are basically the entirety of the extent of what the set has to offer. With the lack of detail, we get zero grasp about how this moveset would play, but it's so underdetailed we can't even get a grasp of how things like the duplicates from dtilt and Side Special work, they may as well last forever for all we know. Because this set has to fit in a tiny image and we would have to go through the effort of having more "mandatory" pictures, the set also has no dashing attack or grab-game, making it cry in the face of shields and all of these superarmor spamming sets posted recently.

I would heavily argue that the Smash fandom has a misconception that Slime should be the Dragon Quest character given that he does nothing in the source material and is just given the title of mascot, having equal importance to a Goomba outside of being a mascot. He relies entirely on his spinoffs where he is playable in order to even be capable of having a set, which you barely use outside of a Neutral Special anyway and wouldn't be enough to carry him. An alternative slime like Healslime which you disgrace by making a prop (and healing the foe to make it a useless move) in the set would be better, or a main character like Roto who you use the sword of as another tacky prop.

I go into detail on summoning other characters as props in the Crash comment, and you summon random humanoid "Slimes" which are in no way iconic or representative of Dragon Quest on the smashes because Slime blatantly has no potential for a set. Treasure boxes are not randomly portals in Dragon Quest either, and the Neutral Special could've easily sufficed as a recovery instead of you saying he uses generic DQ teleporting spell in the treasure chest for some reason, which he can now only use with treasure chests because you said so.

BAKURA

The Ghost Gang really, really need better descriptions of how their various team attacks work. If one of the ghosts is involved in a team up move whatsoever, does the entire move become unusable, or just the part involving that ghost? As is, it sounds like it just can't be input at all, which leaves the group very weak. The ghosts have zero sense of personality in this set and it's very arbitrary what ghost does what on each input, as any of them can do it. The only real characterization that comes across in the set is Clyde is an idiot, but on the actual majority of the moves it's just something like Ghost X does a generic action, including Clyde.

The Neutral Special is an unusable mess. It splits the ghosts up and makes their movement use weird AI patterns. Over half the moves in the set use more than a single ghost, which makes me think practically nothing is usable when split up. What's more, Clyde's AI pattern has him run from the foe when he's within 8 ghost widths of the foe to the left edge, meaning if he's between the foe and the left edge he just kills himself without the foe even bothering to do anything. Lacking so much as one ghost makes you lose access to the majority of the set.

Bacura is a very random reference to be as stupidly prominent as it is in the set, and it is pretty bad you could not even bother to provide a picture of this insanely obscure thing. Being used for the Up B, grab, and Final Smash is more than what the ghosts that aren't Clyde contribute in terms of personality, and you insist on referring to Bacura as a character rather than an object.

SPEED WEED

Before I say anything else about Welsh, I'd definitely like to commend you for what you came up with in the first 3 specials, as that is where the biggest effort went into this set before you just decided to go and post it out of the blue. How Welsh can interact with the tree by making additional branches, vines, and fruit comes across incredibly natural and is self contained very well within the first 3 specials, providing an excellent basis for the set. You definitely have a more interesting basis for momentum than most when you have Welsh interacting off of a part of the "runway" as much as she is here, having a good amount of fun making your own jungle.

Unfortunately, the set pretty heavily falls off after those 3 Specials. The Down Special in particular has little to contribute, with its primary purpose to enable her to attack while flying at very high speed. With how much charging it requires it would rarely see use, though with less charging it kind of takes away from far more interesting move of enabling her to attack on the vines by giving her access to this Down Special. The whole momentum aspect of the set in general simply feels too easy because of her base dashing speed already being Sonic's - there is little reason to build the momentum higher on vines when moves that would require a high momentum level would already be pretty satisfied by her just doing a dash into them, much less with also having a 10/10 in air speed.

The fsmash is a decent idea to turn it into a runway in the more literal sense, but turning the tree into a slope with generic whack of the bone #69 is awkward, even if she does have super strength (Which I find a bit questionable with how much her speed is emphasized). The move makes the main tree trunk function as a branch, but how the existing branches/vines/etc function on this tree when it's tilted over really needs to be better detailed - aside from giving her a ramp to use with momentum, the tilted over tree is hurting her game by making the existing branches be at unsuable angles. This and the bair have absolutely no playstyle relevance of hitting the foe and exist entirely as moves on arbitrary inputs to interact with her tree. Bair has her hang upside down from branches, which is very redundant and superflous when vines already exist. The usmash is a much better version of what the bair is trying to do, as while it has no playstyle relevance when not interacting with the tree as she swings on the branch, it is still a direct attack that's she actively trying to land on foes.

Very, very few moves have playstyle purpose when not interacting with the tree, just being generic hitboxes before you go into the actual use of the move when you are standing next to a tree. There are already countless moves that heavily mention the tree, but the tree is also the only real source of momentum, just making her use her generic 10/10 speed for the momentum moves like nair otherwise. The bthrow's "purpose" without a tree to jump off becomes a casual method of suicide killing if you manage to grab a foe within 2 characters widths of the ledge with your back to it, something you don't even seem to have considered because of how focused you are on the tree.

I know it's very, very easy to make the trees to get all of this context up, but I'm not sure how good of a thing it is that she can have two of these giant constructs on the stage so casually with so little the foe can do to resist it going up. You'd think they'd be able to attack where the seed was planted during the 1.3 seconds it's growing or something. I am certainly not going to tell you you can't have constructs 4 SBBs tall, but to constantly have 2 of them up as something the character universally assumes exists for the entire moveset is kind of overkill. While these trees aren't super durable, they're easily reproduced and the fact you can have out 2 means one will always be up when the other one dies anyway. Getting to reproduce the enormous hitbox of the tree sprouting out isn't exactly much motivation for foes to ever destroy these trees, though they kind of invalidate projectiles by simply existing.

ANTI SHIELD

Anti Mage's game of interpreting mana as shields is a stroke of genius, interpreting a universal mechanic from Dota that doesn't exist in Smash into a universal mechanic in Smash that doesn't exist in Dota. He is a hypercarry offensive character anyway, so him working down shields isn't exactly the biggest stretch in the first place. That said, Anti Mage doesn't play with the foe's shield quite as much as you'd expect from the premise, with most of the interesting gameplay coming from manipulating his own shield. Having access to tons of teleporting around during moves at the cost of your shield is a fun dynamic, and powering up several of your moves only encourages it further. Furthermore, Anti Mage is actually rewarded for using his shield as an actual shield whatsoever with the perfect shield mechanic from the grab-game, so it's harder to say that he doesn't just not use it, and the grab-game's interactions with Mana Burn are one of the best parts of the set.

The combos created from Blink are the other big part of his game, and how it interacts with his own shield mechanic makes it tie into everything great. Allowing his blink to be usable during all moves is absolutely the way to go with it rather than arbitrarily allowing it during a handful like with Ekko, and Anti Mage has a good amount of thought put into it balancing such a scary universal mechanic. Blinking during moves is constantly brought up and one of the main ways to make simpler moves in the set interesting. Separating parts of multihit moves, teleporting yourself during your sexkick nair to use yourself as a projectile, and stregthening your various moves that benefit from having your shield low before using them at the end of a combo or something are all great uses.

There are some criticisms on a reread for flavor standpoints more than anything else. Shields being mana would be fine if it was only the foe's shield, but having him lower his own Shield as a bigger focus is a bit of a misstep from a characterization standpoint. I know Anti Mage has Mana in Dota because all characters have it, but when his literal title is "Anti Mage", he should be more focused on depleting the enemy's "Mana" than his own, which is flowed off of much more regularly. In addition, some of the moves have rather generic animations to justify their effects, it is particularly random which moves power up having a low health shield and which ones don't. Creating a self damaging Mana trap and projectiles on the dsmash and usmash also come across as weird choices.

SUPERARMORTORIAS

Artorias heavily nerfs his own dodges and shield in an incredibly laggy move that simply sounds like nothing short of a joke regardless of any potential "benefits" that can be attained at the cost of something so ridiculous. Regardless of this, Artorias manages to be viable through not just the passive superarmor, but smashes that raise it up to a pretty respectable level and give him a scary offensive presence, as well as some moves like jab and bair used as quick moves to deflect the foe away from yourself with defensive coverage moves. The perfect shielding mechanic later revisited in Anti Mage is just as interesting here as in that set, as the more specific shield means with full powerup that Artorias can't really do anything besides powershield anyway, making it an interesting dynamic.

For a guy simply slashing his sword around for most of the set with a bit of sludge popping up, this manages to be a very interesting set with impressively little filler, largely just because of how much more interesting everything can become in the context of this massive seesaw of balance of positives and negatives, he truly has good reason to feel as opressive as he does at times given if the foe gets in, they can wreck him just as badly as he dishes out the pain.

I am getting pretty annoyed with sets being non commital to being for Brawl or SSB4 for when it becomes remotely relevant for a set like this. In Brawl, he can be chaingrabbed to oblivion and his grab vulnerability leaves him on the weaker side given he has such terrible dodges. In SSB4, the regrab timer prevents chaingrabs, and attempting to combo him out of a throw will be met with his passive superarmor, making him lean too much on the powerful side. In any case, neither side is super desirable, and the grab vulnerability aspect of the set leaves me not being 100% sold on it.

ROOL REVIVAL

Tutankoopa would be a rather run of the mill camper without the neutral Chompy involved, and interacting off of him is when the moveset is at its best. You have made a very intentional decision to not interact with him too much though to still enable the foe to be able to fight against him and turn him on Tutankoopa a lot, which I disagree with. As is, foes can very easily use Chompy better than Tutankoopa, either with rushdown or their own various campiness. I am not saying you need to accomodate every MYM set ever that could potentially use Chompy better than Tutankoopa, but in a game where Tutankoopa exists it is really doubtful he would be the only one who could produce any kind of walls, for example. Having it be possible to turn Chompy around on Tutankoopa at all would be enough, even if he had more methods to try to kite him into the foe. Aside from balance issues, the set is simply more exciting when interacting with Chompy rather than just camping.

I made the comparison before to Gluth, who benefits a lot more from his neutral minions by comparison and comes across as a much more interesting set for gameplay. The main defense is characterization and how Tutankoopa's primary defining feature is having his chomps and other spells backfire on him due to his incompetence, and that certainly does help it to a degree, but can only carry the set so far.

The boss mode largely suffers from similar balance issues and just greatly underestimates what 3 other characters can do. The only thing that makes it really work is that neutral chomps have 3 foes to target and only 1 Tutankoopa. That said, the boss set adds some more enjoyable additions that would've been nice if they could've made it to the main set, and I really wish stone chomps could've made it in to the main Tutankoopa in some fashion. The mechanic of them only later turning on Tutankoopa at half health is interesting and could be balanced for 1v1, though in 3v1 is more iffy.

HEAVYWEIGHT ICE PENGUIN

Piplup's a combo character with a bit of focus on set-up as his main gimmick. The rain being left on the stage is easy to produce and the interactions with it are very straightforward, largely consisting of just requiring the water be there to get a powerup of some kind. The comboing mostly consists of Pikachu's Quick Attack Canceling into the water, which is a bit underelaborated upon, and comboing off of the Rain Dance cloud platform which can provide some entertainment. The combos are still definitely a bit basic on coming together into a coheisve playstyle for my taste, so I can see why you added in the ice interactions to spruce things up.

The alternate ice versions of the moves are very bare bones and contribute little to Piplup's gameplan. The fact that they were later added in shows a lot, as they basically just add more text to the moveset while not contributing anything to how Piplup would play, just adding another option for the sake of it in hopes of finding something more creative. I really would expect you to play off of freezing over the water puddles more than you do, as well as with ice traction/physics in a combo oriented set. This does neither.

Piplup doesn't learn any Ice moves by level up beyond Mist (Which isn't really enough to shoot beams from your mouth), so it's a fairly questionable decision. I know he's a penguin and all, and I would be more willing to forgive it if you used the ice to do anything worthwhile, but you don't. If you are going to push him as this icy penguin, scald makes less sense to use, and it's not like you take much advantage of the fact the water is hot anyway, so you may as well rename it to be something generic instead. Aqua Ring also doesn't mimic the actual effect it has in the game, so you'd be better off just renaming that move as well to something more generic. Piplup's power still is too strong for my taste for everything else he can do.

ARMOR PRINCESS

As others have said before me, after the smashes the set's creativity kind of drops off a cliff. It is as uninspired as it is at that point because there are two movesets for the majority of the set which contributes little and the better inputs could just be combined together to a lot more easily avoid accusations of filler. The main reason the style switch actually exists is for the fact that you put superarmor on the moveset changing move, and forcing her to swap movesets to get a very powerful effect could definitely provide for some interesting gameplay if you had put more effort into the post smash moves.

As is, the weapon switch is just an arbitrary hurdle to overcome in order to get very strong passive superarmor of 11% for 10 seconds, giving her a massive advantage in any neutral game state. Her smashes and dashing attack scale up to be enough superarmor to effectively block anything when stacking with this, and dashing attack has low ending lag, which is the only part where the superarmor doesn't apply anyway. As far as non neutral game, she has decent comboing ability in addition to heavyweight power, while any foe who can't combo her out of a throw specifically will heavily suffer given the SSB4 regrab timer. Reflectors at least take some effort to put up and leave some place for using projectile moves at close range, this just denies the majority of them outright. At least allow her to take damage from them by getting rid of this silly damage resistance.

The Shining Sword bair is a ridiculous move by itself. First off, it is her most powerful move in her whole set outside of charging smashes, dealing 18% and KOing at 80%. It is laggy, sure, but the startup of the move will clank with any enemy attack, so I don't see how lag is any kind of issue, as if you are interrupted out of it you suffer no penalty. The startup also can be canceled out of by landing on the ground, and without even the cost of any kind of landing lag. This is a pretty cliffnote move that can be nerfed to the ground given how unimportant it is to her playstyle unlike the core superarmor, but I definitely despise it in its current state.

The Side Special Dancing Blade move is the main thing about the set that is at all cool and contains more than just superarmor abuse and swinging around a sword. That said, a complaint that has become rather mainstream is characters only being able to do things during throws that they can't otherwise - why will they only do them after grabbing the foe? Here, it is a bit awkward that she cannot do these moves outside of a specific order. If the sword sets were combined, some of the various Side Special parts could well be made into their own moves and be more interesting than what you have on some of those blander inputs. Marth's Side Special slashes are generic enough they do not really warrant being usable outside of a specific order, these are blatantly just full moves within a moveset list.

On the topic of powers restricted to only when the foe is grabbed, the Shining Sword throws repeats one effect 3 times that is only cool as an animation and does not contribute to gameplay, as Diancie impales the foe with some diamonds and uses her rock powers to move the foe around by moving the diamonds. This could potentially be an actual interesting move were it not just an animation but something she had any kind of interaction with or control over, and only doing it when a foe is grabbed feels rather wasted.
 
Last edited:

IvanQuote

Smash Ace
Joined
Apr 7, 2014
Messages
853
Location
Looking for those who like Mighty No 9
NNID
ivanquote
3DS FC
1693-3075-2999
Thank you for the review! When I was thinking of how to incorporate the whip form, I was afraid of how powerful it would be, as it essentially equates to Project M-styled turbo mode for up to 3 moves in a row. I do agree that going from whip to rapier is a bit excessive and thus have halved the reattachment time.


Violet Stirling-Special Moves:


Neutral Special (Frog Launcher/Reattachment): This attack is the way you manually switch back and forth between Whip and Rapier Modes. In Rapier Mode, Violet holds the bow forwards and presses down on the screw, launching the frog forwards like a bullet, reaching. This attack is rather strong (17%), reaches a length very slightly over the length of a Battlefield platform (screw to frog), and may be a good KO move if the 0.5 second start up and ending times are accounted for accordingly. When the frog is at its furthest point out, the hitbox changes properties somewhat; the attack loses most of its knockback, but does more damage (28%), due to grazing the enemy with the frog’s razor. This special can be reversed as well to cover the other direction. In the air, this attack will act as a tether if a ledge is in range, giving Violet multiple recovery options.

In Whip Form, Violet merely reattaches the frog to the shaft of the bow for 0.5 second, even taking away the tether for this move. This is also the only way to get back into rapier mode other than losing a stock, so you may end up using this a lot if you perform a lot of 3 Step Techniques. Since Violet is committed to the animation, only make sure to do so when you are safe from fatal attacks.


Side Special (Parry/Entanglement): In Rapier Form, Violet will take on a more realistic fencing stance for a time, bow held forwards. If she is hit from the front in this state, she will parry the blow with a flick of her wrist. While this may seem like an ordinary counter, this causes neither damage nor knockback. Instead, the move will stun the opponent due to knocking them off balance. On the ground, this means that the opponent will be in their shield break animation. How long they are in this state depends on both the opponent’s current damage and how strong the parried attack was damage wise (e.g. if the opponent has not taken damage or Violet parries a weak jab, the opponent will regain control almost immediately). By using this move, the opponent will have to be careful, lest they leave themselves open to a fatal attack. In the air, the opponent's aerial momentum is completely halted. This will give the opponent back their recovery in the air, so it does not really work well in edgeguarding, but if timed well Violet can use this to get out of nasty combos. One last thing to note, if over used in a similar manner to Shulk’s vision, the active parry window becomes smaller, discouraging Violet from spamming this this technique.

image.jpeg

In Whip Form, this attack is performed with a flick of the wrist again, sending the length of the whip arcing forwards, entangling any opponents in the whip. This is Violet's tether in Whip Form when preformed in the air and also functions similarly to a zair (3%). This move is rather weak, so it is best used for recovery. This attack acts like a long ranged grab on the ground, as well. Once the opponent is grabbed, Violet can perform one of two throws. Forward/Down throw is a simple whip lash. Since the opponent is entangled in the bow, they are lifted into the air and slammed into the ground as a result of the action, sending the opponent upwards (17%). Back/Up throw involves Violet lashing in the other direction, making the opponent arc along with the whip and slam into the ground on the opposite side of Violet, sending them at a 45* angle away from her (14%). In both cases, it is easy for a third party to be hit by the ensnared opponent as they are being thrown, especially in the Back/Down throw’s case. In doubles, this means that Violet’s partner should stay clear of this throw and Violet should aim to hit multiple opponents at the same time with these special moves.

This attack is the only special to have an Intermediate Form as well. If the B button is pressed while in parry stance, she will retreat one character width (now vulnerable) and preform Entanglement. Since the frog is being launched in this variation, the grab animation is far quicker than the vanilla version of Entanglement, although providing more ending lag if whiffed. Between the parry and intermediate switch, this move in general creates a lot of potential mindgames needed to be respected.


Up Special (Take Flight): In Rapier Form, Violet twirls the bow above her as if it were a baton for 1.5 seconds. By doing this, she can rise up with very little option to move horizontally. Even then, her vertical movement is less than average (about 2/3 of Captain Falcon’s Up B) and the twirling bow does not even do that much damage (5%). Needless to say, this form of recovery is painfully bad however and should be avoided when possible.


In whip form, this attack is much better. Violet does a continuous twirl while she holds her bow above her head for 1.75 seconds. Due to her spinning, the hair and frog of the bow swirls around her like an Olympic twirling ribbon, causing a VERY slight vacuum effect towards Violet. If the special button is only pressed once, the vertical speed is akin to that the Rapier Form’s, but horizontally Violet will move at around Greninja’s air speed. If Violet needs more vertical height, mashing the special button will cause her to spin faster, sacrificing horizontal momentum for vertical momentum. In most cases, it is optimal to find a button tapping rhythm neither too fast nor too slow in order to get decent momentum on both axes.

image.jpeg
This attack has 3 distinct hit boxes: the bow hair (2%), the frog (13%), and the tip of the carbon-fiber shaft (18%). The positions of the former two depend on how quickly the special button is mashed. If pressed once, the hair will twirl very close to her body with the frog being at around knee level. The hair hitbox will protect all of her except from below, protecting against enemy edgeguarding attempts. The faster the button is mashed, the higher and farther away the hair will spin. At maximum, it will appear as if Violet’s bow looks like a twirling helicopter blade. Due to the placement of the hair in this formation, it is difficult to hit opponents with the tip hitbox. This covers her from above, but only from above. Regarding knock back, the tip has the most in the attack and sends the opponent straight up. The other two parts of the attack send the opponent horizontally away from Violet’s body, with the hair causing very little knockback and the frog providing decent knockback. Because of the changes in hitbox placement, vulnerability areas of Violet, and momentum, one must decide how fast to press the special attack button depending on the individual circumstances.


Down Special (Lingering Lullaby/Tune Up): In Rapier Form, Violet takes out her prized instrument and plays a soporific little ditty (in ¾ time at 60 measures per minute.) The song she plays actually 3 minutes in length, but just tapping the special button will make her only play 1 measure of the piece. By holding the button, Violet will continue playing the song and can even move (read: prance) left and right at the speed of half of Jigglypuff’s walk speed whilst playing, but be warned that Violet will only stop playing once she has completed a given measure. Like Jigglypuff’s Sing, anyone close to Violet will fall asleep for a length according to their damage level, though at a lesser effectiveness than Sing. On a side note, when used and stopped in the air, Violet goes into freefall, try to use it when grounded.

However, this song has a secondary action to it; if at least two measures are played in one session, the song will “linger” so to speak, represented by a tickled pink cloud of sound the size of a crate. While learning to play her instrument, Violet managed to make a way to let the soundwaves of her song linger in the air. If the opponent touches this cloud, they will fall asleep upon hitting the ground assuming they aren’t already grounded in the first place. At its base, the sleeping power is rather weak, but it can be used to take greater stage control. For every two measures after the first two in a continuous session, the cloud will continue to gain in “sleeping strength”, as visualized by the cloud turning from light pink to magenta, but considering this leaves Violet laughably helpless, it should be only used for certain when the opponent is nowhere near Violet to punish her.

The cloud will immediately disappear if Violet performs another Lullaby, if Violet is hit when she is performing the cloud’s lullaby, or if an enemy enters the cloud. It will also disappear after 6 seconds of being undisturbed. In Whip Form, Violet merely takes out her instrument and starts tuning it for approximately 2.5 seconds. This tuning is similar to a charge of Samus’ Charge Shot in the sense that it can be stored at partial charge and can be acted out of. Once Violet charges in this manner, her lullaby in Rapier form is benefited. The cloud now charges per every measure instead of every two measures. Due to this charge, the cloud becomes much more dangerous for the opponent, providing more potent stage control for Violet.


Criteria Checklist:

Special Mechanic (3 Step Technique): Side

Stance Change: Neutral, Side

Direct Effect: Down

Chargeable: Down

Produce an Entity: Down

Vary Greatly in the Air vs Ground: Side

Direct Attack: Neutral, Up

Aid in Recovery: Neutral, Side, Up

Have a secondary Input: Side, Up

Sweet/Sour Spot: Neutral, Up

 
Last edited:

Davidk92

Smash Cadet
Joined
Aug 28, 2016
Messages
49
Decided to take advantage of the fact that we're not limited to games, movies, or anything, and make a set for a fairly obscure character I've been a fan of for a long while. It was difficult to do so without spoiling much of the videos he's from.

I tried to take everyone's advice in regards to layout and detail when doing this. And I also discovered that for some reason, I struggle with Aerials and Grabs. So I apologise for the poor quality in that department. :urg:

I hope this is closer to what is expected. For those unfamiliar with this character, I would highly recommend checking out the Mystery Skulls Animated videos for Ghost and Freaking Out before continuing; not just so you understand the character better, but also because they're awesome and need more love.

Lewis Hasn't Given Up The Ghost!

"This time I might just disappear..."

Debut: Mystery Skulls Animated - Ghost (Mystery Skulls, 2014)
Emblem: The two-tone coloured skull from the Mystery Skulls logo (http://tinyurl.com/h3zrmvl)
Homestage: Freaking Out (Tempo)
Unlock Message: "Time for giving up the ghost! Lewis is now playable!"
Boxing Ring Title: "It's YOU He Hates The Most"

Cause the world might do me in...

Lewis is a major character from the Mystery Skulls Animated music video series. First appearing in the video for "Ghost", Lewis is the titular spectre that the Mystery Skulls encounter in a haunted mansion. Chasing them throughout the mansion's hallways and confounding them with his undead powers, the video explores his past and how he came to be the way he is. He returns in the second video, "Freaking Out", where he is accidentally reawakened by the demon Shiromori, and resumes his chase. He will no doubt play a big part in the future videos of the series.

Playstyle - Feelin' Like A Ghost
Damage: ********
Speed: ******
Recovery: ******
Weight: **
Size: *******

In the original video, Lewis is portrayed as an exceedingly powerful wraith, nothing the Mystery Skulls crew have being capable of even slowing him down. As such, Lewis has very high damage and speed stats, as well as high jumps and useful recovery. His running speed matches Shieks, and he can rival Bowser and DK in terms of raw damage. However, despite this, he is still a non-corporeal ghost and as such ways only slightly more than Jigglypuff, making him taking higher than average knockback from attacks and making him easy to KO at low percentages despite his impressive power. In addition, Lewis is VERY large; he stands at half a head taller than Ganondorf (including hair) and his wide shoulders make him match Bowser's width. Intimidating as it is, this makes him an extremely large target and makes it difficult for him to avoid attacks despite his impressive speed and recovery.

Many of Lewis' attacks are intended to compliment his juggernaut-esque fighting style; is B move is a projectile with extremely long range, and Customs that provide effects to limit the opponent's escape, and his Bv is a trap move that gives Lewis control of the terrain. Careful use of these moves is required to take full advantage of Lewis' overwhelming damage potential.

Many of Lewis' attacks have an elemental effect, as they utilise his burning pink flames. However, these are not true flames, but a result of Lewis' ghost powers. As such, any moves that utilise his flames don't do Fire damage, but Darkness instead.

Lewis has two major gimmicks that dictate how he fights; his heart and his flames. Pinned to the front of Lewis' chest is his golden heart, which embodies everything that he is. It is one of the few remnants of his human life, and messing about with it is a sure-fire way to get on his bad side (as Shiromori found out). As such, the heart represents a heavy weakspot for him in this game; the heart has a very small hit box, roughly the size of Mario's fist, right in the centre of Lewis' chest. Any attack to this spot does double damage to Lewis and 1.5x knockback. Aiming for his heart is therefore an excellent way to stop Lewis' assault.

Secondly, for the most part Lewis has glowing pink hair and eyes, as shown in his picture. However, upon performing any of his Smash attacks or Special attacks, these will dissipate, leaving his head as a bare skull (http://tinyurl.com/hgmpwxr). While in this state, Lewis loses his ability to use his Specials. He can still perform Smash attacks, however their damage and knockback are halved (rounding down), and they lose their elemental effect. Lewis will remain in this state for two seconds (if moving) or one second (if standing still) before his hair and eyes re-ignate themselves, and he regains use of his Specials and powered up Smashes.

Special Attacks

B: Dead Beat.
Lewis holds out his heart, sending a Dead Beat (http://tinyurl.com/haz6h7x) rocketing straight ahead from it. Dead Beats move extremely quickly, as fast as Sonic's running speed, and ram the opponent for a hefty 25% Darkness damage despite relatively minor knockback. They are roughly as wide as one of Mario's fireballs, and as long as a Battlefield platform so hitting with them is fairly easy. Tilting the analog stick up and down can cause the Dead beat to move up and down slightly, but they always travel in a perfectly horizontal line. Dead Beats dissipate upon striking an enemy, but will travel the full length of the screen if unimpeded, passing through obstacles completely until they either hit someone or vanish off-screen. However, as noted, Lewis holds his heart out while performing this move, and he cannot move or cancel it once he begins. As such, despite the power and range of this move his weak point is a sitting duck while it is performed, so he must be careful when he uses it.

Custom 1: Sharp Beat.
The Dead Beat that flies out has its eyes open (left, http://tinyurl.com/z444qb8) and goes at the same speed as Fox's Blaster, doing 15% Darkness damage instead of 25% and no knockback, making opponent's drop to the floor as if stunned. However, the Dead Beat now no longer stops when it hits an opponent. As such, Lewis cannot move until the Dead Beat leaves the screen, so while the move is harder to dodge, it leaves Lewis open for a longer period.

Custom 2: Flat Beat.
The Dead Beat has a scary face (right, http://tinyurl.com/z444qb8) and moves slower, matching Mario's running speed, but Lewis is not frozen in his pose while performing it. Once the Dead Beat has left his heart, he places the heart back on his chest and can move even while the Dead Beat is out. Once the Dead Beat hits someone, rather than doing a single burst of damage, the Dead Beat ties the opponent up with its body, squeezing the opponent for 5% every second. While entangled by the Dead Beat, the opponent cannot move. If left to its own devices, the Dead Beat will leave after four seconds, though button mashing and wiggling the analog stick can make the Dead Beat leave, so the total damage is anywhere from 5% to 20%. The Dead Beat will also dissipate if the opponent it is holding is struck by an attack.

B>: Freaking Out.
Lewis pulls his arm back, fist ablaze with his usual pink flames, and glides forward a Battlefield Platform's width straight ahead to deliver a mighty straight punch. The punch does 35% Darkness damage and extremely high knockback, making this an excellent killing move... provided you can land it. The move is much like the Falcon Punch, Warlock Punch and Lunging Straight, in that it is highly telegraphed to make up for its high damage. In addition, the damage is only done provided the fist itself hit the opponent. If Lewis rams into anyone while charging, he does 5% Darkness damage but no knockback, and simply passes through the opponent, essentially wasting it. As such, this works well with the Flat Beat custom to keep the opponent still.

Custom 1: Phasing Out.
Similar to Freaking Out, Lewis pulls his fist back and then performs a powerful straight punch... however, the lunge in between does not exist. Instead, Lewis vanishes in a burst of his pink flame, doing 10% Darkness damage to anyone struck before he reappears a second later, two Battlefield Platform's width away to perform the punch. Unlike Freaking Out, this punch is not enshrouded with flames and only does 15% damage with average knockback; the move's main strength is that, much like Farore's Wind or any other teleport moves, Lewis cannot be struck or damaged in anyway after vanishing until he reappears.

Custom 2: Firing Out.
Lewis performs his lunge as normal, but instead of a crushing Falcon Punch knock-off, Lewis throws his open palm out to send his flames forward in the form of a pink fireball. The fireball does 15% Darkness damage to anyone it hits and travels at a speed twice that of Luigi's fireballs for two Battlefield Platform's width before dissipating.

B^: Haunting Flight.
Lewis enshrouds his body in pink flames as he flies into the air. As expected, anyone struck by Lewis' flaming body as he flies up takes 15% Darkness damage while being knocked away from him, dependant on the angle they were moving at when struck. The movement is similar to Ness's second jump, as Lewis doesn't "shoot" into the air but floats in an arc lazily. Moving the control stick while rising gives the player slight control over where Lewis will move to, but by default will move diagonally upwards in a steep incline.

Custom 1: Wraith Flight.
Lewis does not cover himself in flames, but rather his body becomes translucent as he flies. He moves twice the distance, but loses the ability to control his own flight path. Basically, increased recover at the expense of ANY offensive use for this move at all.

Custom 2: Revenant Flight.
The exact opposite of Wraith Flight; Lewis flies at twice the speed but half the distance, and both when he starts the move and ends the move, he lets out a burst of his ghost flames to do an additional 10% damage to anyone nearby. Compared to the Wraith variant, this is the more offensive variant, at the expense of its use as a third jump.

Bv: Haunted Painting
Lewis raises one hand, causing a painting to appear in a burst of flames in the background where he is standing. The painting is the same size and width as the upper half of Lewis' body and remains where it is until Lewis uses the move again. The initial burst does 5% Darkness damage to whoever is hit by it, but the real strength of the painting s that, once an opponent gets within one Bowser-width of it, the picture will come alive and lunge at the opponent with a deranged look and scream at them, stunning them as if their shield had just broke. This makes the Haunted Painting an excellent way of controlling the terrain. Despite this, Haunted Paintings can only scream once before requiring two seconds to rest. Haunted Paintings are susceptible to damage, and can take 15% damage before the break and are rendered useless. If Lewis sets another Painting elsewhere in the stage, the original page (whether broken or not) will explode in a burst of flames like when it appeared, doing 5% Darkness damage once more. The figure in the painting is randomly either a nobleman, a noblewoman, a wrestler or a priest (http://tinyurl.com/gqwhzxu). This is purely cosmetic and has no effect on the move's properties in anyway.

Custom 1: Haunted Armour.
Like the paintings, the Haunted Armour appears in a burst of flame (5% Darkness) and stays where it is. The key difference is that the Armour doesn't scream at the opponent, but rather raises its sword and swings it at the opponent, doing 10% weapon damage and knockback. Additionally, the armour can take 25% damage to destroy. All other properties (only one at any time, burst into flames when a new one is made, etc) is the same as the Paintings.

Custom 2: Haunted Lantern.
The Haunted Lantern is the odd one out of the group. Like the paintings and armour, it appears in a burst of flame that does 5% Darkness damage, but unlike those it is not intended to trap the opponent or keep them in a certain place. Instead, the lantern acts as a turret, firing small purple fireballs at a steady rate of one per second, each fireball doing 2% Darkness damage to anyone struck with minimal knockback. Unlike the paintings and armour, Lewis can have two of these out at any one time, the older of the two bursting into flames when he tries to create a third one. Lanterns can only take 10% damage before being destroyed, but unlike paintings and armour, destroying them removes them so they can't even be used as bombs.

Smash Attacks

Forward Smash: Spectral Blast.
The same move Lewis used to intimidate Shiromori. Lewis raises his hand into the air, gathering flames, before he brings it down into a fist in front of him and lets out a burst of pink fire. This attack does 23%-33% Darkness damage depending on charge with good knockback to match the damage. Upon releasing the flame, a smaller shockwave is released from Lewis' fist. This shockwave strikes up to a Ganondorf-width on all sides, doing minor knockback but a respectable 7% Darkness damage, accounting for the short range of the flame itself.

Up Smash: Phantom Burst.
Lewis lowers his hand as he charges before he suddenly brings it flying upwards, summoning a pillar of flame a single body width in front of himself. This flame does a nice 20%-28% damage, and does very high knockback. Notably, no matter what angle the opponent tries to attack from or how this move is used, the knockback will always launch the opponent straight upwards, making this an excellent weapon for Star KOs.

Down Smash: Wraith Flame.
Lewis pulls his arms back to charge, before he suddenly thrusts them diagonally downwards at the ground and lets out a burst of his pink flames directly in front of him, blowing back anyone in front of him for 22%-33% Darkness damage. Anyone hit is sent careening backwards into the air and lands directly behind where they were, knocked off their feet.

Standard Attacks

AAA Jab: Crypt Crusher.
Lewis swings his arm up in a dismissive slap, doing minor damage and relatively weak knockback. However, rather than attacking himself for the second hit, Lewis summons his coffin from the ground, causing it to rise up in front of him. For the third hit, he points and the coffin shoots a single Battlefield Platform straight forward, before returning to underground. The damage is 3%-7%-5%, with the coffin doing higher knockback in the direction it is moving than the slap. In addition, for the second and third moves, the coffin can act as a barrier for weak projectiles such as Fox's blaster, Mario and Luigi's fireballs or an uncharged Charge Shot, though strong projectiles like a fully-charge Charge Shot will simply blast right through it.

Dash Attack: Out Of My Way.
Lewis suddenly turns his body slightly, lunging forward with a powerful shoulder ram as his eyesockets widen, almost as if he's yelling. With this move he can barrel straight through anyone in his path, knocking them aside for 14% damage. Due to the nature of this move, it does no knockback, and is intended to get Lewis through an opponent that may be blocking his way.

Forward Tilt: Got You!
Lewis raises his arms in a stereotypical "Boo!" motion, before he suddenly brings both of them down in front of him to strike the opponent. As such, this move has a split-second of lag before the actual damage can be done, though to compensate it does a decent 13% damage with above average knockback.

Up Tilt: Ecto Blast.
Lewis folds his arms as a Dead Beats grow from his heart and lunge upwards, making their usual scary face and biting at the opponent. Like his Smashes and Specials, this does 12% Darkness damage but does not cause him to enter his flameless state. The Dead Beat has excellent range, extending up 0.5x Lewis' height for its bite, though despite being an Up Tilt it actually knocks the opponent downwards, making this a useful anti-air.

Down Tilt: Ghost Flare.
Lewis raises his hands above his head before suddenly bringing them down and releasing a diagonal burst of flame from the ground on either side of his body, blasting attackers from either direction. This attack does 15% Darkness damage, and is primarily designed as a crowd control move.

Aerial Attacks:

Neutral Aerial: Spinning Spooks.
Lewis holds out his arms, Dead Beats spinning around his body. They do 12% Darkness damage to anyone struck and move at such a speed that they hit anyone nearby, regardless of position.

Forward Aerial: Haunted Hammer.
Lewis brings his fist back before swinging it forward in a downward arc like a hammer. Does 14% dammage and can act as a Meteor Smash.

Back Aerial: Backburner.
Lewis turns and kicks backwards behind him, his leg aflame with his pink fire. Does 12% Darkness damage.

Up Aerial: Ghost Lights.
Lewis looks upwards and throws two small pink fireballs into the air from either hand, which collide above his head in a small explosion. The fireballs are very small, resembling a pink version of Din's Fire while in motion though half the size, while the explosion resembles Mario's Forward Smash but pink in colour. The fireballs move extremely quickly, as fast as Fox's Blaster, and do 5% Darkness damage if they hit but minor knockback. The explosion meanwhile does 15% Darkness damage with minor side knockback and high vertical knockback.

Down Aerial: Rain Of Fire.
Lewis pulls his arm back and hurls a pink fireball downwards at a slight angle. The fireball does 10% Darkness damage to whoever it hits and moves at a similar speed to Mario's Fireball. If it hits a solid surface, the fireball bursts and leaves a small patch of burning pink flames where it hit, 1.5 times the width of Bowser. Anyone who gets caught in this space takes 3% damage per second with minor knockback. The burning patch lasts 2.5 seconds.

Grab Attacks:

Grab & Pummel: You Won't Escape!
Lewis reaches directly in front of him, grabbing the opponent with both arms about 0.5 of his body width in front of him. His pummel involves lighting his hands on fire while holding the opponent, doing 4% damage each time.

Forward Throw: Doomed To Fall.
Lewis turns the opponent around and shoves them from behind, knocking them over. Does very minor knockback and only 8% damage if used normally, but acts as a Meteor Smash when used by a ledge.

Back Throw: Poltergeist Push.
Lewis steps around the opponent, switching positions before he swings his arm, launching them with his ghostly powers. Does 10% damage and high knockback.

Up Throw: Phantom Punch.
Lewis throws the opponent into the air, as he punches them upwards with a fiery pink fist. The initial throw does 4% damage, while the punch adds an additional 8% Darkness damage. This move can be shield cancelled after the initial throw, letting the opponent drop to the ground like after Luigi's Super Jump Punch.

Down Throw: Spectral Drop.
Lewis throws the opponent onto the ground before he drops down onto their back, elbow first. This does 15% damage and like many Down Throws, the knockback takes the form of bouncing the opponent.

Final Smash: It Doesn't Matter.
Lewis opens his heart and looks at it, before slamming it shut. His eye sockets change to a deep pink colour as his hair becomes wilder and less corporeal, becoming more and more like pink flame. It slowly begins to grow, before he lets out a roar of rage as it explodes around him. At first the fire acts not unlike a super-powered Smart Bomb, slowly getting bigger and bigger and doing 3% damage to anyone it hits with minor knockback. However, once Lewis roars, the flames grow to take up roughly half the Final Destination platform while doing a serious 30% damage with massive knockback. Visual reference (apologies for the subtitles, I couldn't find any other gif of the full animation): http://tinyurl.com/zhobbxq

Flavour:

Entrance: Lewis's heart is sat on the stage. It begins to let off smoke, before in a burst of pink fire, Lewis appears and attaches it to his chest.
Idle Stance: Lewis stares straight ahead, arms at his side, clenching and unclenching his fists. Incidentally, Lewis will also move his head up and down in time to whatever the stage music is, much like in the Mystery Skulls Animated videos.

Idle Animations:
-Lewis leans back, stretching his arms in boredom.
-Lewis places his hands together and cracks his knuckles.
-Lewis touches his heart and shakes his head.

Walk Animation: Lewis floats forward, his feet hovering just above the ground.
Run Animation: Lewis leans forward, hands up as if ready to grab something (http://tinyurl.com/hxu2ss2).
Jump/Double Jump Animation: Lewis "leaps" (more like floats) into the air from his standing position. He does so again for his double jump.
Edge Hang Animation: Lewis clings to the ledge with both hands, glaring up onto the platform.
Guard Animation: Lewis raiss one fist in front to protect his face.
Sidestep Animation: Lewis vanishes in a burst of pink flame and reappears.
Backwards/Forwards Roll Animation: Lewis vanishes in a burst of pink flame and reappears where the roll would end.
Air Dodge Animation: Lewis vanishes in a burst of pink flame and reappears where the dodge would end.

Kirby hat: Kirby gains a pink pompadour wig and a white mask resembling Lewis's face, along with the ability to command the Dead Beats to fly at opponents.

Alternate Colours:
1. Poltergeist Pink (pink hair/tie, purple/black suit)
2. Lost Love (Blue Team, cyan hair/tie, blue suit)
3. Revived for Revenge (yellow hair/tie, orange suit)
4. Deadman's Dog (Red Team, black hair/tie, red suit)
5. Ghoulish Green (Green Team, lime hair/tie, green suit)
6. Memories of Life (http://tinyurl.com/nadamgx)

Taunts:
1. Lewis points dramatically, then clenches his fist with a menacing glare.
2. Lewis removes his heart and opens it, giving a sad sigh, before placing it back.
3. Lewis raises his hand and clenches it into a fist, as Dead Beats float around him.

Victory Theme: The instrumental in this video, from 0:55 to 1:02 - https://www.youtube.com/watch?v=80SKuF9wX2M

Winposes:
1. Lewis chuckles as he floats into the air, Dead Beats floating around him as he raises his heart up, the Dead Beats flying into it.
2. Lewis calmly opens his coffin, calmly entering it and closing his eyes as it slams shut.
3. Lewis removes his heard from his chest and opens it, viewing the picture inside. He stares quietly, as a tear runs down his face from his eye socket.
Losepose: Lewis claps solemnly, dissatisfied with his loss but willing to respect the winner.

Snake's Codec:
Snake: "Colonel, there's a skull-faced pyromaniac on the battlefield!"
Colonel: "That's Lewis, a genuine spirit returned from the dead."
Snake: "Hm... a spirit huh? You mean like The Sorrow?"
Colonel: "That's right, but unlike The Sorrow, Lewis returned through his own anger and power. He was murdered, and will stop at nothing on his quest for revenge. Those pink flames of his aren't actually fire, but the manifestation of his own rage."
Snake: "I see, so usual fire-proofing won't work. I got it, I'll keep on my toes."

Palutena's Guidance:
Pit: "Lady Palutena, I may be going crazy, but I think I see a Ghost!"
Palutena: "It's no Fantasy, Pit. That's Lewis, a human fighting from beyond the grave."
Pit: "Oh, well that's good to hear. I was Freaking Out for a second there..."
Palutena: "This is no time to be Paralyzed, keep an eye out for Lewis's hellfire and ghostly tricks!"
Pit: "Yikes, I guess he's really Hellbent on revenge, huh?"
Palutena: "And he won't stop until he's avenged himself. He'll fight Forever if he has to."
Pit: "Then I'll just have to send him back the old-fashioned way!"
Palutena: "..."
Pit: "...oops, I-I kinda ruined it, huh?"

Doc's Advice:
"This guy could use some sun-tan lotion, 'cause he's white as a ghost! Keep an eye out for Lewis' fire attacks, and don't try to match him in a slugging match; keep your distance and wait for an opening, then hit him so hard he'll feel it in the afterlife!"

Stage: Freaking Out (Tempo)

The stage consists primarily of the truck that Lewis possessed at the end of the Freaking Out music video (http://tinyurl.com/hfs72u8). The Smashers fight on top of the cargo section, which is similar to Final Destination in that it is a flat platform with a decent size. However, the platform is roughly 1.5x as long as Final Destination, in addition the cab adds an extra length to the stage and is slightly lower than the cargo section, and the back and front of the truck serve as walls that affect opponent's attempting to recover.

The background consists of the forest seen in the Ghost video (http://tinyurl.com/hzxgj32), moving at a high speed. At random moments, a small pink arrow will appear on the left of the screen, which serves as a warning that a tree branch is about to come flying. The opponent must dodge in some way or they will be hit, taking 10% damage and being dragged along slightly. Like the F-zero levels, being struck like this can cause the opponent to be left behind as the truck keeps moving and resulting in a KO.

Boss: Shiromori


After thirty seconds of the match, a small pink and white bonsai tree will appear in the centre of the truck, which quickly grows into Shiromori, the demon from Freaking Out. Much like Yellow Devil or Ridley, Shiromori serves as both a hazard and an additional opponent.

Shiromori will calmly wander around the stage, performing one of three attacks:
-If an opponent is nearby, she will draw her scissors and perform three slow, but powerful slash attacks, doing 5% damage each. If the opponent is struck by the first or second, they are stunned until she finishes her combo, which does very high knockback.
-If an opponent is within mid-range, Shiromori will slam her fist onto the ground, causing another large white bonsai to sprout up under the opponent, doing 10% damage and very high horizontal knockback.
-If the opponents are far away, she will instead summon a flower in her hand and blow it towards the opponent. She can summon purple, orange, blue or red flowers, each of which does a different elemental effect; purple petals do Darkness damage, orange petals to Fire damage, blue petals do Ice damage with a chance of freezing, and red petals do Magical damage. Regardless, each petal does 2% damage, but they are fast and in a wide, unpredictable spread making them difficult to avoid.

Shiromori can take 100% damage before she is defeated, but she is difficult to damage; if she sees an opponent approaching, she will either use one of her three attacks, or she will suddenly dive underground and rapidly move to another section of the stage; while she can be tracked by dirt flying up as she moves, she moves at a speed matching Sonic with a bunny hood while underground. As such, she is extremely difficult to catch up to and will likely have prepared her attack before the opponent can get to her.

Music List:
1. Mystery Skulls - Ghost
2. Mystery Skulls - Freaking Out
3. Mystery Skulls - Hellbent

[Remaining music tracks would depend on the songs used in later Mystery Skulls Animated videos]
 
Last edited:

Reiga

He sold diddy for a switch
Joined
Dec 8, 2014
Messages
1,256
Location
White Noise
3DS FC
1461-7646-7368
Dead Fred
Welcome to MYM, DavidK92! I know you've already done a set before, but I might as well give my warm welcome! Reading Lewis I really notice, you've definately got some good potential. Lewis has what's honestly a pretty fun idea with having a lightweight, but rather fast Ganondorf sorta guy, which doesn't feel too OP when you consider many moves will leave open Lewis' weak spot, which foes can hit for extra damage on the already pretty lightweight guy.

Addressing the Playstyle section, which describe Lewis' stats and also his playstyle, what I (and probably a lot of other MYMers) would reccomend would be to divide this into a Stats section at the start of the set, and a true Playstyle section after all of the moves are covered. A stats section would be able to present all of the fighter's statistics before getting onto the set, which'll get the reader a pretty rough but nice idea of how controlling the fighter is like, while the Playstyle section could talk a bit (or a lot) about how a fighters moves (which have all been presented at this point) mesh together to form a playstyle, like what you have in the end of the current Playstyle section, bar the special mechanics and stuff, which should very well still be presented at the start of the set.

I'd also like to address how "Damage" and "Recovery" aren't really stats you should rate from 0 out of 10, since something like attack damage very clearly can differ from move to move, like how you can have a fighter's DTilt have low damage but have their FSmash be really strong, and while Recovery is a bit less amorphous as a mesurable stat, its better off just having recovery potential be noticed through the fighter's recovery move descriptions. I also highly reccomend diving the "Speed" stat into "Ground Speed", "Air Speed", "Fall Speed" and maybe "Air Control" stats, since most if not all Smash fighter have differing speeds on the ground vs in the air. I think all of those stats for the real Smash fighters are listed in the Kurogane Hammer link in the thread's main posted, so you could compare those stats to those of canon fighters.

I'd say the gimmick where Lewis' flames get put out after using certain moves is rather wonky and hinders a lot Lewis' playstyle, once using any of the cool Special or Smash moves inhibits you from using any other of their type for a solid second, which in Smash is quite a lot, one Falcon Punch takes an entire second! While I think this is to hinder Lewis from being too OP with being a fast Ganondorf sorta guy, but really I'd reccomend cutting this mechanic, and if you still need a way to not make Lewis not so strong and have flaws, maybe have more moves like the NSpec, where while quite rewarding to use, if you whiff, you'll leave your weakpoint exposed for some serious damage!

You say you're weak on doing Aerials and Grab Games, but if you use you're noggin I'm sure you could find some fun stuff! Honestly, most guys at MYM don't care much about Customs, so maybe you could implement stuff like the Custom Down Special possesions into the rest of the set, which right now have an abundance of rather generic melee moves, mixed in with some genuinely fun stuff like the coffin move. Maybe make one of the beat specters grab the foe for the grab game! Lewis actually has some great potential for fun moves, since being a ghost that can summon stuff on a dime makes having props way less tacky.

In general, Lewis is in my opinion a pretty fun set, but it still suffers from a weird mechanic and some rather dull moves. For a newcomer, you're actually pretty good at doing good descriptions, and you're filled with some good potential, so I'm excited for the next set, DK!
 

Davidk92

Smash Cadet
Joined
Aug 28, 2016
Messages
49
Dead Fred
Welcome to MYM, DavidK92! I know you've already done a set before, but I might as well give my warm welcome! Reading Lewis I really notice, you've definately got some good potential. Lewis has what's honestly a pretty fun idea with having a lightweight, but rather fast Ganondorf sorta guy, which doesn't feel too OP when you consider many moves will leave open Lewis' weak spot, which foes can hit for extra damage on the already pretty lightweight guy.

Addressing the Playstyle section, which describe Lewis' stats and also his playstyle, what I (and probably a lot of other MYMers) would reccomend would be to divide this into a Stats section at the start of the set, and a true Playstyle section after all of the moves are covered. A stats section would be able to present all of the fighter's statistics before getting onto the set, which'll get the reader a pretty rough but nice idea of how controlling the fighter is like, while the Playstyle section could talk a bit (or a lot) about how a fighters moves (which have all been presented at this point) mesh together to form a playstyle, like what you have in the end of the current Playstyle section, bar the special mechanics and stuff, which should very well still be presented at the start of the set.

I'd also like to address how "Damage" and "Recovery" aren't really stats you should rate from 0 out of 10, since something like attack damage very clearly can differ from move to move, like how you can have a fighter's DTilt have low damage but have their FSmash be really strong, and while Recovery is a bit less amorphous as a mesurable stat, its better off just having recovery potential be noticed through the fighter's recovery move descriptions. I also highly reccomend diving the "Speed" stat into "Ground Speed", "Air Speed", "Fall Speed" and maybe "Air Control" stats, since most if not all Smash fighter have differing speeds on the ground vs in the air. I think all of those stats for the real Smash fighters are listed in the Kurogane Hammer link in the thread's main posted, so you could compare those stats to those of canon fighters.

I'd say the gimmick where Lewis' flames get put out after using certain moves is rather wonky and hinders a lot Lewis' playstyle, once using any of the cool Special or Smash moves inhibits you from using any other of their type for a solid second, which in Smash is quite a lot, one Falcon Punch takes an entire second! While I think this is to hinder Lewis from being too OP with being a fast Ganondorf sorta guy, but really I'd reccomend cutting this mechanic, and if you still need a way to not make Lewis not so strong and have flaws, maybe have more moves like the NSpec, where while quite rewarding to use, if you whiff, you'll leave your weakpoint exposed for some serious damage!

You say you're weak on doing Aerials and Grab Games, but if you use you're noggin I'm sure you could find some fun stuff! Honestly, most guys at MYM don't care much about Customs, so maybe you could implement stuff like the Custom Down Special possesions into the rest of the set, which right now have an abundance of rather generic melee moves, mixed in with some genuinely fun stuff like the coffin move. Maybe make one of the beat specters grab the foe for the grab game! Lewis actually has some great potential for fun moves, since being a ghost that can summon stuff on a dime makes having props way less tacky.

In general, Lewis is in my opinion a pretty fun set, but it still suffers from a weird mechanic and some rather dull moves. For a newcomer, you're actually pretty good at doing good descriptions, and you're filled with some good potential, so I'm excited for the next set, DK!
Thank you for the warm welcome, it's nice to be in a place where movesets are taken seriously for a change, even if I'm not quite up to the usual standards yet. ^_^

Thank you for the feedback on stats and playstyle, I'll give that a try for my next set.

As you've correctly pointed out, the flame gimmick is more than anything a limiter to keep Lewis from being too powerful. However, I'm not sure if you're familiar with Mystery Skulls Animated but your mention of cutting the flame gimmick and focusing on the weakpoint actually does make more sense in regards to the series. I probably should have thought that through a bit more. >_<

As for Custom specials, while I understand that not many people here in this topic care about them, I include them because I care about them. It's the same reason I include so much flavour that people might not give a crap about; in my eyes, the flavour is what makes the character a character, and not just a bunch of moves slapped together. Then again, I might not have any place to talk about that.

Either way, thank you for the feedback and I'll try to keep all of this in mind for my next set.
 

MasterWarlord

Smash Champion
Joined
Aug 24, 2008
Messages
2,902
Location
Not wasting countless hours on a 10 man community
LORD GALF


Galf is one of the many lords from Fist of the North Star. Largely all of the evil lords obsess over something that they value over human life, and Galf is the original one whom all the later filler lords like Morgan are based off of. In Galf's case, it's dogs, and he will kill anybody who severely harms a dog through becoming the target for ring toss, or the "lesser" penalty of becoming one of Galf's dogs. Galf and his underlings will "talk" to the dogs to determine what the villager's penalty should be, while blatantly interpreting their barking as whatever they want. These are not little puppy dogs being defended, they're vicious, and Galf is horribly offended that villagers would be pretentious enough to come up with the excuse of "defending themselves". As cruel and bizarre as all this is, Galf manages to have some actual real world basis, being inspired by Tokugawa Tsunayoshi, the dog shogun, whom flooded the streets with sick dogs and executed those who harmed them.

Galf's cruelty can easily be seen as comedic due to its over the top nature, and his character is absolutely played for comedy in his "fight". The incredibly overpowered protagonist of Kenshiro very casually defeats him, and Galf whimpers as begging for his life and asking what is going to happen to him. After being told the nature of Kenshiro's powers and that "he is already dead" (going to die in a few seconds), he asks for his most loyal dog to save him only to be urinated on in response before he dies.

STATISTICS
Size: 12
Weight: 11 (136 points)
Traction: 9
Falling Speed: 8
Jumps: 7
Aerial Speed: 5
Ground Movement: 1
Aerial Control: 1

Galf is stupidly large, standing 2.5x or so as tall as a regular human in his source material. Granted, nearly every antagonist in Fist of the North Star for some reason is freakishly tall, so it stands to reason to size him down. In Smash Bros, Galf is only 1.2x taller than Ganondorf, but his frame is still just as wide as Brawl Bowser’s awkward posture due to his extreme obesity, making him a much more juicy target than if he was just tall.

Galf can summon dogs with his Down Special, and he will get angry if they are attacked for any reason. Upon one of them being hit, Galf's slow movement speed will increase to an above average one at Marth's speed for the next second, visibly having a pissed expression on his face and getting a slight red tint. If Galf attacks within a second of the dog being hit, the starting lag of his next attack will reduced by a third. If the foe hits the dogs more than once, this will simply refresh the duration of Galf's anger.

If the dog is killed, though, Galf will get even more visibly angry than before. When outright enraged, the anger lasts 1.5 seconds and increase his dashing speed to Sheik's, while making the starting lag of his next attack be decreased by two thirds if done within the rage's duration. While enraged from a dog's death, Galf will ignore dogs being hit so they don't overwrite the effect from a dog dying. In addition, Galf will gain 8 frames of superarmor the moment a dog dies no matter what he was doing, along with getting the ability to act out of hitstun during those 8 frames as his main answer to being combo food.

Foes can avoid the greater rage of Galf by knocking dogs off-stage, Galf isn't the smartest of villains after all. If knocked off stage/a walk off, Galf will not register the dog as dying, only if the dog's HP is depleted down to 0. Because of both this and his comboability, Galf will often want to fight alongside his dogs - attacking both at once can often be a bad deal for foes.

SPECIALS

SIDE SPECIAL – DOG COLLAR

While the spiked dog collars are Galf’s primary melee weapon of choice, in this move he uses them as a projectile. Galf will take out the collar and get ready to throw it in a motion comparable to a frisbee. This is an unstorable charge move, and doing so with no charge will make the move very fast but have Galf just drop the collar in front of himself. The range of the move varies wildly over the single second of charge, though, potentially traveling the entire distance of Final Destination. The projectile is heavily affected by gravity and will hit the ground at the end of its arc, and Galf’s massive height means that the projectile will start pretty high in the air.

The dog collar deals 5-8% and knockback that kills at 300-200% on contact if it hits a foe from the sides, which is what is most common. If Galf manages to play ring toss to make the collar actually land on top of the foe, though, the collar will become fastened around their neck as they immediately take 10% with a flinch. Galf’s height actually works to his advantage in order to land the “sweetspot” of this attack as he rains down the dog collars against taller foes such as human sized and up, but he also runs the risk of it whisking over a short foe's head. Just keep in mind that the range of the move varies wildly based off charge and the collar will lower to hit the ground at such a rate that it hits the ground at the end of its trajectory, making short range tosses quite effective against them.

Once a collar lands on the foe, they will take 0.5% per second from their tight dog collar, and any of their attacks that hit it will deal 1/12th of that attack's damage to themselves. The damage return feature will not round up damage and is perfectly willing to deal damage in miniscule decimals, so it's doubtful it'd deal that much damage during the collar's regular 5 second duration, though it can be made to last longer through use of Up Special.

DOWN SPECIAL - MAN'S BEST FRIEND

Galf whistles, summoning one of his dogs to his aid. This gives Galf a fairly painful 36 frames of lag to summon, but if he is interrupted after the first 12 frames the dog will still be summoned anyway after the 36 frames are up. He can summon several different varieties of them, but for the most part they all function the same and are slightly less wide than Bowser while being the height of Ness. The dogs take hitstun and knockback just like a playable character, though the fact foes can grab them is largely a positive given grabs can only hit one target, enabling Galf to block the grabs he is so vulnerable to with his dogs, much less projectiles. Dogs have weight comparable to Jigglypuff at 50%, though if not killed through means of knockback they are fairly durable with their 30 HP.

Every third dog summoned will be a bull dog, which are the size of Ivysaur, have 40 HP, and are a good deal heavier, comparable to Mario at 50%. Aside from the durability and smaller size, they function identically. Their higher weight is very preferable to make them not be knocked off-stage as easily (in which case Galf won't be able to get his buff to avenge them properly), though their higher HP is a negative in this department so they are not a strict upgrade.

Dogs will chase after the nearest foe at Mario's dashing speed and will most frequently do a slow biting attack that deals 8% and knockback that kills at 165%, but at least has quick ending lag. Their alternative attack is a pounce that carries them forwards Bowser's width that they can only perform out of a dash, which is quick to start up and deals 6% and knockback that kills at 200%, but leaves the dog in heaps of lag as it collapses onto the ground. Dogs are intelligent enough to use their quick leaping attack over anything else when initially summoned if a foe is within range in order to defend Galf.

Dogs can jump as high as 1.2 Ganondorfs if the foe is off-stage or in the air, but have no aerial jump. This aerial attack is a faster bite that has them latch onto the foe, dealing 5% and then 1% per quarter second until the foe knocks off the dog by hitting them with any attack like a Pikmin. If the dog is still latched onto the foe when they touch the ground, the dog will slam them onto the ground, dealing 11% and knockback that kills at 130%. This is the dog's most powerful attack, and is the most direct one to force a foe to pay attention to it and actually hit it in order to trigger Galf's wrath. This attack enables them to recover with some competency by forcing the foe to do it for them.

If Galf or another allied playable character is off-stage, dogs will latch onto that character without harming them before dismounting them when they land on the ground, coming along for the ride to recover. If a foe comes within range and the dog wouldn't kill itself by doing so, they will pounce at any foes in range off of the allied character they're riding, enabling them to provide some coverage for Galf to perform an actual attack on the enemy. If Galf is interrupted between frames 13-35 of the attack and is currently in the air, the dog will come out from behind Galf, already latched onto him if he is currently in the air and ready to pounce at foes who were inevitably trying to combo him to death.

If Galf inputs this move as a smash, he will summon a Marth sized villager instead of a dog. Villagers are far more frail than dogs when they only have 13 HP and are as light as Jigglypuff at 85%, though it only takes 20 frames to summon a villager - Galf would probably execute them if they took a full 36 frames to show up, after all! Villagers will run away from foes at 0.85x Jigglypuff's dashing speed, though will not move out of range to attack and will not run off ledges. If a foe comes into melee range and they're cornered at a ledge, they will attempt to run past them towards the other ledge to get more distance from them.

Villagers will attempt to use Galf's Side Special on foes, throwing dog collars at them on Galf's order. Villagers aren't actually loyal to Galf though and are only attempting to attack the foe so he won't kill them. As such, the villagers will delibirately attempt to miss the foe with the dog collar toss. Their first toss will be aimed so that it hits a Kirby width away from the foe's current location when they aimed the toss, to try to make it look at all convincing to Galf. The second toss will have a higher margin of error of 1.25-1.75 Kirbies, and a third toss will be fired 3-4 Kirbies away from them.

If the foe hasn't attacked a villager after they've completed 3 tosses, they will outright rebel against Galf and become allied to all foes and hostile to Galf. The villagers are still cowards, though, and if Galf hits any rebel villager with absolutely any attack, even so much as sneezing in their general direction, this will single handedly quash an entire rebellion of villagers, making all unallied villagers instantly ally him. If a foe ever hits a villager, this will be enough by itself to make them loyal to Galf forever and make them actually aim to hit that foe (and only that foe). If Galf kills a rebellious villager, all other villagers already out will become fully loyal to Galf and aim their projectiles properly. While Galf doesn't get any direct buff from foes attacking villagers, this carries with the usual theme of foes wanting to not hit Galf's minions if possible. Regardless, even if a villager is not yet fully loyal to Galf, Galf can easily take advantage of their skewed projectile arcs by filling in the gaps with his own Side Special. These projectiles are fairly useless by themselves, but Galf can certainly take advantage of them to make them relevant.

Dogs and villagers can be given collars. Villagers can still collar dogs, which will still outrage Galf just as if a foe had attacked the dog (Only he is allowed to do that!). That said, dogs will never die from being collared or the self damage effect it does to them when they attack, always leaving them with 1 HP. While Galf has questionable sanity, he's not quite fargone enough to kill his own dogs in order to get offended about it.

UP SPECIAL - DOG LEASH

Galf takes out a chain and starts spinning it above his head for a storable charge move that can be charged as long as Mewtwo's Neutral Special. As he's spinning it above his head, the move deals several flinching hits per second that add up to 13%, with every tenth hit dealing radial knockback that kills at 200%. This charging doubles as a great anti-air move that can be started up nearly on demand, though Galf's height means this will never hit any existing Smash character who's on the ground unfortunately.

When the charge is released, Galf will cast out the chain a greatly varying length based off how long the Up Special was charged, anywhere from 0.5-3 platforms. The chain deals 8-16% and knockback that kills at 200-160%. While this isn't that powerful for how long the move can be charged, the chain is cast out at 1.25x Captain Falcon's dashing speed with very little lag when Galf actually uses up the Up Special's charge. The move can also be angled 45 degrees up or down, making this by far Galf's easiest move to hit with in his set, and can potentially combo out of nearly any move with enough charge on Up Special and little enough ending lag on the move in question, knockback rarely being an issue due to this move's potential range. The ending lag is long enough to be punished, and it unfortunately scales slightly with charge if Galf misses, so ideally he should only be using this when he knows it will hit. Of course this move functions as a tether recovery, and it will continue going after it hits a foe in order to hit the ledge. While this is a very powerful option to have charged up for offensive purposes, Galf has to keep in mind that if he uses it he will be greatly weakening his recovery until he can charge it again.

If this hits anybody with a dog collar, they will be tethered to Galf as he holds onto the other end of the chain, with the length of the tether being the distance he cast it out. The chainlink tether has 20 HP, and destroying it will also destroy the foe's collar. When tethered together, attempting to move against the end of the chain will cause that character to move at only 0.8X the speed they normally would and drag along the other character with them.

If someone is knocked further than the length of the tether allows, the remainder of their knockback will be calculated as if they had the weight of the heavier character - this is obviously Galf against any characters within Smash Bros, enabling him to use his massive weight to his advantage by applying it to the foe at low percentages and making them combo food for him and his dogs. This also means that knockback behaves entirely as normal for the heavier character, so this doesn't make Galf any more combo vulnerable than usual. The knocked character will still drag the other character along with them, if they reach the maximum distance of the tether, though this won't deal any stun to them. If a character takes enough knockback to be knocked 3 platforms beyond the max length of the tether, the tether will break, enabling foes to just break the tether by attacking Galf directly and not bothering with the chain if they so choose. Tethered himself to a minion will also massively increase their weight, making it so foes have to actually deplete their HP. Galf can be tethered to as many sources as he wants at one time.

If Galf inputs this move as a smash when he's leashed a foe (not a minion), he will grab ahold of that foe's chain rather than taking out a new one. If he has multiple targets leashed, he will always choose the nearest foe's chain over any minions by default, but he can quickly scroll through the chains to choose one with inputs of left and right during the move's starting lag. Once one is chosen, he will spin the chain around above his head like he normally does when he charges the move. This will yank the foe to specifically be above Galf's head as he spins them around, dealing up to 15% over several hits of flinching for how long he holds down B which they cannot escape due to a suction effect once they've entered the hitbox. This suction hitbox only works on the foe in question who's tethered to Galf as they are pulled in by the chain, which is why it's not normally there when Galf spins a chain unconnected to foes above his head. In any case, foes can obviously interrupt Galf out of the move as he yanks them in, and given his height they'll generally be moved right past his fat hurtbox. When Galf releases B, he will cast out the chain 0.5-3 platforms based off how he spun them around above his head, changing the length of the tether on that victim, with the range going up an identical rate to when he normally charges Up Special. This can potentially be used after a move to bring a foe back in to you and combo them, but if you want much free damage out of it you'll need to cast them out a significant distance to get more time with you whirling them about above your head, in which case you're definitely not going to be able to combo anything else out of the move.

If Galf inputs this move as a smash, he can press shield during the starting lag of the move to let go of his end of the tether. This will prevent the foe from dragging Galf with them in a suicide kill attempt. It is possible for Galf to do this to a foe, but Galf's slow speed means foes will be able to drag him long before he can drag them. If he really wants to try to do it with a stock lead, he'll have to make use of the movement speed buffs he gets from dogs being hit/dying, and those only last for a very brief time. While Galf can potentially get a suicide kill on a foe while greatly behind in percentage, it's definitely not easy.

NEUTRAL SPECIAL - DOG BONE

Galf takes out a chicken leg still on the bone and starts eating it. This heals 4% over the laggy process of 1.3 seconds, but the healing is done over the 1.3 seconds and Galf can cancel out of eating the chicken leg with any input, causing him to hold the chicken leg as an item. Pressing Neutral Special while holding the chicken will cause him to skip the 17 frame starting lag and feast on the chicken he's already holding, picking up where he left off. It should be noted that 3 out of 4% of the move's healing will be done in the first 36 frames, with Galf obsessively licking the bone clean to get that least 1% of healing. You're better off throwing the bone away before that point, generally.

The chicken leg is a throwing item that deals 11% and knockback that kills at 125% when smash thrown, fairly powerful. If this goes within pouncing/jumping range of any dog, they will leap up into the air to grab the bone with a chomp very quickly, chomping the bone as a hitbox that deals 13% and knockback that kills at 115%, which is more powerful than any of their other attacks they can do. If the bone had any meat left on it, the dog will take the time to eat all of the meat left on that bone, eating 3x as fast as Galf does and getting any healing he would've got.

Just healing the dog isn't really that useful when Galf gets buffs from them dying, but if the dog actually hit a foe within 2 seconds, then the chicken bone will be a "treat" to reward them for their good behavior. This will cause that attack to become 1.15x as powerful and gain 8% heavy armor during starting lag/hitbox duration, able to stack with itself. The bone needs to have meat on it to count as a treat, but just a few scraps leftover to heal the dog of 1% will still count.

Dogs will prioritize chicken legs that are on the ground over foes, running over to them if they are within 2 platforms of them, still making the hitbox as they initially chomp it as usual. After a dog has finished all the meat on a bone or if they just grabbed a bone Galf threw, they will bring it back to Galf. Hitting the dog with any attack will cause the dog to drop the bone and cause it to disappear when it hits the ground, though foes can still have a few frames to pick it up if they want. Given the chicken leg/bone is an item, foes can grab it at any time out of the air to throw it back at Galf. Foes can eat the chicken bone at the same rate as Galf by inputting Neutral A while throwing it, and can throw it normally by inputting A + a direction.

If the dog successfully brings the bone back to its master, Galf will laglessly pick the bone up in his hand if he's not already holding an item. This enables Galf to recycle the bone to throw it at foes again or just recreate the hitbox of the dog jumping up to grab it. Easily reused throwing items aren't something to be underestimated, especially in combination with Galf's potentially long range Up Special at high charge, so foes will want to hit the dog to make it drop the bone if at all possible.

Villagers are starving and poor due to Galf giving all of his food to the dogs - they're so hungry that if anything, they want it worse than the dogs. Villagers will drop anything they're doing to pursue meat, and will massively speed up beyond their pathetic unmotivated 0.85x Jigglypuff's dashing speed all the way to Marth's dashing speed in order to try to get meat. Villagers will become fully loyal to you if you actually bother to allow them to eat, and when they're not starving to death they will gain weight and stamina based off how much meat they ate - the meat enables them to overheal to increase their HP beyond its max, and on a full stomach they are as heavy as a dog at Jigglypuff's weight at 50%, as well as permantely increasing their normal dashing speed to Luigi's.

If a dog is currently eating meat and Galf's back is currently turned towards that villager, villagers will attempt to take the meat from the dog. They will take out a spiked club which they are normally too cowardly to use and whack the dog with it, dealing 16% and knockback that kills at 100% to the dog, and can still hit outside foes. This can actually kill a dog to trigger Galf's wrath. This wrath can be taken out on the foe, of course, but if Galf kills the villager it will last for an additional 2 seconds, and this will give him another attack with reduced starting lag besides the one used to kill the villager. This applies to killing any killer of a dog, though villagers are so frail it's a lot more practical than killing a foe. This is a laggy process and is easily interrupted by the foe, though they have to be careful to not hit the nearby dog, of course.

  • Down Special related to special mechanic
  • Side Special and Up Special apply dirrect effect to foe
  • Up Special can be charged
  • Down Special and Neutral Special produce entities
  • Side Special is a direct attack with the weapon, and Down Special also makes use of it through villagers.
  • Up Special and Down Special can both be smashed.
  • Side Special, Down Special and Neutral Special have sweetspots.
 
Last edited:

Rychu

Thane of Smashville
Joined
Jul 5, 2010
Messages
810
3DS FC
1908-0105-4965
changes to previous moves have been marked in italics.

Shabeel


In ancient China, two villages had been locked in a seemingly endless, century-long war thanks to the rival monarch families' hatred of one another. One, Ohu, was a village of Tigers, was ruled by a family of White Tigers. The other, Long, the village of Dragons, was under a family of Black Dragons. While the dragons relied on their brute strength and elemental abilities in battle, the weaker Tigers relied on their agility.

Shabeel was welcome in neither because of his mixed heritage: his father was a poison-wielding dragon from Long and his mother a nurse from Ohu. When his father was killed and his mother imprisoned, Shabeel took a single tooth from his father and escaped, forging his weapon, the Dragon Whip, using the magically poisonous fang. He was found by a group of bandits, lead by Wukon, the infamous Monkey King, who trained him in the art of stealth, where he found his penchant for not only using his poison-tipped whip, but using it as a sling to launch a plethora of other projectiles.

Eventually, he learned of corruption among both villages - the White Tigers and Black Dragons hadn't been at war, instead using the rivalry as an excuse to prevent either's citizens from rising against each other and staging a coup, allowing both families to collect taxes and increase their own wealth while villagers died by the hundreds. Shabeel gathered a small army of outsiders and warriors from both villages and overthrew both after several epic battles. The warriors integrated the villages and established a working government before leaving to explore the world.

STATS

Size - 7
Weight - 6
Speed - 8
Jump - 8
Aerial Speed - 7
Fall Speed - 4
Traction - 10

Special Movement - Quadroped
Shabeel is an anthropomorphic tiger, and is as such able to switch between running on two legs and four. If Shabeel begins dashing out of a crouch, he actually runs on all fours, bounding at a terrifyingly fast speed - almost matching Sonic's stride. As he's so low, he naturally ducks beneath most standard projectiles, indicating his stealthy training.

SPECIALS
Neutral Special - Dragon Fang
With a tap of the special button, Shabeel unfurls his chain whip, striking it outward. The Whip has a longer range than Zero Suit Samus' by a decent margin, and can be extended out in any of the 8 cardinal directions. The tip of the whip is the hardest-hitting point, dealing 12% damage with slightly below average knockback in the direction of the attack, also inflicting the opponent with poison which deals a constant 1% damage every 2 seconds for the next 6 seconds. The middle of the whip (anywhere not the sweet-spotted tipper) deals 8% and decent knockback away from Shabeel, with the damage getting gradually lower as it gets closer to the handle, bottoming out out at 2% damage at his hand. Shabeel's Dragon Poison is able to stack up to 3 times, and is accessible across various attacks.

If Shabeel taps B just as the Dragon Fang tip hits the opponent, he yanks on it, pulling the opponent in towards him while still dealing the same damage and poison. If used in the air, Shabeel instead pulls himself towards the opponent, claws outstretched, striking them with a swipe that deals 5% damage and very little knockback. Shabeel can use this to aid in his recovery, pulling himself upwards towards a gimping opponent before he even uses his primary recovery. The ending lag on the Dragon Whip is quite heavy on a whiff, taking about as long as Zamus' whip to recoil, so striking with the Fang and pulling an opponent in is a good way to get around it. Shabeel's up-close game is strong, but somewhat laggy to get started, making this spacing-specific pull very important against faster foes. Of course, Shabeel's awesome and stealthy run should be able to get him at the right range.

Up Special - Dragon Wing
Shabeel clutches the fang necklace (not his father's, but rather an artifact from his training with Wukong to awaken the dragon half of him). His eyes glow black and white as a pair of fearsome-looking ethereal dragon wings burst out from his back, actually creating a wind hitbox that pushes opponents away. The beginning lag is as heavy as switching from Zelda to Shiek in Project: M. The Dragon Wings remain on Shabeel's back for 10 seconds before disappearing, having a cooldown time of 15 seconds between uses.

As a wing'd Tiger, Shabeel loses a bit of his weight and speed, the stats dropping to a 4 and 6 respectively and can no longer enter his all-fours run. He gains, however, 2 extra jumps, greatly increased maneuverability and speed in the air, and a Peach-like float by holding the jump button. This helps him get a better grip on aerial opponents as well as allowing him to attack from a different angle, as well as give him an absolutely insane off-stage game combining his whip and wings, but the trade-off is less options on the ground and decreased movement speed. Of course, this transformation is only available while on the ground.

In the air, should the non-wing'd Shabeel use the Up Special, it instead becomes a frantic, last-ditch effort recovery (one which clinched him the win against the great Black Dragon, of course), as he calls upon the wings and so rapidly ascends upwards that he becomes a sort of clawed canonball upwards, which hits opponents with a 10% strike, 16% if they're hit with the tip of his outstretched claw, and deals nasty upwards knockback.

The upwards ascent is at a slight angle and sends him just about as far as Ness's Up Special when it lands. This, unfortunately, also burns up the wing's use, needing a good 8 seconds to cool down. Using the Up Special anywhere while in his Winged form results in the use of this version of the special and ultimately ends up ending the form's use prematurely. Shabeel of course enters free-fall after using it.

Down Special - The Fangs
Shabeel prepares his chain whip and loads it with fang-like darts, up to 5 depending on how long it's charged (5 darts takes 1 second of charging). If the input is merely tapped, Shabeel will forgoe the charging and immediately whip out a dart. This single dart flies in a straight path from the whip, which is only cracked to about a third of its usual length. Each individual dart deals 3% damage and negligible knockback, acting much like Shiek's pins.

Should Shabeel choose to load the whip with multiple darts, he stores the attack, requiring a second input to unleash them. If multiple darts are stored, they are all flung simultaneously at evenly spaced angles, radiating outwards from the tip of the chain whip, meaning that this projectile attack is actually far more potent the closer Shabeel is to his opponent as more darts will likely hit if they're clustered. Each dart retains the same damage and knockback, giving them potential to deal up to 15%.

The attack changes a bit if used out of Shabeel's special dash, as Shabeel will, at the press of the input, flip over the opponent in an arc slightly wider than that of ZSS's Down Special. At just past the apex of the arc, he will whip the darts at a downwards horizontal angle im the direction he came from, presumably at an opponent he just flipped over. This gives him a potentially hard hitting and evasive attack that can come out at a variety of angles, fitting for the stealthy Tiger. Oh, and the whip retains the tipper on this attack, able to poison opponents who are hit by it, though not dealing the same direct damage - instead, it deals the same damage as the darts in this attack.

Side Special - The Claws
Shabeel strikes a pose, exposing his claws, which shine with an audible *shink*, similar to that of a sword drawn from a hilt. After this short but impossibly cool bit of starting lag, Shabeel performs what's known in some circles as a "flash step" - he moves so fast he's invisible to the human eye, striking out at any opponent who's within a BFP of him (somewhat shorter in the air) and in the direction of the attack on the same relative plane (he won't attack opponents that are too far above or below the same plane as him but will travel a short distance up or down). He delivers a brutal slashing uppercut to the opponent, which deals 13% damage and good upwards knockback, generally putting in in range of an upwards chain whip until high damage.

Should the Side Special be pressed just as Shabeel hits the opponent, he will follow up with a second strike, appearing just above the opponent before they fly too far away and striking downwards, delivering a second hit of 11% damage and heavy downwards knockback, not quite a meteor smash, but a scary move off the edge should it hit. The range becomes a bit better should Shabeel be in his dragon form, which also grants him the same range in the air as on the ground.
 

Smady

Smash Master
Joined
Apr 29, 2007
Messages
3,307
Location
K Rool Avenue


Jecht is a major character in Final Fantasy X, at times a protagonist and others a humongous world-destroying whale, this set will focus on the human side of Jecht. In relation to FFX, he's the missing father of main character Tidus and his story is told gradually through flashbacks and from those who knew him in the past. Jecht ruined Tidus' childhood by disappearing and before that bullying his son because he was an alcoholic and egomaniac. He was a wildly successful blitzball player, a sport played in a giant floating water sphere, this made him incredibly famous in Zanarkand but most of his relation to the game's story comes when he accidentally ends up in the whole different world of Spira.

Jecht's story truly begins when he goes out to sea and encounters the monster Sin, this causes him to be transported to the world of Spira. This is 10 years and 3 months ago from the events of FFX. After a few unfortunate events that landed him in jail, Jecht was approached by High Summoner Braska, currently on a pilgrimage to destroy Sin. Braska takes pity on Jecht and humbly requests that he work for him as a Guardian. Jecht takes up this role of bodyguard to get out of jail and because there's nothing else for him in Spira and thinks this huge journey may lead him back to Zanarkand to live the high life again. Auron is against Jecht joining the group from the beginning and until much later on has a strong hated of Jecht because of his incompetence and alcoholism.

Tidus would later embark on the very same pilgrimage 10 years and 3 months later and at first can't stop telling everyone about his hatred for his abandoning father Jecht, who is somehow just as famous in Spira as he was at home. Tidus does eventually come to learn that his father was actually a good man who loved his son and made the ultimate sacrifice for the good of Spira. It wasn't just the fame and fortune of Zanarkand he missed, but also his family. The father and son do get a moment of reconciliation, and at the end of the game share a friendly high five before passing on with Auron to the next life. Jecht isn't shown in the game besides at the end, but it can be easily assumed, especially after his Dissidia moveset, that Jecht largely had a similar stock of abilities and so on as his son Tidus that are displayed over the course of FFX if you follow Tidus' sphere grid. What part of the grid he would go to after he finished the Tidus part, or how far Jecht got in the sphere grid (or what the sphere grid is in reality) is up to interpretation.


Jecht is around the size and weight of Snake, though a little shorter and lighter. Jecht's movement on the ground is comparable to Little Mac - he's fast! This is nothing compared to Jecht's air speed that challenges Yoshi for the top spot because of his experience playing a sport suspended in midair. Jecht's fall speed is very high, as presumably they never taught him how to fall when he's used to floating in midair, among the highest in the game. Again due to Jecht's chosen sport, his jumps and traction are excellent, his first jump greater than Falco's in height and his second jump isn't bad either, comparable to one of Snake's 'clunky' looking jumps. Jecht overall has great statistics, only let down by high falling speed that makes his tall frame vulnerable to combos and he's piled on some pounds over the years, his weight not helping him in that respect.

Jecht has one special quality to his movement that comes whenever he touches a non-hitbox body of water. Jecht will never drown in water and on top of that, has an actual swimming animation. This isn't the dorky breaststroke every NPC has in FFX but a cool free style that shows off Jecht's experience in the pool. It lets Jecht retain his amazing aerial movement in water and lets him refresh his jumps and recovery whenever he enters water to boot! At any time he can jump out of the water with his amazing jumps, which can now be DI'd effectively due to the lowered gravity so he can weave around the water as easily as if he became a giant whale. On top of this, Jecht can use any of his aerials or specials in the water. Of course all this means for now is that Jecht is a hell of a match up on Delfino Plaza and Pirate Ship, but he also has some ways to create his own water that we'll get to later in the set.


Neutral Special: Blitzball

Jecht near laglessly takes out a blitzball, roughly the size of a football. He then tosses it forward! This all takes about the same time to do as Link shooting an arrow. The blitzball thrown can be charged up like a smash and will travel from two battlefield platforms up to Final Destination's width in distance if it doesn't hit anything before stopping and doing a turnaround before heading back in Jecht's direction. At all times other than when it's turning around, the blitzball is an active hitbox that deals 10-14% damage and knockback that can KO at 200-175%, surprisingly powerful for a ball! The blitzball will deal the same damage and knockback on the return path as well, making it doubly dangerous as a combo tool as well as it can hit the foe into Jecht's attacks, when it's first thrown it instead acts as a zoning tool, giving it quite a bit of use just form the throw.

Jecht can alter the ball's trajectory similarly to how Pit's arrows work. As Jecht goes to throw, the blitzball can be angled up or down to give it a curve, which can vary from slight to severe, and this affects the blitzball's path when it comes time for it to return to Jecht. An overhead ball may hit the foe into the ground for a stage spike or rebound them into the air, or hit them from below to pop them up and away or towards Jecht, whose able body can move around the returning blitzball to get any desired effect. A blitzball can get stuck on its way, such as if it hits a foe while returning to Jecht or hits a wall on the way back and dissipates as fast as an item does when it sits doing nothing for a while. A foe can attack the blitzball out of the air, taking knockback like Jigglypuff at 50%, but it will never damage Jecht and so long as it's in motion, it won't dissipate. Jecht can also always create a new one fairly quickly so it's best for the foe to not feed the beast and hit the blitzball out of play.

When the ball returns to Jecht he'll quickly catch it like any good blitzball player would and it dissipates, basically giving Jecht a tiny bit of lag instead of doing any damage. Jecht can press neutral special during this lag to very quickly throw the blitzball at the same speed he received it in the opposite direction, foregoing the usual charge and start up time! So foes really don't want to launch the blitzball back at Jecht if he has remotely good reaction time. Jecht can hit blitzball already on the stage with newer blitzballs and this works as you'd expect, knocking the other blitzball as if it was a football in the opposite direction and cancelling the knockback of the thrown blitzball. This has a surprising effect, the blitzball that was knocked away will turn around and home back in on Jecht as if he threw it! This can lead to all types of mix ups. As a side note, Jecht can dodge or roll to cover the lag of catching the blitzball, working into his animations naturally and letting him avoid any punishment at all by the foe, but is obviously very telegraphed.

Up Special: Jecht Shot

Jecht leaps into the air in a fairly quick animation that gets him two Ganondorfs up, but gives no ledge grab protection making it easy to gimp. The foe will be swept up in front of Jecht if they’re hit and dealt 6% damage. At this point Jecht can press the input again to punch any foe forward with very little lag, but can then press the input again to do another punch and then a final laggy spin and kick that deal 4%, 4% and 12% respectively, the last hit being massively powerful but taking a huge amount of time to come out. This requires that Jecht hit the foe repeatedly into a wall or has the blitzball to hit the foe back into him at the precise timing and spacing required of the move, and he can skip right to the laggy spin and kick by holding the input rather than pressing it. Jecht will fall after rising at a slightly reduced fall speed while he kicks and punches, but after the final hit will enter a free fall until he hits the ground or grabs the ledge. He won’t enter free fall just from the initial leap however, but is still limited to one use per air trip.

The blitzball will be pulled up alongside Jecht at the start of the move if it’s nearby and launched into the area to be kicked around by him. The punches will send it forward at its normal speed, but if it comes back or sticks around for the kick, it will be launched at its max speed and damage at a downward angle. The ball can even rebound off of foes directly in front of Jecht to be hit back at him to do the following one or two hits. A foe has to DI up or downwards to avoid being caught in the combo, and if they’re too close, will inevitably end up getting hit by all of it due to histun. The final hit is largely too laggy to always combo into unless the foe is at low percents or excessively close, but is useful for its 45 degree angle knockback. This will almost always cause the blitzball to rebound on stage to hit from below against the foe, or hit off the side of the stage to go in the opposite direction to help gimp foes behind Jecht off stage. This all takes a good while, but not too long if Jecht already has the blitzball in range at the start of the move.

Jecht will turn upside down in midair if no input is pressed after the initial leap and over the course of 15 frames will turn completely the other way around by the end. This can be interrupted and will end if he hits any solid ground or the ledge. In the air while he is turned upside down, Jecht gains access to his entire set still, including his second, third and fourth hit of the up special just upside down. Usually these moves will deal semi-spike forward knockback for the two punches, and a downward spike at a 45 degree angle, but this will be flipped while upside down to instead send the foe upwards at a 45 degree angle with the kick, the punches remaining unchanged. In this way, all hitboxes are flipped upside down, having their knockback flipped to be the reverse of its original angle. Jecht will stop being upside down once he reaches the ground or uses up special again, but is free to use the whole rest of his set from this stance to fight the foe upside down. He will still fall the same speed so he doesn’t have long to use this just yet.


Side Special: Waterga

Jecht puts out a hand and holds that arm with his free hand, channelling a huge orb of water in the air in front of him, growing from the size of Kirby to the size of Bowser over the course of a smash charge, then lets it go! The water orb will travel forward at the pace of Mario’s walk and lasts for 10-14 seconds, dealing no damage, but not being able to be destroyed either. This can be angled up to make it not move at all, or down to make it go in reverse, moving backwards and immediately enveloping Jecht as it comes into existence.

The orb can be swum in midair by any characters, and uses entirely different mechanics from in Brawl or Smash 4 where water immediately causes a character to start drowning. So much for that unique movement mechanic! There is one thing that doesn’t change and it’s a fairly big deal, any character who swims in it for too long who isn’t Jecht, or the Jecht who made the Waterga ball, will drown in it after swimming for too long without coming out for breaths and will lose a stock, at the normal rate it takes to drown in Smash 4. This is a fairly long time, but should be taken into account as Jecht can create a new Waterga whenever he wants and has no limit on how many he has out. The foe does have plenty of ways to counter this however, as the timer for drowning will stop going down once they leave the water for any reason or are at the surface.

In the Waterga, any character can use all their aerials and specials as if they’re in te air, but they are played at 2/3rds speed, and aerial speed and falling speed are reduced to only 40% their normal statistic. This goes for any projectiles such as Jecht’s blitzball too, delaying it until it leaves the sphere. This may take longer or shorter a time depending on if it’s travelling in the same direction as the Waterga or not. The slowed fall speed greatly helps Jecht who can use his infinite jumps in bodies of water to keep afloat and any character in the Waterga is pulled forward by it naturally anyway, so he can attack the foe from the Waterga without having to worry too much. Jecht can only create one Waterga per air trip as well to keep it from getting too silly with the stalling and a Waterga off stage only lasts for a few seconds before it bursts into a bunch of water and dissipates. The water naturally has other effects, such as weakening fire attacks to 0.75x power, electric attacks pass through all of the water at once and wind hitboxes now have a bubble aesthetic.

Water based moves will now deal 1.5x the damage and knockback when used in water and take on more of a “current” aesthetic due to being already inside a body of water. The Waterga will not just dissipate into nothing, as it travels or stands in place it will drip water onto the stage, creating a puddle half as wide as the Waterga on the floor. The puddle will reduce traction of all character who stand on it to half and lasts for 1 full second after they leave the puddle too, and this mostly just helps Jecht further due to his great run speed on the ground, and of course if he runs forward and up specials into his Waterga, he can go upside down with much delayed falling to do whatever too, he has a great number of options. At the end of the Waterga’s duration on or off stage, it will explode and send a torrent of water down that has the same pushing effect as the FLUDD, at minimum-max charge depending on the Waterga’s size. This can be used to gimp off stage but will also affect anyone still inside of it in case the drowning wasn’t enough to seal their fate, acting as a great gimp move for Jecht if he can trap the foe in the Waterga just as it starts to die. This can be avoided by jumping out of the Waterga first, but is risky as the foe’s recovery is not given back by being in the Waterga, as it deals no damage.

When the Waterga sphere hits a solid wall or object, or a hitbox, it will cause part of it to be splashed off and lose an appropriate amount of mass. When it just travels into a wall, it will leave it dripping wet and slippery for 5-10 seconds depending on the Waterga’s size, and as long as it travels into the wall will keep refreshing the duration until it’s all hit against the surface. The same goes for any attacks dealt in water, as long as the attack isn’t entirely within the water with its hitbox, any parts that hit out of it will carry some water along with it, adding a slippery effect to the move and dripping water everywhere below it. The slippery effect will cause water to come off the attack in the angle it was performed as an extra hitbox that deals 0.2x the damage and knockback what the original hitbox did. This isn’t a particularly long range, but does make every attack disjointed, comparable to Marth and allows for some combos that otherwise wouldn’t be possible due to the lower damage and knockback. Jecht will keep this effect for 5 seconds after he leaves Waterga too, so he can keep up his aggression.


Down Special: Drunk Magic

Jecht is not the most talented magician that ever lived, but he picked up some tricks from his time travelling around the sphere grid, enough to know the basic four spells of the main four elements, Fire, Water, Ice and Electric. For the start up Jecht will swipe his hand next to his face and then release it by doing a cutting motion to summon the spell in front of him, varying depending on what direction is placed and defaulting to Fire. By pressing forward he does Water, down for Ice, up for Thunder and backward for Fire. These each have the same fairly low start lag (besides the initial animation) and end lag is low across the board, but have very different effects.

Fire will launch a fireball the size of Mario’s forward at a horizontal angle, it will deal 5% to the enemy and low knockback. It’s the worst Fire spell for a reason! The fire has an interesting effect on the Waterga or any watery surface, as when it hits water it will cause an explosion of steam to rise up into the air that deals 3% a second and a strong wind hitbox that pulls up a Ganondorf into the air. In a Waterga, this will be extended as the steam will rise 2/3rds as slowly and deals more damage as it takes longer to pass through the foe. Used inside the Waterga, the fire will go a platform forward before dissipating, and cause steam to rise as normal for the entire platform length of the inside of the Waterga. If it reaches the surface of the water, the fireball will remain intact but be reduced in size to deal 1-4% damage instead and is much smaller, but will still deal slight knockback to make it able to interrupt foes, and covers a surprisingly great range. The most straightforward, but has its uses as a spell.

Water will cause a spurt of water to fire from Jecht that’s comparable to Piplup’s Pokeball attack only for a single second, dealing rapid hits of 2% to damage up to 10% if the foe doesn’t DI and stands in place or is caught at the start of the move. This can be casually shielded to do no knockback besides a little pushback. The water will not only push through the Waterga at 1.5x its usual speed, range and power, but will push the Waterga in the direction, refresh its duration by an extra few seconds when on stage and cause it to travel slightly faster in that direction. This also lets you blast a foe out of the Waterga altogether if it lands on them inside it, ejecting them out the back or onto the stage, depending on where Jecht is placed.

Thunder will cause a thin bolt of lightning to strike in front of him as big as Robin’s Elthunder and deals 7% damage. This will deal increased hitstun as do all electric attacks, but passes over its entire hitbox to water as well. This will hit the entire Waterga and will pass over the entirety of puddles too. This can be used as an anti-air effectively because of where it spawns, and when used upside down will make the lightning shoot up effectively because of the reversed angle. This is also a great way to rebound the blitzball by hitting it off the ground or when upside down, into the air directly to start an aerial assault.

Ice will cause a Kirby-sized icicle to form out of the ground a short distance from Jecht that deals 8% and strong upwards knockback, but has a slight delay compared to the other moves, not as fast. In the air, this instead creates a giant snowflake-like trio of ice stakes that point out in all directions and deals the same 8%, but with radial knockback. While both have a delay to appear, only taking about 5 extra frames, they will build up more size and damage per frame as long as they’re in water, dealing up to 5% more damage and becoming up to 1.5x as big.

The icicle or stakes can be formed on the Waterga and will instead be created out of the top (or bottom) of the sphere if Jecht lands it on the surface, and can be used to spike the opponent out of the Waterga. The icicle will spread over all of a puddle and freeze it over, causing to last an extra 10 seconds before reverting back to water. The same will happen to a water sphere, but only in the part the icicle hit – creating a Kirby sized “solid” area that will cause foes to be knocked off it. As the Waterga moves too, this can be used to turn the Waterga into something of a moving wall at the centre to combo or gimp off, but will only last for a couple of seconds.
 
Last edited:

JOE!

Smash Hero
Joined
Oct 5, 2008
Messages
8,075
Location
Dedham, MA
(Example entry for fun)

Ranger - M


Ranger - (Morrison) is an imperial ranger stationed on Jupiter's moon Europa in the year 2356. Europa has proven to be quite like home with its vast inner ocean and various sea life resembling a mix between fish and crustaceans, as well as an atmosphere with Oxygen just like the United Empire's home planet, Earth. A number of settlements have been constructed on the more stable ice "continents", some being mainly on the surface for terraforming, while others delve deep into the icy crust where the waters are surprisingly warm thanks to Jupiter's constant tugging and shifting of the moon's core.

The Ranger division of the Defense Force are more or less the trailblazers, being the first ones to explore and gather intel at any new locations and are highly trained professionals. Dealing with threats, both Human and Extraterrestrial, across the UE's various Solar Settlements. However, a new threat has begun to spread across the Solar System in the form of the mysterious Nictus. A parasitic race that feed off of energy and living things alike, little is known about them other than that they have acquired the ability to become a being comprised mostly of energy and are ruthless predators. After consuming a life form, they often bond with the body and take on it's attributes, even able to change shape at will in some instances. If Europa's "Krakens" were fearsome before, just wait until a Nictus morphs into one that can walk on land!

Morrison and his squad have been tracking down and attempting to neutralize this threat for some time, and hopefully his new equipment can finally tear these inky monsters a new one!


STATS / EQUIPMENT

Ranger-M carries a small arsenal into combat comprised of the best field gadgets and armor the UE can offer, as well as the new and experimental Laser Assault Rifle. His armor weights him down much like Smash's Samus Aran, yet his gravity is similar to that of Mario, the advanced tech that allows for normalized gravity betraying his launch resistance and Ike-esque build. His boots afford good, but not amazing jump stats as well as air control, as well as decent but again not amazing ground speed. Morrison can crawl military-style very low to the ground when the need arises, allowing him to take cover vs many projectiles temporarily, but when all else fails he has his Holo-Shield to fall back on!

Slower to produce than a normal shield, this magnetic energy-barrier creates a cylinder around Morrison as seen above which absorbs damage for him as long as he maintains the field. It has staggering 80% HP before it breaks, and automatically recedes when he takes any sort of action other than pressing or holding (Shield). Once receded, the battery will very slowly repair the Holo-Shield at a rate of 2% a second. If the HP of the shield is put to 0%, it overloads and cannot be used again for 3 seconds and delivers a feedback effect to Morrison that stuns him briefly. After the 3 seconds, the shield will boot back up to a base of 20% hp and begins charging again. If the shield is at full health, various spots on RM's armor will have a feint Red glow as an indicator, though this will change based on his team colors as well as the shield's overall color.

Being a "tower" that reaches as high as a battlefield platform, this can easily protect teammates behind Ranger-M as it cannot be pushed, and does not deplete in size when struck. Otherwise this behaves the same way when struck as other shields in the game save for some interesting frame data properties.The difference here is that while it takes a good deal longer to summon at 6 frames as he opens a display on the LAR (normal shields are frame 1!), it is essentially disjointed from the user where normal characters have to maintain a "block". This means that once up, Morrison can instantly cancel it into pretty much anything much like you can cancel normal shields into Grabs, Jumps or Rolls. So with a little prediction, you can place a shield and block an attack to instantly retaliate with your own! Luckily the shield will stay in place for 6 frames if you do not do anything, allowing you to act quickly with whatever would be right for the situation. Unlike other characters, his shield does not deplete as it is held, but the lag for putting it up in a pinch as well as the slower recharge rate make it take more finesse in exchange for the greater reward of instant cancels.

While he may be a bit better compared to the average human, Morrison is still a man underneath all that equipment. To fight the new threats in the solar system, he will need to keep his wits about him and master his robust Laser Assault Rifle.


Neutral Special: Change Tactics


A press of B will have Ranger-M swap the LAR between the default Compact State and the long range Extended State. Easier identified as "Blade" and "Beam" modes due to the primary offensive functions in each state, the change takes nearly no time at all to perform at a swift 6 frames total, and alters his moveset entirely.

His standard actions all involve the Blade Mode and will include CQC using the powerful Laser Blade, alongside the useful functions of the LAR's built-in computer. In Beam Mode all attacks will be different methods and angles of firing the deadly laser beam at foes, though adjustments made in Blade Mode may affect the beam significantly. In general, the Blade Mode is riskier as you need set up time and close space, yet yields much more launching power, while Beam Mode offers range, safety and a lot of damage while at the same time not too much in the way of stopping power. The changes effect his specials as well, including Change Tactics as a held version in either mode will yield different results!

Holding B instead of tapping it will have an alternate function to simply changing modes. By default, holding B while in Blade Mode will bring up a holographic display and scan forwards briefly before entering Beam Mode. The closest within an area 1 platform tall by 2 platforms wide in front of the LAR will become Marked with a holographic targeting reticle above their head for the next 12 seconds that mimics his default glow (red or other team colors). While Marked, foes will slightly attract any energy-based projectiles with a weak homing effect, bending sort of like when captured by Rosalina's Down B. This greatly increases the Laser's accuracy and even range as a foe just outside the projectile's range can still drag it along for some distance until it veers away or hits. You can mark as many foes as you like, and keep refreshing the same mark over and over again but keep in mind it has the same lag as your average tilt while having 0 hitboxes to it.

In Beam Mode, holding B will have Morrison take a moment to eject the spent Battery from the LAR before compacting the gun to Blade Mode and placing a new one in from his belt. Again, taking about as long as a tilt the Battery is ejected out and onto the floor below and is now a throw-able item that resembles a glowing, see-through capsule. The Battery is very volatile and essentially acts as a Grenade that will explode when smashed by an attack or thrown into a surface/enemy in a Bowser-sized detonation of energy. Foes affected will be dealt 6% damage and light-medium upwards knockback as the haze and sparks clear from the detonation, but not from them! The powerful energies contained in that battery have affected their particles and afflicted them with the Disintegration status. For the following 3 seconds, they will have a pulsing, (red) aura with bits of sparks and vapor trailing off of them as indication of the hazardous aftermath as well as take 1% per second. Every LAR Blade or LAR Beam attack that connects while the foe is Disintegrating will not only refresh the effect's timer, but also deal bonus damage based on their current HP. This damage is equal to 0.5% * (1+Foe %), so at 50% you will add an additional (0.5*1.5) = 0.75% per hit and at 100% deal an additional (0.5+2) = 1% per hit, and so on. This adds up quickly as the natural DoT from Disintegration is also effected and any and all healing is nullified while Disintegrating. A common tactic to get heavy damage vs your enemies would be to expel a battery, hold it and then swap back to Beam Mode in order to shoot it when thrown, maximizing your laser barrage from a safe distance. The Battery can just as easily detonate on Ranger-M if he isn't careful, but luckily he is the only one with an LAR.

Lastly, this Held-Stance can also be Charged by continuing to hold down the button for up to 3/4 of a second! The Charge can be cancelled at any time by simply letting go, but to get the effect you will want to fully charge the input. A Charge from Blade Mode will initiate the scan and bring up a secondary interface on the LAR that shows a straight line becoming thicker until it encompasses the small screen, initiating Blast Mode. This version of Beam Mode is temporary in that it only lasts for one attack before returning to normal, but that one shot could make a world of difference as it super-charges the next Beam Mode attack! Generally this is a raw damage boost, but certain attacks benefit differently. Charging from Beam Mode will produce an Overloaded Battery. Being visibly more volatile than normal, the battery will damage anyone touching it for 1% when it touches them either by walking over it, it striking them or picking it up due to the large amount of energy. When it explodes the radius is increased by 1.4x as is the damage, dealing 10% up from 6% and respectable knockback that can actually KO offstage at high %. This will still inflict the standard Disintegration effect, but with more damage and a much bigger margin for error.


Up Special: Support Drone / Shield Drone


With a press of UP + B, and a press on the display on the LAR's side, the armored "Backpack" on Morrison's back will whirr to life and eject off of him to hover up as a Support Drone! On the ground, the Drone will hover up and just behind Ranger-M and follow him around wherever he goes. If a foe comes within range of about a platform during this time, the Drone will readjust in order to angle a single, electrical shot towards them for 6% and light upwards knockback that is set at about Kirby's height. After the shot, or after about 1 second has passed, it will return to Morrison's back. The shot itself is lined up anywhere within 360* with the Drone hovering this way and that in order to line it up for a moment, giving it a moment of lag but leaving Morrison completely free to do whatever otherwise. The set up time is similar to the extended Change Tactics in that Morrison is essentially a sitting duck for around 20 frames, but at least afterwards there is 0 end lag for the shock that's to come!

Scanning a foe obviously helps aiming the Drone's shot, but there is also another more direct method to get a beat on the enemy. By Smashing Up B, the Drone will fly out and hover towards the nearest enemy within 2 platforms radius before delivering a full-body, multi-hit shock for 10% total! This keeps the foe in place for a good few moments which can lead to a solid hit, but is also riskier as enemies can simply smack the Drone to have it sent packing back to Morrison, and is a bit slower at 30 frames total lag. If the Drone does not home in on anyone, it will hover around the area for about 3 seconds max before returning to Morrison, and if a foe comes within close range of it once it begins hovering, it will attempt to shock them.

Speaking of the Scan, when you have summoned the Drone in Beam Mode it alters functionality from a Support to Shield Drone. Hovering directly behind Morrison instead of over his shoulder, the Drone takes on a brighter full-body glow instead of having the glow just on the opening on the front, and performs a different function altogether. While active, the Drone will emit a tiny version of the Holo-Shield and rapidly orbit you to both deflect/clank enemy attacks and knock foes back with a hit of 4% that sends foes away and into the air a set distance away that cannot really be followed up on (except by Shooting, of course). Morrison is unable to act for 40 frames, unlike the Blade Mode but has incredible defense around himself and can hit multiple foes/times as the Drone orbits three times before returning to his back. Smashing the input again sends the Drone out towards any foe within 2 platform's radius, but with a Shield active instead of a shock! While it travels forward, the Holo-Shield is a hit box for 6% and similar knockback as the tapped version, and when at rest it becomes a solid surface for up to 3 seconds that is as tall as Morrison himself. If left alone, it regains this hit box on the way back as well! Luckily enemy attacks on the drone will not send it back right away, instead the shield can take 2 hits and then the drone remains in place until another hit sends it fleeing. This provides a nice obstacle/cover for Morrison as he can freely shoot and pass through the shield while others cannot.

While in his own Holo-Shield, summoning the Drones has some added perks as they also double as the battery for the shield. The Support Drone's shock will be transmitted throughout the entire shield to deal 8% and moderate upwards knockback, which can then be cancelled instantly into another move or action! This is a very valuable counter-measure, though somewhat easy to see coming as he must go through the lag of the shield, then summoning the drone before the hit box emerges. On the defensive side, the Shield Drone will bolster the shield and heal it for 10%, as well as increase the size for just a moment (10 frames). During this time, any projectiles that strike the Holo-Shield will be reflected back at the senders, though still deal damage to it. The reflect of course can be acted out of like the normal shield and can stack up quite nicely with his other Laser projectiles for return-fire. When shielding, the Tap and Smash versions of Drone both do this same effect, and acting out of Shield will snap them to his back instantly.

In the Air, Up B behaves much differently as Ranger-M uses the Drone's hover capabilities to recover! The Drone in either mode will jut out at an angle, still attached partially to his back as it propels him upwards about the same distance as Captain Falcon or Ganon's Up B's. This can either go straight up, or at about a 60* angle at max when held forward, allowing for some variety, but ultimately still being somewhat limited in range overall. Luckily the Drone is also activated by Morrison to grant him some cover as he ascends, either dealing multiple, generic electric hits for 8% total on the way up as a Support Drone, or providing a shield that can tank 1 hit freely as a Shield Drone to get back to ledge safely. The Support Drone goes just a bit further than the Shield, not by much but by a notable amount in some instances. Speaking of distance, if a Drone is out from a smashed input on the ground, Up B in the air will instantly recall them at Sonic's dash speed as if they were hit by an opponent, able to catch him at a moment's notice. At the end of this flight, Morrison will enter free fall until he lands again, having expended quite a bit of power to boost himself to the air.

Proper Drone Management alongside Change Tactics is incredibly important to dictating the pace of a match. While in Blade Mode, the Drone is more offensively oriented and actually adds a good "threat zone" around you, as well as granting an actually damaging Up B to get through gimp attempts with some added damage. Summoning it then swapping to the Beam can double up on the threat bubble so to speak especially if you smash Up B to send Ol' Sparky out and take pot shots at the foe when they are multi-hit. Conversely, the Beam Mode's Drone is much more defensive with the "Get off me" Tapped version and barrier Smashed version. Useful from a range to deflect other projectiles, this can also be useful in cornering foes when in Blade mode as the Smashed barrier can be worked around like a wall. The recovery here is also safer as you can guarantee tanking 1 attack for free, but be weary of the less power send to the thruster in exchange as you fly about 1 Kirby shorter distance.


Side Special: Blade Lunge / Sweeping Beam

Now, the Drone obviously cannot do all the work here, and with Side B you can really lay on the damage with the LAR! Each mode offers a deadly move, with the Blade Mode offering good KO potential and the Beam Mode offering far superior damage.

Blade Mode offers a powerful, scooping Blade Lunge. With a tap, Morrison will step forward with the Drone's assistance (mirroring Up B slightly) to draw the Laser Blade to the side and slice upwards with both hands, somewhat like Captain Falcon's Side B. The Blade itself is a sweet-spot here, dealing 8% as it tears upwards to launch foes up vertically with med-high knockback that can KO at around 140%, with the rest of the LAR / his arms / torso dealing only 6% and half the knockback at a diagonally away angle. This can be charged up however as power builds in the LAR, flashing red up to a max of 1 second until Morrison automatically releases the attack. With a charge, the distance traveled increases from a mere half platform to a decent 1.5 and the damage likewise increases to 12% / 9% with enough power to KO vertically around 110%! You can of course hit anywhere in between by letting go of the charge early as well. However, fully charging the attack will expend volatile energy through the Blade, causing your target to Disintegrate on hit on top of being sent flying!

Speaking of flight, the Drone allows you to boost straight ahead even in mid air, having the same properties as on the ground. This is trickier to hit of course, and you only get one shot to boost/charge mid air though the rewards are greater given the added height will lower the KO threshold. The first air use will slow your fall speed while charging, and of course boost you forward before entering the awkward end lag where your momentum halts and you fall briefly, though you do not enter free-fall. Subsequent uses will not stall your fall speed or boost you unless you land mid-charge as the Drone needs to recharge.

When in Beam Mode, Morrison holds the LAR like a mini-gun as he sweeps it from the floor to the sky with a continuous Sweeping Beam! Covering a massive, 90* arc from diagonally in below of him to diagonally above, the beam will strike 15 times over a distance of 1.5 platforms. Within the first half platform, the beam will deal 1.5% a hit while the rest deals 1% a hit, for totals of 23%/15% with rapid hit stun. This can be charged up to "steady" the weapon and narrow the beam down to a maximum of 30* (+/- 15*) as well as boost the range to a max of 2.5 platforms. At max Charge, the 1st half of a platform also now hits for 2% damage, with the next platform dealing 1.5% and the last platform dealing the 1%, allowing for a point-blank shot to deal up to 30%! The volatile, close range hits of a max charge will also apply the Disintegration effect, just like a max charge Blade Lunge. After the beam is fired, the LAR will cool off momentarily with visible red "steam" to give it some punishable end lag.

In the Air and on the ground, the Drone will also brace Morrison for the recoil of the sustained blast, reducing his air momentum and fall speed with diminishing returns when airbone to help stall his recovery. While not as directly useful as the Lunge, this can still help you gain distance with time and threaten would-be attackers. This is much easier to hit in the air in general as you get more mileage from the "swoop" not being interrupted by solid ground, as the beam will stop on surfaces but pass through multiple enemies no problem. This is your go-top move for area coverage and damage potential though you often trade one for the other when charged as a Sweeping Beam would only hit 1-3 times as it passes by a foe, and a narrow one will hit up to 15 times but in a select area. Marking a target with your Scanner can assure a few more hits as the beam bends slightly towards them per hit, and in Blast Mode you get an instant full-charge on Side B for instant damage!


Down Special: Attack Vitals / Auto-Target

Upon activation, Ranger-M's Visor will flash red as he strikes a "ready" pose temporarily. This differs between holding the blade up with two hands in Blade Mode or holding the LAR as if he were aiming a rifle with Beam Mode, but either way marks his transition to a tactical Counter Stance.

By default, the Blade Mode stance has Morrison perform a deadly Attack Vitals maneuver if a foe attempts to attack him. The window for activation acts as a sweet/sour spot in this case as he will vary exactly what kind of followup he performs depending on if you Down B straight away to activate as his Visor is glowing brightly, or if it activates later on as he holds the pose with a feint glow. A perfectly timed Down B will have Morrison reach out to grab the foe with his left hand as he then drives the Laser Blade into their gut with the right for 10% damage, before booting them down and away onto the ground for another 5%. If he does not land the grab for whatever reason when triggering the perfect counter, he will still stab outwards with the Blade for 10% and horizontal knockback that will still push the foe into the floor, but a bit further away and with less damage. The foe can tech the landing, but that can be followed up by a Blade Lunge or other move if they are predictable! An imperfect counter will have him simply slash the blade diagonally downwards for 8% damage and standard 45* knockback into the air which can be followed up on at low %.

He can perform this counter while airborne, but without ground to work off of his attack options are altered slightly. A perfect counter here will again initiate a grab but have him hold the foe directly under himself as he plunges the blade into their gut again for 10%. This time, he does not boot them off as they both begin to plummet at their combined fall speed until they either hit the ground or 1 full second passes, whichever comes first! During this time, the foe will take rapid hits that will total to an added 5% over one second until they are either grab-released mid air as they struggle free, or they slam into the ground for another 5% and are left prone. Hitting the ground has a lot of lag for both parties, with slight advantage to the prone victim as Morrison readies himself again. An imperfect counter will again have him slash the blade for 8%, but hit at a shallower 30* angle away that can potentially even gimp some recoveries at very high %'s. This is very risk/reward heavy as missing the grab will still trigger the stall and fall for 10% / 5% landing hitbox, and when done at a low altitude can even trigger a Suicide KO!

Alternatively with Beam Mode he can enter his Auto-Target stance to act as a sort of "Ranged Counter"! Upon activation, a sonar-like ring will emit from him that expands quickly to a 1.5 platform radius as his visor continues to glow. Attacks made within said ring while it is active (Same active frames as Blade Mode mind you) will have him perform one of two shots depending on if they were made right on the edge of the ring or within it. At the edge, attacks will be met with a Precision Shot which deals a single, strong hit of 7% and upwards knockback. Any other spacing will be dealt with by a Snap Shot which is hastily fired at the foe for 5% and very minor knockback bordering on hit stun. Either way the shots can easily stuff aggressive foes as you keep your ground and fire back with more precise inputs in Beam Mode, or swap to Blade Mode for up close encounters.

In the air, Morrison opts for a more Spray and Pray kind of strategy as he is constantly in motion. Enemies that attack on the edge of the radius will receive a Precise Volley of 2 shots that fan out slightly, each hitting for 5% / 10% total and popping the foe upwards each hit. Likewise, a Snap Volley will fan out more, but shoot 3 times for 3%, which can actually total to 9% with a Scanned target but simply do hit stun. The Snap Volley is less accurate as it fans out greater towards the target, but at times can be optimal for defensive purposes. In general the Beam's Auto-Target feature could be argued to be more defensive as the large area can even shoot down projectiles or items that enter range, but at the same time it is incredibly telegraphed and requires some space in order to not be punished by a direct rush by the foe. In Blast Mode, the shots fired will increase in damage by 1.5x, boosting to: 10.5% / 7.5% when Grounded 2x7.5% (15%) / 3x4.5% (13.5%) each when airborne.

Having access to a counter is a wonderful asset for Morrison given the Holo-Shield takes some time to perform. Luckily for him, he can perform his counters instantly while shielding! Hits on the shield will trigger Attack Vitals, and he will still be shielded briefly when Auto-Targeting to deter close-up attacks. These come with a bit of extra end lag however if he were to whiff with either, so be wary of being too defensive all at once.
 
Last edited:

ForwardArrow

Smash Ace
Joined
Aug 17, 2011
Messages
502
Metireon
Metireon is the man responsible for stealing the monolith. He was formerly a high ranking security guard working at Lab 8, the government facility designed to hold and study the monolith. For most of his life, he lived with a good deal of comfort and stability despite his intense training regime, but at one gathering he ended up listening in on a conversation between two government officials. They were discussing the contents of Lab 63, a government lab which was being used in private to perform horrific human experiments in the interest of evolving mankind with science and magic. Metireon was horrified, and ended up ambushing one of the men on their way home and forcing them to show him many more government secrets. This included the newfound use of the monolith, as powerful mages had managed to connect to the world of demons and were forcing them to fight for the entertainment of the wealthy and powerful.

Furious, Metireon went and stole the monolith from the lab, and went into hiding with his wife and child. Soon, he began to hear a being calling from beyond the monolith, an entity known as Yldretch. It claimed itself to be the among the greatest and most powerful of all demons, and it offered him the ability to use the monolith as a weapon by connecting it to both himself and parts of the demon homeworld in the midst of violence. His phyical strength would also be massively enhanced, allowing him to wield the nigh indestructible piece of metal with a greater amount of ease. In exchange, the souls of anyone he killed would be given to Yldretch. Metireon found himself agreeing, as he considered the actions of his enemies so vile that offering their souls to this demon was a fitting punishment.

With his newfound power, Metireon left to find allies to help him destroy the existing government and rebuild from the ground up. He founded an organization on a far off and inhospitable planet of outlaws and people disillusioned with the government. They built a proper base and an army together, and with their help Metireon laid siege to one of the government's secret labs and destroyed it. However, towards the end of the battle he came to realize the cost of making his pact with Yldretch, as the demons were not entirely within his control and ended up killing a good portion of his comrades and feeding their souls to Yldretch. Horrified by his mistake, he chose to never again fight in a situation that would put any of his allies at risk. He left the organization to fight without him, putting his most trusted ally in charge in his place.

He fought his last battle a little while later, when Lab 63 came under siege by an evil cult that had newly risen to power, centered around a robot which had absorbed a large amount of magic and turned into a demonic bird-like monster. The cult's objective was the annihilation of all of mankind, and by stalking them to the lab Metireon determined he would take out two birds with one monolith. He fought his way through many cultists and killed a large portion of the lab staff that the cultists themselves had not, before eventually falling after the lab was already mostly destroyed. Despite his soul being given over to Yldretch, he took satisfaction in his death that he had weakened the cult and helped destroy perhaps the government's most horrific institution. His legacy lived on long after his death, with the foundation he made creating many powerful warriors who would shape the future.

Appearence
While Barbatos here is our basis, Metireon looks a fair bit different from the only man who hates items more than competitive Smash players. Rather than the rather armor/cloak thing Barbatos has, he wears the powered armor he used in his security work. Said armor is very worn from the battles he participated in and Yldretch's presence slowly corroding away at it. Aside from that, his hair is a bit shorter though still quite wild, and more of a grey color. He has a very similar face/build however, you need to be pretty built to wield the monolith as a bludgeon. By default, he holds the Monolith with both hands at his side, ready to swing it like a heavy bludgeon, though he has a strap across his back he can use to carry it outside of combat.

Stats
Weight - 9.5
Size - 9
Traction - 9
Fall Speed - 8
Dash Speed - 7
Air Speed - 4
Jump - 3.5

Metireon clocks in at about Ganondorf's size overall, and actually weighs a bit more than the king of evil. This is due to his heavy metal armor, which does not impede his movement nearly as much as you'd think, as well as the monolith itself. In terms of the air however, Metireon is far less lucky, having underwhelming air speed and a poor set of jumps. His impressive weight is actually less of a boon than it looks, as Metireon's set actually deals him a massive amount of self-damage, and combined with his recovery he's quite a glass cannon. That said, it would be wrong to underestimate him as his raw power can be absolutely incredible. By the way in comparison to his body size, the Monolith is only a little smaller than Metireon himself, making it a huge weapon.

The Monolith's extreme bulk and durability does serve Metireon well in one way, it actually serves as a somewhat effective defense. If an attack would hit Metireon when the Monolith is in the way, be it simply being carried or being used in the wind up for a hitbox, the monolith will partially block the attack, causing it to deal no damage and half the knockback. This will actually serve as a static projectile defense while standing or walking, but the monolith's position is too inconsistent during his run or dash to serve as a reliable defense. Curiously, if the Monolith is hit during the startup of one of Metireon's attacks, he will continue the attack and actually have its damage and knockback boosted by half the damage and knockback of what sent him flying. This is only true if he's not attacking in the opposite direction he was launched, as him slamming the Monolith forward in the opposite direction he was flying would really not make much sense to have gain the power. If he's aiming the attack up or down though, that's fine. Obviously, not very useful on its own, but in the context of some of Metireon's moveset, or just being in an FFA or against a minion/trap user, it can give him immense power.

Specials

Neutral Special - Power of Yldretch
Metireon places his hands on the Monolith as an ominous red aura eminates from it briefly, before it begins emanating a violent black energy in front of it from the lower half of the Monlith, which goes about 1.3x the length of Bowser's fire breath. Its actually quite similar to that move, decaying at a similar rate but dealing 1.75x the damage, which is pretty horrific when the hitbox is a fair bit bigger. There is an unfortunate downside, as Metireon actually takes damage from this, half as much as if he were in a Bowser fire breath for as long as he held the move out as he looks to clearly be in pain from Yldretch's dark magic. It also recharges at two thirds the rate of said move.

After the Monolith stops emitting the energy, it will become fainter and linger in the air, leaving behind a dark magic cloud that varies in size depending on how long you used the move. At max its nearly the two thirds the size of a Smart Bomb blast, which is obtained by holding it long enough for it to entirely decay. The cloud will deal 1% per second to Metireon while he's inside it, and 2% per second to enemies. It will lazily drift forward along the stage, not really moving forward more than 1.5 battlefield platforms over its existence before expiring. You can only have up to the amount of 1.3x a max size cloud of it on the stage at a time, otherwise part of the oldest cloud will begin to disappear. Multiple clouds can combine into a larger one if they collide with each other, taking the flight path of the larger of the two while being the combined size of both of them. The remaining time becomes the average between the two, although it will be considerably closer to the larger cloud's time instead if the larger cloud was at least twice the size of the smaller.

This has two uses, the first of which is a pretty easy one to understand. Demons can thrive to a degree off dark magic, so if you end up using one to attack while inside a cloud it will actually enhance the power of its attack. This will drain a portion of your cloud, so keep that in mind. The second is more dangerous, but also more powerful. After 10 seconds, Yldretch will detonate the cloud with the intent of killing anyone he can possibly can for their soul, dealing damage and knockback based on the size of the cloud. A really small one of about Mario's size will deal and underwhelming 8% and radial knockback that KOs at 250%, while a max sized one deals 25% and radial knockback that KO at 95%. This gives you a hugely powerful delayed trap, and a nice payoff for all the self damage you took, but there's one catch. If the explosion hits you, you take all the damage and knockback yourself!

That sounds like entirely a bad thing, but there is one thing to keep in mind. Your monolith can potentially block the explosion, be it by having the blast graze the back of the monolith or hit it during the startup of one of your attacks. The later bit is nice, as you can actually use the explosion to boost yourself forward, in a really powerful attack at that. And while just having one out to launch yourself forward in a max power strike is pretty predictable, when you have a couple clouds on different timers, this makes the battlefield a very scary place for opponents.

One last thing, but its not relevant to gameplay. There's a 15% chance that, if you get KO'd by your own cloud, you will hear a loud, demonic, hissing voice say "You disappoint me Metireon". So play smart with it, you wouldn't want to disappoint the greatest among demons.

Up Special - Flight of the Monolith
Metireon lifts the monolith up before tossing it, having a similar ability to angle it to a Yoshi egg. Given Metireon's strength he can actually hurl it a pretty similar distance, but the startup lag is actually pretty hefty. The Monolith deals 19% and upwards knockback that KOs at 95% if you hit at absolute point blank range, while decreasing to 12% and diagonally upward knockback that KOs at 155% for the remainder of its flight path. This is a pretty fast moving projectile, but all in all is not very hard to avoid due to the telegraphed startup. That said, it will eat through almost any other projectile it comes into contact with, with ones that deal 25% or more knocking it out of the way in the direction of their knockback. Similarly, melee attacks that deal less than 20% will always get beaten out by this attack while melee attacks that deal that or more will deflect it in the direction of their knockback. The knockback it takes is on par with Bowser at 45%. Traditional reflectors will just get smashed clean through by the Monolith, space animals beware, and it does massive shield damage that can take out half of its health in one go, three quarters at close range. The projectile also can't be absorbed/stored by any means, which is fairly important given the exact mechanics of this move.

Now you might think this horribly gimps Metireon's recovery to have a projectile on Up Special, and you'd normally be right, but that's where the second part of this move comes in. As it reaches the end of its arc, around when the Yoshi egg would break or if the Monolith crashes into something solid/a shield, Yldrech's tentacle will lash out and grab Metireon. If he takes knockback after the initial toss it will still reach to wherever he is at incredible speeds, so if you're going to gimp this recovery do it during the start lag. Yldrech will then drag Metireon to the Monolith's final position, actually giving him quite an absurd recovery range. The lag obviously makes it not flawless, and if the opponent is sufficiently powerful they can smack the monolith around to force you to recover in a less than ideal position or knock it back over the edge. You should also keep in mind that Yldrech's tentacle will deal Metireon a small but notable 4% when this move drags him to the monolith's new position, and given the other self-damage in his set that can certainly add up.

The Monolith's flight path can actually be deflected by your own explosions created by Neutral Special as well, actually being deflected significantly harder by them than other hitboxes(more like Ganondorf at 65%) and adding half their damage and knockback to its own. Combining this with a full power cloud makes for a ridiculously strong projectile that can fly out at a lot of different angles, but still has a great deal of predictability given it will come out at a set interval after the cloud is created. That said it can allow you to recover and re-position yourself in some pretty advanced ways, and when you do hit with it the power is unholy for a projectile given the already strong base power. Just keep in mind, if you throw it into a cloud at the wrong time when trying to recover you might accidentally gimp yourself.

Pressing B a second time during this move will actually give you an alternative option, which depends on if you're on the ground or in the air. If on the ground, Yldretch will instead of pulling Metireon to the monolith pull the monolith to Metireon, maintaining its hitbox as it does so. Since you can press this at any point during the move, you can actually drag yourself forward a certain distance and then pull the monolith back to yourself to surprise the opponent by forcing them to dodge or shield its hitbox. If they shield the Monolith as its moving toward Metireon, it will just bounce around the shield to continue its flight path to him. Metireon takes the normal self-damage when he does this.

In the air, you can press B and once Metireon gets within a battlefield platform of the Monolith, Yldretch will actually swing him around 120 degrees clockwise, or counterclockwise if you input the opposite direction alongside B or before he gets within a battlefield platform. From his new position, the Monolith will fly the rest of the way to Metireon dragged to him by the tentacle, bouncing around shield/walls in the way as per usual. If Metireon gets swung into a wall or the stage by this that is obviously as far as his recovery goes. This move actually increases the self damage to 6% as Yldretch swinging Metireon around isn't exactly a painless process, but it can be worth it to further increase this move's versatility as an approach and recovery. Note that if in either of these options the monolith is still returning to Metireon he won't really be able to perform any actions other than the recovery until he gets it back, given he's kind of occupied by dealing with the tentacle constricting his body, so it does carry some risk if you're using it as an approach even if it is very powerful.

As a final note, this move interacts with shields in a slightly strange way. By default, the monolith's flight will stop at a shield on the trip out while Yldrech's tentacle will influence it around the foe on a return trip to make sure Metireon doesn't spontaneously lose his moveset. However, the initial sweetspot will actually not be stopped and continue along its trajectory even if it hits a shielding foe. If you recall it at this point, you'll shatter their shield instantly given the sheer amount of shield damage this move already does, meaning the grounded Up Special sweetspot is really not something the opponent can afford to shield. Note that if it gets boosted to the power of the sweetspot or higher via an explosion, it will treat shields the same way too.

Side Special - Toxic Smash
Metireon holds the monolith behind himself, in a pose which can be held for up to a 1.4 seconds of charging. When released a small blob of... something will burst out of the monolith right before he swings it. Is it a whole blob-like demon, an egg sack, or a part of a demon? That much is unclear, though knowing Yldrech's vicious nature you're probably about to kill something with this move. Either way, Metireon will swing it near the ground, low enough to crush the little blob into a spray of black goop. The actual swing does 13%-26% and knockback that KOs at 160%-75%, with large start lag and average end lag. The range is obviously quite nice given the size of the monolith, and holding the monolith behind your back during the startup makes it a nice move to use alongside the Neutral Special clouds.

The black goop sprayed out by this move is a pretty useful side effect, even if the hitbox only deals 5% and some abnormally high hitstun. The goop will spray out about a third of a battlefield platform past the swing by default, but charge will increase it until the goop sprays up to a full platform ahead of Metireon. It will also splash on and very slightly behind Metireon, and linger on both him and any foes hit for a total of 8 seconds afterwards. It deals 0.75% per half-second to foes and 0.5% per second to Metireon, and every three seconds will cause opponents with the ooze on them to flinch. Note that if you at least half-charge the move, the goop will actually splash up into the air before falling back down to create a sort of lingering hitbox around you, making this extremely hard to dodge. This will also start giving the move some significant vertical splash range, reaching just above Metireon's head at half charge to 1.5x that at full charge. The ooze's effects will be applied to anyone hit by the swing as well, making the rest of the hitbox more or less just a sourspot, but it can be a pretty sizeable sourspot.

The ooze, aside from causing the occasional flinch, will actually impair the defensive options of both players slightly. The substance makes dodging and rollingslightly harder as the lag involved is increased by a couple frames, or by one frame in Metireon's case. The ooze eats the shield of someone who pulls theirs out alive, eating away a sixth of Metireon's shield per second and a fourth of the opponent's. If the ooze or swing hits a shielding opponent, the ooze effect will be burning away at it whenever they pull it out for the next 8 seconds and shield regeneration will be reduced greatly until it ends. This obviously is a bigger nerf to opponent's defenses than Metireon's, but keep in mind if they successfully dodge the ooze they won't have to worry about the downside while Metireon does. Also note that if you use this move multiple times before the ooze timer is up, it will stack the effects of both the defense reduction and damage over time, both on Metireon himself and the opponent. A notable point is the flinching will be increased to a slightly extended point of hitstun, rather than just a small break in the action.

If you use this move in the black clouds created by Neutral Special, the blob will soak it up and increase in size, absorbing up to half a max sized cloud if its available. This will cause many things about the blob to improve, doubling the power of its initial hitbox and damage per second while providing a 1.5x increase to its range. A max sized blob will also instead apply its flinching once every 1.5 seconds instead of 3, which makes it become unsettlingly difficult to avoid Metireon's brutal assault. If that wasn't enough for you, if you have momentum thanks to an attack clashing with the monolith at the start of the move, the added power will also add to the size of the splash, and at that point the lingering hitbox will stay out a long time due to the ooze taking quite a while to land back on the ground. If you want a move to absorb one cloud with while getting launched by another one, the results of this one are downright ungodly if you do that, even if it is massively predictable to see coming and easy to interrupt.

In the air, the ooze will obviously not have any ground to splat against, and will instead be flung forward as a fairly fast flying projectile. It deals the same 5%-10% based on size and applies the nasty statuses as per usual on the foe, only without any splashback on Metireon. This sounds great in paper, but the hitbox is a small projectile rather than a potentially massive AoE and will make an underwhelming splat on the ground if it lands. The projectile is also kind of low ranged as gravity affects it rather strongly, and using it high in the air is not something you're going to land very often. Still, the safety the aerial version provides is nice. If Metireon ends up getting blasted into the air(which by default from a Neutral Special cloud he won't as it will give him directly horizontal knockback the way he's angling the monolith and himself) he will switch variations to the aerial variation mid move, and if he gets knocked to the ground he will change to the grounded version.

Down Special - Cruel Pact
A few tiny tentacles coming from Yldretch escape the monolith and plug into Metireon, causing his eyes to glow red and a menacing black aura to begin surrounding him. In this state, whenever Metireon lands an attack on the opponent, violent black energy will surge through both him and the opponent. This will deal 5% to Metireon, but multiply the damage output to the opponent by 1.2x, and the knockback will obviously go up proportionately. The self damage will only apply to the first hit of multi-hit moves, so you're not about to take 80% from using your Neutral Special, don't worry. While that self-damage is pretty unpleasant Metireon's base values are already pretty strong, boosting him more is going to give him power than makes Ganondorf jealous. One thing to worry about a bit is that if you collide with a shield, you're still about to take the self damage, which is not a remotely good trade.

Exiting this state is where things get interesting, as over the course of this move Yldretch is absorbing power from both the opponent and Metireon. When you press Down Special again, Yldretch will unleash all the power he's been absorbing in an violent explosion of black and red energy, dealing damage equal to the total bonus damage dealt to the foe plus the amount dealt to Metireon. The knockback is proportional to the damage, as you might expect, and with the minimum value of 5% will KO around 400%. The explosion is pretty concentrated around Metireon with the visual looking more tumultuous and powerful rather than larger even with more power concentrated in it. Its not especially laggy so despite the underwhelming range, this is actually a pretty practical aggressive move for close quarters combat and a potentially scary bonus for all your work. It also becomes a bit easier to hit with if you're getting boosted around with one of your explosions. This move's power caps out at 30% and knockback that KOs at 70%, but if you go over that the power will be kept stored up for subsequent explosions.

Yldretch's energy from this move supercharges your clouds, causing them crackle with streaks of red and deal an increased 2.5% per second to you and 5% per second to enemies. That's scary, and the explosions also gain amplified power, dealing 1.4x the damage as before and proportionately increasing the knockback, making them hideously strong. The catch being of course, you have to have an explosion that deals at least 20% for this supercharging to happen, and a supercharged cloud is liable to kill you in addition to your opponent. Still, this can add a little more incentive to go into that mode so that you can gain some extra power and momentum in the match even if you whiff the initial blast.

Conditions met:
-Special related to Special Mechanic(Side Special)
-Direct Effect like a DoT(Side Special)
-Chargeable Special(Side Special)
-Special that produces an entity(Neutral Special)
-Two specials varying between ground and air(Side Special and Up Special)
-Two direct attacks with the weapon itself(Side Special and Up Special)
-Two aiding in recovery(Up Special and Neutral Special)
-I technically met the sweetspot condition as well with Up and Side Special, but Side Special has already been used five times and I've met the requirements anyway, just throwing it out there.

Also made a few minor tweaks to Neutral Special's damage values.
 
Last edited:

JOE!

Smash Hero
Joined
Oct 5, 2008
Messages
8,075
Location
Dedham, MA

WEEK 3 RESULTS
Week three resulted in a crop of 8 entries! To recap, this week was all about coming up withthe remaining 3 specials for your character that met certain amount of criteria among each of the 4 moves, as well as limiting each move to not exceed 5 of said options.

Lets see what you came up with:

Yomi Mekura
Munomario777 Munomario777

Creativity: 7
Catching up from last week, more Description for Yomi is good! The yellow lines and added "padding/plates" add much more character here. The dark metal also being the basis for her Magnets, as well as being "Smokey" as reference to her dark world is a good touch. The yellow lights as visual indicators are especially cool when the smoke is considered, allowing for fun visuals as two separate lights move about when separate or one long glowing rope whips about in attached.

I already spoke of her Nspec last week, and I am glad to see added changes here to her core move. The added B input mid move on both the Detached and Attached styles are good for keeping things consistent, and I like how she always has 1 Kunai on hand to take advantage of the potential DoT stacking as she slices into a bleeding opponent (granted the DoT does not stack, but you can keep it going by stopping them from shaking off the Kunai). The added hitbox on magnet-ing a Kunai back to you is very good and the lag of deflecting and then re-catching a thrown Kunai is well thought out too to give some counterplay for a foe as well.

The new specials are all rather fitting, but I cant help but feel you had more to work with on the Attached style moves given she had a means to "Scorpion" foes as you put it. Rather, this more applies just to the side B which is sort of just like a Sheik Dash attack and just sort of "hits" compared to the vastly dynamic Rope side B. It is much better in the air as it has an interesting angle and recovery use when paired with Kunai Up B, so there's that. Down B is very cool with the "Ninja Vanish" coupled with an escape option that is very fitting to her character, and the overall theme of "multiple options" with each special is great after Neutral B. However, I just get the feeling more care was put into the attached versions of the moves given their vast range of options compared to the Kunai's "hit and press B again, then press B again" type of flow.

Practicality: 7
Neutral B is fine after the slight edits, but I have some concerns about the other specials.

Down B just seems a bit too punishable overall. You know where she is going to hop to after the startup, and the fastest she can do it also grants no hitbox on the "Bomb" for coverage. The roped descent has no hitbox coverage if you miss the Kunai, but at least the Kunai version (and no input) has mix up value. It just seems a bit much given how she has to commit to it. Even hitting the smoke bomb seems dubious as you make it appear to have decent knockback away, making the followup attacks sort of.. pointless?

At least the smoke obscures your Side B when you snag somebody with the Rope version. That is until you make Grabbing to be the best option by far. This hinges on the Grab game, but invariably you then get access to pummel +4 more throw options for free atop the 7% gained for hitting. Just smacking them away with the other options, unless I suppose you hit midair, seems inferior at a glance. Even in Smash 4, this could potentially break the chain-grab rule as Snag -> throw -> Another Side B wouldn't count as a grab...

Slights here and there in terms of safety, optimal options and questionable reach bring her down a peg here.

Execution: 10
Muno got the following criteria down:

Neutral B: Stance Change, Place Effect, Direct Attack
Down B: Create Entity, Chargeable, Direct Attack, Alternate Input, Aid in Recovery
Side B: Direct Attack, Alternate Input, Aid in Recovery, Stance Change, Altered Mid-Air
Up B: Direct Attack, Alternate Input, Aid in Recovery, Altered Mid-Air

You definitely hit all the notes here, though I am a bit surprised there are no true sweet/sour spots especially on the Kunai-Only moves.

Total: 24
Yomi has a good deal of ninjitsu in her kit that makes good work of her unique weapon. However the specifics keep coming back to bite her as flavor-wise it seems like the Kunai Specials aren't much more than normal attacks with some movement, especially compared to the vastly dynamic rope specials. The rope specials as well have a bit of concern in terms of their reach and with Side B specifically, overshadowed options.


Trace
JamietheAuraUser JamietheAuraUser

Creativity: 8
Trace is revealed to be a highly mobile character, with 3/4 specials involving movement in some manner along with the ability to wall jump anywhere thanks to his barriers! An archetype that is actually kind of rarely seen (in MYM), Jamie has made him into a very mobile, poker-type zoner who would like to spray at you from all angles with bullets while always being out of arms reach, until he gets in on you with a Side B or such for bigger punishes.

I like how each special already plays into each other too, with the barriers adding passive stage control + movement for both you and the opponent. Ether Wisp and Zair let you take much more advantage though, and the ability to shoot the barriers to heal them is a fun aspect to keep them around longer. Hopping off a Barrier into Neutral B or a Side B sounds really fun, and in general up B -> stuff sounds amazing and well balanced.

I am still just a bit dubious towards Side B all things considered. Like, without the rest of the set it feels like this could have been a cool general grab mechanic with the Zair also behaving this way as the Aerial Side B does. For example, Grab on the ground or air would be more like a command grab. Throws have good base power/damage as he charges up the non grabbing gun, but based on your pummels you rack more damage in exchange for faster yet weaker throws. Its just my opinion, but it seems like the Zair doesn't have an offensive use, but is so similar to Side B in aesthetic / theme that they could both be used to tether the edge... but then why not both be a grab and free up side B?

The names and characterization of the move descriptions and call outs are also greatly appreciated. Though again we are missing a bit of the "character" here aside from the blink and you miss it anime starter kit...

Practicality: 9

There is not much to talk about in terms of practicality, but I do want to touch on how Neutral B works when airborne. It gives a boost once per airtime on the initial shots, but on the 2nd burst they each have different boosts. So, do you boost once, then boost again? If so, could you like B- > Neutral B, use that boost, then B (no boost) -> Fwd or Bck B to get that boost? It doesn't really add or detract much as this dude has nutty recovery anyways between Up and Down B, but it is a point where I sort of scratched my head.

Speaking of, it seems like a wall cling's ability to air jump off the wall is superfluous given that you can just shield -> jump immediately and leave "Jump" as wall jump. I also would have liked it if he could make a wall in the air and transition right to wall cling, or at least make mention of that for the lag/etc, but he has so many ways to make it then hop onto it it is sort of a non-issue.

Execution: 10
Jamie got the following criteria down:

Neutral B: Direct Attack, Alternate Input, Altered Mid-Air, Aid in Recovery, Stance Change
Down B: Create Entity, Chargeable, Direct Attack, Alternate Input, Aid in Recovery
Side B: Tie into Mechanic, Alternate Input, Direct Attack
Up B: Aid in Recovery, Chargeable, Tie into Mechanic, (Altered Mid-Air)

You got most of the criteria! Didn't have a direct effect nor sweet/sour that I picked up on, and Up B only sort of alters that much in the air so it sort of scrapes by on that. Otherwise great job!


Total: 27
Trace zoomed into Week 3 with a stellar showing!


Knightly Witch Garnet
U UserShadow7989

Creativity: 8
Garnet certainly lives up to her title as she combines witchcraft with all sorts of Knightly equipment! The three specials added here each add stage control into the mix by producing weapons, armor and even using them as teleportation anchors for recovery. The fact that she can have what amounts to a mirror image of herself with the Armor wielding a weapon is great to think of and totally fits the mechanic as well, with her puppeteering the armor! Up B is great here too as it ties in with Down B, a common thread appears to be her ability to warp in weapons as well as warp to them, allowing for tricky burst movement.

Speaking of the weapons, I did like them but I am iffy on the shield. It seems each input aside from the jab does the same thing more or less, and it is a bit confusing why only Neutral A has the momentum/speed property? Why not have that on any of the active hitboxes as a bonus? Hit damage + X-Y% based on movement would have been nice and encourage good timing with the risk of leaving yourself open for the reward. It also seems a bit like a lot of focus in actuality would be away from the Mythril Thorn, as a good chunk of ground moves would be replaced when wielding a weapon, and you would often be occupied chucking fire or weapons at the foe. However this is a bit fair as in this sort of vacuum, the same could be said about Link.

Of particular note I like how the armor's well, armor works here. The variable super armor based on remaining HP is intuitive, thematic and balanced. The more you bash on armor the less it can really protect, and while starting strong those weak hits eventually may matter!

Practicality: 5
I have a bunch of questions here in terms of how all this works, partly due to some things being detailed and others lacking details or worse yet simply being rather out of line in the"big picture" sense.

Simply going down the list, its a little unclear by what you meant in neutral B when you say "it can be launched at Yoshi Angles". Yoshi's eggs have a particular arcing range and starting at a horizontal, I think it would have been easier to just say that you could aim it briefly before toss almost exactly like you described Up B. That said, being able to litter 9 of these projectiles / weapons across the stage like this is kind of nutty. Yoshi's Eggs behave like mortars as well but explode after a set distance (or just on impact), but these linger as items you can re-equip and re-throw. In a ditto, let alone 8 player match that can get rather silly. For specifics, the Lance is a bit odd in that you do not mention the size of the thing, which hurts the visualization here but otherwise these are all cool.


Side B is still a bit confusing. As stated, it can create 6 traps (3 fireballs, 3 flaming objects) and a minion if given the time to do so. That is quite a bit of stage control when you also factor in her Thorn as a sword hitbox for when foes get close, as well as the Neutral B items that can be tossed about or wielded. Plus her armor which can allow for a few stray hits to glance off early on and you have a good means of setting up a multi-layered wall and keeping foes at bay. Even if it is just light hits of 4% or they are distracted hitting a fireball/minion, they are still "losing" passively by not being able to attack Garnet while she still then has good reach to them. A similar character is Project M Zelda with her Din's fire, acting much like the flame Side B here. The difference with her is that the further she shoots it the more powerful it is as a trap / passive hitbox, but more importantly Zelda herself has no other projectiles or huge range to threaten you with around the "danger zone" of Din's fire. Garnet can create multiple, weaker floating traps and on top of it still throw things at you and has a sword...

Also, how are the objects / minions differentiated here? Is it just order, as in if you have a weapon then place a fire on another weapon, it is treated as an object, yes? That would explain how the armor can be on fire as well if you already had a flaming weapon. I do like how the smashed input can charge the thorn up and add the fireball hitbox temporarily though, but everything else I think needs some tweaking or better detail. As is, she can litter the stage with items non stop and then make them better / into minions, and then be safe inside armor to prevent her Mythril Thorn casting from being interrupted... and then Up B can teleport her around to avoid trouble or snap weapons/foes to her... it all just seems like quite a lot at once.

Speaking of Up B, again this seems very good for recovery given how far you can smash throw something. The variability also makes for unpredictability (plus a smash item hitbox), and the Armor allows even more leeway if she has that on or if it is active for her to "snap" to with a smashed Down B.

Overall I feel like this was a step too far in the direction you wanted to go in Shadow. The core is excellent but the numbers/ amount of stuff she can manipulate at once is stifling when paired with what she already would have going on.


Execution: 9
US got the following criteria down:

Neutral B: Stance Change, Create Entity, Alternate Input, Sweet/Sour
Down B: Stance Change, Chargeable, Create Entity, Aerial Difference, Aid in Recovery, Alternate Input, Sweet/Sour
Side B: Tie into Mechanic, Stance Change, Direct Effect, Create Entity, Direct Attack, Alternate Input
Up B: Tie into Mechanic, Direct Effect, Chargeable, Aerial Difference, Direct Attack, Aid in Recovery, Alternate Input


Unfortunately, you went over the "Limit of 5" rule multiple times based on both our counts, but you did nail everything else to nearly the limit per attack. Well done there.

Total: 22
An bit of a surprise given how well Garnet has been brought up on prior weeks. I think you should take a step back and visualize how she would really be moving around / playing on the specials alone here as in a vacuum each aspect is good, but when combined it can be quite frustrating to play as / against in practice.


Violet Sterling
IvanQuote IvanQuote

Creativity: 7
Violet goes for far more practical "specials" much in vein of the Fire Emblem characters, as opposed to some of the more fantastic elements you'd see in other characters. And like them she has a counter that is actually quite unique in not only being on a Side Special, but for trading damage for a Stun effect if you hit with the Violin Bow! This wisely scales based on the move that you parry + foe %, and is highly tactical for weaving into her 3-step rhythm moves we have yet to see, well except for the Whip Part which you can transition to immediately after hitting the Rapier's parry. I like how this keeps her tether as well, given than Neutral B snaps the Frog back in place (with welcome added speed) when in Whip Mode.


Up B though is a bit weird with how she uses the rapier as a... helicopter? I dunno, it just doesn't strike me as the sort of move such a weapon would perform even with the extended blade in Whip Form. Like, Aang from Avatar could do this with his Staff, but that is taller than he is and is not a wire (also he controls Air but thats besides the point). The animation here would make sense when grounded, but for the height you give her it is kind of weird, though this is sort of nitpicky given that before Violet, we have an actual witch using magic and living armor, etc.

Down B is cool in how you actually have to pay attention to the song and how it is a full 3 minute piece that she plays bit by bit. I would have loved more to to with that! Her weapon is highly musical, and just one special using it as such is a bit disappointing, especially when she already has a Stun in her moveset, and more specifically in her Rapier stance which is also where you get the Sleep! Maybe if say, each part of the song had different effects or you could move/tilt to differentiate the effects? Playing the song in a low key would do X, while holding UP to do a faster, higher pitch would do Y, etc.

I guess I was hoping for more music in her specials overall given the type of weapon, but what you do present is functional.

Practicality: 5
Ivan, you need to work on your numbers. First, holy crap a ranged Nspec that does 28% damage. That is quite a lot, and even if the knock-back is reduced, the doubled damage would make up for that no? Also, is it reversible like Falcon Punch with a special animation/ability to reverse it multiple times or are you just mentioning B-Reverse? If the latter, that is actually a universal technique of all specials. Side B's grab also does quite a bit of damage at 17%, especially when you can parry into it which seems a bit much.

Up B I am 50/50 on as 18% is a hard hit, but is also a very small sweet spot on a large coverage move. However, what is lacking here and in the other attacks are any sort of knock-back values or at least comparisons to gain a visual. From what I picture, Up B would be a KO move of sorts? Striking upwards or to the sides, but no mention of angles or even "This will launch Mario straight up and KO at 100%!" or anything. Even Nspec which seems to be a primary KO move with how you shoot the blade like a gun at people doesn't mention the angle or relative KO power aside from it "being good to KO if not for the start up".

Lastly, I have to make note of a lingering Sleep Trap as well as a Stun being in the same set, let alone the same form (Rapier). Having one or the other is fine, but the sleep effect mixed with the Stunning counter and long range / combos starts to stack up a lot, especially when she is tossing nearly 20% on average with her attacks! Though the timing needed to get this out can certainly balance as both the sleep/stun are very conditional. A section in parenthesis explaining how long a measure/etc are would be very appreciated here, though overall this is walking a bit of a tightrope in terms of being too controlling with her damage output.

Execution: 9
Ivan got the following criteria down:

Neutral B: Stance Change, Direct Attack, Aid in Recovery, Sweet/Sour
Down B: Direct Effect, Chargeable, Create Entity
Side B: Tie into Mechanic, Stance Change, Aerial Difference, Aid in Recovery, Alternate Input
Up B: Direct Attack, Aid in Recovery, Alternate Input, Sweet/Sour


Would have liked to have the prior entry on top just for a reminder, but still good job here.

Total: 21
Another good showing, but some missed notes should be worked on in the coming week.


Lord Galf
MasterWarlord MasterWarlord

Creativity: 7
Galf is fleshed out even further here with the addition of his beloved Dogs. These are cool minions, behaving much as you expect a dog would with the ability to pounce on foes, bite them and latch on like a K-9 unit, even able to KO foes when the conditions are met! As we all saw coming, Up B grants him a leash that acts as a tether recovery, but also a tether to Galf by striking foes who are collared and keeping them within arms reach, or taking them for a ride with the Up B's "spin" attack. It works similarly to the Butcher's own chain, but with Galf as the post which is welcome given his polarizing stats. The chicken bone is also an amusing way to control the dogs, and even coerce folks into attacking them for Galf's buff to take place.

I do have to say though, I do not get the point of the villagers. They throw out Side B's for you sure, but they are so easily defeated by what seems to be by accident that it is a non issue, and they also purposely miss. You didn't really make mention of how often they toss the collars either, and aside from that they don't do much aside from the blue-moon chance they get set up to try and whack a dog with a club for an attack. Sure they are faster to summon but seem in every way just inferior to summoning a Dog, which even as cannon fodder you'd rather the dogs get attacked since they grant you buffs.

Also a bit surprised that collaring / leashing the dogs by Galf would be a negative. You'd think the shiny new collar would be a buff or something, oh well.

Practicality: 7
Not much to talk about here, I feel each move is fairly decent both on its own and when put together, though I do have some questions. Semi serious, but why is the Chicken Wing so much more powerful than the Metal Spiked Collar when thrown? Seems like these should have the opposite numbers! I mean, when sweet-spotted the Collar will deal 10~12.5% + recoil when they attack, sure. But that requires a sweet spot whereas the chicken you just sorta whip freely for comparable 11% and KO power + Dog bait for added damage. Oh, it also can heal you a little bit so there's that too. I dunno, it just seems funny that the Chicken seems like a better overall projectile! I am guessing we will see how much the chain + collar interaction would play into this for a better judgement call.

On similar note, the lag of tossing the Collars is never really stated. Like, how often can you toss these out with quick taps / small charges?

Another big stickler is that you never really mention how many dogs / villagers you can have at once. For minions where the idea is to have multiples, the max number is a big point of interest in terms of balance / game play feel. It seems you would have around 3 at a time for dogs given the Bulldog, but the balance of the move is in question until we get an idea of what kind of dog-pack this guy is rolling with.

Execution: 8
Warlord got the following criteria down:

Neutral B: Create Entity, Sweet/Sour
Down B: Tie into Mechanic, Create Entity, Alternate Input, Sweet/Sour
Side B: Place Effect, Direct Attack, Sweet/Sour
Up B: Place Effect, Chargeable, Alternate Input, Direct Attack

Warlord hits the mark per move, though I would have liked to see a bit more per move here and there. However, he has only 1 special that is a direct attack with the signature weapon and not two. Up B sort of slides by given that it does have an attack when striking somebody who's been struck by the Collar though.


Total: 22
Warlord's doggy loving.... Warlord is shaping up to be quite the pack leader. I just don't know if the villagers really add much that couldn't be done with other moves.


Shabeel
Rychu Rychu

Creativity: 7
Shabeel returns with a new arsenal of moves to compliment the impressive Dragon Fang! The stance changing Up B is first and is a cool twist, essentially taking as long as Zelda's transform and altering him to be lighter and floatier in exchange for 2 extra jumps and air speed for aerial combat and recovery, or alternatively be a last ditch zooming claw attack if in the air. Down B uses the Dragon Fang again to this time launch darts much like Shiek's needles, but a full charge "arcs" them to create a large fan of darts instead of a straight line. Side B is a flash-step move where he zooms to deliver a powerful clawed uppercut, which with another press can be followed up by a teleporting downwards strike.

These are all cool and flavorful, the extra jumps combined with the Neutral B is especially potent given he can aim it any which way and even pull himself to an opponent with it. Though it is a bit weird as a stance-change given it has such a wind up, duration and cooldown. I like both moves here, but think the Aerial version should have just been like, a smash input or the transformation been a charged input as I don't think the "normal" Up B having a cooldown is very fair given it already puts him in helpless.

I like how Down B differs from his unique dash, but at the same time am disappointed the other specials do not follow suite in some manner. The unique movement he performed could certainly be emulated in the other specials in some manner (Dragon Wing low angle strike, Flash Step boost, etc) so that the super dash performs almost like a temporary stance in of itself.

Practicality: 7

The nerfs to Dragon Fang are certainly appreciated given the previous power, the utility alone should be the selling point and is still a great "glue" to pretty much anything he happens to be doing. I am still surprised it isn't a direct tether to whatever it hits for recovery on say, a second press like it is with foes but that is a moot point. The poison is much better now, but it is still a bit unclear as to what you mean by Stacking. Any way you slice it, be it stacking to deal 3/sec, last 9 sec instead of 3, or simply have 3 applications it nets the same effect but some clarity would be nice.


Up B seems sort of under-powered in all honesty. You go through a length form change only for it to last 10 seconds, and be unavailable for 15. This would mainly be for recovery prowess, but you cannot use it in the air/offstage, instead it becomes an attack that has it's own 8 second cooldown! I mentioned earlier that the attack should not have a cooldown since he goes into helpless, but overall I think the Dragon Wings need a second look. Maybe make it a proper "Stance" change where he is slower on the ground / loses the special dash in exchange for air power and can swap back and forth with the prior mention of Dash-Attacks being strong but tricky like in Down B. As is, he seems to have an unfairly bad recovery as one hit off his Up B equals instant death as he has to float around for 8 whole seconds to get it back!

Execution: 8
Rychu got the following criteria down:

Neutral B: Direct Attack, Sweet/Sour, Place Effect, Alternate Input, Aid in Recovery
Down B: Chargeable, Direct Attack, Alternate Input, Tie into Mechanic, Place Effect
Side B: Aid in Recovery, Alternate Input
Up B: Stance Change, Direct Attack, Aid in Recovery, Aerial Difference, Sweet/Sour


You hit most of the notes this week, except only one special varies greatly in the air as far as I can tell when the requirement was two.

Total: 22
Rychu's making progress in training Shabeel's skill, but still needs some refinement in covering his weakness and options.


Jecht
Smady Smady

Creativity: 7
Jecht enters week 3 with a new magical arsenal thanks to Waterga and Drunk Magic, as well as a rather interesting Up B that has multiple uses. In fact the running theme here seems to be all his specials having varied, controllable angles and inputs which is rather nice and cohesive.

He also seems rather spacing/zoning heavy given he has 1 super projectile in Blitzball, Waterga is a pseudo-projectile that more or less dominates space more than actually attacks, and Drunk Magic also crates mini projectiles that are varied in use and can turn Waterga into an attack. These all appear to have powerful zoning effects while Jecht himself is still incredibly fast movement wise, something I mentioned last time.

Up B is cool with how it has "upside down" inputs though, which is a rather simple but unique quirk. However that seems to only effect the Lightning Down B since it will go up instead of down, and popping the foe upwards won't help much if he goes to free fall right after, unable to follow up! I hope more is done with this, but as is he can't seem to do aerials or anything from it.

Overall I like the ideas presented but I fear they are either in contrast with one another or somewhat downplayed naturally.

Practicality: 5
Despite my gripes with some of the creativity, I don't have much to say on the practical side.

Waterga uncharged seems kind of awful since it is so small. Like, it could slow somebody down but not really? By the time a target is slowed down by it they would probably already have passed through it. Granted tossing it out for the eventual "pop" hitbox downward would be nice and his other tools of Zoning with Blitzball + Speed can afford him space to send out charged versions, its just something I noticed. Speaking of it traveling, you say it moves at Mario's Walk for 10-14 seconds. It would be nice to also give a guestimate of the distance that covers as well. From what I can visualize, Mario could probably walk across FD within 10 seconds if not more distance? I do enjoy the eventual "Pop" this has as sending it towards a ledge and pressuring a foe to that end to try for the gimp, or just setting it off a ledge to limit ledge options both feel really tricky and fun, and probably the best options for the move as the foe will need to go through it in such a situation + it makes the best use of the gimping property. The FLUDD power straight down isn't even that bad considering the amount of time needed for it to occur, plenty of time to work around it.

Down B spells are all neat though the control scheme is a bit odd. Does he do the "face cover" pose, then only act after a direction is pressed? A bit more explanation on this move overall would be appreciated I think, as the specific are kind of vague. Like, the duration of the steam is not mentioned which would be important for Fire. The way Lightning actually shoots (is it like Pikachu in a solid bolt, a projectiles from the ground?). And Ice seems like it juts out of but also goes into Waterga spheres? It hurts the visualization a bit here as well as the practicality. Like, if the steam only lasts 1 second, Fire would only do a max of 8% and waste a Waterga. Water does more naturally and even move in a Waterga without destroying it. Ice hits just as hard and have better hitboxes, and Lightning also doesn't destroy the Waterga and also has a better angle. Worse yet though is that all of these are then outclassed by the Blitzball anyways as it deals 10-14%, has epic range, hits once going out and once on the rebound, and can be spammed rather quickly. Why go for these spells when he can just hang back and angle Blitzballs safely while the foe has to maneuver around a Waterga? The only ones I could see are Ice and Lightning since they hit in ways the Blitzball cannot, but even then Ice is slow and hitting Lightning seems inferior to an angled Blitz shot.

Up B is also a bit odd in that it does not naturally combo or ledge grab, but I suppose it is a decent weakness given this guy would have insane stage presence and the ability to refresh his jumps with Waterga. Even then he only gets one shot at that when airborne.

Execution: 9
Smady got the following criteria down:

Neutral B: Direct Attack, Chargeable, Alternate Input
Down B: Direct Attack, Alternate Input,
Side B: Create Entity, Alternate Input, Tie into Mechanic, Place Effect, Aid in Recovery
Up B: Aid in Recovery, Alternate Input


You hit each criteria this week but I am a bit disappointed that you only did the minimum requirements.


Total: 21
Jecht has some cool ideas but he still has the inherit problem of being a zoner with incredible movement. Something that could be balanced via absolutely awful recovery, but what is a big letdown is how Down B seems to be sort of pointless when he can just keep pelting Blitzballs for more effect rather than try and cast spells that may or may not 1) be as effective as a ball, and 2) be counter-productive to his Waterga game play at times.


Metireon
ForwardArrow ForwardArrow

Creativity: 10
Metireon is fleshed out significantly this week with a great deal of interesting effects and characterization in each move. The nerfs to neutral B are appreciated on both ends, and the way the clouds linger atop the goop from Side B and his general damage output make his pacts with the demon Yldretch delightfully frightening for both yourself and others. Especially with the Down B putting that up to 11!

Of special note is the Up B which also carries with it some themes of how he can't really escape the Monolith now that he is bonded to it. He tries to toss it, and Yldretch simply grabs him back making for a cool effect and great moment of characterization. Its also a really novel recovery in general as you don't often see a projectile -> go to where it lands too often, let alone in a tether format that can be influenced by everyone in the match.

Speaking of, it is fitting that he has a really good recovery given all the pain he causes to himself. All his moves could potentially aid here too as the Momentum Mechanic can boost him any which way as long as he angles himself just right with an explosion / etc. Though I still think the max charge Neutral B explosion is sort of absurd, though the gambit here is that you really cannot avoid it either since it will envelop you entirely, avoiding the blocking of the Monolith. One of those high risk/high reward moves that you can at least "suicide" with if you have a lead.

Practicality: 8
Met is hard to pin here, but overall I think the fact that he is so combo-able alongside the self damage and what I would guess to be bad frame data here and there offset the immense power he possesses. That said there are a few points that stick out.

Firstly, does Up B go into freefall? You mention that he snaps to the Monolith's location, but then don't say what happens afterwards. Does he go to freefall? Simply cannot do it again until he touches ground? This is a crucial detail given how powerful the recovery is. On that note, the shield damage both here and on Side B I think may be a bit overkill given he can just Neutral B to nuke a shield + passive shield damage from being in the clouds, but that is more a nitpick as this guy you probably would shield sparingly anyways given the damage output.

Also, how does the Down B Cloud interaction work exactly? You mention you can super-charge a cloud that would have dealt 20%+, but is this by simply being in it while Down b is active or by exploding inside of it? Down B also probably charges pretty damn quickly given that his damage per move is so high naturally. 5% guaranteed means that just 6 swings is a max charge, and even a 10% move would add 2% per swing, and his other attacks range from the teens/twenties to 392874239486%+ with Neutral B's spray. It may actually be a bit too powerful when all said and done!

Execution: 10

FA got the following criteria down:

Neutral B: Create Entity, Aid in Recovery, Direct Attack
Down B: Direct Attack, Stance Change
Side B: Tie into Mechanic, Place Effect, Chargeable, Aerial Difference, Direct Attack, Sweet/Sour
Up B: Aerial Difference, Direct Attack, Aid in Recovery, Sweet/Sour


You hit each criteria this week, and as a side effect every move here can probably "Tie into Mechanic" since Metireon has one of those "always on" ones.


Total: 28
Metireon has made a huge improvement here with the edits to Neutral B and addition of other moves, very nicely fitting the character and delicately balanced where both he and the foe risk demonic annihilation in each match he enters.


WEEK 4 - 5:
PUTTING IT TOGETHER

After the specials of course comes the rest of the moveset, and for that we are granting Two Weeks! Of course by now ideas must be buzzing in your heads, but be prepared to adapt to the challenge as another set of criteria must be met. Wouldn't be much of a challenge if these weren't included, no?

At least one Standard must be both Angle-able, and Vary Based on the Angle in a significant way. Either vastly different hit properties, or even slightly different moves (kick vs punch, etc).

At least one Aerial must include a Landing hitbox. Pretty self explanatory, but the landing portion can be done any multitude of ways.

At least one Smash must include a New Effect on when Fully Charged. This is open to interpretation of course, but it must be "binary" in that it is all or nothing for the effect!

At least one Throw must have an Alternate Use/Input. Firstly, those who have major Stance Changes like Blade/Beam mode do not count here, there must be either a condition or alternate press that makes the throw(s) differ.

At least one Taunt must have a Special/Secret Effect. Whether it be a hitbox, a combination of taunts for a super secret taunt, the ability to taunt on the hit of a certain attack or otherwise, be sure to include these for characterization!

These criteria are more lenient than last week's, but remember there are none that you can skip!

Also, during this time the entrants who have dropped out in prior weeks are free to work on and submit their entries as sets.

Good luck and Have Fun!
 
Last edited:

FrozenRoy

Smash Lord
Joined
Apr 26, 2007
Messages
1,261
Location
Las Vegas, Nevada
Switch FC
SW-1325-2408-7513
An important Iron MYMer announcement!

The Iron MYmer this month ended up being close to the theme of Joe's MYMini. Because of this, plenty of people have entered it, yet it is planning to run over the Iron MYMer count. Due to the MYMini's success and the fact that it fits the criteria so well, all MYMini sets finished during it will qualify for this month's Iron MYMer.

Furthermore, they will not count for your entry this month, allowing you to enter two: One from the MYMini, one not related to it.

Please enjoy creating movesets and have a happy day!
 

Davidk92

Smash Cadet
Joined
Aug 28, 2016
Messages
49
Did this one as a gift to my cousin, who had supported my movesets from the start. Then again, I'm not exactly happy with it; I tried to follow the advice I've gotten so far, but a lot of places you can quite clearly see where I sort of gave up. It doesn't help that there's not a lot of pictures or gif of Van Helsing IN ACTION. I also cut down on some of the flavour that I do, and I'm debating canning the whole flavour section all together.

I'm posting it here now because I want to show him it tomorrow, but I may revisit it in the future, as I'm just not satisfied with it.


Van Helsing Is On The Hunt!

"Vampires, gargoyles, warlocks, they're all the same - best when cooked well."

Debut: Dracula (literature, 1897)
Emblem: The dragon emblem on Van Helsing's ring (http://tinyurl.com/zzup98v)
Homestage: London Rooftops (England)
Unlock Message: Some call him murderer, some call him holyman. Van Helsing is here to vanquish evil!
Boxing Ring Title: The Left Hand of God

Let's see... rings of garlic, holy water, silver stake, crucifix... still no Gatling gun, sadly.

Van Helsing is the man who traded blows with Dracula himself, the bane of the night, THE vampire hunter. A supporting character in the original book by Bram Stoker, Abraham van Helsing assisted the heroes with his intricate knowledge of the supernatural in the fight against Dracula. Since then, Van Helsing has become tied to the mythos, often appearing as an enemy to the lord of the night.

In the original novel, Van Helsing was an aging professor who's aging body forced him into a mentor position while the younger members of the group handled the actual fighting. This version is based on Gabriel Van Helsing, the title character from the 2004 movie bearing the hunter's name as portrayed by Hugh Jackman, and as such is far more adept at holding his own; he would later appear in the animated prequel movie, Van Helsing: The London Assignment. Armed with his signature automatic crossbow, spinning blades, twin revolvers and many other vampire hunting tools, Van Helsing is ready to show why he's Dracula's famed rival.

Stats (out of 10) & Mechanics
Weight: *******
Size: ******
Ground Speed: ***
Air Speed: ********
Fall Speed: ****

Jumps: 2
Wall Jump: Yes
Wall Cling: Yes
Crawl: No

In the film, Van Helsing demonstrates considerable mid-air proficiency, from swinging around Notre Dame cathedral with his grappling hook while battling Mister Hyde to using the power of his curse (see his Final Smash) to leap and climb sheer surfaces. When he is not leaping through the air himself, he is battling opponents who are with his ranged weaponry. As such, Van Helsing has incredible proficiency in the air despite his size and weight, yet is fairly slow and deliberate on the ground. He stands at a height matching Ike and, much like Link, has a high weight due to the many weapons he carries in his bag. Despite his apparent love of mid-air battle, Van Helsing is still a regular human and only has the ability to jump twice, though in the prequel film he demonstrates the ability to cling to walls using a metal claw.

Specials

B: Repeater Crossbow.
Van Helsing kneels down, similar to Link when performing his B, and aims his crossbow forward. There's 0.5 second of lag as the bow whines, before it unleashes a hail of arrows dead ahead. The arrows each hit for 1% damage, however they strike so fast that the damage easily racks up, and the opponent can easily become trapped by the multihitting attack much like Ness's PK Fire; if an opponent is caught, the damage quickly piles up at roughly 4% damage per second. While holding the B button, moving the analog stick will cause Van Helsing to alter his aim, giving him full 180 degree range from the front, back and above. However, the arrows cannot pass through any target, whether it's terrain, platforms, or the opponent. In addition, the arrows can only fire for a maximum of five seconds before the ammo canister runs dry; upon doing so, there is an additional second of end lag as Van Helsing pops out the empty canister and replaces it with one from his pack. Finally, the B button must be held throughout the move, so simply tapping the B button will cause Van Helsing to cancel the move mid-startup without firing any arrows, which is only useful as a feint.

If performed in the air, Van Helsing will automatically fire downwards at a 45 degree angle. However, the aiming ability remains, and as such Van Helsing can aim in full 360 degrees.

Custom 1: Holy Crossbow.
Similar to Repeater Crossbow, however the B button does not need to be held down nor is there any startup. Instead, once the button is tapped Van Helsing releases a burst of arrows in a spread pattern, each arrow doing 3% Magic damage. If performed at point blank range, the attack does 15% Magic damage instead. Van Helsing loses the ability to aim his shots.

Custom 2: Sniper Crossbow.
Unlike Repeater Crossbow, this move does not fire a flurry of arrows so long as the button is held; instead, it release a single arrow once the button is let go. The arrow moves EXTREMELY fast, to the point it's not a true projectile at all: the move uses hitscan. Once the button is released, there is 0.1 second of lag before an arrow hits whatever is in that direction. If that is an opponent, they take 3% damage and flinch, regardless of what they were doing. Like the other moves, the arrows have infinite range but do not pass through any terain or platforms.

B>: Sunlight Grenade.
Van Helsing produces a small glass ball filled with a strange green liquid and hurls it in an arc forward half the distance of Final Destination. Upon contact with either the ground, an enemy, or a projectile, the ball explodes, releasing a blinding flash of light. For a brief two seconds the entire screen's colours become slightly washed out, as a glowing white ball of light around the size of a floating bumper forms where the grenade exploded. Anyone hit by this light will take 12% Solar damage. Anyone within a Battlefield platform's distance of the light is stunned as if their shield broke; Van Helsing himself is immune to this effect, though upon the grenade exploding he pauses for a split-second to pull his hat over his eyes, interrupting whatever he may have been doing at the time. The ball of light remains for a full second before dissipating.

Custom 1: Holy Water Grenade.
Instead of a green liquid that generates a blinding ball of light, this grenade is filled with blue holy water. Upon striking an opponent, it will splash the water over them, doing 5% damage. If the opponent is a villain in their original series, then this does double the damage, and will add a damage-over-time effect similar to the flower from Lip's Stick.

Custom 2: Infernal Grenade.
The green liquid in this grenade is red, and upon exploding it generates a pillar of fire similar to Ness's PK Fire. This pillar does 15% Fire damage to whomever it hits and burns for a decent three seconds.

B^: Grapple Gun.
Van Helsing whips out a small shotgun-like device, takes aim at the nearest ledge and fires a grappling hook at it. The grappling hook will extend up to three Battlefield Platforms length before it runs out and Van Helsing enters Helpless. If it hits the ledge, Van Helsing is automatically pulled to it and hangs on. If there are no ledges nearby, Van Helsing will instead aim for any nearby opponents, who if caught by his grappling hook will suffer 4% damage and Van Helsing will automatically swing from them to as close to the ledge as possible before leaping, entering Helpless.

Custom 1: Grapple Kick.

Instead of prioritising ledges over enemies, Van Helsing prioritises enemies over ledges. The grapple gun's range is cut by half, and instead of swinging he instead pulls himself to the opponent and performs a flying kick, damaging the opponent for 10% damage while putting them into helpless for a full second.

Custom 2: Grapple Stomp.
Both ledges and enemies are prioritised equally, and if an opponent is caught Van Helsing instead pulls the opponent to himself and Footstool Jumps off them.

Bv: Stake Bomb.
Van Helsing squats down and places a home-made bundle of dynamite, absinth and silver stakes. Once he does so, the bomb will remain where it is for three seconds before it explodes, sending the stakes scattering in random directions at extremely high speeds matching Fox's Blaster. Each stake does a heavy 7% damage to anyone struck, and anyone unfortunately enough to get caught in the explosion (1.5x the size of Samus's bombs) will take a nasty 15% Fire damage. Van Helsing himself is not harmed by the stakes or the explosion. If used in the air, Van Helsing will throw the bomb straight downwards, and it will explode upon contact with the ground.

Custom 1: Ignition Bomb.
When the bomb explodes, instead of launching fast stakes in a straight line, it releases fireballs in slow, small arcs, as well as lighting the ground in flames. The fireballs expand on these flames, making a section that deals slow Fire damage to the opponent should they walk through it.

Custom 2: Glacier Bomb.
When the bomb explodes, it manifest a large, jagged wall of ice, dealing 4% Ice damage to whomever it touches and freezing anyone caught in the explosion. The wall can take 20% damage before shattering, and Van Helsing can have up to three of them up at a time.

Smash Attacks

Forward Smash: Tojo Blades.

Van Helsing draws his twin automatic Tojo Blades and charges their spin, before he twirls himself with spinning the blades around him, slashing anyone in range regardless of their position. This does 12%-17% damage and heavy knockback. As stated, the twirling ensures that it doesn't matter where the opponent is attacking from; this attack hits enemies on all sides, including above Van Helsing. If the opponent is running when they are struck by this move, they will pass through Van Helsing before the automatically Tripping behind him.

Up Smash: Silver Bullet.
Van Helsing draws his revolver and aims upwards at a slight angle, before he opens fire with a bullet of silver. As expected of a bullet, it moves extremely fast, much like Bayonetta's bullets, and hits with a heavy 15%-21% Magic damage. While the bullet is the main damage dealer in this attack, anyone hit by Van Helsing's gun will take 6% damage and minor knockback with deceptively high stun. The bullet, as with Van Helsing's arrows, has infinite range.

Down Smash: Crucifix.

Van Helsing draws his crucifix and thrust it forward, and anyone struck by it will take 10% damage and below average knockback for a Smash attack. However, if the opponent is a villain in their original series, then the crucifix will burst into flames, doing double damage in the form of Magic damage to the opponent.

Standard Attacks

AAA Jab: Crossbow Crash.
Van Helsing starts by stepping forward and thrusting his crossbow forward, before leaning back and thrusting the butt of it at the opponent, then finishing by bringing the crossbow down in a hefty swing. This move does 5%-4%-7% damage, with little to no knockback until the final swing. Additionally, while the initial thrust comes out quick, there is longer than average lag between each move that makes this combo easy to punish. While it is there for a possible last resort or keep the opponent at bay, the player should not be relying on Van Helsing's basic combo.

Dash Attack: Flying Bullets.

As Van Helsing runs, he leaps forwards and spins in the air, drawing his twin revolvers and firing three shots behind him. Upon hitting the ground, he will roll and retain his momentum to continue running. The bullets each do 1% damage, but they have priority over other attacks and use hitscan, giving them great stopping power. Unlike many other Dash Attacks, this move does nothing if the opponent is in front of a running Van Helsing and does not lose momentum while using it, making this more an option for fleeing the opponent.

Forward Tilt: Flying Tojo.
Van Helsing draws one of his Tojo Blades and hurls it forward a distance equal to Din's Fire's maximum length after a 0.2 second lag. While lacking the infinite range of Van Helsing's arrows and guns, the blade is a large target that can easily strike the opponent for 4% damage and knocks them back half a Battlefield Platform distance regardless of damage percentage; if the opponent where to hit a wall of any kind during this knockback, the blade will in fact pin them to the surface, which acts much like if they had been Buried by a Pitfall or DK's Headbutt. During the lag where Van Helsing prepares to throw it, tilting up or down will cause Van Helsing to throw the blade at those angles.

Up Tilt: Shotgun Gunshot.
Van Helsing draws his shotgun, ***** it, and immediately fires directly upwards. This move has a range of two Battlefield Platforms and uses hitscan, doing 6% damage and instantly puts whoever is hit into helpless. Pressing A again immediately after the initial shot will cause Van Helsing to alter the angle of his aim, pointing his gun slightly to the side before firing again. The A button can be pressed again to perform a third shot on the opposite side before Van Helsing autmatically ends the move. In total, the three shots take about a full second to perform.

Down Tilt: Holy Water.
Van Helsing produces a bottle of holy water and hurls it down onto the ground, the glass shards flying in all directions and striking anyone within two Bowser widths of him for 2% damage each. The holy water left behind also acts as a trap, forming a puddle that opponents will automatically Trip on, while also doing 4% Magic damage if the character in question was a villain in their own series.

Aerial Attacks

Neutral Aerial: Tojo Slice.
In the air, Van Helsing swings his whirring Tojo Blade downwards at an angle, nicely slicing through anyone nearby for 7% damage. This move has a wide hitbox, allowing Van Helsing to strike virtually anyone that is coming up from below and in front, the sweep of his Tojo cleaving through his opponents to take out many at a time.

Forward Aerial: Air Fire.
Van Helsing draws his pistols and proceeds to fire rapidly, launching 5 hitscan bullets from each at 1% damage, doing a total of 10% damage if all hit. There is a very brief start-up lag, as Van Helsing automatically aims forward; tilting up and down on the analog stick during this period can allow Van Helsing to aim diagonally down at the ground or upwards at higher opponents.

Back Aerial: Trick Shot.
Van Helsing produces his shot gun and aim it behind him, pulling the trigger. The hitscan blast from this hits two Battlefield Platforms directly behind him for 8% damage, while also propelling Van Helsing half a Battlefield Platform forward.

Up Aerial: Praise The Lord.
Van Helsing produces his crucifix and thrusts it into the air, doing 7% damge to whoever he stricks. This has Sex Kick-style properties as he keeps the cross raised so long as the A button is held until he hits the ground, allowing it to strike anyone who runs into it, but it is raised into the air as opposed to extended down or to the side.

Down Aerial: Silver Stake Plummet.
Van Helsing suddenly drops straight down to the ground, drawing his Silver Stake and plunging it into the opponent. The move has extremely short range and a very small hitbox consisting of the tipof the stake, but the move does a high 12% damage on par with some Smash attacks, with the knockback to match. However, the main use of this move is it subverts Van Helsing's usual low fall speed, allowing him to instantly drop to the ground if need be.

Grab Attacks

Grab & Pummel:
Van Helsing whips out his grapple gun and fires it half a Battlefield Platform ahead, grabbing anyone in that range and pulling them forward. Unlike many grab moves, tilting the analog stick while pressing the button will cause Van Helsing to fire his gun in that direction, letting him snag enemies above or behind him. Once snagged, the opponent is pulled close and Van Helsing grips them by the throat. His Pummel involves slamming the butt of his grapple gun against their head, doing 2% damage with each smack.

Forward Throw: Pull The Trigger.
Van Helsing places the barrel of his shotgun against the opponent'stomach and pulls the trigger, blowing them back. Unlike most throws this does very high horizontal knockback but no vertical knockback, simply blasting the opponent a fair distance away.

Back Throw: Up And Pull.
Van Helsing rams his crossbow into the opponent's stomach, doing 1% damage, then hurls them over his shoulder before he takes aim and fires an arrow, doing an additional 5%. Due to the fact the second hit is a projectile, this can be intercepted by other opponents and limit the damage if they choose.

Up Throw: Tojo Strike.
Van Helsing throws the opponent in the air before jamming his spinning Tojo blade into their chest, their damage rapidly increasing by 7% before they are launched into the air.

Down Throw: Stake To The Heart.
Van Helsing slams the opponent onto the ground for 2% damage, then slams his silver stake through their heart for an additional 8% damage. Rather then sending an opponent flying, this paralyzes and leaves them prone for half a second before they can get back up, giving Van Helsing time to flee.

Final Smash: Curse of the Werewolf.

"Even a man who is pure in heart and says his prayers by night may become a wolf when the wolfbane blooms and the autumn moon is bright."
Van Helsing doubles over in pain as a full moon is superimposed over him and the sound of a clock chiming can be heard. His body transforms, his flesh tearing to unveil his werewolf form.

As a werewolf, Van Helsing stands at 1.5x Ganondorf's height and his speed matches that of Fox's while he becomes immune to knockback and all damage down to him is halved. In this form, Van Helsing loses access to his movement aside from four attacks:
-AAA, which is now three swift swipes of his claws that deal 10%-12%-14% damage.
-Dash Attack, which is now a pounce two Battlefield Platforms ahead that, if Van Helsing catches anyone, he sinks his teeth into their neck for a vicious 15% damage.
-Neutral Aerial, which is now a tearing motion with both claws, doing 14% damage.
-B, which is now a mighty howl that stuns anyone within half a Battlefield Platform near.

With the immense speed and strength that this form grants, Van Helsing can easily steamroll through his opponents and rack up serious damage if he is allowed to. He remains in this form for 12 seconds, one for each chime of midnight.

Playstyle - Vampire Hunter

As mentioned in the Stats section, Van Helsing spent a lot of time in the movie either fighting in the air or against mid-air opponents. As such, his game moveset is based heavily around being an anti-air artillery machine on the ground while being at the same time being an aerial menace.

While on the ground, Van Helsing's moveset is based around projectiles and controlling airspace. His basic B move has the ability to aim at absolutely anywhere above him, letting him pelt both on-coming and aerial foes with his arrows, while his B down can serve as a trap to damage grounded and flying opponents alike. His Up Tilt, Up Smash and Forward Tilt all use projectiles that can be used to strike the air no matter how high the opponent is, with the Forward Tilt's controllable aim and the Up Tilt's triple shot giving complete control of the area above Van Helsing. His B^ meanwhile can also serve to actually grab an opponent out of the air and lift Van Helsing himself up to their level.

In the air, Van Helsing's high jumps and low falling speed give him plenty of time to act. Much like many of his ground moves can be aimed into the sky, his Forward Aerial can be aimed downward to bombard the enemy from the air. His Neutral Aerial serves as a keep away measure, while his Back Aerial can not only blast away enemies behind but also propels Van Helsing forward, assisting recovery. If an opponent can somehow get above Van Helsing, his Forward and Up Aerials can deal with that. And should he need to switch to his ground mode, his Down Aerial cancels his slow fall and drops him straight down.

Despite all this, Van Helsing is not a good choice for close combat as his AAA Jab demonstrates, hence his reliance on his projectiles. His Dash Attack is designed to strike while fleeing, and his B>, Bv and Down Tilt setting traps for the opponent. If you intend to do meet the opponent on the ground, you must keep your distance and rely on Van Helsing's many projectiles. His grabs are good ways of forcing a close range opponent back, with his Down Grab in particular good for buying time while his others simply blast them as far away as possible.

When using his Final Smash, the dynamic is reversed. With no projectile moves, high defence, immunity to knockback and overwhelming damage potential, the name of the game changes to being as fast and aggressive as possible, getting in close to opponents and mauling them with the werewolf's powerful attacks. Wise opponents will do all they can to keep the werewolf away for the 12 seconds. As a werewolf, you have to ignore your own safety and focus on crushing your opponents!

Flavour

Entrance: Van Helsing comes riding in on a horse, leaping off as it passed the stage and runs off before he enters his idle stance.
Idle Stance: Van Helsing stands straight, cradling his crossbow in his arms as the wind whips his trenchcoat.
Idle Animations:
-Van Helsing reaches up to adjust his scarf and turtleneck.
-Van Helsing looks at his crossbow, revving it slightly to make sure it still works.
-Van Helsing rolls his shouldrs slightly.

Walk Animation: Van Helsing calmly saunters forward, unintimidated.
Run Animation: Van Helsing leans forward, holding his crossbow to his chest as he sprints as fast as he can.
Jump/Double Jump Animation: Van Helsing leaps into the air, before kicking his legs beneath him to leap even higher.
Guard Animation: Van Helsing places one hand on his hat as he crosses his crossbow in front of him.

Kirby hat: Kirby gains a wide-brimmed hat, resembling a grey version of his Whip hat, and the ability to use Van Helsing's Repeater Crossbow.

Alternate Colours:
1. Vampire Slayer - Black hat, trenchcoat and vest, dark grey trousers.
2. Gypsy Saviour - Black hat, dark red trenchcoat, white vest, black trousers.
3. Holy Training - Greenish-grey hat and vest, brownish-grey trenchcoat and trousers.
4. Unholy Life - Brown hat and trousers, greenish-brown trenchcoat, grey vest, greenish skin.
5. Give In To Temptation - Jet black hat, trenchcoat, vest and trousers, pale skin, red eyes.
6. Holyman or Murderer? - Bright red hat and trenchcoat, gold vest, white trousers.
7. Masquerade Ball - http://www.thecollectorzone.com/images/products/2482_l.jpg

Taunts:
1. Van Helsing lowers his crossbow and performs the sign of the cross with one hand.
2. Van Helsing produces a bottle of absinthe and takes a small swig of it.
3. Van Helsing releases the ammo barrel on his crossbow and replaces it.

Victory Theme: An instrumental similar to 1:49 to 1:53 - https://www.youtube.com/watch?v=9hpb60-TVvM
Winposes:
1. Van Helsing calmly places his hat on his head and pulls his turtleneck over his face, his horse running by as he grabs and leaps onto it, riding off.
2. Van Helsing chuckles and places his crossbow on his shoulder, Carl at his side and the wander off, chatting.
3. Van Helsing places his crossbow down and leans on it, performing the sign of the cross with his spare hand.
Losepose: Van Helsing calmly claps, nodding in appreciation of the victor.
 

Slavic

Ask not the sparrow how the eagle soars
Joined
Jun 5, 2013
Messages
757
Location
taco bell, probablyn't
arr, Platonic Solid
Munomario777
Ahoy! Muno set spotted ahead, comments aweigh! Tetra has some swarthy in-smash moves, and the Specials lay out the foundations to a great ship for the pirate lass to build off of. The barrels are multi-function, and carry the weight o’ the set on its rum-stained shoulders. Stavin’ off the rigors of the ocean and of enemy attacks, while still givin’ Tetra the mobility of a young sloop on the sea. She can toss the barrel around like she were some kind o’ sea monkey, or capure her foes underneath the barrel. The barrel serves as an anchor, allowin’ Tetra to hook onto it with her Grappling Hook from all across the stage, and like any good barrel, it magically fills with gunpowder when not in use, turnin’ it into a veritable bomb. Speakin’ o’ bombs, Tetra’s Up Special, true to ‘er reckless pirate nature, has her detonate a bomb directly under her. Her Side Special be the aforementioned Grappling Hook, allowin’ her to reel opponents in on land or by sky, giving her some leverage o’er her foes. Finally, her Neutral Special is a pistol, a single shooter which launches a powerful shot, and can be coordinated with any of her moves. The reload on its own makes sense, but is unfortunately placed as the startup for the next shot. This means that Tetra has a slow-firing pistol, easy to work around once it be fired once. A better place for the reload would be on the tailend of each use, so she can ambush her foes with a fast-firing flintlock at any time, rather than reloading after usin’ an attack. Other Specials feel less developed, outside o’ the barrel o’ fun, and more interactions with the grapplin’ hook and sailcloth, allowing Tetra to drag herself around in the sky a la Just Cause, or give ‘er the ability to drop a bomb if she prefer.

In her Standards, Tetra starts to flounder, though given that this be a one day set, and by necessity via Iron MYMer they most needed to use her cutlass, one can see how this happened. The most riveting o’ these standards be the Forward Tilt, a Dancin’ Blades type move keyed onto a Standard instead, and addin’ these combos to more o’ the standard moveset would have improved the set a good deal. The pistol is supposed to enrich the standard moveset, but the two-thirds o’ a second of added lag each time the pistol is used to reload means that Tetra must possess some extrasensory prediction to make the gun a big asset to her set. Even the non-sword moves fall flat, such as the Down Smash or the Back Air, and more development on them would help boost this set to new heights.

Papyrus
Davidk92
I think I’ve seen this character before one time, but it feels extremely distant and from a dream, so maybe it was during an ill phase, but I digress. Starting with the two mechanics that Lewis has, they both seem more designed for characterization than balance, and while I think the golden heart mechanic could be fixed up and made viable, I think the Ghost Rider hair mechanic should just go. For balancing the golden heart, I would make it so some aspect of Lewis is very strong, or at least stronger than normal; a latent damage or knockback resistance, for instance, which means the only effective way to deal with him is by targeting the heart, otherwise it is just a weakness for no good reason, and I’m typically not a fan of that. Losing access or power on Specials and Smashes just punishes the player for using them, and doesn’t add anything depth or balance-wise to Lewis’ playstyle, and would just serve to frustrate players in the long run.

Speaking of the Specials, it becomes obvious why this handicap for Lewis would exist, as he’s given an incredibly fast, easy to hit projectile which deals a whole 25% damage at the cost of his heart being easier to hit for the duration of the move. A better way to balance would simply be to lower the damage of Dead Beat so you don’t have to punish the player for using such a strong move. Freaking Out I have the same sort of commentary for, simply that making ludicrously powerful moves and then making them hard to hit and the player getting punished by having no access to other Specials for a period of time is almost a wasted input. You compare it to Warcon Punch, but neither Falcon nor Dorf lose access to their other Specials if they miss, and Ganondorf can afford to miss; if he gets hit, he’ll likely survive, but if Lewis is hit on a miss, he has almost as low weight as Jigglypuff and can easily be KO’d. Haunting Flight is a simple move, but actually is fairly good; it’s not an exceptionally effective recovery but it is strong and a good move, and I would be content with it as is. Haunted Painting has potential, but forced stun in sets is generally unpleasant and not fun to play against; turning the painting into a remote command grab would be much cooler, and be more fun to work against. Lewis’ Standards, Samshes, Grabs, and Aerials are all fairly generic and don’t have a lot of meat on them bones, so I think working towards adding detail and playstyle to these moves would also help to raise the quality of the set. All in all, a good starting point for setbuilding, but takes balance in the wrong direction and could use more detail.

Van Helsing Ultimate
Davidk92
As a follow up to Lewis, Helsing has a few recurring issues that were seen, especially with numbers. Luckily, numerical issues can be the easiest to fix, and with the repeating crossbow, we see that it takes a whole second to reload a crossbow, when part of the draw of a crossbow is that it is quick to reload compared to notching an arrow. Even fractions of a second can be detrimental, and I feel that’s a more appropriate time frame for reloading. I like the idea of the Sunlight Grenade but there are two issues I’d like to talk about, both of which are relevant to Lewis as well. First, the moves in these sets tend to be tagged with Elemental markers, such as Dark or the odd Solar type energy. I could be wrong, but as far as I know these markers in Smash were only used for SSE sticker boosts, and don’t add much context for why it matters in the set. However, it doesn’t take away from the set either, so it’s not an incriminating thing. However, once again we see forced stun on opponents, with a pretty hefty range, and that tends to just dumb down the action for a period of time, and I think just standard damage would be good here. The Up Special isn’t terrible, but Smash 4 did make an effort to remove tether recoveries as Up Specials, seen with ZSamus and Olimar, as this dooms many characters off stage unfairly, especially given that Van Helsing should be proficient in the air. I am actually a fan of the Stake Bomb (delicious?), and it works for characterization and stage control, and is probably my favorite of the Specials.

The Smashes have some issues, like forced tripping on a Smash or, tragically, dealing double damage on “villainous” characters. It’s a weird characterization thing, and it comes up a couple of times throughout the set, but I would avoid arbitrary characterization of other characters like that. The Standards need more development still, and I ultimately think that, between the two, Lewis is a better set, but they’re both moving towards better development of the individual moves and the formation of a playstyle, so keep it up! A good foundation between these two sets.
 
Last edited:

Davidk92

Smash Cadet
Joined
Aug 28, 2016
Messages
49
Papyrus
Davidk92
I think I’ve seen this character before one time, but it feels extremely distant and from a dream, so maybe it was during an ill phase, but I digress. Starting with the two mechanics that Lewis has, they both seem more designed for characterization than balance, and while I think the golden heart mechanic could be fixed up and made viable, I think the Ghost Rider hair mechanic should just go. For balancing the golden heart, I would make it so some aspect of Lewis is very strong, or at least stronger than normal; a latent damage or knockback resistance, for instance, which means the only effective way to deal with him is by targeting the heart, otherwise it is just a weakness for no good reason, and I’m typically not a fan of that. Losing access or power on Specials and Smashes just punishes the player for using them, and doesn’t add anything depth or balance-wise to Lewis’ playstyle, and would just serve to frustrate players in the long run.

Speaking of the Specials, it becomes obvious why this handicap for Lewis would exist, as he’s given an incredibly fast, easy to hit projectile which deals a whole 25% damage at the cost of his heart being easier to hit for the duration of the move. A better way to balance would simply be to lower the damage of Dead Beat so you don’t have to punish the player for using such a strong move. Freaking Out I have the same sort of commentary for, simply that making ludicrously powerful moves and then making them hard to hit and the player getting punished by having no access to other Specials for a period of time is almost a wasted input. You compare it to Warcon Punch, but neither Falcon nor Dorf lose access to their other Specials if they miss, and Ganondorf can afford to miss; if he gets hit, he’ll likely survive, but if Lewis is hit on a miss, he has almost as low weight as Jigglypuff and can easily be KO’d. Haunting Flight is a simple move, but actually is fairly good; it’s not an exceptionally effective recovery but it is strong and a good move, and I would be content with it as is. Haunted Painting has potential, but forced stun in sets is generally unpleasant and not fun to play against; turning the painting into a remote command grab would be much cooler, and be more fun to work against. Lewis’ Standards, Samshes, Grabs, and Aerials are all fairly generic and don’t have a lot of meat on them bones, so I think working towards adding detail and playstyle to these moves would also help to raise the quality of the set. All in all, a good starting point for setbuilding, but takes balance in the wrong direction and could use more detail.

Van Helsing Ultimate
Davidk92
As a follow up to Lewis, Helsing has a few recurring issues that were seen, especially with numbers. Luckily, numerical issues can be the easiest to fix, and with the repeating crossbow, we see that it takes a whole second to reload a crossbow, when part of the draw of a crossbow is that it is quick to reload compared to notching an arrow. Even fractions of a second can be detrimental, and I feel that’s a more appropriate time frame for reloading. I like the idea of the Sunlight Grenade but there are two issues I’d like to talk about, both of which are relevant to Lewis as well. First, the moves in these sets tend to be tagged with Elemental markers, such as Dark or the odd Solar type energy. I could be wrong, but as far as I know these markers in Smash were only used for SSE sticker boosts, and don’t add much context for why it matters in the set. However, it doesn’t take away from the set either, so it’s not an incriminating thing. However, once again we see forced stun on opponents, with a pretty hefty range, and that tends to just dumb down the action for a period of time, and I think just standard damage would be good here. The Up Special isn’t terrible, but Smash 4 did make an effort to remove tether recoveries as Up Specials, seen with ZSamus and Olimar, as this dooms many characters off stage unfairly, especially given that Van Helsing should be proficient in the air. I am actually a fan of the Stake Bomb (delicious?), and it works for characterization and stage control, and is probably my favorite of the Specials.

The Smashes have some issues, like forced tripping on a Smash or, tragically, dealing double damage on “villainous” characters. It’s a weird characterization thing, and it comes up a couple of times throughout the set, but I would avoid arbitrary characterization of other characters like that. The Standards need more development still, and I ultimately think that, between the two, Lewis is a better set, but they’re both moving towards better development of the individual moves and the formation of a playstyle, so keep it up! A good foundation between these two sets.
Thank you for the feedback.

I've actually been reading movesets from the past MYM, trying to discover exactly what good MYM movesets consist of, and I think I've figured out what I'm doing wrong.

I think my flaw is that I'm focusing on characterisation and implementation, imagining how the characters could be adding into Smash while remaining true to their official characterisation. But as a result, this ends up with many of their moves being generic, much like Lewis, usually with the creativity forced due to it taking a backseat. This is how I've always done movesets, which is what can be seen with my initial version of Laharl. And as a result, I feel that I've completely missed the point of what MYM actually IS, and my movesets are suffering for it as a result.

I'd like to come back to these three movesets in the future. But I'd like to make another moveset, one done purely for MYM in an attempt to make sure that I understand how movesets in this topic should be done.

I've been told both in this topic and during my initial invite that I have a lot of potential, but I don't feel like I'm living up to it. So I want to make sure that I know what I'm doing before I try to fix Laharl, Lewis and Van Helsing.
 

Munomario777

Smash Master
Joined
Nov 18, 2014
Messages
3,253
Location
Charleston, South Carolina
3DS FC
0387-9596-4480
Switch FC
SW-8229-3157-8114
Characterization is definitely a big part of movesets – there's not much point in making a moveset for a character if it's not fitting to their personality, traits, and fighting style. The key is finding a balance of characterization and unique gameplay, finding moves and mechanics which serve both of those purposes. A good idea is one which does not solve only one problem, but one which solves multiple problems at once – this applies to a variety of fields, not just movesetting.

For example, it would be fitting to give K. Rool, a heavyweight fighter, a giant punching attack for his nspec, but that's quite bland. Another option in this example would be to, say, have him hurl a cannonball like the ones from his boss fights as a powerful, bouncing projectile, with tricky movement patterns and the ability for K. Rool to launch it at foes with his attacks. This is still fitting to K. Rool's heavyweight nature – it takes a lot of strength to hurl or launch a cannonball! – but it's also unique in terms of gameplay. Stuff like that really helps make a set stand out and still feel true to the character you're representing.
 
Last edited:

WeirdChillFever

Smash Hero
Joined
Jun 10, 2014
Messages
6,496
Location
Somewhere Out There
Hi guys!

My plans for the contest:
-Finish Ghost Gang by revamping the NSpec, adding personalities and removing the Bacura from the grab on top of general stuff like pictures.
-Make the jump to non-gaming characters including Gyro Gearloose and Stanford Pines
-More?
 

Davidk92

Smash Cadet
Joined
Aug 28, 2016
Messages
49
Characterization is definitely a big part of movesets – there's not much point in making a moveset for a character if it's not fitting to their personality, traits, and fighting style. The key is finding a balance of characterization and unique gameplay, finding moves and mechanics which serve both of those purposes. A good idea is one which does not solve only one problem, but one which solves multiple problems at once – this applies to a variety of fields, not just movesetting.

For example, it would be fitting to give K. Rool, a heavyweight fighter, a giant punching attack for his nspec, but that's quite bland. Another option in this example would be to, say, have him hurl a cannonball like the ones from his boss fights as a powerful, bouncing projectile, with tricky movement patterns and the ability for K. Rool to launch it at foes with his attacks. This is still fitting to K. Rool's heavyweight nature – it takes a lot of strength to hurl or launch a cannonball! – but it's also unique in terms of gameplay. Stuff like that really helps make a set stand out and still feel true to the character you're representing.
Which is what I'm getting at. Characterization is important, but for me it was top priority.

As some examples to contrast your K. Rool example, I gave Lewis a fiery punch as a B>. My entire reasoning was "He did a fiery punch in Freaking Out" and that was that. Or with Van Helsing, I watched the movie and then said to myself "So that's how he fights, I'll make a moveset based around that". And I feel this is why my sets aren't as good as they could be.

For my next set, I'm debating actually dropping all my usual additional fluff at least until I get the moves right, then add them in later for a final draft.

Slavic Slavic I meant to address this in my initial post, but according to the Smash Wiki those effects do exist as more than just Sticker boosts; Darkness damage for example is the attacks used by Ganondorf, Mewtwo, and a few other characters that make the opponent flash with purple flames.
 

IvanQuote

Smash Ace
Joined
Apr 7, 2014
Messages
853
Location
Looking for those who like Mighty No 9
NNID
ivanquote
3DS FC
1693-3075-2999
Characterization is definitely a big part of movesets – there's not much point in making a moveset for a character if it's not fitting to their personality, traits, and fighting style. The key is finding a balance of characterization and unique gameplay, finding moves and mechanics which serve both of those purposes. A good idea is one which does not solve only one problem, but one which solves multiple problems at once – this applies to a variety of fields, not just movesetting.

For example, it would be fitting to give K. Rool, a heavyweight fighter, a giant punching attack for his nspec, but that's quite bland. Another option in this example would be to, say, have him hurl a cannonball like the ones from his boss fights as a powerful, bouncing projectile, with tricky movement patterns and the ability for K. Rool to launch it at foes with his attacks. This is still fitting to K. Rool's heavyweight nature – it takes a lot of strength to hurl or launch a cannonball! – but it's also unique in terms of gameplay. Stuff like that really helps make a set stand out and still feel true to the character you're representing.
I've noticed that my main problem is that I can think of a unique and fun tone/set of animations for my characters' attacks, but I have trouble thinking of move properties and how the moves link together to make a cohesive moveset.
 

JamietheAuraUser

Smash Lord
Joined
Jan 11, 2010
Messages
1,196
Location
somewhere west of Unova
Slavic Slavic I meant to address this in my initial post, but according to the Smash Wiki those effects do exist as more than just Sticker boosts; Darkness damage for example is the attacks used by Ganondorf, Mewtwo, and a few other characters that make the opponent flash with purple flames.
They exist, yes, but the damage attributes themselves are ultimately unimportant in most cases aside from the visual effect. What Dr. Slavic was saying is that only in SSE did the damage attribute make any major difference, and this was because there existed stickers that boosted attacks that carried certain damage attributes.

I've noticed that my main problem is that I can think of a unique and fun tone/set of animations for my characters' attacks, but I have trouble thinking of move properties and how the moves link together to make a cohesive moveset.
Something that may help is to not imagine each attack in a vacuum. Instead, try to imagine a sequence of attacks. This may help you make moves that flow together nicely, either through combos and strings or through interaction off of a single primary mechanic. With regards to mechanics, if the setup feels convoluted or choppy to imagine in action, try to simplify the interactions so that they flow more smoothly. I should clarify, however, that "simplify" does not mean "under-elaborate". Indeed, if you spot an edge case, make sure to cover it. Many mechanics with good core concepts in past MYMs have been ruined by simply not providing enough detail for readers to know how they actually work.

Edit: Davidk92 Davidk92 , I would say that some of the problem with your sets so far is that in some cases they try to include gimmicks that wind up tacky. Additionally, stun does not inherently make for good flow. Why do Helsing's shotgun blasts put the foe into helpless fall instead of launching them away? The under-elaboration of knockback on most moves also harms the set's flow, as it makes it difficult to imagine how Helsing wants to move and chain attacks.
 
Last edited:

Altais

Smash Champion
Joined
Nov 14, 2007
Messages
2,083
Location
Starbase, where no turtle has gone before.
Okay, last change to the Gunvolt moveset, with better GIFs. This time, I gave him a LOT more kill options. Since Flash Field is already efficient in building up damage, I figured it would be pointless to give Gunvolt damage-racking aerials. Any productive criticism is appreciated.

[EDIT] Oh dear. Broken image bonanza. If you want to see the Gifs, you'll have to click on the broken image.

Gunvolt Moveset


♦ Index:
1). Jab & Dash
2). Specials
3). Aerials
4). Tilts
5). Smashes
6). Grabs & Throws
7). Final Smash
8). Author's Notes


Summary

Gunvolt is all about speed and evasion. The focus of his playstyle is building up damage as quickly as possible, then move in for the kill.
As a 14 year old warrior, Gunvolt stands at roughly the same height as Pit. Among Fox, Zero Suit Samus, and himself, Gunvolt is the second-fastest runner. His walking speed is half his running speed. Among Roy, Mega Man, and himself, Gunvolt is the second highest jumper, and second fastest faller. As Gunvolt moves, he leaves behind a trail of blue shadow-Gunvolts. When on the ground, jolts of electricity surge from Gunvolt's feet, and along the ground.
Gunvolt's main gimmick is his Electrical Power (EP) gauge. Some of Gunvolt's actions deplete his EP gauge, and one refills it. Gunvolt has a total of 650 EPs. Taking damage will deplete EP. The amount depleted is the % x 10. So if he takes 3% damage, he'll lose 30 EP, and so on. When Gunvolt is not taking damage and is not expending any EP, after two seconds his EP gauge will automatically start to refill, taking roughly four seconds to refill an empty gauge.
If Gunvolt's EP gauge is completely emptied, he will enter Overheat. During Overheat, his gauge will be red instead of blue, and until it refills he will not be able to use any moves that require EP, and the amount of damage he takes from attacks will be multiplied by 1.5. Furthermore, Gunvolt's normal melee attacks will lose their electric effect, thus dealing less damage.
In a nutshell, Gunvolt can make quick work with his opponents, but he himself can be killed very easily. Ergo, just like in his game, Gunvolt's best defense is to not get hit.​


1). Jab & Dash:

Jab (Naga): A non-flinch move. Just like Mega Man, Gunvolt shoots instead of melees with his jab. Gunvolt fires a weak electric round from his pistol, Naga, that sticks to the opponent. Up to three rounds can be stuck to a single opponent, and up to five rounds can be stuck in total, after which the last round that was stuck will disappear. So you have the choice whether to stick multiple opponents, or focus on one or two. Just like Olimar's Pikmin, however, the opponent can un-stick the rounds after enough flailing.
Once an opponent is stickied, Gunvolt can shock them from far away with his Flash Field (see special moves). The radius at which an opponent can be shocked is roughly 3/4 the length of Final Destination.
You can either fire rapidly by repeatedly pressing the special button, or hold down the attack button for a charge shot. The repeated fire rate is very flexible; ranging from steady to rapid. The Naga Pistol charges very quickly, and once it is fully charged, it will fire as soon as the player lets go of the attack button. While the charge is held, Gunvolt can walk, run, and jump. The charge shot can go straight through walls, shields, reflectors, and other solid objects, sticking any opponent it touches. It is also much faster than a normal shot.
The normal shot does 1% damage, travels 8/10 the distance of Final Destinaton, and travels roughly the same speed as Ness's PK Fire. The the charged shot deals 3% damage, and travels twice as fast, but the same distance.
The overall move has immediate startup time, and next to no cooldown.


Dash Attack (Dullahan): Whilst running forward, Gunvolt fires up to three large energy projectiles. Each shot deals 3% damage. The shots have zero knockback, but high hitstun, allowing Gunvolt to close in with a grab. These shots DO NOT stick opponents. Instant startup.


2). Specials:

Neutral Special (Flash Field): A non-flinch attack. Gunvolt surrounds himself in a forcefield of electricity, the radius of which is half his height multiplied by 3. Gunvolt can still move around and use normal attacks while this move is in effect, and it will stay in effect as long as the special button is held. Any opponent within the Flash Field will recieve 1% at a rapid rate. Anyone with a round stuck on them will rapidly recieve 3% damage per bolt. The Flash Field can also completely block physical projectiles--BUT, it will have no effect on energy projectiles. For instance, it can block Samus's missiles or Link's arrows, but Samus's charge laser and Pit's arrows will go right through it. While used in the air, Gunvolt's fall speed will be halved. Whilst this move is in effect, Gunvolt's EP gauge will slowly deplete. Instant startup. Good for recovery, if knocked high above the stage. Flash Field takes roughly 10 seconds to deplete a full EP gauge. REPEAT: All damage inflicted by this move is non-flinching; so even if an opponent is inside the Flash Field, they can still grab or attack Gunvolt--either of which will stop the move.


Side Special (Luxcalibur): Gunvolt's most powerful move. Gunvolt zaps the opponent(s) with a giant sword made of condensed electricity. The length of the sword is Gunvolt's height times 7, and the base of the sword is his height times 2. This move deals 22% damage, and 1.5 times the knockback of Robin's back air. As a price, however, this move will consume half of Gunvolt's total EP. Futhermore, it has a slow start, and a high cooldown. Even worse, it can be shielded--though the shield will shrink significantly. Thus, this move is best used as a trap or an edgeguarder. If this move is used in the air, Gunvolt's descent will be halted, but he will enter helpless frames soon after. Lastly, to prevent abuse, each consecutive use of this move will multiply its EP consumption by 1.5--and obviously, it will stale.


Upward Special (Joule's Anthem): A non-damage move. Gunvolt's spirit sidekick, Joule, appears behind him and sings a note. Immediately after, a firey, rainbowish aura surrounds Gunvolt. For three seconds, Gunvolt will have unlimited air jumps. He will also have unlimited Air-Dashes (see Aerials). Both during and after this move, Gunvolt can still use his normal attacks and his neutral and side special. Using his side-special, however, will terminate the move. As time runs out, Gunvolt's aura will flicker on and off. When the move ends, Joule will disappear. To prevent abuse, if Gunvolt is knocked out of this move, he won't be able to use it again until he either lands or grabs a ledge. Also, each consecutive use of this move will reduce the timer.


Downward Special (Recharge): Gunvolt accelerates his cool-down time, refilling his EP gauge in less than a second. During the move, however, Gunvolt is helpless, so use wisely. This move can only be used on the ground, and cannot be used during Overheat.


3). Aerials:

Air Dash: Gunvolt has a unique aerial mechanic from the rest of the Smash cast. If the player inputs the dash command as they would on the ground, Gunvolt will fly forward. The longer the stick is held foward, the farther Gunvolt will travel. The farthest he can travel is roughly the same distance as Fox's side-special. This move does no damage--rather, its sole purpose is for recovery and evasion. Gunvolt can only use one air-dash before landing, and each consumes 90 EP. No EP = No Air Dashes. If Joule's Athem is in effect, this move will consume no EP. During this move, Gunvolt can still use Flash Field, and can follow up with an aerial or Luxcalibur; however, an aerial attack or Luxcalibur will stop the dash.


Wall-Climb: Like some other fighters, Gunvolt can wall-jump. But unlike others, Gunvolt can also climb walls by repeatedly kicking off them. This is done by pressing the jump button against a wall, with the control stick tilted toward the wall.


Neutral Aerial (Orochi): Gunvolt fires a yellow round. At the same time, a small drone appears above and slightly behind him. Said drone fires seven bolts below him in a half circle--starting in front of Gunvolt, then ending behind him. If the control stick is pressed upward immediately after pressing the attack button, the drone will fire above Gunvolt instead. Instant startup. Each bolt deals 2% damage, and travels the same speed and distance as Naga. If Naga is charged, Gunvolt will use Naga instead of Orochi.


Forward Aerial: With his hand encroached in electricity, Gunvolt slams his open palm down on the opponent, potentially spiking them. The range of the move is from 45 to -45 degrees--the sweetspot being from 45 to 0, the sourspot being from -1 to -45. Quick startup, but small hitbox makes it difficult to land. Sweetspot deals 12% damage, sourspot deals 8% damage. During Overheat, this move will NOT spike, and the damage is divided by 1.5. Great way to finish someone off-stage? Air-Dash toward them and use this move with precision.

Backward Aerial: With his gun pointed downward and free arm across his face, Gunvolt swiftly performs a powerful, electrified pushing kick behind him. The kick goes in a straight line, and can be fast-falled very close to the ground, making it very useful for short enemies. Deals 15% damage. During Overheat, the damage is divided by 1.5, and the knockback significantly reduced. Quick startup. At the centre of Final Destination, this move is guaranteed to kill at 100%.

Upward Aerial: Similar to Falco, Gunvolt backflips, kicking any opponent above him in an arc whilst electrocuting them. Deals 13% damage. During overheat, the damage is divided by 1.5. Instant startup. Can star KO near the ground at high percentages.

Downward Aerial:
Similar to Bayonetta, Gunvolt performs a stall-then-fall drop kick that electrocutes the opponent. When Gunvolt lands, a bolt of lightning explodes from his boot. This move has two hitboxes: the falling hitbox, and the landing hitbox. The falling hitbox deals 10% damage and spikes, and the landing hitbox deals 12% damage and kills at high percentages. During Overheat, the damage is divided by 1.5, and the knockback severely reduced.


4). Tilts:

Forward Tilt (Mizuchi): A reticle appears in front of Gunvolt, and Gunvolt fires at the reticle. After hitting the reticle, the shot homes in on the nearest opponent, sticking them. Only one shot can be fired at a time; Gunvolt won't be able to fire again until the shot either hits or disappears. Deals 2% damage. Same speed and distance as Naga. If Naga is charged, Gunvolt will use Naga instead of Mizuchi.

Upward Tilt: A "get away from me" move. Gunvolt jump-kicks straight upward at a slight diagonal angle, his foot surrounded by electricity. Instant startup. The knockback of this move is strongest at the beginning, and weakest toward the end. At the beginning, this move deals 10% damage. At the end, it deals 7%. During Overheat, the damage is divided by 1.5, and the knockback severely reduced. On Final destination, this move is guaranteed to Star-KO at 100% damage.


Downward Tilt: A "get away from me" move. Gunvolt slides forward like a baseball player, his body surrounded by electricity. Gunvolt goes straight through opponents, knocking them upward whilst shocking them. Instant startup. Afterwards, Gunvolt can follow up with up-air. Similar to Mega Man's d-tilt, but travels twice as fast and has almost no cooldown. Deals 8% damage. During Overheat, the damage is divided by 1.5, and the knockback severely reduced.


5). Smashes:

Note: During Overheat, these moves will NOT work at all. Gunvolt will go through the motions, but nothing will happen.

Forward Smash (Dragonsphere):
A three-hit move. In front of him, Gunvolt conjures a sphere of electricity. The sphere's diameter is roughly Gunvolt's height, and hovers slightly above him. The first hit deals 5% damage, the second deals 4% damage, and the final hit deals 10% damage, knocking the opponent at a 45 degree angle. A total of 19%. Slightly slow startup and cooldown. At the centre of Final Destination, this move is guaranteed to kill at 80% damage.


Upward Smash (Crashbolt): Gunvolt unleashes a pillar of lightning that zaps opponents, knocking them straight upwards. The vertical range of this move is half the distance of Palutena's up-smash, while the horizontal range barely covers Gunvolt's body. The pillar also goes below Gunvolt, making this move useful for edgeguarding. Below Gunvolt, this move will send opponents down instead of up. Slightly slow startup and cooldown. Deals 18% damage. On Final destination, this move is guaranteed to Star-Ko at 70% damage.


Downward Smash (Astra Sphere): A five-hit move. Gunvolt surrounds himself in a sphere of lightning that damages opponents repeatedly before knocking them away. The sphere's diameter is Gunvolt's height times 3. The direction in which the opponent is knocked depends on the angle at which they touched the circle. The damage and knockback dealt depends on how deep they are in the circle. Up close, the first hit deals 5%, the second 4%, the third 3%, the fourth 3%, and the fifth 7%. At the edge of the circle, the damage is divided by 1.5. At the centre of Final Destination, this move is guaranteed to kill up close at 80%, and 100% at the edge. Despite this move's long range, it has a slightly slow startup and a high cooldown, making it easy to punish if dodged or shielded.


6). Grabs & Throws:

Grab: Gunvolt leans forward and quickly thrusts out his free hand. Instant startup, and almost no cooldown. If it connects, he will pull the opponent toward him. Has a slightly longer range than Pit's grab. Dash grab reaches farther, but has a higher cool down. Pivot grab is fastest, but has the shortest range.

Pummel: Gunvolt sends a surge of electricity through his arm, into his opponent. Deals 3% damage. Roughly as fast as Pikachu's pummel.

Forward Throw: Gunvolt sends the opponent flying upwards diagonally with a backflip kick. Deals 10% damage. On Final Destination, this move is guaranteed to kill near the ledge at 100% damage.

Backward Throw: Similar to Fox, Gunvolt will throw the opponent away and fire three shots at them. Afterwards, the opponent will have three rounds stuck to them. The throw deals 6% damage, while the shots deal 1% damage each.

Upward Throw: Similar to Fox, Gunvolt will throw the opponent straight up in the air and fire three shots at them. Afterwards, the opponent will have three rounds stuck to them. The throw deals 4% damage, while the shots deal 1% damage each.

Downward Throw: Similar to Fox, Gunvolt will slam the opponent to the ground and fire three shots into them. After this move, the opponent will have three rounds stuck to them, and Gunvolt can follow up with up-tilt. The shots deal 1% damage each, and the throw deals 5% damage.


7). Final Smash (Voltaic Chains): Cutting loose with all his power, Gunvolt summons a barrage of electrified chains that lash across the screen, dealing 10% damage to everyone they touch. Once the entire screen is all but covered, the chains explode with a powerful discharge, dealing 40% damage and killing at 50%.


8). Author's Notes:

• Originally, Gunvolt's jab was a traditional 3-hit combo, Naga was his neutral special, and Flash Field his up-special. In the end, however, I hated this idea, because it didn't give Naga, Gunvolt's most important weapon, much flexibility. In order to better capture the essense of Gunvolt's game, I pulled a Mega Man and made Naga his jab, dash, f-tilt, and n-air.

• To expand upon Gunvolt's projectile game, I decided to incorporate more of his guns, not just Naga. I thought Dullahan would be best for his dash, Orochi best for his neutral air, and Mizuchi for his f-tilt. In his game, Mizuchi can only fire in three directions: up, down, and forward. But in this moveset, I decided to give it a homing effect. Said homing effect was inspired by another of his guns, Vasuki. So really, Gunvolt's f-tilt is a combination of the two.

• In Azure Striker Gunvolt, Luxcalibur does not consume EP. Rather, it consumes Skill Points, which take a LONG time to regenerate. I considered incorporating these skill points, but in the end thought that would handicap Gunvolt, so I had the move consume EP instead.

• Joule is a major character in both Azure Striker Gunvolt 1&2. She has the ability, bluntly put, to grant others special powers with her singing voice. She mainly behaves as Gunvolt's sidekick. Under certain circumstances, if Gunvolt falls in battle, Joule will revive him with her anthem, and Gunvolt will be granted unlimited EP, enabling him to use Flash Field for as long as he wants, and jump and air-dash as many times as he wants. I decided to base his up-special on this mechanic.

• Gunvolt's down-tilt and down-air were inspired by one of the bosses from his game, Viper, whom bluntly put is a hot-headed pyromancer. The only difference is that Gunvolt uses electricity instead of fire.
 
Last edited:

ForwardArrow

Smash Ace
Joined
Aug 17, 2011
Messages
502
Juzo Sakakura
Juzo Sakakura is one of the new characters introduced in the absolute disaster of an anime that is Dangan Ronpa 3. Juzo is a member of the Future Foundation, an organization led by former students of Hope's Peak Academy who are attempting to stop the spread of people influenced by "despair" that are destroying the world. Juzo's talent was that he was the Ultimate Boxer, so its no surprise that his means of fighting "despair" pretty much amounted to him beating up the people under its influence. While his intentions are arguably in the right place, Juzo comes across as a very cruel man, beating up a reserve course student who was just trying to investigate a murder even before the apocalypse started.

During the events of Dangan Ronpa 3, he and several others are trapped in the latest in a series of killing game, with this time the only motive being that there's an "attacker" who is murdering people whenever the power goes out. Juzo's boss, Munakata, determines this has to be someone within the group's fault and immediately goes after Naegi because of a disagreement they were having about whether or not it was worth trying to redeem some of the "despair" faction. Munakata goes along with it and tries to kill Naegi, as well as anyone who dares try to side with Naegi. This would have made him and Munakata into fairly respectable antagonists as Naegi is an extremely boring and terrible character and I'd say hating him is a good quality if anything, but unfortunately Juzo and Munakata are also bland characters with little to no substance to them, preventing any joy from being derived from their antagonism.

While Juzo's talent is boxing, in the game he is not actually able to utilize this talent because of the tacky mechanic of "Forbidden Actions". Everyone has a wristband that will knock them out every eight hours to let the attacker do their thing, but it has a secondary function. If the person performs an action they are told about specific only to them, the wristband will inject them with poison and kill them on the spot. Juzo is banned from attacking someone barehanded, so he's forced to use improvised weapons throughout the show. While still effective with them, its strongly implied that in many encounters where other characters were actually able to escape him if he could use his bare hands he would have easily killed them.


Stats
Fall Speed- 10
Ground Speed- 8
Traction - 8
Size - 7
Weight - 7
Air Speed - 6
Jump Height - 3

Juzo is a fairly above average character in most regards, having good speed, traction, and weight while being a hair taller than Ike. His air game is a bit limited by his poor jumps however, on top of his high fall speed. There isn't really a whole lot to talk about with him statistically, so let's move on to the actual set.

Specials
Neutral Special
Juzo pulls his arm back as a firey aura surrounds his body, before he lets out a scream of rage and punches forward with all his might. This move deals a horrific 45% and has noticeably stronger knockback than Warlock Punch. Unlike the Warlock Punch, this move is actually pretty low on lag, taking about as long as Sonic's FSmash to come out. If that sounds horrifying to you, that's because it is. Juzo also slides forward during this move and has considerable amounts of super armor to it, giving the move a stupid amount of safety and range. At least as far as the Smash cast is concerned, this is the best move in the entire game between how ludicrously easy it kills, its safety, and its speed.

So as you might expect, there's a catch, as if you look closely you'll notice Juzo does in fact have his wristband from the game. That means if he uses this move, whether or not he lands it, Juzo's body will be flooded with poison during the end lag. The poison will cause blood to shoot out of Juzo's face as it turns partially purple and he falls to the ground, killing him instantly. You'll appear on the respawn platform, down a stock, and also down your dignity if you used this on a shielding or dodging opponent. That said, its not the worst to use for suicide kills if you are sure you'll land it, but Juzo's actual ability to combo people into this move is rather low as he's something of a slow power fighter. If you kill the opponent with this on their last stock, they will die first.


Down Special

The wristband is a frustrating obstacle to Juzo, as it severely limits his combat ability, but its not one that is totally impossible to overcome. Deciding to solve his inability to perform certain kinds of violence with more violence, Juzo takes out a saw and begins cutting off the arm the wristband is on. This deals him 4% per second while using the move for fairly obvious reasons, and it'll take you a total of 5 seconds to cut your whole arm off. This already deals Juzo 20%, but Juzo will start bleeding out and taking 0.5% per second once you get a third of the way through your arm. Two thirds of the way, and Juzo will take 1% instead, and 2% once he cuts the whole arm off. There's also some start lag before you can begin cutting your arm off too, making it a fairly high effort task to actually cut it off.

So what are your rewards for cutting your arm off? Well once you hit the halfway point, Juzo will take a slight hit to his stats, lose some of his ground and air speed, and reducing his moves to deal 0.9x their normal damage. Once you fully remove the arm, Juzo's speed stats take another hit, his damage is reduced to 0.8x, and his attacks that used both his arms take a notable lag increase as he attempts to perform the same task with one arm with much more difficulty, while his other moves get a more minor but still notable one. While this doesn't sound worth it, removing your entire arm gives you free access to your horrific Neutral Special. Sure, its laggier now, and "only" deals 36%, but its still a completely ridiculous move and will let you kill opponents with utmost ease using it. Considering you're taking 2% per second and you probably took in the range of another 40% or so self damage to get this far, you had better make good use of this move.

As an aside, Juzo will hold onto the saw after using this move, and drop it if he starts using a move with a different weapon. If you use this move or another saw move next to the saw, Juzo will just grab the pre-existing saw to considerably reduce the lag. You can have multiple saws out on stage at once, but ones left on the ground disappear after 10 seconds. If Juzo drops the saw in midair, it will fall to the ground as a weak falling projectile that deals 6% and weak upward knockback before embedding in whatever is below it. Juzo will be visibly bleeding after using this move for more than one second, which is relevant in a couple later moves.


Side Special
Juzo takes out a Wario-sized chair, which is arguably one of his more well remembered weapon choices, and chucks it forward as a projectile. The chair will travel 2 battlefield platforms at Sonic's dash speed and deal 14% and knockback that KOs at 150%, making it a pretty brutal projectile. In the air it can go further depending on how high you are above the stage, given its fall is influenced by gravity. The problem of course is its pretty laggy, but the throw is actually fairly fast when you use a chair that's already on the stage, at least as long as you have both arms. As you might expect, the chair is left lying around the stage like your saw after you drop it, but unlike the saw lasts forever and is a solid object on the stage. Instead, you can destroy it by removing its 30 stamina.

Given how much bigger it is than Juzo's other weapons, Juzo can actually embed his other weapons in the chair if he switches near one. Of course, you can't embed chairs in each other. This isn't too much different than embedding them in the floor at first glance, but the weapons will dislodge from the chair when it has flown two thirds of a battlefield platform. The saw will fly at a much higher angle and land slightly in front of the chair while dealing 10% and knockback that KOs at 245%, and goes at a slower speed to make for a much longer lingering projectile than the chair. While Juzo's approach is not very well covered by the basic chair toss, a chair toss with another weapon embedded in it suddenly becomes a great deal harder to dodge and provides much heavier cover for Juzo's attacks, including his almighty Neutral Special. Any weapons embedded in the chair are used up when the chair is thrown.


Up Special
Juzo's forbidden action is barehanded combat, but it said nothing to prohibit him from using his feet. Juzo performs a rising spinning kick, with it hitting behind him for 6% and weak horizontal knockback before dealing a much more considerable 14% and diagonally upward knockback that KOs at 145%. On the ground, Juzo will simply slide slightly forward as he uses this move, giving it considerable range while not having to worry about a helpless state afterward. This is pretty lacking as a recovery option, having similar vertical capability to Bowser's Up Special but less horizontal reach. The actual attack properties are nothing to scoff at though, as the lag is low enough its a very solid KO move if you're avoiding using Neutral Special. While you have to worry about helpless over high end lag in the air, you can kill people absurdly early with this in the air if you're close enough to a blast zone.

Standards

Jab
Ducking down slightly, Juzo performs a headbutt that deals 10% and very low knockback, weaker than Ganondorf's Jab in that regard and having less range in exchange for being considerably faster. It only will combo into itself on low percent heavyweights, and will never combo into your almighty Neutral Special. That said, it is a great setup for the rest of your game or a good reset if you're in close range combat with the opponent to put things in your favor. What's more, it comes with a rather nice benefit of not taking any damage decrease as Juzo cuts off his arm, giving Juzo one very reliable option even under those circumstances. The range is pretty bad though, so against opponents with solid mid and long range games you're in more danger.

Forward Tilt
Juzo takes out his saw and stabs it forward, in a motion that deals 7% and knockback that KOs at 265%. This is a fairly solid move given its reach and speed, but what it lacks is power as stabbing someone with a saw is not exactly the most dangerous motion to be making with a saw. It does however serve as a good mid range option for Juzo to play off with his other weapons, albeit one that will get noticeably worse when you're bleeding out. If Juzo doesn't already have a saw on hand this move is a bit slower to start up, causing it to end up like a somewhat lower range Dedede Forward Tilt if you don't have one.

The most exciting use of this move however, is using it on a chair, as Juzo will jam it along the chair in a manner far faster than the saw is meant to go through the material. This will bust up the saw and force Juzo to discard it, but come with the benefit of a huge amount of friction occurring, setting the chair on fire. A burning chair is a static hitbox that deals 8% and radial knockback that KOs at 400% to anyone who comes in contact with it, though if Juzo uses a move that requires a chair close enough to it, he will pick it up and only take 3% through sheer force of will. Burning chairs do 1.3x the damage and knockback of a normal chair in all moves they're used on, but will take 5% per second while they burn.

If a burning chair has a weapon embedded in it or within a very small range of it, that weapon will burn as well, meaning it deals 2% per second to Juzo while he holds onto it. The white hot weapon, however, deals 1.3x its normal damage while Juzo holds onto it, and that damage bonus is doubled against shields to 1.6x. This bonus can occasionally give other properties as well, as will be detailed in the given move.


Up Tilt
Juzo takes out a broken pipe and jabs it, pointed end upward, into the air. This deals a solid 11% and knockback that KOs at 165% with considerable range, while not being terribly laggy. Note the tip of the pipe is a sweetspot that deals 14% and knockback that KOs at 140%, a rather nice bonus. What it lacks is much of any range to the side, making it strictly an anti-air tool. It is a pretty solid one at that, and introduced a new weapon to your arsenal, the pipe.

The pipe can obviously be embedded in a chair or heated just like a saw, and lasts for 13 seconds, slightly longer than the saw. When embedded in a chair, it will be launched out as a projectile like the saw. Unlike the saw it will instead spin in the air when it dislodges, only going half the remaining distance the chair flies but remaining in the air for 1.5x as long. This deals 7% if the majority of the pipe hits the opponent, but the pointy bit will deal an increased 12% and knockback that KOs at 185%, though its very situational to land. Heating it has pretty much the same properties as heating a saw, increased damage and knockback at the cost of self damage while you carry it.

While Juzo is holding a pipe, he will let some of his blood pour into it, because as far as Juzo is concerned everything is a weapon. This will spill out of his pipe when he performs an attack with it after 8-2 seconds of buildup, depending on how hard Juzo is bleeding(and he has to be bleeding in the first place, meaning you sawed for a second and are taking self damage). If the pipe is blood filled, it will keep the blood inside it when dropped on the stage. It can actually go even faster if another set were to hit him with an attack that causes a bleed effect. The blood will spill out when the pipe is launched out of the chair, dealing 3% and a flinch to those who come into contact with it, but greatly increasing the hitbox size of the pipe. In the case of the Up Tilt, it'll spill out the back for 5% and some flinching and pushback to opponents behind Juzo, giving the move a little more coverage than just serving as an anti-air.

If a pipe is already full of blood when you discard it, the blood will still be there when you pick it back up. This is important because in the case of the burning chair, the blood inside will be upgraded to burning blood, which makes all blood hitboxes considerably nastier. The blood that shoots out of the pipe in midair will deal 8% and extended hitstun while the blood that pours out of the back of the Up Tilt deals 12% and horizontal knockback that KOs at 155%. Similarly, blood poured into a burning pipe becomes burning blood, so while the self-damage from both sources is pretty nasty your pipe moves become pretty incredible with it.

There is one last trick with this move. If you use Neutral Special and die of poison while holding a pipe, the poisoned blood will be left in the pipe when you respawn. If you splash this blood on the foe, they'll take 8% per second for 5 seconds, as well as flinch once every 1.5 seconds for the duration of their poison, making the blood hitbox you first get from this move absolutely terrifying. Of course, this requires you to die first, so it better be a strong interaction.


Down Tilt
Juzo sweeps his pipe low to the ground in an attack that deals 9% and weak upwards knockback that won't KO until 350%. The tip deals an increased 11% and upwards knockback that KOs at 225%, but other than that this move is kind of unremarkable. This is a move with very low startup lag, but given its a two handed swing its going to get somewhat worse as you cut your arm off. The range is quite nice though and the end lag is not bad, making this a great move before you start down your path to one armed glory.

Its actually still a decent move despite its considerable nerf as you bleed, because the blood hitbox on it is quite good. At the end of the move by default, it will cause a small rush of blood at the end that deals 4% and trip opponents. Prone is a pretty strong result out of a Down Tilt, and the burning variation is even better. It deals 8% and high hitstun with low upwards knockback, which is a 100% true combo into your Neutral Special until your arm is all the way cut off. Your set doesn't have a lot of ways to true combo into Neutral Special, so this can help you close out a game once you get a stock lead at a disturbingly fast pace.


Dash Attack
This attack is a slightly unique case as it becomes different depending on how much you're bleeding. If you're not bleeding at all, Juzo simply does a powerful lunging kick with a lot of startup lag, dealing 20% and horizontal knockback that KOs at 90%. This is easily the strongest dash attack in the game, but also disturbingly slow to make it hard to land, only really helped by the long distance Juzo slides during it.

The move becomes a fair bit better as you start to bleed, as Juzo will flick his bleeding arm or arm stump at the opponent, sending out a small splash of blood that deals 1% and very small hitstun. The amount increases the more Juzo is bleeding, from making the subsequent kick slightly easier to land to at an arm stump actually being a true combo into it, making this a very scary dash attack. Keep in mind however that not only does Juzo lose some power and dash speed as his arm is removed, but also he slides a shorter distance and it won't true combo if you don't hit with the more moderately ranged blood splatter anyway. Still, this is one of the most benefitted moves as you cut off your arm, so keep that in mind.


Smashes

Forward Smash
Juzo lifts his saw over his head before bringing it down on the opponent in front of him, dealing 7 hits of 1% followed by 8%-14% as well as knockback that KOs at 120%-85%. This has above average lag for a smash attack, and it only gets worse the more you're bleeding out given it is a two handed move, but fortunately the end lag is pretty short even if you've entirely lost your arm. The range and power on this move are quite solid, and it will actually leave an aftereffect on the opponent. The saw will cut through their flesh and cause a noticeable bleeding effect, dealing them 1% per second for the next 6 seconds.

The bleeding effect is not that intense but it does bring up the moves damage to a more considerable amount. You can, however, make this bleed a bit scarier by doing nothing more than hitting the opponent. Every hit with a weapon, like the saw or pipe, will add 1 second of duration to the bleeding. Every hit with your blood will add 1% per second to the bleeding, making your self-inflicted bleeding a lot scarier for opponents to deal with. Actually landing the Forward Smash again adds 3 seconds, considerably more than the normal.

You can make this a little more extreme if you want too, by hitting them with a heated saw. This will have considerably less difficulty cutting into their flesh, causing a "harsh bleeding" effect, giving the foe a visibly more gruesome visual and dealing 2% per second for 8 seconds at a base. Harsh bleeding will actually inflict the foe with the same nerf that Juzo has when his Down Special has sawed off half his arm, and your weapon attacks will extend its duration by 1 second. 1% per second will be added to the current bleeding if you hit the opponent with a hot saw during a regular bleeding effect, and will increase the timer by 3 seconds if its over 5 seconds left, or up to 8 seconds otherwise, as well as upgrading their nerf to the "harsh bleeding" nerf. The best thing about harsh bleeding is that your weapon attacks will actually extend its duration by 1.5 seconds instead of 1, and given how that can stack up this is a very scary buff.

Oh yeah, speaking of scary, if you hit a wounded opponent with poisoned blood, the poisoned blood effect will stack on top of the other one and its timer won't tick down while the opponent is wounded. This is downright godly, but you did have to literally suicide to even get accessed to poison blood and then land this specific move to get the wound started.


Down Smash
Juzo takes out a chair, lifting it over his head briefly with both his arms if he has them before smashing it in front of him so hard it breaks into pieces. This is a pretty laggy move, and though if you have a chair at the ready its only slightly above average for a Smash. The explosion is quite sizeable though, and deals 20-28% with radial knockback that KOs at 100%-65%. Obviously, that gets pretty powerful if you have a burning chair at the ready, making it very dangerous for the opponent to fight you next to one.

Any weapons embedded in the chair you use for this move will be send flying out as projectiles, being blasted away from the chair in a direction depending on where exactly Juzo embedded them in it. They go twice-three times as far as in the Side Special, and the hitboxes all deal 1.5x-2.1x the damage and increased knockback in accordance with that. Notably, ones that go flying right up will come falling back down, and you can get that by planting a weapon toward the center of a chair. This gives Juzo absurd coverage even after the move ends, and while the end lag is high you'll still be able to get some mileage out of the saws as they fall down. If the chair was on fire, the weapons will be burning as they fly obviously.

The weapons will also add a bit of power to the base move, increasing its damage by 3% per pipe or saw invested into the chair. You can potentially make this Down Smash ludicrously powerful if you're actually willing to invest some setup into it, though Juzo doesn't have a lot of means to focus on setup. That said, if the opponent tries to interrupt you out of setting up an ungodly powerful chair, you can potentially just smash it on them and ruin their day regardless.


Up Smash
Juzo swings his pipe overhead, dealing 15%-21% and upward knockback that KOs at 115%-80%, while dealing 20%-28% and KOing at 85%-50% at the tip. This is your best KO move barring you gain full access to your Neutral Special, given the sheer range it covers and the solid power. It also has the blessing of a moderate amount of super armor attached, which can be a godsend at high percentages. It does lack a little bit in speed, but given the swing is one armed it won't be hampered by your arm getting cut off nearly as much as say, Forward and Down Smash would be. The lag is a fair bit worse if he has to take out the pipe for this move, so keep that in mind, but with it out killing with this is quite practical.

The blood effect on this is fairly standard, as blood will splatter out of the end of the swing for 6%-8% and similar hitstun to Zelda's lightning kick. Obviously pretty weak, but it does give the move additional coverage and safety towards opponents in front of Juzo. The burning blood is considerably upped in power, dealing 14%-19% and knockback that KOs at 160%-115. While the blood won't do anything especially strange in this move, this hits a pretty big area with it, which can be good for powering up the wounded effect on opponents to scary levels, as well as simply providing amazing coverage.


Grab Game

Grab
Juzo is unfortunately prohibited from performing a normal grab due to his restriction on hand to hand combat, so he improvises by taking out his pipe and attempting to impale the opponent to the ground with it. This has more range than any normal grab but less range than a tether grab, with all the lag of a tether grab. If you have a pipe already on hand, however, the lag is much closer to a normal grab, making it less punishable.

Impaling the opponent comes with a small reward of 4% at the start of the grab, but it gets a bit better if you have blood in the pipe. Regular blood will add another 3% at the start of the grab at the cost of using up the blood, which is a small bonus but helpful. Burning blood will add a more considerable 10% instead, meaning you get 14% off simply grabbing the opponent, before pummels or throws. Of course, burning blood isn't some super easy thing to acquire, but this is a pretty sizeable payoff for it. Poisoned blood will immediately apply its powerful status effect to the opponent, god help them if they were wounded before the grab. For the record, whatever type of blood you have in the pipe will preserved for the throws and pummel, as there are moves affected by that.


Pummel
Juzo twists the pipe in the opponent, dealing them 1% in a rapid pummel. This is upped to 2% with blood in the pipe, 3% with burning blood, 5% with poisoned blood, and 8% with poisoned and burning blood. There isn't much more to say about this, but suffice to say if you grab an opponent with a burning blood pipe they're in for a lot of damage, and god have mercy on their soul if you get one of the last two variants.

Down Throw
Juzo tears the pipe out of the opponent in a manner specifically intended to wound them further, dealing 10% and leaving them in prone. This is the end of the throw unless the opponent is wounded, at which point if the wound is a regular wound its upgraded to harsh bleeding from the tearing motion, and harsh bleeding is a rather scary status effect to have. This is a way you can get it without any self-damage from burning, and considering how much self-damage Juzo takes there are definitely times you'll want to resort to that. This extends the duration by 3 seconds on an already harshly bleeding foe.

Burning will let you take this even further, as if you already have a harshly bleeding opponent and a heated pipe, Juzo is able to drag it through the foe in an even more brutal fashion, causing the bleeding to get upgraded to "savage bleeding". They take 4% per second, identical nerfs to Juzo with his arm completely sawed off barring the dependence on attacks being one or two handed, and take a 2 second extension whenever you hit them with a weapon, and have the duration refreshed to 8 seconds. This is scary powerful, but it is going to require a pretty specific set of circumstances and likely a lot of self damage to Juzo to make work, but it can drag them down to your level when you're heavily wounded or down an arm and allow you to push for an easy stock lead otherwise.


Forward Throw
Juzo swings the opponent around on the pipe behind him before flinging them forward, dealing 11% and horizontal knockback that KOs at 185%. This is a decent throw all around for getting damage and space, but lacks in follow up potential and won't KO until later than Juzo would really want too.

If you have blood in the pipe, it will actually be flung out after the opponent as a projectile, dealing 3% with regular blood and 8% with boiling blood. The boiling blood also deals extended hitstun, which might actually give Juzo the room he needs to follow up on this throw. The opponent will have a small window to get out of the way, but it puts additional pressure on them that leaves Juzo heavily advantaged to continue his onslaught. Throwing a chair, particularly one full of weapons, into the mix while this is happening can make things very chaotic for the opponent as well.


Back Throw
Juzo swings the opponent over his head through the pipe and smashes them into the ground, dealing them 12% and knockback that diagonal knockback that KOs at 200%. This is pretty underwhelming, given this move is meant to be your KO throw and Juzo actually experiences some bad end lag for it, worse if he had to do it with one arm.

That's because this move actually gets stronger the more percent Juzo has, dealing an additional 2% and KOing 25% sooner for every 50% he has. This means at 100% this move is actually a solid KO throw, and it gets buffed by another 2%/5% if you had blood/burning blood in the pipe respectively, with a similar KO power buff. On the off chance you get to 200%-250% based off the foe being too scared of your ridiculous melee with a sawed off arm and a death chair, landing this can become ungodly powerful, though if you're not getting to that kind of percentage 21% and knockback that KOs at 100% off burning blood, especially when the initial damage for a grab is so high, is pretty damn scary.


Up Throw
Juzo simply swings the pipe over his head, dislodging the opponent from it and sending them tumbling into the air for 7%. Compared to your other throws, it lacks the potential power they have, but instead makes up for it by being a pretty great combo setup. It will combo into your Up Tilt until 80%-90%, and in the 60-90% range it even combos into the sweetspot, which is a pretty great setup and can actually KO lightweights under the right circumstances(burning pipe or a high platform). Its a good throw to use when none of the prerequisite conditions to empower the other throws are met, though its hardly some kind of godlike move all the same.

Aerials
Neutral Aerial
Juzo makes use of whatever weapon he's currently holding onto and swings it around himself with both arms. This actually causes not only the start lag to increase when he's bleeding out worse, but also increases the duration of the swing, which can situationally be actually a good thing for pressure as it takes longer for Juzo to get whatever he's wielding around himself. The saw deals 11% and knockback that KOs at 225%, the pipe deals 8% and knockback that KOs at 180% while spraying out blood from the end of the pipe that deals 3%/8% with burning blood and a flinch. The tip of the pipe deals 2% more and KOs 20% earlier. On the off chance you use this move near a chair, you will actually pick up the chair for it and swing it for 14% and knockback that KOs at 150%. The chair swing actually has a small amount of super armor to let you shrug off attacks here or there.

If you swing a chair with this, it will actually dislodge the oldest weapon embedded in the chair. This will send it in the same arc it would have traveled in Down Smash, albeit only half the distance the chair toss sends it and with 0.8x as much power. Still, if you use Nair again with the chair equipped you can create some interesting combos and setups with this technique. If you have no weapon equipped Juzo will take out a saw by default, but you can press A during the lag of him taking out the saw to take out a pipe instead, or B if you want to take out a chair instead for increased lag.


Forward Aerial
Juzo swings the pipe down in front of him, in a hitbox that covers an arc over his head and in front of him that deals 13% and radial knockback that KOs at 160%. The tip of the pipe will deal 16% and knockback that KOs at 130% instead. Interestingly, the pipe will be swinging down by the end of it, allowing you to spike people with this move, and given its terrifying range that's quite a threat. Unfortunately Juzo is a bit limited in terms of off stage ability, but he can at least ledge-guard with this. The problem of course is that the lag is enormous, especially for an aerial, and the landing lag is kind of terrible as well. At least right before the swing Juzo gains a brief period of super armor to help make this a bit more usable.

At the end of the move, if there's blood in the pipe it will drop out the end as a hitbox that deals rapid hits of 1% and flinching, which add up to about 8%. The hits will help cover the end lag rather nicely, and the blood dripping out covers an area Ganondorf's height and somewhat wider. If the blood is burning, each hit will deal 3% and they will take knockback at the end that depends on how much of it they were hit by, maxing out at KOing at 95% if you hit with all 8 hits. Of course this requires you read the foe very well, but this can make for a nasty aerial KO move if nothing else.


Back Aerial
Juzo kicks out behind himself, dealing 10% and horizontal knockback that KOs at 185%. This is admittedly not a terribly interesting move, but it does have one important piece of utility, it doesn't use a weapon. Its also very usable out of a short hop and reasonably fast, making it fairly practical for that purpose, and a good alternative to your jab in that regard.

Up Aerial
Juzo does a flip kick in mid air, which is fairly fast and deals 12% and upwards knockback that KOs at 200%. While this is a pretty basic move, it can make for some decent follow ups to your Up Tilt and Up Throw, as well as providing an upwards move that does not utilize a weapon.

Down Aerial
Taking out his saw, Juzo descends toward the stage and drags the saw through whatever he meets with on the way, dealing rapid hits of 4%. You'll likely only land enough to land 12%-16% worth of damage with this move, and the landing lag is kind of awful though he will only fall two Ganondorf heights before stopping the move, for what that's worth. If you hit the foe into the stage with this, they'll take an additional 4% and upwards knockback that KOs at 125%, which may make taking the risk in regards to the landing lag worth it.

Its pretty situational, but if you want to land more hits with this move you can potentially do that with one of your projectiles, generally some blood being sent flying off a pipe launched from Down Smash. If you can flinch them with that you're likely to land another 2-3 hits, and this move can max out at dealing 36% if you land every hit, which is rare except against heavyweights under the mentioned conditions. When you do pull it off though, this can be a pretty brutal aerial.


Final Smash


Juzo takes out a phone and sends in a call for backup. His two allies arrive a moment later via helicopter, the extremely edgy Munakata, as well as their medical supplier Seiko. Munakata will fight alongside Juzo as a highly intelligent AI ally, utilizing Roy's moveset with considerably buffed speed with his heated katana. He's not completely allied to Munakata though, and will turn on you for the remainder of his duration if you do more than 10% to him in a period of 3 seconds, less than that and it can be called an accident. He can still be KO'ed and is actually lighter than Roy. He will leave once he is KO'd, given by Final Smash standards he is not especially powerful of an ally.

Seiko will only stay around for five seconds, carrying with her two bottles with a glowing red and a glowing green liquid. If you press A next to her, she will give you the red bottle, while pressing B will get you the green bottle. The green bottle will give you a buff lasting 30 seconds that will increase all your damage by 1.4x, as well as allowing you to saw your arm off in one swift motion that deals 15% to you rather than over 5 painful seconds and 40%. It will finish the job if your arm is already partially sawed off. The green bottle will heal you 1% per second for 30 seconds, and stifle all effects of your arm severing for its duration aside from the increased lag on two handed attacks, which is less extreme regardless. She will give the other bottle to Munakata after you make your decision, and while he can't use the buffs quite the same as you its still a boon to him.

Update 10/5/16:
-Halved all self-damage from Down Special, and removed the lag increase on non-two handed moves.
-Both of the chair moves are faster now
-Super Armor added to Nair, Fair, and Up Smash, to help him survive at high percentages
-Up Special nerfed slightly
-Confirmed how Neutral Special works on the final stock.

Update 10/6/16:
-Nerfs to overtuned parts of the set, like the damage on smashes and the grab hitbox, clarity added in a couple places
 
Last edited:

Davidk92

Smash Cadet
Joined
Aug 28, 2016
Messages
49
Edit: Davidk92 Davidk92 , I would say that some of the problem with your sets so far is that in some cases they try to include gimmicks that wind up tacky. Additionally, stun does not inherently make for good flow. Why do Helsing's shotgun blasts put the foe into helpless fall instead of launching them away? The under-elaboration of knockback on most moves also harms the set's flow, as it makes it difficult to imagine how Helsing wants to move and chain attacks.
Can you elaborate on what you mean by tacky gimmicks?

The shotgun is another example of characterization over gameplay, as in the film Van Helsing only used his shotgun against Dracula's offspring to shoot them out of the air.

I'm also concerned about what you mean regarding knockback. How would be an appropriate way to describe it? I don't see what can be done since knockback varies so much based on the move, the opponent's weight and the opponent's damage, so I don't see how I can describe it in any static terms. Even charged Smash attacks have a specific 1.4x multipler added to their damage.

Also, how are people able to make their movesets look so good? Is there specific tags or HTML we can use? I type my sets up in a text editor and make all the changes when posting it, but people are making their's look so elaborate and fun to look at in what I highly doubt is a single sitting.
 
Top Bottom