• Welcome to Smashboards, the world's largest Super Smash Brothers community! Over 250,000 Smash Bros. fans from around the world have come to discuss these great games in over 19 million posts!

    You are currently viewing our boards as a visitor. Click here to sign up right now and start on your path in the Smash community!

"I hope I can figure out the secret of its power one day" - Shulk AT's/tech thread

Joined
Jun 8, 2009
Messages
18,990
Shulk advanced techniques/tech thread
"I hope I can figure out the secret of its power one day"

Credit to @ Masonomace Masonomace for almost EVERYTHING in the OP

***
MALLC (Monado Arts Landing Lag Cancel)
(Credit to @ erico9001 erico9001 )

How to perform it:
Prepare a Monado art activation :GCB:

(Upon suffering landing lag from using an aerial, Art activates and cancels the landing lag)

Applications: This tech is extremely pivotal and important for Shulk for it effectively nullifies one of Shulk's primary weaknesses: His landing lag. This also allows him to throw out aerials and remain safe due to the cancelled landing lag making his rushdown/approach options safer than before. Spacing with this tech is the key to maximizing its usage. Using it up-close will likely get you to be beaten out before even pulling out the aerial. MALLC is most known for being used with b-air. B-air is one of Shulk's best moves because of it's insane horizontal reach, however one flaw of it is its landing lag being at 21 frames. MALLC can fix that which gives Shulk a fierce spacing option which can even be combo'd off from if you land a hit with it (dash grab in speed or f-smash or f-tilt depending on how far you are). One more nifty use of MALLC is to abuse the short intangibility of the monado art activation animations. The intangibility window varies from art to art, jump having the shortest duration.

MADC (Monado Art Dash Cancel)
(Credit to @ Eisen Eisen )

How to perform it:
Prepare a Monado art activation :GCB:
(Art activates which cancels the dash animation) :GCR: Dash

Applications: This tech is useful in certain situations. It's great for ledge trapping and maybe mixing-up your dash approaches. The issue with the latter is that this is MUCH more predictable and easy to anticipate than MALLC (or art cancelling in short). With MADC, you can perform techniques such as a sliding u-tilt, sliding f-smash, or a sliding d-smash. You can also use this such that pretty much your whole moveset (sans dash attack) is basically some sort of pseudo-dash attack. With the additional slide effect (which is most notable in shield, buster, and smash art), MADC or dash cancelling is great for juggles, ledge trapping and for landing kills

MABD (Monado Art Buffered Deactivation)
(Credit to @ erico9001 erico9001 )

How to perform it:
Press :GCB: 3 times during an animation

Applications: This tech is amazing for throw set-ups and combo extensions. You can use this along with MALLC/art cancelling to extend your combos. For example, from d-throw, you can buffer deactivation then combo with f-air after then art cancel into jump. You'd have enough time to throw out another attack on the opponent. You can also create some set-ups with MABD. For example, with buster d-throw. You can buffer the deactivation such that you can land KO's from the throw via air slash, or dash u-smash or b-air. This is also fairly useful with recovering since using this tech with jump art allow your jumps to be surprisingly higher than it is in jump art. So basically, MABD is amazing for enhancing Shulk's throw reward and it also opens new doors to longer combos and more reliable set-ups

Other notes (Credit to erico9001 erico9001 )

move|slide distance
MABD MSpeed JCUS|9 or 7 (-2 for jump crouch)
MABD MSpeed Walk|6.5
MSpeed JCUS|6.5 or 4.5 (-2 for jump crouch)
MSpeed Running Up Smash|6
MJump Landing|5.5
MSpeed Sliding Pivot|5
MARC|5
MSpeed Walk|4
Vanilla JCUS|3.5
MSpeed jump crouch|2

-Speed's jump cancelled up smash is worse than speed's running up smash (despite the appearance of longer slide distance)
-MABD from Speed -> run -> jump cancelled up smash travels quite far. The jump cancel is needed here.
-MARC has an unexpectedly large slide distance
-Speed MARC travels the same distance unless the activation animation is interrupted
-MABD MSpeed Walk has a great slide distance
-MABD -> Buster D-Smash is nice because they can't unshield between the hits and get shield poked.[/QUOTE]

B-Reversing

Grounded
In order to do a grounded B-reverse, you must be using a mixture of cycling arts while moving. If you're trying to learn how to B-Reverse on the ground, start with just cycling to Jump or whichever art & then start dashing to running in a direction. If you're holding your joystick towards a direction while dashing or running & you press the B button, you misinput it as Back Slash.

(Cycling arts while walking, dashing, running, or slow running to the :GCL:) Tap your joystick to the :GCR: after the art activation
(Cycling arts while walking, dashing, running, or slow running to the :GCR:) Tap your joystick to the :GCL: after the art activation

Misinput / Troubleshooting
If you end up getting a dash turn animation, it means you're tapping your joystick to the opposite direction too soon. You have to be patient & let the art activate first. The art flashing brightly for a brief moment is a good indicator to help your timing.

Moves that can be used while the slide from the grounded B-Reverse happens:
  • Short Hopping or Full Hopping, Up tilt, uncharged Forward smash, uncharged or charging Up smash, uncharged or charging Down smash, Standing Grab, Shielding, Spot Dodge, Forward Roll, Back Roll, and Back Slash
Moves that halt the slide from the grounded B-Reverse:
  • Jab, Forward tilt, Down tilt, charging Forward smash, Dash Grab, Pivot Grab, Air Slash, and Vision

Knowing the different slide distances
How fast you're moving varies with how far you side from the grounded B-Reverse. So in one scenario, Shulk is walking, & the other scenario is Shulk dashing to running. In the walking scenario, Shulk B-Reversing Up tilt will slide about a third of the distance the other Shulk would travel when running. Likewise, a Shulk that is running & B-Reverses Up tilt will slide farther across the floor than a Shulk who's slow running.

What to gather from this
B-Reversed Up tilt is great. If you cycle to Speed & then B-Reverse Up tilt connecting the Blade sweetspot, you instantly create the Speed walking Up tilt juggling or Up airs scenario. B-Reversing any smash attack is super neat to try as for an example, you can cycle to Buster & at the last moment dash away from your current position near the ledge to make your opponent think you're giving them breathing room, then you B-Reverse Dsmash toward the ledge & semi-charge it to deal huge damage to them on-hit or on-shield which potentially breaks it. Above all, imho, the best rewarding option to perform with the grounded B-Reversed is standing grab. When you talk about Vanilla Shulk's grab choices no matter which one, they're all mediocre at best. However, combine a standing grab option with the grounded B-Reverse & the slide you gain from a running motion, you get grab range greater than Vanilla dash grab & arguably Vanilla pivot grab. Perhaps Speed Art B-Reversing grab isn't as effective as Jump Shield Buster or Smash, but still, it's much better than standing grab or dash grab by themselves.


Airborne
In order to B-reverse in the air, you must be using a mixture of cycling arts while drifting. If you're trying to learn how to B-Reverse in the air, start by dashing to running across the ground & jump into the air. After that, release your joystick letting it sit back to neutral & cycle to Jump art. If you kept holding your joystick toward a direction to drift in the air & then tried to press B, that inputs as a Back Slash which is an unfortunate event off-stage. "Not good!"
Also, if you're tumbling in the air, you cannot input a B-Reverse. So either use an aerial or airdodge to stop tumbling. If you don't want to use an aerial or airdodge, then using doublejump instantly removes the tumble state.

(Cycling arts while drifting to the :GCL:) Tap your joystick to the :GCR: during the art activation
(Cycling arts while drifting to the :GCR:) Tap your joystick to the :GCL: during the art activation

Misinput / Troubleshooting
If you end up getting a turnaround, it means you tapped or held your joystick to the opposite direction much too soon. Like I said for the grounded B-Reverse, just be patient & let the art activate. The art flashing beside Shulk's character portrait is a good indicator to use for timing it better.

About the airborne B-Reverse
When you B-Reverse your art activation in the air, you shift your movement from one direction to the opposite. The distance you travel in the air during the B-Reverse is the same for all five Monado arts. Yes you read right. Jump, Speed, & Shield all drift the same air speed during the whole duration Shulk is performing his unique pose for said art. It's when Shulk finishes performing the unique pose & returns the Monado on his back that the art's mobility start to take effect. However, this is only when you do not interrupt the unique pose Shulk makes for said art. You can instantly gain the art's drift speed when you interrupt the unique pose. To do this, you can use either Doublejump, Neutral air, Forward air, Back air, Up air, Down air, or Airdodge. On the other hand, using Back Slash Air Slash or Vision don't grant the art's drift speed because Back Slash does its own thing, but Air Slash does get the vertical boost from Jump or the horizontal drift speed increase from Speed & decrease from Shield respectively. Vision is kinda like Shulk performing a pose during an art activation because the art's drift speed & mobility only starts taking effect after Vision's endlag finishes & Shulk returns the Monado on his back.


Applications: Mixups become very interesting. Shulk is a very special character in that he's the only character in the game that can act with any of his moves immediately after B-Reversing from the ground or the air respectively. Most characters that B-Reverse their Neutral B must cancel their action by either shielding or pressing the grab button to revert some sort of charging animation. For Shulk though, If you're first cycling arts & then dashing to running or drifting toward a direction followed by ceasing art cycling, you can time the B-Reverse after seeing the art flash beside Shulk's character portrait near the damage meter. This results with a movement slide toward the opposite direction. The B-Reverse by itself looks neat plus if it's an airborne B-Reverse by itself you still have the intangibility frame window for defensive frame protection. but add in a move & you create an option that no other character can perform with the sacrifice of losing the intangibility window. Some options include:
  • Walking > Art B-Reverse Jab
  • Dashing > Art B-Reverse Dtilt
  • Running > Art B-Reverse Dsmash
  • Jumping & drifting > Art B-Reverse Nair
  • Jumping & drifting > Art B-Reverse Airdodge
  • Art B-Reverse > Wavebounced Back Slash
Like I've said, Art B-Reversing Monado Speed on the ground results with a slide distance less than the other four Monado arts. Even when you Art B-Reverse Monado Speed in the air & land on the ground, you travel less distance sliding upon landing because the art increases friction / traction the moment Speed activates. Surprisingly, Monado Jump & Monado Shield B-Reversed across the floor travel about the same distance, which is also true for Monado Buster & Monado Smash. Sorry Speed art.:upsidedown:

And again, I seriously see potential in B-Reversed grab. According to Shulk's frame data, standing grab going by numbers is the safest option between standing grab, dash grab, & pivot grab, but standing grab by itself is the worst when it comes to an actual match when you want to go for a grab. So to make standing grab better, Art B-Reversing grab improves the standing grab option immensely. This effective option is worsened by the Speed art unfortunately, but eh still fine.
Pivoted Forward Tilt
How to perform it:
(While Dashing or Running Left):GCL: » :GCR::GCA:
(While Dashing or Running Right):GCR: » :GCL::GCA:
As you're Dashing or Running towards a direction, tap to the opposite direction on the control stick & press the A button.

Applications: This technique is a swell spacing option for Shulk. Not only does Shulk hit characters from up close as he slides a bit of distance during the pivoted animation, but per-say a roll or any chasing approach coming toward you, this technique can be the solution to that. Pivoted Forward Tilt becomes a solid option for Speed Shulk since he slides a great amount of distance, & Buster Shulk's F-tilt deals amazing damage & shield knockback for when characters approach you with shielding after dashing or running towards you. Shield Shulk slides less distance than Vanilla but that can be utilized for closer fighting range. And if you're playing safe with Smash Shulk, this technique doesn't hurt you for trying it despite the weaker shield damage & shield knockback.

Jump Canceled Up Smash
How to perform it:
(Tap Jump on) While dashing or running :GCL: or :GCR: » tap & hold :GCUL: or :GCUR: » immediately press :GCA: or flick :GCCU:
(Tap Jump off) While dashing or running :GCL: or :GCR: » press:GCX: » immediately tap & press:GCU::GCA: together

Applications: JCUS slightly extends the distance you travel across the ground rather than doing a hyphen smash or running USmash. The times you're dashing or running to a direction, getting that extra distance to assure USmash hits the opponent can be done with this technique. Shulk's 1st hit of USmash from the front reaches farther than from behind, & because Shulk still moves slightly forward while doing the JCUS, the 1st hit knocking them up into the 2nd hit is more guaranteed since the opponent could tap the control stick in order to DI away from the 2nd hit. Only the Speed & Shield Arts make a mobile difference to this technique, which Speed increases the distance & Shield decreases the distance (It's not even worth trying to JCUS with Shield Art on. You're better off doing running USmash or hyphen smashing out of a dash as Shield Shulk). Catch characters trying to land to the ground with this technique especially when you're Speed Shulk, & using it to catch a ledge option is not too shabby either.

Reverse Jump Canceled Up Smash
How to perform it:
While dashing or running left :GCL: » tap & hold :GCUR: » immediately press :GCX:& :GCA: together
While dashing or running right :GCR: » tap & hold :GCUL: » immediately press :GCX: & :GCA: together

Applications: The difference that you'd utilize about RJCUS compared to JCUS is the reversed motion since USmash's 1st hit from the front has a better hit-box range than behind the USmash. It'd be more common using this technique with only the Speed Art but Vanilla or rather any Art active still works. Reversing the JCUS will mess up an opponent's DI capability since they'll think to hold away, but this would actually favor the RJCUS because they'll be holding towards the direction they get launched to, being the USmash's 2nd hit. USmash in general can punish spotdodge or a ledge option like the ledge-roll, but a RJCUS would punish those same options including others such as a forward roll towards you in order to get behind you.

Neutral Air Landing
How to perform it:
Upon landing » :GCA:
(If C-stick is set to Attack) Upon landing » :GCCUR: or :GCCDR: or :GCCDL: or :GCCUL:

Applications: When performing an aerial out of a rising Full Hop with Vanilla Shulk such as FAir, BAir, or UAir, you can input NAir as you're about to land so that you land with only 12 frames of landing lag instead of 17 - 21 frames of landing lag. Shulk's NAir has the shortest amount of landing lag frames, so when you're trying to position yourself by falling to the ground after placing an aerial, it may be helpful landing with N-air & apply drifting in a direction based on the opponent's positioning & reaction to you Full Hopping. Jump Art expands the possibilities of this tactic not just because you're jumping around, but because Short Hopping or Full Hopping an aerial, & landing with NAir while drifting away from or towards your opponent causes Jump Shulk to slide a bit of distance towards across the floor. It's also notable that NAir starts from behind you & becomes active on frame 13, so a retreating NAir upon landing & facing away from your opponent can cover you at the last moment.

*Some Examples*
Jump Shulk
Short Hop » FAir » NAir landing lag
Full Hop » FAir » NAir hit-box & landing lag
Full Hop » BAir » NAir hit-box & landing lag
Full Hop » UAir » NAir landing lag
Full Hop » DAir » NAir landing lag

Speed Shulk
Short Hop » AirDodge » NAir landing lag
Full Hop » AirDodge » NAir hit-box & landing lag
Full Hop » FAir » NAir landing lag

Shield Shulk
Short Hop » AirDodge » NAir landing lag
Full Hop » FAir » NAir landing lag
Full Hop » AirDodge » NAir hit-box & landing lag

Vanilla Shulk, Buster Shulk, & Smash Shulk
Short Hop » AirDodge » NAir landing lag (It's unneeded but it can fake someone out since it looks like it's active)
Full Hop » FAir » NAir hit-box & landing lag
Full Hop » BAir » NAir landing lag
Full Hop » UAir » NAir landing lag (This is tricky because inputting UAir too quickly can become USmash)

Air Slash Out of Shield
How to perform it:
(Tap Jump on) Press & hold :GCLT: » tap :GCU: » press :GCB: immediately
(Tap Jump off) Press & hold :GCLT: & hold :GCU: » press :GCX: & then press :GCB: immediately

Applications: Moments where you block an attack or you just want to be safe sitting in shield & want to punish their mistake, Air Slash is for you. Whether you like to zone the ledge & shield a ledge-attack or any attack you foresee near the ledge like their recovery move, or even them ledge-dropping & double jumping with an aerial, you can act out of shield & punish the aerial's endlag or the landing lag. Any projectile(s) that's dropped to hit you from above can be blocked & then the rising 1st hit of Air Slash can scoop them up followed by the 2nd hit no problem. If needed, you can also reverse the Air Slash to hit from behind you in case someone rolls or ledge-rolls behind you.

Air Slash Recovering Horizontally

How to perform it:
(Recovering Left):GCU::GCB: » Immediately Tap & Hold :GCL: » Delay Pressing :GCB:/:GCA:/:GCCN:/:GCZ:
(Recovering Right):GCU::GCB: » Immediately Tap & Hold :GCR: » Delay Pressing :GCB:/:GCA:/:GCCN:/:GCZ:

Applications: Optimizing our recovery with Air Slash is vital & very helpful. Times you're launched out too far & need to inch closer horizontally with the 2nd hit of Air Slash is key for surviving longer. For a visual signal of when it's safe inputting the 2nd hit of Air Slash after enough time delaying it, watch the red Beam disappearing from the Monado as it's swung behind Shulk. Right as you see that happening, input the 2nd slash while holding toward the direction you're moving towards to maximize the horizontal distance of the Air Slash. This helpful tactic is further improved by the Jump & Speed Arts because of their respected increased mobility stats, & as you'd figure the Shield Art makes this worse, delaying the 2nd hit of Air Slash with Shield active can still save your stock because delaying the 2nd slash to move forward or backward in most cases is always better than not delaying it at all.

*Note* Whenever you're performing an Air Slash & per-say you get hit in the midst of the delayed 2nd hit of Air Slash by an attack near the ledge, then pressing the B button again while holding forward would input as Back Slash which is a huge no-no. Instead of pressing B, conditioning yourself by pressing the A button or flicking the C-stick would input as a F-air. And pressing the Z button inputs as Airdodge, which finishes quicker than F-air. Perhaps maybe players would think it's good to input Air Slash normally & instead press Z for the 2nd slash in hopes to avoid inputting a move that could be a dangerous risk to do.

Jump Canceled Vision
How to perform it:
(Tap Jump on) Either :GCUL:, :GCU:, or :GCUR: » :GCD::GCB:
(Tap Jump off) Press :GCX: » :GCD::GCB:

Applications: A quickly executed Jump Canceled Vision in stationary position will travel a farther distance therefore extending the hit-box range of the Vision counterattack rather than a regular grounded Vision counter. Certain timing & height above the ground during the Vision counter is necessary for different results in order to extend the range of the attack even further, but again, a quickly executed JCV OoS with very little height off the ground is enough to be a noticeable result. The drawback to the JCV (which is jumping in the air & Vision countering in a way that Shulk's feet return to the ground before attacking) is that it loses the intangibility a grounded Vision possesses, which allows grounded Vision to counter most attacks like Flare Blitz & Metal Blade. If you were to attempt JCV countering Mega Man's Metal Blade with your intentions, then Shulk would be punished for it thus JCV is character-dependent against other MUs.

*Note* Jump Canceled Vision done airborne & landing on the ground before the counterattack begins does indeed increase the hit-box range of the move, but not touching the ground before the Vision counter sacrifices the intangibility it possesses. One way to counter an attack with JCV is by instantly canceling the jump so that Shulk's feet stay grounded before & after Vision counters the attack. You won't lose the intangibility from the Vision counter if done very quickly per-say out of shield or when dashing / running toward a direction.

Dashing / Running to Shield Grab
How to perform it:
While dashing or running to the :GCL: or :GCR: » press & hold :GCLT: » press :GCA: after shielding

Applications: Dashing or Running to Shield Grab can be helpful for approaching against the opponent's landing option, considering that they may use one of their aerials to cover their landing. Dashing or Running in & Shielding the attack at the right moment will cause a perfect shield to their attack & punishing them by grabbing out of shield would defeat the opponent's option of trying to keep you out. This also helps if you manage to Dash / Run Shield into a Pivoted FTilt & answer it by quickly shield grabbing after the move finishes hitting your shield unless the FTilt deals enough shield knockback to push you away. In that case, a Monado Art would improve this because any Art active following into a successful grab leads to a throw, but what about those moves that deal good shield knockback? Speed Art would be your answer to that. Speed Shulk has higher traction therefore takes less shield knockback from attacks, allowing him to punish with shield grab much more easily than Vanilla or any other Art. The increased traction also means that the distance you slide across the floor while Dashing / Running to Shield Grab is shortened, granting better control with your shield grabbing. Since Speed Shulk moves quickly & travels great amounts of distance from Dashing or Running, it blends well with shortened sliding from holding shield during a moving option.

Combat Walking
How to perform it:

Hold the :GCA: button when they're above you at a certain angle so that they're getting hit by Jab-1. If done right, the opponent will be hit high enough that Jab-2 will whiff & thus Jab-1 will hit the opponent repeatedly.To perform this without hitting someone, first hold your attack button to start the rapid Jab-1 animation & proceed to let go holding the attack button followed by holding the button once more. If done correctly, Shulk will do his rapid Jab-1 into Jab-2 & back to rapid Jab-1. Performing the Command Walk quicker & more fluently requires less time holding the A button & not pressing A again too fast since Shulk will do the full Jab Combo.

Note: Monado Arts don't affect this technique's movement. However, it's best to use the Buster Art with this technique as you'll find yourself dealing a lot of damage with just Jab-1 repeatedly & it's less knockback than Jab-2. As long as you delay Jab-3 so that it's able to hit, or mix it up after Jab-1 like grab or a tilt, you'll be fine.
 
Last edited:

DrShankums

Smash Cadet
Joined
Oct 23, 2014
Messages
47
The way I see it, this is one of the only ways in game to "L cancel". That's such a huge advantage right there, and with 5 different arts to "burn" you could be canceling most of your actions. Never stand still to choose your art, that's a total waste. If you need to enter a certain art, you should throw out an aerial and abuse the L cancel. Even if it doesn't hit, baiting an aerial may make your opponent go for a punish, which you can punish.
 
Last edited:

MarioFireRed

Smash Journeyman
Joined
Oct 4, 2014
Messages
445
Location
Colony 9
NNID
MarioFireRed
3DS FC
5026-4457-8398
A very interesting and unique advantage for Shulk in this game. Got to get down to learning this, especially with every Art from Speed onwards.
 
Joined
Jun 8, 2009
Messages
18,990
You guys better learn how to mash REALLY fast and accurately

I'm curious to see how each aerial's utility changes with MALLC. I've used b-air for MALLC when I'm going on the offensive. MALLC'ing d-air finally allows me to deal with landing and getting away from juggles
 

Locke 06

Sayonara, bye bye~
Joined
Oct 2, 2014
Messages
2,725
Location
Grad School
NNID
tl.206
Falling uair MALLC could be something. The weak hit (5%) pops them up in place and I could see it being used similar to Samus' falling UAir.

Uair (5% hit) MALLC>utilt true combos at all %'s. But it's ridiculously hard to get a falling 5% hit on small opponents like Jigglypuff. Also, it is just difficult in general. But it's a thing.

Maybe more promising:
Uair (10% hit) MALLC>air slash1>air slash2 is a lot easier. % testing needed, but works at 0% going into smash (don't ask). Might be different for speed and jump due to air slash heights.

Also, MALLC works really well off of ledge drop>double jump.
 
Last edited:
Joined
Jun 8, 2009
Messages
18,990
Correction about MALLC d-air, MALLC air dodge is better for the same situation stated but you can also go for d-air if you want. Air dodge is a lot safer though
 
Last edited:

Maple42

Smash Apprentice
Joined
Oct 4, 2014
Messages
150
I cannot stress how important this tech is enough; while Shulk is defensive in nature, there is literally no reason not to use this. I don't think it needs much explanation on why it's important; why not maximize your inputs per match?
 
Last edited:

kenniky

Smash Master
Joined
Oct 8, 2014
Messages
3,054
Location
MA
NNID
kenniky
3DS FC
1349-7627-3646
Request: can you put the different methods of MALLC in the OP? It'd be nice to have themm in text format instead of watching a 9 minute video every single time I need to remember :p
 

S.F.L.R_9

Smash Master
Joined
Sep 29, 2014
Messages
4,355
Location
Las Vegas it's hot yall help
NNID
suffler9
3DS FC
0061-1006-1500
I've been practicing MALLC recently and I really think it's going to become a major part of Shulk's gameplan. You can approach safely, come down onto the stage and cover yourself with a lagless aerial, and get some awesome combos off. One thing I'm really interested in is using a MALLC fair or bair with Jump. Since the first aerial of the string would have no lag, it'd easily let you follow up and gimp or kill someone; this is definitely something we should look into.
 

Maple42

Smash Apprentice
Joined
Oct 4, 2014
Messages
150
@ kenniky kenniky
: D

Short Hop and directly afterwards, hit B. Use any aerial (or air dodge); do not fast fall.

Full Hop, press B at the top of the arc, use any aerial; avoid fast falling.

To Full Hop with a fast fall, press B at some point before you reach the top of the arc.

To double jump, press B soon after your legs extend, after the spin from the second jump.

To short hop and fast fall, press B directly before you short hop, then after performing the aerial, fast fall.

To use an Art other than Jump, press B one less time than necessary for the desired art; then, perform one of the methods mentioned beforehand.
i.e. For Buster, press B three times, then follow the directions for the other method.
 

Masonomace

Yeah Shulk, get stuck in!
Joined
Apr 10, 2010
Messages
4,622
Location
Independence, MO
NNID
Masonomace
When I'm falling down towards the floor & MALLC with any aerial (mostly B-air), my friend would spot-dodge the attack or perfect shield the hit. If either happened & I respond with a spot-dodge immediately after MALLC'ing so that I have enough invincibility to evade the perfect-shield grab or the spot-dodge > grab.

@ Locke 06 Locke 06 brought up a nice point for MALLC'ing U-air whether it's for just the 1st hit's little knock-up to true combo into U-tilt, or for the 2nd hit that does all the knockback & leads into Air Slash. Since Customs are a thing too, Advancing Air Slash would do very nicely I imagine. This all does wonderfully when you MALLC U-air under a platform to force an airdodge into a free U-tilt, or combo into it if planned. And as a quick note, Speed mode doesn't affect Air Slash's height. Jump is the only Art that affects the height.

EDIT: I'm currently messing with B-Reversing, Turn-around, & WaveBouncing the MALLC window to see any interesting results.
 
Last edited:

erico9001

You must find your own path to the future.
Joined
Jul 13, 2014
Messages
1,670
Location
Wiscooonsin
NNID
Erico9001
3DS FC
1091-8215-3292
Great! I was actually about to post a thread relating to this. The thread's draft somehow got erased though? Idk. The important thing was the pictures, though, which I still have.

Oh, before I get to that, I'd like to bring up that I've been MALLC with an air dodge to cover my landing! Not being able to air dodge near the ground is a real pain, so I'm glad to have this.
-
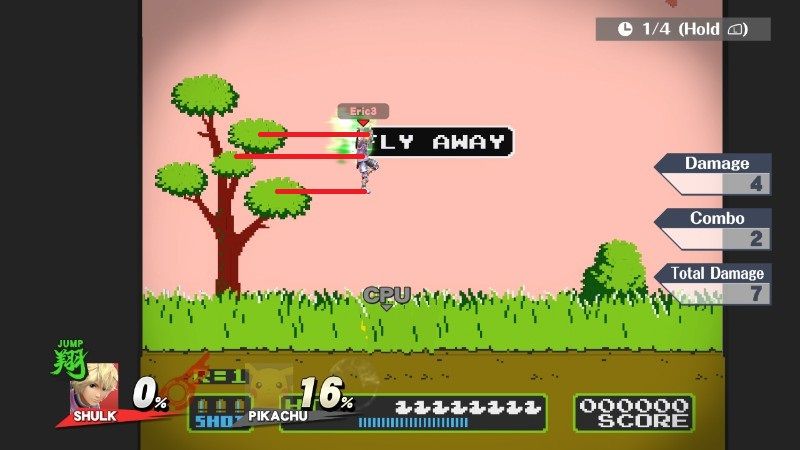
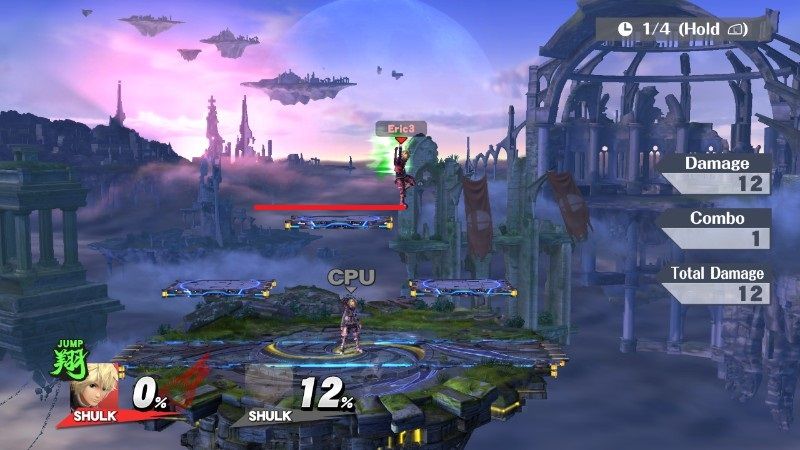
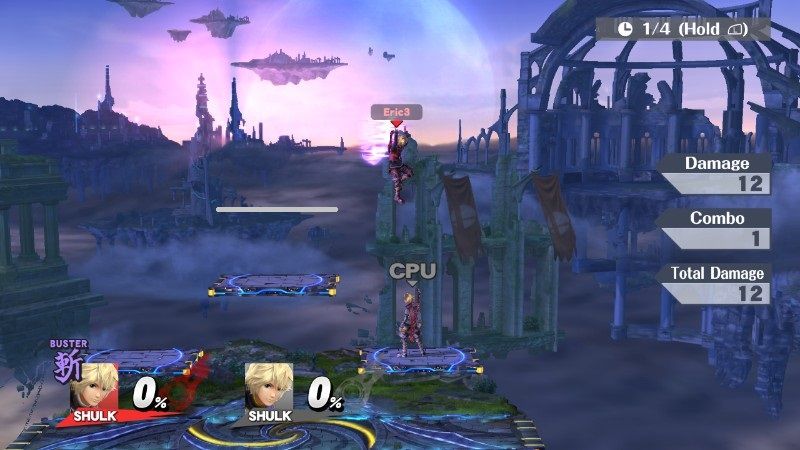
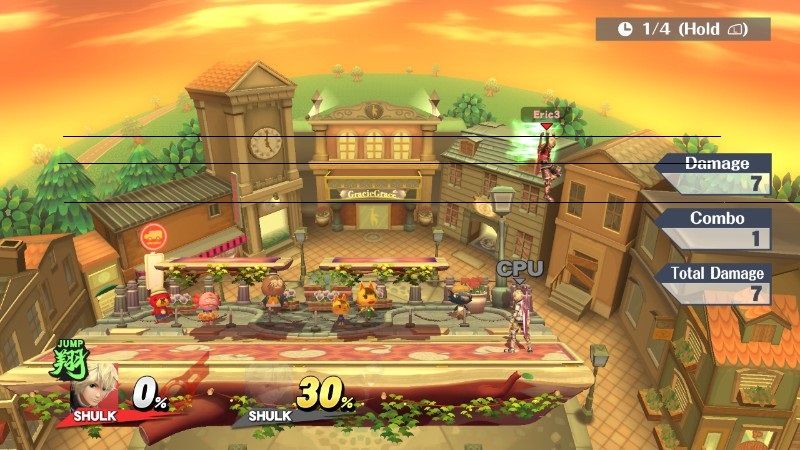
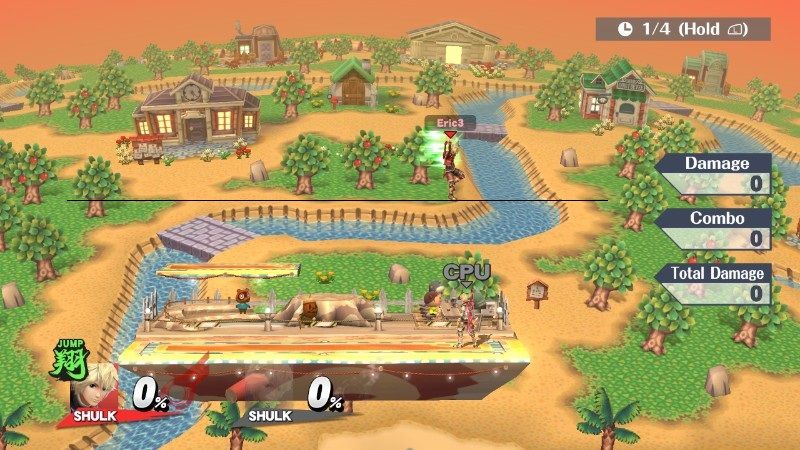
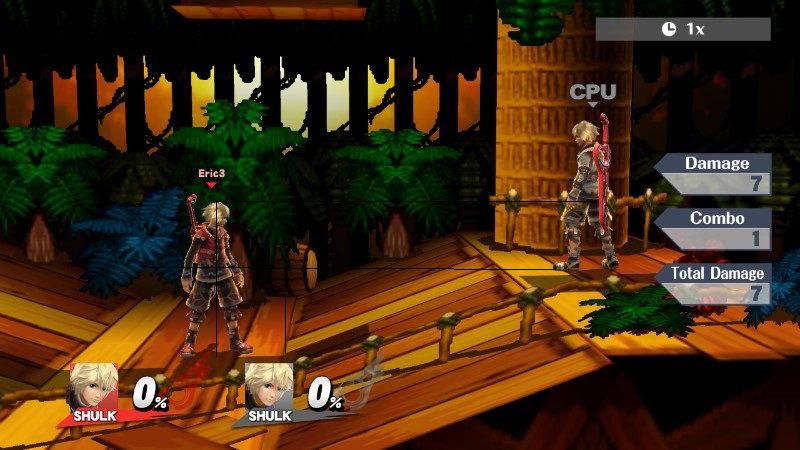
So what I've been doing research into is MALLC with different stages. You can use the stages as references in order to MALLC from high areas. There are advantages to this, such as being an easy way to utilize a specific art you want. Another is to cover landings after being hit high up. When I'm doing this, I'm using Bair. It has more hitstun than Fair and Nair, so it needs lower heights to work. The difference isn't too significant, though, and you should still get a decent MALLC with Fair and Nair. I think the combined hits of Dair and Uair have more hitstun, so they may not work with these heights. Single hits should work, though.


From this height, going at full (constant) fall speed, I will MALLC when I hit the ground. Any higher than this and the activation of the art will be before I land. At later times, there will still be a MALLC, but the lag increases.


Just imagine a horizontal line from the point of reference on Shulk's body to the part of the stage. Usually I'll either use Shulk's head, feet, or waist as reference points.

Battlefield

The reference to use is when Shulk's feet are just above the top platform. However, you still get a great MALLC if you use the top platform as reference instead (still, feet on top).


To MALLC onto the lower platforms, envision a third platform (with same vertical distance) being above the top platform. Think of it kind of like Big Battlefield, how you have the third platform on top there. Hit B when your feet are just above that imaginary platform. If you want to MALLC onto the top platform, you need to either imagine the height of two platforms, or just put the height from the ground to the top platform.

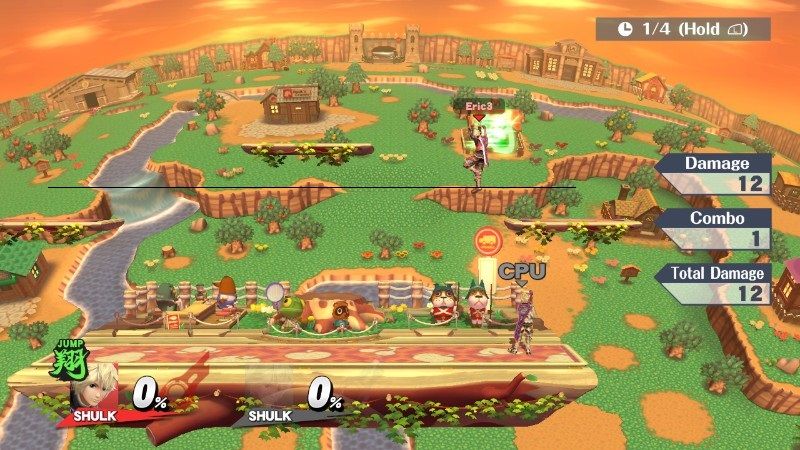
Town and City


This photo is a little off. Shulk's foot is supposed to be on the black line. Anyways, for this part of Town and City, you can either use *a little above the side platforms* as reference, or if the camera is zoomed out at this height (result of you being high in the air and opponent being on ground) you can use the cliff in the background as a reference.


For the other part of Town and City, the moving platforms are just a little above the height of Battlefield's shorter platforms. All you need to do is imagine twice the height of the moving platforms (or imagine another platform stacked on top of it). You may be able to use some things in the background as reference too. I wouldn't recommend it, though.

Smashville


The height of the moving platform on Smashville is the same height as the paltforms on the second part of Town and City. Use the same method.

Kongo Jungle 64

If landing on the outer parts of the base of the stage, Use when your foot is right by the higher part of the side platforms.


For MALLC onto the lower part of the stage, we must figure out the height difference in reference to Shulk.


The difference in height is from his foot to his waist. Therefore, to MALLC onto the lower platform, activate your art when your waist is on the top of the higher part of the side platforms.


Use your own judgement for when to activate the art if landing between the top and middle parts.

---------------------

These are the only stages I've looked into so far. After all this testing, though, I've kind of gotten a feel for the actual height from which to MALLC from regardless of stage. It's a little more than 2.5 Shulk heights from the ground to Shulk's feet. Or, if you're using Shulk's waist as reference instead of his feet, then it's a little more than 3 Shulk heights.
 

Artryuu

Smash Journeyman
Joined
Oct 19, 2014
Messages
296
Location
Canada
NNID
Artryuu
3DS FC
5086-2093-6692
There are so many things Mallc can be used even to the point I have come very attach to it that I can't change arts in the ground anymore. From aerials landing, to airdodging and landing safely, to even landing with taunt invincibility=
https://www.youtube.com/watch?v=hRVYiYpASV8&t=1m11s

Yeeeah. This is a must for any shulk player :p. Tbh, I don't analyze the moment to activate it, just do it as second nature. It's not that you always have to do a full hop with jump monado (it works tho.)

But so far this are some of the follow-ups I have done with it=
Mallc, Any aerial, spotdodge/ grab
Mallc, Any aerial, shield
Mallc, Any aerial, any smash attack
Change arts, Bair (if bair hits), dash attack/ smash attack.
Change arts, airdodge, art cancels and you land safely.

This brings lots of mindgames too ;). <3
 

Masonomace

Yeah Shulk, get stuck in!
Joined
Apr 10, 2010
Messages
4,622
Location
Independence, MO
NNID
Masonomace
^ I dig those options @ Artryuu Artryuu , especially the MALLC > any aerial > spotdodge. The invincibility window from both the MA activation combined with the spotdodge is very helpful & it has saved me from getting grabbed on many occasions.

What about cycling to Buster / DBuster / HBuster after hitting someone's shield with an aerial, would that next (D or H)Buster augmented attack have shield-breaking potential?
 

Artryuu

Smash Journeyman
Joined
Oct 19, 2014
Messages
296
Location
Canada
NNID
Artryuu
3DS FC
5086-2093-6692
^ I dig those options @ Artryuu Artryuu , especially the MALLC > any aerial > spotdodge. The invincibility window from both the MA activation combined with the spotdodge is very helpful & it has saved me from getting grabbed on many occasions.

What about cycling to Buster / DBuster / HBuster after hitting someone's shield with an aerial, would that next (D or H)Buster augmented attack have shield-breaking potential?
It would shield break only if you were already pressuring his shield or if you fully charged that f-smash after the bair hits. I don't think they will fall for that though, but it's possible.

But if anything an option setup for shield break pressure could be=

Change
speed art, bair, lag cancel and immediately jump, change art to jump, bair, lag cancel and immediately jump, change art to buster, bair, lag cancel to f-smash.
Kinda like how 9B started of his matches with Earth=

https://www.youtube.com/watch?v=ebpNgfi5d4U
 
Last edited:

Masonomace

Yeah Shulk, get stuck in!
Joined
Apr 10, 2010
Messages
4,622
Location
Independence, MO
NNID
Masonomace
It would shield break only if you were already pressuring his shield or if you fully charged that f-smash after the bair hits. I don't think they will fall for that though, but it's possible.

But if anything an option setup for shield break pressure could be=

Change
speed art, bair, lag cancel and immediately jump, change art to jump, lag cancel and immediately jump, change art to buster, lag cancel to f-smash.
Kinda like how 9B started of his matches with Earth=

https://www.youtube.com/watch?v=ebpNgfi5d4U
Indeed. That video gave me some inspiration to a shield-break "combo". What I could see as a simplified follow-up would be the aerial with the highest shield-stun (probably B-air) & then MALLC'ing to a Buster Art in order to use D-smash (or any quick move that deals good shield-damage) since it has very high shield-damage & shield-stun as well.

As far as shield pressure goes, that match's beginning is a very nice reference. It feels overwhelming.
 
Last edited:

erico9001

You must find your own path to the future.
Joined
Jul 13, 2014
Messages
1,670
Location
Wiscooonsin
NNID
Erico9001
3DS FC
1091-8215-3292
It would shield break only if you were already pressuring his shield or if you fully charged that f-smash after the bair hits. I don't think they will fall for that though, but it's possible.

But if anything an option setup for shield break pressure could be=

Change
speed art, bair, lag cancel and immediately jump, change art to jump, bair, lag cancel and immediately jump, change art to buster, bair, lag cancel to f-smash.
Kinda like how 9B started of his matches with Earth=

https://www.youtube.com/watch?v=ebpNgfi5d4U
Speaking of this, what 9B does in that video is:
1) Short hop. During this time, he deactivates any monado art he is in if needed.
2) Second jump.
3) When rising with the second jump, he switches to the art he wants. He gets to the art he is looking for just after the top of the arc.
4) Fast Fall
5) Use aerial (in this case, Bair, which basically means he needs to fast fall and use Bair at the same time.)
 
Joined
Jun 8, 2009
Messages
18,990
I'm really loving how I can cancel my air dodge's landing lag with MALLC. It really helps in getting out of juggles quickly. @ Zatchiel Zatchiel brought this up but have you guys thought about using vision off from MALLC? It's hilarious.

Oh, here's the original quote:
Zatchiel said:
- I found myself being saved by the invincibility frames on activation a few times, so maybe it's not always best to keep on aggression or dodge once it cancels your landing lag. I think it'd be wise to go for Vision if the opponent is aggressive out of shield. Otherwise you can bait some other shield option. Just know that you can do whatever you want after the lag cancel.
MALLC b-air is godlike but I think it's essential also to get MALLC down with f-air since f-air comes out faster and it's less prone to being power shielded. Although cancelling the landing lag is as tricky since f-air has ~3 less frames of landing lag than b-air, getting follow ups from f-air is much easier than getting follow ups from b-air imo because we're usually spacing b-air so chances are, the only move we can follow up from b-air (base hit, NOT super close but at the middle of the Monado) is f-smash. MAYBE d-tilt or f-tilt may work but it depends.

Now I'm think about this...

It's possible to get more follow ups off from n-air if you cancel the landing lag. No ****. B-air is great for defensive and offensive pressure. F-air is pretty much the same except it's easier to follow up from. I think d-air deals a good amount of shield stun even in Vanilla so if you manage to land the beam hit on shield, THEN you cancel your landing lag, you can go for a grab while the opponent's still shielded. Test this if you can before actually using this online or at a local plz (I'm away from Smash atm). U-air, well... Locke and Mace explained that already
 
Last edited:

Masonomace

Yeah Shulk, get stuck in!
Joined
Apr 10, 2010
Messages
4,622
Location
Independence, MO
NNID
Masonomace
Something interesting yet very difficult I'm trying to practice for MALLC'ing, I'm currently practicing this:

Quickly press B to cycle to Jump, Short Hop immediately & use an aerial & FF it immediately. Doing this input in a very quickly is not easy & I probably won't continue to practice this, but it was educational while it lasted. If anyone else tried this & has some good results from it lemme know.:shades:
 
Last edited:

Zatchiel

a little slice of heaven 🍰
Joined
May 27, 2009
Messages
11,089
Location
Georgia
NNID
Zatchiel
Switch FC
SW-0915-4119-3504
Something interesting yet very difficult I'm trying to practice for MALLC'ing, I'm currently practicing this:

Quickly press B to cycle to Jump, Short Hop immediately & use an aerial & FF it immediately. Doing this input in a very quickly is not easy & I probably won't continue to practice this, but it was educational while it lasted. If anyone else tried this & has some good results from it lemme know.:shades:
I do that a lot. Just short hop and select Jump while you're rising, then fast fall with an aerial. If you're going to use b-air you have to select the art at the apex of your short hop instead, before you fastfall. F-air, n-air, and b-air set up edgeguards easily combined with this. Or you could tech chase/pursue them from the air if that sends them somewhere onstage.
 

erico9001

You must find your own path to the future.
Joined
Jul 13, 2014
Messages
1,670
Location
Wiscooonsin
NNID
Erico9001
3DS FC
1091-8215-3292
I do that a lot. Just short hop and select Jump while you're rising, then fast fall with an aerial. If you're going to use b-air you have to select the art at the apex of your short hop instead, before you fastfall. F-air, n-air, and b-air set up edgeguards easily combined with this. Or you could tech chase/pursue them from the air if that sends them somewhere onstage.
I'm pretty sure he means the strategy of pressing the monado art before short hopping and being sure to fast fall ASAP (remembering you can't fast fall until the top of the arc). It is actually in the video, but I just showed a video of Jerm doing it.

For what you're describing, I dont see why you're fast falling when selecting the art after you short hop. It's unnecessary, unless you're trying to avoid connecting both hits of a Dair or Uair, which would have too much hitstun for the MALLC to work.
 
Last edited:

Masonomace

Yeah Shulk, get stuck in!
Joined
Apr 10, 2010
Messages
4,622
Location
Independence, MO
NNID
Masonomace
I do that a lot. Just short hop and select Jump while you're rising, then fast fall with an aerial. If you're going to use b-air you have to select the art at the apex of your short hop instead, before you fastfall. F-air, n-air, and b-air set up edgeguards easily combined with this. Or you could tech chase/pursue them from the air if that sends them somewhere onstage.
The timing is different. I'm talking about pressing B right before lightly pressing X to SH & go from there. The reason I brought this up is because a very quick input of cycling to an Art & then immediately doing a SH > aerial (let's use N-air for an example) > FF > MALLC literally shows no landing lag if not just a few frames. The exact moment you land on the floor while N-air is out there, you've automatically MALLC'ed the N-air so quickly that if you were to mistime this entire input, it would look like the Jump Art activated just before you landed. This particular input chain is the fastest I've been able to MALLC an aerial but yeah.

It looks really sexy when you do this with D-air but not so much U-air because of the whole U-smash mis-input issue but it's still possible. I feel that trying to consistently do this certain way of doing MALLC requires a certain controls button layout so that it's easier for me to do. Right now, it's much too stressful on my GCC trying to swipe my thumb pressing B & shifting all the way to X to jump. I'll probably have to set R to Jump before I tackle this type of MALLC input again.
 
Last edited:

Zatchiel

a little slice of heaven 🍰
Joined
May 27, 2009
Messages
11,089
Location
Georgia
NNID
Zatchiel
Switch FC
SW-0915-4119-3504
I'm pretty sure he means the strategy of pressing the monado art before short hopping and being sure to fast fall ASAP (remembering you can't fast fall until the top of the arc). It is actually in the video, but I just showed a video of Jerm doing it.

For what you're describing, I dont see why you're fast falling when selecting the art after you short hop. It's unnecessary, unless you're trying to avoid connecting both hits of a Dair or Uair, which would have too much hitstun for the MALLC to work.
I'm aware that his suggestion is different from mine. I'm not confused. He wanted feedback and I let him know of my experiences with Jump MALLC while also making a suggestion of my own, although I notice I did misspeak. He said that his method felt difficult to pull off so I recommended an easier one.

Upon further inspection the fastfall does seem fruitless. Possibly just something I'm accustomed to but it doesn't carry any real benefit. Without the fast fall it still allows you to be in the air earlier, and cancels almost regardless of when you use the aerial during the short hop.

The timing is different. I'm talking about pressing B right before lightly pressing X to SH & go from there. The reason I brought this up is because a very quick input of cycling to an Art & then immediately doing a SH > aerial (let's use N-air for an example) > FF > MALLC literally shows no landing lag if not just a few frames. The exact moment you land on the floor while N-air is out there, you've automatically MALLC'ed the N-air so quickly that if you were to mistime this entire input, it would look like the Jump Art activated just before you landed. This particular input chain is the fastest I've been able to MALLC an aerial but yeah.

It looks really sexy when you do this with D-air but not so much U-air because of the whole U-smash mis-input issue but it's still possible. I feel that trying to consistently do this certain way of doing MALLC requires a certain controls button layout so that it's easier for me to do. Right now, it's much too stressful on my GCC trying to swipe my thumb pressing B & shifting all the way to X to jump. I'll probably have to set R to Jump before I tackle this type of MALLC input again.
Once again, I am aware. I apparently imposed rather than making a separate suggestion. I wasn't trying to imply that the two methods were to the exact same effect.

For your method, it's very good for approaches, but the only downside to it is that it doesn't work out of a dash or run. So the offensive use is strictly close quarters combat since you have to fast fall. Either method is fine here so it only depends on when exactly you want to go on the offensive. But if you're trying to invade from mid range getting that extra distance after the short hop could be crucial. And if you hit your opponent just before landing you can follow up just as quickly.

Modifying your control scheme could do you some good. I don't play with tap jump off so maybe that's why I'm having an easier time with your method. What I had guessed was that mine would make it feel a bit easier to get the same result; an art cancel. Time discrepancies aside.
 

Masonomace

Yeah Shulk, get stuck in!
Joined
Apr 10, 2010
Messages
4,622
Location
Independence, MO
NNID
Masonomace
For your method, it's very good for approaches, but the only downside to it is that it doesn't work out of a dash or run. So the offensive use is strictly close quarters combat since you have to fast fall. Either method is fine here so it only depends on when exactly you want to go on the offensive. But if you're trying to invade from mid range getting that extra distance after the short hop could be crucial. And if you hit your opponent just before landing you can follow up just as quickly.

Modifying your control scheme could do you some good. I don't play with tap jump off so maybe that's why I'm having an easier time with your method. What I had guessed was that mine would make it feel a bit easier to get the same result; an art cancel. Time discrepancies aside.
The good thing about this is that it can work out of a dash or run. By dashing, lightly tapping the control stick forward & setting it back to Neutral followed by pressing B immediately will cycle to Jump. After Jump is displayed that's when a SH > aerial > FF > MALLC is in need. Running is trickier because you can't do it with Jump unless you cycled through all 5 Arts & cycle back to Jump after Smash, but it's do-able from running as well. I usually do this with Speed since it's the 2nd Art & because I can press B once to get to Jump & then act with dashing / running forward, I can go from there.

The issue with this like you mentioned is that it's close quarters if I'm SH'ing in stationary position but not as close quaters if I do a tapping Dash sequence & go from there. Running is mid-way-ish distance & can be a decent closing of space. Drifting some distance after the FF though?
:4sonic:: No way dude!
lol, but yeah, all that control stick guiding is going to buff my left thumb to the max. Tap Jump on would immensely help if it meant this way of doing MALLC is easier to do. Tbh though, you're right in that we get the same result, & that this way of implementing MALLC atm is more strenuous than anything. I'll give this some more thought.
 
Last edited:

erico9001

You must find your own path to the future.
Joined
Jul 13, 2014
Messages
1,670
Location
Wiscooonsin
NNID
Erico9001
3DS FC
1091-8215-3292
The timing is different. I'm talking about pressing B right before lightly pressing X to SH & go from there. The reason I brought this up is because a very quick input of cycling to an Art & then immediately doing a SH > aerial (let's use N-air for an example) > FF > MALLC literally shows no landing lag if not just a few frames. The exact moment you land on the floor while N-air is out there, you've automatically MALLC'ed the N-air so quickly that if you were to mistime this entire input, it would look like the Jump Art activated just before you landed. This particular input chain is the fastest I've been able to MALLC an aerial but yeah.

It looks really sexy when you do this with D-air but not so much U-air because of the whole U-smash mis-input issue but it's still possible. I feel that trying to consistently do this certain way of doing MALLC requires a certain controls button layout so that it's easier for me to do. Right now, it's much too stressful on my GCC trying to swipe my thumb pressing B & shifting all the way to X to jump. I'll probably have to set R to Jump before I tackle this type of MALLC input again.
Oh. Yeah, definitely make the switch. A while ago, I actually made the switch from tap jumping to using the left bumper on my Pro Controller, and I've never regretted that. It's very easy to jump around in the air while changing monado arts. It's also very easy to do aerials with the right analog or c stick (another switch I made at that time).
 
Joined
Jun 8, 2009
Messages
18,990
I'm going to utilize this tech for a tournament tomorrow. I'll post what I manage to do with this tech
 

AlvisCPU

Smash Ace
Joined
Jul 16, 2014
Messages
778
Location
Luxendarc
NNID
GaleSlash
3DS FC
2492-4221-0172
Wow, I need to venture out of the Social thread more. I didn't even know this was here - and it's beautiful.

Thanks to @ erico9001 erico9001 for the video. I think we really did just need to learn the timings to make consistent use of the tech.

I too have a tourney this weekend but I don't think I'll learn it well enough in two days to make reasonable use of it. I've got a lot of reading to do here.
 
Last edited:

ampatron

Smash Rookie
Joined
Dec 13, 2014
Messages
9
Location
BC, Canada
NNID
ampatron
Just to be clear: Does the landing lag end the moment the art activates? I'd like to have a point of reference for this.
 

Eisen

Smash Ace
Joined
Sep 17, 2009
Messages
662
Location
Planet Tallon IV
NNID
AndroidPolaris
Guys, i just figured out something even more useful.

>start match > switch to speed monado > dash > hold the direction > shulk will automatically cancel the art while you're running, which can lead into things like ftilt, fsmash, dtilt, dsmash, vision, jab and uptilt. I don't know if this was mentioned in previous posts because for some reason this thread is incredibly laggy on my laptop and I can't be bothered to look through all the replies right now.

But this is seriously important. I just found myself a new match opener. You can do so much with this. Cancel speed art into a long range dash-cancelling fsmash, cancel shield and jump/buster/smash arts for mixups, and even just holding the control stick and walking out of the monado cancel if the opponent gets jumpy. I can't wait to try this out in FG tomorrow.

Edit: I have a impromptu video made and ready to upload if anyone can confirm that nobody has really discussed/tutorialized this.
 
Last edited:

Masonomace

Yeah Shulk, get stuck in!
Joined
Apr 10, 2010
Messages
4,622
Location
Independence, MO
NNID
Masonomace
Just to be clear: Does the landing lag end the moment the art activates? I'd like to have a point of reference for this.
It does. I did this in Training Mode at 1/4x (Hold L) speed to see what happens in chronological order & it goes like this:
  1. Landing Lag
  2. Monado Art symbol by your Damage meter flashes along with the sound the Art activation makes. At the same time, Shulk begins to do his pose having invincibility frames near the very beginning of the pose (the moment Shulk starts doing whichever pose, we have to wait for a couple of frames [Idk how many frames it is] & then we can cancel the remainder of the pose by using whatever input you wanted).

Guys, i just figured out something even more useful.

>start match > switch to speed monado > dash > hold the direction > shulk will automatically cancel the art while you're running, which can lead into things like ftilt, fsmash, dtilt, dsmash, vision, jab and uptilt. I don't know if this was mentioned in previous posts because for some reason this thread is incredibly laggy on my laptop and I can't be bothered to look through all the replies right now.

But this is seriously important. I just found myself a new match opener. You can do so much with this. Cancel speed art into a long range dash-cancelling fsmash, cancel shield and jump/buster/smash arts for mixups, and even just holding the control stick and walking out of the monado cancel if the opponent gets jumpy. I can't wait to try this out in FG tomorrow.

Edit: I have a impromptu video made and ready to upload if anyone can confirm that nobody has really discussed/tutorialized this.
This is nice for any Art because they slide longer distances across the floor during the activation while dashing or running (even walking can grant a little distance). One thing we can do while running is use the Monado Art activation in combination with spot-dodging at the right time to slide a greater distance. Another cool thing to do is cycle to Smash during a running motion & Vision counter to halt the slide & prepare countering said move for a likely KO. There's a bunch of cool things we can do with this.:shades:

But about Speed. It can be much safer than any other Monado Art activation because the instant increase of traction reduces the sliding distance afterwards, which is a good thing. The improved ground control no matter if you were running or walking is nice to have & it gets better with Hyper Speed (better meaning that you slide for less distance after running or walking).

Edit: Something I'm trying out pertaining to this is running & timing a B-Reverse to the Art activation to turn us around running in the other direction. There's some interesting results from doing this.
 
Last edited:

Eisen

Smash Ace
Joined
Sep 17, 2009
Messages
662
Location
Planet Tallon IV
NNID
AndroidPolaris
Pardon my broken speech. Like I said, this was ad-libbed and I'm not a camera person. u_u
 
Joined
Jun 8, 2009
Messages
18,990
Nice video. I'll try applying this in my matches :)

I might change this thread into the AT thread. Title suggestions?
 
Last edited:
Joined
Jun 8, 2009
Messages
18,990
I think I got the title right. I think... I think....

Is this okay?
 
Last edited:
Joined
Jun 8, 2009
Messages
18,990
I could, but an idea is that we could take all the technique videos in the Metagame Thread & move them here instead.
Yeah that works. Oh and I responded to your report btw. I gotcha

Edit: Whelp. I can't change OP owners anymore. Never mind :(

Just give me suggestions for the OP or just make an OP post, send it to me, then I'll replace the current OP with it
 
Last edited:

Jerm

U Feelin' It?
Joined
Dec 24, 2013
Messages
687
Location
Canada
NNID
Jermalie0
3DS FC
4940-5666-9945
Pardon my broken speech. Like I said, this was ad-libbed and I'm not a camera person. u_u
This is actually sooooo useful! I've done it a bunch by accident but didn't fully realize what I was doing. I think this will be great to run towards an opponent while switching to smash then dash cancel right under them and surprise them with that sexy Utilt! Gonna try it out today during Hypest :D Been trying to find a way to run and do a utilt (Similar to a DACUS approach) since the Utilt is the greatest anti air attack in the game imo and this is just too perfect!


Since air dodges are sooo bad in this game you can literally run under someone while they are trying to land and just keep changing arts until you are ready to cancel it into a punish. So excited!!
 

Eisen

Smash Ace
Joined
Sep 17, 2009
Messages
662
Location
Planet Tallon IV
NNID
AndroidPolaris
Besides what I mentioned already, I want to point out that dashing backwards from the monado art cancel is an option as well. It's like shulk gets a big, one time dash dance. Not amazing but any tech at all is great in this game.

And yeah, @ Jerm Jerm , that's exactly the kind of thing I'm hoping to implement. Utilt is usually so predictable and vertical it's one of the lesser used moves of mine. Now it just got even sexier, which is great because it's such a satisfying move to land.
 

erico9001

You must find your own path to the future.
Joined
Jul 13, 2014
Messages
1,670
Location
Wiscooonsin
NNID
Erico9001
3DS FC
1091-8215-3292
This is actually sooooo useful! I've done it a bunch by accident but didn't fully realize what I was doing. I think this will be great to run towards an opponent while switching to smash then dash cancel right under them and surprise them with that sexy Utilt! Gonna try it out today during Hypest :D Been trying to find a way to run and do a utilt (Similar to a DACUS approach) since the Utilt is the greatest anti air attack in the game imo and this is just too perfect!


Since air dodges are sooo bad in this game you can literally run under someone while they are trying to land and just keep changing arts until you are ready to cancel it into a punish. So excited!!
Oo you're right, U-tilt would be great for this. I can imagine cancelling the dash with monado jump, doing U-tilt, and following up with an aerial. Also would be nice against people on platforms.
 
Top Bottom