• Welcome to Smashboards, the world's largest Super Smash Brothers community! Over 250,000 Smash Bros. fans from around the world have come to discuss these great games in over 19 million posts!

    You are currently viewing our boards as a visitor. Click here to sign up right now and start on your path in the Smash community!

Super Smash Bros. Infinite Project (Finally Finished!???)

Which title should we use?


  • Total voters
    22
  • Poll closed .
Status
Not open for further replies.

Venus of the Desert Bloom

Cosmic God
Super Moderator
Premium
BRoomer
Writing Team
Joined
Jul 30, 2007
Messages
15,317
NNID
VenusBloom
3DS FC
0318-9184-0547
At least the spam troll sort of respected the rules and didn’t delete submissions and such. I’ll be watching the music doc for any signs as well...

So I would still like to continue to use the Googledoc system as that helps funnel content away from this thread. That allows us to focus on more pressing issues such as newcomers, stages, and such.

Here’s my thoughts:

We focus on characters from each Smash game though games like Brawl and Smash 4 will be separate due to the roster size.

We allow only one submission per round. Along with a submission, a quick explanation as to why this alt color/costume should be included.

Each submission will have For and Against sections. People write thier Smashboards username in either section and the first one to get 6 votes wins. For means the costume is locked in while Against means it’s removed and a new one must be submitted.

When voting for Against, then explain why with a short sentence as to why you think this costume doesn’t fit.

After we complete every fighter’s costume, we move to the costume.

How does that sound?
 

Janx_uwu

Smash Champion
Writing Team
Joined
May 17, 2020
Messages
2,975
Location
Faraway Avalon
At least the spam troll sort of respected the rules and didn’t delete submissions and such. I’ll be watching the music doc for any signs as well...

So I would still like to continue to use the Googledoc system as that helps funnel content away from this thread. That allows us to focus on more pressing issues such as newcomers, stages, and such.

Here’s my thoughts:

We focus on characters from each Smash game though games like Brawl and Smash 4 will be separate due to the roster size.

We allow only one submission per round. Along with a submission, a quick explanation as to why this alt color/costume should be included.

Each submission will have For and Against sections. People write thier Smashboards username in either section and the first one to get 6 votes wins. For means the costume is locked in while Against means it’s removed and a new one must be submitted.

When voting for Against, then explain why with a short sentence as to why you think this costume doesn’t fit.

After we complete every fighter’s costume, we move to the costume.

How does that sound?
So, I think it sounds promising, but we may need to do a trial run as practice as I still don't fully understand it.
 

Venus of the Desert Bloom

Cosmic God
Super Moderator
Premium
BRoomer
Writing Team
Joined
Jul 30, 2007
Messages
15,317
NNID
VenusBloom
3DS FC
0318-9184-0547
Ok, so I really changed up the rules for submitting alternate costumes so please check the newly updated Google docs for it. I filled in some of the alternate costumes to give an example of the format to use. I think this system is the fairest and safest for adding content


Commander_Alph

Smash Lord
Joined
Mar 20, 2019
Messages
1,792
I want to an alt costume to t
Ok, so I really changed up the rules for submitting alternate costumes so please check the newly updated Google docs for it. I filled in some of the alternate costumes to give an example of the format to use. I think this system is the fairest and safest for adding content

Wait up, I don't have access to edit the doc.
 

Otoad64

Smash Lord
Joined
Oct 22, 2020
Messages
1,982
Location
Who Knows Where?
Ok, so I really changed up the rules for submitting alternate costumes so please check the newly updated Google docs for it. I filled in some of the alternate costumes to give an example of the format to use. I think this system is the fairest and safest for adding content

this part is unclear
  1. We will not be including alternate costumes, that changes the outfit and such, for every character. Unless it's a character like Inkling or Villager, a character that has all eight fields filled with alternate costumes will see these all removed.
so, are we only allowed to submit recolours?
 

Venus of the Desert Bloom

Cosmic God
Super Moderator
Premium
BRoomer
Writing Team
Joined
Jul 30, 2007
Messages
15,317
NNID
VenusBloom
3DS FC
0318-9184-0547
I think it meant "don't fill the rest of the spot with just alt costume"
Yes, this. I know it’s tempting to want to see an alt costumes for every character that are in the same vein as Builder Mario, Ike, or Joker but that’s not really realistic or feasible. We can of course include a few if they are iconic or popular but I kind of had a facepalm when I saw someone skin Akira over Ken on that last list.
 

GoodGrief741

Smash Legend
Joined
Sep 22, 2012
Messages
10,169
I finished organizing the music submissions, the Other section is done (the release dates were really convenient so thank you to whoever wrote them).

It's worth noting that some of the songs there don't follow the rule about having to be from a game on Nintendo consoles. Specifically, Jet Set Radio, Touhou 6, 3D Dot Game Heroes, and Slap City (well, and Dragalia Lost but... y'know). I left them there so that Venus can decide what to do with those, along with the SNK track that somehow got in.
 

Mr. Robotto

Smash Ace
Joined
Jan 20, 2019
Messages
631
Location
The Mayship
I finished organizing the music submissions, the Other section is done (the release dates were really convenient so thank you to whoever wrote them).

It's worth noting that some of the songs there don't follow the rule about having to be from a game on Nintendo consoles. Specifically, Jet Set Radio, Touhou 6, 3D Dot Game Heroes, and Slap City (well, and Dragalia Lost but... y'know). I left them there so that Venus can decide what to do with those, along with the SNK track that somehow got in.
Had some time on my hands, but not enough to organize them myself. So I thought about helping a bit.

Also yeah, for the record, the Capcom vs SNK track should not be there. I don't know who put that one in, but they should either be in the Street Fighter category or King of Fighters one, perhaps both even. Though just to let you know, Capcom vs SNK 2 is a Capcom-produced game, do what you will with that information. Though I'm moreso a fan of letting the track be playable on both the Street Fighter and KOF stage.

Can you send the song list again? I want to see it.
Here you go:
 
Last edited:

Venus of the Desert Bloom

Cosmic God
Super Moderator
Premium
BRoomer
Writing Team
Joined
Jul 30, 2007
Messages
15,317
NNID
VenusBloom
3DS FC
0318-9184-0547
Crash Moveset and Stage Voting

Well, it seems that we only have three entries for Crash. I was hoping for more but his moveset has pretty standard throughout the community. Here are the movesets.

Cash Banooca
View attachment 300539
What can I say? I'm a pretty big Cash Banooca fan. I've been supporting him ever since I first got the N. Sane Trilogy back in 2017.

With so much material to work with, it's not exactly easy to get a consise idea of how Crash would play in Smash. However, I wanted to keep it as simple as possible while staying true to his games.
Intro: Crash appears from a dimensional rift and jumps into his fighting stance.

Stance/Idle 1: His default idle animation from It’s About Time
Idle 2: Crash looks to either the left or the right
Idle 3: Crash looks to the screen and raises an eyebrow while smiling

Notable Palette Swaps:
  • Crash 4: It’s About Time (default)
  • Coco (blue/yellow)
  • Cortex (yellow)
  • Aku Aku (brown)
  • Uka Uka (dark brown)
  • Biker Crash (alt 1)
  • Fake Crash (alt 2)
  • JP Crash (alt 3)
Walk: His walk from It’s About Time
Run: His iconic run from the N. Sane Trilogy
Dash: The Crash Dash
Damage: Crash spins for a split second, in a manner similar to his death animation from the very first game
Jump: His iconic Jump and Double Jump
Crouch: His crouch from the N. Sane Trilogy

Weapon of Choice: Crash mainly uses his body to attack, but he can also pull out a Fruit Bazooka

Normal Attacks
Jab: Crash slaps twice (4%, small knockback) and then performs a weak spin that goes continuously (.5-2% each hit, small knockback), then finishes with an uppercut with his right fist (6%, small knockback)
Forward+A: Crash spins once and sticks out his left foot (5%, small knockback). This is based on Coco's spin kick from Wrath of Cortex.
Down+A: Crash does a slap along the ground (4%, small knockback)
Up+A: Crash lunges his legs upwards and spins them twice to look like kicking (8%, small knockback)

Aerial Attacks
Air+A: Same as his Forward Tilt (6%, small knockback)
Air Forward+A: Crash slightly hops forward and kicks with his left foot (5%, small knockback). This is based on his animation for when he jumps after a slide.
Air Back + A: Crash kicks behind himself with both legs (8%, small knockback)
Air Up+A: Crash does a quick spin with both arms in the air (9%, OK knockback). This is based on his spin from Crash of the Titans.
Air Down+A: Crash does a Belly Flop that bounces him back up when the hit connects, possibly meteor smashing the opponent (11%, OK knockback)

Dash Attack: Crash slides along the ground (7%, small knockback)
Edge Attack: A tiny TNT crate explodes under Crash and he flops up above the edge and back onto the stage (12%, OK knockback)
Get-Up Attack: Crash does a weak spin kick with both legs (7%, small knockback)

Smash Moves
Forward+A: Crash spins horizontally in his direction, moving forward a little (15%, OK knockback). This is based on when he spins underwater in Crash 3 and Wrath of Cortex.
Up+A: Crash attempts to put on his jetpack on (which is upside down), only for it to malfunction and shoots its flames upwards (17%, OK knockback)
Down+A: Crash does a powerful spin kick (18%, medium knockback); this is based on a move in It’s About Time where Crash can spin kick right after a slide

Grab Game
Grab: Crash spins quickly and attacks with a Crystal, only for the opponent to grab it.
Pummel: Crash punches the opponent in the face (2%)
Forwards+Throw: Humiliskate; Crash attempts to skate on the opponent’s back, only to slip (11%, OK knockback)
Down+Throw: Crash lifts the opponent from the ground and tosses them back down (12%, OK knockback). This is based on a move in Crash Twinsanity where you use the Crystal Cortex steals to use him like a hammer
Back+Throw: Crash lifts the opponent behind himself, and the two land flat on the ground (14%, OK knockback; 1.3%)
Up+Throw: Crash successfully lifts up the Crystal, and its shine pushes the opponent back (10%, OK knockback). This is based on an animation in Crash 3 where Crash is shown holding up the Crystal in victory whenever he wins a race in the motorcycle levels.

Special Moves
B : Death Tornado Spin
; Crash's most iconic move. Pressing B once performs a short, quick spin that reflects projectiles (11%, OK knockback). Holding B turns into a much faster spin that lasts for a few seconds (26%, medium knockback); not only is it faster, it can help Crash glide a good distance.
B + Forwards : Super Slide; Crash slides at lightning speed, which trips opponents (9%, OK knockback). He can use it in the air to kick diagonally downward, and cancel it by pressing the Shield button.
B + Up : Rocket Jump; Crash will jump high off a TNT Crate, damaging opponents in the process (13%, OK knockback)
B + Down : Fruit Bazooka; Crash takes out a bazooka that he can aim by tilting up or down (10%, OK knockback). The Wumpa Fruit juice that sticks on opponents is a weaker variation of the Inklings' Ink that adds a 1.3x multiplier to all other attacks, including another Wumpa Fruit.

Final Smash: Most Missed Boxes; Crash dons a golden Aku Aku mask and Crash Dashes into an opponent (8%). The opponent is then taken into a cutscene were hundreds of TNT and Nitro boxes rain down from the sky and Crash runs away (62%, devastating knockback)

Gimmicks: N/A

However, Crash does have his famous death animations:
  • Whenever he falls down offscreen, his shoes fly up and fall back down
  • Whenever Crash loses a Stamina Battle for good, he appears as an angel (he also plays a didgeridoo when he dies from a Final Smash)
Taunts:
1: Crash does the first part of his victory dance
2: Crash does the second part of his victory dance
1+2: Crash performs the final part of his victory dance

Winposes:
1: "Yeee-HAW!" Crash squats for a second, and then performs his victory animation against bosses in the very first game
2: Crash’s victory animation from It's About Time
3: Crash performs the final part of his victory dance

Icon: A Wumpa Fruit
Boxing Ring Title: It’s About Time!
Victory Music: A shortened version of N. Sanity Beach’s Theme
Kirby Hat: A replica Aku Aku mask
(Fights characters born on PlayStation on its rival consoles)
Round 1: :ultsnake: on :shadowmoses: (Encounter)
Round 2: :ultcloud: on Midgar (Let the Battles Begin!)
Round 3: :ultsonic: on :greenhill: (Angel Island Zone)

Bonus Stage

Round 4:
:ultlink: (Color 2) on Hyrule Castle 64 (Overworld Theme - The Legend of Zelda)
Round 5: :ultdk: (Color 3) on Battlefield :75M: (Donkey Kong / Donkey Kong Jr. Medley)
Round 6: :ultmario: on Peach’s Castle 64 (Main Theme - Super Mario 64)
Final Round: View attachment 300541View attachment 300540 (team battle w/Mario, Donkey Kong, Link, Snake, Sonic and Cloud) on N. Sanity Beach Ω (Dr. Neo Cortex - Crash Bandicoot WARPED)
Credits: Time Twister - Crash Bandicoot WARPED
Wumpa Islands
N. Sanity Beach

View attachment 280272
Game of Origin: Crash Bandicoot (1996)

Description: Exactly as it says; this beach is pure N. Sanity! There are crates aplenty hidden around.

Layout: The middle on the ground has a somewhat wide hole. There are 8 crates along the top of the hole, each a different one. There are also four crates each on the top left and right.

Gimmicks and Hazards: The different types of crates in each spot:
-Crate: Just a simple crate, which can be broken by any attack.
-Arrow Crate: An indestructible steel crate that bounces fighters back onto the stage.
-Bounce Crate: A crate that can not only bounce fighters up, but take five hits before breaking.
-TNT Crate: A crate that explodes 3 seconds after any contact (15%, OK knockback)
-Nitro Crate: A deadly crate that explodes IMMEDIATELY upon contact (27%, medium knockback), destroying any two crates on both sides of it.


Music:
  1. Crash Bandicoot Theme (JP)
  2. N. Sanity Beach - Crash Bandicoot
  3. Bonus Round Medley - Crash Bandicoot
  4. Hog Wild / Whole Hog
  5. Papu Papu
  6. Ripper Roo Medley
  7. Koala Kong
  8. Pinstripe Potoroo
  9. Dr. Nitrus Brioot
  10. Dr. Neo Cortex - Crash Bandicooot (Original)
  11. Tiny Tiger - Crash Bandicoot 2: Cortex Strikes Back
  12. Jetboard Stages - Crash Bandicoot 2: Cortex Strikes Back
  13. Ruin Stages - Crash Bandicoot 2: Cortex Strikes Back
  14. Dr. N. Gin Medley
  15. Time Twister
  16. Medieval Stages
  17. Great Wall Stages
  18. Tiny Tiger - Crash Bandicoot WARPED
  19. Dingodile - Crash Bandicoot WARPED
  20. Dr. Nefarious Tropy - Crash Bandicoot WARPED
  21. Dr. Neo Cortex - Crash Bandicoot WARPED
  22. Crash Cove
  23. Papu's Pyramid
  24. Boss Race - Crash Team Racing
  25. Papu Pummel
  26. Dot Dash
  27. Bamboozled
  28. Wizards and Lizards
  29. Atmospheric Pressure
  30. Crunch Time
  31. N. Sanity Island - Crash Twinsanity
  32. Dr. Neo Cortex - Crash Twinsanity
  33. Cavern Catastrophe
  34. Slip-Slide Icecapades
  35. Rooftop Rampage
  36. The Evil Twins
  37. Spyro Circuit
  38. Nina's Nightmare
  39. Koala Carnival
  40. Gingerbread Joyride
  41. Megamix Mania
  42. Drive-Thru Danger
  43. Main Theme - Crash Bandicoot 4: It's About Time
  44. Hook, Line & Sinker
  45. Off Beat
  46. Snow Way Out / Ship Happens
  47. Bears Repeating
  48. Out for Launch
  49. The Past Unmasked
  50. Opening - Spyro the Dragon
Main: N. Sanity Beach
Alt.: Time Twister

Battlefield/Ω Form: The stone pillars found in the jungle.
Crash Moveset

Crash is a somewhat light character at around Sonic's weight class. He moves at a decent speed, and his traction, air acceleration, and air friction are all quite high, which gives him good control over his movement. He's capable of crawling. His walking animation is based on his standard run from the games, but his dash animation is based on the Crash Dash from 3.

Overall, Crash is a combo-based character with a variety of moves that can take the opponent forward to the blast zone.

The main attack you'll be using throughout every Crash game is the spin attack, but I don't want this to be a situation where all of his moves are the same attack. As such, while most of his attacks aren't the spin attack, many of them incorporate some kind of 360-degree rotation to visually suggest the spin attack.
  • Jab/Forward Tilt: This is Crash's spin attack. Similarly to Mega Man and Steve, Crash has a walking jab. However, like Meta Knight, Crash's jab consists purely of a flurry attack. It's a spinning multi-hit attack that drags the opponent along with Crash before knocking them away on the final hit.
  • Up Tilt: Crash performs a spinning uppercut, similarly to Mario's up tilt.
  • Down Tilt: Like how Meta Knight's forward tilt serves as his replacement for his standard jab combo, Crash's down tilt serves much the same purpose. It's a simple breakdance kick. It hits on both sides of him.
  • Forward Smash: Vaguely inspired by Coco's sweep attack from Wrath of Cortex. Crash performs a roundhouse kick.
  • Up Smash: Okay, look, I didn't want to steal anything here, but Perkilator Perkilator 's take on this was too funny - and also incorporated the vehicular sections from the later Crash games in a way that felt natural. Crash puts on a jetpack upside-down, causing flames to shoot into the air... and Crash to get slammed into the ground.
  • Down Smash: Crash pulls out the fruit bazooka and aims it directly at the ground, Snake-style. Unfortunately, this isn't such a good idea - as when he fires, the Wumpa juice goes all over his face.
  • Neutral Aerial: Crash performs an aerial roundhouse kick. Unlike many neutral aerials, this move only attacks in front of him.
  • Forward Aerial: Like Mega Man, this is also Crash's spin attack. Its properties are effectively identical to when it's used on the ground. In fact, you can jump or land during the spin attack without cancelling the move.
  • Back Aerial: Crash does a bicycle kick with a backflip. This move is slower than Crash's other aerials, but if you hit with it exactly behind Crash, it spikes.
  • Up Aerial: Crash does a midair uppercut, whose momentum causes him to spin all the way around.
  • Down Aerial: Crash kicks below him. This move doesn't spike.
  • Grab: Crash... simply grabs the opponent.
  • Pummel: Crash shakes the opponent back and forth.
  • Forward Throw: Crash spins the opponent around before throwing them.
  • Back Throw: Based on the Rollerbrawl, Crash and the opponent enter a rolling ball of violence that takes them both behind Crash. Crash comes out on top, knocking the opponent.
  • Up Throw: Crash triumphantly lifts the opponent over his head... but his grip slips and they're sent sailing into the sky.
  • Down Throw: Crash actually succeeds in lifting the opponent over his head this time, and slams them into the ground.
  • Neutral Special: Aku Aku: Aku Aku appears and circles around Crash for just a second (during which time he can move normally). During this time, attacks that hit Crash won't deal knockback or cause him to flinch, but they will deal damage. Aku Aku goes away once Crash gets hit or the brief window is up. In either case, there's a brief cooldown before he can be used again.
  • Side Special: Slide Attack / Body Slam: On the ground, this is Crash's slide attack that's been part of his arsenal since 2. It propels him forward. Hitting the jump button will perform a Slide Jump with different momentum, while hitting attack will perform a Slide Spin. In the air, it instead becomes Body Slam, a stall-then-fall that only slight affects your momentum.
  • Up Special: Crate Chaser: Similarly to Fox or Ridley's up-Bs, this is a directional recovery move. Unlike those two, Crash isn't suspended in the air while choosing a direction. A crate appears in the direction you chose. Wanting to break it, Crash cartoonishly scrambles toward it. When he breaks it, he casts a glance at the camera before helplessly falling to the stage (or bottom blast zone).
  • Down Special: Hog Wild: Based on the riding levels, a staple of the Crash series. Crash leaps forward (or downward in the air). If this move connects, he proceeds to "ride" the opponent forward for a time (variously skating on them, brawling with them in a rolling ball, and other such things depending on the opponent and situation). During Hog Wild, you automatically move forward. You can jump, but can't double-jump or turn around.
  • Final Smash: Aku Aku Beam: Aku Aku appears and fires a large blue laser from his face. While this is happening, Crash can move freely and use all his moves aside from his neutral special. Based on the final boss of 3.
Crash Bandicoot Moveset

Specials:


Neutral B: Spin

Crash's most iconic move, the spin attack!

Crash will spin in place for a couple seconds, damaging anyone who touches him.

This move also reflects projectiles

Side B: Hog Wild

Crash mounts a hog which will charge foward.

This move isn't cancelable, but you can turn and jump on the Hog and it doesn't go off ledges.

If Crash is hit while on the hog he'll fly foward

The hog will disappear when it hits someone or after a couple of seconds

Down B: Fruit Bazooka

Crash fires his fruit bazooka.

It launches a wumpa fruit foward which can launch fighters quite far

Up B: Jetpack

Crash shoots upwards with his trusty jetpack, before it disappears, sending crash into free fall

Only the top of Crash deals damage.

Normals:

Jab:

flails his arms foward in a flurry of punches.

It isn't very ranged but does quite a bit of damage

Foward Tilt:

for his foward tilt he kicks his leg foward and then does a sweep kick

it has a teeny bit of startup lag but does quite a bit of percent

Up Tilt:

Crash slams two crates together above him, both of which break.

Doesn't do too much damage but does quite a bit of knockback

Down Tilt:

The Down Tilt references the Super Slide!

It's similar to Mega Man's, but it's slower and goes farther

Dash Attack:

Crash does a wheelie on his motorcycle, before stopping in place.

This move can bury.

Smash Attacks:

Side Smash:

Crash kicks a TNT crate forward which then explodes, sending his opponents flying.

This has a little end lag as Crash is also hit by the blast.

Down Smash:

Two crates appear next to Crash and drop next to him before breaking

Up Smash:

Crash preforms the Death Tornado Spin.

it is a more powerful version of the normal spin which rises him upwards slightly.

Aerials:

Neutral Air:

Crash spins in midair.

it's much faster and weaker then his other spin moves, and has a smaller hitbox

Foward Air:

Crash swipes his arm in a foward arc.

Similar to Mario's but doesn't go as far and doesn't spike

Back Air:

A simple backwards kick that launches fairly far.

Up Air:

Crash does a handstand on a launch crate which launces him up and he kicks upwards.

The crate then breaks and creates a small hitbox.

Down Air:

Crash does his signature belly flop.

it has a bit of endlag but other than that it's a great move.

Pummel and Throws:

Pummel:

Crash shoots you with his fruit bazooka

Foward Throw:

Crash spins you around before kicking you away

Back Throw:

Crash slams you onto a nitro crate behind him

Down Throw:

Refrences the Humiliskate from Crash Twinsanity

Crash jumps on your back and slides you away and kicks you into the air

Up Throw:

References the Rollerbrawl also from Twinsanity.

Crash fights with you in a ball before punching you out


Final Smash:

Crate Bash:

Crash gets Aku Aku's invincibiltiy power and a bunch of crates fall out of the sky damaging everyone else.

Crash can still move during this

TNT and Nitro crates occasionally spawn and explode on contact
Due to a lack of movesets, we will only be voting for one and, as a new rule for this round, submitters (Perkilator, Ahemtoday, and Otoad) can’t vote for themselves. Please pick only one entry.

1. Perkilator Perkilator
2. ahemtoday ahemtoday
3 Otoad64 Otoad64

Next, we will also be voting for the stage...


Job #35: Crash Bandicoot Stage

Upstream

Appearance:

Looks virtually identical to its appearance in the N. Sane Trilogy. Since the sky isn’t seen in the stage, I’ll fill in the blanks: the background has an orangeish sky, Cortex’s castle and the Native Fortress can be seen in the background behind the trees, as can a bridge a la the Road to Nowhere linking them together.

Layout and hazards:
With hazards off Upstream is merely a very small Battlefield (not Small Battlefield, just a small version of Battlefield) clone which can feel claustrophobic even with as little as 4 players. It is on a rock (similar to the one the checkpoint crate is on in the attached image) above non-swimmable water, very close to the lower blast zone. That is where the hazards come in: to either the left or right of the rock different platforms will emerge from the water at random intervals, each with unique properties.

The end of level pillar is the most basic, simply appearing then disappearing after 10 seconds.


The man eating plant is a platform that bites every 5 seconds of its 15 second appearance. The first two will merely trap you and serve as a mild annoyance and make you easier to hit while the third will have it drag you to the depths. It shakes a little so you can recognise when it’s about to bite


When big TNT is stood on you bounce a little and it begins the timer, counting from 3 to 0, once it reaches 0 it explodes, it’s quite a big, powerful explosion (albeit not a 1HKO) and reaches to the edge of the main platform. If not activated it disappears after 8 seconds. Occasionally the Big TNT will spawn with Ripper Roo standing on it, as he bounces to activate it instantly, albeit not avoiding the explosion and ending up flying off stage.


The lily pad simply sways back and forth, making it tricky to land on. Disappears after 10 seconds.


Cameos:
A lab assistant can sometimes be seen getting caught up in the current.
Cortex will sometimes fly by on his hoverboard, laughing while holding OG Tawna in his arms, on rare occasion it may be followed up with Tawna riding the hoverboard with a dizzy Cortex hanging on for dear life after an off screen ass-whooping
The aforementioned Ripper Roo cameo

Importance:
Upstream is the fifth level of the first Crash Bandicoot game. While not remarkably important or memorable, it is still a stage a lot of people will have seen considering how early it comes in the game and series.
35 Crash Bandicoot Stage

N-SANITY BEACH

APPEARENCE:
It would take cues from all of it's appearances throughout the crash franchise


LAYOUT:

This would be the approximate layout and background (Terrible photoshop not included)


The sand portion is about the size of FD and the blue areas to the side is Water
(The background would have proper scaling)

Occasionally Crates will fall onto the stage there are 3 types

Wumpa Crate

Jumping on this would give you a boost into the air and it will spawn an apple as soon as it's destroyed

TNT Crate

Jumping on this will make it explode after 6 seconds

Nitro Crate

Jumping or hitting this it will explode instantly KOing anyone over 100%

OMEGA AND BATTLEFIELD:
The omega and battlefield forms would look similar everywhere except the bottom part of the stage will look like a temple.

CAMEOS:
These characters will appear at various locations in the background at random
-Coco (We have yet to decide if coco will be an echo or costume so there is a Huge asterisk here)
-Tawna
-Cortex
-Dingodile
-N. Gin
-N. Brio
-N. Tropy
-Crunch
-Nina Cortex
-Lani Loli
-Aku Aku
-Uka Uka
-Tiny Tiger
-Pinstripe Potoroo
-Koala Kong
-Nitrous Oxide

IMPORTANCE:
N-Sanity Beach is the first level of 5 separate Crash games and is the first level of the franchise, because of that fact it is very important to the franchise and is very iconic.
Much like above, please only vote for one and submitters (WarioWarioWario and Cashregister9 l) can’t vote for themselves. Once we have a winner, we will begin submitting music.

1. Wario Wario Wario Wario Wario Wario
2. cashregister9 cashregister9
3. Perkilator Perkilator
 
Last edited:

Krookodilian

Smash Ace
Joined
Oct 18, 2020
Messages
566
Location
Texas
mpa Islands
N. Sanity Beach

View attachment 280272
Game of Origin: Crash Bandicoot (1996)

Description: Exactly as it says; this beach is pure N. Sanity! There are crates aplenty hidden around.

Layout: The middle on the ground has a somewhat wide hole. There are 8 crates along the top of the hole, each a different one. There are also four crates each on the top left and right.

Gimmicks and Hazards: The different types of crates in each spot:
-Crate: Just a simple crate, which can be broken by any attack.
-Arrow Crate: An indestructible steel crate that bounces fighters back onto the stage.
-Bounce Crate: A crate that can not only bounce fighters up, but take five hits before breaking.
-TNT Crate: A crate that explodes 3 seconds after any contact (15%, OK knockback)
-Nitro Crate: A deadly crate that explodes IMMEDIATELY upon contact (27%, medium knockback), destroying any two crates on both sides of it.


Music:
  1. Crash Bandicoot Theme (JP)
  2. N. Sanity Beach - Crash Bandicoot
  3. Bonus Round Medley - Crash Bandicoot
  4. Hog Wild / Whole Hog
  5. Papu Papu
  6. Ripper Roo Medley
  7. Koala Kong
  8. Pinstripe Potoroo
  9. Dr. Nitrus Brioot
  10. Dr. Neo Cortex - Crash Bandicooot (Original)
  11. Tiny Tiger - Crash Bandicoot 2: Cortex Strikes Back
  12. Jetboard Stages - Crash Bandicoot 2: Cortex Strikes Back
  13. Ruin Stages - Crash Bandicoot 2: Cortex Strikes Back
  14. Dr. N. Gin Medley
  15. Time Twister
  16. Medieval Stages
  17. Great Wall Stages
  18. Tiny Tiger - Crash Bandicoot WARPED
  19. Dingodile - Crash Bandicoot WARPED
  20. Dr. Nefarious Tropy - Crash Bandicoot WARPED
  21. Dr. Neo Cortex - Crash Bandicoot WARPED
  22. Crash Cove
  23. Papu's Pyramid
  24. Boss Race - Crash Team Racing
  25. Papu Pummel
  26. Dot Dash
  27. Bamboozled
  28. Wizards and Lizards
  29. Atmospheric Pressure
  30. Crunch Time
  31. N. Sanity Island - Crash Twinsanity
  32. Dr. Neo Cortex - Crash Twinsanity
  33. Cavern Catastrophe
  34. Slip-Slide Icecapades
  35. Rooftop Rampage
  36. The Evil Twins
  37. Spyro Circuit
  38. Nina's Nightmare
  39. Koala Carnival
  40. Gingerbread Joyride
  41. Megamix Mania
  42. Drive-Thru Danger
  43. Main Theme - Crash Bandicoot 4: It's About Time
  44. Hook, Line & Sinker
  45. Off Beat
  46. Snow Way Out / Ship Happens
  47. Bears Repeating
  48. Out for Launch
  49. The Past Unmasked
  50. Opening - Spyro the Dragon
Main: N. Sanity Beach
Alt.: Time Twister

Battlefield/Ω Form: The stone pillars found in the jungle.
Venus of the Desert Bloom Venus of the Desert Bloom I believe Perkilator Perkilator ‘s stage was missed
 

BowserKing

Smash Lord
Joined
Feb 16, 2019
Messages
1,842
Location
winnipeg
Moveset: OToad64
Stage: Wario (X3)

Also I don’t know who deleted my earlier post, but I did not do anything wrong to have a post removed
 

Venus of the Desert Bloom

Cosmic God
Super Moderator
Premium
BRoomer
Writing Team
Joined
Jul 30, 2007
Messages
15,317
NNID
VenusBloom
3DS FC
0318-9184-0547
Please remember to vote for Crash!

Here're the results of the veteran rework poll. These reworks will be featured within the E3 trailer which highlights changes for each character (as well as old and new stages). I want to push this out quickly as we are nearing the end of our E3 content so that means we will be doing a total of four veterans!

Pretty crazy, huh? These characters are...
DF3F38E1-FBAE-467A-9F56-5CB2F0421296.jpeg

:ultganondorf::ultyounglink::ultdk::ultsamus:

So please start brainstorming what kind of new Specials and moves they may have, any potential gimmicks, and any gameplay changes. We will begin this after voting for Crash.

Job #36: Submit a Stylist Gameplay and Moveset proposal, Misc. info, Classic Mode, and Style Savvy Stage

It’s time to finally finish our E3 newcomers by submitting a proposals for gameplay and movesets for the Stylist. This also includes misc info, a classic mode route, and a stage for the Styke Savvy series. Pleaseleap the moveset proposal, misc Info and classic mode route, and stage proposals on seperate posts.

As always, fleshing out a moveset which also includes normals and Smash attacks along with Specials usually do well in the voting phase. As for the musc info and classic routes, I tend to go with what is posted first or what seems like the option that fits the best.

For the misc info,

On-Screen Appearance airConditioner airConditioner

The Stylist walks out of a changing room.

Idle Animations

Taunts

1.
2.
3.

Victory Animations
1
2
3

Victory Theme @_uwu


Kirby Hat


Boxing Ring Title @


Crowd Chant

Classic Mode Route GoodGrief741 GoodGrief741

Her classic mode consists of fighting a sequence of fighters with questionable fashion choices, including weird accessories and color palettes.

Round 1: :ultsnake: using his brown alt on Shadow Moses (animal print? That's a no-no)

Round 2: :ultpacman: using his plaid alt on Pac-Land (plaid gloves are a strong fashion statement)

Round 3: :ultmetaknight: using his pink alt on Halberd (those colors don't work together Mr. Knight)

Round 4: :ultshulk: using any alt except the beach one, on Gaur Plains (too many straps!)

Round 5: :ultbylethf: using her default alt on Garret Mach Monastery (couldn't resist)

Round 6: A barrage of Mii Fighters of all three types, using randomized costumes for max mismatch, on whatever stage comes with the Stylist.

Boss: Dracula (that style went out of fashion long ago!)


STAGE PROPOSAL

As always when proposing a stage, please include the following:

1. it’s appearance
2. The design and layout
3. Any hazards
4. Cameos
5. Importance to the series
6. OPTIONAL - Omega and battlefield forms
 
Last edited:

Venus of the Desert Bloom

Cosmic God
Super Moderator
Premium
BRoomer
Writing Team
Joined
Jul 30, 2007
Messages
15,317
NNID
VenusBloom
3DS FC
0318-9184-0547
Ah crap, that’s why I prefer us separating posts for movesets abs stages...

Moveset: Otoad64

Stage: Wario Wario Wario
Moveset: Perkilator

Stage: Wario Wario Wario
Moveset: Ahemtoday
Stage: Triple Wario
Moveset: OToad64
Stage: Wario (X3)

Also I don’t know who deleted my earlier post, but I did not do anything wrong to have a post removed
Sorry everyone but I glanced over Perkilator’s stage submission. I have since added it in. You are all more than welcomed to change your vote if need be. This is particularly why I like to have movesets, misc info, and stages all separated. It makes it easier for me to go through the thread and quickly glance at what was submitted. I know that sounds lazy but it really helps out as I work long days and don’t have much free time at home. I really appreciate anything that helps make running the thread easier and quicker.

BowserKing BowserKing removed your post as it showed it as a double post. Not sure why it did but I had since undefeated your post. It’s back up and nothing was removed so it’s ok now. Sorry about that.
 
Last edited:

Mr. Robotto

Smash Ace
Joined
Jan 20, 2019
Messages
631
Location
The Mayship
Moveset: ahemtoday
Stage: cashregister9

Got three more Spirits for Golden Sun by the way, focusing on the monsters you find in the games this time.
Amaze.png
Amaze (Golden Sun)
Spirit Information
  • Type: Novice
  • Class: Grab
  • Category: Support - Floaty Jumps
  • Way of Obtaining: Spirit Battle
Battle Information
  • Puppet Fighter: White Dark Samus and Purple Dark Samus
  • Stage: Luigi's Mansion
  • Music Track: The Sanctum of Sol [Music Doc]
  • Match: Stock (HP)
  • Conditions: The enemies favor normal attacks. White Dark Samus has 39HP, while Purple Dark Samus has 116HP.
Salamander.png
Salamander (Golden Sun)
Spirit Information
  • Type: Advanced
  • Class: Attack
  • Category: Support - Fire & Explosion Attack ↑
  • Way of Obtaining: Spirit Battle
Battle Information
  • Puppet Fighter: Purple Charizard
  • Stage: Gerudo Valley
  • Music Track: Isaac's Battle Theme [Music Doc]
  • Match: Stock (HP)
  • Conditions: Fire and Explosion attacks aren't as effective against the enemy. The enemy has 212 HP.
GSPhoenix.png
Phoenix (Golden Sun)
Spirit Information
  • Type: Advanced
  • Class: Attack
  • Category: Support - Speed ↑
  • Way of Obtaining: Spirit Battle
Battle Information
  • Puppet Fighter: Red Sephiroth
  • Stage: Norfair
  • Music Track: Isaac's Battle Theme [Music Doc]
  • Match: Stock (HP)
  • Conditions: The enemy favors its neutral special attack. The enemy has increased move speed. The enemy has 281 HP.
 
Last edited:

Krookodilian

Smash Ace
Joined
Oct 18, 2020
Messages
566
Location
Texas
The Enchantress (Shovel Knight: Shovel of Hope)
Class: Legend ✩✩✩✩
Type: Support
Effect: Critical Super Giant, 3 Slots
  • Enhance from the Shield Knight Spirit
Black Knight (Shovel Knight: Shovel of Hope)
Class: Ace ✩✩✩
Type: Primary/Attack, 2 Slots
Effect: None
  • Puppet Fighter: Link (Dark), Bowser (Red)
  • Stage: Dracula's Castle
  • Music Track: Flash in the Dark (Dr. Wily Stage 1)
  • Match: Stamina (100 HP)
  • Conditions: The enemy favors down air attacks (Link), Defeat the Main enemy to win
Treasure Knight (Shovel Knight: Shovel of Hope)
Class: Novice ✩
Type: Support/Neutral
Effect: Swimmer, 1 Slot
  • Puppet Fighter: Simon Belmont (Yellow)
  • Stage: Kalos Pokemon League (Flood Chamber)
  • Music Track: Flash in the Dark (Dr. Wily Stage 1)
  • Match: Stamina (100 HP)
  • Conditions: The enemy favors side special
Mole Knight (Shovel Knight: Shovel of Hope)
Class: Novice ✩
Type: Support/Grab
Effect: Bury Immunity, 1 Slot
  • Puppet Fighter: King Dedede (Default)
  • Stage: Norfair
  • Music Track: Flash in the Dark (Dr. Wily Stage 1)
  • Match: Stamina (100 HP)
  • Conditions: The enemy favors dash attack
Tinker Knight (Shovel Knight: Shovel of Hope)
Class: Novice ✩
Type: Support/Neutral
Effect: Drill Equipped, 1 Slot
  • Puppet Fighter: Morton
  • Stage: Halberd
  • Music Track: Flash in the Dark (Dr. Wily Stage 1)
  • Match: Stamina (100 HP)
  • Conditions: The enemy favors side special
Propeller Knight (Shovel Knight: Shovel of Hope)
Class: Advanced ✩✩
Type: Primary/Attack, 1 Slot
Effect: Jump ↑
  • Puppet Fighter: King K Rool (Default)
  • Stage: Rainbow Cruise
  • Music Track: Flash in the Dark (Dr. Wily Stage 1)
  • Match: Stamina (100 HP)
  • Conditions: The enemy favors up special
Polar Knight (Shovel Knight: Shovel of Hope)
Class: Advanced ✩✩
Type: Support/Shield
Effect: Ice-Floor Immunity, 2 Slots
  • Puppet Fighter: Donkey Kong (White)
  • Stage: Minecraft World (Snowy Tundra)
  • Music Track: Flash in the Dark (Dr. Wily Stage 1)
  • Match: Stamina (100 HP)
  • Conditions: Hazard: Ice Floor
Phantom Striker (Shovel Knight: Shovel of Hope)
Class: Advanced ✩✩
Type: Primary/Attack, 1 Slot
Effect: Electric Attack ↑
  • Puppet Fighter: Robin (Blue)
  • Stage: Unova Pokemon League
  • Music Track: Flash in the Dark (Dr. Wily Stage 1)
  • Match: Stamina (100 HP)
  • Conditions: The enemy favors forward smash, Certain items will appear in large numbers (lightning)
Baz (Shovel Knight: Shovel of Hope)
Class: Advanced ✩✩
Type:
Primary/Attack, 2 Slots
Effect: No Effect
  • Puppet Fighter: Simon Belmont (Default), Pichu (Default)
  • Stage: Gaur Plains
  • Music Track: Flash in the Dark (Dr. Wily Stage 1)
  • Match: Stamina (100 HP)
  • Conditions: Reinforcements will appear during the battle, Defeat the main fighter to win, Enemy favors neutral special (Pichu)
Mona (Shovel Knight: Shovel of Hope)
Class: Advanced ✩✩
Type: Support/Grab
Effect: Fire/Explosion resist ↑, 1 Slot
  • Puppet Fighter: Byleth (Sothis)
  • Stage: Frigate Orpheon
  • Music Track: Mother 3 Love Theme
  • Match: Stock (1)
  • Conditions: Take your strongest team into this no frills battle
Troupple King (Shovel Knight: Shovel of Hope)
Class: Legend ✩✩✩✩
Type: Support/Shield
Effect: Invincibilty after eating, 2 Slots
  • Puppet Fighter: King K. Rool (Maroon)
  • Stage: Balloon Fight
  • Music Track: Underwater Theme - Super Mario Bros.
  • Match: Stock (1)
  • Conditions: Certain items will appear in large numbers (Apple)

For the veteran moveset reworks, will we be voting on individual moves like mario, or doing full movesets, like with newcomers?
 

Janx_uwu

Smash Champion
Writing Team
Joined
May 17, 2020
Messages
2,975
Location
Faraway Avalon
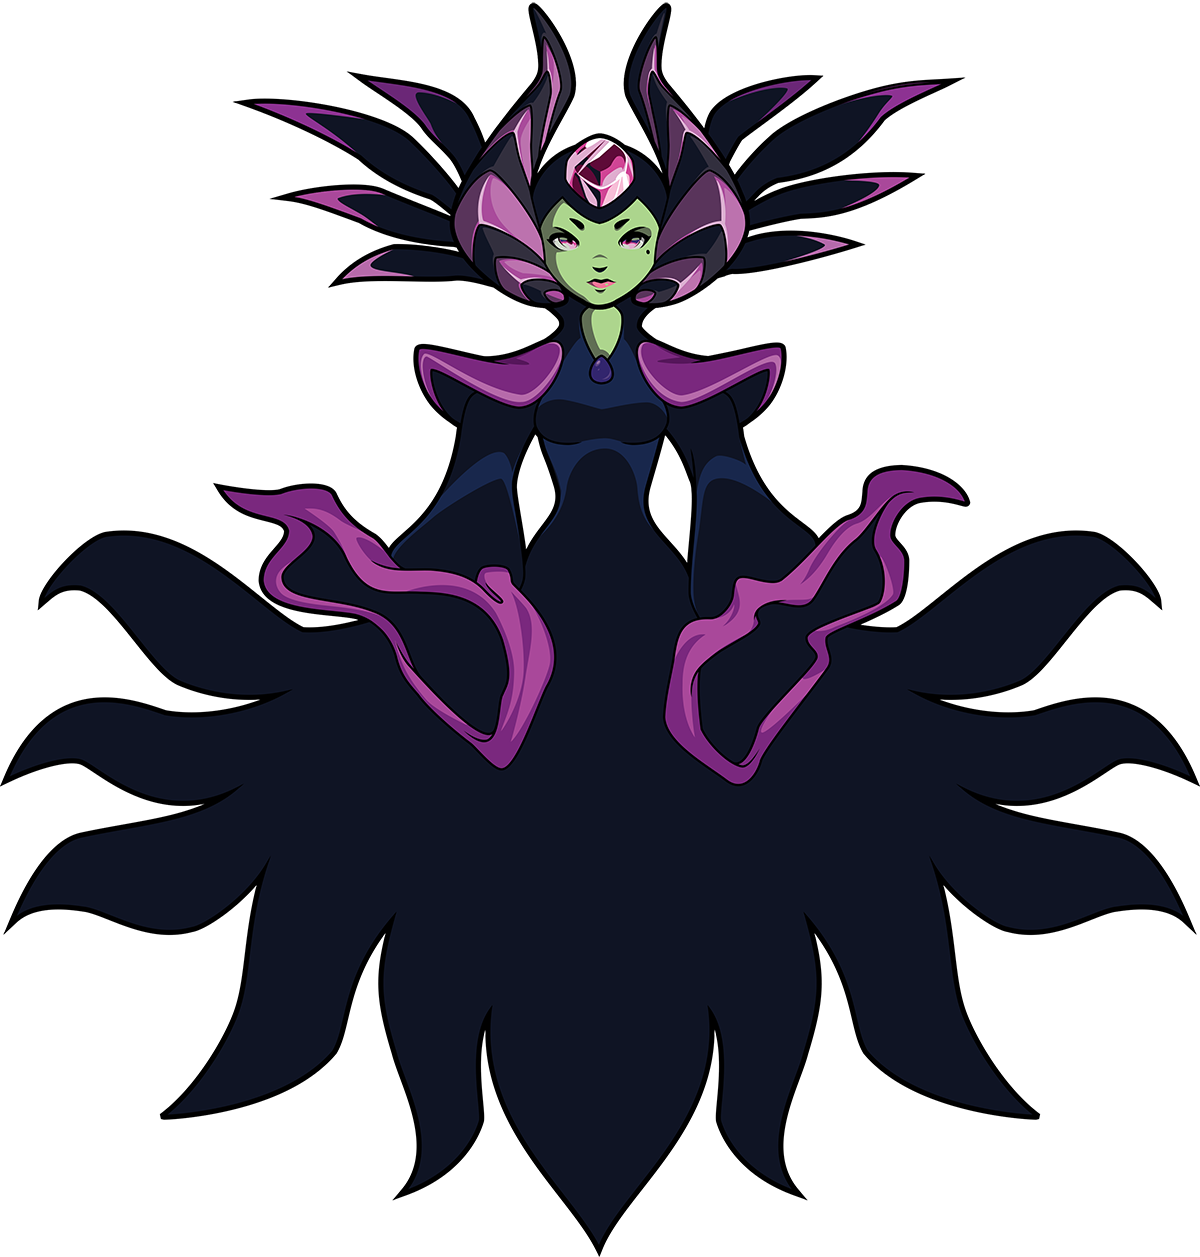
STYLIST is looking sharp!

Style Savvy was an immediate success in 2008, leading to the series getting three sequels (all on the 3DS). While I have not played a Style Savvy game (probably because 9 year old me couldn't be caught dead playing a girly game-yuck!), but I figure the series and its gameplay can't be that difficult to understand as an outsider.
In Style Savvy, you approach customers, they tell you want they want, and you (the Stylist) pick out clothes for them, trying to satisfy them. As far as I can tell, the games rarely diverge from this formula going forward. You must pick out a clothing article or oufit that meets their budget and wants. You do get some different jobs in Fashion Forward, but they are practically the same as the Stylist, just with hair or makeup. Some of your customers will come often for your service, so it's helpful to memorize things about them so you can better fit their needs.
Keeping this in mind, Stylist is a Smash Brother that not only wears different clothes to boost her stats, but she attacks her opponents using coat hangers, handbags, hair dryers, makeup, hairspray, and everything in between. But she has a budget, so keep an eye on that when attacking or wearing clothes. Overall, Stylist, in my eyes, will be our most complicated character yet, despite having some of the most simple gameplay in her home series.
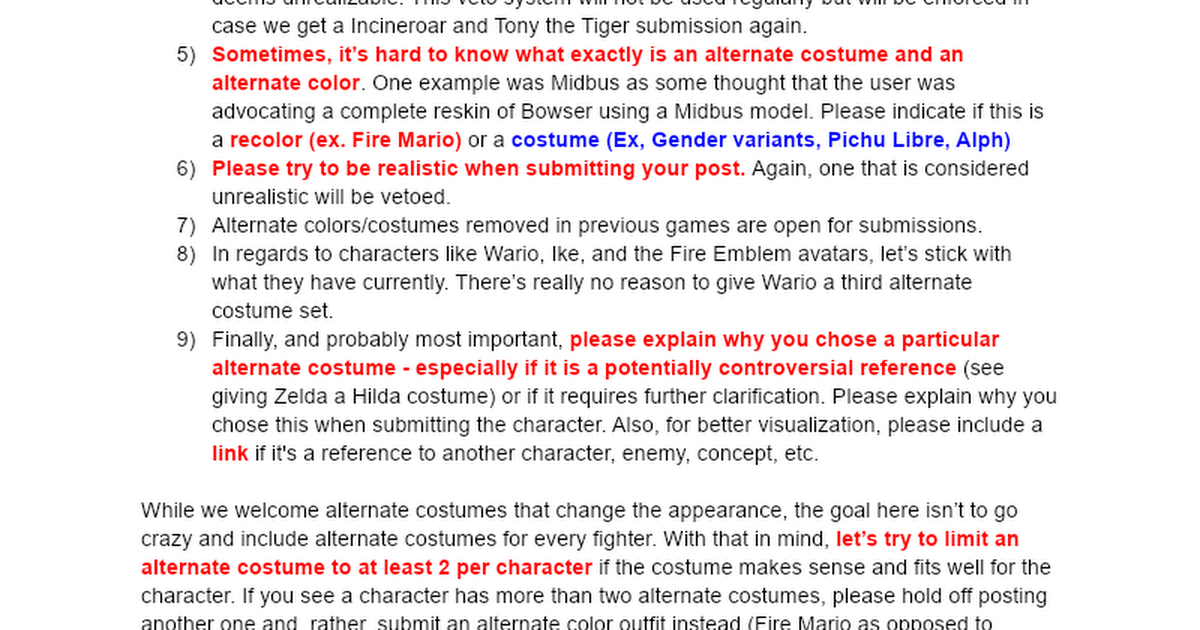
With that out of the way, here's my moveset for Stylist!

Stylist has a buget of $800 that cannot be increased, except when losing a stock (or grabbing an opponent), when it goes back to 800. This is always displayed beneath her icon, in green text, like this: $800.

Down B-Try it on!
In Style Savvy, after picking out a clothing article for your customer, you can choose Try It On! so you can see how they look before selling them the clothes.
In Smash Bros, in a rather quick motion, a curtain is flung up in front of Stylist. From here, five squares appear on the left bottom, left upper, right bottom, right upper, and top of the curtain. These squares look like the icons for clothes when picking them out in Style Savvy. There's a blue winter coat; an orange T-shirt and blue jeans; a plain beige vest with a lighter beige shirt and a medium-length brown skirt; a hooded top that is fiery red and comes with leggings; and finally, at the top, Stylist's default outfit. You can select any one of these just as if it were Shulk's Monado wheel. When you have chosen with either the B button or by letting go of the left stick, the curtain will pull back and the disapear, revealing Stylist's new outfit.
(I know nothing about women's fashion-please, if you have any experience in that field point out what I can improve here).
Anyways, each outfit icon (or square) has something labled above and below it, in small-ish but still very visible text. On top is the outfit's Mood, and on the bottom is how much it costs. Each outfit has its own mood (except for default), and this is a reference to Style Savvy, where the mood of an outfit basically just referred to its color scheme and theme. In Smash, however, it refers to both that and the stat boost you get from the outfit.
The blue winter coat is a Cool mood-it increases defense, decreasing the damage and knockback you take.
The orange T-shirt and blue jeans is a Warm mood-it increases the amount of damage you do to an opponent, but not the knockback.
The plain vest, shirt, and skirt is a Pale mood-it increases her speed.
The fiery red hooded top and leggings is a Strong mood-it increases your knockback greatly, letting Stylist get in early kills.
The cost of each outfit is $100 (for simplicity's sake, not realism), and since you have a buget of $800, that means you get 8 outfits per match. But how do you get rid of an outfit?
Well, three ways. One-you change outfits. Two-you get hit with a strong enough attack, and your outfit instantly reverts back to the default costume. And three-you die, and respawn with the default outfit and $800.

Neutral B-Hairspray
Stylist starts shaking a hairspray canister in her hand, in a charging like attack similar to Samus' CS. When finished, she can press B again to spray. It has a small hitbox, but a lasting one-for a visual aid, a purple, almost invisible cloud right in front of Stylist. You'll need to be pretty close to land it-but if you do, the opponent will be stunned! How long they are stunned depends on how long you charged the hairspray and how much damage your opponent has.
However, after being used five times, the canister is empty. If you try to use the move again, Stylist will toss it behind her (it can hit opponents and be picked up), and a new one immedeatly appears in her hand, setting her back $30.

Side B-Lipstick
Stylist winds up, and then throws a lipstick thing (don't know the name of it) forward. It travels in an arc similarly to Young Link's Fire Arrows. This is pretty strong for a projectile. The longer you hold B, the stronger the lipstick projectile will be.
However, while this move can be spammed, it does set you back $10 per containter, so be wary.

Up B-Hair Dryers
Stylist pulls out two electric hair dryers and aims them down before turning them on, and they propel her upwards. This causes a windbox beneath you, so it's pretty good for gimping an opponent offstage. It's also a pretty fast move. However, the move only has decent horizontal range, and good vertical range, so you can't go too far left or right offstage.

Jab: Stylist slaps the opponent once, twice, before a combo-finishing kick. It's pretty average in damage and knockback. Stylist makes sure to look to the camera and smile during the kick.

Up tilt: Stylist will strike a pose, where she faces the camera, with one hand on her left (player's right) hip and the other pointing to the sky. Both arms have a hitbox, kind of like Wii Fit's weird hitboxes. This move is pretty good for starting combos but because it is relatively weak, not your best kill move by any means.

Forward tilt: Stylist swings her handbag forward. This is one of her strongest attacks, killing pretty early, however it is pretty slow-maybe she just has so many beauty products in there?

Down tilt: Stylist bends down and holds a piece of measuring tape out, like she's helping a client find the right size pair of shoes. This move doesn't last very long, but its knockback is good for comboing, its quick, and it can trip your opponent at certain percents.

Dash attack: Stylist runs forward and reaches out a bag, as if checking out a customer in a forceful sort of way. The move is pretty quick but isn't that strong for a dash attack.

Forward Smash: During the wind up, Stylist leans back and begins rumaging around in her handbag. When the move is unleashed, Stylist pulls out a hand mirror and thrusts it in front of her, and begins to do her makeup. This move has abysmal endlag and not-great startup, however its her strongest move, and kills deceptively early.

Down Smash: Stylist raises up her foot during the start up. When it's unleashed, she slams her foot down at an angle and poses, as if showing off her spectacular shoes. This move can hit below the ledge and is very strong, and quite fast. However the ranges is very lacking.

Up Smash: Stylist brings up a hairspray container and, when the move is unleashed, sprays her hair. The move hits all around her head and a bit above it, and its the weakest of her smashes. Be wary, as this move will take one of your five Hairspray uses away.

Neutral Air: Stylist swings her handbag around on her finger, and it swings all around her, being a very good edgeguarding move. It can also be used for combos at low percents.

Forward air: Stylist swings a coat hanger in front of her. It's a pretty weak forward air, but it is good for combos like forward air to forward air etc, even at higher percents.

Back air: Stylist brushes her hair with a single, forceful stronke, and anyone right behind her will be hit with a weak-ish spike that scales in knockback past mid-percents.

Up air: Stylist does a standard backflip kick move, with properties similar to Min Min's.

Down air: Stylist swaps out her current heels for winter boots and thrusts down with them. Because she's changing shoes the move has slow startup, but the endlag and landing lag isn't that bad, and the spike is very strong.

Grab: Stylist reaches out in front of her and clenches her fist. If the grab is unsuccessful, she will look at her hand and groan, annoyed she couldn't land the move. If it's successful, a hair styling chair will appear, and the opponent will sit on it, bound to the chair, with Stylist holding a brush and in deep thought-how should she style her opponent? Pummels have her cut at an opponent's hair (or just their general head area).

Forward throw: Stylist spins the chair around at dangerous speeds, then kicks it, sending her opponent flying. The chair dissapears after a bit. This move is really good for KO'ing.

Down throw: Stylist bends down to shine her opponent's shoes, then tips over the chair so that they fall onto the floor. Like Snake's, this down throw puts your opponent in a tech situation. However they aren't right in front of her, so while she can predict where they will go, she can't combo into any moves at any percent.

Back throw: Stylist combs her opponent's hair, then picks them up and throws them in the opposite direction. This throw is mainly used for positioning.

Up throw: Stylist kicks down the lever underneath the chair, which causes her opponent to eject straight up! This move is about as strong as K. Rool's up throw.

Her throws are special because it's the only way she can earn back money! For every throw she earns $25, meaning its a slow but worthwhile process to earn enough money to get a new outfit.


EDIT: One last thing I forgot to say: what happens when Stylist runs out of cash?
Well, when she does, her neutral B, side B, and down B will not function anymore, and pressing those buttons won't do anything.


And that's Stylist! Overall, she's the kind of character who needs to keep an eye on her in-game meter (in this case, money). She's pretty good at combos, but her kill power isn't lacking either, especially with her potent Strong clothes. She's sort of a passive-aggressive character-not entirely defense or offense, but more so half and half.
 
Last edited:
Status
Not open for further replies.
Top Bottom