
Quick Primer
I plan on releasing this thread as soon as one of the techniques is covered, simply to get the knowledge behind the Marth community for the rest of the techniques and to get feedback on the layout, ideas and ways of improving this thread further. This will be a learning experience for myself and hopefully anyone who might come across this.
Thanks!
Feedback From The Community
If anyone can provide any more information, correct any information, frame data of the moves, ways of executing and videos of the techniques it would be more than appreciated.
Any member will be credited of any information / work they put forward.
What you can expect from this thread
In this thread I want to put forward my ideas and discuss ways with the community that Marths shield can be used to better his game.
Techniques covered:
Shield Drop
Shield Pivot
D-tilt IASA Shield
Shield Stop
Wavedash OOS
Powershield
Light shield
Shield Pressure
Shield DI
In each section you will find:
Shield Drop:
SSBM Tutorial Video:
https://www.youtube.com/watch?v=_IQFgGm49aI
Marth abusing Shield Dropping against Falco:
https://www.youtube.com/watch?v=PDPChlbWN5M
![]()
There are many ways of carrying out a shield drop and by implementing shield dropping into your game you increase both your defensive and offensive capability, by being able to drop through platforms and throw out a move, waveland on the stage or jump back up to the platform.
Scenario of when to use shield dropping:
You can utilize shield dropping if you are being attacked from below while on a platform.
For instance you are away to be up-tilted by a Marth, you bring up your shield, next during the shield stun you can move your movement stick into the correct position to buffer the shield drop, once your shield stun ends you will drop through the platform and pull of a sick f-air chain to reverse Ken combo.
Shield Dropping can be used to extend your combos on / coming down to platforms which will hopefully lead into an edge-guarding opportunity where you can sap the enthusiasm from your opponent one gimp at a time.
Running Shield drop:
Possibly the easiest method of learning how to shield drop
this is preformed by dashing across a platform and bringing up your shield while still holding the direction you dashed in.
Once your shield is up you can drop your movement stick down to the lower notch, hopefully you should drop down and you have now preformed a shield drop!
Practice:
When learning how to shield drop, go around the different stages and practice shield dropping on all of the platforms, once you are confident enough doing this plug in a player 2 Bowser with a handicap of 9, damage ratio of 0.5, leave your handicap at 1, then move punch-bag Bowser under a platform and ensure you are L-cancelling your moves.
If you are having trouble practising L-cancelling on Bowser it remember to let go of the shield button when you drop and tap it again to get the L-cancel.
Buffer - allows the user to input a move while your character isn't controllable; hitstun, airdodge, the input will be done on the 1st possible frame after the condition ends.
L-cancelling - pressing L/R trigger 1-7 frames before you land on the ground after preforming an aerial move, doing this reduces the landing lag of said move.
Shield Pivot:
Pivot Tutorial: (skip to 1:00 for shield pivot)
https://www.youtube.com/watch?v=WuCCmymFpMU
At first glance Shield Pivoting does not seem too useful, but you can integrate it with some other techniques covered in this guide and you'll get some mileage out of it. Think of it as another option you have when moving, the more options you have the deadly you are. Having the option to quickly turn Marth around is great because you can throw out moves and abuse that range of Marths even more.
Scenario of when to use Shield Pivot:
I personally like to use it when in neutral with Marth, you can be really tricksy with Marths movement and this only adds to it!
Leading into a shield drop:
While on a platform after you have smashed the direction you want to pivot in you can hold that direction and do a shield drop, this allows you to abuse F-air a little bit more, this scenario is best used when you are not being harassed from below as you can hit when you pivot.
Movement:
Like mentioned before you can use a shield pivot to change Marths direction and on top of this it stops all momentum, you can use this to help with your combos.
I could talk about Marths movement all day so if you have any questions about how to integrate it into your movement ask in the comments and I will reply ASAP.
Chain-grabbing:
When chain-grabbing spacies starting from roughly 17% if the hacky-sack, sorry I meant spacies does slight behind DI then you have to pivot grab in order to keep the chain-grab going, you can do this quite easily by shield pivoting then grabbing!
Executing a shield Pivot:
A Shield pivot can only be done while in the dash animation.
By moving in one direction and then smashing your movement stick in the other direction, hold this direction then pull up your shield and Marth should be facing the other direction. Once you are facing the other direction you can preform an attack, grab or stay in shield and WD OOS.
Practice:
This is a pretty simple technique and should not take too long to master.
Its important to note that you do not need to hold Marths shield down for very long after the pivot, so work with shortening the time spent in shield.
Vary the lengths you dash before pivoting and make sure you can pivot in both directions.
And of course try implementing attacking / JC-grabs, WD OOS once you have pivoted.
JC-grabs - Jump cancel grabs, dashing then jumping and cancelling the jump with a grab if done correctly Marth should slide across the ground
WD OOS - Wavedash Out of Shield cover later on in the guide!
DI - Directional Influence, manipulating your trajectory after being hit with a move
To Write up:
D-tilt IASA Shield
Shield Stop
Wavedash OOS
Powershield
Light shield
Shield Pressure
Shield DI
I plan on releasing this thread as soon as one of the techniques is covered, simply to get the knowledge behind the Marth community for the rest of the techniques and to get feedback on the layout, ideas and ways of improving this thread further. This will be a learning experience for myself and hopefully anyone who might come across this.
Thanks!
Feedback From The Community
If anyone can provide any more information, correct any information, frame data of the moves, ways of executing and videos of the techniques it would be more than appreciated.
Any member will be credited of any information / work they put forward.
What you can expect from this thread
In this thread I want to put forward my ideas and discuss ways with the community that Marths shield can be used to better his game.
Techniques covered:
Shield Drop
Shield Pivot
D-tilt IASA Shield
Shield Stop
Wavedash OOS
Powershield
Light shield
Shield Pressure
Shield DI
In each section you will find:
- A video explaining how to execute the technique covered
- Tips and tricks to learn how practice the technique
- If applicable different approaches of preforming the technique
- Frame data / Gifs / controller button movement
- Scenarios when the technique is best used and how to implement it into your game
- At the bottom of each thread you will find explanations of any terms or other techniques that were highlighted
Shield Drop:
SSBM Tutorial Video:
https://www.youtube.com/watch?v=_IQFgGm49aI
Marth abusing Shield Dropping against Falco:
https://www.youtube.com/watch?v=PDPChlbWN5M
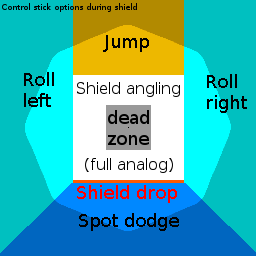
There are many ways of carrying out a shield drop and by implementing shield dropping into your game you increase both your defensive and offensive capability, by being able to drop through platforms and throw out a move, waveland on the stage or jump back up to the platform.
Scenario of when to use shield dropping:
You can utilize shield dropping if you are being attacked from below while on a platform.
For instance you are away to be up-tilted by a Marth, you bring up your shield, next during the shield stun you can move your movement stick into the correct position to buffer the shield drop, once your shield stun ends you will drop through the platform and pull of a sick f-air chain to reverse Ken combo.
Shield Dropping can be used to extend your combos on / coming down to platforms which will hopefully lead into an edge-guarding opportunity where you can sap the enthusiasm from your opponent one gimp at a time.
Running Shield drop:
Possibly the easiest method of learning how to shield drop
this is preformed by dashing across a platform and bringing up your shield while still holding the direction you dashed in.
Once your shield is up you can drop your movement stick down to the lower notch, hopefully you should drop down and you have now preformed a shield drop!
Practice:
When learning how to shield drop, go around the different stages and practice shield dropping on all of the platforms, once you are confident enough doing this plug in a player 2 Bowser with a handicap of 9, damage ratio of 0.5, leave your handicap at 1, then move punch-bag Bowser under a platform and ensure you are L-cancelling your moves.
If you are having trouble practising L-cancelling on Bowser it remember to let go of the shield button when you drop and tap it again to get the L-cancel.
Example of a running shield drop to the left:

L-cancelling - pressing L/R trigger 1-7 frames before you land on the ground after preforming an aerial move, doing this reduces the landing lag of said move.
Shield Pivot:
Pivot Tutorial: (skip to 1:00 for shield pivot)
https://www.youtube.com/watch?v=WuCCmymFpMU
At first glance Shield Pivoting does not seem too useful, but you can integrate it with some other techniques covered in this guide and you'll get some mileage out of it. Think of it as another option you have when moving, the more options you have the deadly you are. Having the option to quickly turn Marth around is great because you can throw out moves and abuse that range of Marths even more.
Scenario of when to use Shield Pivot:
I personally like to use it when in neutral with Marth, you can be really tricksy with Marths movement and this only adds to it!
dash away -> shield pivot -> N-air for example
While on a platform after you have smashed the direction you want to pivot in you can hold that direction and do a shield drop, this allows you to abuse F-air a little bit more, this scenario is best used when you are not being harassed from below as you can hit when you pivot.
Movement:
Like mentioned before you can use a shield pivot to change Marths direction and on top of this it stops all momentum, you can use this to help with your combos.
I could talk about Marths movement all day so if you have any questions about how to integrate it into your movement ask in the comments and I will reply ASAP.
Chain-grabbing:
When chain-grabbing spacies starting from roughly 17% if the hacky-sack, sorry I meant spacies does slight behind DI then you have to pivot grab in order to keep the chain-grab going, you can do this quite easily by shield pivoting then grabbing!
Executing a shield Pivot:
A Shield pivot can only be done while in the dash animation.
By moving in one direction and then smashing your movement stick in the other direction, hold this direction then pull up your shield and Marth should be facing the other direction. Once you are facing the other direction you can preform an attack, grab or stay in shield and WD OOS.
Practice:
This is a pretty simple technique and should not take too long to master.
Its important to note that you do not need to hold Marths shield down for very long after the pivot, so work with shortening the time spent in shield.
Vary the lengths you dash before pivoting and make sure you can pivot in both directions.
And of course try implementing attacking / JC-grabs, WD OOS once you have pivoted.
Example of a shield pivot dash right then pivot to face left:
WD OOS - Wavedash Out of Shield cover later on in the guide!
DI - Directional Influence, manipulating your trajectory after being hit with a move
To Write up:
D-tilt IASA Shield
Shield Stop
Wavedash OOS
Powershield
Light shield
Shield Pressure
Shield DI