
Neutral Game Basics: Understanding & Controlling Space

NOTE: This guide is most applicable to Smash 4, but can be applied to other smash games, on a mental basis.
What is Space?
As I watched a tournament smash brothers match, I noticed that the commentators would just openly say the word Neutral Game, without understanding or even able to explain what the Neutral Game actually consists of; furthermore, when I listen to the better players talk about improvement in the Neutral Game, discussions usually involve way too abstract ideas for an amateur smash player to understand, and learn from. As a result, players warp these lessons into flawed concepts, trying to mimic top players who understand the Neutral Game. Neutral Game is an important concept of Smash Bros. If a player thinks about Neutral Game, he or she will come across “space” and “dead space.” Space is referring to the effective attack range of a character in its current position, while dead space refers to the position that a character needs to control, to gain an advantage over the opposing character.
Tools and Range
Before I move on to discussing space and dead space in-depth, the foundation of these concepts comes from tools and range of a character. Tools is the options available to the character; range is the area threatened by the mobility and tools offered to the character. The tools and range of a character together to create the space of that character.
To paint a more tangible picture, let’s look at a specific example; consider the characters Sonic and Diddy Kong. The Diddy Kong and Sonic matchup is generally considered even by the community, and each character has a relatively wide array of options to approach each other, so the two create a sterling illustration of the concepts at hand.
It’s important to understand what each character can do, especially the range of each of their attacks. Sonic has a relatively small range; furthermore, his attacks have low priority and his best tool- Sonic’s spin dash- is itself a hurtbox from which Sonic takes more damage. However, the spin dash also makes up Sonic’s most important tool- it allows him the speed to approach and escape his opponent before he is punished. As a result of this, in most matchups Sonic will:
- get in, and gain control of the area the closer he is to his opponent.
- get in, and needs to use escape options to win the Neutral Game/ not get punished on demand.
- get in, and can abuse his escape options because the opposing character has a difficult time punishing Sonic.
As for Diddy Kong, Diddy Kong’s best tools in Smash is his f-air being able to contest the majority of the cast as aerial attacks versus aerial attacks, and his banana setups, which controls the grounded area before him; as a result, Diddy Kong can net grabs, which gives him the biggest damage output, while at the same time he can challenge characters with walls that pack a consistent amount of %. As a result of this, in most matchups Diddy Kong will :
- challenge an opponent's air approach with f-air (because of transcendence) ( in a sense how much priority it has over other attacks).
- force an opponent to make a mistake on the ground with bananas.
- punish the opponent for making a mistake, or even pressure the opposing character to make a mistake with his presence.
Dead Space
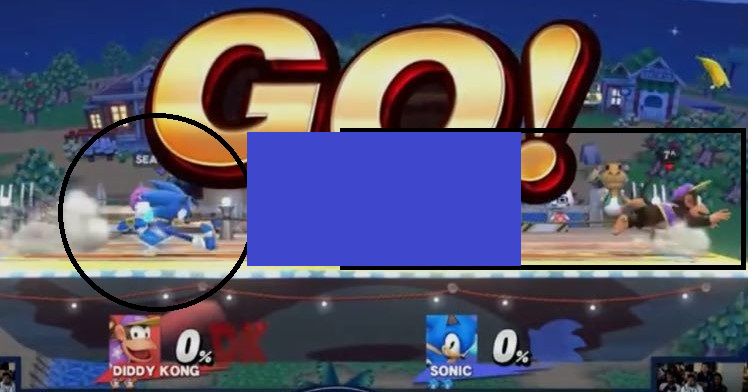
The black outline shows the range of Sonic’s attacks; On Diddy’s side, his range extends horizontally, because of his banana being a strong tool. The blue area shows all of the dead space that both Diddy Kong and Sonic can take control of, to create favorable or less unfavorable situations.
Controlling Dead Space (Getting small gains)
Unlike most fighting games, such as anime fighters that allows a player to perform devastating combos that puts their opponent at a “near-death” position for not having an amazing defense, smash focuses a lot more on achieving small gains, which build “momentum”. A player can maintain a big advantage to punish his opponent with damage ranging relatively huge. Often times, the average player will try so hard to deal a lot of damage on their opponent by seeing the setups top players do, and put themselves in positions where they get punished when having an advantage. This usually happens because, top players who consistently punish their opponents very well often get mirrored by other players, trying to repeat the same scenarios, without understanding that a small gain must be achieved to reach said amazing positions; furthermore, in higher levels of play, gaining small advantages every step of the way allows the player to win the game, vs going 100% for one setup that can win you the game. The analogy I will use for this, is like playing a RPG, and using all of the hard to find “revive all party member items”, and getting to the final boss with 100,000 HP, and not having any to spare left, when the player could have had five “revives” to spread amongst 25,000 HP, and won the game a lot easier. The point is, smash is about gaining plenty of small advantages in each scenario, to create big advantages, or wins to dominate the opponent; furthermore, a player that never puts themselves at a disadvantage (not to be confused by playing safe). In general, when fighting for space, as a player, these questions are example prerequisites to making a plan towards winning the game of spacing:
- Is the opponent retreating? ( Take the stage, and try to bully them)
- Is the opponent committing? (Play footsies, and try to out poke)
- Is the opponent throwing out hitboxes? ( Find a counter-play, look for holes)
There is always a way to counter what an opponent is trying to do.
Example : Diddy Kong vs Sonic (Controlling Dead Space)
The first way to visualize controlling dead space, is in the picture above of Sonic vs Diddy Kong. Sonic has to try to gain advantage over the dead space, by using spin dash; Sonic can threaten Diddy Kong with spin dash, challenging him on the ground. It can be rough for Sonic to apply pressure, if he is hasty, or does not apply mixups to force Diddy Kong to question when to throw out a fair to wall out Sonic’s approach, or call out the spin dash timing with a banana.
https://gfycat.com/BonyBowedHawaiianmonkseal
In this gfycat above, Sonic has to find his way through the dead space, to approach Diddy Kong. Sonic has to respect that Diddy Kong may throw out f-air to block Sonic’s approach to take control of that space. Because of this scenario where Sonic was looking for an opening, and did not find it fast enough, the Diddy Kong player was able to punish him retreating, by: grabbing a banana, throwing it at the dead space, then grabbing the banana, and catching Sonic out of his spin dash. This sequence led from 10% on Sonic for eating one f-air, then another 23% for losing control of the dead space and getting for grabbed off a banana setup.
Re-capping on getting small gains, Diddy Kong took control of the dead space with his tools and range, then pressured Sonic into an unfavorable position, where Diddy Kong now is in a strong position to net a lot of damage by a grab.
https://gfycat.com/ScalyFrighteningAmethystinepython
In this gfycat above, Diddy Kong was attempting to apply pressure to Sonic, while he has control of the dead space. Diddy Kong threw out a f-air at a punishable angle; as a result, Sonic punishes Diddy Kong from 21% to 48%. Since Diddy Kong is in the air, Sonic now has room to freely take complete control of the dead space with his tools (gaining a big advantage), while punishing Diddy Kong’s landings. Diddy Kong has now went from 21% to 59%, a 38% damage output. The Sonic then is able to reset the situation, while at the same time being closer in the dead space, more than Diddy Kong. Diddy Kong is forced into shield, and Sonic is less likely to be punished.
Conclusion
In conclusion, every game in smash involves being able to learn to control the game with the space and environment around the characters. In a sense controlling dead space can include, but is not limited to :
- Neutral Game
-Micro Spacing
-Baiting (Tricks)
-Ground Game
-Aerial Game
-Zoning
- Stage Control
- Movement
As mentioned here, a lot of dead space deals with Neutral Game. A player must also use movement implement strong stage control to maneuver dead space as well. Hopefully this article helps, and thanks for reading!
Works Cited
Tafokints. "Zero To Hero: Episode 1 Featuring Tafo and Atrioc." YouTube. YouTube, 23 Feb. 2015. Web. 20 Jan. 2016.
Locator, Tourney. "TBH5 Smash 4 - TSM | ZeRo (Diddy Kong) vs Seagull Joe (Sonic) - Pools." YouTube. YouTube, 3 Oct. 2015. Web. 20 Jan. 2016.
"Advent Children: Cloud vs Sephiroth." By TayleRX on DeviantArt. N.p., n.d. Web. 25 Jan. 2016.
- Applicable Games
- Smash 64, Melee, Brawl, Project M, Smash 3DS, Smash Wii U
