Should I just call it Grab Air then?As far as I know, Z-Airs are just called Z-Airs because of the Z button in Melee.

-
Welcome to Smashboards, the world's largest Super Smash Brothers community! Over 250,000 Smash Bros. fans from around the world have come to discuss these great games in over 19 million posts!
You are currently viewing our boards as a visitor. Click here to sign up right now and start on your path in the Smash community!
It appears that you are using ad block :'(
Hey, we get it. However this website is run by and for the community... and it needs ads in order to keep running.
Please disable your adblock on Smashboards, or go premium to hide all advertisements and this notice.
Alternatively, this ad may have just failed to load. Woops!
Please disable your adblock on Smashboards, or go premium to hide all advertisements and this notice.
Alternatively, this ad may have just failed to load. Woops!
Make Your Move 16: MYM 17 Starting June 1st
- Thread starter MasterWarlord
- Start date
Munomario777
Smash Master
- Joined
- Nov 18, 2014
- Messages
- 3,253
- Location
- Charleston, South Carolina
- 3DS FC
- 0387-9596-4480
- Switch FC
- SW-8229-3157-8114
You could call it an aerial grab, or a tether recovery for when it's shot at the ledge.So there's no word for it? I don't like shortening words into letters in my movesets.
Standard Attacks
Neutral Attack (Jab)Side Tilt
Down Tilt
Up Tilt
Dash Attack
Aerial Attacks
Side Air
Back Air
Down Air
Up Air
Smash Attacks
Down Smash
Up Smash
Special Attacks
Neutral Special:Side Special:
Down Special:
Up Special:
Grab Game
GrabPummel
Forward Throw
Back Throw
Down Throw
Up Throw
Miscellaneous
Ground AttackTrip Attack
Ledge Attack
Ledge Attack 100%+
Playstyle
Description
Last edited:
Reiga
He sold diddy for a switch
That actually looks good, not gonna lie. You did forget to put the template for the Final Smash.This is my template for movesets. I will need it when creating them.
Name
ImageCharacter description
Standard AttacksNeutral Attack (Jab)
Side Tilt
Down Tilt
Up Tilt
Dash Attack
Neutral Air
Aerial Attacks
Side Air
Back Air
Down Air
Up Air
Forward Smash
Smash Attacks
Down Smash
Up Smash
Special AttacksNeutral Special:
Side Special:
Down Special:
Up Special:
ThrowsGrab
Pummel
Forward Throw
Back Throw
Down Throw
Up Throw
MiscellaneousGround Attack
Trip Attack
Ledge Attack
Ledge Attack 100%+
Playstyle
Description
i myself prefer to put Specials first, but I guess it's more of preference than anything.
Also, you just made 4 Spoiler tabs, you could fix that
")
TheDarkKnightNoivern
Smash Master
Here's my template if anyone cares, I really should make more movesets, it's been a while
Jab 2:
Jab 3:
Dash attack:
Forward Tilt:
Up Tilt:
Down Tilt:
Up Smash:
Down Smash:
Forward Air:
Back Air:
Up Air:
Down Air:
Pummel:
Forward Throw:
Back Throw:
Up Throw:
Down Throw:
Ledge Attack:
100% Ledge Attack:
Z-Air: (If they have it)
Special Attacks:
Neutral B: Neutral B Name
Custom Neutral B 1:
Custom Neutral B 2:
Side B: Side B Name
Custom Side B 1: Custom Side B 1 Name
Custom Side B 1: Custom Side B 2 Name
Up B: Up B Name
Custom Up B 1: Custom Up B 1 Name
Custom Up B 2: Custom Up B 2 Name
Down B: Down B Name
Custom Down B 1: Custom Down B 1 Name
Custom Down B 2: Custom Down B 2 Name
Final Smash:
Entrance:
Stance:
Idle 1:
Idle 2:
Side Taunt:
Up Taunt:
Down Taunt:
Victory Pose 1:
Victory Pose 2:
Victory Pose 3:
Victory Fanfare:
Alternate Costumes:
1) Default (Origin)
2)
3)
4)
5)
6)
7)
8)
Also, Here's a moveset I posted a while back in the Krystal thread but forgot to post here
Jab 2: Similar to the first hit of jab, only going left to right
Jab 3: Krystal will stab straight in front of her
Rapid attack: Krystal will repeatedly stab multiple times in front of her before swinging her staff upwards
Dash attack: Krystal will slide similarly to mario with her staff pointed out in front of her
Forward Tilt: Krystal will do a quick jumping slash with her staff, spinning around with it
Up Tilt: Krystal will throw her staff upwards in a spinning motion before catching it
Down Tilt: Krystal will poke her staff outwards, tripping anyone hit with the tip of it
Up Smash: Krystal will slam her staff into the ground and use it as a pole vault allowing her to jump up and flip in the air
Down Smash: Krystal will get down near the ground and spin her staff around her, similarly to Shulk's down smash
Forward Air: She'll perform a front flip before slamming her leg downwards in front of her
Back Air: Krystal will swing behind her with her staff in an upwards arc
Up Air: Krystal will backflip, swinging her staff upwards along with her
Down Air: Krystal will take her staff and stab straight downwards acting as a meteor smash
Pummel: She'll hit the opponent with the centre of her staff
Forward Throw: She'll swing her staff which is below her in an upwards arc, knocking the opponent away
Back Throw: She'll throw the opponent behind her before spinning around and hitting them with her staff like a baseball bat
Up Throw: She'll catch the opponent on the end of her staff and then toss them straight upwards
Down Throw: She'll throw the opponent downwards, then jump on then jump on them with her staff pointed downwards, looks visually similar to the finishing blow in twilight princess
Krystal will shoot a blast of fire, this deals quite a lot of damage but is fired in an upwards arc making it harder to hit than say, Fox or Falco's blaster. The move travels about halfway across battlefield before landing where it will stay on the ground for a second before disappearing.
Side B: Ice Blaster
Krystal will release a stream of ice from her staff, the move is visually similar to the ice climber's Blizzard, it also has similar range and can freeze opponents just like it. However, Krystal can also move while using it and the stream will become smaller and weaker over time similarly to Bowser's fire breath.
Up B: Rocket Staff
Krystal will grab her staff and hold on tightly as it prepares to blast upwards, the move is similar to Fox and Falco's Fire Fox/Bird except it goes further and the direction it can be fired is much more limited, only ever going straight upwards or slightly diagonally. The move also has a sweetspot if hit with the tip
Down B: Ground Quake
Krystal will rise up as she begins to charge the move, at full charge she will be about half her height up on the air, then when released she'll slam downwards stabbing her staff into the ground and releasing waves of energy from both sides. At lower charges the move does minimal damage and knockback but when fully charged it can easily KO opponents in higher percents
Final Smash: Dinosaur Stampede
Krystal will put her fingers against her forehead and call the cloudrunner she rode at the beginning of Star Fox Adventures which will fly on stage as 2 portals similar to those found in Adventures appear at both sides of the stage. A stampede of Earthwalkers from one side and Clousrunners from the other will charge across the stage trapping and repeatedly hitting anyone in their way before running through the other portal as the Cloudrunner flies past with Krystal jumping off it, landing with one hand on the ground, one leg outstretched and one leg kneeling on the ground.
Entrance: The Cloudrunner from the beginning of Star Fox Adventures will fly onstage as Krystal jumps off where it will then take back to the skies and fly off the other side
Stance: She'll essentially stand like this with her staff in her right hand
Idle 1: This basically
Idle 2: Krystal will stab her staff into the ground and lean on it for a second
Side Taunt: Krystal spins her staff before stabbing it into the ground then striking this pose saying "All right, that's enough"
Up Taunt: Krystal will place her right hand on her hip and brush her hair back with her left saying "It's not over, yet"
Down Taunt: Krystal will stretch her arms behind her back and say "Is that all you've got?"
Victory Pose 1: Krystal will fly in on the dinosaur from the beginning of adventures and say "I can take it from here" (Quote from Adventures) before jumping off and waving to it as it flies away before looking back at the camera and smiling
Victory Pose 2: Krystal will slam her staff into the ground pulling this pose while standing next to tricky, she'll then kneel down and pet him
Victory Pose 3: Krystal will throw her staff into the air and catch it before saying "I didn't hurt you too badly, did I?" in a sassy tone while also showing her caring side
Victory Fanfare: The regular Star Fox fanfare which is also shared by Fox and Falco
![]() 2) Katt Monroe (Gray Fur, blue eyes, pink eyeshadow, yellow, orange and red outfit)
2) Katt Monroe (Gray Fur, blue eyes, pink eyeshadow, yellow, orange and red outfit)
![]() 3) Amanda Toad (Pink fur, blue eyes, green, yellow and blue outfit
3) Amanda Toad (Pink fur, blue eyes, green, yellow and blue outfit
![]() 4) Lucy Hare (Light pink fur, Hot pink eyes, light hellow face fur, yellow, orange and red outfit)
4) Lucy Hare (Light pink fur, Hot pink eyes, light hellow face fur, yellow, orange and red outfit)
![]() 5) Kursed (Black outfit, Purple makeup)
5) Kursed (Black outfit, Purple makeup)
![]() 6) Dark Krystal (Dark alt like Fox and Falco's)
6) Dark Krystal (Dark alt like Fox and Falco's)
![]()
![]() 7) Miyu (Orange fur, blue eyes, red and white outfit)
7) Miyu (Orange fur, blue eyes, red and white outfit)
![]() 8) Fay (White fur, blue eyes, red and white outfit)
8) Fay (White fur, blue eyes, red and white outfit)
![]()
Character Moveset:
Character description
Character image
Playstyle:
Stats:
Ground Speed - /10
Air Speed - /10
Overall Attack Power - /10
Jump Height - /10
Fall Speed - /10
Weight - /10
Height - /10
Tilt Attacks:
Jab 1:Character description
Character image
Playstyle:
Stats:
Ground Speed - /10
Air Speed - /10
Overall Attack Power - /10
Jump Height - /10
Fall Speed - /10
Weight - /10
Height - /10
Tilt Attacks:
Jab 2:
Jab 3:
Dash attack:
Forward Tilt:
Up Tilt:
Down Tilt:
Smash Attacks:
Forward Smash:Up Smash:
Down Smash:
Aerial Attacks:
Neutral Air:Forward Air:
Back Air:
Up Air:
Down Air:
Grab and Throws:
Grab:Pummel:
Forward Throw:
Back Throw:
Up Throw:
Down Throw:
Other Attacks:
Get Up Attack:Ledge Attack:
100% Ledge Attack:
Z-Air: (If they have it)
Special Attacks:
Neutral B: Neutral B Name
Custom Neutral B 1:
Custom Neutral B 2:
Side B: Side B Name
Custom Side B 1: Custom Side B 1 Name
Custom Side B 1: Custom Side B 2 Name
Up B: Up B Name
Custom Up B 1: Custom Up B 1 Name
Custom Up B 2: Custom Up B 2 Name
Down B: Down B Name
Custom Down B 1: Custom Down B 1 Name
Custom Down B 2: Custom Down B 2 Name
Final Smash:
Extras:
Entrance:
Stance:
Idle 1:
Idle 2:
Side Taunt:
Up Taunt:
Down Taunt:
Victory Pose 1:
Victory Pose 2:
Victory Pose 3:
Victory Fanfare:
Alternate Costumes:
1) Default (Origin)
2)
3)
4)
5)
6)
7)
8)
Also, Here's a moveset I posted a while back in the Krystal thread but forgot to post here
Krystal Moveset:
Krystal is a character from the Star Fox series. She's a newly recruited member of the Star Fox team after an incident occured where her planet was destroyed leaving her as the last remaining survivor of Cerinia and assists the team using her telepathic abilities which always come in handy. Krystal is a very caring and gentle character but she can be stubborn when she needs to. This fiesty vixen is ready for a fight and with her amazing hand-to-hand combat skills, she can easily get the job done.
Krystal is a character from the Star Fox series. She's a newly recruited member of the Star Fox team after an incident occured where her planet was destroyed leaving her as the last remaining survivor of Cerinia and assists the team using her telepathic abilities which always come in handy. Krystal is a very caring and gentle character but she can be stubborn when she needs to. This fiesty vixen is ready for a fight and with her amazing hand-to-hand combat skills, she can easily get the job done.
Playstyle:
Krystal is a character with a lot of range thanks to her staff and she's pretty quick on her feet too, however she lacks in power meaning she needs to rack up tons of damage before knocking someone out but with her speed that's not too much of a problemStats:
Ground Speed - 8/10
Krystal is pretty quick on her feet, overall her speed is in between Fox and Falco's
Air Speed - 6/10
She also has a decently quick air speed too
Overall Attack Power - 4/10
Krystal isn't the strongest of characters but she makes up for that in other areas
Jump Height - 7/10
Krystal can jump quite high, it's about between Fox and Falco
Fall Speed - 5/10
Krystal falls quite a bit slower than the other star fox characters, around mario's speed
Weight - 5/10
Krystal is also fairly light
Height - 5/10
Krystal is around the same height as the other Star Fox characters
Tilt Attacks:
Jab 1: Krystal will swing her staff in front of her going from right to leftJab 2: Similar to the first hit of jab, only going left to right
Jab 3: Krystal will stab straight in front of her
Rapid attack: Krystal will repeatedly stab multiple times in front of her before swinging her staff upwards
Dash attack: Krystal will slide similarly to mario with her staff pointed out in front of her
Forward Tilt: Krystal will do a quick jumping slash with her staff, spinning around with it
Up Tilt: Krystal will throw her staff upwards in a spinning motion before catching it
Down Tilt: Krystal will poke her staff outwards, tripping anyone hit with the tip of it
Smash Attacks:
Forward Smash: Krystal, using her staff as leverage will swing up it and kick out her legs before jumping back down (See 1:59 of The Suxxed One's Krystal vid)Up Smash: Krystal will slam her staff into the ground and use it as a pole vault allowing her to jump up and flip in the air
Down Smash: Krystal will get down near the ground and spin her staff around her, similarly to Shulk's down smash
Aerial Attacks:
Neutral Air: Krystal will spin around with her staff, kicking out with her legs in front of her (Think Zero Suit Samus' Fair)Forward Air: She'll perform a front flip before slamming her leg downwards in front of her
Back Air: Krystal will swing behind her with her staff in an upwards arc
Up Air: Krystal will backflip, swinging her staff upwards along with her
Down Air: Krystal will take her staff and stab straight downwards acting as a meteor smash
Grab and Throws:
Grab: A standard grab, she'll reach out with her left handPummel: She'll hit the opponent with the centre of her staff
Forward Throw: She'll swing her staff which is below her in an upwards arc, knocking the opponent away
Back Throw: She'll throw the opponent behind her before spinning around and hitting them with her staff like a baseball bat
Up Throw: She'll catch the opponent on the end of her staff and then toss them straight upwards
Down Throw: She'll throw the opponent downwards, then jump on then jump on them with her staff pointed downwards, looks visually similar to the finishing blow in twilight princess
Special Attacks:
Neutral B: Fire BlasterKrystal will shoot a blast of fire, this deals quite a lot of damage but is fired in an upwards arc making it harder to hit than say, Fox or Falco's blaster. The move travels about halfway across battlefield before landing where it will stay on the ground for a second before disappearing.
Side B: Ice Blaster
Krystal will release a stream of ice from her staff, the move is visually similar to the ice climber's Blizzard, it also has similar range and can freeze opponents just like it. However, Krystal can also move while using it and the stream will become smaller and weaker over time similarly to Bowser's fire breath.
Up B: Rocket Staff
Krystal will grab her staff and hold on tightly as it prepares to blast upwards, the move is similar to Fox and Falco's Fire Fox/Bird except it goes further and the direction it can be fired is much more limited, only ever going straight upwards or slightly diagonally. The move also has a sweetspot if hit with the tip
Down B: Ground Quake
Krystal will rise up as she begins to charge the move, at full charge she will be about half her height up on the air, then when released she'll slam downwards stabbing her staff into the ground and releasing waves of energy from both sides. At lower charges the move does minimal damage and knockback but when fully charged it can easily KO opponents in higher percents
Final Smash: Dinosaur Stampede
Krystal will put her fingers against her forehead and call the cloudrunner she rode at the beginning of Star Fox Adventures which will fly on stage as 2 portals similar to those found in Adventures appear at both sides of the stage. A stampede of Earthwalkers from one side and Clousrunners from the other will charge across the stage trapping and repeatedly hitting anyone in their way before running through the other portal as the Cloudrunner flies past with Krystal jumping off it, landing with one hand on the ground, one leg outstretched and one leg kneeling on the ground.
Entrance: The Cloudrunner from the beginning of Star Fox Adventures will fly onstage as Krystal jumps off where it will then take back to the skies and fly off the other side
Stance: She'll essentially stand like this with her staff in her right hand
Idle 1: This basically
Idle 2: Krystal will stab her staff into the ground and lean on it for a second
Side Taunt: Krystal spins her staff before stabbing it into the ground then striking this pose saying "All right, that's enough"
Up Taunt: Krystal will place her right hand on her hip and brush her hair back with her left saying "It's not over, yet"
Down Taunt: Krystal will stretch her arms behind her back and say "Is that all you've got?"
Victory Pose 1: Krystal will fly in on the dinosaur from the beginning of adventures and say "I can take it from here" (Quote from Adventures) before jumping off and waving to it as it flies away before looking back at the camera and smiling
Victory Pose 2: Krystal will slam her staff into the ground pulling this pose while standing next to tricky, she'll then kneel down and pet him
Victory Pose 3: Krystal will throw her staff into the air and catch it before saying "I didn't hurt you too badly, did I?" in a sassy tone while also showing her caring side
Victory Fanfare: The regular Star Fox fanfare which is also shared by Fox and Falco
Alternate Costumes:
1) Default (Star Fox: Command inspired, featuring more realistic fur akin to assault as well as a black flight jacket among various other changes)


Last edited:
I didn't make 4 spoiler tabs. The forum failed.That actually looks good, not gonna lie. You did forget to put the template for the Final Smash.
i myself prefer to put Specials first, but I guess it's more of preference than anything.
Also, you just made 4 Spoiler tabs, you could fix that
Great template, great Krystal moveset. Easy to read and seems pretty fitting. I'd love to see Wolf and Krystal representing Star Fox in the next smash... if there is one... or DLC.Here's my template if anyone cares, I really should make more movesets, it's been a while
Character Moveset:Jab 1:
Character description
Character image
Playstyle:
Stats:
Ground Speed - /10
Air Speed - /10
Overall Attack Power - /10
Jump Height - /10
Fall Speed - /10
Weight - /10
Height - /10
Tilt Attacks:
Jab 2:
Jab 3:
Dash attack:
Forward Tilt:
Up Tilt:
Down Tilt:
Smash Attacks:Forward Smash:
Up Smash:
Down Smash:
Aerial Attacks:Neutral Air:
Forward Air:
Back Air:
Up Air:
Down Air:
Grab and Throws:Grab:
Pummel:
Forward Throw:
Back Throw:
Up Throw:
Down Throw:
Other Attacks:Get Up Attack:
Ledge Attack:
100% Ledge Attack:
Z-Air: (If they have it)
Special Attacks:
Neutral B: Neutral B Name
Custom Neutral B 1:
Custom Neutral B 2:
Side B: Side B Name
Custom Side B 1: Custom Side B 1 Name
Custom Side B 1: Custom Side B 2 Name
Up B: Up B Name
Custom Up B 1: Custom Up B 1 Name
Custom Up B 2: Custom Up B 2 Name
Down B: Down B Name
Custom Down B 1: Custom Down B 1 Name
Custom Down B 2: Custom Down B 2 Name
Final Smash:
Extras:
Entrance:
Stance:
Idle 1:
Idle 2:
Side Taunt:
Up Taunt:
Down Taunt:
Victory Pose 1:
Victory Pose 2:
Victory Pose 3:
Victory Fanfare:
Alternate Costumes:
1) Default (Origin)
2)
3)
4)
5)
6)
7)
8)
Also, Here's a moveset I posted a while back in the Krystal thread but forgot to post here
Krystal Moveset:
Krystal is a character from the Star Fox series. She's a newly recruited member of the Star Fox team after an incident occured where her planet was destroyed leaving her as the last remaining survivor of Cerinia and assists the team using her telepathic abilities which always come in handy. Krystal is a very caring and gentle character but she can be stubborn when she needs to. This fiesty vixen is ready for a fight and with her amazing hand-to-hand combat skills, she can easily get the job done.
Playstyle:Krystal is a character with a lot of range thanks to her staff and she's pretty quick on her feet too, however she lacks in power meaning she needs to rack up tons of damage before knocking someone out but with her speed that's not too much of a problem
Stats:
Ground Speed - 8/10
Krystal is pretty quick on her feet, overall her speed is in between Fox and Falco's
Air Speed - 6/10
She also has a decently quick air speed too
Overall Attack Power - 4/10
Krystal isn't the strongest of characters but she makes up for that in other areas
Jump Height - 7/10
Krystal can jump quite high, it's about between Fox and Falco
Fall Speed - 5/10
Krystal falls quite a bit slower than the other star fox characters, around mario's speed
Weight - 5/10
Krystal is also fairly light
Height - 5/10
Krystal is around the same height as the other Star Fox characters
Tilt Attacks:Jab 1: Krystal will swing her staff in front of her going from right to left
Jab 2: Similar to the first hit of jab, only going left to right
Jab 3: Krystal will stab straight in front of her
Rapid attack: Krystal will repeatedly stab multiple times in front of her before swinging her staff upwards
Dash attack: Krystal will slide similarly to mario with her staff pointed out in front of her
Forward Tilt: Krystal will do a quick jumping slash with her staff, spinning around with it
Up Tilt: Krystal will throw her staff upwards in a spinning motion before catching it
Down Tilt: Krystal will poke her staff outwards, tripping anyone hit with the tip of it
Smash Attacks:Forward Smash: Krystal, using her staff as leverage will swing up it and kick out her legs before jumping back down (See 1:59 of The Suxxed One's Krystal vid)
Up Smash: Krystal will slam her staff into the ground and use it as a pole vault allowing her to jump up and flip in the air
Down Smash: Krystal will get down near the ground and spin her staff around her, similarly to Shulk's down smash
Aerial Attacks:Neutral Air: Krystal will spin around with her staff, kicking out with her legs in front of her (Think Zero Suit Samus' Fair)
Forward Air: She'll perform a front flip before slamming her leg downwards in front of her
Back Air: Krystal will swing behind her with her staff in an upwards arc
Up Air: Krystal will backflip, swinging her staff upwards along with her
Down Air: Krystal will take her staff and stab straight downwards acting as a meteor smash
Grab and Throws:Grab: A standard grab, she'll reach out with her left hand
Pummel: She'll hit the opponent with the centre of her staff
Forward Throw: She'll swing her staff which is below her in an upwards arc, knocking the opponent away
Back Throw: She'll throw the opponent behind her before spinning around and hitting them with her staff like a baseball bat
Up Throw: She'll catch the opponent on the end of her staff and then toss them straight upwards
Down Throw: She'll throw the opponent downwards, then jump on then jump on them with her staff pointed downwards, looks visually similar to the finishing blow in twilight princess
Special Attacks:Neutral B: Fire Blaster
Krystal will shoot a blast of fire, this deals quite a lot of damage but is fired in an upwards arc making it harder to hit than say, Fox or Falco's blaster. The move travels about halfway across battlefield before landing where it will stay on the ground for a second before disappearing.
Side B: Ice Blaster
Krystal will release a stream of ice from her staff, the move is visually similar to the ice climber's Blizzard, it also has similar range and can freeze opponents just like it. However, Krystal can also move while using it and the stream will become smaller and weaker over time similarly to Bowser's fire breath.
Up B: Rocket Staff
Krystal will grab her staff and hold on tightly as it prepares to blast upwards, the move is similar to Fox and Falco's Fire Fox/Bird except it goes further and the direction it can be fired is much more limited, only ever going straight upwards or slightly diagonally. The move also has a sweetspot if hit with the tip
Down B: Ground Quake
Krystal will rise up as she begins to charge the move, at full charge she will be about half her height up on the air, then when released she'll slam downwards stabbing her staff into the ground and releasing waves of energy from both sides. At lower charges the move does minimal damage and knockback but when fully charged it can easily KO opponents in higher percents
Final Smash: Dinosaur Stampede
Krystal will put her fingers against her forehead and call the cloudrunner she rode at the beginning of Star Fox Adventures which will fly on stage as 2 portals similar to those found in Adventures appear at both sides of the stage. A stampede of Earthwalkers from one side and Clousrunners from the other will charge across the stage trapping and repeatedly hitting anyone in their way before running through the other portal as the Cloudrunner flies past with Krystal jumping off it, landing with one hand on the ground, one leg outstretched and one leg kneeling on the ground.
Entrance: The Cloudrunner from the beginning of Star Fox Adventures will fly onstage as Krystal jumps off where it will then take back to the skies and fly off the other side
Stance: She'll essentially stand like this with her staff in her right hand
Idle 1: This basically
Idle 2: Krystal will stab her staff into the ground and lean on it for a second
Side Taunt: Krystal spins her staff before stabbing it into the ground then striking this pose saying "All right, that's enough"
Up Taunt: Krystal will place her right hand on her hip and brush her hair back with her left saying "It's not over, yet"
Down Taunt: Krystal will stretch her arms behind her back and say "Is that all you've got?"
Victory Pose 1: Krystal will fly in on the dinosaur from the beginning of adventures and say "I can take it from here" (Quote from Adventures) before jumping off and waving to it as it flies away before looking back at the camera and smiling
Victory Pose 2: Krystal will slam her staff into the ground pulling this pose while standing next to tricky, she'll then kneel down and pet him
Victory Pose 3: Krystal will throw her staff into the air and catch it before saying "I didn't hurt you too badly, did I?" in a sassy tone while also showing her caring side
Victory Fanfare: The regular Star Fox fanfare which is also shared by Fox and Falco
Alternate Costumes:1) Default (Star Fox: Command inspired, featuring more realistic fur akin to assault as well as a black flight jacket among various other changes)
2) Katt Monroe (Gray Fur, blue eyes, pink eyeshadow, yellow, orange and red outfit)![]()
3) Amanda Toad (Pink fur, blue eyes, green, yellow and blue outfit![]()
4) Lucy Hare (Light pink fur, Hot pink eyes, light hellow face fur, yellow, orange and red outfit)![]()
5) Kursed (Black outfit, Purple makeup)![]()
6) Dark Krystal (Dark alt like Fox and Falco's)![]()
7) Miyu (Orange fur, blue eyes, red and white outfit)![]()
![]()
8) Fay (White fur, blue eyes, red and white outfit)![]()
![]()
Last edited:
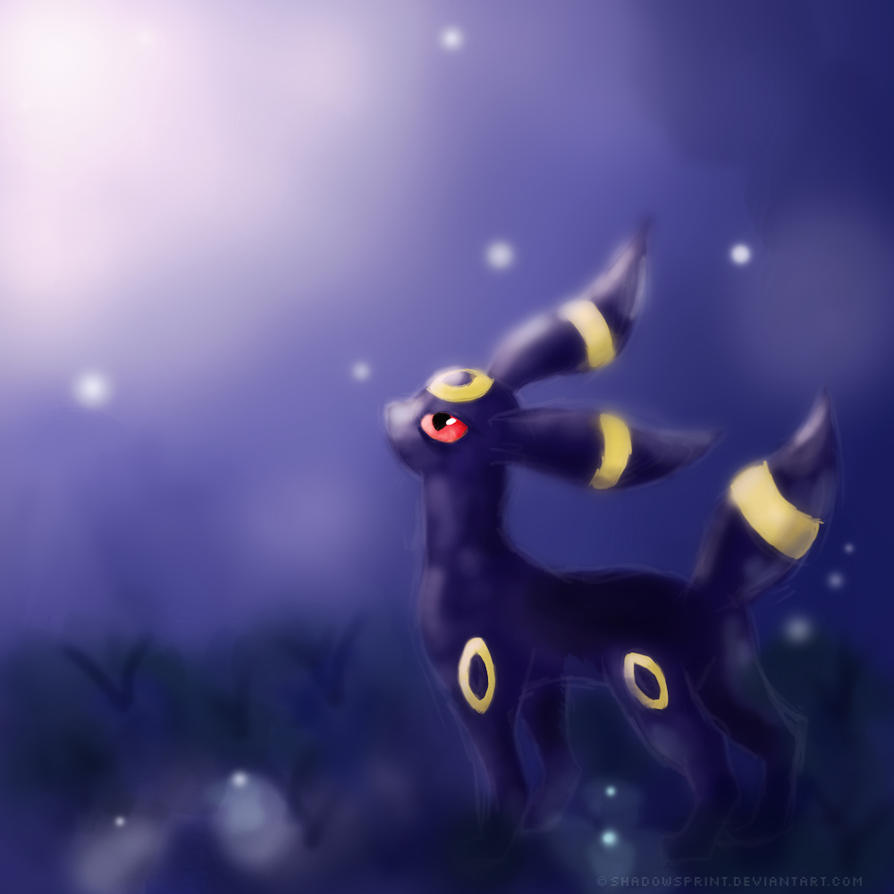
Umbra of Shadows
Smash Rookie
Umbreon
The Lord of Darkness

Attributes (SSB4 Stats):The Lord of Darkness
----Jump Height: Equal to Pikachu's Jump Height
--Falling Speed: 1.5------------------(Same as Mario, Dr. Mario, Robin, and Shulk)
-------Air Speed: 1.0------------------(Same as Rosalina, Robin, and Little Mac)
-----------Weight: 89-------------------(Same as Peach)
-----------Gravity: 0.09----------------(Same as R.O.B., Sonic, and Wii Fit Trainer)
Walking Speed: 1.3------------------(Same as Donkey Kong)
Dashing Speed: 1.8-----------------(Higher than Bowser, lower than Diddy Kong)
------------Height: Equal to Yoshi's height
----------Traction: Equal to Shulk's Traction
-
Jab
A 3-hit Jab Combo
-
Hit 1: Umbreon headbutts the opponent - 3%
-
Hit 2: Umbreon turns around and hits the opponent with its tail - 4%
-
Hit 3: An explosion of dark energy (imagine Robin's jab) sends the opponent into the ground - 4%
-
Tilts
-
F-Tilt: Bite: Umbreon lunges forward slightly, biting the opponent and causing a darkness effect to momentarily envelop them - 7% - High base knockback, low knockback scaling (Sends opponent at a 25 degree angle in the attack direction)
-
D-Tilt: Sand Attack: Umbreon kicks sand at the opponent, forcing them to trip - 4% - No knockback
-
U-Tilt: Snarl: Umbreon looks up and growls, creating small, dark waves above its head in a fairly wide arc - 6% - Fixed knockback (The opponent goes into the ground at a 315 degree angle in the direction that Umbreon faces)
-
Aerials
-
N-Air: Hidden Power: A black ring of energy swirls around Umbreon horizontally - 6% - Low base knockback, low knockback scaling (Knockback given is purely horizontal)
-
Hidden Power has different variants that can be used by inputting another button immediately after pressing the attack button (the Default described above is Hidden Power Dark):
-
Jump: Hidden Power Water: A watery ring that deals no damage or hitstun, but pushes the opponent. Fixed, horizontal knockback
-
Grab: Hidden Power Fire: A flaming ring that creates a multi-hit move that deals a fair amount of hitstun - 9% - No knockback
-
Shield: Hidden Power Steel: Instead of spinning for a half of a second, this attack appears as a solid steel ring and disappears after about a quarter of a second - 4% - Low base knockback, high knockback scaling (Meteor Smash)
-
Attack: Hidden Power Fighting: An orange ring appears that hits opponents upwards - 5% - Low base knockback, low knockback scaling (85 degrees in the direction that Umbreon faces)
-
Special: Hidden Power Ice: Shards of ice swirl around Umbreon vertically, having the same effect as Hidden Power Fire - 9% - No knockback
-
F-Air: Swift: A star appears over Umbreon's head and travels downwards in a wide arc in front of it - 8% - Low base knockback, moderate knockback scaling (Sends opponents at a 315 degree angle in the direction that Umbreon faces)-
Jump: Hidden Power Water: A watery ring that deals no damage or hitstun, but pushes the opponent. Fixed, horizontal knockback
-
Grab: Hidden Power Fire: A flaming ring that creates a multi-hit move that deals a fair amount of hitstun - 9% - No knockback
-
Shield: Hidden Power Steel: Instead of spinning for a half of a second, this attack appears as a solid steel ring and disappears after about a quarter of a second - 4% - Low base knockback, high knockback scaling (Meteor Smash)
-
Attack: Hidden Power Fighting: An orange ring appears that hits opponents upwards - 5% - Low base knockback, low knockback scaling (85 degrees in the direction that Umbreon faces)
-
Special: Hidden Power Ice: Shards of ice swirl around Umbreon vertically, having the same effect as Hidden Power Fire - 9% - No knockback
-
-
B-Air: Tail Whip: Umbreon swipes its tail to the side in order to slam the opponent - 10% - Low base knockback, high knockback scaling (Knockback given is horizontal)
-
D-Air: Flail: Umbreon kicks and scratches beneath itself, performing multiple hits in the order of claw-foot-foot-claw - First Claw: 4% ; Both Feet: 1% ; Second Claw: 4% ; Total: 10% - First Claw and Both Feet: Fixed Knockback (Moves downwards with Umbreon) ; Second Claw: Low base knockback, moderate knockback scaling (Meteor Smash)
-
U-Air: Sucker Punch: Umbreon quickly adjusts its body to a vertical position and swipes upwards at its opponent. If this move connects, Umbreon pushes off of the opponent as a results and falls rapidly. - 6% - High base knockback, low knockback scaling (Sends the opponent at 85 degrees in the direction that Umbreon was facing when the attack was used)
-
Smashes
-
F-Smash: Foul Play: Umbreon jumps a very small distance and slashes at the opponent in midair , enveloping the opponent in a darkness effect- This attack copies all aspects, excluding hitboxes and animations, of the F-Smash of the nearest opponent at the time it began charging, including the speed at which the attack occurs, how long it lasts for, its damage, its knockback, and even super armor, if applicable. If fighting an Umbreon, this attack copies Iron Tail instead.
-
U-Smash: Iron Tail: Umbreon's tail briefly goes into a metallic state and is then used to spike the opponent into the ground - 13% - Low base knockback, high knockback scaling (Sends opponent at a 305 degree angle in the direction that Umbreon faces)
-
D-Smash: Dig: While charging, Umbreon rapidly digs a hole in the ground, which it then goes into when the attack button is released. Umbreon reappears a second later from the ground by jumping up in a tackle, hitting the opponent. During the time that Umbreon is underground, nothing can affect it. - 10% - High base knockback, high knockback scaling (Knockback is purely vertical)
-
Ledge and Get-Up
-
Umbreon does not have any ledge or get-up attacks, but it makes up for this by being able to roll twice the distance of its normal roll dodge after being knocked on the ground or after grabbing a ledge.
-
Dash Attack
-
Instead of a Dash Attack, Umbreon has the ability to use any of its tilts during its dash, which will cause Umbreon to slide forward while doing the tilt, ending the dash. This is useful for approaching with Sand Attack, continuing combos with Bite, and getting aerial opponents back to the ground with Snarl.
-
Grab and Throws
-
Grab: Mean Look: At close range, Umbreon uses dark energy to trap its opponent
-
Pummel: Screech: Umbreon screeches at the trapped opponent with sound waves that are high in frequency and volume, causing its opponent harm - 1%
-
F-Throw: Tackle: Umbreon runs into the opponent head-on - 6% - Moderate base knockback, moderate knockback scaling (Sends the opponent flying at 45 degrees in the direction that Umbreon faces)
-
B-Throw: Wish: Umbreon uses the dark energy to throw the opponent behind it. It then summons a star by making a Wish, which appears above its head and flies diagonally downwards, hitting the flying opponent and fulfilling the Wish - 9% - Low base knockback, high knockback scaling (Sends the opponent at a 30 degree angle in the opposite direction that Umbreon faces)
-
D-Throw: Confuse Ray: Umbreon summons a strange blue light that causes the opponent to trip on the ground and sit there for a short amount of time. They cannot be grabbed during this, as they are still under the effects of a grab. The higher the percentage the opponent was at when the throw was used, the longer they will be confused for. - 1% - No knockback
-
U-Throw: Hyper Voice: Umbreon uses the dark energy to raise the opponent above its head, where it uses powerful sound waves to send away the opponent - 7% - Moderate base knockback, moderate knockback scaling (Sends the opponent at 80 degrees in the direction that Umbreon faces)
-
Specials
-
Neutral Special: Dark Pulse: Umbreon stores dark energy, and the more it stores, the more powerful this attack becomes. When Umbreon releases the attack, it creates a powerful pulse of darkness that travels extremely quickly horizontally. This covers a distance that is a minimum of the length of one Battlefield platform and a maximum of the length of Final Destination. While charging, Umbreon can cancel by inputting a shield, roll, or spot dodge if on the ground or air dodge if in the air. - Minimum: 3% ; Maximum: 15% - Low base knockback, high knockback scaling (Sends the opponent at 25 degrees in the direction that the pulse travels in)
-
Side Special: Quick Attack: Similarly to Ike's Quick Draw, Umbreon charges energy, and when it releases the charge it shoots forward rapidly, travelling more distance and having more knockback and damage the greater the charge - Minimum: 1% ; Maximum: 10% - Low base knockback, moderate knockback scaling (Sends opponent at 15 degrees in the direction that Umbreon faces)
-
Down Special: Protect: Umbreon creates a protective sphere of darkness around itself that lasts for three seconds, reflecting all projectiles and stopping all attacks during that time. This can be grabbed through and has a cooldown time of 7 seconds. - No damage - No knockback
-
Up Special: Psychic: Umbreon applies psychic energy to a circular area half of a Battlefield platform away horizontally and two Battlefield platforms vertically. If an opponent is in that location, he/she/it will be held within the sphere of psychic energy, giving Umbreon the following two options:
-
Special F-Throw: Psychic: Umbreon uses the psychic energy to send the opponent downwards - 7% - Moderate base knockback, high knockback scaling (Meteor Smash)
-
Special B-Throw: Psychic: Umbreon uses the psychic energy to send the opponent flying behind it - 10% - Moderate base knockback, high knockback scaling (Knockback is purely horizontal)
-
Psychic aids Umbreon's recovery by acting as a Z-Air tether recovery. It has the same range to grab a ledge as Samus' Z-Air and pulls Umbreon to the ledge if it connects.
--
Special B-Throw: Psychic: Umbreon uses the psychic energy to send the opponent flying behind it - 10% - Moderate base knockback, high knockback scaling (Knockback is purely horizontal)
-
Psychic aids Umbreon's recovery by acting as a Z-Air tether recovery. It has the same range to grab a ledge as Samus' Z-Air and pulls Umbreon to the ledge if it connects.
Final Smash
Moonlight
-
For 15 seconds, night falls on the stage and the light source becomes the full moon, which causes everything to cast long shadows. The stars in the sky become visible, and Umbreon's rings glow in the color of a shiny Umbreon's.
-
During this time, Umbreon harvests the moon's power to become stronger. The changes to Umbreon are as follows:
- Walking speed doubles
- Dashing speed doubles
- Air speed doubles
- Falling speed doubles
- Umbreon gets a third jump
- Umbreon cannot be grabbed
- Umbreon cannot flinch
- Umbreon takes no knockback
- All attacks are performed twice as fast
- Aerials no longer have any landing lag
- All attacks deal 1.5 times their original damage (rounded up)
- All attacks deal 1.5 times their original knockback (rounded up)
- Dark Pulse charges in half of the time
- Other actions can be performed during Quick Attack
- Psychic has twice of its normal range to grab an opponent or a ledge
- The range of Hidden Power, Swift, Sand Attack, and Snarl double
-
Additional Character Information- Dashing speed doubles
- Air speed doubles
- Falling speed doubles
- Umbreon gets a third jump
- Umbreon cannot be grabbed
- Umbreon cannot flinch
- Umbreon takes no knockback
- All attacks are performed twice as fast
- Aerials no longer have any landing lag
- All attacks deal 1.5 times their original damage (rounded up)
- All attacks deal 1.5 times their original knockback (rounded up)
- Dark Pulse charges in half of the time
- Other actions can be performed during Quick Attack
- Psychic has twice of its normal range to grab an opponent or a ledge
- The range of Hidden Power, Swift, Sand Attack, and Snarl double
-
-
Up Taunt: A moon appears above Umbreon and it sits in the moonlight. This heals 1%.
-
Side Taunt: Umbreon puts its head down and raises its tail, as if about to leap on its prey, and then performs its cry from the Pokémon games.
-
Down Taunt: Umbreon takes a quick nap on the ground, with sleep bubbles appearing above its head. This taunt can be held. If it is held, it can be canceled at any time.
-
Palutena's Guidance:
Pit: "Really, I have to put up with another one of these Pokémon? Aren't there already six of these things?"
Viridi: "Excuse me, Pit, but these Pokémon are not things, and biodiversity is one of the greatest parts of nature! In fact, I say that we need even more Pokémon here!"
Palutena: "Well, Squirtle and Ivysaur seem to be missing lately, and I hear that everyone used to face off against Pikachu's first evolutionary form, Pichu, before you were invited, Pit. Perhaps I should see if I could get them for you to face off against too?"
Viridi: "Oooh, I hear that there are over 700 Pokémon, maybe I can try to get all of them in here in some form!"
Pit: "That sounds great and all, but how do I fight this Umbreon?"
Palutena: "Well, Umbreon is great at controlling the horizontal space in front of it, but it has poor vertical options. Its range isn't all that, either. I would recommend playing defensively and attacking from the back or top. Maybe you could even throw it into the air and attack from beneath it!"
Pit: "Thanks! I'll do it for you, Lady Palutena!"
Palutena: "Pit, I choose you!"
-
Idle Pose: Stands, turning its head periodically to check for foes. Its rings slowly intensify in light radiation and then fade back to normal.
-
Victory Theme: The same as all other Pokémon's victory theme.
-
Victory Pose 1: Underneath the full moon, Umbreon does its side taunt.
-
Victory Pose 2: Umbreon is napping on the ground. It wakes up when the announcer says its name.
-
Playstyle
-
Overview: Umbreon is a relatively mobile character who has powerful moves, but fairly poor range. Umbreon is a character that is generally only effective in one direction, but it has plenty of tricks with which to fight its enemies well.
-
As Palutena mentions in her conversation with Pit, Umbreon is best at controlling the horizontal space in front of it, with more limited capabilities behind, and especially above and below, it. Umbreon's only real way to get a vertical KO at a reasonable percentage is Dig. Generally, an Umbreon could be played as follows:
-
Tilt Game: Umbreon should use Bite often in order to space opponents effectively. Sand Attack is extremely effective for combos, getting grabs, and setting up for powerful hits. Snarl should only be used in an attempt to stop an aerial opponent from hitting Umbreon, as it sends the opponent to the ground in front of Umbreon, where it works most effectively.
-
Aerial Game: Utilizing the different varieties of Hidden Power is essential to Umbreon's air game due to their various uses and possible applications in combos. Swift is a great tool for spacing opponents that are outside of Hidden Power's range. Flail is an attack with limited viability, being useful mostly for edge guarding, which Umbreon is not great at in general. Sucker Punch is useful for getting back to the ground when a combo has extended into the air or when Umbreon has taken a significant amount of vertical knockback. Tail Whip is great for sending opponents away, getting damage, and possibly even getting a KO, but it is fairly slow and hard to land.
-
Smash Game: Sand Attack and Confuse Ray give Umbreon plenty of opportunities to smash. However, Iron Tail is primarily effective on opponents above Umbreon, as it wants to get them back to the ground. Dig takes too long to be useful with Sand Attack or Confuse Ray, but can be an effective counter for opponents approaching Umbreon thanks to its intangibility frames. Foul Play is the real star of Umbreon's smashes, as it takes the effectiveness of the F-Smash of the opponent. If Ganondorf is the foe, Umbreon can send him flying! Bowser can be stopped dead in his tracks once his powerful and unstoppable F-Smash is thrown back at him!
-
Ledge Game: This essentially consists of using Swift and the Hidden Powers to force the opponent back, creating an opportunity to get back up.
-
Recovery Game: When Umbreon is above the ground, Quick Attack is its best bet. When below the stage, it should aim to get within the range of a Z-Air and use Psychic.
-
Grab Game: Confuse Ray is great for setting up combos and KOs, especially at later percentages. Tackle is nothing spectacular, but not bad either. Hyper Voice is mostly for sending away the opponent in order to allow Umbreon to get away to a better position. Wish is a KO move near the edge of the stage at higher percentages, making it extremely valuable.
-
Special Game: Protect is great for punishing overly-aggressive opponents, as Umbreon does not take shield knockback with it and can instantly drop it. Quick Attack is an excellent positioning move, especially when the opponent has flown to far away to pursue with another method of approach. Psychic is Umbreon's only real way of controlling vertical space. Its forward throw brings the foe back to Umbreon's domain, and its back throw can be a useful KO move. Dark Pulse has great potential for spacing, finishing combos, and KOing the opponent.
-
This is my first moveset here, so any feedback on how I could improve would be appreciated!
Last edited:
Katapultar
Smash Lord
[collapse=Umbreon]Cool picture! Umbreon is a unique set in some ways, and not just for a newcomer. Though it might not be necessarily fitting for the character, the presentation is unique and refreshing, and I like what you've done with the [color=orange[i]attack names[/i][/color] to make them stand out, that especially helps in the playstyle section. My main complaint would have to be how you've filled all the inputs with Pokemon attacks Umbreon can learn, and as such some of these attacks come off as being unnatural such as Psychic, Iron Tail and Hidden Power. This is widely known in the MYM community as "Pokemon Syndrome", and it not only hurts the character but also creates some awkward moves like that of the F-Smash and Dash Attack with no hitbox. That being said, the syndrome does introduce a few fun ideas on said moves, along with the enhanced get-up roll idea. Because the Pokemon Syndrome takes over, the set lacks character compared to the playable Pokemon in smash who generally only use Pokemon attacks on their Specials.
As far as capturing the character of the Pokemon, it is not only good to read their Pokedex entry but also see their status and the natural learnset as for an idea of what kind of playstyle they should have. Umbreon, for example, has high defenses and is one of those Pokemon that uses status moves like Confuse Ray, so its definite playstyle would ideally be defensive moves combined with some confusion and deception; not much speed and not much power. It's good that you have a playstyle section, but Umbreon being a fast and powerful character sort of goes against his interpretation in the games. Character was something of a problem for me with this set, but the images, "Lord of Darkness" title (even if he doesn't live up to it) and presentation were charming points for me, and it seems that you've put a decent amount of thought into the moves.
[/collapse]
Umbra of Shadows
Smash Rookie
Thank you for the feedback! I feel like it is very accurate in pointing out what I could improve on. I did create the moveset entirely out of moves that Umbreon can learn, and I see now how this is not very fitting to the character of Umbreon, but I was concerned that if I tried making attacks that were more practical, they would end up being either too generic (ex: N-Air: Umbreon spins around) or too predictable and boring (ex: F-Smash: Umbreon tackles). What advice can you give me for how to get past this issue that would be present in many Pokémon, especially those with body types that seem to prohibit effective fighting in Smash (Umbreon)?[collapse=Umbreon]Cool picture! Umbreon is a unique set in some ways, and not just for a newcomer. Though it might not be necessarily fitting for the character, the presentation is unique and refreshing, and I like what you've done with the [color=orange[i]attack names[/i][/color] to make them stand out, that especially helps in the playstyle section. My main complaint would have to be how you've filled all the inputs with Pokemon attacks Umbreon can learn, and as such some of these attacks come off as being unnatural such as Psychic, Iron Tail and Hidden Power. This is widely known in the MYM community as "Pokemon Syndrome", and it not only hurts the character but also creates some awkward moves like that of the F-Smash and Dash Attack with no hitbox. That being said, the syndrome does introduce a few fun ideas on said moves, along with the enhanced get-up roll idea. Because the Pokemon Syndrome takes over, the set lacks character compared to the playable Pokemon in smash who generally only use Pokemon attacks on their Specials.
As far as capturing the character of the Pokemon, it is not only good to read their Pokedex entry but also see their status and the natural learnset as for an idea of what kind of playstyle they should have. Umbreon, for example, has high defenses and is one of those Pokemon that uses status moves like Confuse Ray, so its definite playstyle would ideally be defensive moves combined with some confusion and deception; not much speed and not much power. It's good that you have a playstyle section, but Umbreon being a fast and powerful character sort of goes against his interpretation in the games. Character was something of a problem for me with this set, but the images, "Lord of Darkness" title (even if he doesn't live up to it) and presentation were charming points for me, and it seems that you've put a decent amount of thought into the moves.
[/collapse]
Last edited:
Katapultar
Smash Lord
There's nothing wrong with predictable or boring attacks if they play a role in the overall playstyle or have some sort of interesting effect, but really I'd say it all comes down to creativity and taking advantage of the character you're given - Greninja, for example, uses water swords in his smashes, which takes advantage of his water-type and ninja motif. It might be tough to think of interesting animations for most Normal-type Pokemon, but Umbreon has darkness on his side, which provides him with far more options than say, Eevee.
Incidentally, someone made an Umbreon set long before you back in MYM6, along with the rest of the Eeveelutions (minus Sylveon) on that same page. The set itself is very, very outdated with its complete lack of launching/KO moves and does have some Pokemon Syndrome, but the author does take into Umbreon's character into account both from a lore and gameplay point of view.
Also, here is an article that goes into explicit detail about Pokesets and Trainer sets alike, a good read for anyone striving to make good Pokesets...though it might be a little outdated in regards to the actual sets listed as examples.
Hope this helps!
TheDarkKnightNoivern
Smash Master
I made a new moveset
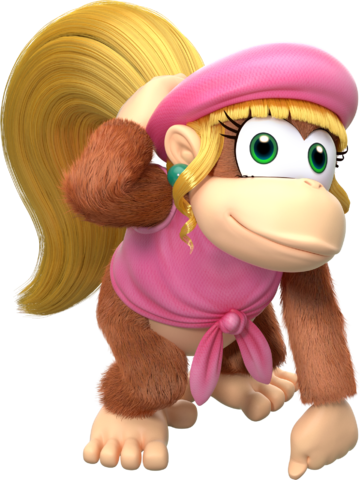
Dixie Kong Swings into Battle!
Jab 2: She'll then do the same thing with her right foot
Jab 3: Dixie will thrust he entire body forward with both legs outwards before landing on the ground
Rapid Attack: Dixie will do a rapid string of hits with her feet before doing the third hit of her jab
![]()
![]() Dash attack: Dixie's dash attack is almost identical to her roll in Tropical Freeze, she'll spin around while moving forward, whipping her hair around her with her hands up above her head kind of like a ballerina. This move has 3 hits
Dash attack: Dixie's dash attack is almost identical to her roll in Tropical Freeze, she'll spin around while moving forward, whipping her hair around her with her hands up above her head kind of like a ballerina. This move has 3 hits
Forward Tilt: Dixie Kong will lean forward on one hand and slam her hair onto the ground in front of her
![]() Up Tilt: Dixie Kong will swing her hair above her head like a propeller twice
Up Tilt: Dixie Kong will swing her hair above her head like a propeller twice
Down Tilt: This is another move from Tropical Freeze, her ground pound, Dixie will slam her hair downwards on one side before doing it a second time on the other
![]()
![]() Up Smash: Dixie will get into a hand-stand like pose atop her head, she'll then use her hair to spring her upwards, as she kicks out to both sides
Up Smash: Dixie will get into a hand-stand like pose atop her head, she'll then use her hair to spring her upwards, as she kicks out to both sides
![]()
![]() Down Smash: Dixie will jump upwards and spin upside down, while turned around she'll use her hair to keep her aflight while she rotates 360 degrees while kicking outwards
Down Smash: Dixie will jump upwards and spin upside down, while turned around she'll use her hair to keep her aflight while she rotates 360 degrees while kicking outwards
Forward Air: Dixie will swing her hair diagonally upwards going from left to right, slashing anyone in front of and slightly above and below her
Back Air: Dixie will swing her head downwards and behind her attacking with her hair in a rising motion
Up Air: Dixie will use her hair as a propeller to damage enemies above her, the move is visually similar to her flight ability in Tropical Freeze where she'll spin her hair above her head to lift her up
Down Air: Dixie will flip upside down, essentially being on her back and use her hair as a propeller slicing anyone below her with it
Pummel: When pummelling opponents, Dixie will just tighten her hair around them
Forward Throw: Similar to DK's forward throw, she'll be able to pick them up and hold them above her head, when tossed Dixie will pull her head back then push forwards launching them straight ahead
Back Throw: Dixie will spin around twice similar to her dash attack/neutral air before letting go and launching them behind her
Up Throw: Dixie Kong will quickly lift her head upwards, releasing the opponent and sending them in that direction
Down Throw: Dixie Kong will throw the opponent to the ground and jump on them as she pulls out her bubblegum gun, before blasting them in the face with it
Ledge Attack: Dixie will swing her hair above the ledge, slamming down on the ground and anyone that comes in contact with it
100% Ledge Attack: Dixie Kong will hold onto the ledge with her hair and use it as a vine to swing onto the stage, where she'll perform a cartweel in mid-air similar to the pose she pulls when jumping on an enemy in Tropical freeze
Z-Air: Dixie Kong will whip her hair straight in front of her
Dixie will pull out her bubblegum gun and shoot a shot from it, it will then bounce along the ground like Mario's fireball. Depending on the colour of the gumball it'll have a different effect
Red Gumballs are standard, Yellow are really fast but are also weaker, Green bounce higher than the rest but are harder to hit with, Purple are stonger but also slower and pink can hit mutiple targets but are weaker
![]() Custom Neutral B 1:
Custom Neutral B 1:
Custom Neutral B 2:
Side B: Guitar Blast
Dixie will pull out her guitar from Donkey Kong Country Tropical Freeze and strum it sending a shockwave of pink energy forwards which can stun opponents similarly to Zero Suit Samus's neutral B, the move can be charged
![]()
Custom Side B 1: Custom Side B 1 Name
Custom Side B 1: Custom Side B 2 Name
Up B: Ponytail Launch
Dixie will spin her hair above her to send her upwards, this move has a windbox above it which can blow away opponents but it can't damage. Looks a lot like her flight in Tropical Freeze and goes about the same distance as Bowser's Up B however unlike him, she won't be put in a helpless state
Custom Up B 1: Custom Up B 1 Name
Custom Up B 2: Custom Up B 2 Name
Down B: Milkshake Mayhem
Dixie Kong will pull out the milkshake she drank in her Donkey Kong Country 2 idle animation and squirt a puddle of it on the ground which can cause the opponent to slip, kind of like if the were on ice. This is a useful trap in her arsenal
Custom Down B 1: Custom Down B 1 Name
Custom Down B 2: Custom Down B 2 Name
Final Smash: Guitar Blast Bananza
This move is similar to the Barbara assist trophy, a bar will appear over Dixie's head which will show when to press the attack button, which will increase the size of the shockwaves she releases. Unlike DK's final smash, Dixie's shockwaves will trap the opponent in rather than knocking them away, however the range of her attacks aren't as large
![]()
Stance: Same as in Tropical Freeze
Idle 1: Dixie will brush her ponytail behind her with her right hand
Idle 2: Dixie will chew on some gum before blowing a bubble in reference to her DKC2 idle animation
Side Taunt: Dixie will play air guitar, it is similar to one of her idles in Tropical Freeze
Up Taunt: Her second taunt is another idle from Tropical Freeze, she'll get into a handstand and perform some gymnastics
5:18 and 5:28
Down Taunt: Dixie will dance around and clap like she does when starting the first level in Tropical Freeze
0:38
Victory Pose 1: Her first victory pose looks similar to her intro animation in Tropical Freeze, she'll fly in using her hair before landing arms out with one leg outstretched before looking to the camera and giggling
0:08
Victory Pose 2: Dixie will fly across the victory screen a couple of times before falling as her name is announced but she'll save herself with her hair just before landing similar to the first boss fight cutscene
Victory Pose 3: Dixie will pull out her guitar and play along to her victory theme
Victory Fanfare: A rock remix of the Donkey Kong Victory Theme shared be DK and Diddy
2) 2-player outfit from DKC2
![]() Red hair with a purple outfit
Red hair with a purple outfit
3) DK King of Swing 2nd Player outfit
![]() Red hair with a blue outfit
Red hair with a blue outfit
4) DK King of Swing 3rd Player outfit
![]() Pink hair with Yellow outfit
Pink hair with Yellow outfit
5) DK King of Swing outfit 3
![]() Purple hair with Green outfit
Purple hair with Green outfit
6) Tiny Kong
![]() Blue outfit with a flower on it with a pink, purple and green striped hat
Blue outfit with a flower on it with a pink, purple and green striped hat
7) Diddy Kong
![]() Brown hair with a red outfit, her top also has yellow stars on it and her hat a nintendo logo
Brown hair with a red outfit, her top also has yellow stars on it and her hat a nintendo logo
8) Funky Kong
![]() Light Blue hair with a white top and a red hat with white polkadots on it
Light Blue hair with a white top and a red hat with white polkadots on it
The images used in her Up smash, Forward smash, jab and forward tilt were created by @BirthNote, I take no credit for them
Dixie Kong Moveset:
The original girl with the whirl is finally back! (to kick some tail) Armed with a bubblegum gun, a karton or milkshake and a pony tail, Dixie Kong swings into battle! But don't underestimate her, Just like her Loyal friend Donkey and boyfriend diddy she's not to be underestimated. Dixie Kong is a Kharacter that originates from the Donkey Kong Country Series, Donkey Kong Country 2: Diddy's Kong Quest to be exact where she along with diddy set out on a mission to save Donkey Kong from K Rools klutches. She then got her own game in the form of Donkey Kong Country 3: Dixie's Double Trouble, where she and her kousin Kiddy Kong ventured into the Northern Kremisphere to save Donkey and Diddy. From that alone we know she can fend for herself unlike a few other ladies in smash. Oh, but she's not done yet while Dixie and the DK series as a whole sort of disappeared from this point onwards she appeared in plenty of spin-off games before taking a starring roll in 2014's Donkey Kong Country: Tropical Freeze.
Dixie Kong Swings into Battle!
Playstyle:
Dixie Kong overall feels like a mixture of Diddy Kong and Princess Peach, but she is far from a clone. She's slower on the ground and overall weaker there but she makes up for that in her aerial manouverability and aerial power thanks to a Peach-esque glide, however rather than just floating in place she'll fall slowly, allowing her to stay in the air for a lot longer.
Stats:
Ground Speed - 6/10
Overall Dixie Kong is slower than Diddy on the ground
Air Speed - 7/10
However she's a lot quicker and more agile in the air
Overall Attack Power - 5/10
Dixie isn't the strongest on the ground but her aerial attacks make up for that
Jump Height - 8/10
Dixie's jump height is about the same as Diddy's
Fall Speed - 6/10
Dixie Kong falls a little slower than diddy kong, it's slightly faster than mario's
Weight - 3/10
Dixie is a little bit lighter than Diddy
Height - 5/10
About the same height as diddy
Tilt Attacks:
Jab 1: Dixie Kong will thrust her left foot forward as she supports herself using her hair and hands on the groundDixie Kong overall feels like a mixture of Diddy Kong and Princess Peach, but she is far from a clone. She's slower on the ground and overall weaker there but she makes up for that in her aerial manouverability and aerial power thanks to a Peach-esque glide, however rather than just floating in place she'll fall slowly, allowing her to stay in the air for a lot longer.
Stats:
Ground Speed - 6/10
Overall Dixie Kong is slower than Diddy on the ground
Air Speed - 7/10
However she's a lot quicker and more agile in the air
Overall Attack Power - 5/10
Dixie isn't the strongest on the ground but her aerial attacks make up for that
Jump Height - 8/10
Dixie's jump height is about the same as Diddy's
Fall Speed - 6/10
Dixie Kong falls a little slower than diddy kong, it's slightly faster than mario's
Weight - 3/10
Dixie is a little bit lighter than Diddy
Height - 5/10
About the same height as diddy
Tilt Attacks:
Jab 2: She'll then do the same thing with her right foot
Jab 3: Dixie will thrust he entire body forward with both legs outwards before landing on the ground
Rapid Attack: Dixie will do a rapid string of hits with her feet before doing the third hit of her jab


Forward Tilt: Dixie Kong will lean forward on one hand and slam her hair onto the ground in front of her
Down Tilt: This is another move from Tropical Freeze, her ground pound, Dixie will slam her hair downwards on one side before doing it a second time on the other
Smash Attacks:
Forward Smash: Dixie will first wrap her hair around her body, She'll then spin around and unravel her hair, slashing the space around her

Aerial Attacks:
Neutral Air: Based off of Donkey Kong Country: Tropical Freeze when bouncing off two enemies in a row, Dixie will spin around, whipping her hair around her with her arms outstretched and feet pointed straight downwards, visually similar to her dash attack and like that is also a multihit with a total of 4 hitsForward Air: Dixie will swing her hair diagonally upwards going from left to right, slashing anyone in front of and slightly above and below her
Back Air: Dixie will swing her head downwards and behind her attacking with her hair in a rising motion
Up Air: Dixie will use her hair as a propeller to damage enemies above her, the move is visually similar to her flight ability in Tropical Freeze where she'll spin her hair above her head to lift her up
Down Air: Dixie will flip upside down, essentially being on her back and use her hair as a propeller slicing anyone below her with it
Grab and Throws:
Grab: Dixie will grab the opponent with her hair, wrapping it around themPummel: When pummelling opponents, Dixie will just tighten her hair around them
Forward Throw: Similar to DK's forward throw, she'll be able to pick them up and hold them above her head, when tossed Dixie will pull her head back then push forwards launching them straight ahead
Back Throw: Dixie will spin around twice similar to her dash attack/neutral air before letting go and launching them behind her
Up Throw: Dixie Kong will quickly lift her head upwards, releasing the opponent and sending them in that direction
Down Throw: Dixie Kong will throw the opponent to the ground and jump on them as she pulls out her bubblegum gun, before blasting them in the face with it
Other Attacks:
Get Up Attack: Dixie will essentially perform her down tiltLedge Attack: Dixie will swing her hair above the ledge, slamming down on the ground and anyone that comes in contact with it
100% Ledge Attack: Dixie Kong will hold onto the ledge with her hair and use it as a vine to swing onto the stage, where she'll perform a cartweel in mid-air similar to the pose she pulls when jumping on an enemy in Tropical freeze
Z-Air: Dixie Kong will whip her hair straight in front of her
Special Attacks:
Neutral B: Bubblegum GunDixie will pull out her bubblegum gun and shoot a shot from it, it will then bounce along the ground like Mario's fireball. Depending on the colour of the gumball it'll have a different effect
Red Gumballs are standard, Yellow are really fast but are also weaker, Green bounce higher than the rest but are harder to hit with, Purple are stonger but also slower and pink can hit mutiple targets but are weaker

Custom Neutral B 2:
Side B: Guitar Blast
Dixie will pull out her guitar from Donkey Kong Country Tropical Freeze and strum it sending a shockwave of pink energy forwards which can stun opponents similarly to Zero Suit Samus's neutral B, the move can be charged

Custom Side B 1: Custom Side B 1 Name
Custom Side B 1: Custom Side B 2 Name
Up B: Ponytail Launch
Dixie will spin her hair above her to send her upwards, this move has a windbox above it which can blow away opponents but it can't damage. Looks a lot like her flight in Tropical Freeze and goes about the same distance as Bowser's Up B however unlike him, she won't be put in a helpless state
Custom Up B 1: Custom Up B 1 Name
Custom Up B 2: Custom Up B 2 Name
Down B: Milkshake Mayhem
Dixie Kong will pull out the milkshake she drank in her Donkey Kong Country 2 idle animation and squirt a puddle of it on the ground which can cause the opponent to slip, kind of like if the were on ice. This is a useful trap in her arsenal
Custom Down B 1: Custom Down B 1 Name
Custom Down B 2: Custom Down B 2 Name
Final Smash: Guitar Blast Bananza
This move is similar to the Barbara assist trophy, a bar will appear over Dixie's head which will show when to press the attack button, which will increase the size of the shockwaves she releases. Unlike DK's final smash, Dixie's shockwaves will trap the opponent in rather than knocking them away, however the range of her attacks aren't as large
Extras:
Entrance: Dixie will pop out of a DK barrel before giggling like she does normally does in Tropical Freeze with her eyes closed and he hand over her mouthStance: Same as in Tropical Freeze
Idle 1: Dixie will brush her ponytail behind her with her right hand
Idle 2: Dixie will chew on some gum before blowing a bubble in reference to her DKC2 idle animation
Side Taunt: Dixie will play air guitar, it is similar to one of her idles in Tropical Freeze
Up Taunt: Her second taunt is another idle from Tropical Freeze, she'll get into a handstand and perform some gymnastics
Victory Pose 1: Her first victory pose looks similar to her intro animation in Tropical Freeze, she'll fly in using her hair before landing arms out with one leg outstretched before looking to the camera and giggling
Victory Pose 3: Dixie will pull out her guitar and play along to her victory theme
Victory Fanfare: A rock remix of the Donkey Kong Victory Theme shared be DK and Diddy
Alternate Costumes:
1) Default2) 2-player outfit from DKC2

3) DK King of Swing 2nd Player outfit

4) DK King of Swing 3rd Player outfit

5) DK King of Swing outfit 3

6) Tiny Kong

7) Diddy Kong

8) Funky Kong

The images used in her Up smash, Forward smash, jab and forward tilt were created by @BirthNote, I take no credit for them
Last edited:
Lucina

Oh no, another clone!
Time to fix that.
Standard Attacks
Neutral Attack (Jab)This jab starts off with the first hit of her original jab, but then it changes. Imagine Pit's rapid jab. Now imagine that on Lucina, but at the speed of Captain Falcon's jab, and swaying the position of the swings back and forth less frequently. The finishing blow is the second hit of her original jab, except it has more knockback. Like with Pit's jab in Brawl, you have to mash the attack button if you want to activate the rapid slash part of the jab. The first hit does 4%, the rapid slashes do 2% each, and the ending hit does 5%.
Side Tilt
A simple downward cut. Has small range but you can actually trap people in a combo with this, as it has lots of hitstun, meaning you are almost guaranteed another hit. However, once you have used the move 3 times in a row, there will be more end lag on the third Side Tilt, meaning a character can escape. 5% damage, low knockback.
Down Tilt
A lower kick, a bit like Ganondorf's. Based off her Down Tilt in a Lucina Brawl mod. 4% damage, low range, little knockback, hardly any lag.
Up Tilt
Lucina stabs her sword above her. A bit like her old Up Smash, but then again Meta Knight also has that. 7% damage, medium knockback, and low start lag, but moderate end lag.
Dash Attack
Lucina swings her sword forward in an upwards arc. 8% damage, average knockback.
Aerial Attacks
Similar to the old one, except the slashes are vertical instead of horizontal. The first one is in front of her and is a downwards slice, then the second one is behind her and is an upward slash. Same stats as the old one except, bigger hitbox.
Side Air
Consists of 4 long ranged horizontal slashes, each with a 0.24 second delay between them, and the whole attack taking 1 second to fully execute. Each slash does 5% damage, and doesn't really work as a KO move but racks up damage.
Back Air
Lucina swings out behind her in an upwards arc. Similar to her old one. 9% damage.
Down Air
Like her old one, except it doesn't have the major end lag, but it no longer spikes.
Up Air
Lucina flips around and does a vertical upwards kick with her left foot. This is one of her only attacks where she doesn't use her sword. Very quick but that's pretty much the only advantage, as it has small range, a little hitbox, low damage and knockback, and mediocre hitstun. Almost no start or end lag. Good for racking up damage, and can be used as a finisher after using Warp Signature. 3-4% damage, low knockback.
Smash Attacks
Lucina slashes forwards twice in the space of 0.4 seconds. These are horizontal slashes with good range and low start lag. If you don't charge it each slash does 7% damage (14% total) and if you do charge it they both do 11% damage (22% total). High knockback, high end lag. Can be punished if avoided or shielded.
Down Smash
She swings from left to right. There is a 0.3 second delay between the 2 slashes. Each one does 8% damage if not charged, but 19% if charged. Moderate start lag, average end lag.
Up Smash
Like the last hit of Dancing Blade tilted upwards. This is actually based off the Up Smash of Lucina in a brawl mod with her. And this is not the same as Roy's Up Tilt because if you look at my Roy moveset you will see I have changed certain aspects of the moveset.
Back to the Up Smash, this has moderate end lag and low start lag, and the attack is powerful and does 10-27% damage. High knockback, but small hitbox, making it hard to hit with, and the range is short, as it doesn't hit behind her.
Special Attacks
Neutral Special: Activation StrikeLucina holds her sword against her, tip facing upwards. It makes a noise slightly similar to the counter noise, and her sword glows for a split second. This is based off the part in Fire Emblem Awakening where she kills Chrom. It's where the text comes up before she goes in for the killing strike.
The next part is simple; she brings the sword down. The slice has medium range, and isn't the quickest slash, meaning it doesn't actually make a noise when it happens, so don't expect it to be the most powerful. It can be charged, but it has a much shorter charge time than most smash attacks, taking 1.2 seconds to get fully charged, and the minimum amount of time being 0.3 seconds. If you just press the special button, you will start charging it, so if you want to quickly unleash it you have to press it twice. When fully charged, it will do moderately high knockback and 26% damage. When uncharged, it does 10% damage. Will lower Lucina's gravity when she executes the slash.
Side Special: Cloned Illusion
I'm not really sure how to explain this. The first thing to note is that I do not know whether or not this move has anything to do with FEAwakening or not, however it's based upon part of a move in the Lucina Brawl mod.
When you use this, a half-transparent version of herself will spring out 2 SBBs in front of her. This clone is actually an optical illusion, which you can tell by the thin horizontal lines that cover it's body and make it faint. Being an illusion you would expect it no not do any damage; WRONG. This 'clone' zooms out in front of her taking a split second to reach its distance, acting as a hitbox which will repeatedly damage any opponent in it's path, doing 1% damage every 0.2 seconds, and staying still there for 0.4 seconds.
If you don't do anything else, this illusion will spring back to Lucina, being like her Soul getting sucked back into her body. But if you mash the special button when the clone is at it's maximum distance, Lucina will rush into the the clone's position and spring forwards 1 more SBB. While using this she keeps her momentum she had before, meaning using it after her mid-air jump or Up Special will be more effective than using it while she is falling. Afterwards it will leave her in helpless. This recovery part doesn't actually damage anything, but it acts as a windbox, meaning if done right it can gimp foes trying to recover.
I hope you understood that. If you can't picture the clone, just think of what Lucario looks like when he is attacked during his counter.
Down Special: Directional Counter
Oh crap, another counter? This one is slightly different. Firstly, the invincibility frame does not cover her whole body. It is like a small shield, which by default is positioned on the front of her body, where her sword is.
But you can also angle her sword up or down to move the invincibility frame to where you think your foe's attack will be. When you get hit, it will make the counter noise (obviously) and then you actually have more options than with most counters as you can input when you will execute the slash, and you can angle it up or down also. The power of the hit will be 6/5 of the attack you countered.
Up Special: Warp Signature
I made the concept of this attack a very long time ago, so I don't know why I thought of it or where it's from. 4 yellow arcs (which I may call the 'Warp Signature') appear around her, 2 on each side, the inner ones being slightly smaller and thinner. Then these waves quickly close in on Lucina, and she disappears, the Warp Signature disappearing with her.
Then she appears again 3 SBBs up (straight up, not diagonally), and the WS appears with her, but it does the opposite of what it did before; instead of closing in, the waves travel outwards. They travel horizontally and fade away after travelling 0.5 SSBs.
Just imagine Wolf's reflector, except yellow.
The attack does not render Lucina helpless, but will fling the opponent up with her, acting as a good setup for aerial combos, the most common one being an Up Air finisher. It does 3% damage in total and provides enough hitstun to be followed by an aerial attack.
Final Smash: Brand of the Exalt
I did a lot of research when I made a similar Lucina moveset in Wiichat's 'The Moveset Thread', and found out that as Lucina has a Brand of the Exalt symbol in one of her eyes, this would fit as a final smash.
This starts off looking similar to her old one. She brings her sword up above her, saying 'Time to change fate' like in her old one, but then 8 big Brand of the Exalt symbols appear on the stage (1 in each corner/side) and rapidly fly towards her, damaging anything in their path 8% damage and doing medium knockback (they are slightly bigger than Zelda's Nayru's Love). When they get to Lucina, she does the strike from her old Final Smash without moving (which will OHKO anyone who is unlucky enough to get caught in it), which send the BOTEs flying away from her, doing great damage and knockback to anyone in their paths. These break shields almost instantly, but they can be dodged with an air dodge, sidestep or roll, and do 27% damage and high knockback when they make contact with opponents.
Miscellaneous
Ground AttackLucina quickly scrapes her sword along the ground from left to right.
Trip Attack
She swings her sword from left to right.
Ledge Attack
Similar to her Ground Attack, she scrapes her sword along the ground, then swings it in an upwards arc.
Ledge Attack 100%+
A slower version of her normal Ledge Attack.
Playstyle
Unlike Marth, Lucina's attacks have the same power throughout the whole of her sword, meaning she is relatively easy to play. However you may have gathered that Cloned Illusion is a bit harder to use than most of her attacks. This is no problem as Dancing Blade is relatively tricky to master, and as Marth and Lucina's range is now lower than Marth's was in Melee and Brawl, it's harder to trap your opponent in the combo.You may be wondering why I didn't include her Grab Game. My reason is that I don't feel that grabs are really that important in a moveset compared to the other attacks. If I'd known more about Lucina's appearance in Fire Emblem Awakening I may have been able to base her pummel and some of her throws off it, but as I don't actually play FE, I had to do some research.
How does Lucina play? Well. Pretty similar to her old self. The only change is that her recovery is slightly better as she can use Warp Signature and not go into helpless, so then she can use Cloned Illusion immediately afterwards to hopefully grab the ledge.
Her counter is also harder to use, but it is slightly more effective if you use it right.
Most of her standard moves are generally a lot simpler than her specials, and you won't have to use her specials to be decent, however it would be wise to take the time to learn how to use them.
Thank you for reading.
Last edited:
MasterWarlord
Smash Champion
TOXIC GAME
I came into Drow expecting something passable but mediocre, and while it’s not exactly the most memorable set I feel it does a fair bit better with what little you’re given. This is a surprisingly decent set for one that is required to be a camper played straight. The methods of manipulating and aiming projectiles are somewhat interesting, as well as the dynamics with when you use which moves at which ranges. More surprisingly, I don’t think the filler is really all that terrible for a set of this archetype, as most of the moves do feel like they serve fairly specific purposes to me in her game, even if her game is rather unexciting by MYM standards. Regardless, like the actual character, it does a decent job of representing a necessary “boring” archetype without just botching it, which is honestly one of the more difficult things to accomplish in moveset design.
The character does feel a bit strange to use the element of wind so strongly. The gust portion of the move was only added in relatively recently when the move used to be a generic silence, and is largely a cliffnote of the ability in the game. In the moveset, she borders on being a wind elementalist, and the “silence” aspect, the primary function of the move, is rather poorly represented. That said, I respect using it for Up Special since it’s the only real thing that could be interpreted in some way that could help her recover, and regardless of being quite tacky I like the gameplay effects of the wind on the uair.
As some small number issues, I noticed you have greatly increased the duration of status effects in this moveset compared to the very modest ones from your previous movesets. While I would generally approve, the duration of the Frost Arrows seems a bit strange to me in that it’s so easy to get up stacks, and you can hit with multiple moves other than just the Frost Arrows themselves before it wears off to get some form of payoff. With how long the status effect lasts, though, I think it’s not really worth it to use up the accumulated units on it with dsmash or fthrow (outside of for kills, which is a bit scary) for the somewhat meager payoffs. I also think it might be cooler if it took longer to recharge the Up Special (Longer than Rob’s recovery with no marksmanship), giving her more reward for staying further away rather than enabling her to make the space so casually.
PINSIR PREVOLUTION
Pretending Heracross was posted back to back with Pinsir, the connections to it would still seem bizarre. Having to rely on constructs from another moveset is very strange, and Heracross also has a handful of very weak and pathetic moves designed as fodder for generic doubles. Heracross is supposed to be a powerhouse, and him playing a support is rather embarrassing. The connection between the two Pokemon isn’t even all that strong – if anything, Heracross more ignores Pinsir’s existence while Pinsir is incredibly jealous of him (Up until X and Y anyway), making it even weirder that Heracross is the “support” bug of the two while Pinsir has a perfectly normal moveset.
When Heracross already has more distasteful moves in it such as Earthquake, I don’t see why he doesn’t just generically create his own boulders anyway for this moveset, though I don’t think he’s a particularly good fit to be manipulating them in the first place. This moveset has more blatant Pokemon syndrome than any other Pokeset in remotely recent memory, with Pokemon move effects being stolen just to make individual moves look better. Another pet peeve of mine is when Pokemon move names are used in a largely religious manner regardless of them having little to do with the move – basically every Pokeset will have a move generically called “Fling” where the foe is thrown, despite the move itself having nothing to do with them on a characterization level. The actual move Fling isn’t even generically throwing opponents, but instead throwing items.
LEAGUE JUNGLE BUFFS
Nue has some cool concepts in it and has some basic makings of flow into a token campy playstyle with the generic smokescreen, but she is provided some extensive motives to play offensively. In order to take advantage of the UFOs, you need to use them to apply extensive pressure to make foes benefit from destroying them or play offensively enough that the debuffs foes get from the UFOs won’t be worth the buffs. The fthrow also exists to apply extensive pressure, and if anything it feels too powerful. I really wonder if the same FrozenRoy that made that cliffnote fthrow made Blake’s pathetically weak duplicates a centerpiece.
I’m not sure how I feel about a return to a smokescreen, but this set plays off it in satisfactory enough ways for me. The countless fakeouts Nue has throughout the moveset feel like they’d be more relevant in her and give her more offensie presence as the set desires to do. While the set is sometimes more focused on just doing cool things than forming a truly cohesive playstyle, it still flows enough for me and I think you actually struck a really good balance between camping and offense in this moveset. You’ve been striving for that in a lot of your “powerset” based movesets with projectiles, and this moveset is one of your best in that regard for pulling it off more successfully than most of your other works.
KINGLER
This moveset definitely goes more in the direction of sets I’d like to see from you than Donnel, and it has the most intensely focused playstyle of your sets. Of course, I entirely agree with the criticisms from ForwardArrow (which I won’t repeat), and there are also a lot of moves which don’t really serve much particular purpose. I’ve done plenty of sets based around boulders myself – one of the things you could’ve done, among others, would be to let Clawgrip hit the boulders with his basic attacks or grab to give them some new contexts to talk about rather than dedicating an entire move just to moving around boulders in the Side Special.
The minions from the smashes are definitely one of the more satisfying parts of the set from a gameplay standpoint. However; they feel strange to have on a brute like Clawgrip – he’s a heavyweight thug crab who relies on his brute strength. While he does talk so he’s not some dumb animal, if he summoned minions I think the only ones that would be particularly good for flavor would be the miniature crabs, since he technically is one in Mario Advance. Aside from the other minions’ presence feeling a bit strange, my other issue is that they overshadow the boulders, which are the heart and soul of his characterization – he’s a generic strong crab that throws heavy objects at people, and it’s his only real animation in his first appearance. You can still certainly have some minions (at least the crabs), but the moveset could have used some more interactions with the boulders, especially considering how much Clawgrip was dead set on interacting with the bubbles.
KEL’THUZAD
I feel the lack of detail on Lom Lobon incredibly heavily, and I think it speaks pretty loudly that you got Katapultar to complain about it. The ice blocks introduced in the neutral special, with just how little detail is given, are spawned in random quantities and serve absolutely no purpose other than fodder to bounce things off of for interaction purposes. They don’t hurt foes or impede their attacks in any way, apparently being indestructible given the non-existent detail provided. Giving just so little to go off of leaves them as nothing but interaction fodder, which feels very bad to me and very out of character for your setmaking, especially considering that these blocks are 95% of the Neutral Special’s purpose.
Of course I like the basic concept of the tornado, but it feels like very basic stuff you’d see in a newcomer set on Clawgrip’s level. The set is incredibly wasteful with inputs (Even the Specials), and the most of anything that is accomplished is some brief generic bouncing around of projectiles and doing basic flow with the tornado. When he has access to his entire moveset in the air, these insultingly basic newcomer interactions really don’t cut it.
VIPER
I obviously heavily agree with the notion that sapping the foe’s attributes in essentially everything is a fairly cancerous concept. While all the foe has to do to get it back is to hit Gloorx Vloq, they have to do it with lesser attack speed and damage, and it only scales further and further. It would scale very fast, and at just around 30% drain they may as well be dead already. The drain concept could be decent as a generic instant kill after acquiring enough drain (Since, let’s not kid ourselves, it is one already) and not draining every single statistic the foe has that matters.
Even assuming that drain was something more generic and less damning to the foe, the moveset’s actual execution isn’t exactly stellar. The Neutral Special is completely pointless from a gameplay standpoint and just serves as a generic move that applies drain to introduce it to the reader at the start of the set, the Side Special actively works against Gloorx Vloq’s core strategies, and the set doesn’t exactly play into the invisibility given, despite constant mentions of doing invisible backstabs on every move.
Up Special, Utilt, uair, and uthrow only help Gloorx if the foe already has a decent amount of drain on them in which case he’s basically already won the match, and uthrow even heals the foe of all their drain in exchange for just healing Gloorx’s damage, a terrible trade. The dsmash does nothing but create a non damaging trap that doubles the least important effect drain weakens, while the usmash is one of those moves that has no playstyle relevance to hitting with it and just does an interaction when used that you condemn. Utilt, uair, Bthrow, uthrow, fsmash favor simply damaging the foe over what Gloorx actually wants to do, considering how powerful his draining is. Granted, damaging the foe is somewhat viable, but that’s more due to Gloorx having very high power/damage on the majority of his moveset because he apparently needs further advantages.
Smady
Smash Master
These threads tend to have dead periods. There's an off site chat where most of the off-topic discussion takes place, to answer your question. We've gotten over 100 sets in this contest already and the end date is announced, so this one is essentially winding down. As for your Lucina, there's honestly not much to comment on, it's a typical swordsman set that declones Lucina but makes up stuff that is completely unfitting for the character like the illusions or up special that frankly I found hard to understand. I'd recommend making sets for characters you know well, because you admit yourself you haven't played Fire Emblem and it comes across that way in the moveset. I see you have a Minecraft avatar, there have been sets for characters from that game if you need an example, but literally any character is allowed from whatever game, anime or anything you want to represent. I get the impression you may think you can only do strictly Nintendo or Smash relevant characters, this is not true.I take back what I said about this topic being popular.
Seriously though, where is everyone?
Thanks MasterWarlord for posting. Unfortunately you didn't review my Lucina in that post...
I also don't mean to be rude, but casually posting all the time about your own sets needing comments or opining about the thread's current activity is frowned upon both for obvious reasons and because you're bumping sets off the page every time you do it. If you want to post in approval of another post, just hit the like button. This is anything but a social thread. Please keep this in mind when you post here.
Finally posting my long backlog of comments. Sorry to keep some of you waiting so long.
Joke sets like Wang Chan have become something of a tradition of yours and I always enjoy if not vote these given their entertainment value. I don’t need to go over the comedy in this set, it’d be pretty bold of me to review your humour and it’s largely agreed to be good. Dio’s head as a mechanic is a clever way to make Wang Chan’s lag into an advantage. It takes Falco’s lasers, which almost everyone tells me they hate, and makes it into a fun gimmick on a character that is also rushdown-focused, which is impressive in of itself. It’s a good idea because it reduces the toxic Falco lasers down to an automated minion, leaving the player to use their full moveset instead of spamming one button. That’s not all the set does, though if it was I wouldn’t call it a failed project. Juggling the head, claw and crystal ball adds to the depth. Although there are a few problems with seemingly rushed moves having weird animations and filler inputs, though kept relatively minimal.
The characterisation is fantastic and links in to the humour aspect. Wang Chan is essentially useless without Dio and if the player even does well, he’s reduced to minion status. Of course there are the problems expected out of a joke set and this character who is at best, Vega’s claw moves and a couple of props, but this set not only keeps a level headed approach but doesn’t take itself too seriously either, making it both a funny set and legitimately well-executed.
Mnoleg is a huge success all around, it’s my new definitive DM set. Its combination of an open-ended character and expertly simple execution; presented in your now distinctive style. The ‘Pan Lord’ movement all follow this approach, but Mnoleg’s set is the best example as it is able to squeeze the most potential out of minions, status effects and rushdown elements. It’s all fitting on these characters whose origins I got to know fairly well during the sets’ development. They never stray far from their roots as characters made up of pixels that demand the player’s imagination. On that note I was happy that you inserted some fun ideas like the tentacle, some minion altering and other elements that you wouldn’t usually on another set. I want the status effects to have more of a purpose, but I appreciate that it’s executed this unambiguously too; status effects tend to err on the forced side when they’re given too much spotlight.
At this point, I don’t think your style is actually “in smash” as much as it is focused on balance, it’s the good design that fans of Project M prefer over Brawl or Smash 4. That is not simply numerical balance, it’s not burdening match-ups with complicated mechanics and that allows an easier balance for the theoretical game where these sets would be playable.
Kunka ’s easily my favourite attempt at a DotA2 set, but at the same time has a number of flaws. Firstly the mechanic handles Tidebringer (Kunka’s passive in-game) in a way that both fits the source’s version and gives a new depth to simple sword motions. The use of “x marks the spot” and the nuke to secure a degree of forced positioning on the foe is wholly accurate to the game and present a new way to work off the simple moves that come later. It goes a long way, longer than I had expected, on such a simple premise, with some of the best moves popping up later in surprisingly imaginative moves. The best examples are the first two aerials, both very good moves. The implementation is flawless but the set is held back by the obvious flaw of the last third of the set being subpar. The grab game is particularly uninspired, it includes a KO throw and more set up when I feel that x marks the spot does a better job at that. It’s a letdown but the set overall is very exciting for its large success in translating over a moba set without being a straight port or forgetting its roots.
Of all the Kat sets, Judge Nemo is probably my favourite, and honestly, one of my favourite sets period, it has to be in the top ten. Let’s get the flaw out of the way immediately: the grab game. This should’ve been separate monsters too, if at all possible. If not, at least it should’ve been more creative. It doesn’t fit the extravagance seen in the rest of the set.
The set is not just impressive because of the minion power ups, but let’s not graze over that, it’s incredible. You don’t shy away from giving most moves a scary big amount of options. It has depth from a characterisation perspective too, it characterises the idea of a moveset within the moves. The stupid chicken as back aerial, slime as down tilt and down aerial gargoyle, all are good archetypes for their moves within a moveset context. It goes the next step in combining the strongest elements on each into other outlets for Nemo’s moveset. The gun is a very clever way to give Nemo about a million more options on top of just the customisable minions, giving him a projectile that doesn’t intrude on the rest of the set, but works alongside it. That’s a big plus too, Nemo stays in the shadows even for the set’s characterisation, letting the set itself create its own personality.
The most fun is obviously in the fusion, for me anyway. You can create real abominations with this and the brevity of options is always the strength here. It’s not just horrible monsters combining into primordial ooze; the set understands the importance of using basic elements instead. As with most things on this set it focuses in on the part that’s the best and emphasizes it over and over, leaving any moveset fan drooling at the possibilities. The balance in this set is also solid, Nemo is really weak, and relies heavily on his minions to survive, when they get very strong it’s because he was willing to make risky decisions and played them through to success. These kinds of sets are in part popular because they allow for a smaller version of moveset making for the player, for doing that so well Nemo is truly one of the very best.
Dhoulmagus is a set I’m incredibly thankful for even existing, as it’s a character I semi-wanted to make for years, but never could get a good grip on the fundamentals and never got a start. The most important aspect of the set is the execution of the duplicates, as they don’t seem overpowered, as many of the most famous sets of the genre do at this point in time. This elevates the set’s approach above relying on mindgames which only results in the foe wasting time and extending the match painfully long trying to find the “real” Dhoulmagus. Instead the duplicates are used offensively and there is a brilliant chemistry going on as the player has to decide how risky they want to use their duplicates on top of the usual situational factors. The set takes into account the positioning of the duplicates all the time, leading to huge amounts of options depending on what set up Dhoulmagus has but not obsessing over it as others tended to do in the past. It’s a very fitting and fun, simple way to interpret duplicates that is refreshingly balanced.
I’ve expressed to you a long time ago my problems with the set and they amount to a few moves that are a little over the top. This mostly applies to a couple of throws, up throw and down throw, which are flashy for what are, at their core, a star KO throw and time bomb. I also felt that a few moves out of aerials and standards were reaching, like the portal up tilt, the juggling jab and impaling down aerial. These moves are relevant to playstyle and not outright bad moves, but do feel out of place in a particularly well executed moveset. The grab and thorns in general can also at times feel overwhelming, mostly the idea of trying to set up a grab with a lingering thorn or the various ways to stack the grab using them, could probably be more balanced if it wasn’t a power up but a variation. To complete the laundry list of nitpicks, I didn’t feel the boss mode added anything to the set’s depth, but I’m glad it exists and I respect that you even made the effort. This stuff is all inconsequential compared to how it’s my favourite duplicate set in existence, it blows all the others out of the water.
If I’m glad Dhoulmagus exists, Evil Sir Leopold is the cherry on top. I never expected you to make another set for the game let alone one for a minor character, even if he sticks around for a long time. What’s surprising is how fun this set ends up being in spite of the character’s shortcomings, taking full advantage of the whole process of mind control from mindless dog to demon spawn. This is the first time I can remember this being explored, much like with Dhoulmagus reminding me that there are many premises yet to be fully excised in Make Your Move. Aside from that many of the moves are deliriously enjoyable, utilizing the dog pack as a group being the highlight. It reminds me of your Thrall set but is able to bring in so many good new elements that make it distinctly memorable. As with Dhoulmagus though, this set is actually pretty straightforward despite its lofty concepts, which I feel is essentially for a Dragon Quest set. The balance here is equally as smart, depending on you passing the baton to your successor and knowing when to pick your battles. I prefer it to Dhoulmagus, although he is more impressive, this one was very enjoyable. Especially the characterisation, every instance of Dominico is a joy to behold.
You’ve gone on an extended break after Wizzro and it’s not undeserved, as this is easily your best set. You’ve still got a few problems to overcome but this set at least gets all the basics down well enough. Importantly here, you manage to get all the specifics about lag and so on nailed pretty well. There’s also a decent writing style going on, I’m not sure if this is intentional, but it feels very slow and methodical, which is fitting for the character. What I would say is the major problem though is the playstyle is fairly shallow, because there’s simply no central concept to the set. Even in Smash Bros sets that are almost all projectiles like MegaMan, the specials tend to stand out. Here, I lost track of all the various projectiles and how they might work in tandem because so many have similarities, and there’s nothing to bring them together. This could be as complex as projectile manipulation, or just moves that work into a chaotic or orderly set up of projectiles. A good start would be moving the duplication throw to the specials as a command grab and making that a cornerstone of the playstyle. It’s far too flashy to be on a throw, and would give you something to play around with that pins down the set’s playstyle.
There are some concepts that are very difficult and Loatheb 's close-range 1v1 playstyle where he's immovable is one of them. This is because being stuck in place greatly limits the impact of many moves, as you lose any sense of momentum from movement, most mindgames, and grounds Loatheb's already limited projectile game. This means Loatheb's entire set can almost entirely be condensed into a GTFO move of varying amounts of damage, knockback or angle, because that's all his moves become when he's stuck in the ground. Moves don't try and approach this playstyle for what it is, but mistakenly tries to ignore that and instead use typical archetypes of moves that lose any versatility when reduced in the 1v1 element central to the playstyle. The funghal poison mechanic also eventually becomes pretty redundant, as moves spread more of the gas with wind effects or just in other directions. This gives Loatheb the damage to get to a KO, but the end result is at best too strong as he locks himself in and the foe can't unearth him then he hits with a KO move or move that KOs at a ridiculous percentage. There's no room for nuance in that playstyle, no compromise for the opponent to have fun or the Loatheb player to be non-passive after his small amount of set up.
The death knight is a classic of Warcraft and Lord Rivendare is a representative of that, bringing some chilling status effects at its core.These stacking effects and taking advantage of a stack of them on the foe is the core of the playstyle, but at times just keeping in mind the actual effect on foes it doesn't lend much to Rivendare's character as an imposing death knight. The new addition of the skeletons fixes this for the most part, as it gives Rivendare a minion to abuse plus much like Thaddeus, these effects are much more interesting when not exclusively used on a foe, because of their multiple functions. This minion feels like it fills in what was previously missing in the set. There's actually a lot of fun stuff here involving the skeleton that means, for me, the set goes from a thumbs down to a thumbs up.
There've been improvements to Rivendare but a divisive issue remains in the statistics. "Height-wise, he is around that of Ganondorf, while width-wise he is a bit less wide than Bowser." No stat for Rivendare himself is given, but knowing he is on a horse but shorter than Ganondorf logically means he is silly short. This is obviously because a correct size would be very big, but in game the chosen size would look awkward. As a balance issue, there've been plenty of huge sets that are balanced, such as Grandmatriarchs very recently that you ranked high. In terms of his own series' sets he would look just as weird next to Kel'Thuzad or Loatheb who are correctly proportioned.
It's surprising that Patchwerk ended up one of my favourites of the movement, but it has a simple playstyle that is executed well. Like many of the sets in Naxxramas, Patchwerk has a on/off mechanic that buffs some of his moves when available, and a way to patch together moves and reduce end lag. Moves such as "By Hook or By Crook" are not desert doo doo at all, but add a small amount of depth, and almost all moves are worksmanlike in how they give Patchwerk enough versatility to work on a starved tool set compared to other characters in his group. When the set is at its best it's very fun, especially for the tardy brute of a character who feels perfectly characterised. Whereas Rivendare needed the skeleton to get across his personality, Patchwerk does it all on his own, and I feel that actually makes him a more impressive execution, if no longer the better set. There's not much to say about the set though because it's that simple.
I figured Grobbulus would be a personal favourite of mine because the character seems amazing, with the poisonous syringe, the general body type, the fact he has no face. All are big checks on my list of positive character traits. But the execution here is very weird. The focus on buffs similar to Jin-Gitaxias, mostly with the throws, comes off as fairly redundant. There are two defensive effects here that don't feel well distinguished enough and that bizarre move that gives the victim wings, with no real basis. That might be fun on top of a lot of other viable options, but my honest view is that Grobbulus only has one defensive option between back and down throw, and a more offensive one in the gas mutation, with the wings seemingly not very useful. There's also some redundancy because he refuses to ever use his feet, meaning he uses his syringe in samey ways for many move that slowly wear down any point the previous moves had. I can see why he'd be focused around his syringe, but not using his feet is a very random and arbitrary limitation when even Bowser now has a drop kick. The fist moves are mostly there to fulfill functionality, ultimately creating this blasé feeling with disappointing throw effects, overused syringe moves and mostly passive minions. It's a strangely unversatile playstyle that seems to hit an artificial ceiling in minion creativity lower than even Jin-Gitaxias from years past.
Thaddius is a counterpart for Rivendare in that I feel as if Rivendare's use of minions made me change my mind, whereas locking them away in Thaddius' boss mode divides me and Warlord. I personally don't think it's enough to make up for the limited flow to have it in the boss mode, which he disagrees with and that's fair enough. It's a shame because the magnetism concept hasn't been tried much before, but simply using it on the foe isn't enough to make the rudimentary moves interesting on their own. You need another outlet, which is why he actually works really well in FFAs or teams too. It's just that in singles matches, it's a really limited effect. I also think you could include the minions in the main set without hurting the characterisation, simply making the minions low HP or focus on their early uses would be a suitable way to reference how they work in the game. That said, the boss mode is really good because of all the exclusive stuff it gets, I'd probably like the set if it was just a boss set, but it doesn't seem good as a 1v1 set.
Kel'Thuzad is one of those sets that merits a longer comment, because it's very ambitious and there's a lot to go over. First of all, my views on the chains mechanic mirror Warlord's. It's an albatross for the inputs that focus on the dynamic, as it's simply not a very fitting mechanic for Kel'Thuzad's playstyle. The moves that use the chains in any way tend to be underwhelming and the chains never feel justified as a mechanic rather than just a part of his tool set. It's a big disconnect, because it makes Kel'Thuzad bulkier, when he's meant to be frail. This requires the foe whittling down his defences. It's not that this feels imbalanced, but rather that it makes the way the set plays feel awkward, as it gives him a tonne of resistances to make his set up easier. When the chains are used as tethers it can look awkward (like using the chains to physically move abominations around), but it at least doesn't detract from the playstyle.
The minions are both weird choices for the set as well as not much of an accomplishment to set up. The skeleton, 'soul weaver' and abomination could be any character, there's little differentiation made in later moves that feels substantial. The shade that comes later actually hurts the set further for me as it forces the opponent to destroy all of Kel'Thuzad's chains placed on the foe. These are a lot of distractions from the fight. Although very laudable as a premise, the two grab games don't add much in the way of really good throw options on the foe. Most of the more complex throws revolve around grabbing the kind of boring minions instead. This is confounded when in most of the set, Kel'Thuzad is passively slowing the foe or draining their mana to try and force a shield break or pressure around that. He's going to be relying hard on this minions, but their given moves aren't powerful enough to fill the void when he has to summon them and their HP is fairly low.
The shield aspect is the third major part of the playstyle after the chains and minions, and none of these elements work well together. The lack of flow between these three ideas makes the set is dependant on stalling tactics, slowing the foe, throwing meat shield minions in their way, and a mid-range game that mostly pokes away at their shield. The chains let him survive long into a stock, but survival is pretty much all he can muster as he has no particularly deep set up or pay off. That doesn't mean he's got a pro-active playstyle either, as it depends on laggy moves like the minion summon or chaining up the foe to do anything. It's a big slog of a playstyle, which might be fitting to his WoW boss appearance, but flies in the face of what he is in the other games. It doesn't pay nearly enough attention to the other games to be truly representative, it doesn't even have chain frost or frost blast. That is why I don't like this set despite the ambition and impressive effort put into it.
Who'd have thought back in the days of FMA Man, that today we'd get a full two-in-one set for the face of that joke, Father Cornello . It's a sign of the times, and reverent for anyone who has discussed the series recently in the community, but for me especially as one of the handful of MYMers who have played the FMA WC3 map (many praises to WooJ for his latest masterpiece). I'm the only one who has played the game enough to analyse how it has been adapted and it's easy to tell it's an immense improvement. In the game, it's just random luck, but here Cornello is given a bar mechanic I can approve of for once, as it takes into account the balance of the numbers on every move. The result is a playstyle that encourages aggressive play from a character who would otherwise be a boring camper. It's incredible that you also managed to squeeze out almost 50 inputs for a character who barely gets to do anything in the source material.
The scale of effort involved in this project is remarkable, I could see this be in development hell forever before it actually got finished. The fact it's so good in spite of all the writing invovled deserves everyone's attention. Most sets that do two forms just have the second form have a handful of inputs, most have cliffnote changes like a boss mode, but the monster form in this set is just as creative, detailed and mindful of balance as the first form. I can't think of a set that pulls off the two-in-one concept this fully, without any gimmicks, just taking all the extra work and doing it. In that regard it's a triumph and I find it inspirational. It's weird that FMA has become such an iconic MYM series but it was worth it to get a set of this calibre.
Nue is one of your best Touhous in a while Roy, because most every input until the last couple of aerials feel relevant to the playstyle and filler is kept to a minimum, while the main concept of minions and a theme of illusion is executed well. The UFOs buffing and debuffing works in a way characteristically self-aware of all the niches that need to be covered for this to be a factor in any given match-up, but on the other hand Nue doesn’t become too specific, it’s another modified toolset made up of many fun options as a moveset. It’s a set that seems simple to use and fun to play, which is at the core of your set making philosophy. I do think you’ve done a better job of smokescreens and multifunctional moves, primarily on Remilia, but this is nonetheless a strong addition to your Touhou collection.
One problem I do have is with the input placement on the forward throw, it should really be a command grab on a special, especially when it interacts with a couple of other moves. The way the back throw creates a duplicate of the foe also felt illogical and underutilized. In fact the whole grab game feels like a letdown, the two other throws being a generic tether and a prone abuse throw. The latter at least plays into her theme of illusions, but the tether in particular has become a very overdone cliché of your sets. The throw and its effect need to be more strongly linked; your throws too often seem like an afterthought compared to their effect.
I felt obligated to do a Munomario set here and Wonder Red was remotely recent and from a developer I like (I still need to play this game) so I felt I’d give it a go. To start off, just like Inkling, this set has a very fun mechanic that actually feels like a good fit for the character. One positive thing in your set style seems to be you’re good at adapting to different styles of character; here you manage to do a simple comboing character well, compared to a more harassing playstyle of Inkling. The problem later is that you simply don’t use the mechanic enough and simply insert stuff from the game without much thought or reason. It’s not the worst kind of set making, but I would really jot down all your ideas first, and then try to think of a really clever way of putting them together. For example, the tomb stone up smash doesn’t even hit up, and would fit more on a down special if it needs to be charged in the air. There’s also just not enough attention paid to the very interesting idea of multiple versions you could have of moves depending on the mechanic. As a side note, this is also a set begging for some images from a visually intense game.
Grandmatriarchs is the size and weight of a vehicle set without the in-built mechanics to balance around, which makes it more understandable to me why you took such a long time to finish it off. The multiple Grandma mechanic in the stats helps to counterbalance their sheer survivability and add some depth. Grandmatriarchs won't be an aerial fighter, but multiple hurtboxes and the foe healing off of the cookies makes it believable that this could work. That's really not the point of the set though, it's all about the structures and the hilarious character. It's in this respect that it's a really enjoyable moveset as you combine an impressively versatile playground with decent ways to influence it later on. I do feel the later inputs miss the mark a little as they make a big thing out of sweetspots and the character as a hitbox. Sure, it's a big character, but you only need one move (perhaps one in the air, one on the ground) for a move that hits all over, because they can't very well position themselves. If they're overlapping the foe, they just need a move to get them off, because they're also in a lot of danger themselves.
Ultimately this is mostly nitpicking though because reading past the specials, it's a balancing act just to keep the set from hurting what it set up. The minions, the cookies, the way it interacts, it's all great stuff. There's nothing that can be said to further hype it up when the character is this fun and the reception is this positive, so I'll just say I enjoyed it a lot. It's exactly what you'd want and none of the bad you'd expect out of a set for this character.
Nice to see you back Slavic, I remember your first set for Spider. I’m going to have to go back and read Clawgrip/Magcargo sometime but I feel it’s obvious Donnel and Castform are your best just from a skim, so I’ll comment those instead. What impresses me most with Donnel is that you manage to take very hard to work mechanics like the Reeking Box and make it into a core mechanic. This is one of the best representatives for the whole series of Fire Emblem because it includes the forging system, the pair-ups, Risen, it’s also pretty fitting on a strong archetype like Donnel. I feel like you’d come out of this set knowing a lot about Fire Emblem as an outsider.
The moveset actually manages to keep up the quality until the aerials and throws which is very impressive, but this is where you start to trip up a little bit. The throws feel a little awkward on Donnel, stuff like cancelling a throw mid-animation or having multiple interaction points in a throw where Donnel moves around during it feel like forced creativity. I can definitely empathize that making interesting Fire Emblem grab games is difficult, but as Warlord already stated, just having a FFA focus with the Risen could’ve made stuff like the Mario back throw inspired throw work on several levels, if you could hit a foe into them. Still, a very good introduction to the series for outsiders and as a fan, this is more than I’d have ever expected for a Donnel set, good job.
You've come far, Kiwi, J 's your best set yet, but there's still room for improvement in many areas. The set's greatest strength is that later inputs stay relevant to the core premise of the Black Sun. There's a hint of flow in the last couple input sections but it's very faint and that is the simple problem. At its deepest, the set revolves around the Black Sun being existent and this buffs your moves in various ways. There are some obvious ways to improve on this, either by giving his non-Black Sun set a core playstyle of its own, even if it's not as interesting, that can transition into or works if used around the Black Sun. In that way, you could make the Black Sun more important but less of a focus and expand the playstyle. The way your style works, it's extremely easy to read, but it spreads the flow so thinly. I'd like if you tried to maintain the detail and creativity of the first few specials for a future set and see how it goes as it could be a very interesting experiment. This set does have a very strong start, easily your best ever section of moves in the specials, but later on, as in Zhu Li, it tapers off and feels like filler.
Castform has gotten several sets in the years MYM’s been around and this is probably my favourite, as it’s the most straightforward execution while remaining very creative in its interactions. You have a lot of simple ways to interact with all its projectiles, mostly centred around turning steam into water into ice or vice versa. This is all logical and has obvious playstyle relevance, given the clear and logical distinction of powerful ice versus damaging steam. It’s pretty much exactly what you’d want out of this character’s weather changing mechanic, but you keep it grounded enough that I wouldn’t call it overly-gimmicky. It’s very impressive how much of a feel you have for the Smash Bros engine already.
This set has a couple of big problems for me unfortunately. For one, I don’t think the cloud mechanic is even necessary, just have him create clouds and change forms on separate specials. I’m not sure if this is perfectly accurate for his character, but it’s very awkward balancing for his recovery to have clouds work the way they do, and having to be in a cloud to change forms is simply annoying given how important that is. The second problem is the throws, which are all the same throw just with a different effect. I don’t tend to like throws that put the opponent in prone, but here it’s not even relevant to Castform’s playstyle in any special way so it feels doubly redundant. I also echo FA’s thoughts on the directional aerial being more of a forward aerial, which is a shame as it means this set is simply lacking a lot of inputs it should have in the aerials and grab game.
Also expect some long delayed user rankings sometime soon.
Last edited:
Thanks for replying. And I have actually been planning to make sets for characters that aren't Nintendo related, in fact I have figured out 3 characters that aren't even in existence, not in a video game, TV show or anything else, just my imagination.These threads tend to have dead periods. There's an off site chat where most of the off-topic discussion takes place, to answer your question. We've gotten over 100 sets in this contest already and the end date is announced, so this one is essentially winding down. As for your Lucina, there's honestly not much to comment on, it's a typical swordsman set that declones Lucina but makes up stuff that is completely unfitting for the character like the illusions or up special that frankly I found hard to understand. I'd recommend making sets for characters you know well, because you admit yourself you haven't played Fire Emblem and it comes across that way in the moveset. I see you have a Minecraft avatar, there have been sets for characters from that game if you need an example, but literally any character is allowed from whatever game, anime or anything you want to represent. I get the impression you may think you can only do strictly Nintendo or Smash relevant characters, this is not true.
I also don't mean to be rude, but casually posting all the time about your own sets needing comments or opining about the thread's current activity is frowned upon both for obvious reasons and because you're bumping sets off the page every time you do it. If you want to post in approval of another post, just hit the like button. This is anything but a social thread. Please keep this in mind when you post here.
Anyway, the Illusion thing was based of the animation of Lucina's Up B in an awesome Lucina mod. And the Side Special was originally going to be her Critical Hit from Fire Emblem, but I decided to leave that for Chrom, which will be my next moveset (which I have been thinking about a lot lately), and I have planned to have special moves that actually fit him and that are based on Fire Emblem stuff.
I also may make a moveset for my avatar.
TechPowah
Smash Ace
There's a slight adjustment to my Tyrantrum moveset; Other than some extra proofreading, I gave him a Ledge Attack as I meant to do so before and forgot. Whoops.
Bionichute
Smash Champion
- Joined
- Jun 30, 2012
- Messages
- 2,151
Mad Mike/XX Mileno

XX Mileno was the best Pizza Chef of Space Biker Gang Bowzock. Zonette planned to have him sent down to Earth to bake a Carranger pizza, but she was distracted by the Bowzock's Anuual End of Summer Festival. Insulted by this, XX Mileno went down to Earth anyway, where he ended up distracting Signalman with traffic law breaking pizzas. Despite baking the rangers into a giant pizza, and taking over the Wild Cars, he was eventually defeated by the combined team of the Carrangers and Signalman.
After Divatox loses her memory during a weapons testing accident, she ends up working at a pizza place. Porto creates Mad MIke from an image on a pizza box, and is sent to distract the rangers while they try to save her. Mad Mike quickly bakes the rangers into a pizza, and takes over Lightning Cruiser and Storm Blaster, the Blue Senturion ends up saving them, because the evil pizzas are no match for a simple stoplight.
(Note: I will be calling the character Mad Mike throughout the set, mostly because its easier to remember, but this set is mostly inspired by the original japanese version, and not the Power Rangers version.)
Stats:
Size: 6
Weight: 6
Speed: 5
Jump: 6
Aerial Control: 5
Specials:
Neutral Special: Pizza Toss:
Mad Mike spins around a bit, and then throws two large, flat pizzas through the air. The pizzas are fairly large, about half a Stage Builder block wide, and incredibly flat. This makes the pizza fairly hard to avoid, due to its very odd dimensions, especially for a basic projectile. The pizzas fly at two different arcs, with one flying at an upward arc, before falling down (It travels about 2 Stage Builder blocks), and the second one travels forward, gradually falling down (Travels 4 Stage Builder blocks). As soon as one of the pizzas hits the ground, it will explode, with the explosion being around half a Stage Builder block wide. The two pizzas also have very different speeds as well, with the high flying pizza going at a fairly slow speed, remaining in the air for about 3 seconds, while the low flying pizza travels at a much faster speed, only flying for about 1 second before reaching its maximum distance. The pizzas hitting an opponent, and the explosions themselves are actually two different hitboxes. The pizza hitting an opponent, which can actually be triggered by touching the pizza anywhere on its model, causes 14% damage to the opponent, while the explosion by itself will cause 9% damage to any opponent who wanders by.
Side Special: Pizza Roll:
Mad Mike leans back, in a type of bowling motion, before swinging his arm forward, unleashing a large pizza that rolls along on its side. The pizza is fairly large, about the size of Kirby, and rolls forward about 4.5 Stage Builder blocks at a fairly fast speed. The pizza has a few... odd features to it. For one, it can instantly distract any projectiles that come near it. Yes, really. Any projectile that comes within half a Stage Builder block near it will instantly be redirected toward the pizza. The pizza has 25% stamina, meaning it can survive a few projectilesbefore being destroyed. The other odd feature the pizza has is its ability to take over any vehicle based character like Bowser Jr. or Anthill Mob. This happens when a pizza hits the vehicle based character, and doesn't cause damage at all, instead turning the character into a hyper agressive level 9 AI partner for about 13 seconds. Any KOs that the controlled character gets will instantly be transferred to Mad Mike's KO count. This feature will only definitely work once, and all other times have 25% chance of working. If the pizza hits a normal character, it will instead only cause 9% damage.
Up Special: Spin the Pizza:
Mad Mike pulls out a large pizza, and then begins to spin it around incredibly fast, like how pizza bakers do with their pizza dough. Mad Mike, however, can spin it around fast enough to completely lift himself off the ground and into the air, making this odd move a recovery. However, its recovering abilities are very basic, as it, at most, lifts Mad Mike up about 2.5 Stage Builder blocks, and only in a directly straight angle. At the end of the move, Mad Mike will still keep spinning the pizza, turning it into a type of pizza helicopter, which allows him to glide around for about 2 seconds before the pizza flies out of his hands and up into the depths of space. The pizza is a hitbox during its entire existence, causing 10% damage to any opponent that touches it, with some minor knockback as well.
Down Special: Mad Microwave:
Mad Mike minces around a bit, and then pulls out a small, black box, which he then drops to the ground. However, as soon as the box hits the ground, it will balloon out into... a large microwave. And by large, I mean, it takes up two full Stage Builder blocks, making it laaarge. The microwave itself is not a solid object, as opponents can fully walk through it without trouble, technically making it a background element. Hitting the microwave with any attack will cause the door to open up. If anybody walks through the microwave while the door is open, they will suddenly find themselves inside the microwave, with the door immediately shutting to keep them in. Soon the opponents will find that... nothing is happening. In order to activate the microwave, Mad Mike must attack it again, which will cause it to turn on, making the microwave bake the trapped opponent. The microwave only cooks for 5 seconds, but it causes 3% damage for every one of those seconds. After the time runs out, the microwave will explode, causing an extra 10% damage, and launching the opponent incredibly far. Not is all lost for the opponent, however, as they can attack the microwave, but only when inside it. The microwave has 30% stamina, meaning that a few smash attacks can break it open easily.
The microwave has another feature, but we'll get to it later.
Standards:
Jab: Utensil Combo:
Mad Mike pulls out a pair of giant novelty forks and knives. The first jab has him swinging forward with the knife, the second has him poking the fork forward a bit, and the final jab has him slamming both onto the ground. The move has slightly better range than most Jabs, due to the knife and fork's increased size. The jab is also fairly slow to fully perform, with a bit of lag in between each subsequent jab. The full jab causes 14% damage, and the slam causes quite a bit of knockback as well, making it decent for damage racking.
Forward Tilt: Onion Ring:
In a similar, but shorter, animation to his Neutral Special, Mad Mike throws a large onion, which is cut into a disk shape. The onion behaves similiarly to the Neutral Special, with the biggest changes being that the onion only flies around 2 Stage Builder blocks before hitting the ground, and that it will only cause 8% damage on contact. But, there is a bigger element that this move fits into.
This attack is the first of six that plays into Mad Mike's main gimmick; his ability to turn his foe into a pizza. If he manages to hit an opponent with all six of these moves, they will be turned into a pizza, which completely stuns the opponent for 30 full seconds, no matter what. This allows for Mad Mike to simply wail on the opponent for half a minute. Later moves will add onto this gimmick, but for right now, it simply acts as an incredibly long stun time.
Up Tilt: Green Pepper Trap:
Mad MIke pulls out two green pepper skins, and throws them up into the air. The peppers fly in an upward arc, and both land at 1 Stage Builder block away, or 1.5 Stage Builder blocks away. The peppers are fairly large while in the air, around, again, the size of Kirby. Once the peppers land on the ground, they will lay on their sides, which makes them incredibly thin, but their size is still around the width of Kirby. If an opponent happens to run overone of the peppers, they will be forced into a trip, but it also causes 7% damage as well. If an opponent is hit with a pepper in the air, it will instead cause 9% damage. This is one of the six attacks that activates the pizza gimmick.
Down Tilt: Knife Sweep:
Mad Mike bends down and sweeps his giant novelty knife across the ground directly in front of him. The move has a decent range to it, reaching about 2/5ths of a Stage Builder block forward, due to the knife's large size, and is relatively fast, but not incredibly so. The attack causes 8% damage on direct contact.
Dash Attack: Rolling the Dough:
Mad Mike pulls out both of his large navelty utensils, and spins around, with each of them in his stretched out arms. Due to the size of the weapons, the range of the attack is much larger than most spinning attacks, and because the attack moves along as well, that makes its range even better. After the attack, Mad Mike, displays a bit of dissiness, but it's just an animation quirk, and not an effect. Causes 12% damage.
Smash Attacks:
Forward Smash: Salami Slam:
Mad Mike pulls out a large salami, and then swings it like a bat, similar to the Homerun Bat, obviously. In fact, its basically the exact same animation. The attack is basically a weaker version of the Homerun Bat, with a bit less range, and a lot less power. The attack still has the charge aspects of all Smash attacks, dealng 17% damage at lowest charge, and 28% damage at full charge, with great knockback at each hit. This attack is part of Mad Mike's pizza gimmick, and is one of the more powerful parts of it.
Up Smash: Mushroom Bomb:
Mad Mike throws up a small mushroom, which flies up into the air, and then lands back down and explodes as soon as it hits the ground. The mushroom causes 9% damage on its own, and can even explode in midair. The charge of this move doesn't change the amount of damage that the mushroom does, it instead changes how many mushrooms Mad Mike throws, with the maximum being 3. Each mushroom still only causes 9% damage, making 3 mushrooms likely to cause 27% damage. An opponent will have a chance to dodge at least 2 of the mushrooms if they find themselves trapped, as there is a brief moment where they can activate the shield, protecting them a bit. This attack is 1/6th of Mad Mike's pizza gimmick.
Down Smash: Exact Knife:
Mad Mike pulls out his oversized novelty knife, which... looks a bit larger than normal, and slams it down onto the ground. The attack is fairly basic, having quite a bit of range, due to the size of the knife, which reaches 1/3rd of a Stage Builder block forward. At lowest charge it causes 14% damage, and 26% at highest charge. However, the move is far more interesting when used on an opponent turned into a pizza. When used, the knife will cause 36% damage, and some incredible knockback to it. Unfortunately, this instantly frees the trapped opponent, but it will most likely get a KO due to its power.
Aerials:
Neutral Aerial: Pizza Spin:
While the name might sound similar to Mad Mike's up special, this attack instead revolves around he himself spinning around, similar to Kirby's NAir. In fact, its almost exactly like that, but due to Mad Mike's larger body, he has a lot more range to it. About twice the range of Kirby's, actually. The move also causes 10% damage to any opponent it hits.
Forward Aerial: Rotten Tomatoes:
Mad Mike pulls out a bright red tomato, and then throws it forward, where it becomes a flying projectile. The tomato is a fairly small projectile, about as big as an uncharged Super Scope shot, and at about the speed of one as well. The tomato flies at a downward arch, until it hits the ground with an audible splat. It also splats if it hits an opponent, where it will cause 13% damage. The attack is also part of Mad Mike's pizza gimmick.
Up Aerial: Have a Slice:
Mad Mike pulls out both his fork and knife, and waves them about wildly above him. The range of the move is fairly good for a UAir, due to the size of the utensils, and is also fairly quick, but despite the move seeming like it could hit multiple times, it cannot,and simply acts as a single hit move that causes 14% damage. However, the move does have a bit of a bounce to it, meaning that you could juggle with it if you time it right.
Back Aerial: Silver Steel Stab:
Mad Mike pulls out his large knife, and then stabs it backwards. Again, the knife's range is great, due to its size, but other than that the move is a fairly simple BAir, simply causing 12% damage with decent knockback. Well, it does move Mad Mike backwards a little bit, and has a bit of start up lag too it as well.
Down Aerial: Shredded Cheese:
Mad Mike raises his arm, and then swings it down, releasing a shower of small cheese slices that float down to the ground. The cheese slices form a sort of cloud, about 1 Kirby big, that floats gently from the released area to the ground at a very slow speed. If the cheese hits an opponent, it will instantly melt, stunning the opponent for a half second and causing 15% damage. Due to the slow speed of the move, it is very easy to dodge, but it has a fast start up, making it better to use when directly over an opponent. This attack is the final part of Mad Mike's pizza gimmick, closing out the moves he needs to hit with to make a pizza out of his opponent.
Grab Game:
Grab & Pummel:
Mad Mike's grab is seemingly normal, if a bit odd. He reaches forward with his giant fork, impaling any opponent it hits, locking them into the grab. However, if the grab is used near an opponent who has been turned into a pizza, he will instead pull out a large spatula and lift the opponent with it. While doing this, Mad Mike can move around, bringing the trapped opponent with him until the time limit wares off. He cannot perform throws on the opponent, however, unlike DK. The main fuction of this comes in conjunction with the Mad Microwave. If Mad Mike brings the opponent to the microwave, we will instantly throw them in. After about 2 seconds, the microwave will explode, with the opponent inside, instantly KOing them, and leaving behind a pizza item that acts as a Heart Container. Aside from the instant KO, the explosion behaves much like it does normally. His pummel is simple, as he hits the impaled opponent with the side of his knife for 3% damage.
Forward Throw: Fork Fling:
Mad Mike pulls the fork back, and then thrusts it forward, launching the opponent off of it and causing 9% damage to them, with decent knockback that can KO at around 140% damage.
Up Throw: Toss the Pizza:
Mad Mike takes the opponent off of his fork, and holds them above his head. He then spins them around and throws them upward, similar to how a pizza maker does when making pizza. The throw has a bit of start up lag to it, but it causes a decent 11% damage with good upward knockback.
Back Throw: Compost:
Mad Mike looks at the grabbed opponent, scoffs at them and then flings his fork over his shoulder, launching the opponent off, causing 10% with some simply okay knockback, as the throw will usually launch the opponent into the ground.
Down Throw: Half Cut:
Mad Mike pushes the opponent off of his fork with his foot, and then pulls out his knife, and quickly slams it down onto them, launching them upwards and forwards a bit, and causing 10% damage to them, with decent knockback.
Last edited:
ChaosKiwi
Smash Apprentice
- Joined
- Feb 1, 2014
- Messages
- 104
- NNID
- ChaosKiwi
Last leg of the contest... I might need to unleash my TRUE POWER!
TRANSFOOOOORM!
EX RED KING

Red King- An ancient dinosaur-like Kaiju from deep beneath the Earth, blessed with unimaginable physical strength and durability. A force of terror, it was feared by many, until it was defeated by the mighty Ultraman!
However, that was not the end. Red Kings continued to appear over the years-- Some, with an extraordinary ability to evolve. By unleashing hidden energy, a Red King can transform into an EX Red King, a far more powerful form. Outfitted with new, larger arms and a control over magma, EX Red King is a force to be reckoned with.
STATS
Size- 12
Weight- 12
Jumps- 8
Ground Speed- 4
Aerial Speed- 4
Fall Speed- 7
EX Red King, though heavy, is a super extraordinary jumper, able to leap far higher than it should rightly be able to. Additionally, for the sake of visualization, remember: Due to his huge arms, EX Red King normally walks with a gorilla like stance.
SPECIALS
neutral- VOLCANO PUNCH
EX Red King superheats his right fist, winding up a punch similar to Donkey Kong. However, unlike DK's Giant Punch, the charge isn't storable-- you have to completely charge up the move all at once in order to be able to use it at all, with the charge time being roughly as long as Samus' Charge Shot. However, you aren't completely vulnerable during this charge, as you can still move around freely! Ain't that nifty? It's an easy way to get in close to enemies who would normally be out of this move's range!
Upon full charge, Red King will unleash a powerful uppercut-- Dealing 10% and launching foes straight upwards. That's not all, however. Once launched into the air, the foe will explode, dealing an additional 6% to them (bringing the move's total damage to 16%), and creating an explosion around them a little short of a Smart Bomb's in terms of size, dealing 9% and high knockback to anybody who comes into contact with it! Ain't that swell?
side- FLAME ROAD

EX Red King brings down his fists, transferring an unimaginable amount of energy into the ground before him. This technique, called the Flame Road, causes a series of eruptions in a straight line, one after another, in the direction EX Red King is facing. These eruptions are as tall as he is, and deal 14% and launch on contact. At full length, this attack extends 1/2 of Final Destination, with a total of 6 evenly spaced eruptions, meaning you have to aim it just right, or a foe can slip in between! The first explosion is immediately in front of EX Red King, while the last is at the very end of the attack's range. And remember, Flame Road only affects the platform that EX Red King is standing on when he uses it.
If used in air, there is no shockwave. Instead, it's a short range spike attack, EX Red King using his hands to smack foes down, dealing 10% and, you guessed it, spiking them. Has a big range for a spike, though, because EX Red King's hands are huge.
up- SUPER EXTRAORDINARY JUMPER
You didn't believe me, did you? Didn't believe that something as bulky as EX Red King could be such a super extraordinary jumper. Well aren't you surprised, buster brown? For his up special, EX Red King takes an enormous leap upwards, the angle of which is determined by the angling of the analog stick. The total distance traveled by this jump is about three times Red King's height, making it quite useful for a third jump/recovery, since he's frikkin huge. However, that's not all!
Should EX Red King come in to contact with a foe while super extraordinary jumping, he grabs them in his big, meaty hands, before chucking them downwards at a 45 degree angle in the direction he's facing, allowing you to either KO somebody near the edge or, should you so choose, throw them into some sort of trap! What kind of trap, you ask? Well...
down- HEAT BOULDER

EX Red King pulls from the ground below him a huge boulder, about the size of an item crate. He then quickly superheats this boulder, turning its exterior into semi-molten rock, making it impossible for other foes to touch the boulder without getting hurt. There can be only one Heat Boulder out at once, so creating a new one will cause the old one to crumble. The boulders EX Red King creates form a sub playstyle of their own.
In their most basic form, Heat Boulders are a sort of stage hazard that EX Red King can create. They, if not interacted with further by EX Red King, will remain static, not moving at all under their own power. Due to their superheated surface, the boulders cannot be touched by enemies. If some poor schmuck does touch a Heat Boulder, they will be sent back, and take 7% fire damage. Heat Boulders can be destroyed, however, and only have 12 HP. Though, enemies who attack them with melee attacks will still take damage, even if they succeed in breaking the Heat Boulder.
The second most basic use of the Heat Boulder is as a projectile. EX Red King, and only EX Red King, is able to lift them as he would a heavy item, using one arm to hoist the boulder above his head. He can still move nearly his normal speed while doing this due to his immense strength, and can even retain use of his up special and grab while holding a Heat Boulder. Heat Boulders, when thrown, shatter on impact, but deal 10% as opposed to the usual amount of damage.
Now's where it gets interesting. Heat Boulders can be manipulated in various ways by several of EX Red King's attacks, allowing him to move them around the stage as he pleases or give them interesting effects. In this description, the effects of other specials on Heat Boulders will be outlined, while other moves' effects will be stated in the individual move's description:
When the shockwave created by Flame Road comes into contact with a Heat Boulder, it will transfer the energy into the Heat Boulder. This, essentially, charges it into a bomb of sorts. Now, when an enemy comes into contact with the Heat Boulder, it will explode, dealing 14% and high knockback, though the explosion is small. However, a charged Heat Boulder cannot be picked up/thrown by EX Red King, and unlike an uncharged boulder only gets one use before EX Red King has to create another one. Overall, it's more powerful, but has less versatility. Additionally, most significantly powerful explosive or energy based projectile can cause it to prematurely detonate, so be careful.
When a Volcano Punch is used on a charged Heat Boulder, however, it is possible to move it-- Specifically, it launches the Heat Boulder up at a 90 degree angle, while retaining its explosive properties. The perfect Anti-Air move! However, this only affects charged Heat Boulders, and, somehow, uncharged ones will not be moved.
STANDARDS
jab
A three part jab, with each press of the button in quick succession, similar to, say, Ike's jab combo. The first strike is a punch forward, dealing 4%, the second is a small kick, dealing 3%, and the third is a clap of the hands, dealing 5%. Short range, but the clap at the end does high knockback.
side tilt
Planting his fists firmly on the ground, EX Red King performs a sort of kangaroo kick-- You know, where they balance on their tails and then kick you with both feet at once? Yeah, he does that, thrusting his feet with great force, yet only dealing 8%. This move, though, does have another purpose: If used on a Heat Boulder, it will be rolled one Battlefield Platform forward! Nifty!
up tilt
EX Red King performs a shoryuken style uppercut, without ever leaving the ground. Good reach, given his long ass arms. Somewhat slow, granted, for a tilt, but it makes up for that with very high knockback/launching power, and deals a very respectable 13% on contact. So, it's got ups and downs, like all moves.
down tilt
The Red King species has been noted to have absolutely astronomical strength-- In their tails. As such, EX Red King makes use of this trait in several of his attacks, this first of which on this list is this here down tilt. He does the ever so popular "spin and whip stuff with your tail" technique, creating a ring of damage around him that deals 8% and low knockback. A sort of good keep away move, if anything.
dash attack
A windmill strike-- the classic. EX Red King's arms are huge after all, so spinning them like a windmill while he runs should be more effective than when most others do it, no? As such, this turns, essentially, everything sans his tail into a hitbox, as that's just how much reach his arms have. The damage isn't anything to scoff at, either, at 13%. However, he slows down just a bit while doing this, which may make it somewhat easy to avoid.
SMASHES
up smash- LAVA PLUME
EX Red King slams his fists down, similar to his side special. However, this time, there is only a single, very tall lava plume directly in front of him. And by very tall, I mean 2.5 times EX Red King's height. This lava plume, obviously, does fire damage on contact. At no charge, it does 17%, and at full charge it deals 23%. There is a slight delay between releasing the attack and the plume reaching full height, however, so take that into account. The Lava Plume can KO at around 95% on a good day.
The Lava Plume is able to affect EX Red King's Heat Boulders, as well! Only uncharged ones, though. If a Heat Boulder is directly in front of EX Red King when Lava Plume is used, the plume will carry the boulder up, giving it the height it may need to hit an airborne foe, or to reach a platform higher than its current one. Heat Boulders retain their damaging properties being pushed up by a Lava Plume.
Additionally, the Lava Plume can block weak projectiles. Nifty!
down smash- CONVECTION POOL
EX Red King jabs his fingers into the ground below, transferring intense thermal energy into it. This creates a pool of superheated magma around his feet, which cools almost immediately. While it's hot, however, it deals high fire damage, and launches foes upwards. At no charge, it deals 14%, and at full charge it deals 20%. The pool extends one EX-Red-King-arm-length to each side. The Convection Pool KOs at around 130%.
Should there be an uncharged Heat Boulder in the area of the convection pool, the heat from the magma will transfer to the boulder, buff its damage output for 8 seconds. During this time, it is visibly warmer (indicated by being near-white), but cannot be picked up by EX Red King. It will deal 12% on contact instead of the usual 7%. Hereafter, Heat Boulders buffed by Convection Pool will be referred to as superheated.
side smash- EXPLOSION FIST
The kaiju throws a swift right straight, quickly superheating the air in front of his fist once his arm reaches full extension. This creates a small explosion right there, the damage of which is the same no matter how much the smash is charged. What changes, then? Well, the more it's charged, the more knockback the explosion deals. An uncharged Explosion Fist can KO at 120%, while a fully charged one can KO at around 80%. Quite the difference! Explains why the charge time for this smash is slightly longer than a usual one, I'd say.
An Explosion Fist used on a Heat Boulder, charged or uncharged, will caused it to positively zoom. The punch won't create an explosion, sure, but the Heat Boulder will fly straight forward at high speed, effectively turning it into a bullet. However, this causes it to do less damage than when they are thrown, meaning it will cause 8% if uncharged, 10% if charged, and 8% if superheated. And, similar to when they are thrown, Heat Boulders fired in this manner shatter on contact. There is an upside, however, in that, in addition to their remarkable speed, Heat Boulders shot forward with this move deal sick knockback. Not a bad tradeoff, I guess.
AERIALS
neutral
Despite being a super extraordinary jumper, EX Red King doesn't do so well while he's in the air. Thus, his aerials are, perhaps, a bit lacking. For instance, his neutral special is merely a swing of his arm, hitting above, below, and in front of him, but dealing only a mere 5%. It does, however, hit foes straight downward, not exactly a spike but close enough.
forward
EX Red King spins quickly, using his tail as a blunt instrument to attack the space in front of him. Comes out fast, but the lack of grounding means the damage output suffers, as it only deals around 5%. However, the length of the tail means he has fairly decent range.
This move has the same effect on Heat Boulders as the side tilt.
back
This is one of EX Red King's best aerials, all things considered. He turns, performing a backhand. Generally, this move deals 7% and reasonable knockback. However, there's a sweetspot at the very end of his hand, which deals 14% instead and much, much higher knockback, comparable to a smash attack. However, this move comes out a bit slow, so you need to time it just right to get the hit.
down
Sometimes, you just need to get to the ground quickly. Thus, EX Red King rights himself so his fists are pointed down, and starts falling faster, like some kind of anvil with giant hands. This spikes enemies, and deals a neat 10% damage. Be careful not to use it over an open pit, though!
When used above a Heat Boulder, the boulder will shatter, creating a pair of stone projectiels on either side of Red King, which both retain the effects of the Heat Boulder (though, charged Heat Boulder fragments will do less damage than usual, about 4%), and travel at the speed of any old thrown projectile. Pretty neat, huh?
up
EX Red King claps above his head, similar to Wario, hitting directly above himself and slightly to the left and right. This has pretty good knockback, all things considered, making it very good for juggling in air or getting KOs near the top of the screen, while dealing 9% in the process.
GRAB GAME
In the throws, you will encounter what is called a superheated enemy. This is explained below, but it's important to note one effect: A superheated foe thrown into a Heat Boulder will actually heal it, restoring 3 HP to the heat boulder. It can even extend its life, if used on a Heat Boulder will full or near full HP. Ain't that spiffy?
grab
EX Red King's grab, as you could imagine from his long as heck arms, has quite a bit of reach, meaning it's easy to grab enemies who, for lesser fighters, would be out of range. As such, his grab animation is attempting to hug grab his enemies with both hands.
pummel
Since his foes are held in both hands like some sort of... hot dog? Or something? I dunno. Point is, sine he's holding foes with both hands, it is easy for EX Red King to pummel them by simply squeezing them, dealing 4% per pummel.
forward throw
EX Red King superheats his enemy, dealing 12% before pushing them away. Not a big deal, huh? Well, not exactly. You see, this move is especially useful against multiple foes-- When an enemy is superheated by a throw (as in, several of his throws do this), they will deal collision damage to anybody they come into contact with! This heat lasts 5 seconds, and deals 6% on contact.
up throw
Once more, EX Red King superheats his enemy, though this time he throws them straight up with all his strength, chuckling just a title as he does. This throw deals 10% and, like the previous one, makes the enemy hot to the touch for 5 seconds. It also throws foes very quickly and very high, making it a very good anti air type thing!
down throw
This move, unfortunately, does not superheat foes. It does, however, deal quite a bit of damage; EX Red King smashes his enemy face first into the ground... repeatedly, dealing 17% over multiple hits, and leaving enemies prone.
back throw
EX Red King superheats his enemy, and hammer throws them in the opposite direction, dealing only 10% but getting really good distance.
FINAL SMASH
SUPER ERUPTION
EX Red King punches the ground below him, creating a huge explosion of magma all around him. This turns into an advancing wall on both sides, dealing 50% and high knockback on contact. The wall is thrice EX Red King's height, making it hard as hell to avoid. Unfortunately, magma isn't known for being super fast, meaning escape, though unlikely, is possible.
TRANSFOOOOORM!
EX RED KING
Red King- An ancient dinosaur-like Kaiju from deep beneath the Earth, blessed with unimaginable physical strength and durability. A force of terror, it was feared by many, until it was defeated by the mighty Ultraman!
However, that was not the end. Red Kings continued to appear over the years-- Some, with an extraordinary ability to evolve. By unleashing hidden energy, a Red King can transform into an EX Red King, a far more powerful form. Outfitted with new, larger arms and a control over magma, EX Red King is a force to be reckoned with.
STATS
Size- 12
Weight- 12
Jumps- 8
Ground Speed- 4
Aerial Speed- 4
Fall Speed- 7
EX Red King, though heavy, is a super extraordinary jumper, able to leap far higher than it should rightly be able to. Additionally, for the sake of visualization, remember: Due to his huge arms, EX Red King normally walks with a gorilla like stance.
SPECIALS
neutral- VOLCANO PUNCH
EX Red King superheats his right fist, winding up a punch similar to Donkey Kong. However, unlike DK's Giant Punch, the charge isn't storable-- you have to completely charge up the move all at once in order to be able to use it at all, with the charge time being roughly as long as Samus' Charge Shot. However, you aren't completely vulnerable during this charge, as you can still move around freely! Ain't that nifty? It's an easy way to get in close to enemies who would normally be out of this move's range!
Upon full charge, Red King will unleash a powerful uppercut-- Dealing 10% and launching foes straight upwards. That's not all, however. Once launched into the air, the foe will explode, dealing an additional 6% to them (bringing the move's total damage to 16%), and creating an explosion around them a little short of a Smart Bomb's in terms of size, dealing 9% and high knockback to anybody who comes into contact with it! Ain't that swell?
side- FLAME ROAD
EX Red King brings down his fists, transferring an unimaginable amount of energy into the ground before him. This technique, called the Flame Road, causes a series of eruptions in a straight line, one after another, in the direction EX Red King is facing. These eruptions are as tall as he is, and deal 14% and launch on contact. At full length, this attack extends 1/2 of Final Destination, with a total of 6 evenly spaced eruptions, meaning you have to aim it just right, or a foe can slip in between! The first explosion is immediately in front of EX Red King, while the last is at the very end of the attack's range. And remember, Flame Road only affects the platform that EX Red King is standing on when he uses it.
If used in air, there is no shockwave. Instead, it's a short range spike attack, EX Red King using his hands to smack foes down, dealing 10% and, you guessed it, spiking them. Has a big range for a spike, though, because EX Red King's hands are huge.
up- SUPER EXTRAORDINARY JUMPER
You didn't believe me, did you? Didn't believe that something as bulky as EX Red King could be such a super extraordinary jumper. Well aren't you surprised, buster brown? For his up special, EX Red King takes an enormous leap upwards, the angle of which is determined by the angling of the analog stick. The total distance traveled by this jump is about three times Red King's height, making it quite useful for a third jump/recovery, since he's frikkin huge. However, that's not all!
Should EX Red King come in to contact with a foe while super extraordinary jumping, he grabs them in his big, meaty hands, before chucking them downwards at a 45 degree angle in the direction he's facing, allowing you to either KO somebody near the edge or, should you so choose, throw them into some sort of trap! What kind of trap, you ask? Well...
down- HEAT BOULDER
EX Red King pulls from the ground below him a huge boulder, about the size of an item crate. He then quickly superheats this boulder, turning its exterior into semi-molten rock, making it impossible for other foes to touch the boulder without getting hurt. There can be only one Heat Boulder out at once, so creating a new one will cause the old one to crumble. The boulders EX Red King creates form a sub playstyle of their own.
In their most basic form, Heat Boulders are a sort of stage hazard that EX Red King can create. They, if not interacted with further by EX Red King, will remain static, not moving at all under their own power. Due to their superheated surface, the boulders cannot be touched by enemies. If some poor schmuck does touch a Heat Boulder, they will be sent back, and take 7% fire damage. Heat Boulders can be destroyed, however, and only have 12 HP. Though, enemies who attack them with melee attacks will still take damage, even if they succeed in breaking the Heat Boulder.
The second most basic use of the Heat Boulder is as a projectile. EX Red King, and only EX Red King, is able to lift them as he would a heavy item, using one arm to hoist the boulder above his head. He can still move nearly his normal speed while doing this due to his immense strength, and can even retain use of his up special and grab while holding a Heat Boulder. Heat Boulders, when thrown, shatter on impact, but deal 10% as opposed to the usual amount of damage.
Now's where it gets interesting. Heat Boulders can be manipulated in various ways by several of EX Red King's attacks, allowing him to move them around the stage as he pleases or give them interesting effects. In this description, the effects of other specials on Heat Boulders will be outlined, while other moves' effects will be stated in the individual move's description:
When the shockwave created by Flame Road comes into contact with a Heat Boulder, it will transfer the energy into the Heat Boulder. This, essentially, charges it into a bomb of sorts. Now, when an enemy comes into contact with the Heat Boulder, it will explode, dealing 14% and high knockback, though the explosion is small. However, a charged Heat Boulder cannot be picked up/thrown by EX Red King, and unlike an uncharged boulder only gets one use before EX Red King has to create another one. Overall, it's more powerful, but has less versatility. Additionally, most significantly powerful explosive or energy based projectile can cause it to prematurely detonate, so be careful.
When a Volcano Punch is used on a charged Heat Boulder, however, it is possible to move it-- Specifically, it launches the Heat Boulder up at a 90 degree angle, while retaining its explosive properties. The perfect Anti-Air move! However, this only affects charged Heat Boulders, and, somehow, uncharged ones will not be moved.
STANDARDS
jab
A three part jab, with each press of the button in quick succession, similar to, say, Ike's jab combo. The first strike is a punch forward, dealing 4%, the second is a small kick, dealing 3%, and the third is a clap of the hands, dealing 5%. Short range, but the clap at the end does high knockback.
side tilt
Planting his fists firmly on the ground, EX Red King performs a sort of kangaroo kick-- You know, where they balance on their tails and then kick you with both feet at once? Yeah, he does that, thrusting his feet with great force, yet only dealing 8%. This move, though, does have another purpose: If used on a Heat Boulder, it will be rolled one Battlefield Platform forward! Nifty!
up tilt
EX Red King performs a shoryuken style uppercut, without ever leaving the ground. Good reach, given his long ass arms. Somewhat slow, granted, for a tilt, but it makes up for that with very high knockback/launching power, and deals a very respectable 13% on contact. So, it's got ups and downs, like all moves.
down tilt
The Red King species has been noted to have absolutely astronomical strength-- In their tails. As such, EX Red King makes use of this trait in several of his attacks, this first of which on this list is this here down tilt. He does the ever so popular "spin and whip stuff with your tail" technique, creating a ring of damage around him that deals 8% and low knockback. A sort of good keep away move, if anything.
dash attack
A windmill strike-- the classic. EX Red King's arms are huge after all, so spinning them like a windmill while he runs should be more effective than when most others do it, no? As such, this turns, essentially, everything sans his tail into a hitbox, as that's just how much reach his arms have. The damage isn't anything to scoff at, either, at 13%. However, he slows down just a bit while doing this, which may make it somewhat easy to avoid.
SMASHES
up smash- LAVA PLUME
EX Red King slams his fists down, similar to his side special. However, this time, there is only a single, very tall lava plume directly in front of him. And by very tall, I mean 2.5 times EX Red King's height. This lava plume, obviously, does fire damage on contact. At no charge, it does 17%, and at full charge it deals 23%. There is a slight delay between releasing the attack and the plume reaching full height, however, so take that into account. The Lava Plume can KO at around 95% on a good day.
The Lava Plume is able to affect EX Red King's Heat Boulders, as well! Only uncharged ones, though. If a Heat Boulder is directly in front of EX Red King when Lava Plume is used, the plume will carry the boulder up, giving it the height it may need to hit an airborne foe, or to reach a platform higher than its current one. Heat Boulders retain their damaging properties being pushed up by a Lava Plume.
Additionally, the Lava Plume can block weak projectiles. Nifty!
down smash- CONVECTION POOL
EX Red King jabs his fingers into the ground below, transferring intense thermal energy into it. This creates a pool of superheated magma around his feet, which cools almost immediately. While it's hot, however, it deals high fire damage, and launches foes upwards. At no charge, it deals 14%, and at full charge it deals 20%. The pool extends one EX-Red-King-arm-length to each side. The Convection Pool KOs at around 130%.
Should there be an uncharged Heat Boulder in the area of the convection pool, the heat from the magma will transfer to the boulder, buff its damage output for 8 seconds. During this time, it is visibly warmer (indicated by being near-white), but cannot be picked up by EX Red King. It will deal 12% on contact instead of the usual 7%. Hereafter, Heat Boulders buffed by Convection Pool will be referred to as superheated.
side smash- EXPLOSION FIST
The kaiju throws a swift right straight, quickly superheating the air in front of his fist once his arm reaches full extension. This creates a small explosion right there, the damage of which is the same no matter how much the smash is charged. What changes, then? Well, the more it's charged, the more knockback the explosion deals. An uncharged Explosion Fist can KO at 120%, while a fully charged one can KO at around 80%. Quite the difference! Explains why the charge time for this smash is slightly longer than a usual one, I'd say.
An Explosion Fist used on a Heat Boulder, charged or uncharged, will caused it to positively zoom. The punch won't create an explosion, sure, but the Heat Boulder will fly straight forward at high speed, effectively turning it into a bullet. However, this causes it to do less damage than when they are thrown, meaning it will cause 8% if uncharged, 10% if charged, and 8% if superheated. And, similar to when they are thrown, Heat Boulders fired in this manner shatter on contact. There is an upside, however, in that, in addition to their remarkable speed, Heat Boulders shot forward with this move deal sick knockback. Not a bad tradeoff, I guess.
AERIALS
neutral
Despite being a super extraordinary jumper, EX Red King doesn't do so well while he's in the air. Thus, his aerials are, perhaps, a bit lacking. For instance, his neutral special is merely a swing of his arm, hitting above, below, and in front of him, but dealing only a mere 5%. It does, however, hit foes straight downward, not exactly a spike but close enough.
forward
EX Red King spins quickly, using his tail as a blunt instrument to attack the space in front of him. Comes out fast, but the lack of grounding means the damage output suffers, as it only deals around 5%. However, the length of the tail means he has fairly decent range.
This move has the same effect on Heat Boulders as the side tilt.
back
This is one of EX Red King's best aerials, all things considered. He turns, performing a backhand. Generally, this move deals 7% and reasonable knockback. However, there's a sweetspot at the very end of his hand, which deals 14% instead and much, much higher knockback, comparable to a smash attack. However, this move comes out a bit slow, so you need to time it just right to get the hit.
down
Sometimes, you just need to get to the ground quickly. Thus, EX Red King rights himself so his fists are pointed down, and starts falling faster, like some kind of anvil with giant hands. This spikes enemies, and deals a neat 10% damage. Be careful not to use it over an open pit, though!
When used above a Heat Boulder, the boulder will shatter, creating a pair of stone projectiels on either side of Red King, which both retain the effects of the Heat Boulder (though, charged Heat Boulder fragments will do less damage than usual, about 4%), and travel at the speed of any old thrown projectile. Pretty neat, huh?
up
EX Red King claps above his head, similar to Wario, hitting directly above himself and slightly to the left and right. This has pretty good knockback, all things considered, making it very good for juggling in air or getting KOs near the top of the screen, while dealing 9% in the process.
GRAB GAME
In the throws, you will encounter what is called a superheated enemy. This is explained below, but it's important to note one effect: A superheated foe thrown into a Heat Boulder will actually heal it, restoring 3 HP to the heat boulder. It can even extend its life, if used on a Heat Boulder will full or near full HP. Ain't that spiffy?
grab
EX Red King's grab, as you could imagine from his long as heck arms, has quite a bit of reach, meaning it's easy to grab enemies who, for lesser fighters, would be out of range. As such, his grab animation is attempting to hug grab his enemies with both hands.
pummel
Since his foes are held in both hands like some sort of... hot dog? Or something? I dunno. Point is, sine he's holding foes with both hands, it is easy for EX Red King to pummel them by simply squeezing them, dealing 4% per pummel.
forward throw
EX Red King superheats his enemy, dealing 12% before pushing them away. Not a big deal, huh? Well, not exactly. You see, this move is especially useful against multiple foes-- When an enemy is superheated by a throw (as in, several of his throws do this), they will deal collision damage to anybody they come into contact with! This heat lasts 5 seconds, and deals 6% on contact.
up throw
Once more, EX Red King superheats his enemy, though this time he throws them straight up with all his strength, chuckling just a title as he does. This throw deals 10% and, like the previous one, makes the enemy hot to the touch for 5 seconds. It also throws foes very quickly and very high, making it a very good anti air type thing!
down throw
This move, unfortunately, does not superheat foes. It does, however, deal quite a bit of damage; EX Red King smashes his enemy face first into the ground... repeatedly, dealing 17% over multiple hits, and leaving enemies prone.
back throw
EX Red King superheats his enemy, and hammer throws them in the opposite direction, dealing only 10% but getting really good distance.
FINAL SMASH
SUPER ERUPTION
EX Red King punches the ground below him, creating a huge explosion of magma all around him. This turns into an advancing wall on both sides, dealing 50% and high knockback on contact. The wall is thrice EX Red King's height, making it hard as hell to avoid. Unfortunately, magma isn't known for being super fast, meaning escape, though unlikely, is possible.
Last edited:
StaffofSmashing
Smash Lord
- Joined
- Jul 5, 2013
- Messages
- 1,100
- Location
- When you're not looking, I'm there.
- NNID
- Lolu83
- 3DS FC
- 1590-5734-6768
StaffofSmashing?
Gone!?
No way.
He has something up his sleeve.
Springtrap set perhaps?
No.
But yes.
He was gone.
But he is still here.
Gone!?
No way.
He has something up his sleeve.
Springtrap set perhaps?
No.
But yes.
He was gone.
But he is still here.
Rychu
Thane of Smashville
- Joined
- Jul 5, 2010
- Messages
- 810
- 3DS FC
- 1908-0105-4965
What's a good franchise without a few good villains?
Rychu and Kiwi are still at it
I can see your whole history in your eyes. You were born with nothing. So you've had to struggle and connive and claw your way to power. But true power, the divine right to rule, is something you're born with. The truth is: they don't know which one of us is going to be sitting down on that throne, and which of us is going to be bowing down. But I know, and you know. Don't flatter yourself: in this game, you were never even a player.
Princess Azula

Ruthless, crazy, and immensely hungry for power, Princess Azula of the Fire Nation is one of the greatest villains in the world of Avatar: The Last Airbender. Once Avatar Aang was discovered unfrozen and the forces of General Zhao proven to be incompetent, Fire Lord Ozai sent his only daughter Azula to capture both him and the Earth Kingdom capital city Ba Sing Se. At the tender age of 12, Azula succeeded in both, if only briefly.Rychu and Kiwi are still at it
I can see your whole history in your eyes. You were born with nothing. So you've had to struggle and connive and claw your way to power. But true power, the divine right to rule, is something you're born with. The truth is: they don't know which one of us is going to be sitting down on that throne, and which of us is going to be bowing down. But I know, and you know. Don't flatter yourself: in this game, you were never even a player.
Princess Azula
A fire-bending prodigy, Azula is not only able to expertly wield a much hotter than normal blue flame, but also self-taught herself the ancient art of lightning bending, an incredibly rare and dangerous form of fire-bending. She far outmatches any of the main characters in one-on-one fighting, only losing thanks to the combined wits and incredible luck of four people desperately trying to escape. Once she sets her sights on something, Azula will not stop until she's achieved victory. Victory at any cost.
Statistics
Size - 4
Weight - 3
Speed - 8
Jump - 7
Aerial Speed - 7
Falling Speed - 3
Traction - 4
Lightning /
Azula's favorite method of attack is her Lightning Bending, a powerful version of Fire Bending only known by a few people throughout the course of history. Azula, of course, has mastered it.
When Azula attacks with a lightning-based move, which she will on ANY physical attack, the lightning doesn't just augment her punches: the lightning will linger across the length of the hitbox for another quarter second before disappearing, even if Azula can move before that half second is up. While opponents who come into contact with the lightning won't be dealt any knockback, they'll be dealt the full amount of damage from the attack, though take no stun or knockback whatsoever. The lightning can't stack, in fact, continuous use decays the effects-if the opponent is still suffering the effects of a lightning hitbox, they won't be affected by another, and won't be able to be affected for another quarter second. Moves that have this affect will be marked with a white /.
Special Attacks
Up Special - Fire Rockets
Azula ignites a blue fire under each of her hands, blasting upwards. Functionally, this attack works like ROB's Up Special - it's not true flight, but Azula can boost herself multiple times in order to recover over large distances. Azula will not enter freefall when she's used her third (and final) boost, able to attack foes even after being launched from the stage. If she hadn't used it yet, she loses her second jump in the process of recovering. Azula can use this attack as an obvious means of amazing recovery - which she'll need thanks to her rather petite weight - but it has another, far more battle-ready application in terms of just how much distance Azula can cover thanks to it.
If used on the ground, instead of rocketing upwards, on the initial boost at least, Azula will instead propel herself along the ground, moving at a bit faster than Sonic's dash speed, and pushing her forward a total of 1.5 SBUs, though she'll slide a bit further than that thanks to her traction. Azula can use any of her ground attacks while boosting along the ground this way, grabbing at foes, charging smashes, or even using her tilts, all while keeping the forward momentum, unless she's hit while using it. She can even jump out of the boost, launching herself into delivering an aerial onslaught to the foe. This attack is an INSANE movement option, an she'll likely be using it almost as much as her regular dash.
Down Special - Lightning Redirection
Azula thrusts her palm to the sky, and a bolt of lightning strikes her from the sky, even passing through some non-solid platforms to get to her. Yes, it's very similar to Pikachu's lightning, at least initially, as the bolt deals 20% damage and knocks opponents away, KOing at around 130%. So far, so simple, right?
Well, once the bold strikes, Azula can then press any of the 8 cardinal directions, and redirect the bolt in that direction. Same speed, same damage, same knockback and everything, but Azula can actually time it and hit twice with this attack, dealing absolutely massive damage in the process. The main drawback? The lag on this attack is absolutely horrid, and while Azula can somewhat cover herself initially by putting up a defensive electric barrier with one of her other attacks, it won't last long enough to protect her from ending lag punishment. However, it's an amazing offensive, long range move, and even an amazing anti-air, and definitely worth the risk to hit with.
An alternative to the second attack is to press the special button again once the lightning strikes Azula's hand, making her absorb it - yes, this is also a power-up attack, increasing the damage and knockback output of any of Azula's lightning-based attacks by 1.2x (an attack that once dealt 10% damage now deals 12, one that dealt 16 now deals 20, etc). The drawback here is quite simple - she no longer has access to this attack for the duration of the power-up, around 10 seconds, and that Azula, overtaken by the power, is dealt 1% damage a second while powered up. Still, it increases the killing power of the already deadly Azula exponentially, and is very much worth the still quite heavy ending lag.
Side Special - Fire Whip
Azula points her arm to the sky, shooting blue flame from it, creating a long whip, 1.5 times the length of Zero Suit Samus', whipping it downward. This acts similarly to gif above, snaking it's way down to the ground, creating a massive wall of fire raining down onto any opponent within it's range. The fire deals significant damage, around 22%, and spikes the foes downward with the force. This can be used against recovering offstage opponents, though the fire does not bend further, always being even with the ground the attack was initiated on.
If Azula uses the Fire Whip while airborne, she instead whips the fire diagonally downward, creating a wall of fire, which deals the same amount of damage as the grounded variation, and will still knock opponents downwards, making it a good offstage attack. The drawback to the aerial version is that it's quite a bit shorter than the grounded one, about 3/4ths the length of Zamus' whip, and the landing lag is absolutely terrible.
Neutral Special - Fire Blast
Azula holds one hand forward, giving a sly smirk, before she releases a blast of blue fire, which erupts from her palm like an explosion from a bomb. This isn't actually all that long-range - it has about half the distance of Charizard's fire, and lasts for a far shorter amount of time, as it's literally a single blast of fire. This is highly damaging, dealing opponents 25% damage and knockback KOing around 90% damage. While it's an awesome KO move, it's got a short range, and much like the lightning redirection, has some heavy ending lag, leaving Azula open to fire should she miss. Strike precisely, even if the temptation to throw out a powerful blast is high!
Standard Attacks
Jab - Lightning Fist /
Azula throws a brutal punch forward, dealing an initial hit of 5% damage. Unusually, she doesn't follow up with a second punch, rather, she opens her palm, and, with a smirk, creates a small ball of lightning in he hand, holding it out for as long as the attack is held. The lightning deals small shocks of 2% damage, though that soon erodes down to nothing the longer Azula holds it. Azula turns around and roundhouse kicks the opponent away when the jab is released, dealing some decent knockback. The ball of lightning will linger on the stage after the attack is finished.
Up Tilt - Lightning Flip /
Azula does an impressively quick back-flip, delivering a hard kick, empowered by her lightning bending. The initial kick deals some decent damage on it's own, 14%, and upwards knockback that'll KO around 120%. The path of the hitbox, a semi-circle arching above her, remains lingering on the stage as a lightning hitbox. The lingering lightning hitbox on this, as stated, deals the same as the kick, though if the opponent isn't hit by the initial attack, they're only dealt the damage, with minor hitstun.
Forward Tilt - Fiery Roundhouse
Azula does an impressive jumping roundhouse kick, unaided by her lighting. By double-tabbing the attack at any point during the kick, Azula will compliment it by shooting a small ball of blue fire from her foot, which quickly travels an SBU straight forward before disappearing. The kick itself is quite powerful, dealing 12% damage and horizontal knockback, but the fire projectile, it's own hitbox, is probably the more useful part of the attack. Given it's range and the attack's general quickness, this attack can be used to throw opponents off guard, or still score a hit on rolling opponents, as the fire deals 4% damage and briefly hitstuns opponents, like a single hit of Ness' PK Fire.
Down Tilt - Lightning Spin /
Azula, looking like a crazed break-dancer, spins on the ground, kicking her legs out, and augmenting those kicks with her lightning bending, even going to far as to extend the lightning outwards a bit, increasing the range of the attack slightly. The spinning kick deals 12% damage, but begins and ends extremely quick, with the entirety of the attack lasting under half a second. The lightning that lingers takes the shape of a waist-high horizontal line (actually circular in shape, due to the spinning, but for all intents horizontal on the battlefield) 1 BFP long, which has all the properties of the rest of her lingering lightning.
Dash Attack - Lightningan
Azula creates a ball of lightning in her hand as she dashes forward, bringing it forward and pushing it into the opponent's chest. The opponent is initially dealt shock and hitstun, as well as 10% damage. Azula herself flips over the opponent, landing behind and facing them, in prime position to strike.
Aerial Attacks
Neutral Aerial - Fireball
Azula holds both of her hands out, kamehameha-style, creating a small, blue flame, which bursts to life just in front of her hands. The flame is roughly the size of one of Mario's, and, once the input is released, has pretty much all the same properties, down to how it travels through the air at a downward 45 degree angle. Azula can hold this fireball in front of herself for a short while before it's automatically released, letting her have even more control over when it disrupts the opponent. The fireball deals 6% damage, and light upwards knockback to anyone it hits - it's small, but more than enough for Azula to capitalize on.
Down Aerial - Lightning Leg Drop /
Azula, showing off, does a flip in mid-air, before kicking down, sending herself flying towards the ground. The kick on the way downwards, obviously, is enhanced by the lightning, which once the attack is over, continues lingering along the entire length she fell, potentially creating a gigantic wall of lightning, which remains onstage for only a short while. As for the drop itself, the kick, as it flies downwards, hits and drags opponent with it, dealing small hits of 2% damage and very light downwards knockback, though this can be DI'd out of fairly easily.
Once Azula hits the ground, a shockwave surrounds her, traveling a very short distance (and also lingering with the large line of lightning), which deals 12% damage and knocks opponents upwards lightly, enough for Azula to capitalize on. Should she miss with this attack, though, she'll be in danger - the ending lag is absolutely atrocious, rivaling that of Link's Down Aerial.
Up Aerial - Flip Kick /
Azula utilizes her impressive athletic ability to do a back-flip kick in mid-air, powering it up by way of her lightning. The kick lasts just under a third of a second, with a hitbox that circles around her entire body, leaving a large electric circle lingering in the attack's wake. The kick itself deals 11% damage and decent knockback is whatever direction the opponent was hit from, giving this attack a bit of versatility depending on the situation - it'll KO opponents at around 100%, so it you just so happen to be under them at a KO percentage, it's a quick input to a KO.
Forward Aerial - Lightning Straight /
Azula creates a fist, drawing her lightning around it, before laggily punching forward in the same vein as Mario's Forward Air. This creates a horizontal drag as the hitbox goes forward, and as with all of her other lightning attacks it lingers. When the punch DOES hit, it deals a rather impressive 15% damage and spikes downwards, making this an especially devastating offstage attack, though the lag on the beginning makes it rather risky, as does the ending lag, which is actually a bit longer than that of the Italian plumber's aerial punch.
Back Aerial - Heel Kick
Azula contorts and twists her body, turning around to do a backwards facing dropkick. She blasts fire from her heels to extend the range of the already decently far-reaching aerial, as well as pumping up the pain, dealing 12% damage, The knockback isn't great, but the force of the attack does push Azula backwards, and she ends the aerial turned around, allowing her to quickly follow up.
Smash Attacks
Up Smash - Pillars of Flame
Azula points her palm to the sky, a small flame erupting from her hand, though her eyes are pointed directly at the ground below her. As the attack charges, the fire in her hand grows more powerful. At the moment the attack is released, Azula slams the flaming hand into the ground, and immediately upon that, two flaming blue pillars erupt on either side of Azula, ranging from just as tall as she to the height of Ganondorf, depending on charge. The ending lag is mercifully short, allowing Azula to move almost immediately after the pillars erupt.
The initial eruption deals between 16 and 30% damage, and upwards knockback that'll KO at around 120 to 80%, depending on charge, though the rather paltry horizontal range of the attack means that you most likely won't hit with the initial eruption. The pillars linger on the stage after they erupt - 2 to 4 seconds, depending on charge. Opponents who come into contact with these fiery pillars are dealt 10% damage an light knockback away, essentially keeping opponents away from the inside of the two pillars by any other means than jumping into it from above, a position where, if they're fighting Azula, they really don't want to be.
Side Smash - Explosive Clap
Azula smiles and raises her hands up, blue fire cackling off of her fingers, steadily growing larger as the attack charges. Upon release, Azula claps her hands together so hard the sound of thunder can be heard, causing a massive explosion of blue fire to erupt from her hands. At no to low charge, the explosion covers an area barely larger than a bob-omb explosion and deals around 12% damage with minor knockback, all the way up to 35% damage, covering an area that even covers Azula's body (so quite a large area of effect), with Knockback KOing at 90%. The lag on the beginning of the attack is quite minimal, making this a great move to use when up close and personal with an opponent, though the end lag is long enough to be quite punishable. At lower charge, this attack doesn't deal significant knockback, making it a great combo starter.
Down Smash - Shockwave /
Azula clenches her fists, drawing all of her powerful lightning into her palms. Upon release, she slams her hands into the ground, surging the electricity through her arms, creating a shockwave on the ground that reaches from about half a SBU length up to a BFP length around Azula's body, depending on charge. Also depending on charge is the damage - at no charge, it'll deal around 14% damage, while at full charge it'll do 28%. It'll remain onstage for just under a second, though the electrical properties remain onstage even after the actual shockwave has left. This smash deals little in the way of knockback, dealing only stun to light upwards KB depending on charge, but it's ending lag is incredibly short, allowing Azula time to even throw out another smash to finish off her opponent.
Grab Game
Grab - Chokehold
Azula crouches, like a predatory animal, ready to strike. She pounces forward a bit, swinging her arm with purpose, attempting to grab any opponent unlucky enough to be in her way. She grabs them by their neck, holding them up off the ground with one hand.
The grab has its pros and cons - it's quite long range, even longer than the fat penguin king's, but it's also a bit laggier than the standard grab thanks to her initial need to get into pouncing position. The pummel is exactly what you'd expect: Azula shocks the opponent with her lightning, dealing 3% damage per shock.
Forward Throw - Rocket Launch
Azula takes her free hand and, smirking, places it over the opponent's chest. After a beat, she blasts fire at point blank range, dealing opponents a hefty helping of 17% damage and high horizontal knockback, with the added benefit of next to no ending lag for Azula, letting her immediately chase down her opponents. When combined with her Fire Whip, this is a powerful tool for comboing opponents at low percents.
Down Throw - Burn, Baby...BURN!
Azula forcibly chokeslams the opponent onto the stage, creating a little indent with the impact. She then takes her free and and, after a brief flare-up, Azula blasts fire directly into the opponent's chest as forcefully as she does with her Rockets, dealing them an astounding 20% damage, though knocking herself backwards in the process. The opponent doesn't take any knockback from this, though the hitstun is comparable to that of a PK Fire. Azula is left with some distance between her and the opponent, and the opponent is in deep trouble for it.
Back Throw - Propulsion
Azula places her hands on the opponent's shoulders, flaring up her rocket hands. At the last second, as the opponent is cowering, Azula lifts her hands off and propels herself backwards, burning the opponent a bit and dealing hitstun and very minor damage. Azula can immediately act upon propelling herself away from opponents, making this throw a great combo-starter.
Up Throw - Blast Away
Azula uppercuts the opponent, launching them upwards a short distance, before blasting fire directly at them, knocking them up slightly but acting similarly to Ness's PK Fire, about the distance of the top battlefield platform from the ground away from Azula. Total, the attack deals around 17% damage and holds the opponent in the air for a brief moment in time (though it's easier to DI out of at higher percents), allowing Azula to efficiently follow up with an aerial.
Final Smash
Azula has grabbed the Smash Ball! As she utilizes the immense power granted from it, a comet is seen flying overhead. Azula's eyes burn a bright yellow, as she begins to laugh. Azula jumps, extending her arms, and unleashes a massive, fiery explosion from every limb of her body, which encompasses almost the entire length of battlefield. This is, of course, incredibly damaging, and should any opponent be caught within the explosion, they're as good as KO'd.
My own mother thought I was a monster.
She was right of course, but it still hurt.
She was right of course, but it still hurt.
Last edited:
ChaosKiwi
Smash Apprentice
- Joined
- Feb 1, 2014
- Messages
- 104
- NNID
- ChaosKiwi
"It was the pathetic rule of kings and queens that caused the Earth Kingdom to fall into such incredible disarray. It's taken me three years to get it back on track, and there's no way I'm willing to let it slip back into the dark ages. I'd like to make an announcement to the world. The Earth Kingdom is no more. I have created a new Earth Empire, and I will continue to lead it into the future myself, bringing about a new era of prosperity for my people. And let me assure my fellow leaders of one thing: Anyone who crosses our borders, or stands in our way... will be crushed."
KUVIRA
The Great Uniter

Kuvira, the ruthless and cunning villain of the fourth season of The Legend of Korra. A metalbending master, she managed to take over the Earth Kingdom in three years, rechristening it the Earth Empire, with her as its empress. She took on the title of Great Uniter, stemming from her bringing all of the broken states of the Earth Kingdom together under her iron fist. From then, she declared war on the United Republic, aiming to reclaim the land that was once property of the Earth Empire. Here's hoping Korra can stop her.
Kuvira fights using a combination of earthbending and metalbending, the latter being her forte. Metalbending is an advanced form of earthbending developed by Toph Beifong at the tail end of the 100 Year War. Essentially, metal is nothing more than refined earth, allowing certain very skilled earthbenders to manipulate it through the mineral impurities that remain within. Kuvira makes deadly use of these abilities, turning the steel plating of her armor into projectile weapons with a myriad of uses.
STATS
Size- 7
Weight- 7
Jumps- 4
Ground Speed- 7
Aerial Speed- 5
Fall Speed- 7
SPECIALS
Neutral Special- Metal Plates
As a master of the craft, it makes sense that Kuvira's moves would center around metalbending in some capacity. Therefore, the focal point of her playstyle is the manipulation of various metal plates.
Kuvira performs the action seen above, bending the plating off of her armor and turning it into projectiles. With each press of the input, another plate is fired, up to six out at a time (firing a seventh causes the first to disappear, and so on), with a slight delay between each plate to prevent spamming. The plates' trajectory can be slightly angled with the stick, up to around 30 degrees either up or down, or they can be fired straight down by pressing that direction immediately after triggering the attack. Not straight up, though, that's just crazy talk.
Now, these plates are not simple projectiles. They actually serves a tons of purposes. Let's go down the list of what happens when you hit different surfaces:
KUVIRA
The Great Uniter
Kuvira, the ruthless and cunning villain of the fourth season of The Legend of Korra. A metalbending master, she managed to take over the Earth Kingdom in three years, rechristening it the Earth Empire, with her as its empress. She took on the title of Great Uniter, stemming from her bringing all of the broken states of the Earth Kingdom together under her iron fist. From then, she declared war on the United Republic, aiming to reclaim the land that was once property of the Earth Empire. Here's hoping Korra can stop her.
Kuvira fights using a combination of earthbending and metalbending, the latter being her forte. Metalbending is an advanced form of earthbending developed by Toph Beifong at the tail end of the 100 Year War. Essentially, metal is nothing more than refined earth, allowing certain very skilled earthbenders to manipulate it through the mineral impurities that remain within. Kuvira makes deadly use of these abilities, turning the steel plating of her armor into projectile weapons with a myriad of uses.
STATS
Size- 7
Weight- 7
Jumps- 4
Ground Speed- 7
Aerial Speed- 5
Fall Speed- 7
SPECIALS
Neutral Special- Metal Plates
As a master of the craft, it makes sense that Kuvira's moves would center around metalbending in some capacity. Therefore, the focal point of her playstyle is the manipulation of various metal plates.
Kuvira performs the action seen above, bending the plating off of her armor and turning it into projectiles. With each press of the input, another plate is fired, up to six out at a time (firing a seventh causes the first to disappear, and so on), with a slight delay between each plate to prevent spamming. The plates' trajectory can be slightly angled with the stick, up to around 30 degrees either up or down, or they can be fired straight down by pressing that direction immediately after triggering the attack. Not straight up, though, that's just crazy talk.
Now, these plates are not simple projectiles. They actually serves a tons of purposes. Let's go down the list of what happens when you hit different surfaces:
- Upon contact with an enemy, the plate will deal 4% to them. But that's not all, plucky young readers. Once a plate hits and enemy, it latches on to them, Kuvira subtly bending it to conform to the shape of the opponent's body. This, on its own, does nothing of note aside from make one portion of the foe more reflective looking... but in tandem with the rest of her moveset and strategic enough player, it can be downright deadly. A foe can have up to four plates on their body at once, and any further plates that hit them will simply fall to the ground after dealing the damage.
- Upon contact with the ground/a wall/etc, the plate will become lodged sharp side out in the surface, becoming a sort of passive hitbox, dealing 7% to anybody who stands, lands, or walks on the plate while in this state, but it doesn't cause flinching.
- If the plate hits an energy based projectile, two things can happen. On a move that isn't too powerful, the plate will simply pass through, as its priority is quite high compared to most projectiles. On, say, a fully charged charge shot, however, the plate will fall limply to the ground, losing all momentum.
- On contact with a solid projectile, it varies. The plate will, on contact with stone, wood, or similar "weak" material projectiles, slice right through, splitting the projectile down the middle in such a way that Kuvira is able to pass harmlessly through the center. However, there's a slight delay between making contact and splitting the projectile, meaning if you don't have a good head start Kuvira could still be hit. This is illustrated by the animated GIF below this list.
- Should the solid projectile be something stronger, like something else metal, or... an Ice Climber, the plate will, similar to with strong energy projectiles, fall lifeless to the ground. However, it will ~rob~ the projectile of some momentum, not exactly slowing it down but shortening the total distance it can travel, perhaps buying Kuvira the few extra inches she needs to not get KO'd by a strong attack.
Should a plate be reflected, or otherwise be turned on Kuvira (Such as through the Villager's Pocket, etc.), it loses any additional effects, and becomes a simple projectile that deals 4%.
Down Special- Plate Recall
A simple enough move. Kuvira pulls her arms back quickly, calling back every metal plate she has spread around the battlefield at once in one fluid motion. They fly to her with the shortest path possible, no matter how far away they are. Should they hit an opponent on the way back, that unlucky schmuck takes 8% and is stunned. Can be used to give Kuvira's plate placement a purge.
Alternatively, it's a good way to set up a trap. Littering plates around the field in various positions and calling them all back can create a miniature bullet hell for a foe unlucky enough to be near Kuvira at the time of recall.
Side Special- The Impenetrable Wall of Ba Sing Se
Kuvira can do more than just bend metal, obviously. She's an earthbender first, and thus makes use of the ground below her to augment her fighting style. Upon input of the Side Special, Kuvira bends the floor in front of her, causing a wall slightly taller than she is (and about as thick as the trunk of the Villager's tree) to quickly rise. The wall does no damage upon formation, but does launch anybody unlucky enough to be standing there. From here, there are several options.
Normally, it acts like a wall is supposed to: blocking stuff. As it has 20 HP, it can easily tank a few hits, buying Kuvira necessary time to set up plates or do something else. If the wall is destroyed by an enemy, it crumbles harmlessly. Walls can also be created on the edge of platforms for an easy edgeguard, though Kuvira would need to be close enough to do so, leaving her open to a recovery attack from a quick enough opponent.
However, the wall is still a physical surface, meaning Kuvira can embed plates in it if she so chooses, leading to various outcomes. For one, hitting a wall with two plates on the same side causes it to fall over, becoming a hitbox that deals very high knockback and 15% damage to anybody it falls on. Additionally, using just a single plate on either side could be used in tandem with Kuvira's up special (see below). Or, it could just be a way to leave a plate in place for later, perhaps using Plate Recall while a foe is next to the wall to guarantee a hit.
Kuvira can only have one wall out at once. Making a new one causes the first to crumble.
Up Special- Jettison//Cable Tether
The Great Uniter stomps, quickly causing a chunk of earth directly underneath her to launch her in the direction the stick is held, giving her immense speed. This does no damage.
In air, however, this has a different effect. Since, obviously, there is no earth to jettison her, she has to use something else. She sticks out her arm, and a long, iron cable is fired from the wrist of her gauntlet. This acts as a tether, but behaves differently than other tethers in Smash Bros. While she, yes, can grab on to edges with it and pull her self in as you would expect from a tether recovery, she can also use the move in tandem with her plates-- Essentially, any plate she has attached to a wall becomes a point that she can tether to, allowing her a wider range of mobility.
STANDARDS
Jab
Under normal circumstances, Kuvira's jab is a simple, quick punch that deals 5% on contact.
Under circumstances where plates are latched on to a foe, however, it has an additional effect. Foes with plates on them will notice the plates tightening their grip each time the Jab input is pressed. This deals 2% to the foe, with the damage stacking if multiple plates are latched on to them, meaning it can do a maximum of 8% per hit. This causes no flinching, however, so no worries there. The damage is only done if Kuvira actually jabs, by the way-- If she gets hit out of it, she doesn't deal the metalbending damage at all.
Side Tilt
Bending the armor on her wrists into short blades, Kuvira swings her arm forward, mimicking the slashing of a sword. This deals 10% on contact, and good horizontal knockback. There are no additional effects to this one, believe it or not, even when foes have a plate on them. It's just your average side tilt. They can't all be awesome.
Up Tilt
Kuvira swipes above her head with the wrist armor blade thing from the last move in a sort of uppercute, dealing 10% to foes she hits. This move is pretty good for juggling due to how quickly it comes out. And, similar to the above move, it doesn't have any real additional affects, simply being used for hitting foes right above Kuvira and nothing else. It's simple, but effective.
Down Tilt
Kuvira's basic old stomp move, where she stomps on the ground below her and causes a small section of the ground in front of her to jut up, dealing 9% on contact with somewhat small range. One could say that this move is underwhelming.
However, there's more. When used directly above a plate that's been lodged in the ground, Kuvira bends its shape into a trap of sorts-- From this point on, that specific plate causes people other than Kuvira to trip whenever they should walk over it, making it a helpful obstacle in the Great Uniter's arsenal. Only two plates can be in this tripping state at a time, however, and attempting to do so to a third will cause the first one to straighten back into its non-trap form.
Dash Attack
Kuvira bends the earth below her feet in such a way as to allow her to travel faster, turning her body into a one woman plow, dealing 12% to anybody she hits in this state. The knockback sends foes behind Kuvira.
If used close enough to/facing a wall she's created, however, Kuvira can up the plow factor of the move. The wall forms a sort of armor in front of her, allowing her to push foes (causing them to fall prone) while also moving the wall around, with the trade off being that the move only deals 4%.
SMASHES
Side Smash
Kuvira's side smash actually differs, in a certain way, depending on the direction input to use it. No matter what, the basic move is the same: She, in the direction you press, causes a small section of rock to spike up from the ground in front of her at a steep ninety degree angle, dealing 15% uncharged and 20% at full charge. Unfortunately short range, all things considered. As for the thing affect by direction, here you go. Just mind the fact that these secondary effects only come in to play when there's a foe with a plate on them within two Battlefield platforms at the time of use (Additionally, these only work with a fully charged smash):
Forward Side Smash: Compulsion- When inputting the side smash in the direction Kuvira is facing, she will bend the plate on the enemy, forcible pulling them towards herself at roughly her running speed. This deals no damage, but could be enough to, say, make a slightly out of range enemy be hit by the rock spike, or perhaps draw the foe into some other trap, like a motion sensor bomb or what have you. The distance they are pushed depends on the number of plates they have on their person at the time.
Back Side Smash: Repulsion- Essentially, the opposite of the move above. This time, the player inputs the direction opposite Kuvira. This causes her to bend the plates on enemies away from her person, meaning that they'll fly back at the same speed as they would fly forward in the other directional variation. A good way to get the pressure off, or even just to buy some time. The distance they are pushed depends on the number of plates they have on their person at the time.
Up Smash
Kuvira stomps, causing a singular rock to fly out of the ground below her, about the size of Kirby. The height the rock manages to fly to depends on the amount of charge used for the smash, with maximum being about 2.5 Ganondorfs, and minimum being just above Kuvira's head. The rock, if it doesn't hit anybody on the way up, will fall right back down, dealing 1% more damage and spiking. It deals, on the way up, between 17% and 23% based on the charge. Kuvira is free to move as soon as the rock is fired.
If there are plates embedded in the ground when this move is used, they will also be fired into air, becoming hitboxes that deal 7% on contact and will re-embed themselves once they fall back down. They, like the rock, fly farther up with more charge.
Down Smash
Planting both feet firmly in the earth, Kuvira concentrates, quickly rotating the earth around her 180 degrees. This move is short range, extending about a Kirby width to either side, but good for disorienting enemies. You see, anything on the left of Kuvira will be quickly shifted to her right side, and vice versa, if they're touching the ground when she uses this move. That allows her to, in addition to confusing enemies, move plates or walls she's put down quickly. The speed of the turning is almost instant.
The move deals 4% at minimum charge, and 9% at full charge. Even if Kuvira is hit while using it, the rotation will still occur. Anything moving when rotated maintains its momentum, just in the opposite direction.
AERIALS
Neutral Air
A simple jab, or so it would seem, dealing 6% on contact and having next to nothing in terms of range. However, that's just because this attack has something else going for it-- On contact with a foe who has a plate, the attack does 2% more damage for every plate on the person. What this means is that, should you hit somebody who has the full number of plates, this instead does 14%, and the knockback, likewise, stacks. Not bad, eh?
Forward Air
Kuvira roundhouse kicks midair, because she's really cool like that, dealing a reasonable 10% to foes she hits in the process. Unfortunately, this move doesn't do anything special to enemies who have plates on them, though it does carry Kuvira slightly forward when used, making it possible to reach a just-out-of-reach ledge if you time its use just right. But that's about it for this one.
Back Air
Kuvira turns, using the blade she can make out of her wrist armor (remember that?) to swipe behind herself, dealing 9% on contact but somewhat low knockback. Quick enough to be used during a shorthop.
If used while there's a plate in the air, however, there's another effect. And by in the air, I mean plates that have been fired by Kuvira but haven't hit anything yet, and plates thrown up by her up smash. Anyway, when this move is used while their are airborne plates, it causes their direction to shift: They will now be sent in the direction opposite the one Kuvira's facing, if they weren't already (for example, if Kuvira is facing left, the plates will move right). This does not, however, affect plates that are airborne because Kuvira used Plate Recall.
Plates launched up by the up smash, then, act like plates fired by the neutral special.
Up Air
Kuvira stabs the air above her with her arm blade wrist bracelet gauntlet thing, dealing 8% on contact. It has a sweetspot at the very tip of the blade, which deals 13% and much higher knockback, allowing her to KO foes at 100% with it... if she hits the sweetspot, that is.
Down Air
Kuvira straightens herself, kicking below her in that generic spike-kick thing that everyone has as their down special, dealing 12% on hit. However, it also has an effect on people with plates: She bends any plates in contact with her foe, causing them to hold the foe down once they hit the ground. In laymen's terms, that means that if a foe with plates on them is hit by this attack and hits the ground, they will have a harder time than usual getting up, as the plates will actively hold them down. This doesn't deal any more damage, but keeps the enemy occupied for a while, leaving Kuvira free to deal with other business.
GRAB GAME
Grab
A simple enough grab, the generic "stick out your hand and grab enemies" type move. When she grabs a foe, she sticks a metal plate around their neck until she throws them, at which point the plate comes off.
However, if there isn't an enemy in range of your regular grab, and there's a plate attached to an enemy in the direction you're facing (within about 1/3 of Final Destination), Kuvira will make a motion similar to when she's recalling plates. This will cause the plates attached to the enemies fitting that criteria to pull that enemy to Kuvira-- and the first one to reach her, she grabs, as normal. Ain't that a neat trick?
Pummel
Kuvira, holding her foe by the throat with the metal plate, tightens it. This deals 4%, a you'd imagine a plate of metal being crushed around somebody's wind pipe would.
Up Throw
Kuvira drops her foe, letting them fall to their knees as she walks away. At this point, Kuvira is free to move around as normal. Perhaps they're free to go? Is Kuvira showing mercy?
Of course not, that's no way for a conqueror to act. After a brief delay, Kuvira bends the ground directly below the enemy, causing a spike to quickly jettison them into the air above, dealing 14% in the process.
Down Throw
Kuvira throws her foe straight up, slightly angled based on how the player angles the stick, and waits a second. Then, all of a sudden, she bends the plate on their neck down, slamming them face first into the ground. This throw deals a nifty 13% damage and leaves foes prone.
Back Throw
The Great Uniter flings her captive opponent behind her back, as if they are beneath her notice. This, normally, deals 10% and good horizontal knockback, making it an okay directional throw.
However, plates make this throw a lot better. Any plates embedded in the ground or walls that the thrown enemy passes close to will fling themselves at that person, attaching to them and dealing an additional 3% per plate. However, the foe is still subject to the four plate limit, meaning that additional plates will not move.
Forward Throw
Kuvira metalbends the new collar she's given her foe, causing them to slowly float forward about two Battlefield platforms, taking 9% over the course of the whole trip. She's free to move around while they're moving, but none of her attacks (specifically her attacks; other people can still hit them) will do damage to the foe until they're released. Speaking of, as soon as they reach that 2 BFP distance, the collar disengages, dropping the foe. Now, if they're above ground, this does nothing more than make them fall prone. But, if they're above a pit... well, they're now falling into a pit. Whoops.
Just remember, the grace period after this throw is longer than most other throws, so you won't be able to grab that enemy again for a while.
FINAL SMASH
METAL COLOSSUS

Jumping offscreen, there's a slight delay before a loud, ominous droning can beheard. Then, from the background, rises the monstrosity above, a giant mecha suit piloted by Kuvira. How big is it? Well, that little thing in the air next to it is a blimp, and at its feet is an entire army. But that's not the most terrifying part: That thing on its right arm is a gun, able to fire a laser beam made of concentrated spirit energy, capable of leveling an entire mountain in one shot. So, that's all Kuvira needs.
A crosshair appears on the screen as the cannon charges, said crosshair being about 1/3 of Battlefield in width. After a few seconds, Kuvira fires, the purple beam dealing 50% on hit and KOing pretty much anyone. Afterwards, the mech disappears, and Kuvira jumps back into play.
"Something you should know about me: I always get what I want."
Last edited:
MasterWarlord
Smash Champion
HYDRAZOA

Hydrazoa/Clioneman is an antagonist from Ultimate Muscle/Kinnikuman Nisei. He actually technically isn’t a villain, as he is competing against the protagonists in order to claim their titles as earth’s protector. Regardless, his powers and personality are still very antagonistic, and a good portion of why he seems to want to be a “hero” is just jealousy of the protagonists’ popularity despite his superior fighting and actual powers.
Hydrazoa’s series is incredibly campy and filled with juvenile gags, and in tandem with the 4Kids dub most of the appeal in watching the series is appreciating the raw cheese. Despite this, there are some legitimately good fights and powersets on display, with Hydrazoa being a prime example as the blatant best character in his arc.
STATISTICS
Aerial Control: 10Size: 7.5
Weight: 6.5
Ground Movement: 6
Jumps: 5
Traction: 4.5
Aerial Speed: 4
Falling Speed: 3
Hydrazoa has a decent degree of aerial affinty, able to sit in the air for long periods of time but not move through it particularly quickly.
In Smash, if characters attempt to clip inside of each other they will get pushed away when they stop moving. This does not occur with Hydrazoa, with other characters able to stand inside of his watery mass freely. Attempting to dash through Hydrazoa will very briefly slow enemies by a quarter of their movement speed during the time they’re overlapping him.
If half or more of a foe’s hurtbox is overlapping Hydrazoa’s hurtbox or any of his many water hitboxes, they will begin drowning. 10 seconds of constant contact are required to drown, instantly killing foes and taking off a stock. Foes heal off “drowning” only half as fast as they can drown when not in contact with water.
SPECIALS
UP SPECIAL – CONVEX LENS BODY
Hydrazoa flies up a platform off the ground if he started the move there as he turns his torso into a magnifying glass of sorts. He gains 3.5 seconds of free flight comparable to Pit’s recovery. Hydrazoa cannot use his main moveset during this and will not gain his recovery back if hit out of the move, but he can exit the move’s stance and go back into it, saving the remainder of his flight time for later. If he runs out of flight time, he will enter helpless, though any competent player will cancel out of it before then considering this move can be entered and exited with minimal lag.
The purpose of the magnifying glass is to concentrate the sun’s energy into a beam, firing it straight downwards onto opponents. The beam is as wide as Wario and reaches downwards with infinite range. Any foe who gets hit by the beam will take 1.25% per quarter second while they remain in it, with every fourth hit flinching opponents. Once foes leave the beam, they will continue to burn for double the duration that they were inside of it. This is a rather ridiculous damage racker, and the easiest way to guarantee some good damage from this is to poke the foe off the stage and spraying them with sunrays as they’re forced to recover.
Foes do have a way to circumvent this otherwise very powerful move – if the foe ever comes in contact with Hydrazoa or any of his many, many watery hitboxes, they will be cured of the burning status effect instantly. Hydrazoa has plenty of options up close (Most obviously his grab), far more than just some camper, enabling him to use this to transition to that phase of his game.
If Hydrazoa just concentrates the beam at the same spot on the ground for 1 second or longer, he will create a pillar of flame. This flame pillar will be Mario-1.25x Ganondorf’s height based off how long Hydrazoa shoots the sunbeam at it. The pillar lasts triple as long as the time it took to create it, and will deal 6-14% with knockback that KOs at 300-180%. The fire pillar will cause foes to have the burning effect for 1.75-4 seconds based off charge.
If Hydrazoa simply walks over the fire with his body to cover it completely in water, the flame will disperse, so foes can counter this powerful technique by knocking Hydrazoa into his fire. Hydrazoa can also destroy his fires by hitting them with some form of water attack (most of his moveset). When a fire is destroyed by water, it will burst into a cloud of steam that floats upwards a Ganon height over a quarter of a second. The steam cloud is 1.2x the size of the fire, and the power of the steam cloud varies based off both of the size of the fire and the power of the water attack that destroyed the fire, dealing 12-26% and knockback that kills at 180-100%.
The fire is fairly forgiving, and will not die due to being in a weak hitbox that does 6% or less hitting it, just weakening slightly and creating a very small steam cloud. If a puddle overlaps it, the fire will gradually deteriorate instead of instantly dying, giving Hydrazoa a chance to go absorb the puddle before the fire is killed.
NEUTRAL SPECIAL – BUBBLE PRISON
Hydrazoa morphs his mass into a bubble 1.5x Bowser’s size with his head sticking out of the top. Hydrazoa can roll along the ground a bit slower than his normal dash speed, moving around the location of his head. If in the air, Hydrazoa will just float left and right with his normal air movement/control, and will bounce off the ground either a Wolf height or 1.5x Ganondorf’s height based off whether he fast falled into the ground or not. Canceling out of this move by pressing anything will cause Hydrazoa to explode with a splash before reforming back to his humanoid state, dealing 11% and knockback that kills at 120% for a rather powerful attack. Hydrazoa will automatically explode if he stays in this form for 5 seconds.
This is an awkwardly laggy move to compensate for the power as you’d expect, but Hydrazoa can’t be interrupted out of this move unless his head is hit (still taking all damage and knockback). If a foe was overlapping Hydrazoa when he used this move, they will find that Hydrazoa’s body is solid from the inside only, and if Hydrazoa makes contact with an outside foe they will be absorbed into his body. If Hydrazoa can catch an opponent using a move aimed any direction but upwards where it’d hit his head, he can take the attack and drag the foe along with him before exploding to deal them even further knockback. This is a pretty scary move off the stage, but is also a good one for getting the foe off the stage in the first place if the foe has you cornered at the edge, taking the foe with you when they just intended to knock you off. While grounded, Hydrazoa can attempt to roll his head away from where the foe’s attack will hit, making it a lot more appealing.
DOWN SPECIAL – BASE ELEMENT
Only usable on the ground, Hydrazoa spontaneously melts into a puddle of water. His head sticks out of the puddle, still vulnerable to attack, and if hit will cause him to reform to his humanoid state and take the damage and knockback. Hydrazoa can move his head at Captain Falcon’s dash speed through the puddle before pressing any button to come out of the puddle manually. If he presses up, Hydrazoa will quickly absorb the nearest platform’s worth of liquid around himself and rise up out of the water, reforming. If he presses B, he will perform an uppercut up out of the puddle as he reforms with a bit more lag, dealing 10% and vertical knockback that kills at 170%.
Several of Hydrazoa’s moves will create puddles when used. The bubble prison from the previous move will create one double Bowser’s width when it explodes. These puddles can obviously be used with this move if they’re in contact with the initial 1.5 platform width of Hydrazoa’s personal puddle, and they last for 5 seconds before evaporating. Puddles will never evaporate and will in fact have these timers refreshed if Hydrazoa is currently using them with this move.
SIDE SPECIAL – ICE BREATH
Hydrazoa breathes icy air, creating a platform long hitbox as tall as he is that pushes foes away with force comparable to Dedede’s inhale. Foes will also be dealt 1% per third of a second they are pushed. This deals no stun which makes it rather useless on the stage against opponents, but rather horrific as a gimping tool. The move takes some time for Hydrazoa to begin utilizing the full range, but the effect in front of him starts instantly and expands out from there.
If the ice breath comes in contact with a puddle on the stage, it will of course freeze it into ice on the stage. The ice functions as generic ice from Brawl, though it will cause Hydrazoa’s grounded Bubble Prison to roll across the ground faster than his dash. It has 10 HP and can be destroyed by the foe’s attacks, with each Kirby’s worth having its own personal HP. If the foe was standing in the puddle when it was frozen over, their feet will get stuck, and they will have to destroy the ice in order to free themselves. If the foe uses a leg based attack, the starting lag will be increased by 1.3x but it will destroy the ice restraining them instantly regardless of the move’s power. Restraining the movement of foes is decent for getting in close for a grab.
If the Up Special sunbeam ever hits ice, it will unfreeze it and revert it back into water, refreshing the duration of it back to 5 seconds.
STANDARDS
DASHING ATTACK – TIDAL WAVE
Hydrazoa quickly morphs into a tidal wave with his upper torso at the top of it and sweeps across the stage a bit slower than the Wario bike for as long as A is held down. Hydrazoa’s upper torso is the hurtbox the has to be hit to knock him out of the move, while a Ganondorf’s worth of tidal wave is below it as the move’s hitbox. Hydrazoa does several flinching hits of 1% as he goes along, dealing 8 per second, comparable to the Piplup Pokeball. Foes cannot DI out of this move horizontally and have to do so vertically to escape it once caught. On the stage, this means foes will DI up towards Hydrazoa’s vulnerable point and hit him for free. While Hydrazoa’s ability to cancel out of this move is a bit laggy, the hitbox will keep going for the entirety of the lag before Hydrazoa’s legs form, attached to where his upper torso was in the wave. This leaves Hydrazoa in a fairly frame neutral position with the foe, ready to attempt a point blank grab.
If Hydrazoa is allowed to travel over the stage for long periods of time, his tidal wave height will slowly decrease at a rate of a Pokeball height per second. Hydrazoa can absorb every Kirby width of puddle to increase his tidal wave height by a Kirby height. All tidal waves will crash at the edge regardless of how tall they get. Upon crashing, tidal waves deal 7% and “set” knockback that scales based off the height of the wave rather than damage, though will never kill on any legal stage. Half of the puddles used in the creation of the tidal wave + a Bowser width puddle will leak out back onto the stage, while the other quarter will fall off the stage.
Canceling out of the move is done by pressing shield, but if Hydrazoa simply releases A he will instead take some extra time in order to regenerate a new lower torso while the wave continues of its own accord. Hydrazoa can much more quickly fuse with the same wave by inputting dashing attack on top of one that’s already going. Hydrazoa will restore any height to tidal waves he fuses with if they’re shorter than Ganon, but the otherwise non-existent lag will be slightly increased if he has to restore a significant amount of height to it.
If a tidal wave is frozen, it will form a solid wall. For each Ganondorf tall a frozen tidal wave is, it will have 25 HP. If a foe is completely inside a tidal wave when it is frozen that’s bigger than they are, they will get frozen inside of it and it will become solid. When frozen inside of a tidal wave, foes must destroy it to get out. Their attacks will deal a small amount of knockback to it from inside, comparable to hitting Bowser at 25%, giving themselves a small degree of control over their movement to make them a bit less helpless. While being inside this will not cause the drown timer to tick down, foes won’t regenerate air inside of it either. Hydrazoa cannot freeze himself inside of a tidal wave, getting “pushed” out as it freezes. If a foe is frozen inside of a tidal wave, Hydrazoa’s attacks will become able to damage it in the same way those of the foe’s can to enable him to get to that foe.
Frozen tidal waves form “slopes” that Hydrazoa’s bubble form can roll down in order to pick up even more speed than going across regular ice. If the bubble rolls up the tidal wave, it will lose a bit of speed but can launch off of it as a ramp.
JAB – LIQUID BLADE
Hydrazoa morphs his arm into a sword and rapidly stabs with it in an infinitely repeating jab comparable to Link’s. It’s somewhat nice to just keep the foe in contact with you for prolonged periods for drowning purposes, and each hit will cause a very small 0.5x Pokeball width puddle to leak off of Hydrazoa’s arm. While Hydrazoa normally stabs in a pattern of up, forwards, downwards, much like Link, he will stab in whatever direction you want over and over if you hold the control stick in the desired direction. This can make the move somewhat obnoxious at the ledge.
If in a puddle, the sword simply comes out of the puddle in front of Hydrazoa’s head. The jab loses the ability to be aimed or “leak” puddles in favor of allowing Hydrazoa to move his head while the jab keeps going where it was created. Hydrazoa can even press up to reform as normal while the jab continues so long as Hydrazoa does not leave contact with the puddle the jab sword is connected to. Once he releases A, the jab will continue for one fifth of the time he held down the button so long as he doesn’t step off of the puddle.

If Hydrazoa freezes the sword, it will form into an icicle spike with 15 HP, dealing 9% and knockback that kills at 150% to foes. Hydrazoa’s bubble prison can absorb any frozen structures such as spikes or tidal waves to carry them elsewhere, though since he has to be on the ground to absorb them he cannot bring them into the air. They will tumble inside of the bubble alongside the foe as Hydrazoa rolls around, and in the case of the spike will damage them. Beware that if the spike is uprooted in this way, it will shatter after hitting a target once so as to not hit them repeatedly. Regardless, both this and walls can be enough to delay a foe long enough in order to explode the bubble, and this can also enable you to generically reposition these constructs.
FORWARD TILT – BUBBLES
Hydrazoa blows a stream of bubbles out of his mouth. 12 bubbles are created in this somewhat laggy attack, each one dealing 0.5% and a flinch. The bubbles will slowly drift forwards at a pathetic speed slower than Jigglypuff’s walk, but will float upwards at the rate of Jigglypuff’s falling speed. While the bubbles take a lengthy 5 seconds to pop and expire on their own, they will become useless fairly quickly from floating up too high for the foe to actually be hit by them.
If the bubbles are frozen, they will begin falling and shatter on contact with a foe/the ground, dealing 12% and knockback that kills at 150%, enabling you to rain them down on the foe if you went into the air to try to camp with your sunray. Your ice breath can also blow the bubbles even after they’re frozen, enabling you to blow them over the foe’s horizontal position. If the bubbles fall less than Hydrazoa’s height before making contact with the ground (accomplished on legal stages by using the move in a puddle), they will not shatter and will instead remain on the ground as a trap. Any foes who step on them will shatter them as if they stepped in some glass shards, taking the full 12% and knockback that kills at 150%. This trap is more powerful than the jab, but can only hit a foe one time. Hydrazoa can also catch falling frozen bubbles with his bubble prison to use them in there, not destroying them, potentially even letting them down on the ground gently if he feels obligated to.
UP TILT – FREEZE
Hydrazoa’s entire body freezes over, causing any opponents in contact with him to take 10% and knockback that KOs at 140% with very high base knockback. Hydrazoa’s grab has a similar hitbox, but this is the faster move in favor of lesser payoff, jointed priority, and worse ending lag. Regardless, it’s quite nice to have a secondary option to use at this range rather than the grab.
If used in a puddle, the Kirby’s worth of puddle in front of Hydrazoa will get frozen over, potentially freezing any constructs from the jab/dashing attack/ftilt that were resting on it. If a foe was standing in that puddle, they will get their feet stuck in it identically to the ice breath, sitting ducks for some kind of follow-up attack. Inputting utilt in front of an already frozen puddle will unfreeze it.
DOWN TILT – TENTACLE SWEEP
Hydrazoa morphs his arm into a squid’s tentacle and sweeps it in a wide arc in front of himself. This is a fairly laggy attack, but has range comparable to Dedede’s ftilt. The end of the tentacle deals 13% and knockback that kills at 115%, very powerful, but requiring foes to be at a specific range on a laggy attack. The rest of the tentacle is still a treat to hit with, dealing 6% and tripping the foe. The move’s lag is all on the starting end, enabling Hydrazoa to actually follow-up on any foes he manages to trip with something like a dashing attack or grab. The tentacle splashes onto the ground at the end of the move as Hydrazoa reforms his arm, forming a Bowser width puddle.
If Hydrazoa is in a puddle, the tentacle will form under his head. Once fully formed, his head will be at the end of the tentacle. The tentacle sweeps backwards during the starting lag, enabling Hydrazoa to move away from the foe evasively before swinging into them. After the swing, the tentacle collapses into the puddle with Hydrazoa’s head resting at the end of the move’s range away from his initial position. Rarely will Hydrazoa actually hit a foe with the “sweetspot” of the move, but if he uses this attack as a “counter”, the tripping portion of the hitbox will hit any foe who was attempting to hit him.
GRAB-GAME
GRAB – BIG FISH BONE
Hydrazoa’s rib cage appears inside of himself and clamps down on any foes overlapping his body. While it’s only average for speed, the range of Hydrazoa’s entire body is still a lot better than some of the terrible grab ranges of actual Smash characters. If you’re still not sold, Hydrazoa has access to his grab-game while in the air.
Foes drown twice as quickly for their duration of being grabbed by Hydrazoa. Extensive grabs is the way that Hydrazoa will want to go if he actually intends to kill people in this way, very impractical to attempt a kill without them. Of course, Hydrazoa still has excellent throws, so most of the time you can consider the drowning aspect of the grab more of a bonus than the goal.
PUMMEL – IMPALE
Hydrazoa stabs his rib cage further into the foe’s body, dealing 2% per pummel. If he can manage to get in this pummel 4 times before the foe escapes, it will be embedded in their body when they escape the grab or get thrown. Considering the nature of Hydrazoa’s body, it’s rather questionable why he has a rib cage at all, and he can function fine without it. Foes will take 0.5% a second while they have the rib cage embedded in their body, and foes have to get rid of it by dealing 30 damage to it. While Hydrazoa can still use his grab fine on foes other than this one, he gets a bonus if he attempts a grab on a foe who’s holding a rib cage. The lag on the grab is reduced to be quite fast, as Hydrazoa’s rib cage simply “reattaches” to his mass. If Hydrazoa pummels four times again to reattach the rib cage to the foe, this will not refresh the rib cage’s HP from whatever the foe had whittled it down to.
This can provide a lot of pressure as it makes your all important grab even harder to avoid. Aside from that, foes having to attack at nothing in order to destroy the rib cage can give you the time to close in, providing a second level of pressure. If Hydrazoa uses his ice breath or utilt on a foe with a rib cage impaled in their body, it will briefly become frozen for 1.5 seconds. If the foe destroys it during this time, it will shatter into icicles and deal the foe 9 hits of 1% while briefly stunning them.
While these effects are downright insane, this isn’t something that Hydrazoa can accomplish until higher percentages, especially if he wants to use his uthrow since that move carries over the grab escape timer. If he really wants this effect, he can attempt to treat the 4 pummels as a “throw”, risking the foe potentially escaping the grab out of his raw desire to try to impale the foe.
FORWARD THROW – THOUSAND JELLY FIST
Hydrazoa begins rapidly punching himself in the stomach in order to hit the restrained foe. His skin is rubbery enough that it bends inwards to allow his punches to actually hit the foe. He hits the foe with dozens of rapid punches to deal 12% over the move’s duration, and each punch causes his body to stretch backwards further and further, with his arms stretching inwards to continue assaulting the foe. After the foe has stretched back a platform’s distance behind Hydrazoa, he stops punching the foe and allows his elastic body to snap back into place as the foe is catapulted out of his body with knockback that KOs at 130%. While this knockback is very impressive for a throw, the foe will take this knockback from a platform behind Hydrazoa, making it harder to actually kill with it.
Having any form of ice “trap” to your back when using this throw is largely beneficial. Having a solid frozen tidal wave will cause Hydrazoa to prepare the slingshot in place, meaning you still get the powerful knockback but the foe will take it at Hydrazoa’s position. If Hydrazoa’s stretched back body makes contact with regular bubbles or an ice sword spike, the foe will generically get hit by them without being released from the throw. In the case of the spike, it will not shatter upon being hit, meaning the foe will get hit by it twice – once as they first pass it then a second time on the return trip. If the foe passes by frozen bubbles on the ground, Hydrazoa will absorb them into his body and slingshot them out alongside the foe. The bubble shards will automatically combo at lower percentages, but at higher percentages foes will have to dodge the bubble shrapnel before it catches up to them, delaying them before they can continue fighting Hydrazoa properly.
BACK THROW – WATER TETHER
Hydrazoa turns around and puts his hands on the foe’s shoulders as he releases them from his body. As they come out of his body, a tether of water tied to the foe’s ankle will ooze out of Hydrazoa’s torso, tethering them to him. He then proceeds to kick the foe with both legs, dealing 10% and knockback that kills at 175%. The tether prevents the two bound characters from moving more than a platform away from one another. Characters can drag each other at half their normal speed if the other one does not attempt to fight against it.
While it’s nice to have foes on a tight leash to get them regrabbed, any attack will destroy the tether. This tether is very short term and will rarely see the kind of use a tether with actual durability would get. The main thing the tether actually does is cause Hydrazoa to get dragged along with the foe as they take their knockback, functioning as an obvious move to begin a gimping attempt by bringing yourself off-stage alongside the foe. If you rush in on the foe immediately, they will generally be too pressured to go out of their way to perform an attack that will actually hit low enough to destroy the tether, as they’ll leave themselves too open to your next move.
UP THROW – XYZ CRASH
Hydrazoa leaps into the air and ascends at Ganon’s dashing speed for as long as he holds up, using his ability to fly. If Hydrazoa starts the move on the ground, he will jump a minimum of Ganondorf’s height off the ground even if the control stick is released. On the way up, he can potentially bring foes into some stray bubbles that have floated too high to otherwise take advantage of.
Once up is released, Hydrazoa releases the foe’s head from his body and flips upside down in midair before beginning his rapid descent, attempting to create as large of an impact on the foe’s skull as possible. On contact with the ground, foes take 10% and vertical knockback that KOs at 160% at minimum, but if Hydrazoa fell further the power can increase. For every additional Marth height Hydrazoa drops with the foe, they will take an additional 3% and the throw will KO 10% earlier.
Foes can escape from this throw, so it can’t suicide kill unless Hydrazoa has a large percentage lead. Hydrazoa will keep going down regardless of if the foe escapes, so if anything it’s one of the highest risk suicides in the game. The grab escape difficulty carries over from the regular grab, but the remaining difficulty is multiplied by 1.5x of whatever it previously was.
The foe will cough up water as only their head is released from Hydrazoa’s body, gasping for air. The amount of time this happens for is one eighth of the amount of time Hydrazoa has been drowning them for, and during this time the foe may not attempt to escape the grab.
DOWN THROW – JELLY BODY IMPACT
Hydrazoa’s upper torso extends upwards while his legs remain where they previously were. The foe is caught in the middle of this attack, getting elevated up roughly Wolf’s height. Hydrazoa’s rib cage retracts into his body during this time, but Hydrazoa instead constricts the foe with his body directly. This deals 3 hits of 4% before releasing foes into their footstooled state, decent for a gimp if used in the air. During this time, the foe will vomit up an eighth of their drowning water, creating anywhere from a Pokeball width to a Bowser’s worth. If the foe hits the stage while in this footstooled state, they will enter prone, but can tech out of it. If the foe vomited up at least 0.6 seconds of water (meaning they had 4.8 seconds of drowning), though, this prone will be untechable. This provides some powerful prone abuse in tandem with the dtilt and the general Down Special puddle game, though requires some careful management when the foe’s drowning is lower.
SMASHES
FORWARD SMASH – JELLY SLINGSHOT
Hydrazoa gets down onto the ground and gets a tight grip on the ground with his hands, then starts stepping back with the rest of his body as his arms stretch to stay connected to his hands. Over the course of the charge, Hydrazoa can step back up to a platform’s distance if full charge is reached. Upon releasing the charge, Hydrazoa will fling himself from his current position forwards 1-3 platforms. For the first half of his flight where he’s still in the air, Hydrazoa deals 10-16% and knockback that kills at 200-165%. After halfway through his course of travel, Hydrazoa will splat on the ground in a huge splash, dealing a more respectable 22-30% and knockback that kills at 120-90%. Hydrazoa will slide along the ground from this point as his body melts into a puddle, dealing 7-12 hits of 1% and flinching as he goes and creating puddles for a distance equal to half of his total travel distance. Hydrazoa ends the move as just a head in a puddle as if he had used his Down Special.
This move is actually quite quick to start, but it is quite difficult to hit foes with the powerful hitbox. While that hitbox is large, it takes some time for it to actually come out and foes can oftentimes get hit out of the way by the weak hitbox at the start of the move. In order to hit with it, it’s ideal to try to use this move as a counter, moving Hydrazoa’s hurtbox out of the way by stepping back while simultaneously charging this attack. Beware, though, that if Hydrazoa charges this attack foes will be able to hit his hands with any attack in order to explode them into a Kirby sized puddle. This will cause Hydrazoa to get flung in the opposite direction with enough momentum to send him backwards a platform’s distance at a 45 degree angle, even if he won’t suffer the effects of the foe’s actual attack. Despite this, he won’t actually be in lag during this time and will be free to assault the foe with his long range aerials.
The portion of the move where Hydrazoa slides along the ground into a puddle at the end can be seen as something of “ending lag”, even if it does have some protection on it. Even if you miss, though, you’re fleeing from the foe during your vulnerable state while creating a huge puddle. In addition, if you hit with the move at a lower percentages/hit with the sourspot at slightly higher percentages, the slide can actually help you to chase after the foe and follow up with something like a dtilt.
UP SMASH – LIVING GEYSER
Hydrazoa’s legs morph into a geyser of water that propels his upper torso into the air. As being shot up, Hydrazoa performs a triumphant uppercut that deals 15-23% and knockback that kills at 170-130%. Hydrazoa will be propelled into the air 0.7-1.5 Ganondorfs based off charge, and at the top of the geyser will reform his legs out of the geyser, ending the move in the air. The geyser is not a hitbox, but will take some time to sink back down into the stage, creating a gigantic puddle that is as wide as Wario-1.3x Bowser’s width. Hydrazoa can cancel out of the move early at any time, though this will cause the resulting puddle to be a bit smaller as the geyser sinks back down to the ground immediately.
While the geyser is not a hitbox as it falls back down to the ground, Hydrazoa can fastfall through it at a highly accelerated speed much faster than his normal falling speed, enabling him to easily catch foes who think it’s safe to hide there. He can also freeze the geyser as it goes down, with it functioning in a largely identical fashion to a tidal wave when frozen.
During the charging of the move, Hydrazoa will absorb any puddles connected to his body at a rate of one Kirby width per every 0.15 seconds, with each Kirby width making the geyser go a Kirby higher, adding 2%, and making the uppercut KO 2.5% sooner. Hydrazoa can also absorb steam that’s up to half a platform’s distance away, increasing the height by a potential full Ganondorf height, adding up to 10% damage, and making the move KO up to 35% sooner. While using this next to a steam cloud may sound a bit predictable, foes will have to dodge the steam itself, then this attack, and then have to deal with Hydrazoa coming at them at lightspeed if they still have not been hit somehow, giving foes good reason to be afraid. The height increases to the geyser that aren’t from charging the smash will not cause it to produce a bigger puddle.
DOWN SMASH – UNDERSEA PUNCH
Hydrazoa raises his hands behind his head in a pose as if he were gathering power, then combines them into a single hand as he continues to enlarge the singular giant hand with more of his mass as he charges. Upon release, Hydrazoa slams the fist onto the ground in front of himself, dealing 19-27% and knockback that kills at 140-115%. His giant fist explodes on contact with the ground, creating a puddle the size of Kirby-Bowser before Hydrazoa reforms his normal hands during the ending lag.
If this move is used on top of a puddle, when Hydrazoa punches the puddle his fist will go inside of it. After a brief pause of 6 frames, the fist will then come out of the puddle in the position horizontally closest to the foe. If Hydrazoa presses “A” during this time as if it were a “two part” smash attack, the rest of Hydrazoa’s body will go into the puddle and come out at the location of the hand instead of the hand retracting back to Hydrazoa. Instead of just spamming this version of the move to attack from long range, Hydrazoa will be using this attack to perform some degree of hit and run. There is some lag before the rest of Hydrazoa’s body will dive into the body to follow his hands, meaning there is still some incentive for foes to rush to Hydrazoa’s starting position to try to punish him. If you actually hit, that’s all well and good, but upon a miss the move becomes more something along the lines of “pressure and run”.
AERIALS
NEUTRAL AERIAL – WIND-UP PUNCH
Hydrazoa starts spinning around his arm around to charge up a punch somewhat like DK’s Neutral Special. As Hydrazoa spins his arm around, though, he stretches it further and further, and the spinning of the arm by itself creates a hitbox. The spinning deals 30 hits of 0.5% and flinching, and it’s somewhat feasible to actually hit with a good amount of them. The hitbox is at first only as big as DK spinning his arm behind himself, but eventually expands to a hitbox double that size that covers Hydrazoa’s body and slightly in front of him, in addition to a large amount behind himself. This portion of the move takes around 0.65x as long as charging DK’s neutral special. Hydrazoa ends the move by punching forwards, dealing 16% and knockback that kills at 105%.
If Hydrazoa catches somebody in this move from the front rather than the back, they’ll really have their work cut out for them. In foes just DI out back in front of Hydrazoa and the move is remotely close to ending, they’ll have to address the rather frighteningly powerful punch that will be heading their way. Going below Hydrazoa is dangerous off-stage and it’s very easy for Hydrazoa to chase with this move there, so the “safest” option is for foes to awkwardly DI through Hydrazoa’s entire body despite there being more of the spinning arm hitbox positioned behind him. If Hydrazoa is in the foe’s way back to the stage, this can provide them with even more incentive to bite the bullet and just take some of this damage, and the many multiple hits will also rack up a good amount of drowning on the foe.
This is absurdly laggy for an aerial, but to enable Hydrazoa to ever use it on-stage the move only has long landing lag if he lands on the stage later on in the move. The move has almost no landing lag if Hydrazoa lands more quickly in the move, enabling him to use the flinching hits of the spinning arm as a close range option when shorthopping around. More close range options are always nice, considering Hydrazoa has so many ways to bait, drag, or make his way into said range.
FORWARD AERIAL – SQUID’S CLUTCHES
Hydrazoa turns his arm into a tentacle and slaps forwards with it, but in an inwards motion. This deals 9% and knockback that kills at 170%. This is a fast, long range move that’s excellent fodder as a generic spacer. The interesting part of the attack is that it does inwards knockback towards Hydrazoa. While foes will simply fly through him at higher percentages, this can be an obvious lead in to a grab at lower percentages. Aside from this, it makes it easier for Hydrazoa to get his opponents off-stage – whether he or the foe is the one “cornered” at the edge, he has the ability to knock them off it.
BACK AERIAL – CLOSING IN
Hydrazoa extends both his arms behind himself a platform without turning around. If his hands hit a foe, he will reel himself in to them and perform a kick upon his arrival that deals 12% and knockback that kills at 150%. Hydrazoa reels himself in to the foe at 1.5x his normal aerial movement speed, and if the foe had momentum he will gain as much momentum as they currently have. Foes can attack Hydrazoa’s hands to explode them into a Kirby sized puddle that falls to the ground, interrupting the move but dealing no damage, stun, or knockback to Hydrazoa. Foes can still hit Hydrazoa’s main body during this time as normal.
The move obviously gives foes less time to react if used at close range, making this one of Hydrazoa’s more powerful moves at close range besides his obvious grab. Aside from that, this move makes an excellent follow-up to the fair, as this will directly combo into it at lower percentages. At especially low percentages Hydrazoa can just get the kick off for free, but at higher ones foes still will rarely have time to hit Hydrazoa’s hands and will have to trade an attack with Hydrazoa’s kick due to the nature of aerial priority. The primary appeal of such a trade is to try to get the foe further and further off-stage, and if used skillfully this can form a unique “wall of pain”. If they just panic and dodge, Hydrazoa will be overlapping them at the end for the obvious grab attempt.
While this move still has some degree of lag if foes force Hydrazoa to cancel out of it by destroying his hands, Hydrazoa can still DI during this time. While both the foe and Hydrazoa are in lag, it provides a rather obvious opportunity for him to get in closer to prepare for a grab or even another use of this move.
UP AERIAL – ICE SHIELD
Hydrazoa holds his hand above himself with the palm pointed upwards, then freezes the hand into a shield of ice that he shoves upwards. While this isn’t particularly fast, it deals 10% and vertical knockback that kills at 140%.
If a foe attacks the shield during the attack’s duration, Hydrazoa will experience a small bit of lag as the shield shatters into several icicles, during which time he regenerates his hands, but will not personally suffer the actual effects of the foe’s attack. The initial shattering of the shield will deal 4% to foes and flinch them out of the move they were using. 10 icicles will fall to the ground with this attack through Hydrazoa’s body, each dealing 1% and flinching. They will still fall from above Hydrazoa, so he can DI about to effect where they will rain down. During the time the foe is in lag, they will inevitably end up falling into and past Hydrazoa’s body. Most enemies will opt to just fastfall and dodge spasm through Hydradoa himself, leaving them vulnerable to a poke from the icicles to enable him to reclose the gap they just made.
DOWN AERIAL – DIVE
Hydrazoa goes to perform a generic stomping spike dair not unlike Ganondorf’s move on the same input. The difference is Hydrazoa uses his stretching ability to extend his legs downwards during the stomp. The move is just as laggy but with 0.8x the power. The range is good, but the hitbox is only present a good ways away from Hydrazoa’s character model due to stretching, leaving him vulnerable. While the move does have a blind spot, it’s in your primary grab range that foes will be afraid of, enabling you to play around it if you can get a good feel on the enemy’s behavior. The blind spot also will rarely be an issue when actually using the move to gimp.
If the landing lag of this move is triggered by Hydrazoa’s extended legs making contact with the ground, he will retract his upper torso down to reach his legs rather than the other way around for extremely little lag. This makes the move extremely scary for foes to spotdodge or shield on the ground, as he’ll be overlapping them and ready for a grab upon “missing”. Of particular note is that this can be used to techchase prone opponents similarly to Ganondorf’s dair, but with Hydrazoa able to potentially get a grab as the payoff instead of some damage and knockback.
FINAL SMASH – KALAMARI

Hydrazoa turns into a giant squid made of water. He does a basic impersonation of Game & Watch’s tacky Final Smash, though given Hydrazoa can fly it’s significantly more logical. Hydrazoa can actually turn around unlike Game & Watch, and pressing any button and a direction will cause Hydrazoa to stab a tentacle in the input direction a platform’s distance. Upon a successful hit, Hydrazoa will grab the opponent for 11% and fling them in any direction for knockback that kills at 150%. While this is rather weak, Hydrazoa can just fling the foe into his passive tentacle hitboxes that are identical to Game & Watch’s final smash and fairly powerful, giving him a decent improvement on a mediocre Final Smash.
PLAYSTYLE SUMMARY
Hydrazoa is a slippery character to catch, constantly weaving in and out of combat. Many of his moves can function as “counters” in some way – if not in the traditional sense, to try to give him the upper hand in positioning. Aside from his direct methods of closing in on a foe for a grab with moves like fair, something good Hydrazoa players can do is just aggravate their enemies into full on relentless assaults with how much Hydrazoa can bait out attacks. Hydrazoa will inevitably be making his way back and forth across the stage a lot with this kind of playstyle, and this provides countless opportunities for Hydrazoa to pressure opponents into traps. The fire trap from the Up Special is of course the most prominent of them, as it gives foes a new goal of having to touch Hydrazoa, and soon, encouraging aggressive and dumb behavior that Hydrazoa can punish better than just about anyone else.
Hydrazoa is a surprisingly aggressive character for how much range he has and how defensive his moves can seem on a basic level. By Brawl standards, Hydrazoa has a lot of comboing ability at lower percentages. The fair, fthrow, bthrow, fsmash, and bair provide the most obvious examples, and he can have “soft” combos with his limited prone abuse game and aggressive repositioning on his counter-esque moves. While Hydrazoa can and will score plenty of perfectly normal kills, it can sometimes be a good approach to leave foes at a lower percentage due to the advantages it offers. Hydrazoa in no way needs damage to kill people – while his most obvious method that doesn’t require damage is gimping, he can potentially score some kills at percentages lower than his knockback kill methods by drowning people. Racking up drowning doesn’t require that Hydrazoa rack up the foe’s damage, and aggressive repositioning on moves like most of his aerials and smashes will cause the foe to get some drowning due to contact with Hydrazoa even if none of his actual hitboxes connected.
Hydrazoa is a force to be reckoned with when off the stage. In this scenario, foes are forced to pass through his body unless they can recover super high, which typically leaves them punishable upon their return to the ground. Constantly turning on and off the Up Special can enable Hydrazoa to float around for a sickeningly long time, and even if foes do pass him he has the potential to knock them back onto the stage with his fair. For how powerful he is in gimping and how good his recovery looks, Hydrazoa is a bit vulnerable to getting gimped himself due to his recovery not hitting above him and his uair being a very weak option if not using the counter aspect of it. Of course, one of the most satisfying things Hydrazoa can accomplish is to turn it around with his evasive and counterish aerials, beginning an attempt of his own.
Last edited:
Katapultar
Smash Lord
[collapse=WoMF Set]The lingering lightning immediately comes across as being cheap in that it easily covers Azula and is too potent in comboing, especially when it always lingers for half a second no matter how strong the hitbox. If you're going to keep it in, you might want to get rid of the flinching, or make it specific to certain attacks where it would be balanced such as the D-air. A lingering hitbox that deals no flinching is an interesting idea to punish foes who shield or dodge your attack, but it has no use in this particular set.
Putting the lightning aside, Azula is already plenty strong with high damage output and KO percentages seen in some of your past sets this contest, along with a very competent rushdown tool in the Up Special. The lightning is meant to cover Azula for her laggy attacks and help combos from my understanding, but you don't need that kind of thing to help with lag when you can simply launch foes (F-throw) and intercept them as far as your Down Special and Smashes go. Speaking of the Down Special, it's easily my favorite move in the set, if maybe a bit too strong for its aim and reach, but I definitely like the risky buffing aspect that makes you stronger at the cost of losing a strong projectile and being damaged. Good characterization there. It’s not quite enough to hold the set up for me, however; it’s straightforward, which is fine, but it can be disjointed at times with moves like the Side Special, and there’s still the rather broken lightning effect. [/collapse]
[collapse=Kuvira]I thought this character was a man until I saw a “her”…
Your movesetting is improving, Kiwi, and Kuvira has a cool opening move in the metal plates that can be fired out and manipulated in various ways, able to place them on foes or set them on the ground as damaging traps (good job not making them flinch). Between the Neutral and Down Special, it really feels like Kuvira excels at destroying opponents who dare approach her, first placing metal plates before bringing them in for additional damage. How fitting for a dictator. Also, I like the D-Smash for being a simple yet unique way to reposition your traps.
Kuvira has a good base, but it could be better. I was expecting a big payoff for placing a bunch of the metal plates on the foe in the Grab or a Special, like maybe a powerful KO move or special metal-based effect, for one. There are some fillerish moves, which is fair since I know full well how tough it can be to think up various move-based interactions for a signature component, and some of the metal-based interactions feel a bit illogical given the attack animations that trigger them such as the D-tilt, B-air, U-Smash (why does throwing up a rock up into the air also send up all your metal on the same ground?) and F-Smash to some degree. That being said, I like what you did with the F-Smash by making compulsion “default” for a forward smash input despite the fact that you’d expect it to the opposite way round, as drawing opponents towards you, especially when you have a powerful hitbox in front of you, is much more beneficial than pushing them away and players will of course input a forward smash by default (given a back smash input would normally turn them around). Some of the metal effects feel a bit underwhelming for how few plate interactions there are, namely the U-Smash, mostly lacking the feel of power in my eyes if anything.
This set is held back by what I feel is a slight lack of substance and there not being too much focus, but I could very easily like it. A close contender for one of your best.[/collapse]
[collapse=Pepsiman]I enjoyed the second half of this set a fair bit more than the first half, as Hydrazoa uses a great air game (although the N-air is awkward animation-wise) to compliment his drowning mechanic in a surprising way by forcing foes to go through his body and potentially lead into his overlapping grab game. This all flows with his evasive tendencies, which in turn making drowning opponents more feasible than one would expect if they keep dodging your attacks. It’s underhanded and leads to a great antagonistic feel from a one-time anime fighter villain who would do whatever it takes to win…
With that part of Hydrazoa’s set in mind, I didn’t really like the majority of the Specials and Standards: these felt too campy and disjointed with the second half of the more (fitting) melee-esque game you introduce flavor-wise, there being too many traps and artificial structures and interactions that don’t feel all that necessary later on, just there because the character has to potential to do it all. While Hydrazoa does do some pretty weird and un-wrestler-like stuff in his series, I think you should have given him a bigger focus on melee/wrestling via the tilts and Specials, actually taking advantage of his physique and mechanic more for close-combat rather than to interact with stuff he can make. Even if one could argue that the traps/interactions do fit snugly with the entire set, I don’t think the rift in flavor they create will ever bode well with me. The set can also get a bit overpowered with its numerous traps, insane Up Special (should probably be 3 seconds) and gimping Neutral Special to some degree, but despite its flaws I did enjoy the finer parts of it.[/collapse]
the8thark
Smash Lord
- Joined
- Oct 28, 2013
- Messages
- 1,273
My Ryu Hayabusa Moveset
Why Ryu Hayabusa?
He was in a trilogy on NES games and the trilogy was remade for the SNES (similar to the NES Mario trilogy remade for Mario All Stars). Also he's a bad *** ninja with a cool ninja sword. More obsecure Nintendo characters have been SSB characters in the past. Lucas or Rob or Game and Watch - Remember those? Anyway I think people would enjoy playing as Ryu Hayabusa in SSB Wii U. I think making him like the recent games is a bad idea. He needs to follow his NES roots.
Playing Style
Ryu Hayabusa would be based off his NES style. Sure he does feature in modern games but none of them are on Nintendo and since SSB is mainly for characters featured on games on Nintendo consoles, I think that's fair. And better in a way as NES ninja skills would make for a very good SSB Wii U Character. He is fast, agile, able to climb walls, swing a sword, create a double of himself and let some really cool ninpo (Ninja magic.) His weakness? He is very light weight and is easily flung around a lot. This is evident in the NES games as hits send him flying. And his jump height is average. Not high and not low.
Move Set
I will describe possible moves for Ryu Hayabusa for most button combinations. I'll use GIFs I've made from videos taken from playing Ninja Gaiden 2 NES, (Ninja Gaiden 3 for the side A upgraded sword move and Double Dragon 3 for a couple of jump attacks) on an emulator. So you can have a visual representation of the moves. This I feel is a better way to understand the character.
All the moves are in a spoiler tag because there is quite a few gifs here and they could take a while to fully load.
Not much else to say. What do you think about all of this? All feedback is greatly appreciated.
And it's pretty obvious I am a fan of the original Ninja Gaiden series. Even NG3 which I think is not that good a game.
Why Ryu Hayabusa?
He was in a trilogy on NES games and the trilogy was remade for the SNES (similar to the NES Mario trilogy remade for Mario All Stars). Also he's a bad *** ninja with a cool ninja sword. More obsecure Nintendo characters have been SSB characters in the past. Lucas or Rob or Game and Watch - Remember those? Anyway I think people would enjoy playing as Ryu Hayabusa in SSB Wii U. I think making him like the recent games is a bad idea. He needs to follow his NES roots.
Playing Style
Ryu Hayabusa would be based off his NES style. Sure he does feature in modern games but none of them are on Nintendo and since SSB is mainly for characters featured on games on Nintendo consoles, I think that's fair. And better in a way as NES ninja skills would make for a very good SSB Wii U Character. He is fast, agile, able to climb walls, swing a sword, create a double of himself and let some really cool ninpo (Ninja magic.) His weakness? He is very light weight and is easily flung around a lot. This is evident in the NES games as hits send him flying. And his jump height is average. Not high and not low.
Move Set
I will describe possible moves for Ryu Hayabusa for most button combinations. I'll use GIFs I've made from videos taken from playing Ninja Gaiden 2 NES, (Ninja Gaiden 3 for the side A upgraded sword move and Double Dragon 3 for a couple of jump attacks) on an emulator. So you can have a visual representation of the moves. This I feel is a better way to understand the character.
All the moves are in a spoiler tag because there is quite a few gifs here and they could take a while to fully load.
A - Dragon Sword
Down + A - I have not thought of a move for this. Possibly just a ducking sword stab.
![]()
Left + A or Right + A - Dragon Sword Upgraded
![]()
Smash + A - Hard Kick
![]()
Up + A - Spin Slash (also works as a recovery move)
![]()
Left + A or Right + A while in the air - Aerial Dragon Slash or an Aerial punch/kick (I have GIFs for both options)
![]()
![]()
Aerial Recovery Move - Spin Slash. This means Ryu has no 2nd jump. Just one jump and the recovery. This is because I feel a 2nd jump with the wall climbing is a little OP.
B- Shuriken
![]()
Left + B or Right + B - Windmill Shuriken
![]()
Hold B for a few seconds without moving - Create a clone. The clone lasts for a short time (different to NG2) and only does 50% damage but mimics all of Ryu's moves.
![]()
Up + B - Fire Ninpo
![]()
Down + B - Fireball Ninpo
![]()
Throw - Nothing fancy here, just an average throw.
Block - Ryu parries the enemies moves with his sword
Super special ability from Smash Ball - Art of the Fire Wheel Ninpo - Makes Ryu invincible for a limited time and damaging anyone who comes into contact with the Fire Wheel. You could also majorly slow down the sun speed of every other character to make it easier for Ryu to run into everyone else and cause major damage.
![]()
Character Ability - Wall Climbing
![]()
Down + A - I have not thought of a move for this. Possibly just a ducking sword stab.

Left + A or Right + A - Dragon Sword Upgraded

Smash + A - Hard Kick

Up + A - Spin Slash (also works as a recovery move)

Left + A or Right + A while in the air - Aerial Dragon Slash or an Aerial punch/kick (I have GIFs for both options)


Aerial Recovery Move - Spin Slash. This means Ryu has no 2nd jump. Just one jump and the recovery. This is because I feel a 2nd jump with the wall climbing is a little OP.
B- Shuriken

Left + B or Right + B - Windmill Shuriken

Hold B for a few seconds without moving - Create a clone. The clone lasts for a short time (different to NG2) and only does 50% damage but mimics all of Ryu's moves.

Up + B - Fire Ninpo

Down + B - Fireball Ninpo

Throw - Nothing fancy here, just an average throw.
Block - Ryu parries the enemies moves with his sword
Super special ability from Smash Ball - Art of the Fire Wheel Ninpo - Makes Ryu invincible for a limited time and damaging anyone who comes into contact with the Fire Wheel. You could also majorly slow down the sun speed of every other character to make it easier for Ryu to run into everyone else and cause major damage.

Character Ability - Wall Climbing

Not much else to say. What do you think about all of this? All feedback is greatly appreciated.
And it's pretty obvious I am a fan of the original Ninja Gaiden series. Even NG3 which I think is not that good a game.
Last edited:
ChaosKiwi
Smash Apprentice
- Joined
- Feb 1, 2014
- Messages
- 104
- NNID
- ChaosKiwi
Well, for starters, that's not exactly a complete moveset. For instance, you should think of every move. Additionally, you really should put down, like, descriptions of things like animation, damage, knockback, etc., even if you have a gif to show it. It's just, not finished. I can tell you like the character a lot though, so that at least shows it's true to the source.
the8thark
Smash Lord
- Joined
- Oct 28, 2013
- Messages
- 1,273
You make good points even though you said them in a really abrupt way. I'll edit my move set soon when I have the time to add in those things you talked about. Actually it is an almost complete moveset. The moves are not described as much as you (and others) would like (ie no talk about amount of knockback or damage numbers or other points).Well, for starters, that's not exactly a complete moveset. For instance, you should think of every move. Additionally, you really should put down, like, descriptions of things like animation, damage, knockback, etc., even if you have a gif to show it. It's just, not finished. I can tell you like the character a lot though, so that at least shows it's true to the source.
Your feedback is appreciated but I'm really not happy in the way in which it was said. Just not finished is different to not a complete moveset. I'll edit it taking into account these points. But if people hate on this move anymore I'll just delete it. It's just not worth the effort for that kind of a response. If you hate the moveset, don't message here, don't PM me, just say nothing and move on.
I appreciate what you said here but I have to say I don't appreciate how it was said. Harsh but true.
I know it's not everyone on these forums as the last time I shared this move set here in a totally different topic a while ago it got a very positive response.
Last edited:
Munomario777
Smash Master
- Joined
- Nov 18, 2014
- Messages
- 3,253
- Location
- Charleston, South Carolina
- 3DS FC
- 0387-9596-4480
- Switch FC
- SW-8229-3157-8114
@
 the8thark
I don't really see how it's "hating"; more like constructive criticism. I really do like some of the concepts you have in your set; the lack of a double jump could make for an interesting play style, and the other recovery options I feel make up for it. The wall climbing is an interesting idea, and the up tilt/aerial propelling you upwards could be a nice combo continuer (as well as being a sort of pseudo-double jump). That said, what this set really needs is more detail. Point out what's good about the move, what's bad about it, the damage, the knockback, the speed, the best way to use it, anything you can think of, and I'm sure you'll come out with a better moveset.
I don't really see how it's "hating"; more like constructive criticism. I really do like some of the concepts you have in your set; the lack of a double jump could make for an interesting play style, and the other recovery options I feel make up for it. The wall climbing is an interesting idea, and the up tilt/aerial propelling you upwards could be a nice combo continuer (as well as being a sort of pseudo-double jump). That said, what this set really needs is more detail. Point out what's good about the move, what's bad about it, the damage, the knockback, the speed, the best way to use it, anything you can think of, and I'm sure you'll come out with a better moveset.
Smady
Smash Master
@
the8thark
This was already covered in part by the others, but they did leave out some information that you might find helpful. Your set has some good points to it; you have good images to display most moves, and a clear understanding of the character and game. The problem is that it's hard to understand. You describe moves by their GameCube controller input, so B for special moves and A for standard inputs, and I did this too at one point, but there is a universal system used that makes conveying moves a lot more straightforward and universal for all control schemes. B moves are specials (neutral, up, down and side), A moves on the ground are standards (including the jab, dash attack and three tilts (forward, up and down)), A moves on the ground that are held or charged are smash attacks (forward up and down), A moves in the air are aerials (neutral, down, up, forward, back) and the Z input is the grab game with four throws in each cardinal direction.
You may have felt Kiwi's comment was hateful, but he was only trying to help. If you read other movesets here you'll see they follow this same system, except they might combine a couple of aerials or call a forward input a side input when there's no back equivalent (which is true with the forward smash and tilt, and side special is always called that). If you think about it you'll realise you're actually missing quite a few moves you may not have known existed. This is okay though, most of us starting out did the same thing, and this is all Kiwi was trying to tell you even if it was abruptly worded.
As for damage and knockback, the first is expected on every move that does damage, but the latter is only necessary if the move can KO at a viable percentage. Your moves don't have to be hugely descriptive but things like the animation and damage are the basic requirements. Without those it's difficult to know how a move works, even if it does have very well done gifs showcasing the animation.
the8thark
Smash Lord
- Joined
- Oct 28, 2013
- Messages
- 1,273
Thank you for the reply. I'll defo look into it today. Most likely when I get home. Expect a lot more information added@
I don't really see how it's "hating"; more like constructive criticism. I really do like some of the concepts you have in your set; the lack of a double jump could make for an interesting play style, and the other recovery options I feel make up for it. The wall climbing is an interesting idea, and the up tilt/aerial propelling you upwards could be a nice combo continuer (as well as being a sort of pseudo-double jump). That said, what this set really needs is more detail. Point out what's good about the move, what's bad about it, the damage, the knockback, the speed, the best way to use it, anything you can think of, and I'm sure you'll come out with a better moveset.
Chrom

I've been going mad with Fire Emblem characters lately... trust me, this is my last one.
'Certainly more useful than a simple swordsman like myself.'
You'll take back those words when you've finished reading this, Chrom. You're going to be in whether you like it or not!
OK, the main aspect of Chrom in this moveset is that he can switch between different weapons to change his playstyle. This is the only moveset that I will be showing the specials of first, primarily because his Neutral Special is his weapon switch, and this affects all of his moves in some way.
Statistics
Weight: 6 (101)Size: 6
Ground Speed: Default=6, Sword=4, Shield=2, Lance=5
Air Speed: Default=7, Sword=5, Shield=1, Lance=6
Fall Speed: Default=7, Sword=9, Shield=10, Lance=8
Chrom enters the match without holding a weapon. This is the 'default' kit, and Chrom will have his weapons somewhere on him, but he won't use them until you use the Weapon Switch.
Special Attacks
Neutral Special: Weapon SwitchAs I said earlier, Chrom will enter by default without holding anything, meaning he will just punch and kick in his moves. But when you use this move, you have 4 different options depending on which direction you input on your control pad:
Forward: Chrom gets out the legendary Falchion sword. When he is in sword mode, he is generally a bit faster than Ike but also a bit weaker than Ike. This is his strongest stance, but probably his most vulnerable as he is quite slow and doesn't have too much protection. The sword trail is yellow.
Down: He hauls out a generic Fire Emblem shield. While in this stance he holds it in front of him similar to how Link holds his shield, except Chrom's shield is bigger and heavier, but also much more protective, as it will protect from all attacks, rather than just projectiles. It will reflect projectiles in some attacks while in this stance. While being very defensive in this stance, Chrom is also slower, the shield being weak and useless in attacks, and he also has a worse recovery. But if your enemy is playing overly aggressive this is the ultimate defence. Unless you get hit from behind.
Up: He produces an iron lance. This is his quickest weapon and is used to execute good combos. It also is his most range weapon and he is considerably faster than with his sword. However he is not the most powerful in this stance, so don't expect to be launching foes into oblivion.
If you are in any of these stances and just press the special button without inputting a direction for 1 second, he will put his weapon away and go into neutral stance. If you are interrupted in this attack before inputting a direction, your attack will simply be cancelled out. But if you are interrupted after inputting a direction, the animation of getting out the weapon will be cancelled out, but you will still end up with the weapon you wanted.
Side Special: Zooming Slash
This is based off his critical hit from Fire Emblem, like how Ike's Quick Draw is based off his critical hit. But this attack acts more like Chrom's critical hit than Ike's Quick Draw. It also doesn't have a variation for his Neutral kit.
Sword Kit: Chrom zooms forward, his sword in a 'ready-to-strike' position, a maximum of 3 SBBs. If he connects, he slices through the opponent, ending up behind them. Does 10-15% damage and has 0.6 seconds of startup lag and almost no end lag, and the knockback is high enough to throw the foe off the ground but low enough so Chrom can go in for an attack afterwards. Good for combo setups and can KO at around 180%. When used in the air, afterwards he will go into helpless unless the attack connects.
Shield Kit: Quite similar to his sword variation. He zooms forward, his shield out in front of him reflecting projectiles, going forward 2 SBBs max. If it connects, he brings his shield up over his head (not behind him), flinging the opponent above his head, ending up behind them. When used in the air he will always go into helpless mode afterwards. Does 6-10% damage and high knockback, being pretty much his only move that is powerful in Shield Stance. Has 0.7 seconds of start lag and medium end lag, being OK for starting combos at low percents. Can KO at around 100%.
Lance Kit: This is the fastest variation. It's pretty much the same as with his Sword Kit; except when it connects, he jumps up slightly (like a shorthop) and performs a from flip, swinging his sword down and stabbing his opponent into the ground, ending up behind them. Can follow up with a Down Smash or Side Smash if you are quick enough. Works the same in the air, and like his sword variation, he goes into helpless afterwards unless it connects. 8-11% damage.
If he uses this move when he is in his Neutral stance, he will automatically get out his sword while using it, but will put it away afterwards.
Down Special: Surging Diffusion
This is based off a part of Cutscene 06 in Fire Emblem Awaking where Chrom and Lucina fight. When used on the ground, Chrom tenses up, then surges forward with his weapon by his side, the tip facing forwards, like when Chrom and Lucina both rush at each other and their swords clash. He travels 2.5 SBBs whichever weapon he has, and unlike Zooming Slash, the shield doesn't reflect projectiles in this attack. He also creates shiny green particles while he is moving, which will absorb projectiles and convert it into health which heals him. It takes 0.7 seconds for him to surge forward, and it has 0.2 seconds of startup lag. When Chrom is moving forward he has knockback resistance, making it a defensive move with any kit. When you hit your foe with this, they will be carried along with Chrom, regularly taking damage (1% every 0.2 seconds without a weapon and with his shield, 3% with his sword, and 2% with his lance), and the final hit deals moderately high knockback for your stance. For example, with his Neutral Kit it has fairly low knockback but has very little end lag, the Falchion has high knockback but quite high end lag, his Lance Kit has medium knockback and average/low end lag, and his shield reflects projectiles on this last frame, but not the rest, and has low knockback but high end lag.
But when it is used in the air, he only goes forward 1.5 SBBs and it goes down at a 35* angle. It does not render him helpless because technically it's not a recovery move.
Up Special: Aether?, Shield Jump, Tether Lance
'Plus you don't have an Aether recovery move like Ike does, do you?'
Well... not exactly. However, multiple characters in Fire Emblem can use Aether, so I don't see why I shouldn't be allowed to give Chrom something similar...
OK, first thing to note is that this attack doesn't have a Neutral Kit variation, but it does for the other 3 types, which are all completely different recoveries.
Sword Kit: Chrom swings his sword around 420*, starting behind him and finishing in front of him.
I know what you are thinking. WTF is this?!
That's not all there is to it. See, after he has swung it round 180*, he jumps upward about 4 SBBs (still swinging his sword, will be below him at the time of the jump). It's more like Final Cutter than Aether, except the main difference is that he doesn't plummet down like with FC and Aether, making it a more reliable recovery than Aether. Instead he just goes into helpless mode afterwards. The whole attack happens quite quickly, and the sword acts as a hitbox that knocks them in the direction it is swung, for example the foe will be hit slightly downwards at first, but then they will be launched back up again as the sword goes round below Chrom, then they get spiked at the end, making it safer as a kill move.
Shield Kit: Very similar to Pit's Project M Up Special. He jumps up 2.5 SBBs, holding his shield above his head. Reflects projectiles in this attack and does 8% damage and mediocre knockback. Renders him helpless.
Lance Kit: Chrom throws his lance towards the nearest ledge, and the point sticks to the ledge, no matter what part of the lance hit the ledge. Then he leaps upwards, performing multiple front flips, and grabs hold of the lance. He can then pull himself up like with all other tether recoveries. The range of this move is 4.5 SBBs and the lance is a hitbox that damages anyone in it's path. If there is no ledge in a 6 SBB radius, he will throw it in the direction of the nearest opponent, wherever they are. Note the lance will fall down after travelling 4.5 SBBs, and one it has hit the blast lines, you will not have access to your Lance Kit for 20 seconds. When used on the ground he throws it at the nearest opponent.
Standard Attacks
Neutral Attack (Jab)
This is the same with every kit, and since he holds his weapons with his right hand, the hits that use his right hand with the Neutral Kit will use the weapon.
He punches out with his left hand, then his right hand; then he kicks out with his left foot. Then he punches out with his left hand again, then kicks with his right foot, then smashes down with his right fist. The first and second punches are switched around with the Lance Kit, as the lance has good range and pulls the opponent in towards him after the first hit, guaranteeing the next hits. Chrom's kicks have longer range than his punches, because otherwise he would just knock the opponents out of the jab with the sword and shield stances. With the neutral stance, each punch deals 2% damage, and each kick deals 3% damage, and the last strike also deals 3% damage. Using the Sword Kit, the the first stab does 5% damage, and the final slash deals 7% damage and fairly high knockback. The hits with the Shield Kit do the same damage as with the Neutral Kit, and with the Lance Kit the first stab does 4% and the last cut does 5% and low knockback.
Side Tilt
Neutral Kit: Chrom kicks out with his right foot, similar to Captain Falcon's. Quick and easy to use. 5% damage, average knockback.
Other kits: He performs a horizontal slash with his weapon. He uses both hands for the sword variation but only one hand with the others. The sword version is like a quicker but weaker version of Ike's (11%), but the Lance Kit variation (7-8%) throws the opponent into the air slightly with enough hitstun to get a guaranteed follow up with an Up Tilt, Up Smash or Neutral Air. The shield stance variation reflects projectiles and has low lag for a shield attack, but is weak (4%) and not really very useful.
Down Tilt
Neutral Kit: He swings his feet round over the ground in front of him, one at a time, being a multi-hit move. One of his most useful standard attacks with in this stance. The first kick inflicts 3% damage and has a fixed amount of knockback (very little), and the second kick does 4% damage and comes out immediately after the first one. Has low start and end lag, and the second hit inflicts high knockback for neutral stance.
Sword Kit: Chrom violently stabs his sword into the ground at a 45* angle. Moderately high start lag, average end lag. If you actually get hit with the tip of the sword when it is stabbed into the ground, you take 13% damage and high knockback, but if you get hit with any other part of the sword, you take 8% damage and medium knockback.
Lance Kit: Same thing as with his Falchion except it has moderately low start lag, and the tip does 9% damage, whereas any part of the end of the lance does 6% damage, and the handle does 2% damage.
Shield Kit: He slides his shield a short distance along the ground in front of him. Knocks the opponent into the air and has very low everything, making it his only good combo option with the Fire Emblem shield. 4% damage. Will reflect projectiles if they hit the front of the shield, which can only be done if you are on a platform considering the front of the shield will be facing the ground.
Up Tilt
Neutral Kit: This is a bit like Fox and Falco's Up Smashes. Chrom performs a quick backflip very close to the ground, with a relatively big hitbox and low lag. If the opponent is right in front of you when you execute the move, it will knock them behind you, but when they are above you they are knocked diagonally up behind you. If they are behind you, then they will only flinch. A maximum of 5% damage.
Sword Kit: He performs a quick overhead slash, a bit like the third hit of Marth's Dancing Blade not tilted. This has average lag and a relatively small hitbox, and does up to 11% damage. Does not hit behind him and does not hit the ground.
Lance Kit: Chrom sticks his Lance up into the air. Like with most lance attacks, the end of the spear does the most damage. It does up to 7% damage and quite high vertical knockback, but with relatively high lag for the Lance Kit.
Shield Kit: He pokes his shield upwards. Has quite low start lag but moderately high end lag. 4% damage, low knockback. Reflects projectiles, but only when the shield is moving, so not in the frames of end lag where it is held above him.
Dash Attack
Neutral Kit: Chrom punches out across the space in front of him, a horizontal strike. Is generally quite a laggy move, but one of the most powerful moves without a weapon and as his neutral dash speed is generally quite fast when unarmed, making this a scary move overall, as it has potential kill power, inflicting up to 8% damage (the most damaging attack while weaponless) and relatively high knockback, but with start and end lag as much as Marth's Dash Attack.
Sword Kit: This is actually based off what Lucina does in the Lucina+Robin+C.Falcon trailer, however that doesn't mean he can't do it. The move starts with him scraping his sword along the ground creating sparks (while still dashing), then he performs a powerful horizontal slash (slanting upwards at a 15* angle). Has more lag than the neutral stance variant but does 14% damage and high knockback.
But what happens if he dashes off the stage in the startup of his Dash Attack?
Well, Chrom is unique in the way that inputting a Dash Attack by a ledge will result in him running off the stage and performing the slash while in the air, lowering his gravity by 35%. The slice will have the same properties as on the ground except the end lag is cancelled out, making for a good aerial combo starter. The direction the opponent is flung is dependant on which part of the sword connects with them, but by no means will it launch them behind Chrom, and is unlikely to knock them down at any angle.
Shield Kit: He punches out with his right hand (the hand which he holds his shield in), impacting anyone who gets hit with the shield. reflects projectiles both in the dash and in the Dash Attack, making his dash a very safe move to use. Causes devastating knockback if it hits on a certain frame on the sweetspot of the attack, which is just above the middle of the Fire Emblem shield. The amount of knockback is rather devastating in comparison to other shield attack rather than powerful overall, but it's still very strong, being extremely hard to hit with and there being a smaller chance of connecting the sweetspot on the certain frame than getting a Nine with Mr. Game and Watch's Judge attack. The sweetspot does a maximum of 10% damage and the rest of the shield does 4-6%.
Lance Kit: An uppercut, causing vertical knockback if it hits with the end of the lance. Around 8% damage, average start and end lag.
Aerial Attacks
Neutral AirA front flip, the same with any kit. The flip itself will hurt anyone next to Chrom at the time around 5% damage, however if his weapon hits them it does more damage. The sword does up to 9% damage, the lance does 7%, and the shield does 3% (and reflects projectiles).
Forward Air
Neutral Kit: Chrom kicks out across the space in front of him. About 5% damage and low knockback, with average hitstun and low lag.
Sword Kit: No reason not to allow this to be like Ike's Forward Air, except faster and weaker. 11% damage, high knockback.
Shield Kit: Chrom swings his shield in an upwards arc. Not the best shield move as it doesn't reflect projectiles, but it has fairly low lag. 4% damage, little knockback.
Lance Kit: He sticks his lance out in front of him, piercing people in front, and holding them on the end of the spear, unable to attack or shield (though you can use good DI to escape), taking 1% damage every frame (for 9 frames) and pulling them in towards him when he pulls his lance back. Has low start and end lag but has disgusting landing lag. Is good for racking up damage and is safe unless you hit the ground while using it, in which case you are pretty much screwed as the move only causes hitstun on the final hit where they are pulled back in towards Chrom (and no, being trapped on the end of the spear is not hitstun, it is it's own property).
Back Air
Chrom spins around, punching out behind him. The same for all kits except the sword one, and if I had given a description for the kits, the Lance Kit would have said 'The same as his F-air except behind him and he spins around while doing it'.
Sword Kit: Like a multi-hit version of Ike's Back Air. Chrom spins around 3 times, performing a horizontal slash on each spin, dealing 8% damage on each strike (don't worry, it doesn't rack up 24%, each slash deals high knockback). Mediocre start lag, medium end lag.
Down Air
Neutral, Shield & Lance Kits: Chrom swings his right fist around below him in an arc. Is the same speed as Samus' Down Air, and the shield variant spikes if the foe is hit by the front of it. N=4%, S=2% (reflects projectiles), L=7%.
Sword Kit: A quicker, less powerful version of Ike's, except it never spikes.
Up Air
Same for every kit. Basically like his Down Air except above him and with consistent speed of the strike.
Smash Attacks
Side SmashNeutral Kit: A bit like Sheik's except with punches. Chrom smashes forward with his left fist, stepping forward slightly, then he smashes out harder with his right fist, steeping forward again. The punches are 0.2 seconds apart, and the first one does up to 9%, the second one does 10%. The first one does a set amount of knockback and enough hitstun to trap the foe for the second punch, which does quite high knockback. Has little start lag but average/high end lag.
Sword Kit: Chrom holds his sword above his head, charging for a strong overhead slash to the ground, like Ike's F-Smash (I called it a Side Smash because it can be done forward and back). Is not quite as strong as Ike's but is faster, and does up to 28% damage and very high knockback, being the 4th strongest Side Smash in the game.
Shield Kit: Same thing as Sword Kit, except it is weaker, but reflects projectiles when the shield is on the ground, and he holds the shield on the ground for longer, technically giving the attack a ton of end lag, however the shield protects him a lot, as Chrom is also half-crouching.
Lance Kit: He swings his lance up performing an upwards arc.
'But that's what his Dash Attack is!'
Shut up. I don't care.
Down Smash
Neutral Kit: Chrom strikes across the air beside him with his left fist, then the same with his right fist. Both hits do up to 8% damage and quite high knockback, with moderately high end lag.
Other Kits: He scrapes his weapon along the ground on both sides. Creates sparks. The shield doesn't reflect projectiles in this attack unfortunately. Sword does up to 12% each hit (and has low lag), shield 7%, lance 10%.
Up Smash
He swings his, uh, weapon, from his feet, over his head and to behind him, like with Ike's. In neutral stance his fist doesn't touch the ground, but the weapons do. Shield reflects projectiles here. I'm getting really bored writing this now, can we skip the details? I want to finish this with the Final Smash.
Final Smash
Chrom's most common weapon is his Falchion, so that is what the Final Smash uses, no matter what kit you are using.
He jumps up about 5 SBBs, slowing down time by 70%. Then he flies at the nearest opponent, performing multiple front flips, and when he gets to the opponent, he smashes them hard with his sword, dealing 23% damage. The foe takes extremely high knockback, and would be KOed at as low as 30%. However, 6 frames after striking the opponent, time will be slowed down by 80%, then he will fly at the opponent again, or if there are multiple players, he will fly towards the next nearest opponent. He does the same thing as before, except he hits harder, inflicting 25% damage, and slightly higher knockback. Then the same thing as before happens once more, and the final strike does 28% damage. If on a 4 player match, this hits everyone, and can potentially KO multiple players. However in a 1v1, the opponent takes a total of 76% damage and being a guaranteed KO. This attack is based off Cutscene 06 where Chrom does his first attack, which I believe is called Aether? I think it is.
Well guys, that's my Chrom moveset. I may add his Grab Game later, but I don't have any more time at the moment. I hope you enjoyed and can give me some feedback!
Last edited:
I like this. Having no air jump seems like a cool addition, and being able to climb on walls is awesome as no other character can do this, they can just jump off walls or cling to them.My Ryu Hayabusa Moveset
Although like Smash Daddy said, there are a lot of moves you missed out and there are specific names for attacks. You missed out the Up and Down smashes, and there are 4 throws and a pummel. However having a GIF to show attacks is a pretty decent idea because it shows me the animation.
Is this your first moveset? If so, welcome to Make Your Move!
Bionichute
Smash Champion
- Joined
- Jun 30, 2012
- Messages
- 2,151
Maybe you should practice what you preach, bud.there are 4 throws and a pummel.
You and I both know what I am talking about. There is a grab, a pummel, a forward, back, down, and up throw.Maybe you should practice what you preach, bud.
EDIT: And thank you Munomario for the like on my moveset!
Last edited:
Bionichute
Smash Champion
- Joined
- Jun 30, 2012
- Messages
- 2,151
You didn't put throws in your last set. You should probably do that.You and I both know what I am talking about. There is a grab, a pummel, a forward, back, down, and up throw.
I did say I will put them in later, and also, my comment was regarding how he simply put 'throw' rather than the different types of throws.You didn't put throws in your last set. You should probably do that.
JOE!
Smash Hero
Can we not do this petty stuff on here? Thanks
Agi
Smash Lord
That'd be pretty great, personally I thought this whole squabble was over with
Davidreamcatcha
Smash Ace
- Joined
- Feb 9, 2011
- Messages
- 629
"It kind of implies that co-existing hostilely is fine and dandy… unless you cross the boundary and become OVERLY hostile. Then we’ve got a serious problem, man."That'd be pretty great, personally I thought this whole squabble was over with