
This will/should turn into a repository for any useful information we come across. ATs, oddities, moveset hints, stage information...
In the meantime, I (Reflex) will just put my charts here so they don't get swallowed up by the Strategy Discussion Thread. If you see anything on the boards that seems like it would be good to put here, please don't hesitate to reply to this thread with that information. Thanks!
I was testing the strike invincibility/hitbox on U-Tilt to see how it holds up against many standard spacing tools and got some interesting results. The general rule of thumb here is that the better the opponent's move is spaced, the more likely it will lose to Wario's U-Tilt. This is likely because the hurtbox on Wario's body is round, so having a hitbox directly above his head instead of on the side will reach the highest point. Remember that Wario's head and hands are invincible from frames 5-23; that's quite a while.
Lime means it will not hit you at all immediately out of a shorthop.
Yellow means its range is reduced significantly, generally requiring the attacker to be poorly spaced.
All aerials listed are ones that would hit Wario under normal circumstances. Here are the results:
Bowser: F-Air, B-Air
Bowser Jr.: N-Air, F-Air, B-Air, D-Air
Captain Falcon: N-Air, U-Air (landing), D-Air
Charizard: N-Air, F-Air
Cloud: D-Air (immediate fullhop)
Dark Pit: B-Air
Diddy Kong: F-Air, B-Air, Forward-B (grounded, kick)
Donkey Kong: B-Air, U-Air (landing)
Dr. Mario: None
Duck Hunt: N-Air, F-Air, B-Air, D-Air (first hit)
Falco: N-Air, B-Air
Fox: N-Air, D-Air
Ganondorf: N-Air, F-Air, U-Air, D-Air
Greninja: N-Air
Jigglypuff: F-Air
Ike: N-Air, F-Air, B-Air, U-Air (landing)
King Dedede: N-Air, F-Air
Kirby: F-Air
Link: B-Air, D-Air
Little Mac: None
Lucario: F-Air
Lucas: N-Air, F-Air
Lucina: N-Air, B-Air, Forward-B (air)
Luigi: F-Air, B-Air, D-Air
Mario: B-Air, D-Air
Marth: N-Air, B-Air, Forward-B (air)
Mega Man: N-Air, B-Air, D-Air (clanks)
Meta Knight: N-Air, F-Air
Mewtwo: N-Air (you trade with linking hit), F-Air, B-Air
Mii Brawler: None
Mii Gunner: N-Air
Mii Swordfighter: N-Air, B-Air
Mr. Game and Watch: B-Air (you trade with linking hit)
Ness: F-Air (you trade with linking hit), B-Air, D-Air
Olimar: N-Air
Pac-Man: F-Air, B-Air
Peach (float-cancel height will still beat you): N-Air, F-Air, B-Air
Palutena: F-Air
Pikachu: F-Air, D-Air
Pit: B-Air
R.O.B.: N-Air, F-Air, B-Air
Robin: N-Air, F-Air, B-Air
Rosalina and Luma: N-Air (first hit), F-Air
Roy: N-Air, F-Air, Forward-B
Ryu: N-Air, F-Air, B-Air (landing), D-Air
Samus: U-Air (landing), D-Air
Sheik: N-Air, B-Air
Shulk: B-Air, D-Air (first hit)
Sonic: N-Air, F-Air, U-Air, Forward-B (end of hop)
Toon Link: N-Air, F-Air, B-Air
Villager: None
Wario: N-Air, B-Air
Wii Fit Trainer: D-Air
Yoshi: N-Air, F-Air, B-Air, D-Air
Zelda: N-Air, F-Air, B-Air (avoids Zelda's sweetspot), D-Air (avoids Zelda's sweetspot)
Zero Suit Samus: Down-B
D-Tilt doesn't have fixed knockback, so its frame advantage is affected by Rage and the victim's percents. Higher knockback pushes people away further (duh), but because its knockback is so small until you get to 150+%, it doesn't put people into tumble, which means it cannot be DI'd.
On shield, D-Tilt gives -11 frame advantage, but your hand is not a grabbable hurtbox, so we're working with something like Meta Knight/Pikachu D-Tilt in terms of general safety here, as it takes seven frames to drop a shield normally. You're vulnerable to some Up-Bs out of shield if not well-spaced, though, because your hand is still hittable.
Wario's D-Tilt has two hitboxes: One at the glove that sends opponents at a 46-degree angle and one at the finger that sends opponents at a 67-degree angle. Same power and knockback, but the glove hitbox has priority over the finger one. The following numbers all assume 0% Rage with a fresh D-Tilt with the close hitbox. and they're pretty dependent on weight and fall speed (fall speed can sometimes mean we don't get the couple frames of landing lag to exploit). Generally speaking, the lower those are, the better frame advantage we have.
At +5, D-Tilt -> D-Tilt, D-Tilt -> Dash Attack, and D-Tilt into Half Waft are true combos. The last one has to be right on top of the opponent or a run turnaround D-Tilt.
At +8, D-Tilt -> Jab, D-Tilt -> Dash Grab, and D-Tilt -> D-Smash are true combos. The last one has to be right on top of the opponent or a run turnaround D-Tilt.
Some characters who are hit by D-Tilt can buffer a command before they touch the ground. Because you can only buffer one command at a time, and buffer priority is Special > Shield > Attack > Jump, opponents attempting to Shield, Grab, or Roll will buffer an airdodge, giving you 20 more frames of vulnerability than normal (compared to the two extra from landing lag). Have you ever landed D-Tilt -> F-Smash before? It's likely because of this. Only a handful of characters have this property at any range, but many more have it from a D-Tilt that hits at the tip. Here's a list that shows what characters it works on:
Any range: Jigglypuff, Kirby, Olimar, Peach, Rosalina
Tip only: Bowser Jr. (100+%), Dark Pit, Donkey Kong (very specific distance; not recommended), Dr. Mario, Duck Hunt, Little Mac, Lucario, Lucina, Luigi, Mario, Marth, Mewtwo, Mii Gunner (small), Mr. Game and Watch, Ness, Pac-Man, Pit, Robin (65+%), Samus, Shulk (non-Jump), Sonic (75+%), Toon Link, Villager, Wario (95+%), Wii Fit Trainer (54+%), Yoshi, Zelda
Doesn't work: Bowser, Captain Falcon, Charizard, Diddy Kong, Falco, Fox, Ganondorf, Greninja, Ike, King Dedede, Link, Mega Man, Meta Knight, Mii Swordsman (small), Palutena, Pikachu, R.O.B., Sheik, Shulk (Jump), Zero Suit Samus
Yellow numbers denote 50% Rage, Orange numbers signify 100% Rage, and Red numbers represent 150% Rage.
Character | +5 Frame Advantage | +8 Frame Advantage | Can buffer up close? | Can buffer at tip?
Mario | 48%, 44% , 33% , 23% | 88% | No | Yes
Luigi | 29%, 26% , 16% , 8% | 65% | No | Yes
Peach | 20% | 53% | Yes | Yes
Bowser | 60% | 110% | No | No
Yoshi | 39%, 35% , 24% , 15% | 79% | No | Yes
Rosalina and Luma | 9%, 6% , 0% , 0% | 38% | Yes | Yes
Bowser Jr. | 60% | 101% | No | Yes at 100+%
Wario | 59% | 100% | No | Yes at 95+%
Donkey Kong | 37% | 82% | No | No
Diddy Kong | 59%, 53% , 43% , 32% | 93% | No | No
Mr. Game and Watch | 33% | 67% | No | Yes
Little Mac | 35% | 70% | No | Yes
Link | 50% | 94% | No | No
Zelda | 22% | 55% | No | Yes
Sheik | 54%, 51% , 41% , 30% | 88% | No | No
Ganondorf | 65% | 102% | No | No
Toon Link | 36% | 66% | No | Yes
Samus | 32% | 71% | No | Yes
Zero Suit Samus | 55%, 50% , 39% , 30% | 87% | No | No
Pit | 26% | 65% | No | Yes
Palutena | 58% | 92% | No | No
Marth | 29% | 64% | No | Yes
Ike | 59% | 100% | No | No
Robin | 51% | 92% | No | Yes at 65+%
Duck Hunt | 31% | 66% | No | Yes
Kirby | 12% | 41% | Yes | Yes
King Dedede | 26% | 71% | No | No
Meta Knight | 54% | 86% | No | No
Fox | 54% | 86% | No | No
Falco | 55% | 87% | No | No
Pikachu | 54%, 49% , 39% , 29% | 86% | No | No
Charizard | 66% | 104% | No | No
Lucario | 44% | 84% | No | Yes
Jigglypuff | 0%, 0% , 0% , 0% | 22% | Yes | Yes
Greninja | 59% | 93% | No | No
R.O.B. | 56% | 99% | No | No
Ness | 33%, 29% , 19% , 10% | 69% | No | Yes
Captain Falcon | 62%, 57% , 45% , 34% | 98% | No | No
Villager | 35% | 72% | No | Yes
Olimar/Alph | 17% | 49% | Yes | Yes
Wii Fit Trainer | 53% | 91% | No | Yes at 54+%
Shulk (non-Jump) | 47% | 87% | No | Yes
Shulk (Jump) | 61% | 97% | No | No
Dr. Mario | 48% | 88% | No | Yes
Dark Pit | 26% | 65% | No | Yes
Lucina | 29% | 64% | No | Yes
Pac-Man | 25% | 60% | No | Yes
Mega Man | 61% | 94% | No | No
Sonic | 52%, 48% , 37% , 26% | 93% | No | Yes at 75+%
Mewtwo | 24% | 58% | No | Yes
Cloud | 61% | 96% | No | No
Mii Gunner (small) | 36% | 77% | No | Yes
Mii Swordsman (small) | 48% | 92% | No | No
Mii Brawler (small) | | | |
On shield, D-Tilt gives -11 frame advantage, but your hand is not a grabbable hurtbox, so we're working with something like Meta Knight/Pikachu D-Tilt in terms of general safety here, as it takes seven frames to drop a shield normally. You're vulnerable to some Up-Bs out of shield if not well-spaced, though, because your hand is still hittable.
Wario's D-Tilt has two hitboxes: One at the glove that sends opponents at a 46-degree angle and one at the finger that sends opponents at a 67-degree angle. Same power and knockback, but the glove hitbox has priority over the finger one. The following numbers all assume 0% Rage with a fresh D-Tilt with the close hitbox. and they're pretty dependent on weight and fall speed (fall speed can sometimes mean we don't get the couple frames of landing lag to exploit). Generally speaking, the lower those are, the better frame advantage we have.
At +5, D-Tilt -> D-Tilt, D-Tilt -> Dash Attack, and D-Tilt into Half Waft are true combos. The last one has to be right on top of the opponent or a run turnaround D-Tilt.
At +8, D-Tilt -> Jab, D-Tilt -> Dash Grab, and D-Tilt -> D-Smash are true combos. The last one has to be right on top of the opponent or a run turnaround D-Tilt.
Some characters who are hit by D-Tilt can buffer a command before they touch the ground. Because you can only buffer one command at a time, and buffer priority is Special > Shield > Attack > Jump, opponents attempting to Shield, Grab, or Roll will buffer an airdodge, giving you 20 more frames of vulnerability than normal (compared to the two extra from landing lag). Have you ever landed D-Tilt -> F-Smash before? It's likely because of this. Only a handful of characters have this property at any range, but many more have it from a D-Tilt that hits at the tip. Here's a list that shows what characters it works on:
Any range: Jigglypuff, Kirby, Olimar, Peach, Rosalina
Tip only: Bowser Jr. (100+%), Dark Pit, Donkey Kong (very specific distance; not recommended), Dr. Mario, Duck Hunt, Little Mac, Lucario, Lucina, Luigi, Mario, Marth, Mewtwo, Mii Gunner (small), Mr. Game and Watch, Ness, Pac-Man, Pit, Robin (65+%), Samus, Shulk (non-Jump), Sonic (75+%), Toon Link, Villager, Wario (95+%), Wii Fit Trainer (54+%), Yoshi, Zelda
Doesn't work: Bowser, Captain Falcon, Charizard, Diddy Kong, Falco, Fox, Ganondorf, Greninja, Ike, King Dedede, Link, Mega Man, Meta Knight, Mii Swordsman (small), Palutena, Pikachu, R.O.B., Sheik, Shulk (Jump), Zero Suit Samus
Yellow numbers denote 50% Rage, Orange numbers signify 100% Rage, and Red numbers represent 150% Rage.
Mario | 48%, 44% , 33% , 23% | 88% | No | Yes
Luigi | 29%, 26% , 16% , 8% | 65% | No | Yes
Peach | 20% | 53% | Yes | Yes
Bowser | 60% | 110% | No | No
Yoshi | 39%, 35% , 24% , 15% | 79% | No | Yes
Rosalina and Luma | 9%, 6% , 0% , 0% | 38% | Yes | Yes
Bowser Jr. | 60% | 101% | No | Yes at 100+%
Wario | 59% | 100% | No | Yes at 95+%
Donkey Kong | 37% | 82% | No | No
Diddy Kong | 59%, 53% , 43% , 32% | 93% | No | No
Mr. Game and Watch | 33% | 67% | No | Yes
Little Mac | 35% | 70% | No | Yes
Link | 50% | 94% | No | No
Zelda | 22% | 55% | No | Yes
Sheik | 54%, 51% , 41% , 30% | 88% | No | No
Ganondorf | 65% | 102% | No | No
Toon Link | 36% | 66% | No | Yes
Samus | 32% | 71% | No | Yes
Zero Suit Samus | 55%, 50% , 39% , 30% | 87% | No | No
Pit | 26% | 65% | No | Yes
Palutena | 58% | 92% | No | No
Marth | 29% | 64% | No | Yes
Ike | 59% | 100% | No | No
Robin | 51% | 92% | No | Yes at 65+%
Duck Hunt | 31% | 66% | No | Yes
Kirby | 12% | 41% | Yes | Yes
King Dedede | 26% | 71% | No | No
Meta Knight | 54% | 86% | No | No
Fox | 54% | 86% | No | No
Falco | 55% | 87% | No | No
Pikachu | 54%, 49% , 39% , 29% | 86% | No | No
Charizard | 66% | 104% | No | No
Lucario | 44% | 84% | No | Yes
Jigglypuff | 0%, 0% , 0% , 0% | 22% | Yes | Yes
Greninja | 59% | 93% | No | No
R.O.B. | 56% | 99% | No | No
Ness | 33%, 29% , 19% , 10% | 69% | No | Yes
Captain Falcon | 62%, 57% , 45% , 34% | 98% | No | No
Villager | 35% | 72% | No | Yes
Olimar/Alph | 17% | 49% | Yes | Yes
Wii Fit Trainer | 53% | 91% | No | Yes at 54+%
Shulk (non-Jump) | 47% | 87% | No | Yes
Shulk (Jump) | 61% | 97% | No | No
Dr. Mario | 48% | 88% | No | Yes
Dark Pit | 26% | 65% | No | Yes
Lucina | 29% | 64% | No | Yes
Pac-Man | 25% | 60% | No | Yes
Mega Man | 61% | 94% | No | No
Sonic | 52%, 48% , 37% , 26% | 93% | No | Yes at 75+%
Mewtwo | 24% | 58% | No | Yes
Cloud | 61% | 96% | No | No
Mii Gunner (small) | 36% | 77% | No | Yes
Mii Swordsman (small) | 48% | 92% | No | No
Mii Brawler (small) | | | |
N-Air's sweetspot hits on Frame 4 (and only on Frame 4 :< ), then the sourspot comes out on Frames 15-38. Because of our solid jump height, the only character that can shieldgrab us after a shorthop immediate N-Air (as in, reflexively, before the sourspot becomes active) is Mewtwo. N-Air only has 12 frames of landing lag, and Wario's horizontal aerial mobility and speed are quite high. All of this means that floating around with N-Air just outside of opponents' immediate range is a relatively strong tool in the neutral position.
Shorthop immediate N-Air's sweetspot can hit any standing character, as well as a large number of crouching ones. Shorthop immediate N-Air's sourspot lingers until you hit the ground, and it can hit any character at any height.
Fullhop immediate N-Air's sweetspot can hit a standing Diddy Kong, as well as anyone taller than him. Fullhop immediate N-Air's sourspot will only hit a standing opponent if you fastfall it, which causes you to have significant endlag, but if you fastfall as soon as possible, it can hit any character at any height before the sourspot ends. Also, after a fullhop immediate N-Air, you can buffer a N-Air that will land on the frame after the sweetspot becomes active. This is relatively safe on shield and has good synergy with Neutral-B against approaching opponents.
In a large contrast to D-Tilt, N-Air's combo potential becomes worse as the opponent's damage increases because it starts sending them too far away to get a guaranteed follow-up. That said, you can still effectively pressure opponents who will likely want to airdodge your follow-up, so it's still useful even at high percents.
I like charts. Here's a chart. I will add the highest percents (before the hit) where the sweetspot doesn't put an opponent into tumble; you cannot DI a move if you aren't put into tumble, so it will reliably combo into the sourspot at these percents and earlier. Yellow numbers denote 50% Rage, Orange numbers signify 100% Rage, and Red numbers represent 150% Rage.
Character | Fullhop N-Air? | Shorthop N-Air when crouching? | Sweetspot-to-sourspot combo %
Mario | Yes | No | 45%, 42% , 35% , 28%
Luigi | Yes | No | 45%, 42% , 35% , 28%
Peach | Yes | No | ?
Bowser | Yes | Yes | ?
Yoshi | Yes | No | 47%, 44% , 36% , 29%
Rosalina and Luma | Yes | No | 40%, 37% , 30% , 24%
Bowser Jr. | Yes | Yes | ?
Wario | Yes | No | 46%, 45% , 37% , 29%
Donkey Kong | Yes | Yes | ?
Diddy Kong | Yes | No | 44%, 41% , 34% , 27%
Mr. Game and Watch | No | No | ?
Little Mac | Yes | No | ?
Link | Yes | Yes | ?
Zelda | Yes | Yes | ?
Sheik | Yes | No | 42%, 39% , 32% , 26%
Toon Link | Yes | Yes | ?
Ganondorf | Yes | Yes | ?
Samus | Yes | Yes | ?
Zero Suit Samus | Yes | No (when crawling) | 41%, 38% , 31% , 25%
Pit | Yes | Yes | ?
Palutena | Yes | Yes | ?
Marth | Yes | No | ?
Ike | Yes | No | ?
Robin | Yes | No | ?
Duck Hunt | Yes | No | ?
Kirby | No | No | ?
King Dedede | Yes | Yes | ?
Meta Knight | No | No | ?
Fox | Yes | Yes | ?
Falco | Yes | Yes | ?
Pikachu | No | No | 40%, 39% , 31% , 24%
Charizard | Yes | Yes | ?
Lucario | Yes | No | ?
Jigglypuff | No | No | ?
Greninja | No | No | ?
R.O.B. | Yes | Yes | ?
Ness | Yes | No | 44%, 39% , 34% , 27%
Captain Falcon | Yes | Yes | 47%, 45% , 36% , 29%
Villager | Yes | No | ?
Olimar | No | No | ?
Wii Fit Trainer | Yes | No | ?
Shulk | Yes | Yes | ?
Dr. Mario | Yes | No | ?
Dark Pit | Yes | Yes | ?
Lucina | Yes | No | ?
Pac-Man | Yes | Yes | ?
Mega Man | Yes | No | 46%, 43% , 36% , 28%
Sonic | Yes | No | 44%, 42% , 34% , 27%
Mewtwo | Yes | Yes | ?
Cloud | Yes | No | ?
Mii Brawler (small) | ? | ? | ?
Mii Gunner (small) | Yes | Yes | ?
Mii Swordsman (small) | Yes | Yes | ?
Shorthop immediate N-Air's sweetspot can hit any standing character, as well as a large number of crouching ones. Shorthop immediate N-Air's sourspot lingers until you hit the ground, and it can hit any character at any height.
Fullhop immediate N-Air's sweetspot can hit a standing Diddy Kong, as well as anyone taller than him. Fullhop immediate N-Air's sourspot will only hit a standing opponent if you fastfall it, which causes you to have significant endlag, but if you fastfall as soon as possible, it can hit any character at any height before the sourspot ends. Also, after a fullhop immediate N-Air, you can buffer a N-Air that will land on the frame after the sweetspot becomes active. This is relatively safe on shield and has good synergy with Neutral-B against approaching opponents.
In a large contrast to D-Tilt, N-Air's combo potential becomes worse as the opponent's damage increases because it starts sending them too far away to get a guaranteed follow-up. That said, you can still effectively pressure opponents who will likely want to airdodge your follow-up, so it's still useful even at high percents.
I like charts. Here's a chart. I will add the highest percents (before the hit) where the sweetspot doesn't put an opponent into tumble; you cannot DI a move if you aren't put into tumble, so it will reliably combo into the sourspot at these percents and earlier. Yellow numbers denote 50% Rage, Orange numbers signify 100% Rage, and Red numbers represent 150% Rage.
Mario | Yes | No | 45%, 42% , 35% , 28%
Luigi | Yes | No | 45%, 42% , 35% , 28%
Peach | Yes | No | ?
Bowser | Yes | Yes | ?
Yoshi | Yes | No | 47%, 44% , 36% , 29%
Rosalina and Luma | Yes | No | 40%, 37% , 30% , 24%
Bowser Jr. | Yes | Yes | ?
Wario | Yes | No | 46%, 45% , 37% , 29%
Donkey Kong | Yes | Yes | ?
Diddy Kong | Yes | No | 44%, 41% , 34% , 27%
Mr. Game and Watch | No | No | ?
Little Mac | Yes | No | ?
Link | Yes | Yes | ?
Zelda | Yes | Yes | ?
Sheik | Yes | No | 42%, 39% , 32% , 26%
Toon Link | Yes | Yes | ?
Ganondorf | Yes | Yes | ?
Samus | Yes | Yes | ?
Zero Suit Samus | Yes | No (when crawling) | 41%, 38% , 31% , 25%
Pit | Yes | Yes | ?
Palutena | Yes | Yes | ?
Marth | Yes | No | ?
Ike | Yes | No | ?
Robin | Yes | No | ?
Duck Hunt | Yes | No | ?
Kirby | No | No | ?
King Dedede | Yes | Yes | ?
Meta Knight | No | No | ?
Fox | Yes | Yes | ?
Falco | Yes | Yes | ?
Pikachu | No | No | 40%, 39% , 31% , 24%
Charizard | Yes | Yes | ?
Lucario | Yes | No | ?
Jigglypuff | No | No | ?
Greninja | No | No | ?
R.O.B. | Yes | Yes | ?
Ness | Yes | No | 44%, 39% , 34% , 27%
Captain Falcon | Yes | Yes | 47%, 45% , 36% , 29%
Villager | Yes | No | ?
Olimar | No | No | ?
Wii Fit Trainer | Yes | No | ?
Shulk | Yes | Yes | ?
Dr. Mario | Yes | No | ?
Dark Pit | Yes | Yes | ?
Lucina | Yes | No | ?
Pac-Man | Yes | Yes | ?
Mega Man | Yes | No | 46%, 43% , 36% , 28%
Sonic | Yes | No | 44%, 42% , 34% , 27%
Mewtwo | Yes | Yes | ?
Cloud | Yes | No | ?
Mii Brawler (small) | ? | ? | ?
Mii Gunner (small) | Yes | Yes | ?
Mii Swordsman (small) | Yes | Yes | ?
These numbers assume that the opponent is on the center of the floor (for Lylat Cruise, specifically), that Wario has no Rage, and that the opponent has normal survival DI.
Bayonetta: 104%
Bowser: 125%
Bowser Jr. (car): 122%
Bowser Jr. (body): 117%
Captain Falcon: 119%
Charizard: 117%
Cloud: 115%
Corrin: 113%
Dark Pit: 109%
Diddy Kong: 111%
Donkey Kong: 129%
Dr. Mario: 110%
Duck Hunt: 110%
Falco: 103%
Fox: 100%
Ganondorf: 121%
Greninja: 106%
Ike: 119%
Jigglypuff: 84%
King Dedede: 135%
Kirby: 95%
Kirby (Jump art): 91%
Kirby (Shield art): 144%
Kirby (Buster art): 93%
Kirby (Smash art): 84%
Link: 116%
Little Mac: 107%
Lucario: 115%
Lucas: 105%
Lucina: 108%
Luigi: 105%
Mario: 110%
Marth: 108%
Mega Man: 118%
Meta Knight: 100%
Mewtwo: 95%
Mii Brawler (guest size): 115%
Mii Gunner (guest size): 110%
Mii Swordfighter (guest size): 113%
Mr. Game and Watch: 91%
Ness: 104%
Olimar: 97%
Pac-Man: 106%
Palutena: 102%
Peach: 99%
Pikachu: 99%
Pit: 109%
R.O.B.: 118%
Robin: 108%
Rosalina & Luma: 93%
Roy: 113%
Ryu: 112%
Samus: 113%
Sheik: 99%
Shulk: 113%
Shulk (Jump art): 109%
Shulk (Shield art): 170%
Shulk (Buster art): 111%
Shulk (Smash art): 101%
Sonic: 106%
Toon Link: 103%
Villager: 107%
Wario: 118%
Wii Fit Trainer: 104%
Wii Fit Trainer (Deep Breathing): 106%
Yoshi: 110%
Zelda: 100%
Zero Suit Samus: 100%
Bayonetta: 102%
Bowser: 123%
Bowser Jr. (car): 117%
Bowser Jr. (body): 112%
Captain Falcon: 115%
Charizard: 115%
Cloud: 110%
Cloud (Limit): 115%
Corrin: 110%
Dark Pit: 107%
Diddy Kong: 108%
Donkey Kong: 124%
Dr. Mario: 108%
Duck Hunt: 108%
Falco: 100%
Fox: 96%
Ganondorf: 116%
Greninja: 102%
Ike: 116%
Jigglypuff: 84%
King Dedede: 130%
Kirby: 93%
Kirby (Jump art): 90%
Kirby (Shield art): 143%
Kirby (Buster art): 91%
Kirby (Smash art): 83%
Link: 113%
Little Mac: 104%
Lucario: 113%
Lucas: 103%
Lucina: 106%
Luigi: 104%
Mario: 108%
Marth: 106%
Mega Man: 115%
Meta Knight: 98%
Mewtwo: 93%
Mii Brawler (guest size): 112%
Mii Gunner (guest size): 109%
Mii Swordfighter (guest size): 111%
Mr. Game and Watch: 90%
Ness: 103%
Olimar: 96%
Pac-Man: 106%
Palutena: 99%
Peach: 99%
Pikachu: 96%
Pit: 107%
R.O.B.: 112%
Robin: 107%
Rosalina & Luma: 92%
Roy: 110%
Ryu: 110%
Samus: 112%
Sheik: 95%
Shulk: 111%
Shulk (Jump art): 111%
Shulk (Shield art): 167%
Shulk (Buster art): 109%
Shulk (Smash art): 99%
Sonic: 104%
Toon Link: 102%
Villager: 105%
Wario: 114%
Wii Fit Trainer: 103%
Wii Fit Trainer (Deep Breathing): 105%
Yoshi: 109%
Zelda: 99%
Zero Suit Samus: 98%
Bayonetta: One frame of leeway on shield. Can't spotdodge after perfect shield.
0 on latest spotdodge. Wario D-Tilt beats attacks but loses to counters. Wario Neutral-B beats Jab and counters but loses to D-Tilt and U-Tilt.
+1 on earliest spotdodge. Wario D-Tilt beats attacks but loses to counters. Wario Neutral-B loses to D-Tilt but beats everything else.
Bowser: Three frames of leeway on shield. Can spotdodge after perfect shield.
+5 on latest spotdodge. Punish with D-Tilt, Neutral-B, or Down-B (half charge).
+9 on earliest spotdodge. Punish with D-Tilt, D-Smash, grabs, Neutral-B, Up-B, or Down-B (half and full charge). You can actually D-Tilt before Bowser can shieldgrab.
Bowser Jr.: Six frames of leeway on shield. Can spotdodge after perfect shield.
-1 on latest spotdodge. Wario D-Tilt loses to Jab and D-Tilt.
+6 on earliest spotdodge. Punish with D-Tilt, grabs, Neutral-B, Up-B, or Down-B (half charge).
Captain Falcon: One frame of leeway on shield. Can't spotdodge after perfect shield.
0 on latest spotdodge. Watch for Jab and grabs (including Up-B).
+1 on earliest spotdodge. Watch for Jab and grabs (including Up-B).
Charizard: Two frames of leeway on shield. Can spotdodge after perfect shield.
+2 on latest spotdodge. Wario D-Tilt beats attacks and rolls but loses to shield. Wario grabs beat shield.
+4 on earliest spotdodge. Wario Neutral-B beats attacks and shield. Wario D-Tilt beats attacks and rolls but loses to shield.
Cloud: One frame of leeway on shield. Can't spotdodge after perfect shield.
+1 on latest spotdodge. Wario D-Tilt trades with Jab. Wario grabs beat shield but lose to attacks.
+2 on earliest spotdodge. Wario D-Tilt beats attacks but loses to shield. Wario grabs beat shield but lose to attacks.
Corrin: One frame of leeway on shield. Can't spotdodge after perfect shield.
0 on latest spotdodge. Wario D-Tilt trades with Jab and D-Tilt. Wario D-Tilt will not activate Down-B.
+1 on earliest spotdodge. Wario D-Tilt beats attacks. Wario grabs beat shield but lose to attacks. Wario D-Tilt will not activate Down-B.
Dark Pit: Zero frames of leeway on shield. Can't spotdodge after perfect shield.
0 on spotdodge. Be on your guard. Wario D-Tilt trades with Jab and D-Smash. Wario grabs beat shield but lose to attacks.
Diddy Kong: Zero frames of leeway on shield. Can't spotdodge after perfect shield.
+2 on spotdodge. Wario D-Tilt trades with Jab1 and beats other attacks. Wario grabs beat shield but lose to attacks.
Donkey Kong: Two frames of leeway on shield. Can spotdodge after perfect shield.
-1 on latest spotdodge. Be careful. Wario D-Tilt loses to Jab1 and U-Tilt.
+1 on earliest spotdodge. Wario D-Tilt beats pokes but loses to immediate pivot grab and shield. Grabs beat shield but lose to attacks.
Dr. Mario: Zero frames of leeway on shield. Can't spotdodge after perfect shield.
-1 on spotdodge. Wario pokes lose to Mario pokes. Perfect shield into a punish or get away.
Duck Hunt: Two frames of leeway on shield. Can spotdodge after perfect shield.
-3 on latest spotdodge. Wario pokes lose to Duck Hunt pokes. Perfect shield into a punish or get away.
-1 on earliest spotdodge. Wario D-Tilt loses to Jab and trades with D-Tilt.
Falco: Two frames of leeway on shield. Can spotdodge after perfect shield.
0 on latest spotdodge. Wario D-Tilt loses to Jab and trades with U-Tilt. Wario grabs beat shield but lose to attacks and rolls.
+2 on earliest spotdodge. Wario D-Tilt trades with Jab and beats other pokes. Wario grabs beat shield but lose to attacks.
Fox: Zero frames of leeway on shield. Can't spotdodge after perfect shield.
-1 on spotdodge. Wario pokes lose to Fox pokes. Perfect shield into a punish or get away.
Ganondorf: One frame of leeway on shield. Can't spotdodge after perfect shield.
+5 on latest spotdodge. Punish with D-Tilt, grabs, Neutral-B, or Down-B (half charge).
+6 on earliest spotdodge. Punish with D-Tilt grabs, Neutral-B, Up-B, or Down-B (half charge).
Greninja: Eight frames of leeway on shield. Can spotdodge and even D-Tilt instead after perfect shield. Follow up a U-Air with D-Tilt or a roll instead of a spotdodge.
-9 on latest spotdodge. You should be ashamed of yourself.
-1 on earliest spotdodge. Wario D-Tilt loses to Jab and D-Tilt.
Ike: One frame of leeway on shield. Can't spotdodge after perfect shield.
+2 on latest spotdodge. Wario D-Tilt beats Jab. Wario grabs beat shield but lose to Jab.
+3 on earliest spotdodge. Wario D-Tilt beats Jab. Wario grabs beat shield but lose to Jab.
Jigglypuff: Zero frames of leeway on shield. Can't spotdodge after perfect shield.
-3 on spotdodge. Wario pokes lose to Jigglypuff Jab. Perfect shield into a punish or get away.
King Dedede: One frame of leeway on shield. Can't spotdodge after perfect shield.
+5 on latest spotdodge. Punish with D-Tilt, grabs, Neutral-B, or Down-B (half charge).
+6 on earliest spotdodge. Punish with D-Tilt, grabs, Neutral-B, Up-B, or Down-B (half charge).
Kirby: Zero frames of leeway on shield. Can't spotdodge after perfect shield.
-2 on spotdodge. Wario pokes lose to Kirby Jab and tilts. Perfect shield into a punish or get away.
Link: Six frames of leeway on shield. Can spotdodge after perfect shield.
+26 on earliest spotdodge. Punish with whatever you want.
+32 on latest spotdodge. Punish with whatever you want.
Little Mac: Three frames of leeway on shield. Can spotdodge after perfect shield.
0 on latest spotdodge. Wario pokes lose to Mac pokes. Perfect shield to punish or get away.
+3 on earliest spotdodge. Wario D-Tilt trades with Mac Jab. Wario grabs beat shield but lose to attacks and rolls.
Lucario: Zero frames of leeway on shield. Can't spotdodge after perfect shield.
-1 on spotdodge. Wario D-Tilt trades with Jab1. Wario grabs beat shield but lose to attacks and grab.
Lucas: Six frames of leeway on shield. Can spotdodge after perfect shield.
+10 on latest spotdodge. Punish with D-Tilt, D-Smash, N-Air, grabs, Neutral-B, Up-B, or Down-B (half and full charge).
+16 on earliest spotdodge. Punish with F-Tilt, D-Tilt, U-Smash, D-Smash, N-Air, B-Air, D-Air, grabs, Neutral-B, Up-B, or Down-B (half and full charge).
Lucina: One frame of leeway on shield. Can't spotdodge after perfect shield.
-1 on latest spotdodge. Wario D-Tilt loses to Jab and trades with U-Tilt/D-Smash. Perfect shield to punish or get away.
0 on earliest spotdodge. Wario D-Tilt trades with Jab and beats other pokes. Watch out for Up-B.
Luigi: Zero frames of leeway on shield. Can't spotdodge after perfect shield.
-1 on spotdodge. Wario pokes lose to Luigi pokes. Powershield to punish or get away.
Mario: Zero frames of leeway on shield. Can't spotdodge after perfect shield.
-1 on spotdodge. Wario pokes lose to Mario pokes. Perfect shield into a punish or get away.
Marth: One frame of leeway on shield. Can't spotdodge after perfect shield.
-1 on latest spotdodge. Wario D-Tilt loses to Jab and trades with U-Tilt/D-Smash. Perfect shield to punish or get away.
0 on earliest spotdodge. Wario D-Tilt trades with Jab and beats other pokes. Watch out for Up-B.
Mega Man: Zero frames of leeway on shield. Can't spotdodge after perfect shield.
+1 on spotdodge. Wario D-Tilt beats pokes. Wario grabs beat shield but lose to attacks and grab.
Meta Knight: One frame of leeway on shield. Can't spotdodge after perfect shield.
+1 on latest spotdodge. Wario D-Tilt loses to D-Tilt and trades with D-Smash. Powershield to punish or get away.
+2 on earliest spotdodge. Wario D-Tilt trades with D-Tilt. Wario grabs beat shield but lose to attacks and rolls.
Mewtwo: One frame of leeway on shield. Can’t spotdodge after perfect shield.
+5 on latest spotdodge. Punish with D-Tilt, Neutral-B (hold to beat spotdodge), or Down-B (half charge).
+6 on earliest spotdodge. Punish with D-Tilt, Neutral-B, Up-B, or Down-B (half charge)
Mii Brawler (Guest size): Zero frames of leeway on shield. Can’t spotdodge after perfect shield.
0 on spotdodge. Wario D-Tilt loses to Jab.
Mii Gunner (Guest size): Zero frames of leeway on shield. Can’t spotdodge after perfect shield.
-1 on spotdodge. Wario D-Tilt loses to Jab and trades with U-Tilt.
Mii Swordfighter (Guest size): Zero frames of leeway on shield. Can’t spotdodge after perfect shield.
-1 on spotdodge. Wario D-Tilt loses to D-Tilt, trades with Jab, and activates Down-B1.
Mr. Game and Watch: Zero frames of leeway on shield. Can’t spotdodge after perfect shield.
0 on spotdodge. Wario D-Tilt loses to Jab and trades with D-Tilt.
Ness: Zero frames of leeway on shield. Can’t spotdodge after perfect shield.
+5 on spotdodge. Punish with D-Tilt, Neutral-B (hold to beat spotdodge), or Down-B (half charge).
Olimar: Four frames of leeway on shield. Can spotdodge after perfect shield.
+11 on latest spotdodge. Punish with D-Tilt, D-Smash, N-Air, Neutral-B, Up-B, or Down-B (half and full charge).
+~18 on earliest spotdodge. Punish with anything but F-Smash.
Pac-Man: Six frames of leeway on shield. Can spotdodge after perfect shield.
+40 on latest spotdodge. Punish with whatever you want.
+46 on earliest spotdodge. Punish with whatever you want.
Palutena: One frame of leeway on shield. Can’t spotdodge after perfect shield.
+1 on latest spotdodge. Wario D-Tilt beats Palutena pokes. Wario grabs beat shield and attacks.
+2 on earliest spotdodge. Wario D-Tilt beats Palutena pokes. Wario grabs beat shield and attacks.
Peach: Zero frames of leeway on shield. Can’t spotdodge after perfect shield.
+2 on spotdodge. Wario D-Tilt loses to Jab. Standing grab loses to D-Smash.
Pikachu: Zero frames of leeway on shield. Can’t spotdodge after perfect shield.
-2 on spotdodge. Wario is always punished by Jab. Don’t do it!
Pit: Zero frames of leeway on shield. Can't spotdodge after perfect shield.
0 on spotdodge. Wario D-Tilt trades with Jab and D-Smash. Wario grabs beat shield but lose to attacks.
R.O.B.: One frame of leeway on shield. Can’t spotdodge after perfect shield.
0 on latest spotdodge. Wario D-Tilt loses to Jab and D-Tilt. Perfect shield to punish or get away.
+1 on earliest spotoddge. Wario D-Tilt trades with Jab and D-Tilt.
Robin: One frame of leeway on shield. Can’t spotdodge after perfect shield.
+9 on latest spotdodge. Punish with D-Tilt, D-Smash, Neutral-B, Up-B, or Down-B (half and full charge).
+10 on earliest spotdodge. Punish with D-Tilt, D-Smash, N-Air, Neutral-B, Up-B, or Down-B (half and full charge).
Rosalina and Luma: Zero frames of leeway on shield. Can’t spotdodge after perfect shield.
+6 on spotdodge. Punish with Dash Attack, D-Tilt, Up-B, or Down-B (half charge).
Roy: One frame of leeway on shield. Can’t spotdodge after perfect shield.
-1 on latest spotdodge. Wario D-Tilt loses to Jab and trades with U-Tilt.
0 on earliest spotdodge. Wario D-Tilt trades with Jab.
Ryu: Zero frames of leeway on shield. Can’t spotdodge after perfect shield.
0 on spotdodge. Wario D-Tilt loses to Jab, light U-Tilt, light D-Tilt, and Up-B. Perfect shield to punish or get away.
Samus: Ten frames of leeway on shield. Can’t spotdodge after perfect shield.
+36 on latest spotdodge. Punish with whatever you want.
+~44 on earliest spotdodge. Punish with whatever you want.
Sheik: Zero frames of leeway on shield. Can’t spotdodge after perfect shield.
-2 on spotdodge. Wario is always punished by Jab. Don’t do it.
Shulk: One frame of leeway on shield. Can’t spotdodge after perfect shield.
-1 on latest spotdodge. Wario D-Tilt loses to Jab. Perfect shield to punish or get away.
0 on earliest spotdodge. Wario D-Tilt trades with Jab.
Sonic: Zero frames of leeway on shield. Can’t spotdodge after perfect shield.
+1 on spotdodge. Wario D-Tilt loses to Jab.
Toon Link: Six frames of leeway on shield. Can spotdodge after perfect shield.
+26 on latest spotdodge. Punish with whatever you want.
+32 on earliest spotdodge. Punish with whatever you want.
Villager: Nine frames of leeway on shield. Can spotdodge after perfect shield.
+17 on latest spotdodge. Punish with anything but F-Smash.
+26 on earliest spotdodge. Punish with whatever you want.
Wario: Two frames of leeway on shield. Can spotdodge after perfect shield.
-2 on latest spotdodge. His D-Tilt beats your D-Tilt.
0 on earliest spotdodge. Good luck!
Wii Fit Trainer: Zero frames of leeway on shield. Can’t spotdodge after perfect shield.
-1 on spotdodge. Wario D-Tilt loses to Jab and trades with F-Tilt. Perfect shield to punish or get away.
Yoshi: Eight frames of leeway on shield. Can spotdodge after perfect shield.
+18 on latest spotdodge. Punish with anything but F-Smash.
+26 on earliest spotdodge. Punish with whatever you want.
Zelda: Four frames of leeway on shield. Can spotdodge after perfect shield.
+4 on latest spotdodge. Wario D-Tilt beats pokes.
+8 on earliest spotdodge. Punish with D-Tilt, D-Smash, grabs, Neutral-B, Up-B, or Down-B (half charge).
Zero Suit Samus: Ten frames of leeway on shield. Can spotdodge after perfect shield.
+29 on latest spotdodge. Punish with whatever you want.
+39 on earliest spotdodge. Punish with whatever you want.
The first six hits of Wario's D-Air has two hitboxes that can hit opponents while they're in the air: One is below his head and hits upward, while another is on his head and hits downward. They are supposed to hit the opponent back and forth between each other until the final hit sends them away. However, if both hitboxes overlap the opponent at one time, the downward hit will have priority. If you can prevent the final hit from sending them away, it is possible to send the opponent downward like a normal Meteor Smash. This can be accomplished in a number of ways:
1. Trading hits with an off-stage opponent. This is probably the most useful method; even if you hit the opponent but don't trade, a regular D-Air is still excellent for edgeguarding, considering its many active frames and disjointed hitbox. Definitely something to consider for challenging many recoveries.
2. Landing on the stage during the linking hits. Because the move ends prematurely, it can stop on a downward hit. This can even work on a grounded opponent if you get more than one hit (since the first hit puts them in the air). The best use of this would be as a punish on an opponent on the ledge without invincibility (perhaps after a ledge trump). Landing a single hit of D-Air before hitting the ground will always send a ledge-grabbing opponent downward.
3. Passing through an opponent horizontally. Sometimes the hits don't suck them in enough and they fall out, causing it to end on a meteor. This is unreliable and is usually something that happens accidentally if at all, but, take it where you can get it.

Because the linking hits of D-Air have fixed knockback, the opponent's percent is irrelevant; it will send people downward at the same distance whether the opponent is at 0% or 999%. However, different variables still affect the knockback of the D-Air meteor. Here is a list of those attributes, in order from greatest effect to smallest:
1. Wario's Rage. An opponent will be sent down further if Wario is at 100% than if he is at 0%. Rage caps at 150%.
2. The opponent's Gravity stat. The higher the value, the faster/further they will be sent down before they can act. This affects how fast a character reaches their max fall speed after a jump, but it also puts a multiplier on vertical knockback so that high-gravity characters don't live longer when sent upward (unlike Melee Fox/Falco). This has a minuscule effect on most Meteor Smashes, but, apparently, it is still applied significantly on Meteor Smashes with fixed knockback. Here is a universal list of characters' Gravity values: http://kuroganehammer.com/Smash4/Gravity
3.The opponent's Weight stat. The lower the value, the faster/further they will be sent down before they can act. Even though D-Air has fixed knockback, part of it is weight-dependent knockback, which means it is slightly stronger against Jigglypuff than it is against Bowser, etc. Here is a universal list of characters' Weight values: http://kuroganehammer.com/Smash4/Weight
Even though D-Air has 19 frames of landing lag, the hitstun the linking hits provide when you land on the ground before the final hit comes out is enough to combo into other moves in some situations. The linking hits on D-Air have fixed knockback, so the opponent's percent is irrelevant, and it isn't high enough to put people into tumble, so people cannot DI the hits.
Frame advantage is dependent on a few things:
1. Your own Rage value. Using D-Air at 100% will give you greater knockback, and, as a result, better frame advantage than using D-Air at 0%.
2. The opponent's weight. The lower their weight, the better your frame advantage. With no Rage, you appear to have about +4 frame advantage on Jigglypuff, +2 on Mario, and 0 on Bowser.
3. Frame syncing (also known as "frame cancel," but that's a misleading name). Because a new hitbox comes out on every other frame, if the opponents is close enough to the ground right before you land, there is a chance of Wario's landing lag happening during hitlag freeze, giving Wario between +1 and +5 extra frame advantage.
4. Whether or not the opponent is forced to land on the ground after hitstun. This is primarily based on gravity and fall speed values. If they are forced to land on the ground, they can shield on Frame 1 instead of being forced to jump, attack, or airdodge.
The list for #4 is as follows: Captain Falcon, Diddy Kong, Falco, Fox, Ganondorf, Greninja, King Dedede, Mega Man, Mii Brawler, Roy, Ryu, Sheik, Shulk (Jump art only), and Zero Suit Samus.
These are the minimum Rage percents that landing D-Air -> Half Waft becomes a guaranteed combo. This is WARIO'S percent, not the opponent's; the opponent can be at any percent, and stale moves doesn't affect the combo at all.
This list assumes that you hit a linking hitbox as close to the ground as possible (as in, the opponent didn't fly up and miss a linking hit on the way down). It also accounts for the empty frame between D-Air hits. For especially light characters; percents for Full Waft are listed as well.
Bayonetta: Any%
Bowser: None
Bowser Jr.: 103%
Captain Falcon: 92%
Charizard: 125%
Cloud: 80%
Corrin: 75%
Dark Pit: 69%
Diddy Kong: 60%
Donkey Kong: 144%
Dr. Mario: 75%
Duck Hunt: 54%
Falco: Any%, Full at 144%
Fox: Any%, Full at 134%
Ganondorf: 117%
Greninja: 63%
Ike: 100%
Jigglypuff: Any%, Full at 93%
King Dedede: 133%
Kirby: Any%, Full at 134%
Link: 92%
Little Mac: Any%, Full at 144%
Lucario: 78%
Lucas: 63%
Lucina: 51%
Luigi: 72%
Mario: 75%
Marth: 51%
Mega Man: 86%
Meta Knight: Any%, Full at 137%
Mewtwo: Any%, Full at 116%
Mii Brawler: 80%
Mii Gunner: 80%
Mii Swordfighter: 80%
Mr. Game and Watch: Any%, Full at 119%
Ness: 63%
Olimar: Any%, Full at 134%
PAC-MAN: 66%
Palutena: 54%
Peach: 48%
Pikachu: Any%, Full at 134%
Pit: 69%
R.O.B.: 98%
Robin: 66%
Rosalina: Any%, Full at 127%
Full at 127%
Roy: 66%
Ryu: 89%
Samus: 103%
Sheik: Any%, Full at 141%
Shulk: 86%
Sonic: 63%
Toon Link: 60%
Villager: 72%
Wario: 100%
Wii Fit Trainer: 69%
Yoshi: 91%
Zelda: 36%
Zero Suit Samus: Any%, Full at 137%
So, airdodges start up pretty quickly (within 2-4 frames on the whole cast; Wario's is Frame 3) and they only have 5 frames of endlag. The animation takes a decent bit longer than a Brawl spotdodge (Wario's is 32 frames, and the average Brawl spotdodge took 25 frames), but you also get to weave during an airdodge, helping to make up for it.
That's all well and good, but Wario's aerials aren't really well-suited to take advantage of it. However, using the same principle as with this situational Jigglypuff technique (where Wario hits because of good range rather than fast active frames)...
...We can footstool opponents into it with minimal risk of losing said Waft. Full Waft and D-Air both have enough speed and range to hit from a footstool on many characters, and Half Waft (and all strong forms of the custom Wafts) will work on almost the whole cast. Footstools are Frame 1 and actually cancel opponents' grab animations at any point, so someone trying to reflexively grab you will get footstooled if they don't grab you within your five frames of airdodge endlag.
Here's a recent clip of Abadango doing a footstool -> Half Waft. I don't know if he did the option select here, but it couldn't have hurt.
Full Quick Waft hits everyone but Diddy Kong, and all forms of Rose Waft hit the whole cast.
Here's a handy CHART showing who gets hit by what:
Character | SH AD -> FS | FS -> Half Waft | FS -> D-Air | FS -> Full Waft | Air FS -> Half Waft| Air FS -> Full Waft
Mario | Yes | Yes | Yes | Yes | Yes | No
Luigi | Yes | Yes | Yes | Yes | Yes | No
Peach | Yes | No | No | No | No | No
Bowser | Out of standing grab | Yes | Yes | Yes | Yes | Yes
Yoshi | Yes | Yes | Yes | Yes | Yes | Yes
Rosalina and Luma | No | Yes | Yes | Yes | Yes | No
Bowser Jr. | Yes | Yes | Yes | Yes | No | No
Wario | Yes | Yes | Yes | Yes | No | No
Donkey Kong | Yes | Yes | No | No | Yes | No
Diddy Kong | Yes | No | No | No | No | No
Mr. Game and Watch | Yes | No | Yes | No | Yes | Yes
Little Mac | Yes | Yes | Yes | Yes | Yes | No
Link | Yes | No | No | No | Yes | No
Zelda | Yes | No | No | No | No | No
Sheik | Yes | Yes | Yes | Yes | Yes | No
Toon Link | Yes | Yes | Yes | Yes | Yes | No
Ganondorf | Out of grab startup | Yes | No | No | No | No
Samus | Out of standing grab | Yes | No | Yes | No | No
Zero Suit Samus | Yes | Yes | Yes | Yes | No | No
Pit | Yes | Yes | No | No | No | No
Palutena | Yes | Yes | Yes | Yes | No | No
Marth | Out of standing grab | Yes | Yes | Yes | Yes | Yes
Ike | Yes | Yes | No | No | No | No
Robin | Yes | Yes | Yes | Yes | No | No
Duck Hunt | Yes | Yes | Yes | Yes | Yes | No
Kirby | Yes | Yes | Yes | Yes | Yes | No
King Dedede | Yes | Yes | No | No | Yes | No
Meta Knight | Yes | Yes | No | No | Yes | No
Fox | Yes | Yes | No | No | No | No
Falco | Yes | Yes | No | No | No | No
Pikachu | Yes | Yes | No | Yes | No | No
Charizard | Yes | Yes | No | Yes | Yes | No
Lucario | Yes | No | No | No | Yes | No
Jigglypuff | Yes | Yes | Yes | Yes | No | No
Greninja | Yes | Yes | No | No | No | No
R.O.B. | Yes | Yes | Yes | Yes | No | No
Ness | Yes | No | No | No | Yes | No
Captain Falcon | Out of standing grab | Yes | No | No | No | No
Villager | Yes | Yes | Yes | Yes | Yes | No
Olimar | Yes | No | No | No | Yes | Yes
Wii Fit Trainer | Yes | No | No | No | No | No
Shulk | Yes | No | No | No | No | No
Dr. Mario | Yes | Yes | Yes | Yes | Yes | No
Dark Pit | Yes | Yes | No | No | No | No
Lucina | Yes | Yes | Yes | Yes | Yes | No
Pac-Man | Yes | Yes | No | No | No | No
Mega Man | Yes | Yes | Yes | Yes | Yes | No
Sonic | Yes | Yes | Yes | Yes | Yes | No
Mewtwo | Yes | Yes | No | Yes | Yes | No
Lucas | Yes | No | No | No | Yes | No
Roy | Yes | Yes | Yes | Yes | Yes | No
Ryu | No | Yes | No | Yes | No | No
Cloud | Yes | Yes | Yes | Yes | No | No
Corrin | Yes | Yes | Yes | Yes | Yes | No
Bayonetta | No | Yes | Yes | Yes | No | No
Mii Brawler | Yes | Yes | Yes | Yes | No | No
Mii Gunner | Yes | Yes | No | Yes | Yes | No
Mii Swordsman | Yes | Yes | No | Yes | No | No
That's all well and good, but Wario's aerials aren't really well-suited to take advantage of it. However, using the same principle as with this situational Jigglypuff technique (where Wario hits because of good range rather than fast active frames)...
...We can footstool opponents into it with minimal risk of losing said Waft. Full Waft and D-Air both have enough speed and range to hit from a footstool on many characters, and Half Waft (and all strong forms of the custom Wafts) will work on almost the whole cast. Footstools are Frame 1 and actually cancel opponents' grab animations at any point, so someone trying to reflexively grab you will get footstooled if they don't grab you within your five frames of airdodge endlag.
Here's a recent clip of Abadango doing a footstool -> Half Waft. I don't know if he did the option select here, but it couldn't have hurt.
Full Quick Waft hits everyone but Diddy Kong, and all forms of Rose Waft hit the whole cast.
Here's a handy CHART showing who gets hit by what:
Mario | Yes | Yes | Yes | Yes | Yes | No
Luigi | Yes | Yes | Yes | Yes | Yes | No
Peach | Yes | No | No | No | No | No
Bowser | Out of standing grab | Yes | Yes | Yes | Yes | Yes
Yoshi | Yes | Yes | Yes | Yes | Yes | Yes
Rosalina and Luma | No | Yes | Yes | Yes | Yes | No
Bowser Jr. | Yes | Yes | Yes | Yes | No | No
Wario | Yes | Yes | Yes | Yes | No | No
Donkey Kong | Yes | Yes | No | No | Yes | No
Diddy Kong | Yes | No | No | No | No | No
Mr. Game and Watch | Yes | No | Yes | No | Yes | Yes
Little Mac | Yes | Yes | Yes | Yes | Yes | No
Link | Yes | No | No | No | Yes | No
Zelda | Yes | No | No | No | No | No
Sheik | Yes | Yes | Yes | Yes | Yes | No
Toon Link | Yes | Yes | Yes | Yes | Yes | No
Ganondorf | Out of grab startup | Yes | No | No | No | No
Samus | Out of standing grab | Yes | No | Yes | No | No
Zero Suit Samus | Yes | Yes | Yes | Yes | No | No
Pit | Yes | Yes | No | No | No | No
Palutena | Yes | Yes | Yes | Yes | No | No
Marth | Out of standing grab | Yes | Yes | Yes | Yes | Yes
Ike | Yes | Yes | No | No | No | No
Robin | Yes | Yes | Yes | Yes | No | No
Duck Hunt | Yes | Yes | Yes | Yes | Yes | No
Kirby | Yes | Yes | Yes | Yes | Yes | No
King Dedede | Yes | Yes | No | No | Yes | No
Meta Knight | Yes | Yes | No | No | Yes | No
Fox | Yes | Yes | No | No | No | No
Falco | Yes | Yes | No | No | No | No
Pikachu | Yes | Yes | No | Yes | No | No
Charizard | Yes | Yes | No | Yes | Yes | No
Lucario | Yes | No | No | No | Yes | No
Jigglypuff | Yes | Yes | Yes | Yes | No | No
Greninja | Yes | Yes | No | No | No | No
R.O.B. | Yes | Yes | Yes | Yes | No | No
Ness | Yes | No | No | No | Yes | No
Captain Falcon | Out of standing grab | Yes | No | No | No | No
Villager | Yes | Yes | Yes | Yes | Yes | No
Olimar | Yes | No | No | No | Yes | Yes
Wii Fit Trainer | Yes | No | No | No | No | No
Shulk | Yes | No | No | No | No | No
Dr. Mario | Yes | Yes | Yes | Yes | Yes | No
Dark Pit | Yes | Yes | No | No | No | No
Lucina | Yes | Yes | Yes | Yes | Yes | No
Pac-Man | Yes | Yes | No | No | No | No
Mega Man | Yes | Yes | Yes | Yes | Yes | No
Sonic | Yes | Yes | Yes | Yes | Yes | No
Mewtwo | Yes | Yes | No | Yes | Yes | No
Lucas | Yes | No | No | No | Yes | No
Roy | Yes | Yes | Yes | Yes | Yes | No
Ryu | No | Yes | No | Yes | No | No
Cloud | Yes | Yes | Yes | Yes | No | No
Corrin | Yes | Yes | Yes | Yes | Yes | No
Bayonetta | No | Yes | Yes | Yes | No | No
Mii Brawler | Yes | Yes | Yes | Yes | No | No
Mii Gunner | Yes | Yes | No | Yes | Yes | No
Mii Swordsman | Yes | Yes | No | Yes | No | No
After Wario successfully throws an opponent with Neutral-B, he cannot use Neutral-B for the next half-second or so, but he can use any other option. This is not the case after eating a projectile.
If Neutral-B ends in the air, it has five fewer frames of endlag. This can be used immediately out of a shorthop or with an aerial B-Reverse for extra safety.
The grab's length of time before the throw is dependent on the opponent's damage and number of inputs, much like a normal grab, except a release acts as a throw. Pressing buttons to pummel the opponent deals extra damage but affect the time it takes to release them only very slightly.
Neutral-B throws opponents at a 45-degree angle. Stages that are useful for gimping tend to have a flat bottom and/or are angled in such a way that a missed tech against the side is basically death. Things that affect it significantly:
1. The opponent's mashing speed. It actually doesn't take many inputs to significantly lower the time spent grabbed until very high percents.
2. The opponent's percent. Like a normal grab, the higher the percent when grabbed, the longer it will take to be released. This also affects how far they get thrown, so a missed tech becomes more deadly, or a tech against a flat "ceiling" will require more horizontal movement to recover from.
3. Your percent. Neutral-B has high base knockback and knockback growth, so the knockback is much higher when influenced by Rage.
4. The walls of the stage. The sides of each stage have different angles that bounce people in different directions on a missed tech, and some stages go down a decent bit before reaching the bottom side.
Some stages of note:
Dream Land 64 has a very low blast zone, a flat bottom, and a long side wall, making it ideal for opponents who do not mash out immediately.
Omega Temple and Omega Kongo Jungle 64 have a long side wall and invisible/obscured wall locations, making it more difficult to tech.
Omega Halberd and Omega Pilotwings have a short side wall and don't allow you to slide up the bottom with your Up-B.
Lylat Cruise has a short side wall and can be awkward to tech on/against.
There are some setups that allow you to eat four small pieces of the Bike in slightly more time than it takes to eat the Bike whole:
Ledge crash -> sweetspot F-Air -> hard throw Down -> Neutral-B. Does not work if F-Air is staled three or more times prior.
Ledge crash -> sweetspot F-Air -> hard throw Down -> Neutral-B. Does not work if F-Air is staled two or more times prior.
When you throw the Bike, U-Throw/D-Throw are active on Frame 11 and have an IASA frame of 23. F-Throw/B-Throw are active on Frame 16 and have an IASA of 31. Long story short, D-Throw should be your go-to in almost all cases. While the pictures don't really show it, a D-Throw to the right is super-safe, while D-Throw left is pretty safe.
The active frames of some of Wario's Bike throws are significantly different when facing left than when facing right; for example, there is a huge difference in how low U-Throw hits between directions, too; I didn't take one picture late.
Wario picking up the Bike appears to take 11 frames. Other characters vary significantly in how long it takes for them to pick up the Bike. You can buffer a throw out of the "picking up" animation, and characters' F-Throws' first active frame is universally about 16-18 frames.
Some characters' Bike throw forward puts the Bike fairly high up, preventing Wario from being in any real danger as a result of that throw if he's not outside of Wario Dash Attack range. Most of them require you to crouch to avoid it, but there are a couple of exceptions.
Here are some characters' "pick up the Bike" animation frames:
Captain Falcon: 12 (Forward goes over)
Cloud: 12 (Forward goes over crouch)
Diddy Kong: 12 (Forward goes over crouch)
Fox: 14 (Forward goes over crouch)
Ike: 11
Mario: 12
Mega Man: 11 (Forward goes over crouch)
Meta Knight: 12
Ness: 12 (Forward goes over)
Pikachu: 20 (Forward goes over crouch)
Rosalina: 17
Ryu: 12 (Forward goes over crouch)
Sheik: 17
Sonic: 14
Yoshi: 12 (Forward goes over crouch)
Zero Suit Samus: 11 (Forward goes over crouch)
The active frames of some of Wario's Bike throws are significantly different when facing left than when facing right; for example, there is a huge difference in how low U-Throw hits between directions, too; I didn't take one picture late.
Forward:
![]()
Back:
![]()
Up:
![]()
Down:
![]()

Back:

Up:

Down:

Forward:
![]()
Back:
![]()
Up:
![]()
Down:
![]()

Back:

Up:

Down:

Wario picking up the Bike appears to take 11 frames. Other characters vary significantly in how long it takes for them to pick up the Bike. You can buffer a throw out of the "picking up" animation, and characters' F-Throws' first active frame is universally about 16-18 frames.
Some characters' Bike throw forward puts the Bike fairly high up, preventing Wario from being in any real danger as a result of that throw if he's not outside of Wario Dash Attack range. Most of them require you to crouch to avoid it, but there are a couple of exceptions.
Here are some characters' "pick up the Bike" animation frames:
Captain Falcon: 12 (Forward goes over)
Cloud: 12 (Forward goes over crouch)
Diddy Kong: 12 (Forward goes over crouch)
Fox: 14 (Forward goes over crouch)
Ike: 11
Mario: 12
Mega Man: 11 (Forward goes over crouch)
Meta Knight: 12
Ness: 12 (Forward goes over)
Pikachu: 20 (Forward goes over crouch)
Rosalina: 17
Ryu: 12 (Forward goes over crouch)
Sheik: 17
Sonic: 14
Yoshi: 12 (Forward goes over crouch)
Zero Suit Samus: 11 (Forward goes over crouch)
Up-B hits on Frame 6 and is one of Wario's few lingering hitboxes. Also, unlike N-Air and D-Air, the linking hits have no gaps between them. The first grounded hit cannot be clanked with, and because it has set knockback, it links just as well when your opponent is at 0% as when they are at 300%. It deals a strong 13% if every hit connects, and it has very high BKB and KGB values, so it can function as a legitimate KO move in the right situations.
Your momentum doesn't change until the first hitbox is out, so you can rise or fall into Up-B for a bit of misdirection or aid in punishing. Because of the lingering hitbox and good damage, this is often the most reliable punish for airdodges. Using an Up-B right before landing on the ground avoids normal landing lag, so this can be a faster poke out of an empty hop than, say, D-Tilt. Could be good to punish shieldgrab-happy players. Because of the first hit's decent disjoint in front, we could reasonably use it as a slower, more powerful Mario Up-B.
The hitboxes are pretty similar to their Brawl counterparts (don't pay attention to the knockback values; those are Brawl's):
![]()
![]()
However, there are a number of factors that can prevent it from linking into the final hit. Because the weight-dependent knockback is quite high, the linking hits are heavily affected by Wario's Rage. As a result, when you are at high percent, opponents are prone to falling out of the move before the final hit. Also, because the knockback angles of the linking hits are close to 90 degrees, the more you steer it horizontally, the more likely an opponent will fall out of it.
You can mitigate these issues, though! If you're actively trying to hit an opponent with it, you should try not to steer it horizontally much/at all. The disjoint on the first hit will catch the people your steering is meant to catch, anyway. Also, if you start it above your opponent so that they get hit by the bottom hitbox, they have more room to rise before moving out of range, so any extra knockback from Rage will not be enough to make you miss.
Your momentum doesn't change until the first hitbox is out, so you can rise or fall into Up-B for a bit of misdirection or aid in punishing. Because of the lingering hitbox and good damage, this is often the most reliable punish for airdodges. Using an Up-B right before landing on the ground avoids normal landing lag, so this can be a faster poke out of an empty hop than, say, D-Tilt. Could be good to punish shieldgrab-happy players. Because of the first hit's decent disjoint in front, we could reasonably use it as a slower, more powerful Mario Up-B.
The hitboxes are pretty similar to their Brawl counterparts (don't pay attention to the knockback values; those are Brawl's):
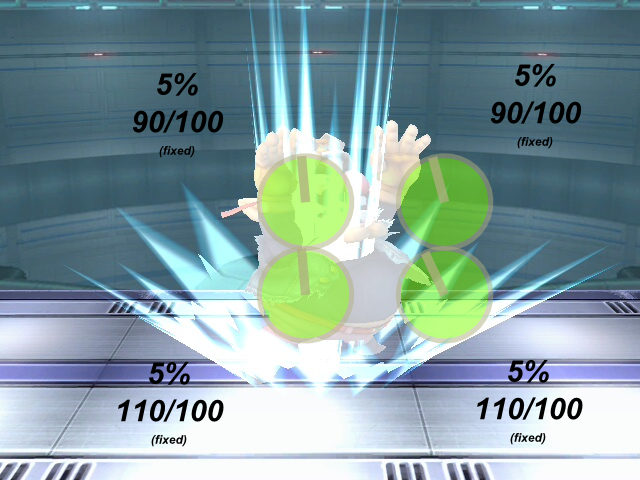
However, there are a number of factors that can prevent it from linking into the final hit. Because the weight-dependent knockback is quite high, the linking hits are heavily affected by Wario's Rage. As a result, when you are at high percent, opponents are prone to falling out of the move before the final hit. Also, because the knockback angles of the linking hits are close to 90 degrees, the more you steer it horizontally, the more likely an opponent will fall out of it.
You can mitigate these issues, though! If you're actively trying to hit an opponent with it, you should try not to steer it horizontally much/at all. The disjoint on the first hit will catch the people your steering is meant to catch, anyway. Also, if you start it above your opponent so that they get hit by the bottom hitbox, they have more room to rise before moving out of range, so any extra knockback from Rage will not be enough to make you miss.
If Wario manages to spotdodge an opponent's grab, depending on how early he becomes invincible before the grab, he can have enough frame advantage to get a guaranteed Waft punish on reaction. Half Waft comes out four frames faster than Full Waft, and Dash Grabs are generally more punishable than Standing Grabs.
![]()
![]()
![]()
![]()


The two percents listed for each character are from center stage/edge of the stage. It assumes that Wario has no Rage, and it assumes the opponent has optimal DI. The exact knockback value required for each stage is also listed, so if you want to see how Rage would affect it, you could use this handy calculator: http://rubendal.github.io/Sm4sh-Calculator/index.html
If you want to test with Rage, use the calculator and try to get a Total Knockback value of 201+ for the center of and 168+ for the edge.
Bayonetta: 54%/34%
Bowser: 75%/50%
Bowser Jr. (car): 68%/46%
Bowser Jr. (body): 60%/38%
Captain Falcon: 63%/41%
Charizard: 68%/45%
Cloud: 61%/40%
Corrin: 60%/39%
Dark Pit: 59%/38%
Diddy Kong: 58%/37%
Donkey Kong: 71%/47%
Dr. Mario: 60%/39%
Duck Hunt: 57%/37%
Falco: 53%/34%
Fox: 52%/33%
Ganondorf: 67%/44%
Greninja: 59%/38%
Ike: 64%/42%
Jigglypuff: 47%/29%
King Dedede: 70%/46%
Kirby: 52%/33%
Kirby (Jump art): 46%/26%
Kirby (Shield art): 94%/70%
Kirby (Buster art): 48%/29%
Kirby (Smash art): 44%/26%
Link: 63%/41%
Little Mac: 53%/34%
Lucario: 61%/40%
Lucas: 59%/38%
Lucina: 57%/36%
Luigi: 60%/39%
Mario: 60%/39%
Marth: 57%/36%
Mega Man: 62%/41%
Meta Knight: 52%/33%
Mewtwo: 50%/31%
Mii Brawler (guest size): 61%/40%
Mii Gunner (guest size): 61%/40%
Mii Swordfighter (guest size): 61%/40%
Mr. Game and Watch: 50%/31%
Ness: 59%/38%
Olimar: 52%/33%
Pac-Man: 59%/38%
Palutena: 57%/37%
Peach: 56%/36%
Pikachu: 52%/33%
Pit: 59%/38%
R.O.B.: 64%/42%
Robin: 59%/38%
Rosalina & Luma: 51%/32%
Roy: 59%/38%
Ryu: 63%/41%
Samus: 65%/43%
Sheik: 53%/33%
Shulk: 62%/41%
Shulk (Jump art): 56%/34%
Shulk (Shield art): 109%/81%
Shulk (Buster art): 58%/37%
Shulk (Smash art): 54%/33%
Sonic: 59%/38%
Toon Link: 58%/37%
Villager: 60%/39%
Wario: 64%/42%
Wii Fit Trainer: 59%/39%
Wii Fit Trainer (Deep Breathing): 62%/41%
Yoshi: 63%/41%
Zelda: 55%/35%
Zero Suit Samus: 52%/33%
If you want to test numbers with Rage, use the calculator and try to get a Total Knockback value of 200+ for the center of and 161+ for the edge.
Bayonetta: 54%/30%
Bowser: 74%/45%
Bowser Jr. (car): 68%/41%
Bowser Jr. (body): 60%/34%
Captain Falcon: 63%/37%
Charizard: 68%/40%
Cloud: 61%/36%
Corrin: 60%/35%
Dark Pit: 59%/34%
Diddy Kong: 58%/33%
Donkey Kong: 71%/42%
Dr. Mario: 60%/35%
Duck Hunt: 57%/33%
Falco: 53%/30%
Fox: 52%/29%
Ganondorf: 67%/39%
Greninja: 58%/33%
Ike: 64%/38%
Jigglypuff: 46%/25%
King Dedede: 69%/42%
Kirby: 51%/29%
Kirby (Jump art): 45%/22%
Kirby (Shield art): 94%/64%
Kirby (Buster art): 48%/25%
Kirby (Smash art): 44%/23%
Link: 62%/37%
Little Mac: 53%/30%
Lucario: 60%/35%
Lucas: 58%/33%
Lucina: 56%/32%
Luigi: 59%/34%
Mario: 60%/35%
Marth: 56%/32%
Mega Man: 61%/36%
Meta Knight: 52%/29%
Mewtwo: 49%/27%
Mii Brawler (guest size): 61%/35%
Mii Gunner (guest size): 61%/35%
Mii Swordfighter (guest size): 61%/35%
Mr. Game and Watch: 50%/27%
Ness: 58%/33%
Olimar: 51%/29%
Pac-Man: 58%/34%
Palutena: 57%/33%
Peach: 56%/32%
Pikachu: 51%/29%
Pit: 59%/34%
R.O.B.: 63%/37%
Robin: 59%/34%
Rosalina & Luma: 51%/28%
Roy: 58%/34%
Ryu: 62%/36%
Samus: 64%/38%
Sheik: 52%/29%
Shulk: 62%/36%
Shulk (Jump art): 55%/30%
Shulk (Shield art): 108%/75%
Shulk (Buster art): 58%/32%
Shulk (Smash art): 53%/29%
Sonic: 58%/33%
Toon Link: 58%/33%
Villager: 60%/34%
Wario: 64%/38%
Wii Fit Trainer: 59%/34%
Wii Fit Trainer (Deep Breathing): 62%/37%
Yoshi: 63%/37%
Zelda: 54%/31%
Zero Suit Samus: 52%/29%
Outside of dive-kick D-Airs, the aerials assume that the opponent lands on the stage after/during the aerial.
Bowser: F-Tilt (down-angled), D-Tilt, F-Smash (sourspot), F-Air, D-Air, Up-B (final hit)
Bowser Jr.: F-Tilt (down-angled), D-Tilt, D-Smash, B-Air, D-Air, Up-B (explosion)
Captain Falcon: D-Tilt, U-Tilt, D-Air, Down-B (aerial)
Charizard: F-Tilt (down-angled), F-Smash, D-Smash, N-Air, F-Air, B-Air, D-Air
Cloud: D-Tilt, N-Air, F-Air, D-Air, Neutral-B, Limit Neutral-B, Limit Forward-B (4th and 5th hits only, Frame 26+), Up-B (weak landing hitbox), Limit Up-B (while falling, can meteor and grab the ledge backward)
Dark Pit: D-Smash, D-Air
Diddy Kong: F-Tilt (down-angled), D-Tilt, D-Smash, N-Air, D-Air, Forward-B (kick)
Donkey Kong: F-Tilt (down-angled), D-Tilt, D-Smash, F-Air, D-Air
Dr. Mario: F-Tilt (down-angled), U-Tilt, D-Tilt, F-Smash (down-angled), D-Smash, Forward-B, Up-B, Down-B (final hit)
Duck Hunt: Jab3, Rapid Jab finisher, F-Tilt (down-angled), D-Tilt, F-Smash (sometimes), D-Smash
Falco: F-Tilt (down-angled), D-Tilt, F-Smash, D-Smash, F-Air, D-Air
Fox: U-Tilt, D-Tilt, D-Smash, D-Air
Ganondorf: U-Tilt (lol), D-Tilt, Down-B (aerial), F-Air, D-Air
Greninja: Dash Attack, F-Tilt (down-angled), D-Tilt, D-Smash, D-Air, Neutral-B (fully-charged)
Ike: Jab3, F-Tilt (down-angled, perfectly spaced), U-Tilt, D-Tilt, F-Smash, U-Smash, D-Smash, N-Air, F-Air, D-Air, Neutral-B
Jigglypuff: F-Tilt (down-angled), D-Tilt, D-Smash, N-Air, F-Air, D-Air, Forward-B
King Dedede: Dash Attack, F-Tilt (final hit), D-Tilt, D-Smash, F-Air, D-Air, Up-B (lol)
Kirby: Rapid Jab finisher, F-Tilt (down-angled), D-Tilt, F-Smash (down-angled), D-Smash, D-Air, Up-B, Down-B (landing hitbox)
Link: Dash Attack (not up close), F-Tilt, D-Tilt, D-Smash, D-Air, Forward-B
Little Mac: D-Tilt, U-Smash (sourspot), D-Smash, D-Air, Forward-B (max distance)
Lucario: F-Tilt (down-angled), D-Tilt, D-Air, Neutral-B (shot @ 26+%, charge @ 111+%), Forward-B (~80+%)
Lucas: F-Tilt (down-angled), U-Smash, D-Smash, B-Air, D-Air
Lucina: D-Tilt, F-Smash, D-Smash, F-Air, D-Air, Forward-B
Luigi: Dash Attack, F-Tilt (down-angled), D-Tilt, F-Smash (down-angled), D-Smash, D-Air
Mario: F-Tilt (down-angled), U-Tilt (>:/), D-Tilt, F-Smash (down-angled), D-Smash, Forward-B, Up-B (first hit)
Marth: D-Tilt, F-Smash, D-Smash, F-Air, D-Air, Forward-B
Mega Man: U-Tilt (sourspot), D-Tilt, D-Smash, F-Air, D-Air
Meta Knight: F-Tilt, D-Tilt, F-Smash, D-Smash, F-Air, B-Air, D-Air
Mewtwo: F-Tilt (down-angled), D-Tilt, D-Smash, D-Air
Mii Brawler (minus specials): F-Tilt (down-angled), D-Tilt, F-Smash (down-angled), D-Air
Mii Gunner (minus specials) Jab1, D-Tilt, D-Smash, N-Air, D-Air
Mii Swordfighter (minus specials): Jab2, D-Tilt, F-Smash, D-Smash, N-Air, F-Air (single hit), D-Air
Mr. Game and Watch: Jab1, F-Tilt, D-Smash, F-Air, B-Air, D-Air, Down-B
Ness: Dash Attack (final hit), F-Tilt, D-Tilt, U-Smash, D-Smash, N-Air, F-Air, B-Air, U-Air, D-Air
Olimar: D-Tilt, D-Smash, F-Air, B-Air, D-Air
Pac-Man: Dash Attack (single hit), F-Tilt (down-angled), D-Tilt, D-Smash, D-Air
Palutena: D-Tilt, U-Smash, D-Air
Peach: D-Tilt, D-Smash (single hit), F-Air, D-Air
Pikachu: Jab, F-Tilt (down-angled), U-Tilt, D-Tilt, U-Smash, D-Smash (final hit), Down-B
Pit: D-Smash, D-Air
R.O.B.: D-Tilt, F-Smash (down-angled, sourspot), N-Air, B-Air, D-Air
Robin: D-Tilt, D-Smash, F-Air, D-Air, Forward-B (max range)
Rosalina and Luma: Dash Attack (first hit only), D-Tilt, F-Smash (down-angled), D-Smash, F-Air (linking hit), B-Air (Luma only), D-Air
Roy: D-Tilt, F-Smash, D-Smash, F-Air (sourspot), B-Air (sourspot), D-Air, Neutral-B, Forward-B
Ryu: D-Tilt (strong), D-Smash, D-Air
Samus: U-Tilt, D-Tilt, F-Smash (down-angled), D-Smash, F-Air (last hit), D-Air
Sheik: D-Tilt, F-Air, D-Air, Up-B, Forward-B, Down-B (only late in animation)
Shulk: D-Tilt, F-Smash (down-angled), D-Smash (final spin), N-Air, F-Air, B-Air, D-Air
Sonic: D-Tilt, F-Smash (down-angled), D-Smash, B-Air, D-Air
Toon Link: Jab, F-Tilt, U-Tilt, D-Tilt, F-Smash, D-Smash, F-Air, D-Air
Villager: F-Tilt, D-Tilt, F-Smash, D-Smash, D-Air, Down-B (falling tree only)
Wario: Jab (lol), Dash Attack, F-Tilt (down-angled), D-Tilt, F-Smash, D-Smash, Down-B
Wii Fit Trainer: Jab3, D-Tilt
Yoshi: F-Tilt (down-angled), D-Tilt, F-Smash, D-Smash, F-Air, B-Air, D-Air
Zelda: D-Tilt, D-Smash, D-Air, Up-B
Zero Suit Samus: D-Tilt, D-Smash, D-Air, Down-B
Last edited:
 . If I decide to do this for more characters, I'll edit the content here.