Guide to Ace Arwing Pilot Fox McCloud
Updated for 2015
by CunningKitsune
Last Updated (Version 6.22): Monday, February 23, 2015
Version 1.00 Created: Sunday, April 18, 2004
Email: cunningkitsune111@gmail.com
Updated for 2015
by CunningKitsune
Last Updated (Version 6.22): Monday, February 23, 2015
Version 1.00 Created: Sunday, April 18, 2004
Email: cunningkitsune111@gmail.com

Cover art by Christopher L. Scott (www.scottyartz.com)
---
Available in PDF form:
http://www.mediafire.com/view/wu5ph3a8l0ieiuc/Fox_Guide_(2015_Update)_v6.22.pdf
---
Guide Outline
Use this outline as a sort of table of contents for this guide. To jump to a specific section, use your browser's search/find function and search for the term next to the desired section (including the brackets). Thanks to N64 and his Melee Pikachu guide for this organizational idea.
I. The Basics – [TB0]
A. Introduction to Fox McCloud – [INT0]
1. Pros and Cons – [INT1]
2. Modern Tournaments – [INT2]
B. Fox’s Moves – [FM0]2. Modern Tournaments – [INT2]
1. Ground – [FM1]
C. The Physics of Fox – [PF0]a. Neutral A: Jab – [FM11]
b. Neutral A, A: Straight – [FM12]
c. Neutral A, A, A…: Rapid Kick – [FM13]
d. Forward–Tilt: Fox Kick – [FM14]
e. Up–Tilt: Back Kick – [FM15]
f. Down–Tilt: Fox Tail – [FM16]
g. Forward–Smash: Roundhouse Kick – [FM17]
h. Up–Smash: Flip Kick – [FM18]
i. Down–Smash: Fox Split – [FM19]
j. Dash Attack: Jumping Side Kick – [FM110]
k. Taunt – [FM111]
2. Air – [FM2]b. Neutral A, A: Straight – [FM12]
c. Neutral A, A, A…: Rapid Kick – [FM13]
d. Forward–Tilt: Fox Kick – [FM14]
e. Up–Tilt: Back Kick – [FM15]
f. Down–Tilt: Fox Tail – [FM16]
g. Forward–Smash: Roundhouse Kick – [FM17]
h. Up–Smash: Flip Kick – [FM18]
i. Down–Smash: Fox Split – [FM19]
j. Dash Attack: Jumping Side Kick – [FM110]
k. Taunt – [FM111]
a. Neutral–Aerial: Flying Kick – [FM21]
b. Forward–Aerial: Tornado Kick – [FM22]
c. Back–Aerial: Reverse Spin Kick – [FM23]
d. Up–Aerial: McCloud Flip – [FM24]
e. Down–Aerial: Drill Kick – [FM25]
3. Grabs and Throws – [FM3]b. Forward–Aerial: Tornado Kick – [FM22]
c. Back–Aerial: Reverse Spin Kick – [FM23]
d. Up–Aerial: McCloud Flip – [FM24]
e. Down–Aerial: Drill Kick – [FM25]
a. Grab – [FM31]
b. Running Grab – [FM32]
c. In–Grab A…: Knee – [FM33]
d. Forward–Throw: Elbow Bash – [FM34]
e. Back–Throw: Skeet Blaster – [FM35]
f. Up–Throw: Star Blaster – [FM36]
g. Down–Throw: Floor Blaster – [FM37]
4. Special Moves (Ground or Air) – [FM4]b. Running Grab – [FM32]
c. In–Grab A…: Knee – [FM33]
d. Forward–Throw: Elbow Bash – [FM34]
e. Back–Throw: Skeet Blaster – [FM35]
f. Up–Throw: Star Blaster – [FM36]
g. Down–Throw: Floor Blaster – [FM37]
a. Neutral B…: Blaster – [FM41]
b. Forward–B: Fox Illusion – [FM42]
c. Up–B: Fire Fox – [FM43]
d. Down–B: Reflector – [FM44]
b. Forward–B: Fox Illusion – [FM42]
c. Up–B: Fire Fox – [FM43]
d. Down–B: Reflector – [FM44]
II. The Next Level – [TNL0]
A. Advanced Techniques – [ADT0]
III. Character Match–Ups – [CMU0]1. L–Canceling – [ADT1]
2. Wavedashing – [ADT2]
3. Shield–Grabbing – [ADT3]
4. Short–Hopping – [ADT4]
5. Dash–Canceling – [ADT5]
6. Crouch–Canceling – [ADT6]
7. Dash–Dancing – [ADT7]
8. Jump–Canceled Grabs – [ADT8]
9. Fox Trotting – [ADT9]
10. Short–Hop Laser – [ADT10]
11. Waveshining – [ADT11]
12. Boost Grab – [ADT12]
13. PC Dropping – [ADT13]
14. Moonwalking – [ADT14]
15. Ledge–Canceling – [ADT15]
16. Shield–Dropping – [ADT16]
17. Ledge–Teching – [ADT17]
B. The Shine – [TS0]2. Wavedashing – [ADT2]
3. Shield–Grabbing – [ADT3]
4. Short–Hopping – [ADT4]
5. Dash–Canceling – [ADT5]
6. Crouch–Canceling – [ADT6]
7. Dash–Dancing – [ADT7]
8. Jump–Canceled Grabs – [ADT8]
9. Fox Trotting – [ADT9]
10. Short–Hop Laser – [ADT10]
11. Waveshining – [ADT11]
12. Boost Grab – [ADT12]
13. PC Dropping – [ADT13]
14. Moonwalking – [ADT14]
15. Ledge–Canceling – [ADT15]
16. Shield–Dropping – [ADT16]
17. Ledge–Teching – [ADT17]
1. Introduction – [TS1]
2. Properties of the Shine – [TS2]
3. Using the Shine – [TS3]
C. Improving Your Game – [IYG0]2. Properties of the Shine – [TS2]
3. Using the Shine – [TS3]
a. Gaining Close–Range Control – [TS31]
b. Shine–Spiking – [TS32]
c. Setting Up for a Combo – [TS33]
d. Countering Shield–Grabbing – [TS34]
e. Edge–Guarding – [TS35]
f. Stopping Horizontal and Vertical Movement – [TS36]
g. Reflecting Projectiles – [TS37]
4. Infinites – [TS4]b. Shine–Spiking – [TS32]
c. Setting Up for a Combo – [TS33]
d. Countering Shield–Grabbing – [TS34]
e. Edge–Guarding – [TS35]
f. Stopping Horizontal and Vertical Movement – [TS36]
g. Reflecting Projectiles – [TS37]
a. Infinite Down–Wavedash Shine – [TS41]
b. Infinite Wall Drillshine – [TS42]
c. Infinite Jump–Canceled Shine – [TS43]
d. Infinite Drillshine – [TS44]
b. Infinite Wall Drillshine – [TS42]
c. Infinite Jump–Canceled Shine – [TS43]
d. Infinite Drillshine – [TS44]
i. Drillshine Inversion Method 1: Wavedashing – [TS441]
ii. Drillshine Inversion Method 2: Aerial DI – [TS442]
e. Infinite Forward – Reverse Waveshine – [TS45]ii. Drillshine Inversion Method 2: Aerial DI – [TS442]
1. Introduction – [IYG1]
3. Mind Games – [IYG3]
5. Prediction and the Problem–Solution Methodology – [IYG5]
6. 10 Common Mistakes in General Fox Gameplay – [IYG6]
a. Knowledge Is Power – [IYG11]
b. Going in with a Plan – [IYG12]
c. Crush Your Enemy’s Concentration – [IYG13]
d. Style: Aggressive – [IYG14]
e. Style: Control – [IYG15]
f. Style: Aggro–Control – [IYG16]
2. Suggested Practice Regimen – [IYG2]b. Going in with a Plan – [IYG12]
c. Crush Your Enemy’s Concentration – [IYG13]
d. Style: Aggressive – [IYG14]
e. Style: Control – [IYG15]
f. Style: Aggro–Control – [IYG16]
3. Mind Games – [IYG3]
a. Know Yourself – [IYG31]
b. Know Your Opponent – [IYG32]
4. The Power of Spacing and Stage Control – [IYG4]b. Know Your Opponent – [IYG32]
5. Prediction and the Problem–Solution Methodology – [IYG5]
6. 10 Common Mistakes in General Fox Gameplay – [IYG6]
A. S Tier – [ST0]
1. Fox – [ST1]
2. Falco – [ST2]
3. Sheik – [ST3]
4. Marth – [ST4]
5. Jigglypuff – [ST5]
6. Peach – [ST6]
7. Captain Falcon – [ST7]
8. Ice Climbers – [ST8]
B. A Tier – [AT0]2. Falco – [ST2]
3. Sheik – [ST3]
4. Marth – [ST4]
5. Jigglypuff – [ST5]
6. Peach – [ST6]
7. Captain Falcon – [ST7]
8. Ice Climbers – [ST8]
1. Dr. Mario – [AT1]
2. Pikachu – [AT2]
3. Samus – [AT3]
4. Ganondorf – [AT4]
5. Luigi – [AT5]
6. Mario – [AT6]
C. B Tier – [BT0]2. Pikachu – [AT2]
3. Samus – [AT3]
4. Ganondorf – [AT4]
5. Luigi – [AT5]
6. Mario – [AT6]
1. Young Link – [BT1]
2. Link – [BT2]
3. Donkey Kong – [BT3]
4. Yoshi – [BT4]
5. Zelda – [BT5]
6. Roy – [BT6]
7. Mewtwo – [BT7]
8. Mr. Game & Watch – [BT8]
D. F Tier – [FT0]2. Link – [BT2]
3. Donkey Kong – [BT3]
4. Yoshi – [BT4]
5. Zelda – [BT5]
6. Roy – [BT6]
7. Mewtwo – [BT7]
8. Mr. Game & Watch – [BT8]
1. Ness – [FT1]
2. Bowser – [FT2]
3. Pichu – [FT3]
4. Kirby – [FT4]
2. Bowser – [FT2]
3. Pichu – [FT3]
4. Kirby – [FT4]
IV. Beyond the Bracket – [BTB0]
A. Single–Player Mode – [SPM0]
B. Fox’s Hidden Taunt – [FHT0]
B. Fox’s Hidden Taunt – [FHT0]
V. References and Resources – [RR0]
VI. Closing Words – [CW0]
---
Legal Stuff
Legal Stuff
Copyright 2004 – 2015 Anthony Daniel Anastasia. This guide may not be placed on any website by parties other than its author or be hosted by any website without advance written permission, except as indicated below. Use of this guide on any website, except as indicated below, or as a part of any public display without the author’s advance written permission is strictly prohibited and is a violation of copyright. All trademarks and copyrights contained in this document are owned by their respective trademark and copyright holders. The use of any copyrighted works or images is done under fair use of the material under United States copyright law.
Web sites authorized to possess a copy of this guide as of Monday, February 23, 2015:
Please inform me if you see any unauthorized sites with this guide.
Web sites authorized to possess a copy of this guide as of Monday, February 23, 2015:
Smashboards: www.smashboards.com
GameFAQs: www.gamefaqs.com
Facebook: www.facebook.com
MediaFire: www.mediafire.com
GameFAQs: www.gamefaqs.com
Facebook: www.facebook.com
MediaFire: www.mediafire.com
Please inform me if you see any unauthorized sites with this guide.
Contacting the Author
If you wish to get in touch with me concerning this guide or any other meaningful topic, I invite you to do so. If you send me an email, please include a relevant phrase in the subject line (something along the lines of “About Your Guide” or the like) so that I do not inadvertently overlook your message or mistake it for spam. I will do my best to answer you quickly and to the best of my abilities. If you wish to contact me online, I can best be reached via PM on Smashboards at username CunningKitsune. Thank you in advance for reading this; I hope that it serves you well in improving your Fox as well as your overall Melee game.
About the Guide
The principal aim of this guide is to enhance the reader’s abilities with Fox McCloud on a technical as well as psychological level. Nearly all of the content in this guide is centered on Fox as a one–on–one combatant as singles is regarded as the definitive format for high–level tournament play; however, Fox is also a tremendously powerful doubles teammate and is easily amongst the top partners in the game, and so a small amount of material is included that is relevant for doubles play. Note also that all views and advice contained within apply to Fox in the NTSC version of SSBM (although there is a good degree of overlap between the NTSC and PAL versions, of course). This guide also uses quite a bit of modern Melee jargon (shuffling, short–hopping, waveshining, etc.). Definitions of a good deal of the lingo used in this guide are included, but others may be found in the following post: http://smashboards.com/threads/wave...the-terms-read-first-update-12-23-2007.42749/.
The first section of this guide, “The Basics,” is about just that. It introduces Fox McCloud as a character and gives information on all of his moves. A thorough statistics list courtesy of Mew2King and co. is included. In addition, listed for each move is its respective frame data along with other supplemental information, courtesy of SuperDoodleMan, as well as a link to that move’s Gfycat video. Also included is hitlag and shield stun frame data compiled by SCOTU and phanna. I thank these individuals for the time and research that they have put into this game and the enormous amount of data that they have made available to the Smash community.
The second section, “The Next Level,” introduces you to high–level Fox play. This section begins with an overview of the various advanced techniques that the vulpine space animal can perform. The next sub–section presents a wealth of information on the infamous shine, including statistics of, techniques with, and uses for the kitsune’s down–B in battle. Finally, the “Improving Your Game” subsection delves into the inner workings of playing Fox on a psychological level and gives the reader insights into play styles and how to optimize the performance of their Fox in battle.
The third section, “Character Match–Ups,” deals with Fox’s match–ups against each and every character in the game, himself included, and comprises the bulk of the guide. The information presented includes relatively detailed analyses, assorted tips and tricks, and various suggestions for each match–up, although no implication is made that these are in any way exhaustive. The match–ups are presented in the same order as the 2013 Community Tier List on Smashboards in order to organize the information in a manner relevant to the current tournament metagame and to make the information more accessible to readers interested in higher–level play.
The fourth section, “Beyond the Bracket,” is dedicated to Fox on non–tournament play terms. It includes a reference to a compilation of Fox’s single–player mode world records, scores, and videos, along with his secret taunt.
The fifth section of the guide provides various useful links to information for most any player, Fox main or otherwise. Topics covered range from tech chasing to technical frame data and beyond.
The sixth and final section of the guide simply gives credit wherever it is due and cites people directly related to and essential for the writing of this guide.
Notes on SuperDoodleMan’s Frame Data
IASA (Interruptible As Soon As): Some of the animation can be cut off by doing another action, such as an attack.
Auto–cancel: After an air attack is done doing damage, there is often an animation of the character returning to their falling state, during which you can’t do anything. Some attacks are such that that animation will not give any lag upon landing.
Land fall special lag: After many “B” recovery moves, your character will flash black and not be able to do anything. When they land from this, even though the falling animation may be the same, the time it takes to recover on the ground is dependent on which move you did.
---
I. The Basics [TB0]
I. The Basics [TB0]
A. Introduction to Fox McCloud [INT0]
Super Smash Bros. Melee is Fox’s second visit to the Smash Bros. scene, and he has never been better. Although he has lost the stun capability of his blaster from the N64 version, he retains most if not all of his moves from the previous game and then some. As a fighter, Fox is second to none in the hands of a very experienced, fast–paced, technically sound player. His lightning–quick moves; fast, effective finishers; versatile game play; and unparalleled ability to spam his projectile weapon combine to form a fighter who is more than capable of dealing with anything thrown his way. The new player, however, must be careful with Fox; more often than not, slow–moving or unwary players are caught off guard by the fast–paced nature of his moves and movements. Also, there is always the natural tendency to continuously Illusion themselves right off the stage or fall off the edge in a Tornado Kick. Once he is well under your fingers, however, you will find that Fox can control any fight against any character on any stage using his incredible speed and versatility and more than a little blaster fire.
As with any character in the game, excelling with Fox requires a sizable input of time and consistent practice. He is especially heavy in terms of technical feats, and this in many cases causes newer players to shirk the “burden” of learning Fox in favor of characters that are more user–friendly and accessible at lower levels, such as Sheik. However, you will find that Fox can be a highly rewarding and very fun (albeit at times frustrating) character once you have begun to explore him as a competitive character and muster the will to invest the necessary time and effort demanded by his technicals.
1. Pros and Cons [INT1]
Pros:
- Lightning speed on nearly every move
- Little overall lag
- Is a fast–faller
- The shine
- Fast, clean L–cancels on his bread–and–butter aerials
- Very short short–hops
- Great at controlling the pace of the fight
- A perfect combo character
- Very adaptive playing style
- Fast, effective finishers
- Fast foot speed and overall speed
- Infinites (although less prominent in today’s game)
- Very powerful grab game
Cons:- Little overall lag
- Is a fast–faller
- The shine
- Fast, clean L–cancels on his bread–and–butter aerials
- Very short short–hops
- Great at controlling the pace of the fight
- A perfect combo character
- Very adaptive playing style
- Fast, effective finishers
- Fast foot speed and overall speed
- Infinites (although less prominent in today’s game)
- Very powerful grab game
- Exceedingly common in tournament play such that virtually every player has at least a moderate amount of experience against him
- Fast–paced, demanding, and often unforgiving controls
- Is a fast–faller
- Many opportunities to self–destruct
- Recoveries can be Caped or edge–guarded relatively well
- Low overall range
- Demanding technicals give rise to consistency issues in the absence of consistent practice or while under pressure or stress
2. Modern Tournaments [INT2]
Please see the following link for a review of the modern tournament ruleset:
The modern Melee tournament ruleset has undergone innumerable modifications and has been the subject of its fair share of debate and controversy over the years. Competitive play rulesets have evolved from their humble beginnings, in which certain tournaments permitted items and oddball stages in tournament play; to a more restricted but still rather liberal ruleset that removed items but still allowed a number of comparatively off–the–wall stages; to the above modern iteration, the most restrictive and widely accepted ruleset to date.
In years long past, Fox once had at his disposal such stages as Corneria, Onett, Rainbow Cruise, and Princess Peach’s Castle, among others. Now, Fox players and competitors in general usually have six stages on which to battle. While Fox has lost some tools in terms of stage selection, he is more than capable of handling himself on the remaining stages, particularly in combination with stage–striking, which is discussed below.
For quite some time in tournaments long past, the first stage of a game was decided by players banning stages and selecting the “Random” button to have the game choose from among the remaining then–legal locales. The advent of stage striking was a welcome addition for players in general, who were granted more control over the often–pivotal first game of a set. Naturally, stage striking also permits other characters to dodge their least desired stages for the first game, but most of these characters are not nearly as versatile as Fox. The use of stage bans, although not a novel concept by any means, also allows players to influence their opponents’ possible stage choices for the following games of a non–best–of–five set, further contributing to players’ sense of control over their matches and minimizing certain undesired, skewed aspects of the game.
B. Fox’s Moves [FM0]
Please see the following link for technical views of Fox's moves, rolls, and dodges (all in gif form):
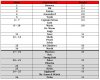
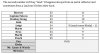
The following section provides information on each of Fox’s moves, ranging from damage to frame data (note that 60 frames = 1 second) to uses in battle. Included whenever possible is a link to a Gfycat video of each move highlighting the move’s more technical aspects (hitboxes, hurtboxes, invincibility, and so on). More importantly, this video allows you to pause and examine each move frame by frame; use this in combination with the presented frame data to gain a deep understanding of each of the tools in Fox’s arsenal. Note that the “Damage” section of each move accounts for “staling,” that is, a reduction in a move’s damage as a result of repeated use of that move; a concise explanation of the underlying mechanism of staling by Smashboards user tauKhan can be found at the following address: http://smashboards.com/threads/fox-advice-questions-topic.98202/page-790#post-17810450. The lower end of the percent range indicates a highly staled (that is, highly and sequentially overused) move, while the higher end of the percent rage indicates a “fresh” (that is, completely non–staled) move.
Frame data for the hitlag and shield stun of Fox’s moves was compiled by SCOTU and phanna (http://smashboards.com/threads/frames-of-hitlag-and-shield-stun-12-chars-done.111814/). According to phanna, hitlag “refers to the stopping of motion for both the attacking players and any victims for a brief moment when the attack hits. Shield stun refers to the inability to perform any actions from your shield following an attack, such as jump, spot–dodge, roll, or grab.” Phanna adds that both the attacker and the victim(s) “stop moving for the time of the hitlag (except for [Smash DI] or [automatic Smash DI]” and that “[p]owershield stun times are the same as shield stun[;] the advantage lies in the option of not still being in your shield after blocking the attack[.]” Furthermore, “if an attack hits (and is not shielded), then the hitbox stays out an additional (hitlag – 1) frames[.]”
1. Ground [FM1]
a. Neutral A: Jab [FM11]
Video: http://gfycat.com/YearlyEdibleHarpseal
Button: A
Damage: 2 – 4%
Speed: Very high
Priority: Low
Range: Relatively short
Knockback: Extremely low
Total frames: 17
Shield stun: 7 frames
This move has a very fast come–out time, but don’t expect it to send the opponent flying across the arena or inflict great damage. According to Fox’s design as a character, the natural purpose of this move is to lead into a Straight and series of Rapid Kicks; however, there are other (far better) uses for this move as well. Because of its high speed and natural tendency to prep opponents for equally speedy attacks (or even a lethal up–smash follow–up), the Jab can at times be useful in close–range combat at higher percents, where it can tie up foes’ timing and virtually negate all slow, high–lag power moves. At medium to high percentages, the Jab and its companion Straight can pop opponents up into the air slightly, a position where you can easily up–smash them for the kill. Take advantage of the Jab and Straight’s high speed and ability to lift foes off the ground to grab and up–throw them and open the door to combos, particularly on fellow fast–fallers. You can also use the Jab out of a shuffled neutral– or down–aerial; this will get your opponent into combo position and will hit them before they can retaliate (this is recommended only at higher percents, however, as crouch–cancels can very readily interrupt your string and put you in a disadvantageous position). Yet another use for the Jab and Straight is out of a waveshine (an advanced technique explained later), again as a form of prepping your foe for a potentially lethal up–smash (if you feel that you will not be able to fit in the up–smash before your foe has a chance to shield) or grab. Regardless, be wary of your follow–up to a prep Jab; at times, enemy DI and Smash DI (particularly on the floatier characters and at higher percentages, such as with Peach and Luigi) can shift them out and away from your chosen follow–up, giving them the time that they need to return with a counterattack. Of all things, you certainly do not want to give your foe a significant opening both to escape your potential combo and to return fire.Button: A
Damage: 2 – 4%
Speed: Very high
Priority: Low
Range: Relatively short
Knockback: Extremely low
Total frames: 17
Hit frames: 2 – 3
IASA: 16
Window of the second punch: 3 – 31
Second punch starts: 6 (or later)
Hitlag: 4 framesIASA: 16
Window of the second punch: 3 – 31
Second punch starts: 6 (or later)
Shield stun: 7 frames
One of the possible uses of the Jab and Straight is to break through your foe’s defenses in close combat with pure speed and then take advantage of that momentary lapse to initiate Fox’s excellent comboing abilities. For example, many times it will be the quick Jab that will stun your opponent long enough for you to slip in with a quick jump–canceled grab to an up–throw and a series of juggling up–aerials or an up–smash. Jabs are also handy to tie up an opponent’s hands should he or she attempt to shut you out with a quick flurry of high–speed or high–priority attacks; a well–placed Jab there could cause them to input a bunch of “dead” buttons during the stun time and interrupt their rhythm long enough for you to turn the tide of the battle in your favor with a simple combo off of a jump–canceled grab, for instance. Against fellow fast–fallers, a well–placed Jab to interrupt a hasty recovery jump could cause them to fall low enough to force an up–B recovery out of them and give you an opportunity for a quick dash–in shine (more than lethal in dittos as well as against Falco); Captain Falcon and most other characters as well can fall prey to the subsequent edge–hog and edge–guarding via ledge–hopped back–aerials. Against floatier characters at high percents, a dash–cancel into a jab could provide you with the opening you need to land a finishing up–smash or a back–aerial.
Still another use for the Jab is as a quite effective stand–in for the shine in match–ups against characters that cannot be caught in proper shine combos. For example, should you land a drill kick on characters such as Game & Watch, Kirby, Jigglypuff, Falco, other Foxes, or Roy, try to fight your urge to shine instantly and instead throw in a Jab, which can put these fall–over characters in position for a follow–up jump–canceled grab or lethal up–smash (character–dependent, of course). Keep in mind that you should not exclude shines from aerials from these match–ups entirely; not only do they keep you quite safe from shield–grabs, but you can also play “wake–up games” with your opponent, so to speak. That is, try to predict and follow how your opponent gets back on his or her feet from the shine and punish accordingly with a dashed jump–canceled up–smash, jump–canceled grab, or shuffled up–aerial, as appropriate. Mixing up shines and Jabs in said match–ups also prevents your opponent from catching on too quickly to your strategy and resorting to crouch–canceling, which can lead to some nasty turn–around situations (see below). If you notice your opponent begin to crouch–cancel, take advantage and start shining from aerials; due to their crouch–canceling, you can then follow the shine with a grab, should they not react fast enough, and follow from that, and the shine also prevents easy crouch–cancel counters on their part.
Against characters that fall to the ground from the shine, the Jab can potentially force a reaction if a player either continuously misses techs or chooses not to tech. Jabbing an opponent who is lying on the ground can force them to stand up in place (the set–up for the “Thunders combo”). You can use this easy opening to come in with a jump–canceled grab or up–smash, or even a shuffled up–aerial. This technique is especially useful against Falco and other Foxes, both of whom will be hitting the ground fairly frequently throughout the course of the fight. Note that it is possible to Smash DI the Jab set–up upwards to escape the jab reset, and it is also possible to buffer a roll afterwards rather than stand up in place. Furthermore, at certain percents for each character, your target will be popped up into the air rather than stand up when jabbed from a prone position (see the following post by Smashboards user Shai Hulud for more detailed information: http://smashboards.com/threads/jab-stand-up-pop-up-percentage-list.173797/); thus, the viability of your jab reset is constrained by opposing percentage. If you see your opponent begin to Smash DI the initial Jab, you can throw in the follow–up Straight to catch them in the air and set up for an up–smash. Please see the following link for an example of the jab reset as performed by Mewtwo: http://smashlounge.com/techniques?tech=Jab Reset.
You absolutely must be aware that Jabs and Straights do not go well with crouch–canceling in the slightest; when coupled with these moves’ virtually nonexistent knockback, crouch–canceling puts you in a very bad situation that will allow your opponent his choice of retaliation. Be especially wary of characters that frequent their crouch–cancels as a means of opening you up, such as Peach (down–smash); Yoshi (down–smash); Samus (down–smash and down–tilt); Mario and Dr. Mario (down–smash); Sheik (down–smash and down–tilt, which will set you up for a potentially lethal forward–aerial); and Mr. Game & Watch (down–tilt that will set you up for a follow–up of the player’s choice, usually a forward– or neutral–aerial). Crouch–cancels from virtually all other characters also can lead to trouble for your Fox, so be wary of your opponent’s style and take note of whether or not he makes frequent use of his crouch–cancel. Note as well that characters can also grab out of their crouch–cancels; this is particularly worrisome with such opponents as Marth, Sheik, Falcon, and the Ice Climbers, all of whom have particularly potent grab games and as such will be looking for easy ways to open you up at low percents.
In general, Fox’s Jab is seeing less action in today’s tournament scene than it has in years past. This is due largely to the numerous aforementioned problems with crouch–cancels and use at lower percents, either of which could cost you either a significant chunk of percentage or that entire stock. The Jab is also not safe when connecting with a shield, despite its short duration. As well, the faster pace of tournament play often leads to a number of unintentional opposing crouch–cancels that can nevertheless cost you percentage or stocks. As a result, I would recommend not becoming excessively reliant on Fox’s Jab outside of its use in forcing a get–up or other such relatively safe situations; the overall risk–reward simply does not justify widespread use, particularly when aerial lead–ins such as the neutral– and down–aerials are so much safer and potentially just as rewarding. Of note is the use of the Jab in doubles to wake up a Jigglypuff teammate after a landed Rest as well as to knock a teammate out of up–B fall stun or shield–break stun.
b. Neutral A, A: Straight [FM12]
Video: http://gfycat.com/FirmForsakenAngwantibo
Button: A, A
Damage: 2 – 4%, 2 – 4%
Speed: High
Priority: Low
Range: Relatively short
Knockback: Extremely low
Total frames: 20
Shield stun: 7 frames
The follow–up to the Jab, which can lead into a series of Rapid Kicks. A one–two punch with a Jab and Straight can lead nicely to a powerful up–smash, but be aware that your opponent has two opportunities to DI out of range (one each for the Jab and the Straight). The Straight is very much similar to the Jab, but with one exception: when Fox Straights, he takes a slight step forward. If you time the rhythm of your Jabs and Straights, you can advance on your enemy very slightly with a Jab–Straight, Jab–Straight series (be careful not to press “A” again during the waiting time for the Rapid Kicks; otherwise, you’ll go into those instead of what you had intended to do). The step forward that Fox takes can also quickly put you in range of your opponent should your initial Jab very slightly miss him or her, although this is not recommended to be done very often (if at all, at higher levels of play). You can also follow the Jab–Straight with a quick waveshine into a grab or most anything else Fox can do. Again, keep in mind, that adding in the Straight after a Jab also gives your opponent another opportunity to input DI, which may cause you to miss your chosen follow-up.Button: A, A
Damage: 2 – 4%, 2 – 4%
Speed: High
Priority: Low
Range: Relatively short
Knockback: Extremely low
Total frames: 20
Hit frames: 3 – 4
IASA: 19
Window of the kick–jabs: 1 – 20
Kick–jabs start: 6
Hitlag: 4 framesIASA: 19
Window of the kick–jabs: 1 – 20
Kick–jabs start: 6
Shield stun: 7 frames
All told, as with the Jab, the Straight is a rare sight in tournament play today for reasons similar to the Jab, that is, its weakness to crouch–cancels, relative risk on hit at lower percents (as well as requiring commitment to a Jab in the first place), and risk on connecting with a shield. The main use of the Straight is as an answer to upwards Smash DI used to escape a Thunders combo set–up.
c. Neutral A, A, A…: Rapid Kick [FM13]

Video: http://gfycat.com/SpotlessSameArmadillo
Button: A, A, A...
Damage: 2 – 4%, 3 – 4%, 1%...
Speed: High
Priority: Low
Range: Relatively short
Knockback: Extremely low
Hits: 3 – 4, 10 – 11, 17 – 18, 24 – 25, 31 – 32
Shield stun: 5 frames per kick
A simple yet semi–effective way to add on damage, Rapid Kicks closely follow the Jab and Straight punches. Larger opponents can be caught in this move for quite some time, depending on where they are when you begin the series, their percentage when you first begin hitting them with it, and the extent of their DI. For this reason, you should initiate the series as close as possible to the opponent so it takes longer for them to DI out of your flying feet. Opponents who habitually crouch–cancel and who do not react in time in between each of the Rapid Kicks can be caught in them for quite a while before they scroll or DI out and away from you. Also, be adept at very quickly executing the Jab and Straight (with two swift taps of the “A” button) to catch the opponent closer to yourself when you start the Rapid Kicks. When you see your opponent begin to crawl out of your Rapid Kicks, follow immediately into a down–tilt, grab, or other fast move so as to give yourself the best chance to cut off their response.Button: A, A, A...
Damage: 2 – 4%, 3 – 4%, 1%...
Speed: High
Priority: Low
Range: Relatively short
Knockback: Extremely low
Hits: 3 – 4, 10 – 11, 17 – 18, 24 – 25, 31 – 32
Intermediary animation: 6 frames
One full cycle: 36 frames
Hitlag: 3 frames per kickOne full cycle: 36 frames
Shield stun: 5 frames per kick
Be sure not to Rapid Kick for long periods of time; your opponent oftentimes can escape from a set of Rapid Kicks before you are actually finished with it, and any number of their moves can cut through your low–priority kicks. Also, be aware that many characters, particularly lighter ones with slower falling speeds, can DI out before your first set of Rapid Kicks ends; this can result in Fox being hit as he is replacing his foot from the kicks. Players can also DI your initial Jab or Straight away if they react fast enough, in which case your Rapid Kicks will once again not be a safe option. If they can get out of range of the last few strikes of your final set of kicks, they will be ready to react before you thanks in no small part to the Rapid Kicks’ post–move lag. Be wary of this, especially at higher percents and while facing characters with slower falling speeds; in both instances, their amount of directional influence may allow them to hit you before you are out of your post–move lag.
Truth be told, the Rapid Kicks hold almost no weight in Fox’s current singles metagame. Their effects are not powerful enough to secure a mainstay spot in his game plan; they are not the most effective of follow–ups to the quicker Jab, which is far more versatile than the Rapid Kicks could ever hope to be; and the ever–present threat of crouch–canceling, especially at lower percents, can open you to far more damaging set–ups against any number of opponents. Be sure not to make these Kicks your principle follow–up to your Jabs and Straights as you progress in skill; you have far more powerful options in jump–canceled grabs and up–smashes. Ultimately, you should aim to remove the Rapid Kicks almost entirely from your singles repertoire; you may be able to utilize them in a two–on–one scenario in doubles where your teammate has grabbed the opponent, but a simple up–smash or up–aerial is far more efficient and will either kill outright or set your teammate up for his or her own kill move of choice.
d. Forward–Tilt: Fox Kick [FM14]
Videos:
Damage: 4 – 9%
Speed: High
Priority: Medium–high
Range: Medium; straight variation has longest range
Knockback: Decent
Total frames: 26
Shield stun (all angles): 12 frames
This simple kick does not exactly excel at damage or knockback, in addition to leaving you open for a tiny bit as Fox withdraws his foot. As well, the slight lag time afterwards will stop you from effectively pursuing foes at higher percentages. Fox’s forward–tilt does come out rather quickly, however, and therefore carries a decent amount of priority with it. The forward–tilt itself is only 3 frames slower than your Jab but possesses greater range and knockback; it is because of these facts that the forward–tilt is a good defensive option when your opponent is at higher percents. You can often intercept an incoming attack with a well–placed forward–tilt, if you react in time. Remember that you can combine the forward–tilt with a reverse wavedash to further improve your defensive abilities.Upward: http://gfycat.com/SkinnyGrimyDeviltasmanian
Straight: http://gfycat.com/ZigzagSlipperyKoodoo
Downward: http://gfycat.com/PaltryCoarseFowl
Button: Left/Right tilt + A (forward–tilt)Straight: http://gfycat.com/ZigzagSlipperyKoodoo
Downward: http://gfycat.com/PaltryCoarseFowl
Damage: 4 – 9%
Speed: High
Priority: Medium–high
Range: Medium; straight variation has longest range
Knockback: Decent
Total frames: 26
Hit frames: 5 – 8
Hitlag (all angles): 6 framesShield stun (all angles): 12 frames
Remember as well that this single attack actually consists of three separate attacks: a kick aimed about level with Fox’s head, another nearly straight out in front of him, and yet another at a low angle near the ground. The angle at which you tilt the control stick for the attack determines which variant you will use (even a slight difference in the angle will change which variant you use). In addition, each variant sends its foe at a different angle in the knockback, i.e., the high at a higher angle, the straight at a relatively straight angle, and the low at a relatively low angle.
The straight variant has the longest range of the three, and also has an interesting property to it. Since it pushes the enemy a good distance away, it can be used effectively to combat crouch–cancellers, a very important attribute for close–range melees involving characters that utilize crouch–canceling as a significant part of their game, such as Samus and Mr. Game and Watch. As well, the straight forward–tilt can be used to harass opponents hanging on the edge who are attempting to regain their position on–stage; with this option, you can, for example, catch opponents out of a botched edge–hop, leaving them without their jump and you with total control of the stage and their stock.
The upper variant is not really used as much as the other two variants. It does not have the crouch–cancel–stopping ability of the straight variant, and with the withdrawal time of the move factored in, you cannot reliably combo out of it. You may be able to make use of it as a highly situational anti–aerial move, but it cannot compare in the slightest to your up–tilt in this regard.
The lower variant can be used as a form of edge–guarding (due to the fact that Fox’s foot extends slightly below the stage) that can catch many opponents out of the air. A nifty technique in and of itself, but if you want other options for edge–guarding, you can go for the down–tilt to pop the opponent back into the air (where you can do more with them) or the space animal’s powerful shine (the shine will be discussed in great detail later). Ledge–hopped and shine–turned back–aerials are also very effective forms of edge–guarding and powerful methods for dealing a quick and lethal off–stage hit. If anything, the downward–angled forward–tilt can function as a mild substitute for the down–smash; indeed, due to its short animation and down-time, it presents a safer alternative overall that can very often allow you to cover multiple edge–guarding options at once (but do not expect it to net you a stock by itself; it may at times require a bit of follow–up to get the job done).
e. Up–Tilt: Back Kick [FM15]
Video: http://gfycat.com/MenacingEquatorialHydra
Button: Up tilt + A (up–tilt)
Damage: 4 – 12%
Speed: High
Priority: High
Range: Low–medium
Knockback: Decent
Total frames: 24
Shield stun: 14 frames
This move is deceptively powerful and in itself is capable of KO’ing opponents at high percentages. A natural follow–up to the hilarity that is Fox’s down–throw against foes not well–versed in teching or DI, it can also aid in juggling certain characters following an up–throw. An interesting property of the vulpine space animal’s up–tilt is that, although it appears that he only strikes above himself, this move actually has the ability to hit both in front of and in back of him in a certain small radius. This is not exactly game–breaking, but it does improve your ability to juggle from the ground with this move.Button: Up tilt + A (up–tilt)
Damage: 4 – 12%
Speed: High
Priority: High
Range: Low–medium
Knockback: Decent
Total frames: 24
Hit frames: 5 – 11
IASA: 23
Hitlag: 7 framesIASA: 23
Shield stun: 14 frames
There are more than a few ways in which you can use the up–tilt effectively. For example, the up–tilt makes a powerful anti–aerial weapon due to its high priority and its speed. It is surprising how well this single move disrupts approaches; simply turn your back to your enemy and let loose with a few well–timed up–tilts to catch your foe and ready him for a back– or up–aerial or up–smash. Another way to make use of this move is as a follow–up to a cross–up aerial (that is, an aerial spaced such that you land behind your opponent), preferably when he or she is shielding. From your position behind your opponent, your up–tilt can either catch them as they attempt to escape their shield (particularly useful for opponents with predictable shield escape timings and choices), or it can eat away at their shield should they insist on holding it up for some time. If the up–tilt hits, you can follow (depending on the character and the percentage) with the usual up– or back–aerial, up–smash (turned around for the sweet–spot, if necessary), or more up–tilts to an up–smash or turn–around grab to the usual up–aerial juggling. It is of course entirely possible for your opponent to escape the shield in between your up–tilts, so be prepared for that possibility as well; this is particularly important against Falcon, who relies on escaping shields safely and can down–aerial you out of his shield to set you up for a tech–chase or a lethal knee. For this reason, as with virtually all other scenarios in Melee, it is important to mix up your cross–ups and the timing of your follow–up up–tilts.
If you want to get creative with your edge–guarding, you can get some use out of the up–tilt in that regard as well (with good timing, of course; its priority alone will more often than not allow it to plow through a good deal of recoveries). Your follow–ups should you choose to go this unique route could include a back–aerial to send your opponent back out again, perhaps for good this time, or, if you are facing a floatier character or a higher–percent opponent, an up–aerial may allow you to deal the killing blow right then and there. This scenario often occurs with opposing Foxes or Falcos attempting to Illusion onto the stage. Of course, you have other forms of edge–guarding at your disposal as well as discussed earlier, but the innate speed of the up–tilt does allow you to cover multiple recovery options at once.
f. Down–Tilt: Fox Tail [FM16]
Video: http://gfycat.com/AllTeemingBarnowl
Button: Down tilt + A (down–tilt)
Damage: 5 – 10%
Speed: Medium
Priority: Medium
Range: Low–medium
Knockback: Moderate
Total frames: 29
Shield stun: 12 frames
One of Fox’s longer tilts in both range and total frame time, this move pops opponents up into the air, readying them for an up–smash, up–tilt, or juggling via up–aerials. On less experienced opponents, i.e., those that do not know how to tech or DI, you can get an easy launch off of the down–tilt from a down–throw, but otherwise I would advise that you steer clear of that generally ineffective route as the up–throw, up–tilt, and up–smash are obviously far more powerful launchers. On a side note, keep in mind that the hit box for this move is in front of Fox, not on both sides of him; in other words, don’t try to hit an opponent at your rear with this move; that’s why the down–smash is here. Also keep in mind that this move can be readily crouch–canceled and has a rather lengthy total animation time, two factors which can combine to leave you vulnerable in certain situations.Button: Down tilt + A (down–tilt)
Damage: 5 – 10%
Speed: Medium
Priority: Medium
Range: Low–medium
Knockback: Moderate
Total frames: 29
Hit frames: 7 – 9
IASA: 28
Hitlag: 6 framesIASA: 28
Shield stun: 12 frames
The down–tilt, although not the most versatile or powerful of Fox’s moves, has its own uses in battle. It can be used to circumvent spent shields as it creeps underneath toward your foe’s feet, and it also functions at high percents as a strange alternative vertical KO move. In addition, you can use the down–tilt for edge–gaurding since Fox swishes his tail over the edge (keep in mind that this will rarely if ever hit sweet–spotting opponents, thus making it a sort of innovative punishment for a missed sweet–spot that many opponents will neglect to DI). With your opponent off of his or her feet, you are free to push them into the open air yet again with a neutral– or back–aerial, or you may be able to kill right then and there with an up–aerial.
Remember that the down–tilt is not fast enough to form true combos from your down–aerial approaches. Its short and front–facing hitbox also forces you to be in a certain position for it to connect. Regardless, you can still use the down–tilt as a sort of spacing fixer after a shuffled neutral– or down–aerial. For example, should you underestimate the distance between yourself and your opponent in your approach, a follow–up down–tilt could give you the range to connect and prep your opponent for an up– or back–aerial. You can also use this technique to deal with players who insist on constantly wavedashing backward to deal with your approach. If you so choose, you can also use the down–tilt as a means of punishing predicted techs and wake–ups (grabs are generally a more powerful option overall, but the down–tilt is relatively underused in the modern Fox repertoire and so many opponents will not be expecting it and thus miss their DI, setting up for an easy up–aerial). As well, depending upon your enemy’s DI, you may be able to connect with a down–tilt after a successful shuffled neutral–aerial, once again readying your opponent for further juggling. Finally, the down–tilt can be useful against opponents who fall to the ground when shined; when performed quickly enough (note that you can buffer the tilt’s down input during your wavedash out of the shine) out of a wavedash of adequate length, a down–tilt can lift an unwary foe off of the ground and put him or her into position for an up– or back–aerial, for example.
g. Forward–Smash: Roundhouse Kick [FM17]
Video: http://gfycat.com/BackDistortedAoudad
Button: Left/right Smash + A (Left/Right C–Stick; forward–smash)
Damage: 6 – 15% (20% when fully charged)
Speed: Medium
Priority: High
Range: Low–medium
Knockback: Significant, although not high for a Smash
Total frames: 39
Shield stun: 16 frames uncharged, 19 frames charged
Although not as powerful an attack as his wingmate Falco’s, Fox’s forward–smash is relatively powerful and somewhat fast, always a good combination, and can be used effectively as an edge–guarding tool. Avoid it at low percentages, however, as your opponent may be able to hit you while you are in the lag from flying past them (especially if they are crouch–canceling). Also keep in mind that because of the move’s noticeable wind–up time and good amount of post–hit ineffective frames, the forward–smash is very easily punished by shield grabs, with the exception of the very low–traction characters; the fact that Fox moves himself forward during the attack also makes spacing the forward–smash properly an often–unnecessary and risky chore. Considering Fox’s built–in vulnerability to chain throws and juggles thanks to his fast–falling, chances are you would rather avoid falling into one of those.Button: Left/right Smash + A (Left/Right C–Stick; forward–smash)
Damage: 6 – 15% (20% when fully charged)
Speed: Medium
Priority: High
Range: Low–medium
Knockback: Significant, although not high for a Smash
Total frames: 39
Hit frames: 12 – 22
Charge frame: 7
Hitlag: 8 frames uncharged, 9 frames chargedCharge frame: 7
Shield stun: 16 frames uncharged, 19 frames charged
The forward–smash itself has its own form of a sweet spot; in this case, it is more like a “sweet time.” The move is more powerful nearer to its initial attack point. For example, consider the scenario in which you forward–smash while your opponent is falling to earth from a jump. You have been forward–smashing (that is, you have been in the animation of it) for about a quarter of a second or so when your opponent falls onto your forward–smash. You will notice that you will not get the “solid” hit of the forward–smash, but rather a “soft” hit (which is you essentially stepping on your foe) that produces far less knockback than a properly positioned forward–smash would have.
Although the forward–smash is not the most versatile or powerful of Fox’s smashes, it too has its own (mainly situational) uses. As mentioned above, it is a handy edge–guarding tool against characters who lack good horizontal recovery options; Captain Falcon is particularly vulnerable to this thanks to his relatively predictable recovery. It can also be used on–stage as a way to punish missed techs, preferably resulting in your opponent being pushed off–stage where your ledge–hopped back–aerials can finish the job (this is particularly effective in the fast–faller match–ups and against characters whose recoveries can be exploited for easy kills). For tech punishes when your opponent is at higher percents and thus is more likely to be DI’ing for an up–smash, you can swap in a forward–smash as a DI trap, causing his away DI meant for the up–smash to amplify greatly the knockback of your forward–smash.
You can also make use of the forward–smash as a way to punish poorly spaced approaches; simply wavedash back to space yourself correctly and let fly with the forward–smash. Similarly, you can bait a reaction out of your opponent and punish with a forward–smash. To do this, charge toward your opponent while watching their character very closely for signs of movement. If you see them begin to wind up an attack, immediately wavedash backwards and follow with a forward–smash right into their face. However, note that you may have to decrease your wavedash’s horizontal length in order to connect fully with the forward–smash. To do this, you must change the angle of your control stick during the wavedash’s air–dodge component; this involves positioning the control stick at a less–than–horizontal position. Note that the closer your control stick is to perfectly horizontal during a wavedash, the longer your wavedash, and that positioning your control stick completely downward will result in an in–place wavedash. Still another use for Fox’s forward–smash is to punish get–up attacks in combination with your crouch–cancel; if you are at a sufficiently low percent, your crouch–cancel of the get–up attack will keep you within range of your opponent and allow you to connect with your forward–smash. Again, keep in mind your vulnerability to being shield–grabbed with the forward–smash; it is best to play it safe and not make heavy use of this move unless the situation is entirely appropriate and safe.
Overall, this is certainly not Fox’s most desirable Smash; that honor belongs to the up–smash. In general, this attack sees very little (if any) use during the neutral game of the modern tournament and is mainly reserved for edge–guarding situations, such as against Captain Falcon.
h. Up–Smash: Flip Kick [FM18]
Video: http://gfycat.com/PleasantAdventurousKissingbug
Button: Up Smash + A (Up C–Stick; up–smash)
Damage: 7 – 18% (24% when fully charged)
Speed: High, for a Smash of this caliber
Priority: Relatively high
Range: Medium
Knockback: High
Total frames: 41
Shield stun: 19 frames uncharged, 23 frames charged
This move, known to all competent Fox players, is the space animal’s notorious up–smash. Able to KO very consistently at relatively low percentages, you will see this used as often as possible by any Fox player who knows what he or she is doing, and for good reason. It is fast, almost too fast when combined with its startling power. Remember that the up–smash changes its knockback power depending on which part of the circle created by Fox’s flipping feet hits the opponent. Generally, the most knockback occurs between the outermost area (the perimeter of the circle) and the innermost area (slightly around Fox’s body). If you hit the opponent too near Fox’s body or on the very edge of the “circle,” you will get essentially a “soft” hit, which will not produce as much damage and not nearly as much knockback as a properly–positioned up–smash would; such a hit also sends opponents more sideways than upwards. Rest assured, though, that it is not extremely difficult to position this attack; it will become a natural feeling for you with enough play. Of course, always try to achieve the proper positioning in order to increase knockback and give yourself more time to recover and resume the chase.Button: Up Smash + A (Up C–Stick; up–smash)
Damage: 7 – 18% (24% when fully charged)
Speed: High, for a Smash of this caliber
Priority: Relatively high
Range: Medium
Knockback: High
Total frames: 41
Hit frames: 7 – 17
Head invincible (but not snout): 1 – 9
Charge frame: 2
Hitlag: 9 frames uncharged, 11 frames chargedHead invincible (but not snout): 1 – 9
Charge frame: 2
Shield stun: 19 frames uncharged, 23 frames charged
Also, be aware that soft–hitting an opponent will not stun them for as long, and they may be able to recover and hit you back before the up–smash actually ends. If you are truly talented at positioning Fox, you can strike opponents in front of you with the diameter of this attack; chances are its stunning priority will win out and punch through their defenses, although this course of action is not recommended for routine use, of course. Enemies in the rear can also be hit by this attack, but this will nearly always result in a "soft" hit; the down–smash is best for covering both sides of your furry hide. For more craziness, try wavedashing out of the shine and into a killer up–smash; this sequence, called a waveshine up–smash, is essential for optimal punishes in such commonplace match–ups as Peach and Marth. In addition, you can up–smash right out of the shield. To do this, you must, of course, be in shield, and then jump and immediately smash up on the C–Stick. The C–Stick will cancel your jump, much like “Z” for jump–canceled grabs, and Fox will up–smash straight out of his shield. Note that this maneuver can also be done without the C–Stick. This is a very powerful technique indeed, and if you can show your opponent that you can do it consistently, it may make him or her think twice about his or her next move. You will find that you can pull off more than a few kills with the up–smash out of shield as an extremely powerful and effective punisher for all manner of technical mistakes that your opponent makes, from botched fast–falls to slow aerial–to–shine transitions to shielded dash attacks to missed L–cancels and much more. Modern–day play, however, focuses much more on technical aptitude and precision spacing, both of which very often make up–smashing out of shield an undesirable option; overuse or improper use can open you to opposing baits, particularly if your opponent spaces correctly off of your shield. You should still keep it as a tool, however, against characters such as Marth that fear mis–spacing their aerials on shield (especially effective if you can run in and shield your enemy’s aerial within their range) or as a means of punishment after a mis–spaced follow–up on your shield. You should be especially conscious of using up–smash out of shield properly against floatier characters (such as Peach and Jigglypuff) when they are at higher percents because an autopilot shield grab in such situations costs you an easy lethal opening.
You can also up–smash out of a run. This is not at all difficult to do, and may aid you in maintaining or beginning your combos or pressuring your opponent. While you are running, simply quickly press up and “A” simultaneously (a jump–cancel; this must be perfectly synched, which is not exactly hard to do, but if you make a mistake, you will probably end up jumping with an up–aerial), and you will perform a (probably slightly charged) up–smash. The same general effect is achieved when you jump–cancel into an up–smash using the C–Stick, but you are not given the ability to charge the up–smash easily while you are enroute to the spot to which you were running (note that you can charge C–Stick Smashes with the “Z” button, but it is extremely awkward to perform). A potential use of the running jump–canceled up–smash is to catch your opponent out of the air right before he or she hits the ground and is given a window to get away from your combo. You can also use it to zoom in with a pre–charged up–smash during the lag from one of your opponent’s moves and begin some damaging juggling. In addition, a charged jump–canceled up–smash is an often–lethal finisher for your fast–faller chain throws, something to take into consideration for the ditto match and the Fox–Falco match–up. As with most maneuvers, however, running jump–canceled up–smashes are not to be repeated incessantly without a set–up as the attack can open you to shield grabs. Please see the following gif for an example of the running jump–canceled up–smash: http://smashlounge.com/techniques?tech=Jump Canceled Up Smash.
Remember that you can also up–smash out of a run via dash–canceling, that is, by pressing down while running to cut your speed and momentum and then immediately afterwards smashing up + A or up C–Stick. Note that if you use the C–Stick for this maneuver, you can continue to hold down on the control stick, thus granting you a crouch–cancel that you can use to shrug off retaliating hits, such as dash attacks.
In terms of follow–ups and launchers, there is very little in Fox’s arsenal that can stand toe–to–toe with his up–smash. As mentioned previously, the up–smash has more than its fair share of possibilities in battle. Jab to up–smash is great at tying up your opponent’s timing while simultaneously opening him to a lethal hit (especially useful as a set–up against floatier characters, but always be wary of crouch–cancels). Waveshine to up–smash is a Fox favorite, particularly when done out of a connected down–aerial. The up–smash is also the finisher of choice for Fox’s infinites, which are discussed near the end of the guide. Like the up–tilt, a well–timed up–smash can do wonders to turn the tables on a predictable approach, even one as speedy as your own shuffled neutral–aerial, when spaced and timed correctly; although a risky endeavor, an anti–aerial up–smash can pay off in more than a few instances, especially when it leads to juggling or death right after breaking the opponent’s advance. Of course, a lone up–smash by itself can lead to up–aerial juggling or a back–aerial to edge–guarding, and it is the perfect companion to finish off a round of up–tilts from an up–throw or otherwise.
In general, the up–smash is Fox’s most versatile Smash in terms of power, speed, and utility. It is a very effective killing move that comes out quickly and sends the opponent airborne for a significant distance, opening him or her to all manner of often–lethal follow–ups and combos (provided the up–smash did not finish the stock then and there, that is).
i. Down–Smash: Fox Split [FM19]
Video: http://gfycat.com/FlatAdorableHorsechestnutleafminer
Button: Down Smash + A (Down C–Stick; down–smash)
Damage: 8 – 15% (20% when fully charged)
Speed: Relatively high
Priority: Relatively high
Range: Medium–high; hits on both sides
Knockback: Decent
Total frames: 49
Shield stun: 16 frames uncharged, 19 frames charged
A decent Smash at higher percentages, the down–smash should be used sparingly in the neutral game as it has very noticeable recoil as Fox twists around to resume his fighting stance. Used as an edge–guarding tool, it sends opponents off at a hideous angle (especially effective on fast–fallers) if you can get Fox’s foot to jut out over the ledge and into your foe’s face; the invincibility on frame 6 is most useful in this regard. Indeed, you will find this move quite effective in dealing with opposing space animals at the edge (simply wait for the distinctive “ping” of their respective forward–B’s and time your down–smash to connect with them just as they reach the edge) as well as characters with easily–read recoveries. In addition, you can flow easily into this move should your opponent air–dodge your ledge–hopped or shine–turned back–aerial (going into a properly positioned forward–smash is also an option in that situation). A successful down–smash tech read near an edge can also put your opponent in a quandary as the move’s downward angle can set up for shine–spikes combined with ledge invincibility frames. As well, you should note that this move does conform to the angle of most sloped surfaces; for example, a down–smash at either edge of Yoshi’s Story causes both the animation and its hitboxes to adopt the downward angle of that edge’s downward slope during the attack, an appreciable boost to your edge–guarding game on that stage.Button: Down Smash + A (Down C–Stick; down–smash)
Damage: 8 – 15% (20% when fully charged)
Speed: Relatively high
Priority: Relatively high
Range: Medium–high; hits on both sides
Knockback: Decent
Total frames: 49
Hit frames: 6 – 10
Legs invincible on frame: 6
IASA: 46
Charge frame: 2
Hitlag: 8 frames uncharged, 9 frames chargedLegs invincible on frame: 6
IASA: 46
Charge frame: 2
Shield stun: 16 frames uncharged, 19 frames charged
Be wary with the down–smash, however. Granted, it is a Smash, but that does not automatically make it a killer move; on the contrary, the down–smash will rarely if ever kill someone outright, and the lag time is definitely not worth using it as a primary killing move as you would the up–smash. If you try this move at low and middle percents, you will get hit back, no questions asked, especially if you hit a crouch–canceling opponent. The down–smash is a good ender for a combo that has pushed your opponent to the edge of the stage since by then its knockback power will have increased, and it comes out faster than the forward–smash does to boot. Keep in mind that you can also down–smash out of a drillshine/waveshine; this is especially effective against Captain Falcon, who is vulnerable to shine–based combos and relies on recovering from high positions.
j. Dash Attack: Jumping Side Kick [FM110]

Video: http://gfycat.com/RemorsefulGreatGallowaycow
Button: A while running
Damage: 2 – 7%
Speed: High
Priority: Medium
Range: Medium (including horizontal distance traveled)
Knockback: Enough to pop opponents into the air slightly, assuming they are not crouch–canceling
Total frames: 39
Shield stun: 10 frames
Not exactly the most powerful move, this kick does have considerable horizontal reach and does a decent job of plowing through a row of fighters. It is an average follow–up to mind games involving dash–dancing and wavedashing since it comes out pretty quickly, but you do have safer options at your disposal. If you do use it, make sure to do so when you can clear your opponent; you do not want to give them a chance to pivot around and smack you. Look out for shield–grabbing too. For these reasons, it is generally better to perform shuffled neutral–aerials instead of this move repeatedly; the neutral–aerial is far faster, has far less lag time than the dash attack, is more powerful, and permits you far more effective follow–ups. Don’t rely too heavily on this attack, especially at higher levels of play.Button: A while running
Damage: 2 – 7%
Speed: High
Priority: Medium
Range: Medium (including horizontal distance traveled)
Knockback: Enough to pop opponents into the air slightly, assuming they are not crouch–canceling
Total frames: 39
Hit frames: 4 – 17
IASA: 36
Hitlag: 5 framesIASA: 36
Shield stun: 10 frames
Despite these taboos against the dash attack, it has its own unique uses. Since the dash attack is not nearly as safe as shuffled neutral– and down–aerials, you must be careful only to use this move in relatively safe circumstances, much like the down–smash. For example, should you notice that your opponent is not prone to putting up his or her shield, you can often land a dash attack to begin juggling with up–tilts and up–aerials or simply get a larger launch (or kill) from an up–smash. Mindgaming into a dash attack out of dash– and wave–dancing is also a somewhat viable option, and you can even launch opponents into the air after a shuffled neutral–aerial or two for juggling or the usual death by up–smash. A more off–the–wall way to use the dash attack is as a strange form of edge–guarding; the dash attack essentially puts up a long–lasting hitbox at the edge which can set up a recovering opponent for a forward–, down–, or up–smash (depending on percentage and DI, of course) without requiring terribly precise timing. Innovative, yes, but not as efficient and effective as other previously–discussed methods of edge–guarding. If by chance you are facing a less–than–competent player, you can effectively juggle them on your foot with this move. Watch out for the strange “anti–gravity” effect, though. All told, the dash attack should only be used offensively if you are able to space it properly and your opponent is not at lower percents or crouch–canceling relatively frequently; while the attack is vulnerable to shield grabs, correct spacing will put you on the other side of a shield and in fact can afford you an advantageous position as you can begin pounding the shield with up–tilts or shine–aerials from the safety of your opponent’s back.
Fox’s dash attack can also be useful as a follow–up to your shine against opponents who fall when shined. This is a helpful alternative to the down–tilt in this regard as the horizontal distance covered by the dash attack compensates for any deficiencies in the length of your wavedash. Similar to the down–tilt out of a shine knockdown, this option sets up nicely for a number of follow–ups depending upon the specific opposing character and your opponent’s percentage, ranging from a grab to a back– or up–aerial and even an up–smash.
Another often–neglected use for this attack is against boomerang–happy Link and Young Link players, strangely enough. Most starter Fox players would resort to the Reflector to bat away the Hylian heroes’ weaponry; this is if you do not really care about advancing on your opponent or allowing them to advance on you since you have a moment of time when the projectile hits your Reflector that you are “frozen” in lag time. This down time is significant and could cost you your approach and positioning and thus your trademark game–winning pressure. If you dash attack into the boomerang instead of reflecting it, the collision will cancel your kick and send the boomerang back towards them, within which time you can advance. The same maneuver can be done with Jabs and Straights, but owing to their already lightning–quick speeds, the collision cancel will do essentially nothing. The forward movement from the dash attack also allows you some advance on the Link’s position as well, again making it a more effective form of dispatching the boomerang, and the longer hitbox on the dash attack removes practically any need of timing on your part as well. Do not forget that there is also a tiny bit of lag for Link and Young Link when they grab their returning boomerang; try to use that to your advantage too.
The dash attack is also a component of an infrequently–used advanced technique named the “boost grab” (discussed under the “Advanced Techniques” section). This grab when used with Fox doubles the distance of his dash grab.
k. Taunt: "Come on!" [FM111]
Button: Up on Control Pad
Duration: 110 frames, or 1.833333... seconds (thanks, Mew2King!)
Duration: 110 frames, or 1.833333... seconds (thanks, Mew2King!)
“Come on!”: 31 (thanks, SuperDoodleMan!)
Fox leans far back to the ground and beckons to the opponent with a curling finger and a “Come on!” as he motions toward himself with his head. Little is more annoying than hearing Fox taunt you from across the stage while blaster fire crashes into you over and over again; see if you can irritate your foe into making a hasty, poorly–planned charge at you.
2. Air [FM2]
a. Neutral–Aerial: Flying Kick [FM21]
Video: http://gfycat.com/AggressiveUnluckyDinosaur
Button: A (neutral–aerial)
Damage: 6 – 12%; a hit with the later frames of this move (a “soft–hit” neutral–aerial) that is highly staled can inflict as little as 4%
Speed: Very high
Priority: Relatively high
Range: Medium–low
Knockback: Medium
Total frames: 49
Shield stun: 14 frames; 12 frames when stale
This kick is interesting in that Fox’s foot stays out for quite a while, giving the move a large chance of hitting a foe. Average damage and very fast come–out time comprise this move, Fox’s basic aerial attack. Note that the damage and knockback that this move inflicts decrease with the amount of time that Fox has his foot out; thus, the strongest attack will occur at the very beginning of this move. As such, you can change the timing at which you connect with this move in order to emphasize killing and forcing your opponent off–stage (with earlier, stronger hits) or comboing into grabs or up–smashes (with later, “softer” hits, which are particularly useful in stringing together combos on floatier opponents and in preventing your adversary from escaping a combo prematurely).Button: A (neutral–aerial)
Damage: 6 – 12%; a hit with the later frames of this move (a “soft–hit” neutral–aerial) that is highly staled can inflict as little as 4%
Speed: Very high
Priority: Relatively high
Range: Medium–low
Knockback: Medium
Total frames: 49
Hit frames: 4 – 31
IASA: 42
Auto–cancel: <3 37>
Land lag: 15 framesIASA: 42
Auto–cancel: <3 37>
L–canceled: 7 frames
Hitlag: 7 frames; 6 frames when staleShield stun: 14 frames; 12 frames when stale
Shuffled (short–hopped, fast–fallen, L–canceled) neutral–aerials are one of Fox’s two key approaches, the other being a shuffled down–aerial; of the two, shuffled neutral–aerials are used far more frequently. The sheer speed with which the neutral–aerial comes out, its priority, and its clean L–cancel allow you an extremely powerful advance that is difficult to break should you space your approaches correctly. More often than not, an opponent’s best solution to your approach is a backward wavedash to reposition themselves and space for a jump–canceled grab, forward–smash, or other fast, high–priority attack; for this reason, it is imperative that you be aware of your neutral–aerial spacing at all times and choose your take–off points with care. You can then follow your shuffle with a quick Jab to reach out and cut off your opponent’s response while also opening them to a jump–canceled grab or an up–smash; be way of crouch–cancels, however. It is absolutely essential that you have total, unwavering control over the execution and use of your shuffled neutral–aerials as they form the backbone of your neutral game.
The beauty of the shuffled neutral–aerial approach is its relative safety and versatility, both alone and in the context of the rest of Fox’s move set. A shine or Jab after one of these will do one of a few things: it will either prevent shield–grabbing (scoring a hit with the shine or Jab on those who attempt to shield–grab and setting up for a number of follow–ups); allow you to escape and reset the confrontation should your opponent continue to hold up his shield throughout your shuffled neutral–aerial and shine sequence; or allow you more follow–ups and combos should the neutral–aerial connect on an unshielding opponent. A common string used by modern Foxes is shine–neutral–airing on shields to break down the opponent’s defense and either knock him or her off–stage or kill outright at higher percents.
Note that the neutral–aerial can also be done at a variety of timings that are of importance in maintaining the integrity of an offense, including preventing an opponent from successfully shielding after the hit or shield–grabbing you and winning the first hit in a close–range battle. In general, you should use later neutral–aerials (that is, those done closer to the ground during the descent portion of your short–hop) to minimize the chances that you are shield–grabbed or that your opponent can put up his or her shield following a connected hit, especially at lower percents; this is because there will be less “dead” time between the time that you connect with the neutral–aerial and the time that you touch the ground and can L–cancel. As well, later neutral–aerials done towards the end of an extended short–hop can keep your opponent from correctly anticipating the timing and positioning of your approaches because you wait until the last moment to commit to the aerial. However, neutral–aerials that are done too late leave you without a protective hitbox for a greater period of time. Of course, earlier neutral–aerials (that is, those done when further from the ground and earlier in the short–hop) are of value in making sure that you take the initial hit in a given confrontation, and they also allow you to cover more space with your aerial’s hitbox, but they come at the greater risk of being shield–grabbed or a shield interrupting your string on hit. Be aware of the interplay of these timings and become familiar with when to use each in your offense.
Full–jump neutral–aerials have some value as well in reading opposing jumps and walling out enemy Foxes and Falcons, particularly when DI’d back out of your opponent’s range. It is crucial that you not fall into the habit of approaching with full–jump neutral–aerials, however; doing so leaves you airborne for far too long, acts as a timing trigger for your opponent to space out your failed approach and land an easy grab or other attack, and opens you to crouch–canceling. The last two cons of such an approach can be somewhat mitigated by waiting until later in the full jump to use the neutral–aerial, but this is still generally not a recommended course of action. The general theme of Fox play in the modern game is to keep your movements as relatively grounded as possible in order to maximize your speed advantage, hence the importance of the shuffled neutral–aerial.
Properly spacing your neutral–aerial approach is of paramount importance, despite how seemingly untouchable the move looks on paper. As frootloop points out, a very common mistake with Fox’s short–hop neutral–aerial is “[…] doing a short hop neutral air aimed at the front of the opponent[’]s dashdance[,] or worse yet, aimed at the empty space between the two player’s dashdances.” This drives home a critical point in that you must be careful not to fall into the mental trap of attacking where your opponent currently is but rather where he or she will be, particularly in the neutral game and against speedier characters’ dash–dances. Again, take careful note of just where you intend to place your neutral–aerial approach at all times; simply flailing about with hitboxes will do little more than get you grabbed and severely punished in tournament play.
Keep in mind that shining after a shuffled neutral–aerial should not be your constant muscle–memory reflex in every situation. For example, at higher percents, should you connect with the aerial, cut out the shine entirely and instead follow your opponent’s trajectory with a dashing jump–canceled up–smash to finish the stock while you have the opportunity; this is especially effective against floatier opponents. You can also chain your shuffled neutral–aerials on heavier characters, your first kick knocking them forward and your subsequent kicks catching them out of the air and sending them sailing once again, particularly if your opponent survival DI’s; however, you must follow your foe’s DI and switch off between sweet–spotted and non–sweet–spotted hits for this string to be most effective. As well, it is important to keep in mind that a waveshine after a connected neutral–aerial is in fact not a safe follow–up; this is because the shine’s hitstun is canceled when the opponent is pushed into the ground by the shine following the neutral–aerial that lifted your enemy off the ground in the first place.
All told, the neutral–aerial has become the preferred approach aerial in Fox’s modern metagame and absolutely must be mastered in order to wield a competent Fox in today’s game. Besides providing a fast L–cancel with safe, effective follow–ups and combo options, the neutral–aerial also avoids problems with DI and Smash DI that the down–aerial encounters due to the down–aerial’s numerous hits and even provides a few options for edge–guarding. For example, on–stage neutral–aerials can catch opposing Foxes and Falcos out of early Illusions while still giving you time to chase. Similarly, running off–stage and jumping with a neutral–aerial provides a long–lasting hitbox wall that can combat Illusions, Fire Foxes and Fire Birds, Falcon’s up–B, and a multitude of other recoveries; when positioned and timed correctly, this tactic allows you to cover multiple recovery options and mix–ups.
b. Forward–Aerial: Tornado Kick [FM22]

Video: http://gfycat.com/KaleidoscopicShabbyDalmatian
Button: Towards Tilt + A (Towards C–Stick; forward–aerial)
Damage: Usually 2 – 18% (varies with number of hits and degree of staling)
Speed: Relatively high
Priority: Medium
Range: Medium
Knockback: Very low
Total frames: 59
Shield stun: 10 frames for first hit; 9 frames for other hits
A rapid series of aerial kicks that can add on a decent amount of damage. If you don’t L–cancel this, you will find yourself facing considerable lag time once you land. This move is known to inexperienced Fox players the world over as one of the two main causes of self–destructs; because of Fox’s sensitive controls, the unwary player attempting to edge–guard can slide off the arena in a Tornado Kick with even the slightest touch of the control stick or “A” button. Stick to your other aerials for far more effective aerial combat. The Tornado Kick stops on its own accord and carries very little knockback other than the very first kick in the series, which has decent stun time. This means that a quick–witted foe could hit you right when you finish the move as chances are they haven’t gone anywhere or suffered very much stun time, particularly at low percents.Button: Towards Tilt + A (Towards C–Stick; forward–aerial)
Damage: Usually 2 – 18% (varies with number of hits and degree of staling)
Speed: Relatively high
Priority: Medium
Range: Medium
Knockback: Very low
Total frames: 59
Hit frames: 6 – 8, 16 – 18, 24 – 26, 33 – 35, 43 – 45
IASA: 53
Auto–cancel: <5 49>
Land lag: 22 framesIASA: 53
Auto–cancel: <5 49>
L–canceled: 11 frames
Hitlag: 5 frames for all hitsShield stun: 10 frames for first hit; 9 frames for other hits
Regardless of its generally low knockback, the forward–aerial’s one redeeming factor is its very first hit, which carries with it decent stun time. In order to use the forward–aerial most effectively, you must shuffle it to make better use of that one strong hit; that first hit sets your foe up rather nicely for a good deal of your follow–ups thanks to the nature of its horizontal knockback, including a dashed jump–canceled up–smash, which can lead further into juggling or a lethal up–aerial. Once your neutral–aerials begin to send your foe too far away for you to combo or pursue effectively, you can begin gradually switching off to shuffled forward–aerials; these will keep your foe within a manageable comboing distance. Try it while falling from platforms to chain follow–ups as appropriate, but be wary of the tricky L–cancel.
Overall, a shuffled forward–aerial’s uses are relatively similar to those of a neutral–aerial; you simply receive less knockback, a smaller hitbox, and a longer move duration. In exchange, however, you get better aerial comboing at higher percents (particularly on floatier characters), which could lead quickly into an up–smash for the kill. However, other than these instances, you will find that Fox’s forward–aerial does not play nearly as crucial a role in his gameplay as his other aerials do; indeed, in modern play, this aerial has been almost entirely phased out of Fox’s repertoire as even the possible mix–ups that it provides simply do not outweigh its lack of versatility and significant lag time and move duration.
c. Back–Aerial: Reverse Spin Kick [FM23]
Video: http://gfycat.com/ZealousLiquidDuck
Button: Away Tilt + A (Away C–Stick; back–aerial)
Damage: 8 – 15%; a hit with the later frames of this move (a “soft–hit” back–aerial) that is highly staled can inflict as little as 4%
Speed: Very high
Priority: High
Range: Medium
Knockback: Medium
Total frames: 39
Shield stun: 16 frames; 12 frames when stale
The backwards partner of the Flying Kick, this move also has a rather extended duration and fast come–out time. If you can begin juggling your foe (usually with the aid of an up–throw or short–hopped up–aerial), you can combine this kick with fast–falls and effectively bounce your foe through the air and out of the arena if they insist on repeatedly survival DI’ing. In addition, you can finish juggling or aerial combo strings with a well–placed back–aerial to send your foe off–stage (at times, you may have to shine–turn into the back–aerial in order to hit with its sweet–spot; see the bottom of the next paragraph for instructions on the shine–turn).Button: Away Tilt + A (Away C–Stick; back–aerial)
Damage: 8 – 15%; a hit with the later frames of this move (a “soft–hit” back–aerial) that is highly staled can inflict as little as 4%
Speed: Very high
Priority: High
Range: Medium
Knockback: Medium
Total frames: 39
Hit frames: 4 – 19
IASA: 38
Auto–cancel: <3 24>
Land lag: 20 framesIASA: 38
Auto–cancel: <3 24>
L–canceled: 10 frames
Hitlag: 8 frames; 6 frames when staleShield stun: 16 frames; 12 frames when stale
Along with the neutral–aerial, the back–aerial generally constitutes the bulk of your aerial game. You can short–hop into this move if you feel it is necessary; just watch your timing on the lengthy L–cancel. At times, players may opt out of fast–falling a short–hopped back–aerial in order to take advantage of the back–aerial’s relatively long hitbox; this can be useful during edge–guarding, particularly against opposing space animals or other characters that are particularly vulnerable to follow–up shine–spikes. The full–jump back–aerial can also be useful for punishing jumps near the edge, as with the neutral–aerial. However, keep in mind that this aerial’s hitbox does not last as long as the neutral–aerial’s and will leave you relatively unprotected for a decent chunk of time should you misread your foe; this is a common situation in which your opponent can escape your ledge pressure and instead take control of the stage and begin pressuring you near the ledge, so proceed with caution. Similarly, using full–jump back–aerials in the center–stage neutral game can be a risky proposition due partly to the relatively short “hard” hitbox and the relatively lengthy L–cancel duration; indeed, you’ll find that trying to “approach” a grounded opponent with a falling full–jump back–aerial will more often than not land you in a great deal of trouble, particularly against characters such as Marth who have the speed and ground mobility to grab and heavily punish you for a seemingly innocuous mistake. Such a tactic should be employed only sparingly and only when your opponent’s movement options are constrained by the edge of the stage. Keep in mind also that hitting a shield high with a poorly–spaced back–aerial will almost certainly result in you being shield–grabbed. As a result, you must always be aware of your spacing and use your back–aerial later on both shielding and open opponents; this is important because a later aerial on shield (that is, one done lower to the ground and thus closer to the time that you can land and L–cancel) minimizes your opponent’s shield grab opportunity window, and a later aerial on an open (unshielded) opponent makes sure that you can connect with a follow–up without a shield, crouch–cancel, or opposing move interrupting your string.
The back–aerial also has an important interplay with the up–aerial (described below) with respect to opposing Smash DI. Note that your opponent can Smash DI your up–aerial such that the second (far more powerful) hit misses them; to combat this, you can switch to your back–aerial for a more guaranteed follow–up.
Remember for all aerials that you can jump right out of a shield or shine and into the aerial of your choice; you do not want to waste precious frames waiting for your shield or shine to lower completely to launch another attack. An out–of–shield back–aerial is one of your most powerful and consistent out–of–shield options and can very quickly grant you the momentum needed to put together a suitable counterattack or even kill your opponent outright; just be cognizant of your relatively limited range and your opponent’s spacing.
The back–aerial functions quite well in an edge–guarding/edge–hogging capacity. If you grab the edge to make it more difficult for your opponent to return and you see that he is going to land squarely on the stage anyway, you can perform an interesting form of edge–guarding with a bit of quick reaction time and finger work. To do this, you must drop from the edge and jump back up while using a back–aerial to knock your opponent away yet again; you can vary the time at which you jump up to change the position(s) that you cover. Of course, doing this requires that you can anticipate the trajectory of your opponent’s comeback, so you may need to vary the length of your drop and jump in order to hit them with the strongest hit time of the back–aerial. Against larger characters and characters with easily–predictable recoveries, a connected ledge–hopped back–aerial often means death when followed up with more ledge–hopped back–aerials or even a simple shine spike.
However, depending on your opponent’s proximity to the stage, you may have to adjust your tactics with the edge–guarding back–aerial. For example, when close to the stage, your opponent may opt to air–dodge your back–aerial hoping both to avoid that hit and return to the stage; you can combat this by forcing an early air–dodge toward the stage, DI’ing toward the stage, fast–falling and L–canceling your back–aerial as appropriate, and following with a down– or forward–smash to send your foe out again (remember to wait for the air–dodge’s invincibility frames to end, if necessary). When your opponent is above and away from the stage, you can take the opportunity to earn an easy kill by jumping toward your opponent, activating your shine, turning around in the shine so that your back is facing your opponent, and jump–canceling the shine into a back–aerial (stall the jump–cancel a bit if you need to compensate for your timing). For many characters, the speed and angle at which the back–aerial comes out is tough to handle, and if you force an air–dodge, so much the better; simply return to the stage and continue edge–guarding with a down– or forward–smash (or up–smash, if you can get a lethal one to connect).
All things considered, the back–aerial, when combined with the neutral–aerial, forms the core of Fox’s modern aerial arsenal. Use both wherever applicable as their strength, speed, and safety afford you potent options in a multitude of situations.
d. Up–Aerial: McCloud Flip [FM24]
Video: http://gfycat.com/QualifiedCostlyIaerismetalmark
Button: Up Tilt + A (Up C–Stick; up–aerial)
Damage:
Priority: Medium
Range: Relatively close–range
Knockback: Relatively high
Total frames: 39
Shield stun: 8 frames for first hit; 15 frames for second hit
Another of Fox’s four most feared moves, it is the McCloud Flip that gives Fox his incredible vertical aerial knockout ability. On low–ceiling stages, such as Yoshi’s Story, the up–aerial can kill at quite low percents, particularly if your opponent misses his or her DI. A fun trick is doing the Flip in a short–hop, allowing you to begin some very damaging juggling (this is an especially viable option as a means of punishing a predicted tech or wake–up). Remember to fast–fall once you commence juggling in order to fit in follow–up Flips for the kill before the enemy hits the ground.Button: Up Tilt + A (Up C–Stick; up–aerial)
Damage:
First hit alone: 2 – 5%
Second hit alone: 7 – 13%
Both hits: 9 – 16%
Speed: HighSecond hit alone: 7 – 13%
Both hits: 9 – 16%
Priority: Medium
Range: Relatively close–range
Knockback: Relatively high
Total frames: 39
Hit frames: 8 – 9, 11 – 14
IASA: 36
Auto–cancel: <7 26>
Land lag: 18 framesIASA: 36
Auto–cancel: <7 26>
L–canceled: 9 frames
Hitlag: 4 frames for first hit; 8 frames for second hitShield stun: 8 frames for first hit; 15 frames for second hit
Although it is possible to use a shuffled up–aerial as a launcher, out of a shield or otherwise, its main purpose is (obviously) as an often–lethal juggler. Your two main launchers for up–aerial juggling are the up–throw and the up–smash, both of which are often preceded by a waveshine (remember that you can also up–smash out of shield for the launch). You can often kill from the set–up that these give you if you can land another up–aerial and then catch your opponent again before he or she can safely land, preferably without a double–jump. Ledge–hopped up–aerial is also an entirely viable punish if you are able to force your opponent to recover on–stage with a laggy recovery move; the characters that are especially vulnerable to this include Marth and Sheik.
The anatomy of the McCloud Flip’s hitboxes is quite strange. Usually, the most powerful hits occur at the tips of Fox’s feet (or the tip of the target’s body), where you will usually get one clean stroke. If the first stroke of the move hits on your enemy’s body, you will usually get one hit and then a finishing stroke. The sweet spot is quite consistent, though. Usually, you only get the “slap” of a failed McCloud Flip if you fall away from the target too quickly (such as in fast–falling) or are way too far away for the second stroke to hit (this includes missing as a result of opposing Smash DI). However, some players do make use of the weak first hit to link into an up–tilt and further juggling. Note that it is also possible to time and position your up–aerials such that only the stronger second hit connects; this nullifies the protective effects of opposing Smash DI as there is no weak initial hit off of which to Smash DI out of range of the more powerful follow–up. Such a tactic is quite useful in maintaining your low–altitude juggling strings in combination with platforms, and it is also a potent tool against characters such as Jigglypuff and Marth against whom your up–aerial constitutes a core kill mechanism. As well, if your opponent attempts to hide in a light shield by a platform’s edge during your comeback invincibility, your up–aerial can push them off the platform’s edge with its first hit (thus deactivating the shield) and then launch them with the second hit.
You must be aware that opponents can Smash DI the up–aerial’s initial hit and escape the more powerful second hit if you are not close enough to them; this tactic is especially prevalent in the modern game, particularly with characters such as Marth and Jigglypuff who are quite vulnerable to up–aerial kills. As a result of the widespread use of Smash DI in today’s game, you will often see Fox players opt for back–aerials rather than up–aerials in certain situations for a more guaranteed hit or kill. Note that you should also be well–versed in Smash DI’ing the up–aerial in order to be prepared fully for the ditto match–up.
Please see the following post by KirbyKaze detailing how to DI Fox’s up–throw to up–aerial: http://smashboards.com/threads/how-to-sdi-foxs-u-throw-u-air-and-not-die.217426/#post-6430241.
e. Down–Aerial: Drill Kick [FM25]

Video: http://gfycat.com/UnequaledHappygoluckyAsianporcupine
Button: Down Tilt + A (Down C–Stick; down–aerial)
Damage: 1 – 19% (varies with number of hits and degree of staling)
Speed: High
Priority: Medium–low
Range: Close–range
Knockback: Nonexistent
Total frames: 49
Shield stun: 7 frames for each hit
A move that sends Fox spiraling downwards at his opponent in a flurry of kicks, the down–aerial itself has no appreciable knockback and therefore is best used to set up combos and follow–ups focusing usually on the shine and the Jab as starters. This move also provides a potent, relatively safe answer to crouch–canceling and is especially useful at lower percents against characters who rely on crouch–canceling to open you to punishment; Marth and Peach are examples of characters that are particularly vulnerable to this because you can connect with a waveshine followed with other damaging follow–ups, but be wary of Smash DI that could allow your enemy to escape your drill. Another feasible use for the down–aerial is as part of one of Fox’s “infinite shine” techniques. Note, however, that the down–aerial is not a spike as Falco’s is; if you try to use it as such, you will drill yourself through your opponent and into the abyss.Button: Down Tilt + A (Down C–Stick; down–aerial)
Damage: 1 – 19% (varies with number of hits and degree of staling)
Speed: High
Priority: Medium–low
Range: Close–range
Knockback: Nonexistent
Total frames: 49
Hit frames: 5 – 6, 8 – 9, 11 – 12, 14 – 15, 17 – 18, 20 – 21, 23 – 24
Auto–cancel: <4 31>
Land lag: 18 framesAuto–cancel: <4 31>
L–canceled: 9 frames
Hitlag: 4 frames for each hitShield stun: 7 frames for each hit
The two moves that most reliably and easily combo from Fox’s down–aerial are the Jab (which hits on frames 2 – 3) and the shine (which hits on frame 1); in conjunction with these two moves, you can start off powerful combos that can lead to heavy damage or a kill. However, the down–smash, down–tilt, forward–tilt, up–tilt, and even the up–smash can also combo from the drill, although the timing windows and circumstances required for proper execution are not nearly as lenient as those of the speedy shine and jab. Importantly, according to Smashboards user Druggedfox, drill to up–smash is not a true combo on every character; this is due to the fact that this aerial’s hitstun is dependent upon weight, that is, it is more effective against lighter characters (see the section labeled "Down–B: Reflector" for a list of the characters’ weights in NTSC). Druggedfox adds that the drill to up–smash is in fact possible on Marth (the first character who is heavy enough not to fall from the shine), but the combo is rather difficult because you must land the latest possible hit of the drill to link the moves. He also states that “anyone heavier than [M]arth[,] you’re not realistically going to get [drill to up–smash] on in a match.” More importantly, in keeping with the speed of the aforementioned follow–ups, you can grab after a drill as a combo (recall that Fox’s standing grab activates at frame 7); while the theoretical timing is tight when considering simply frame data, the drill grab is less risky than the other slower options as you need not worry about connecting with a shield. Thanks to the down–aerial’s quick, extended hit frames and good L–cancel speed, you can switch it in and out with the shuffled neutral–aerial as your primary approach (although the down–aerial has to an extent fallen out of favor in this regard for modern Foxes). It is also an excellent out–of–shield option, particularly against characters who can be waveshined in that the down–aerial provides you with an extremely safe opening for a grab or up–smash as well as the added damage from the drillshine itself.
Once you pin your opponent, shielding or not, in the down–aerial, you have more than a few options available to you. If you DI behind a shielding opponent, you can take chunks out of their shield or prep them for juggling with repeated up–tilts or a shine–turned grab. Should you run into the front of a shield or otherwise land on top of your opponent in the down–aerial, make sure to shine in order to stop any attempts at shield–grabbing and open your foe to a potentially–fatal up–smash or grab. On that note, you should be aware that Fox’s down–aerial into shine on shield is technically not a frame–safe string; while interrupting the sequence requires essentially a frame–perfect shield grab, you nevertheless should not rely upon your drill at the front of shields due to the very real, practical issue of consistently L–canceling it correctly, which is expounded on further below. If you notice that your opponent constantly attempts to shield–grab, not holding up his or her shield past the shine, you can sub in a Jab to prep for an up–smash to the usual juggling (be wary of crouch–canceling and your opponent’s percent, however). Out of a down–aerial to shine, you can switch things up against opponents who insist on holding their shields up throughout your entire assault by grabbing directly out of the shine (explained later). For players who jump out of their shields, you can jump–cancel the shine into a neutral–aerial or a falling up–aerial, both of which could lead to death by edge–guarding (given the right environment) or a vertical kill, respectively; if you anticipate correctly the angle of their jump, you can also connect with a back–aerial.
The down–aerial can also be used as a ledge–hop option; for example, a possible punishment after forcing a Sheik to up–B on–stage is to jump from the edge with a down–aerial and continue into a waveshine (possibly with a few drillshine repetitions tacked on) and the ever–potent up–smash. While still potentially a viable choice, this option has fallen out of favor recently due to its consistency issues. For example, the repeated hits of the down–aerial combine with varying character heights to yield varying L–cancel timings. As well, the small amount of stun on each hit opens the possibility for a sudden reversal should you miss with the remainder of the aerial. Furthermore, the down–aerial’s repeated hits make it especially vulnerable to DI, especially Smash DI; indeed, it is entirely possible for your opponent to Smash DI out of the down–aerial and into a grab, which as usual is not a favorable scenario for a Fox. This aerial can also be used from the ledge in combination with a shine–turn to angle the move’s hitbox into a more favorable position as a means of forcing a recovering opponent below the stage in preparation for a shine–spike; this is particularly potent against opposing Foxes and Falcos.
All things considered, this aerial certainly has a place in the core of Fox’s repertoire, but it should be used with caution; while it can grant you powerful options, it likewise also has a few flaws which can endanger your stocks, hence why the neutral– and back–aerials have largely supplanted the down–aerial in modern Fox play. The increasing prevalence of Smash DI in particular has somewhat mitigated the power of the down–aerial, although this can be somewhat compensated for by using the aerial closer to the ground in order to reduce the number of hits that your opponent can use for Smash DI. As well, the L–cancel timing for this aerial can be challenging as it varies ever so slightly with a number of factors, including the number of connected hits, the height at which the aerial is started and will end, shielding or non–shielding, and individual character heights. Generally, it is not recommended to use the down–aerial against the front of shields as the challenge of correctly L–canceling consistently can open you to shield grabs should you make a mistake. Whenever possible, you should space and DI your down–aerial to your opponent’s back both to compensate for enemy Smash DI away and to remove the option of shield grabs.
The down–aerial has also found use in today’s game as a means of safely resetting opponents who have landed on platforms, setting them up for a lethal up–smash or other potent follow–ups. To this end, note that you can perform your down–aerial across a platform such that it covers virtually the entire length of the platform and most if not all of your opponent’s options, particularly if your down–aerial crosses the location of an in–place tech first.
3. Grabs and Throws [FM3]
Fox executes his throws quickly (within half a second of the beginning of the throw), so be ready with follow–up attacks. Fox also has a short reach, so compensate for that by using running jump–canceled (for added speed) or boosted (for added range) grabs whenever possible. Of course, all buttons listed are while Fox is holding on to the opponent. Generally, stick to the up–throw for all–purpose comboing and juggling and the forward– and back–throws to get your foes off the arena. The down–throw is flashy, but it is teched and DI’d far too easily to be generally feasible in a higher–level fight (although it has its own situational uses). As an interesting additional note, according to data provided by Magus420 (http://smashboards.com/threads/detailed-throws-techs-and-getups-frame-data.206469/), all throws in the game grant invincibility on frames 1 – 8. According to phanna (http://smashboards.com/threads/frames-of-hitlag-and-shield-stun-12-chars-done.111814/#post-2690028), getting hit by the body of a thrown character results in 5 frames of hitlag or 9 frames of shield stun.
You should also keep in mind certain nuances of grab releases and throws. With respect to grab releases, if a character is grabbed after using his or her double–jump and breaks out of the grab, that character’s double–jump is not returned unless he or she jump–escapes from the grab (in comparison to an escape where the character stays grounded; see the following video for an overview of grab release mechanics: https://www.youtube.com/watch?v=-VDgAZqSK2Q). Regarding throws, you must be aware that actually throwing an opponent restores his or her double–jump; this is an important consideration when contemplating your follow–ups on an opponent who has already exhausted this vital escape option, particularly if proper DI off of a throw would disallow a finisher.
a. Grab [FM31]
b. Running Grab [FM32]
c. In–Grab A: Knee [FM33]
Button: A... (with a grabbed character)
Damage: 1 – 3%
Speed: High
Hitlag: 4 frames
Shield stun: 7 frames
Damage: 1 – 3%
Speed: High
Hitlag: 4 frames
Shield stun: 7 frames
Fox knees his opponent while they are stuck in his grip, pure and simple. Use this to add on damage and create a farther throw and greater likelihood that your follow–up will be lethal. However, be careful not to get too knee–happy or your foe will rotate out of your grip before you get to the fun part. Kneeing also gives your opponent time to input DI, so it generally benefits you more so to forego kneeing and instead get right on to the usual up–throw so as not to jeopardize your follow–up or make it unnecessarily more difficult; this is especially key to remember against Jigglypuff, who will die to up–aerial follow–ups at relatively low percents. That said, note that you can also use the in–grab knee (also referred to as a “pummel”) to give your opponent time to DI in order to set up a DI trap. As well, at stage edges, a few knees could give your forward– or back–throw enough power to send your opponent a decent distance, giving you time to set up your edge–guard. It can also ensure a lethal follow–up, an important piece of information to keep in mind when a match is particularly hotly contested.
d. Forward–Throw: Elbow Bash [FM34]
Button: Forward (forward–throw)
Damage: 2 – 7%
Speed: High
Damage: 2 – 7%
Speed: High
Fox’s forward–throw isn’t very powerful; its most common use is to get the opponent off of the arena, where they are vulnerable to shine spiking and edge–hogging and –guarding. When combined with the speed of a jump–canceled grab, you can often slap unwary opponents across significant portions of the stage; after a while, many will spot–dodge or use an escape move to avoid your grab, but you can easily adjust and either wait for the dodge to punish or wait for and follow the escape move.
In teams matches, the forward–throw can sometimes buy you time during two–on–one situations if you can hit the free opponent with the body of the one being thrown.
e. Back–Throw: Skeet Blaster [FM35]
Button: Back (back–throw)
Damage: 1 – 7% (varies with number of lasers landed and degree of staling)
Speed: Inversely proportional to the weight of the character being thrown
Damage: 1 – 7% (varies with number of lasers landed and degree of staling)
Speed: Inversely proportional to the weight of the character being thrown
Fox’s back–throw is flashy but not very powerful. Yet again, its primary use is to get opponents off the edge and into the open air, where you are better able to control them with edge–hogging and –guarding and shine–spiking. In teams matches, the back–throw can be useful in displacing an enemy who is edge–guarding your teammate while placing you in a position to protect your friend as he returns to the stage.
f. Up–Throw: Star Blaster [FM36]
Button: Up (up–throw)
Damage: 1 – 7% (varies with number of lasers landed and degree of staling)
Speed: Inversely proportional to the weight of the character being thrown
Damage: 1 – 7% (varies with number of lasers landed and degree of staling)
Speed: Inversely proportional to the weight of the character being thrown
Fox’s most useful throw by far, the up–throw gets your opponents into the air and ready for juggling or a deadly up–aerial as a finisher. It can also be used multiple times, with Fox hurling opponents into the air, blasting them, and catching them again during their descent (Fox can chain his up–throw on fast–fallers, which can often mean a single grab leading to either a lost stock or a significant chunk of damage, particularly on Final Destination). Combo this with the up–tilt for repeated beatings or the up–smash for a big hit; since fast–fallers can be hit multiple times by both the up–tilt and up–smash, particularly if they miss their tech, the two moves are especially powerful in those match–ups.
It is important to keep in mind that a character’s weight will affect the length of your up–throw animation and thus how long you must wait until you can successfully act after the throw. Specifically, the duration of this throw’s “down time” is directly proportional to the weight of the character being thrown (or, put another way, that the speed of the throw is inversely proportional to that character’s weight); this means that heavier characters take longer to up–throw and stall your follow–up for a longer period of time, and vice–versa for lighter characters. The significance of this in practical terms is that you generally can land follow–ups more effectively on lighter characters than on heavier characters, who at lower percents can jump or otherwise act out of your up–throw before you can implement a true combo string. To see this in action, compare the speed at which you up–throw Pichu (the lightest character in the game) to your throw speed with Bowser (the heaviest character in the game); pay particular attention not only to how much longer the up–throw animation lasts but also to how much longer you must wait before you can act again when up–throwing the far heftier Bowser. Remember as well that your enemies can DI your up–throw quite well, so be ready to follow them and catch them out of the air with a jump–canceled grab or a jump–canceled (charged, if possible) up–smash, or even a shuffled up–aerial, if you can manage it. Not kneeing opponents in your grip and progressing quickly and smoothly from the initial grab to your up–throw both can make DI’ing the up–throw more difficult, making your follow–ups easier and more consistent.
Be careful with the up–throw on floatier characters such as Marth and Luigi. The green plumber’s neutral–aerial is very potent, and his slower falling speed may allow him to regain his stance in the air as you are traveling up to meet him. Be aware that his neutral–aerial, like all others, comes out very quickly, and due to the unique interplay of Luigi’s slower falling speed and Fox’s faster falling speed, he may be able to hit you with it multiple times on your descent. Marth is also a potential up–throw risk. His slower falling speed also will allow him to regain his stance in the air, and virtually all of his aerials possess more than enough priority and range to bite through any of yours; his forward–aerial is particularly troublesome in this regard as it readily sets up for grabs. Pay attention to percents at all times; for example, against Marth, if you up–throw into a back–aerial at low percents, Marth can retaliate, forcing you to shield and putting you into a disadvantageous position. If you can work around these things, however, you will find that Marth is quite vulnerable to your up–aerial, so do not by any means completely phase out the up–throw from your repertoire in the Marth match–up; at early percents, you can often tack on a good 50% or so from a single grab thanks to two or three up–aerials. To ensure success, try approaching Marth from behind for up–throw follow–ups whenever possible. Note also the increasing prevalence of Smash DI against your up–aerial; you may need to mix in back–aerials to combat this.
All things considered, however, the up–throw is easily Fox’s most powerful throw. Its ability to link to other potent follow–ups, combined with the sheer speed of Fox’s jump–canceled grab, gives you a very powerful (and often lethal) means of punishing opponents who favor hiding inside their shields, especially in combination with shine–grabs.
Interestingly, according to research performed by Smashboards user PerhapsMan and reported by tauKhan (http://smashboards.com/threads/fox-advice-questions-topic.98202/page-797#post-18564274), opponents who occupy a higher–numbered controller slot than Fox (e.g., in the P3 slot versus a Fox in the P1 slot) receive one frame less hitstun from Fox’s up–throw; thus, it is advantageous in this regard to occupy the fourth–player (P4) slot as a Fox player to deny your enemies this advantage. Note that this does place you in the lowest controller port with regard to determination of priority; however, this downside is highly unlikely to be as consequential as the added frame of up–throw hitstun gained by plugging into the P4 position as a Fox player.
g. Down–Throw: Floor Blaster [FM37]
Button: Down (down–throw)
Damage: 1 – 4%
Speed: High
Damage: 1 – 4%
Speed: High
Ah, the down-throw, bane of non–techers and non–DI’ers everywhere. This is a natural starter for the up– and down–tilts should your foe fail to tech or DI it, and both tilts can throw opponents into the air as you prepare to juggle them. For the ditto match, you will need to know how to tech or DI out of the down–throw yourself so as not to fall prey to otherwise easily–avoidable combos like the down–throw to up–tilt, down–tilt, or up–smash, all of which can lead to lethal up–aerials themselves if the initial hit does not kill you. Fortunately, it is not at all difficult to tech or DI out of a down–throw, and it is a skill necessary for you to get out of these aforementioned combos. There are indeed two ways to get out of the down–throw, one in which you actually tech (that is, hit “L” or “R” as soon as you hit the floor and either roll away or stand up immediately), and another in which you simply DI (directional influence) to the right or left as the down–throw begins.
Actually teching out of the down–throw requires some timing abilities. If you perform a down–throw in Training Mode on the 1/4 speed setting, you will notice that you bounce slightly when Fox down–throws you. You must press “L” or “R” right when you hit the floor from that bounce, and that is the timing for actually teching a down–throw (except it is done in normal 1 speed in an actual match, of course). You’ll need to roll away from your tech (using the control stick in the desired direction at the same time that you press “L” or “R”) because if you tech and stand up immediately, you give Fox the time that he needs to pull off an up–smash or waveshine where he stands, both of which are more than capable of being strung into the very combo that you were trying to avoid in the first place. Remember that you are not perfectly safe even if you tech–roll his down–throw; Fox can follow where you tech and hit you during your post–roll lag with a jump–canceled up–smash, if he reacts quickly enough, or he can simply opt to pressure you with his nearby presence if he does not arrive entirely in time.
You can also DI left or right out of the down–throw and possibly away from any stationary moves that the Fox had planned for you if you did not tech or DI his down–throw; the up–tilt and up–smash are the most likely candidates for this, both of which can be strung into a very damaging juggling combo leading up to an up–aerial finisher. Basically, you simply hold left or right throughout Fox’s down–throw, and you will pop out in the direction that you pushed. Be warned that it is far easier for Fox to punish you for this than it is for him to punish a tech–roll; you are not given any moments of invincibility using DI, and you do not travel as far away either. This makes it a cinch for Fox to catch you with the tip of his tail in his down–tilt if you did not DI enough, or even jump–cancel an up–smash very quickly and hit you with that. As always, he will lead you into a juggling combo and finish you off if you are not careful. Of course, all of this can be applied to the player whom you are down–throwing as well.
All of the above is well known by experienced players of the game. If you are facing even a slightly experienced player, expect them always to DI or tech out of your down–throw. Be sure to follow their techs to the best of your abilities with a quick jump–canceled up–smash or grab; this will put them in the best position for you to set up the juggling you had in mind. Your best alternative, however, is to stay away from the down–throw for the most part. You will not always be able to predict correctly the direction of their tech, and if you miss, they may be able to hit you while you are in the post–move lag from your up–smash. Be aware of this throughout all of your higher–level matches, and be sure to rely far more on your up–throw than any of your other throws as you grow in experience.
However, at the same time, do not entirely remove the down–throw from your arsenal. At higher percents against floatier characters, such as Jigglypuff and Samus, against whom you no longer have reliable up–throw follow–ups, the down–throw can be quite useful (assuming that you are able to read their techs, that is). Many of these characters favor shielding at higher percents for the very fact that they naturally become immune to lethal up–throw follow–ups; thus, the down–throw is a viable answer for this dilemma should you notice tech patterns and tendencies.
It is also possible to “throw–spike” an opponent with the down–throw. You must of course be facing out into open air when you grab them, and ideally you will grab them out of the air either right above the edge of the arena or above nothing. You will know whether you did this correctly once you down–throw. If you succeed, the throw will essentially meteor–smash them downwards. Generally, though, this technique is far too random and impractical to be used consistently. Enemy DI also throws the down–throw off quite easily, and it can be meteor–canceled as well and thus is not a true “spike.” Unless you are facing a very inexperienced player, you should drop this from your routine almost entirely (although the down–throw “spike” in fact has made an appearance in a modern, very high–level match in Justice 4’s winners finals set between Armada and Hax; the “level nine computer” is immortalized for all to see at http://www.gfycat.com/CooperativeTautLangur#).
4. Special Moves (Ground or Air) [FM4]
a. Neutral B…: Blaster [FM41]
Videos:
Button: B...
Damage: 1 – 3% a shot
Speed: High
Priority: None
Range: Very long range, but the lasers themselves disappear after 34 frames (a little more than half a second).
Knockback: None
Ground frame data:
Shield stun: 7 frames
The third of Fox’s most feared moves, Fox’s Blaster is a favorite of spammers and defensive players alike. Combined with his lightning running speed and the auto–cancel of the short–hopped Blaster, Fox can snipe opponents from afar, forcing them to come to him in a blind haste. Note that the lasers do not stun, unlike Fox’s N64 blaster and the blaster of his wingmate Falco. A well–known piece of historical trivia in the Smash community is that the vulpine space animal’s blaster was too powerful for the then–current tournament stage set, which included Hyrule Temple. The quick fox and his equally quick Blaster were practically made for that large stage, and Fox players became very adept at scampering about the stage, sniping their opponents to high percents. Because of this (and multiple other camping issues), it was agreed upon very early in the game’s competitive life to ban Hyrule Temple from standardized tournament play; the same rationale was applied to Yoshi’s Island 64 with its far–off disappearing cloud platforms and sizable central platform.Button: B...
Damage: 1 – 3% a shot
Speed: High
Priority: None
Range: Very long range, but the lasers themselves disappear after 34 frames (a little more than half a second).
Knockback: None
Ground frame data:
- Total frames (single shot): 23
Air frame data:- Shot comes out on frame: 12
- Total frames (single shot): 36
Other data:- Shot comes out on frame: 10
- Repeated shots fire every 10 frames
- Laser lasts 34 frames
- Auto–cancels upon landing
Hitlag: 0 frames when not shielded; 4 frames when shielded- Laser lasts 34 frames
- Auto–cancels upon landing
Shield stun: 7 frames
Note that you can short–hop and fire off one or two of Fox’s lasers (with a fast–fall should you opt for just a single laser) in order to make yourself into a moving turret. This technique, the uses of which are covered in greater detail under “Advanced Techniques,” makes use of the Blaster’s ability to auto–cancel upon landing; this allows you to weave in and out of your opponent’s range all while tacking on damage and allowing yourself the fluidity to respond however and whenever you deem necessary. As a technical aside, note that you do still experience a small amount of lag (4 frames for Fox) when landing from a jump; thus, these maneuvers are not completely free of lag even though the Blaster itself auto–cancels.
As mentioned above, the Blaster functions as a relatively safe and quick means of tacking on damage to opponents who prefer to sit back on the defense and wait for you to make a move. Plan your advances accordingly (particularly your take–off point and spacing once you decide to approach with an aerial), and use your lasers to force your foes to you lest they take too much damage. You should be wary around characters such as Ness, Falco, and other Foxes as they all have simple ways to combat the Blaster (however, you can take advantage of the lag created by these characters’ anti–projectile methods, the PSI Magnet and shines, respectively). As a side note, Fox’s blaster shots cancel Sheik’s needles, so do not be afraid to start a projectile war with her as it is certainly a plus to make the ninja come to you. Your blaster cannot stop all of the needles from a long–charged attack, however, so be wary all the same.
Despite the loss of Hyrule Temple and its massive spamming potential, you can still spam the Blaster on most medium and large stages due to your foot speed. Be advised that a defensive counter style combined with ample Blaster use is recommended for a multitude of character match–ups, such as Jigglypuff, Peach, and Marth. As well, you can augment your other attacks during the match with the Blaster to increase their comboing potential and minimize the success of crouch–cancels. Around 30 – 40% on most opponents is a good comboing percentage for Fox; that goal is very much within reach, with or without the Blaster. As well, should you knock your opponent far off–stage (for example, if they properly DI’d your up–smash at higher percents or DI’d an up–aerial string out of your range), remember to full jump as needed and fire your Blaster as they are returning to tack on free damage (but not so long that you forfeit your timing window for a proper edge–guard, of course).
b. Forward–B: Fox Illusion [FM42]
Videos:
Button: Left/Right Smash + B (side–B)
Damage: 3 – 7%
Speed: Actual execution is very fast, but the Illusion possesses an appreciable amount of pre– and post–move lag.
Priority: Low
Range: The Fox Illusion sends you across a far horizontal distance and cuts through opponents. You can control the distance incrementally by pressing “B” again as you are moving when you want to stop.
Knockback: Below average; can send opponents into the air
Total frames: 63
Land fall special lag: 3 frames
Hitlag: 5 frames
Shield stun: 10 frames
This move sends Fox towards the opponent at a blindingly fast (albeit low–priority) speed. Be aware that it begins with a significant start–up animation lag time, and it ends with lag as well. Be sure to position yourself while using this move to land far enough away from your opponent to compensate for this downtime. Hitting “B” as you are moving shortens the Illusion incrementally; this can be used to your advantage as a surprisingly effective recovery mix–up and to prevent landing on–stage too near a waiting opponent. Importantly, shortening the Illusion in such a manner when aiming for the ledge makes it much more likely that low edge–guard options (such as the space animals’ down–smashes) will miss. Also, the Illusion is the preferred means of recovery if you can navigate to the same height as the ledge before your opponent has a chance to set up his or her edge–guard due to the Illusion’s faster start–up speed compared to the up–B. With good timing (and the aid of the distinctive “ping” sound made at the start of the Illusion), an opposing Fox can shine you out of this, but should he miss and not crouch–cancel, he will be sent flailing into the air where you can return the edge–guarding favor with a back–aerial or a lethal up–aerial. This option can also be Caped by Mario and Doc. Remember also that this attack, even though its actual execution speed is fast, carries very little priority itself. Even a precisely–timed jab or tilt can cut through it and stun or kill you.Button: Left/Right Smash + B (side–B)
Damage: 3 – 7%
Speed: Actual execution is very fast, but the Illusion possesses an appreciable amount of pre– and post–move lag.
Priority: Low
Range: The Fox Illusion sends you across a far horizontal distance and cuts through opponents. You can control the distance incrementally by pressing “B” again as you are moving when you want to stop.
Knockback: Below average; can send opponents into the air
Total frames: 63
Time to press “B” and stop Fox: 20 – 24
Fox starts moving away: 21
Hit frames: 22 – 25
Can grab edge as early as: 29
Land lag: 20 framesFox starts moving away: 21
Hit frames: 22 – 25
Can grab edge as early as: 29
Land fall special lag: 3 frames
Hitlag: 5 frames
Shield stun: 10 frames
This move is meant to serve as a recovery option and alternative to the Fire Fox, not as a regular part of the neutral game (although it can conceivably be used to combo low–traction characters such as Luigi and the Ice Climbers); this is because it has notable pre– and post–move lag to it, in addition to a verbal cue (the distinctive “ping” sound). Ledge–canceling the Illusion when possible is an increasingly common recovery mix–up in the modern game and can catch unsuspecting edge–guarding opponents off–guard, allowing you to retake center stage without fear of excessive lag. In teams matches, the Illusion can also pop your partner into the air after their up–B, allowing them to up–B again while granting them additional recovery options thanks to the added height.
Fox can also stall infinitely on the ledge with his Illusion, although the timing to retain invincibility is very tight. First, you must of course be hanging on a ledge. Next, press back (away from the stage) on the control stick or C–Stick. Now, you must quickly hit toward and “B” to activate your Illusion as close to the ledge as possible (note that being very close to the ledge is essential to executing this technique correctly as you must cut down on the number of frames spent away from the ledge in order not to lose your invincibility frames). When performed correctly, this will afford you an innovative means to stall on the ledge if you so desire. However, this technique is more difficult (if not impossible) on some of the more awkward locales in the game, such as Battlefield’s unnervingly small ledges. Fox’s Fire Fox stalls overall are far more practical than the Illusion stall; do not rely excessively on this technical feat as there are far more consistent (and less technically demanding) means of retaining extended control of the edge.
Take note that the Illusion cancels your upward jump momentum; thus, if you find yourself in a position off–stage such that you are below the stage but cannot jump to grab the edge without jumping too high, you can use your Illusion to cut off your jump at the edge (preferably at a sweet–spot height) and grab it without extending too far above the stage. Unlike the Fire Fox, the Illusion has the added bonus of being able to turn you around at the start of the move, allowing you to grab the edge quickly regardless of the direction you were previously facing; because ledge teching turns you around to face away from the edge, the Illusion is the preferred follow–up to a successful ledge tech. Be mindful not to Illusion too far away from the ledge as that will cause you either to take more time to grab the edge or put you out of grab range such that the Illusion’s movement portion activates.
c. Up–B: Fire Fox [FM43]
Video: http://gfycat.com/JaggedCreepyHuia
Button: Up tilt + B (up–B)
Damage: 7 – 14% for the moving portion of the Fire Fox; total damage depends on the extent to which the starting flames hit as well as staling, with a range of 1 – 23%
Speed: Medium
Priority: Medium–low
Range: Significant
Knockback: Average
Total frames: 92
Land fall special lag: 3 frames
Other data:
Shield stun: 5 frames for charge–up flames; 15 frames for the Fire Fox itself
Fox’s other means of recovery, the Fire Fox is inherently a bit of a gamble to use since it can be Caped and edge–guarded pretty easily, not to mention that its relatively low priority allows many attacks to plow right through it. Regardless, the Fire Fox has considerable range and is generally more versatile than the Fox Illusion as a recovery move due to your ability to choose the direction of the move. You can aim for the edge of the stage with this move to compensate for its relatively low priority, but watch for your foe to perform a reverse short–hop or wavedash to an edge–hog; obviously, your aiming for the ledge then will lead to a loss of one of your stocks. It is your call on whether to aim for the ledge or above it, but always keep in mind the Fire Fox’s vulnerability to other attacks and the possibility of a Caping by Mario or Dr. Mario (on a side note, Dr. Mario’s White Sheet extends slightly below the stage, so be wary of this as you recover in a match against him) and other potent low edge–guards, such as Marth’s down–tilt and forward–smash. More and more, modern Foxes are choosing to recover high, particularly against characters who heavily rely on successful edge–guards to take stocks and on stages with a high central platform.Button: Up tilt + B (up–B)
Damage: 7 – 14% for the moving portion of the Fire Fox; total damage depends on the extent to which the starting flames hit as well as staling, with a range of 1 – 23%
Speed: Medium
Priority: Medium–low
Range: Significant
Knockback: Average
Total frames: 92
Hit frames: 20, 22, 24, 26, 28, 30, 32, 43 – 72
When to aim: 42
Land lag: 6 framesWhen to aim: 42
Land fall special lag: 3 frames
Other data:
- Can grab edge during first part as early as frame 16
- Can grab edge during moving part as early as frame 73 (if firing straight into a wall, if you go downward at the edge, Fox will stop firing to grab it)
- Grabs edges from both sides
Hitlag: 3 frames for charge–up flames; 7 frames for the Fire Fox itself- Can grab edge during moving part as early as frame 73 (if firing straight into a wall, if you go downward at the edge, Fox will stop firing to grab it)
- Grabs edges from both sides
Shield stun: 5 frames for charge–up flames; 15 frames for the Fire Fox itself
Whatever your decision, always make sure to vary your recoveries and to use DI while falling from an upward Fire Fox to curve in and out as appropriate, sometimes away (as you would do to grab the edge from your fall and avoid anything your opponent throws at you from the ledge, for the most part) and sometimes inward. Also keep in mind to let go of the control stick if you choose to Fire Fox directly to the ledge; holding down at this time causes you to override your ledge–grab and plummet downwards to your doom. As always, you must use a combination of variation and repetition to make your recovery as unpredictable as possible at all times; a predictable recovery will cost you innumerable stocks and a myriad of games and sets, guaranteed. Note also that you can grab the edge at the end of the Fire Fox even if you are facing away from the edge when you start the move. Also remember that, if you find yourself in the unfortunate position of Fire Foxing directly above the ledge while a bit off–stage, you can direct the Fire Fox downwards and grab the ledge from that position. If you hit the surface of the stage before the end of the Fire Fox, you go into a bounce animation for a bit of time and can act relatively quickly afterwards; this of course is not recommended for regular use whatsoever and is still a very risky maneuver.
The structure of certain stages can aid your ability to sweet–spot the ledge with the Fire Fox without rising above the ledge itself. Stages with smoothed or sloped ends, such as Final Destination and Fountain of Dreams, can use up some of the forward momentum of your Fire Fox and enable you to grab the ledge without rising above it and making yourself far more vulnerable than you would like to be. For example, you are playing on Final Destination and are knocked off the left side of the stage. You activate your Fire Fox when you are a small distance below and to the left of the edge (a southwest position, in essence). You need to recover to the stage, but you do not want to open yourself to your foe by rising above the stage. What you would do in this case is aim the trajectory of your Fire Fox at a slight upwards angle into the side of Final Destination. Thanks to its smoothed sides, the stage will use up the Fire Fox’s forward momentum and thus shorten its traveling distance, enabling you to rise up to the ledge and grab it. You can then return to the stage safely and without worry of opening yourself to your opponent by rising above the stage. You can use this same technique to rise upwards and slightly over the ledge by decreasing your trajectory towards the stage by a small amount; this will cause the stage’s side to use up less of your forward momentum and make you poke slightly over the ledge in your Fire Fox. It is your call when to use either of these two methods, but you must still be wary of Capings (particularly by Dr. Mario) and enemy down–tilts and the like. Note that this same technique may also be used against flat–sided surfaces, although obviously with a change in the angle of the Fire Fox.
Keep in mind as well that using the Fire Fox cancels your upward jump momentum, like the Illusion; as a result, if you find yourself in a position off–stage such that you are below the stage but cannot jump to grab the edge without jumping too high, you can use your Fire Fox to cut off your jump at the edge (preferably at a sweet–spot height) and grab it without extending too far above the stage (recall that Fox can grab the ledge out of the charging portion of his up–B as early as frame 16). However, be careful not to Fire Fox too far away from the ledge as that will cause you either to take more time to grab the edge or put you out of grab range such that the Fire Fox proceeds beyond the start–up flames.
There are also a couple of infinite stalling tricks with the Fire Fox, but they do require some quick coordination on your part. The first variation is a simple stand–alone Firefox stall on an edge. To do this, you must first be grabbing the ledge. You then press back to fall away from the edge but immediately cancel your backwards momentum by quickly performing a Fire Fox. If done correctly, you will grab the ledge again immediately after the Fire Fox’s start–up and thus be given the temporary invincibility that grabbing a ledge provides. Another method of performing this tactic is dropping straight down from the edge (not away from it) and jumping again immediately after, activating your Firefox when you feel that you are even again with the ledge (you should not hear Fox’s second jump sound effect, ideally); you will grab the ledge again and can repeat as needed. If you do either of these methods quickly enough, you can actually stall for the rest of the match, but it takes very good coordination and mental and physical fortitude and is rather situational to boot; in addition, most tournaments ban this sort of stalling trick (Peach’s “wall–bombing” is another example of such a stalling trick). It is possible for your foe to counter this tactic by somehow grabbing the ledge, possibly by a reverse wavedash or reverse short–hop, but if you do it quickly enough, this will not be possible.
Another flashier variation on the above tactic is incorporating a jump–canceled shine before your Fire Fox. This has been dubbed the “ShineStall” by Smashboards’ TheCape and the “Infinite Lube Stall” by Smashboards’ noob–lube69. The general idea is the same as above, that is, you must drop from the ledge to begin the stall. However, after dropping, you then shine and jump–cancel that into your Fire Fox, which will allow you to grab the ledge again and continue the cycle. In effect, you will create a veritable wall of damaging flames and shine–spikes that can make it nigh impossible for many characters to return safely without being tied up by your flames or getting shine–spiked right at the ledge.
Although situational, both of the above stalls have their own applications that can come in handy in certain match–ups, largely dealing with stalling through recoveries and attempts to sweet–spot. For example, should a returning Marth attempt to sweet–spot, simply stall on the ledge with the Fire Fox and by the time that he has used his up–B, you will still be invincible and will be holding onto the ledge, causing the Marth to fall to his doom and netting you a stock. Stalling on the ledge also forces your opponents to go above you for their recoveries; you should then be able to predict accordingly where they will be heading and send them out yet again, if not for that stock’s final time (this is especially handy against Sheiks).
As a side note, the Fire Fox can often come in handy in teams matches as a means of hitting your partner with the start–up flames after they have used their up–B to grant them another up–B by knocking them out of their stun time; this is particularly useful when performed as a ledge–hop (as one would for a Fire Fox stall) as Fox can quickly clamp back onto the edge and reduce the risk of this maneuver. Even hitting your partner with the move itself is permissible as the upwards angle grants them more options to return safely to the stage (as well as returning the use of their up–B).
d. Down–B: Reflector [FM44]
Video: http://gfycat.com/DampSeparateDamselfly
Button: Down tilt + B (down–B)
Damage: 2 – 5%
Speed: Highest possible
Priority: Very high
Range: Close–range, but reaches out a bit on either side of Fox with slightly more range on the back end.
Knockback: A set distance for each character (dependent on traction)
Total frames: 39 (or more)
(Shield) Hit lag: 3 – 4 frames
Shield stun: 7 – 8 frames
Reflection lag: 19 frames
Other data:
Button: Down tilt + B (down–B)
Damage: 2 – 5%
Speed: Highest possible
Priority: Very high
Range: Close–range, but reaches out a bit on either side of Fox with slightly more range on the back end.
Knockback: A set distance for each character (dependent on traction)
Total frames: 39 (or more)
Hits on frame: 1
Jump–cancelable on: 4 – 21 or release + 1
Reflects on: 4 – 21 or release + 1
Lag upon release: 19 framesJump–cancelable on: 4 – 21 or release + 1
Reflects on: 4 – 21 or release + 1
(Shield) Hit lag: 3 – 4 frames
Shield stun: 7 – 8 frames
Reflection lag: 19 frames
Other data:
- Per SuperDoodleMan: If you Reflector the first frame in the air from a jump, you will fall enough to jump–cancel from the ground on frame 6. So a cycle could take as little as 8 frames.
- Stun time for selected characters: credit to SuperDoodleMan
- Stun time for selected characters: credit to SuperDoodleMan
The second number is if they “land.” It happens always from an aerial reflector and sometimes from a land one if it hits their back.
![]()

- Fox’s shine distance along the ground: adapted from Mew2King’s statistics list; original list compiled and created by element_of_fire.If your opponent is holding no direction, then their own weight and traction determine how far the shine will send them. If they are holding down, their distance will be shortened, and they will stay on their feet. All tests were done on Final Destination. Other surfaces and/or inclines will affect distances.
---- = Character will fall to the ground
![]()
---- = Character will fall to the ground

- Character weights (NTSC): Adapted from Mew2King’s statistics compilation, this list of character weights is included here for reference. According to Mew2King, weight measures how far a character is knocked horizontally. Any character with a weight value of 85 or less falls when shined and thus can also tech the shine.

C. The Physics of Fox [PF0]
Don’t let the word “physics” scare you; it simply refers to each character’s innate weight, traction, falling speed, and other similar properties.
Fox, being the technically–demanding and unforgiving character that he is, can be killed easily and quickly while in inexperienced hands. Players who have not mastered his more advanced techniques tend to spam one or two moves and wonder why their button mashing leads them to repeatedly Illusioning themselves off the stage. The truth is that Fox can be very difficult to KO effectively. He is a fast–faller, one of a few characters, including Falco and Captain Falcon, who fall at an accelerated rate compared to the other fighters. This can work for or against you. If Fox is knocked upwards, his fast falling may allow you to live for another hit or two. On the other hand, if Fox goes flying horizontally too far, he will plummet out of reach of the ledge, onto which your opponent is likely holding. You can increase Fox’s falling speed by holding down on the control stick at the peak of his relatively short jump (a “fast–fall”). Experienced players use Fox’s fast–falling nature to their advantage, plummeting quickly to earth to avoid being juggled and to increase greatly their comboing speed. As a Fox player, you must acquaint yourself with using his fast, precise moves in order to increase your already blinding speed. Once you can implement the more advanced aspects of Fox into your game, such as L–canceling, fast–falling, short–hopping, and wavedashing, you will not be surprised when you can get an opponent well above 100% (or even remove a stock) within the first 30 seconds of the match. All things considered, Fox is overall the fastest character in the game, and his speed will let you live for quite a while if used properly and combined with proper DI and teching.
Below are tons of statistics pertaining to Fox and virtually everything that he does. Note that 1 frame = 1/60 of a second; thus, there are 60 frames in a second. I give an immeasurably huge amount of thanks to Mew2King and those who helped him for finding, recording, and compiling all of these statistics and many, many, many more. Thanks a lot, Mew2King and co.; this section could not exist without you guys. Thanks are also in order for SuperDoodleMan for his frame data cited below each respective move in the above sections as well as for his contributions here in the form of frame data for Fox’s ledge maneuvers, jump, air– and ground–dodges, roll, dash–to–run frames, and turn–jump threshold. I also thank SCOTU and phanna for the frame data relating to hitlag and shield stun as well as for the information concerning get–up attacks.
Respawn invincibility duration (all characters): 2 seconds (120 frames)
Hard shield duration (all characters except Yoshi): 3.6 seconds (215 frames)
Light shield duration (all characters except Yoshi): 30.333 seconds (1,819 frames)
Weight: 75
Grabbing Range (Relative Approximation): 12th in game
Grabbing Speed:
Grab–Attack Starting Speed: 5 frames. RANKING: 2nd in game (among others)
Grabbing Release Power: 2% (this is how much damage a character receives when he or she escapes your grab due to another character hitting you)
Forward/Backward Throw Power Rating: both rankings are out of 61.
Vertical Throw Power Rating: 18th place. Ranking is out of 30.
Blaster Schematics:
Horizontal Projectile Speed Rating: 1st among selectable characters
Projectile Lasting Time: 34 frames. RANKING: 3rd shortest in game
Falling Speed: 3rd highest in game. Fox has the highest acceleration speed while falling.
Fast–Fall Falling Speed: 48. RANKING: 3rd fastest in game
Landing Recovery Time from a Jump: 4 frames. RANKING: Group B, second best in game (among others)
Jumping Speed: 4 frames. RANKING: Best in game (among others). Every second jump takes 1 frame. [SDM]
First Jump Height: 7th in game
Second Jump Height: 6th in game
Total Jump Height: 6th in game.
Ground–Dodge Rating:
![]()
Air–Dodge Rating:
![]()
Roll Rating (both rolls):
![]()
![]()
Ledge Attack (<100%):
Ledge Stand (<100%): Total frames: 34. Invincible frames: 1 – 30.
Ledge Stand (≥100%): Total frames: 59. Invincible frames: 1 – 55.
Ledge Roll (<100%): Total frames: 49. Invincible frames: 1 – 34.
Ledge Roll (≥100%): Total frames: 79. Invincible frames: 1 – 62.
Ledge Jump (<100%): Total frames: 51. Invulnerable frames: 1 – 14. Soonest fast–fall: 34.
Ledge Jump (≥100%): Total frames: 51. Invincible frames: 1 – 19. Soonest fast–fall: 39.
Walking Speed: 1st in game
Running Speed: 2nd in game
Running Stopping Speed: 18 frames. RANKING: Best in game along with Falco
Running Turning Speed: 30 frames. RANKING: 16th in game.
Traction Rating: 237 (69.3%). RANKING: 12th in game
Wavedash Length: 13th farthest in game
Ducking Rating: 17th in game
Shield Release Recovery Time: 15 frames. RANKING: Group B, second best in game (among others)
Horizontal Aerial Moving Speed: 26th (slowest) in game
Horizontal Aerial Falling Distance: 25th in game
Forward–Smash Rating: 22nd place
Fully–Charged Forward–Smash Rating: 21st place
Rapid Attack Speed:
Dash Becomes Run at Frame: 12
Turn–Jump Threshold: 17
Item–Related Data:
Fox, being the technically–demanding and unforgiving character that he is, can be killed easily and quickly while in inexperienced hands. Players who have not mastered his more advanced techniques tend to spam one or two moves and wonder why their button mashing leads them to repeatedly Illusioning themselves off the stage. The truth is that Fox can be very difficult to KO effectively. He is a fast–faller, one of a few characters, including Falco and Captain Falcon, who fall at an accelerated rate compared to the other fighters. This can work for or against you. If Fox is knocked upwards, his fast falling may allow you to live for another hit or two. On the other hand, if Fox goes flying horizontally too far, he will plummet out of reach of the ledge, onto which your opponent is likely holding. You can increase Fox’s falling speed by holding down on the control stick at the peak of his relatively short jump (a “fast–fall”). Experienced players use Fox’s fast–falling nature to their advantage, plummeting quickly to earth to avoid being juggled and to increase greatly their comboing speed. As a Fox player, you must acquaint yourself with using his fast, precise moves in order to increase your already blinding speed. Once you can implement the more advanced aspects of Fox into your game, such as L–canceling, fast–falling, short–hopping, and wavedashing, you will not be surprised when you can get an opponent well above 100% (or even remove a stock) within the first 30 seconds of the match. All things considered, Fox is overall the fastest character in the game, and his speed will let you live for quite a while if used properly and combined with proper DI and teching.
Below are tons of statistics pertaining to Fox and virtually everything that he does. Note that 1 frame = 1/60 of a second; thus, there are 60 frames in a second. I give an immeasurably huge amount of thanks to Mew2King and those who helped him for finding, recording, and compiling all of these statistics and many, many, many more. Thanks a lot, Mew2King and co.; this section could not exist without you guys. Thanks are also in order for SuperDoodleMan for his frame data cited below each respective move in the above sections as well as for his contributions here in the form of frame data for Fox’s ledge maneuvers, jump, air– and ground–dodges, roll, dash–to–run frames, and turn–jump threshold. I also thank SCOTU and phanna for the frame data relating to hitlag and shield stun as well as for the information concerning get–up attacks.
Respawn invincibility duration (all characters): 2 seconds (120 frames)
Hard shield duration (all characters except Yoshi): 3.6 seconds (215 frames)
Hard shield breaks on frame 216
Light shield duration (all characters except Yoshi): 30.333 seconds (1,819 frames)
Light shield breaks on frame 1,820
Light shields last 8.46 times longer than hard shields
Light shields last 8.46 times longer than hard shields
Weight: 75
RANKING: 22nd heaviest
Note: Weight measures how far characters are knocked horizontally. Average = Mario = 100.
Grabbing Range (Relative Approximation): 12th in game
Grabbing Speed:
Grab:
Total time: 30 frames
First grab frame: 7
Dash grab:First grab frame: 7
Total time: 40 frames
First grab frame: 12
First grab frame: 12
Grab–Attack Starting Speed: 5 frames. RANKING: 2nd in game (among others)
Grabbing Release Power: 2% (this is how much damage a character receives when he or she escapes your grab due to another character hitting you)
Forward/Backward Throw Power Rating: both rankings are out of 61.
Forward: 28th place
Backward: 50th place
Backward: 50th place
Vertical Throw Power Rating: 18th place. Ranking is out of 30.
Blaster Schematics:
10 frames apart; the first shot is 12 frames (exactly 6 shots per second)
Aerial blaster shots are also 10 frames apart; the first shot is 10 frames
Aerial blaster shots are also 10 frames apart; the first shot is 10 frames
Horizontal Projectile Speed Rating: 1st among selectable characters
Projectile Lasting Time: 34 frames. RANKING: 3rd shortest in game
Falling Speed: 3rd highest in game. Fox has the highest acceleration speed while falling.
Fast–Fall Falling Speed: 48. RANKING: 3rd fastest in game
Landing Recovery Time from a Jump: 4 frames. RANKING: Group B, second best in game (among others)
Jumping Speed: 4 frames. RANKING: Best in game (among others). Every second jump takes 1 frame. [SDM]
Airborne on frame 4
Air time: 35 frames
Air time: 35 frames
Earliest fast–fall: 18
Fast–fall air time: 27 frames
Short–hop air time: 21 framesFast–fall air time: 27 frames
Earliest fast–fall: 12
Short–hop fast–fall air time: 15
Second jump earliest fast–fall: 21Short–hop fast–fall air time: 15
First Jump Height: 7th in game
Second Jump Height: 6th in game
Total Jump Height: 6th in game.
Ground–Dodge Rating:
Time before invincibility: 1 frame (dodge starts on frame 2)
Invincible time: 14/22 frames (63.6363...%)
Invincible time: 14/22 frames (63.6363...%)
Invulnerable 2 – 15 out of 22 frames [SDM]
RANKING: Best in game (among others)
Video: http://gfycat.com/GrayHarmfulGallowaycowRANKING: Best in game (among others)
Air–Dodge Rating:
Time before invincibility: 3 frames (dodge starts on frame 4)
Invincible time: 26 frames (frames 4 – 29)
Invincible time: 26 frames (frames 4 – 29)
Invulnerable 4 – 29 out of 49 frames [SDM]
RANKING: Same as every other character except Peach, Zelda, and Bowser
Video: http://gfycat.com/FamiliarBoilingDarklingbeetleRANKING: Same as every other character except Peach, Zelda, and Bowser

Roll Rating (both rolls):
Time before invincibility: 3 frames (both rolls start on frame 4)
Invincible time: 16/31 frames (51.612903225806451%)
Invincible time: 16/31 frames (51.612903225806451%)
Invulnerable 4 – 19 out of 31 frames [SDM]
RANKING: Group C, third best in game (among others).
Video (forward roll): http://gfycat.com/PrestigiousNextGuineapigRANKING: Group C, third best in game (among others).
Video (back roll): http://gfycat.com/LoathsomeBeneficialAmericanbittern

Ledge Attack (<100%):
Horizontal Range: 4th in game
Power: 8% (6% at close range). RANKING: Group C, third best in game (among others)
Total frames: 54
Shield stun: 10 frames
Ledge Attack (≥100%):Power: 8% (6% at close range). RANKING: Group C, third best in game (among others)
Total frames: 54
Invulnerable frames: 1 – 21
Hit frames: 25 – 34
Hitlag: 5 framesHit frames: 25 – 34
Shield stun: 10 frames
Power: 8%. RANKING: Group D, fourth best in game (among others)
Total frames: 69
Shield stun: 10 frames
Get–Up Attacks:Total frames: 69
Invulnerable frames: 1 – 53
Hit frames: 57 – 59
Hitlag: 5 framesHit frames: 57 – 59
Shield stun: 10 frames
“Pratfall” Attack: from a face–up position on the ground; 2 hits
Hitlag: 5 frames for each hit
Shield stun: 9 frames for each hit
“Faceplant” Attack: from a face–down position on the ground; 2 hitsShield stun: 9 frames for each hit
Hitlag: 5 frames for each hit
Shield stun: 9 frames for each hit
Shield stun: 9 frames for each hit
Note: Get–up attacks are not affected by your percentage.
Ledge Stand (<100%): Total frames: 34. Invincible frames: 1 – 30.
Ledge Stand (≥100%): Total frames: 59. Invincible frames: 1 – 55.
Ledge Roll (<100%): Total frames: 49. Invincible frames: 1 – 34.
Ledge Roll (≥100%): Total frames: 79. Invincible frames: 1 – 62.
Ledge Jump (<100%): Total frames: 51. Invulnerable frames: 1 – 14. Soonest fast–fall: 34.
Ledge Jump (≥100%): Total frames: 51. Invincible frames: 1 – 19. Soonest fast–fall: 39.
Walking Speed: 1st in game
Running Speed: 2nd in game
Running Stopping Speed: 18 frames. RANKING: Best in game along with Falco
Running Turning Speed: 30 frames. RANKING: 16th in game.
Traction Rating: 237 (69.3%). RANKING: 12th in game
Wavedash Length: 13th farthest in game
Ducking Rating: 17th in game
Shield Release Recovery Time: 15 frames. RANKING: Group B, second best in game (among others)
Horizontal Aerial Moving Speed: 26th (slowest) in game
Horizontal Aerial Falling Distance: 25th in game
Forward–Smash Rating: 22nd place
Fully–Charged Forward–Smash Rating: 21st place
Rapid Attack Speed:
Hitboxes are 7 frames apart in rapid “A” (last hit takes 8 frames) in a set of 5 kicks
Total time until set of hits repeats: 36 frames
Average speed: 7.2 frames apart, 8 1/3 hits per second
Total time until set of hits repeats: 36 frames
Average speed: 7.2 frames apart, 8 1/3 hits per second
Dash Becomes Run at Frame: 12
Turn–Jump Threshold: 17
Item–Related Data:
Clobbering Item Attack Starting Speed (Beam Sword, Home Run Bat, Lip’s Stick, and Star Rod): “A” – 5 frames; forward tilt + “A” – 12 frames; dash “A” – 6 frames
Item Throwing Speed: “A”/Forward + “A” – 7 frames; Back + “A” – 7 frames; Up + “A” – 6 frames; Down + “A” – 5 frames; Aerial “A”/Aerial Forward + “A” – 6 frames; Aerial Back + “A” – 7 frames; Aerial Up + “A” – 6 frames; Aerial Down + “A” – 6 frames; Dash + “A” – 4 frames. RANKING: Best in game (among others)
Fire Flower and Ray Gun Shooting Speed Starting Time: 10 frames. RANKING: Group C, third best in game (among others)
Home Run Bat Smash Attack Speed: 30 frames. RANKING: Group G, seventh best in game (among others)
Item Pick–Up Speed (using “A”):
Pick–up Speed: 2 frames.
Total Time: 7 frames.
RANKING: Best in game (among others)
Total Time: 7 frames.
RANKING: Best in game (among others)
Barrel, Crate, and Party Ball Pick–Up Speed: 24th in game
Crate Carrying Speed: 26th (slowest) in game.
Super Scope Shot Rapidness: One shot every 6 frames; 10 shots per second; lasts 5 – 6 seconds if shot nonstop. RANKING: Group A, best in game (among others)
II. The Next Level [TNL0]
A. Advanced Techniques [ADT0]
The Smash community regards Fox McCloud as the most difficult character to master at high levels of play. His unparalleled speed, incredibly fast jump time (4 frames, or 1/15 of a second), and fast–paced, technically demanding controls can push even the most skilled Melee player to the limit. Although Fox’s basic moves are powerful when combined with his speed, it is his advanced aspects that make him such a powerful character. The following techniques form the basis of nearly everything that the vulpine space animal can do, and many of them can also be applied for the most part to every other character with slight adjustments for timing. In this section, you will learn how to perform these critical techniques and how to apply them to your game. Once you have mastered them, you will quickly see why many players hold Fox in such high esteem. With his controls and these techniques well under your fingers, your Fox will become a potent, unstoppable force in tournaments and, more importantly, will be an absolute blast to play.
The Advanced How to Play tutorial video (https://www.youtube.com/watch?v=vckV2MJgBzo), by Wak, provides an excellent overview of a number of Melee’s core advanced techniques.
1. L–Canceling [ADT1]
What it is: Cutting in half (rounded down) the duration of an aerial “A” attack’s landing animation, allowing you to act again far more quickly.
How to do it: Press “L,” “R,” or “Z” shortly before landing from an aerial “A” attack. More specifically, you must hit your button of choice 1 – 7 frames (that is, 1/60 – 7/60 of a second) before landing; pressing “L,” “R,” or “Z” during this very short period of time will cut the landing animation in half (rounded down) and return your fighter to his or her fighting stance much more quickly, ready to move or launch another attack. Many players find that timing their button press relative to when they begin to see dust clouds forming around their characters’ feet helps them hit the timing window for the L–cancel. Again, keep in mind that L–canceling is only applicable to aerial “A” attacks, not the “B” special attacks. In addition, remember that in order to get the cleanest L–cancel possible, you essentially have to press your canceling button of choice very slightly before your character actually hits the ground, particularly if you are fast–falling your aerial of choice; this is done to compensate for the small amount of time spent actually pressing the button itself. You will very quickly find that at high–level play, even a few frames here and there can be of great importance to both your character’s wellbeing and your win–loss ratio. As shown by the previous section’s frame data for Fox’s moves, each aerial has its own respective landing animation, and these landing animations all last for varying amounts of time (keep in mind that 1 second = 60 frames); therefore, some moves L–cancel more quickly than others (that is, they will have less lag time after a successful L–cancel than others). For example, Fox’s L–canceled neutral–aerial yields 7 frames of lag, but his L–canceled forward–aerial yields 11 frames of lag.
Uses: L–canceling is the defining technique for tournament–level Melee play. Using it will greatly speed up your character and open many doors to comboing and movement in general. In combination with the lightning–quick Fox, L–canceling can be downright deadly.
So many uses exist for L–canceling that it is virtually impossible to name them all. Of course, the technique’s primary use is to cut in half the lag time after an aerial attack. You will quickly notice whether you have done the technique correctly; it is most noticeable with Link’s Sword Plant (his down–aerial), which has massive recoil lag as Link yanks his sword from the ground. Bowser’s back–aerial also possesses a tremendous amount of lag when not L–canceled correctly as Bowser tilts himself back onto his feet. If you are unsure whether you are L–canceling correctly, try it first with these characters’ moves and then move on to Fox’s naturally fast moves; a missed forward–aerial L–cancel will be most apparent with the vulpine space animal, followed by a missed back–aerial L–cancel. As you progress to higher levels of play, you will find that you can easily pick out missed L–cancels even with someone as fast as Fox; indeed, these missed cancels can often decide a stock, or even the entire match itself.
On the topic of proper execution, it is important to be cognizant of the height at which you execute your aerials when connecting with shields (hitting lower in the shield reduces the chances that your opponent can shield–grab you before your follow–up) and when seeking to maintain an offense at low percents (hitting characters closer to the ground minimizes the chances that a shield or crouch–cancel can interrupt your strings). These are important concepts to keep in mind as you cannot L–cancel until you land on a surface of some kind (for example, the surface of the stage itself, or a platform); therefore, you are committed to your aerial of choice for at least the amount of time between when you start the aerial and when you are first able to L–cancel. Although these “deep” or “late” aerials can be quite useful, you should note the caveat that doing your aerial later leaves you without a protective hitbox (and likely within your opponent’s range) for a longer period of time than would “early” aerials. Note also that performing aerials at different heights also impacts the time at which you will need to input your L–cancel relative to when you input your aerial because these varying heights yield different amounts of time between when you execute the aerial and when you land; the same window of 1 – 7 frames to execute the cancel itself upon landing still applies, however.
L–canceling also factors into an immensely powerful technique (and an essential one with Fox) named “shuffling,” which stands for “short–hop, fast–fall, L–cancel.” Shuffling broken down appears as such:
1) Short–hop with “X,” “Y,” or the control stick
2) Your choice of an aerial “A” attack
3) Fast–fall by pressing down on the control stick (as early as frame 12 of your short–hop; this is critical for proper shuffling to reduce empty air time and to allow a fast flow into the L–cancel and subsequent action)
4) L–cancel (pressed earlier than you would think would be necessary in order to compensate for Fox’s extremely quick fast–fall)
With the aid of shuffling, you can string together moves you never could otherwise and open even more options for attack. In fact, a lack of shuffling with Fox costs you your two chief approaches, both of which are capable in themselves of comboing into Jabs, waveshines to up–smashes or grabs, and even transitioning into infinites. For techniques and combos involving shuffling and L–canceling, see the description text under each of Fox’s respective aerial “A” moves in the first section of this guide.
2. Wavedashing [ADT2]
What it is: An unorthodox method of movement in which you “glide” along the ground. After finishing this movement, you can use all of your attacks and other options as usual. With most characters, wavedashing is as fast as running.
How to do it: Air–dodge diagonally into the ground immediately after jumping. The game converts your motion in the air to horizontal motion, resulting in a strange movement where you essentially “glide” across the ground in a cloud of dust. Try it first with Luigi in Training Mode, set on a slow speed (start with 2/3 or 1/3, if needed). You will know you did it correctly when you see Luigi go sailing smoothly along the ground. Once you are comfortable with the technique, move on to Fox. Note, however, that Fox jumps much faster than Luigi does, so you will need fast fingers to wavedash correctly (if you wait too long with Fox to dodge into the ground, you’ll greatly reduce the length of your wavedash). All told, the sequence of button inputs for a wavedash reads as follows:
1) Jump with “X,” “Y,” or the control stick (it is not necessary to input the jump command as if you were short–hopping because short–hopping is not a requirement to perform a wavedash)
2) Air–dodge
3) Position your air–dodge at an angle into the ground using the control stick. It is the angle at which you place the control stick for the air–dodge that determines the length of the resulting wavedash; the closer to horizontal, the longer the resulting wavedash.
2) Air–dodge
3) Position your air–dodge at an angle into the ground using the control stick. It is the angle at which you place the control stick for the air–dodge that determines the length of the resulting wavedash; the closer to horizontal, the longer the resulting wavedash.
Uses: The wavedash is another member of the group of advanced tactics that make Fox such a powerful character. With this technique, you open a wealth of options for mind games, precision spacing, fluid platform movement (note in particular the link above referencing the waveland), and even a number of possibilities for comboing.
Most players use wavedashing for “offensive defensive” movement, essentially. After wavedashing, you are able to use any attack or other option as if you were still standing on the ground. This allows you to cover your retreats with fade–away short–hopped neutral–aerials or even up–smashes, if you are feeling particularly evil. If you want, you can drive your foes further back with forward wavedashing, and then sprint away and blaster spam them to higher percentages. During close battle, you can wavedash backwards to avoid an incoming strike and then immediately wavedash or run forward into an up–smash or grab. You can also edge–hog using wavedashing by wavedashing off the edge while facing towards the stage, a very commonly used tactic in upper–level play. This allows Fox to grab the ledge rather quickly; this is far faster than doing a normal backwards jump or short–hop to grab the ledge and is very useful, so use it well. Note that you can fast–fall during your short descent to the edge to speed up your edge–hog still further; however, be aware that you must stop fast–falling (that is, stop holding down) as you reach the edge or you will override your grab and fall below the stage. Wavedashing is also used for spacing and positioning. For example, you can wavedash back away from an opponent’s advance to put yourself out of the range of his or her attack and then counter with a grab or other attack of your own. This is very handy for opponents who tend to get too aggressive to the point of blindly launching attacks and not thinking of their foe’s possible answers or their own offensive spacing.
Wavedashing is also a very handy tool in the ever–important and ever–abstract mind games department. Especially with a fast faller and jumper like Fox, the strange movement that wavedashing grants you can be used to fake out your opponent and make them flinch, allowing you to rush in unopposed and do some serious damage. The most common way to do this is to run as quickly as possible at your opponent, making it seem as if you are making a hasty, poorly planned attack. When they wind up an attack to smack you, the proverbial baseball, away from them, immediately wavedash backwards. While they are still in the lag of their chosen move, wavedash or run forwards and hit them. A jump–canceled up–smash works wonders as a powerful punisher in such instances, as does a jump–canceled grab. With time and experience, you will be able to determine just how much time your opponent has gifted you with their missed move and quickly decide whether to punish or to wait for a safer opening.
Wavedashing can also be used to combat L–canceling through the use of precision spacing. If an opponent comes down on you with an aerial attack and L–cancels it, you often are not given enough time to hit back or to escape. Wavedashing solves this. If you see your enemy about to use an aerial attack on your position as he or she is descending, wavedash to either side before they land. This will clear you of their attack and let you hit them back either before they land or during the remaining lag time of the L–canceled aerial.
Still another (very important) use of wavedashing is as a means of safely regaining your footing on–stage after grabbing the ledge. This involves wavedashing up from the ledge and onto the stage while your invincibility frames from grabbing the ledge are still active, a technique termed “ledge–dashing.” It is crucial to keep in mind that if you wavedash on–stage fast enough after grabbing the edge, you can retain a small portion of invincibility from your ledge grab that will enable you to push your opponent away from you and retake center stage. Performing this maneuver into a shine is quite useful in that you can often catch unwary opponents off–guard and continue into a damaging combo thanks to the shine’s first–frame hitbox and ability to be jump–canceled. However, many players opt instead for an up–smash (for a juggling starter, a kill at higher percents, and a larger hitbox) or an extended neutral–aerial toward center stage (this option combines offensive safety with a means of retaking the stage). Successful recovery is of paramount importance in today’s game, and the ability to perform Fox’s invincible waveland from the edge consistently will do wonders in conserving and extending your stocks. Practice this and learn it well, keeping in mind that a mistake will either open you for punishment once again or kill you outright should you air–dodge downwards.
On the topic of Fox’s ledge–dash, you should note that technical information compiled by Kadano (http://smashboards.com/threads/how-pre-ledgegrab-body-states-affect-your-ledgedash-timing.346128/) points to intrinsic differences in the timing at which you can first waveland onto the stage based upon your character’s body state prior to grabbing the ledge. This is due to differences among the environmental collision boxes resulting from actions performed prior to grabbing the ledge. According to Kadano, these boxes “[...] are used to determine whether you land on a platform, collide with a wall[, etc.]” Because of the nature of these differing environmental collision boxes, a ledgehop regrab of the ledge without a fast–fall allows you to waveland onto the stage two frames sooner than if you were to wavedash to the ledge without a fast–fall and one frame sooner than if you were to Fire Fox stall, Illusion stall, or perform most other actions. However, because such a ledgehop regrab opens you to punishment and a wavedash to the ledge, while comparatively safer, stalls your ledgedash for another two frames, Kadano recommends always performing an intangible Fire Fox stall on the ledge prior to wavelanding onto the stage; he explains that “[t]his ensures that you always have the same [environmental collision box] state for your ledgedash” while not excessively compromising either safety or speed.
Wavedashing can also be integrated into combos. Players do this to position themselves better for follow–up strikes. The idea behind this is that since every character’s start–up dash animation has some amount of lag to it, you can wavedash instead to move instantly and continue attacking, useful for such things as positioning yourself for that properly–timed up–smash that will lead to more juggling. Wavedashing can also be incorporated into combos through the use of platform wavelands; these maneuvers allow you to launch with an aerial from a position and timing such that you can continue your string, and they can even enable you to follow a connected aerial or conclude a chase with a lethal up–smash. It is useful to note that wavelands onto side platforms can figure into your ledge return mix–ups. This knowledge is especially useful on Yoshi’s Story; because of the proximity to the ledge (both horizontally and vertically) of Story’s side platforms, you can waveland onto these platforms from the ledge and move a good way towards center stage or even shield while still invincible (see the following video for additional information: https://www.youtube.com/watch?v=vuHch_papYo).
Perhaps one of the most important uses of the wavedash is to escape your shield quickly and safely without having to resort to jumping, rolling, or spot–dodging. The modern Fox is played as close to the ground as possible for as long as possible in order to maximize his speed and ground maneuverability advantages; hence, being able to regain freedom of movement without putting yourself in significant lag or jumping is key to avoiding punishment and allowing you to execute your own punishes. Indeed, you will at times need to wavedash out of your shield to be able to take advantage of an opening, such as when a Marth hits your shield with his forward–smash. Being able to wavedash out of your shield is especially important in order to get the most out of your attempts at throwing off enemy spacing with run–in shields.
As a side note, wavedashing is an essential part to reaching the epitome of Fox technical skill; it is a critical component of Fox’s “infinite shine” combos. In theory, a flawless player could do one of these forever (up to 999%). In order to be truly infinite, however, you would need either to invert the process (since no stage extends forever) via a method known appropriately enough as the inverse infinite shine or start an infinite next to a suitable wall to keep your opponent pinned. More than anything, the infinite shine combos are the space animal’s greatest chance to flaunt his technical abilities as well as your own, but a vast majority of Fox players find that his other advanced techniques are far more practical in battle and still carry the power and synergy needed to take home a victory. It should be noted that modern Fox players have almost entirely done away with the technically demanding and very unforgiving infinite drillshine inversions; this is due in no small part to the prevalence of Smash DI, which makes maintaining infinite drillshine repetitions a truly daunting task. However, if given the opportunity, modern Foxes will utilize the wall–based infinites thanks to their ease of execution relative to the wall–free varieties and their sizable pay–off. The final part of the shine–exclusive section examines Fox’s infinites in deeper detail, providing analysis and instructions on each of them.
3. Shield–Grabbing [ADT3]
What it is: Simply put, it is grabbing out of your shield.
How to do it: While in a hard shield, simply press “A.” Note that you cannot shield–grab out of a light shield using just “A”; this requires an in–place jump–canceled grab, but shield–grabbing out of a light shield is unlikely to connect reliably as you are pushed further back by hits on a light shield than you are when in a hard shield. In either case, your character will grab directly out of his or her shield without having to take the time to lower it.
Uses: This technique is simple to do and extremely useful at lower levels. Indeed, this technique in itself separates the low–level Smash players from the intermediate; it limits your opponent’s options and forces him or her to know how to L–cancel, fast–fall, space, and follow up correctly since if he or she does not (particularly with L–canceling), you can shield his or her attack and then quickly grab out of your shield. Once you land the grab, you can follow up with the usual up–throw to up–smashes, up–aerials, and up–tilts as you see fit, tacking on easy (and at times significant) damage. However, be warned that shield–grabbing’s role in higher–level play is far more limited due to players’ greater proficiency with spacing and technicals; indeed, going for too many shield–grabs at these levels can open you to punishment, especially at the hands of more range–oriented characters, such as Marth, and other space animals (especially Falco). Similarly, characters can bait a shield grab out of you with a number of maneuvers, ranging from wavedashing out of your range at the last second to spacing off of your shield, and more than a few have speedy moves that can catch you before you grab them, including Sheik and Peach’s jabs and still others.
That said, it is still possible to make use of shield grabs in higher–level play. Usually, this involves either angling your shield or running in and shielding within your opponent’s range, both of which can throw off your adversary’s L–cancel timing or his spacing. You can also successfully land a shield grab if your opponent hits your shield too high with an aerial while within your grab’s range. If you see an opportunity for a safe shield grab against more advanced opponents, consider it a rare gift to be cherished and extract as much punishment out of it as you can.
4. Short–Hopping [ADT4]
What it is: As the name implies, it is hopping a small distance above the ground (as opposed to a full jump).
How to do it: You can short–hop with the control stick and with the “X”/”Y” buttons. The choice is up to you, but I recommend you begin with the “X” or “Y” button due to easier execution, greater consistency, and easier fast–falls. To short–hop with the buttons, you must tap the button extremely quickly and release just as quickly. The game judges whether or not you short–hop based on how long your finger stays on the button, not on how much force you put into pressing it; thus, you must be able to get your finger (probably your thumb) off of your button of choice very, very quickly or flick the control stick as quickly as possible. According to data compiled by SuperDoodleMan, short–hopping with Fox (as well as with other characters who become airborne on frame 4 of their first jump, such as Sheik, Pikachu, and the Ice Climbers) allows you to input a jump for a maximum of only 2 frames (that is, 1/30 of a second) before the game registers a full–jump instead.
Short–hopping with the control stick is a bit more complicated. To short–hop with the control stick, you must quickly flick it upwards with more than a little bit of pressure; the tricky part is using enough force for the game to register your input but not so much that you flick the stick for too long and thus register a full jump. You can fast–fall also if you quickly snap down the stick from its short–hopping position, but watch your timing. You can of course short–hop from a standstill position, but it requires an awkward position and movement of the control stick; overall, it is much easier to short–hop using “X” and “Y,” although being able to do so with the control stick will make short–hop double–laser easier. Again, remember that short–hopping is judged based on how quickly you release your jumping mechanism of choice; as such, do your best to flick the control stick as required by your short–hop to give yourself the greatest chance at pulling off the short–hop.
Uses: Short–hopping is used for comboing, edge–guarding, taking the ledge, and for Fox’s short–hop single or double laser. The idea is that if you jump a shorter distance off the ground, you can get to the ground far faster than from a full jump and then execute another attack or movement in a shorter amount of time. All told, short–hopping functions in edge–grabbing (short–hopping off–stage to grab the ledge, also accomplished by wavedashing and the “PC drop,” among other maneuvers); comboing (as a member of the shuffling technique); and even in mind games, to a certain extent (“empty” short–hops and short–hops after which you wavedash backwards are examples of this).
5. Dash–Canceling [ADT5]
What it is: Canceling the forward movement of your dash by crouching, allowing you to fake out the opponent or use an attack other than your running attack at a moment’s notice, or by putting up your shield.
How to do it: While dashing, simply crouch (press down on the control stick) or press your shield button of choice. Note that you cannot cancel your dash with a crouch until you have already traveled a certain distance while dash–canceling with a shield can be done in much smaller increments.
Uses: Though certainly not as versatile as L–canceling or short–hopping, dash–canceling does have its merits. Mastery of this technique with Fox will give you more options to mess with your opponent’s head and his game.
One of dash–canceling’s uses is as a part of mind games, especially with a fast runner like Fox. You can charge headlong towards your opponent, effectively feigning a hasty, random, seemingly last–ditch attack. However, when you see the start–up frames of their retaliatory attack or anticipate such an attack, you can dash–cancel your dash and end up directly in front of them (spaced as necessary, of course), ready for a long–distance down–tilt to sweep them into the air or a powerful up–smash out of shield. You can also dash–cancel so as to position your opponent in the furthest possible effective diameter of Fox’s up–smash. If you can pull this off, the up–smash should plow through his or her defenses, out–prioritizing most retaliatory strikes and sending your foe airborne. Keep in mind only to do this if you see or anticipate him or her going into his or her own attack; otherwise, your opponent will shield the effective moment of the up–smash and shield–grab you or otherwise space you out with a forward–smash from a reverse wavedash or something of the like. Speaking of shield–grabbing, you can use dash–canceling to trick your foe into shielding, thinking he or she is ready to grab you out of your dash. What a surprise awaits your adversary, however, when you screech to a halt out of range of the grab and ready to sprint forward into your own grab.
You can also run through your opponent to his backside, dash–cancel using a crouch, and then forward–smash in the opposite direction. This can serve as a novel mix–up during the neutral game but should be used only sparingly due to its inherent risk.
Dash–canceling is also used to allow ground attacks at fast speeds. Normally, you can only use ground attacks while standing still or walking or after wavedashing. Dash–canceling allows you to use your dash to get to the enemy and then quickly launch into a ground attack once you have reached him or her. You can use this to apply continuous pressure, hunting your opponents down incessantly with the fox’s fast running and then dash–canceling into any attack you wish, whether it is a simple Jab to throw them off their feet, a down–tilt to prep them for juggling, or an up–smash for the killer blow. Note that a wavedash at the end of a dash (spaced correctly from your opponent and where you anticipate your wavedash to put you) also provides the same general effect.
Dash–canceling using a shield is becoming increasingly popular in today’s fast–paced, hitbox–heavy game. A well–timed run in with a shield to cancel your dash can get you safely within your opponent’s range and give you the opening you need against an opponent who is trying to wall you out with aerials. As well, a well–timed run–in shield can mess with your foe’s timing on his or her L–cancel or shuffle, gifting you a potential shield grab or up–smash out of shield.
6. Crouch–Canceling [ADT6]
What it is: Crouching (holding down on the control stick) when you are hit, increasing your defenses and greatly reducing the attack’s normal knockback and stun.
How to do it: Hold down on the control stick when hit or while being hit.
Uses: Fox isn’t exactly the bulkiest or heftiest of characters; therefore, his natural tendency is to be knocked off of the stage very easily and frequently. Crouch–canceling partly solves that problem. With it, you can increase the space animal’s resilience and notably increase his lifespan. When coupled with Fox’s already outstanding evasion abilities, crouch–canceling can keep you in the game more than long enough to hit back and finish your foe. However, be careful with crouch–canceling around ledges. Granted, it can potentially save you from a strike meant to get you off–stage, but on certain moves, the downwards DI of the crouch–cancel can in fact amplify the effects of that move and make it even more difficult for you to return (keep in mind your fast–falling) and at times can even cost you a stock; this is especially apparent with down–smashes from Peach (easily the most flagrant offender), Samus, and Sheik.
Crouch–canceling is more situational than anything; if you are hit, hold down on the control stick to reduce the knockback, plain and simple. The only practical technique you can use with crouch–canceling is what has been dubbed the “crouch–cancel counter,” or “CCC,” which conveniently works quite well with Fox. What this triple–consonant acronym means is using an attack out of your crouch–cancel to take advantage of your own reduction in received stun time and knock–back and your opponent’s lag from his or her connecting hit. A down–tilt as a counter works wonders to prep for juggling or an up–smash. A quick up–smash is also a potentially–lethal option. Even shines and Jabs from crouch–cancels are problematic for opponents and can lead to their usual well–known follow–ups, although you should be wary of their comparatively smaller hitboxes. The crouch–cancel counter is a good answer for a high–damage opponent who has just taken your stock and insists upon pressuring you further. A grab out of a crouch–cancel is especially useful given the potency of Fox’s grab game; make use of this near the beginning of your stocks and if your foe utilizes weak jabs in an attempt to seize control of the scuffle. Likewise, be wary of this concept when facing such characters as Marth, whose powerful grab game on fast–fallers can take entire stocks when combined with edge–guarding.
7. Dash–Dancing [ADT7]
What it is: Constantly turning around in the start–up animation of your dash, allowing you to quickly jet in either direction at any time you choose.
How to do it: Quickly tap the control stick back and forth; you should see Fox quickly and fluidly changing directions while still remaining in a dash. Note that tapping the stick too quickly results in essentially an in–place dash–dance that largely defeats the purpose of the maneuver, but tapping too slowly breaks your dash–dance and results in a very slow turn–around animation.
Uses: Dash–dancing functions in mind games for the most part but can also add fluidity and a certain sense of preparedness to your game. Since dash–dancing allows you to jet off in any direction at any time, you can frequently use it to fake out the opponent or prepare yourself for the direction of your foe’s DI if you knock them to a certain height.
It is important to note that you can slightly vary the lengths of your individual dash–dance animations. The value of this technique is that you are slowly advancing on the opponent, pushing them back, while simultaneously opening up the dual options of fight or flight. The fight component comes in when you can make them blink and think that you are going to charge at them. More often than not, they will unleash some random attack, trying to catch you off–guard, or spot–dodge in anticipation of your own attack or grab. If your eye can catch the start–up frames of your foe’s attack, you can immediately judge the type and length of the attack and whether it has any lag time. If it does, you can plow in with a shuffled neutral– or down–aerial and string together an improvised combo, one that hopefully includes plenty of juggling via fast–fallen up–aerials and perhaps some air time courtesy of the up–tilt. If the attack is a decently fast one (meaning there is not much lag time for you to take advantage of), you can immediately dash–dance away and continue your charade until they either come after you, in which case your quick speed should prevail more often than not, or they flinch again, hopefully with a higher–lag move or a spot–dodge.
You can also combine dash–dancing with the wavedash in yet more of the vulpine space animal’s mind games. These tricks take into account three things, all of which depend on the type of attack being used and who is using it. These criteria are priority of the enemy attack, its speed, and, of course, its lag time. As mentioned previously, dash–dancing can psych the opponent out into thinking you are going to do something that you really will not do. Instead, you will do something seemingly random that will throw them for a loop if it succeeds. The trick is yet again to get your foe to blink, this time using a combination of sudden reverse wavedashing and dash–dancing. Use the dash–dancing to get your foe on his toes, and when you see an opening, charge forward. Your enemy should be ready with a retaliatory attack; otherwise, they have fallen entirely for your ruse, and you can grab them or whatever else you deem necessary. If they let loose with an attack, wavedash backwards (make sure you still end up in decent range of them, however) and soar in with a powerful jump–canceled up–smash (at higher percentages) or the ubiquitous shuffled neutral–aerial. Remember that you can also make use of differing angles of the control stick to adjust the length of your wavedash as you see fit, although the precision required for this can be somewhat daunting for new players.
The fluidity of motion that dash–dancing grants you comes in handy for quick repositioning (to dodge attacks and then quickly weave back in to make the best use of any possible lag) as well as for fast spacing (for when you would like that shuffled neutral– or down–aerial approach to have the most range as possible, or you would like to readjust so as to land behind your opponent and pressure him or her with up–tilts against the shield, for example). Dash–dancing while an opponent is lying on the floor or while he or she is flying at a low altitude through the air can give you the reaction time you need to respond to their choice of wake–up or tech, allowing you to follow it and punish accordingly.
8. Jump–Canceled Grabs [ADT8]
What it is: While running, you phase into a grab that is in the standing position, not the lowered position (as with a dash–grab), while still moving forward. Some characters have a longer reach in a standing grab than a dash–grab, and the standing grab occurs faster than the dash–grab.
How to do it: While running, you must press up on the control stick or press “X” or “Y,” as if you are going to jump, but then immediately press “Z” (note that since Fox jumps incredibly quickly, you may at first need to work on your timing in order to feel how this works for him; you will find that activating your chosen jumping mechanism and pressing “Z” occur essentially simultaneously). This will cancel your jump and begin your grab, but your character will be standing up instead of sprinting forward in a lowered position. Note that you can also use jump–canceled grabs right out of the shine itself in the same fashion, canceling the shine with the jump and canceling the jump into a grab. This tactic, called the “shine–grab,” is useful for foes who insist on holding up their shields for long amounts of time against your shield pressure; it is especially potent in the modern game due to the prevalence of repeated shine–neutral–aerial shield pressure conditioning players at large to hold shield for slightly longer than usual. However, note that the shine–grab is far from an invincible tactic, as KirbyKaze and other contributors detail in the thread at http://smashboards.com/threads/fox-advice-questions-topic.98202/page-492#post-13289512. It is also possible to buffer a roll or spot–dodge out of the shine–grab.
Uses: Jump–canceled grabs are useful in a large number of situations. Since Fox’s moves are all naturally quick, you need to be quite adept at cutting even the tiniest amounts of time off of your lag time and reducing the amount of time that you are “stagnate,” meaning not moving or attacking. These issues will most often arise in heated close combat. The jump–canceled grab is helpful because it occurs faster than a dash–grab, allowing it to be used out of anything from a shuffled attack to dash–dancing to Jabs. It also allows you to cover a good–sized distance prior to the actual grab itself executing, depending on your momentum while going into the grab. Note that while jump–canceled grabs outdo dash–grabs in terms of speed, dash–grabs are generally superior in terms of range; however, the modern metagame has nearly entirely discarded dash–grabs in favor of jump–canceled grabs due to the aforementioned speed advantage as well as the far shorter recovery time (that is, jump–canceled grabs are far safer in terms of post–move lag than are dash–grabs, but you are still open for a small amount of time afterwards).
Jump–canceled grabs can be performed on numerous occasions. These include continuing to apply pressure to an opponent after your shuffled attack has knocked them away and following up all manner of mind games.
Fox McCloud, with his natural speed and agility, is made to apply pressure. You must always be doing something that appears even remotely threatening in order to keep the opponent on his or her toes and guessing as to what you are going to do next. For example, once you have batted the opponent away with some attack, don’t sit back and wait for him or her to tech and come back to you; rather, you must continue the chase. Run out of the attack that you used to send your foe flying and see if you can catch him or her out of the air with a well–timed jump–canceled grab. If successful, up–throw and follow up as you usually would, or hurl your enemy off the stage and proceed to edge–guard and edge–hog or, if you so desire, shine–spike. If you don’t trust yourself with the timing on the grab, you can always run to pursue and use shuffled neutral–aerials or up–aerials to finish your opponent. You can also Jab out of shuffled aerials to stop your target’s momentum and set up for jump–canceled grabs; this same idea can be applied in close combat to tie up your foe’s fingers and timing and again open him or her to a damaging (or lethal) grab.
Mind games work well with both the jump–canceled grab and the dash–canceled grab. For example, you can combine dash–dancing and wavedashing to fake out the opponent and charge in with a fast grab, or use the aforementioned dash–dancing mind game to fake out your foe and break him or her with a dash–grab. Thanks to the jump–canceled grab’s sheer speed, you can often catch shielding opponents by surprise with a fast grab to up–throw when they would normally expect a shuffle or two out of you, an important mix–up of which you should be aware and of which you should make use frequently.
Jump–canceled grabs’ other major use is in chain–throwing with Fox’s up–throw. Although not nearly as devastating to as many characters as Sheik’s chain throws, Fox’s are nevertheless a powerful tool to have at your disposal in the proper match–ups. Against opposing Foxes and Falcos, Fox can chain jump–canceled up–throws to decent percents before correct DI enables an escape; you can finish these with an up–smash to up–aerial juggling or a back–aerial to set up for edge–guarding. Note that during chain throws, you will need to follow your enemy’s DI, which is not exactly a difficult task; simply pay attention and react accordingly.
9. Fox Trotting [ADT9]
What it is: Repeating your initial dash animation many times in succession; since Fox’s initial dash animation is faster than his actual dash, you can accumulate bursts of speed that are otherwise impossible.
How to do it: To Fox trot, you must flick the control stick in the desired direction to perform your initial dash; once this initial dash is complete, you then do it again as many times as desired, each time gaining a burst of speed.
Uses: Since one of Fox’s main weapons in battle is his amazing combo ability, you as a Fox player need to be able to move as quickly as possible, whenever possible. It only makes sense that increasing your running speed even more could augment your ability to pressure your opponent and initiate your close–range combos faster, hence the theoretical benefit of the Fox trot. Remember that you can dash–cancel your Fox trot and then immediately dash or Fox trot again. However, keep in mind that in order to do much of anything out of your Fox trot, you will need to wavedash out of it.
Admittedly, modern–day play has all but discarded Fox trotting; the speed increase that it provides is rather immaterial when weighed against the burden of added inputs and its general lack of flexibility. In the end, simply running has proven to be a more efficient and consistent mode of transportation, and in competitive play, efficiency and consistency win the day.
10. Short–Hop Laser [ADT10]
What it is: Short–hopping, firing a blaster bolt, and fast–falling. Because Fox’s blaster auto–cancels, you can then continue into another cycle of this series, if you so wish, or into anything else that you want to do.
How to do it: As stated above, you must short–hop, fire your blaster (that is, press “B” to activate the move), and fast–fall. You may opt to input the fast–fall before pressing “B”; this makes it easier to hit characters with shorter crouches, but it also raises the likelihood that you will land too soon, thus preventing the Blaster from activating. You can both advance and retreat with your SHL. Pay particular attention to your control stick and “B” inputs while moving before and during the SHL itself. If you fail to separate these inputs properly and mistakenly press “B” while hitting sideways on the control stick at the same time, you will instead go into an Illusion, opening yourself to punishment or causing you to hurtle off the stage (although recall that you can shorten the Illusion if you are able to react in time).
Uses: Fox’s SHL, due to his blaster’s inability to stun, is nowhere near as powerful a technique as his wingmate Falco’s. That said, the vulpine space animal’s SHL does allow you to tack on damage from afar and prod your opponent into approaching you. Importantly, the mobility of the SHL in combination with its auto–cancel allows you to respond quickly to your opponent’s reaction to your blaster fire and also lets you flow effortlessly into nearly anything that Fox can do (although you still must account for the very slight 4–frame lag caused by landing from a jump). For example, you can go into a shuffled neutral–aerial to begin your pressure, begin dash–dancing to space or bait out an attack, and still other options. You can also toss in quick SHL’s as you poke for an opening with dash–dancing and wavedashing. If you see yourself becoming idle during the course of the match and you do not want to give your opponent some clear time to think and plan, start SHL’ing and force the opposition to solve that problem instead; the SHL is quite useful in this regard as it prevents your offense from stagnating.
One advantage that Fox’s blaster has over Falco’s is his ability to fire two shots within the span of a single short–hop (the short–hop double laser, or “SHDL”). Obviously, you cannot fast–fall your short–hop in order to be able to get the second laser, and you need quite speedy fingers to make it from “X” or “Y” over to “B” in time; with the SHDL, you literally only have a few frames to hit the first laser before the second laser is cut off by your landing. As such, you should make a point of sliding your thumb from button to button in order to cut the down time you would otherwise experience while lifting and lowering your thumb. Some players also utilize the “claw” hand position in which the index finger is placed on “Y” and the thumb is placed on “B.” However, if you are looking for the easiest method to SHDL, simply short–hop using the control stick; this frees up your thumb and requires it only to press “B” twice for the lasers themselves. As with the SHL, you can both advance and retreat with the SHDL, but an advancing SHDL is not recommended due to your increased vulnerability while airborne. Overall, the SHDL is a flashier variant of the short–hop laser that can pour on more blaster fire when you find yourself at safer ranges. However, when operating with comboing and pressure in mind (that is, at closer ranges), the SHL is the preferred option.
11. Waveshining [ADT11]
What it is: Wavedashing out of Fox’s shine and into whatever you may want to do.
How to do it: Simply put, you activate Fox’s shine with down + B and then wavedash out of it (see above for how to do the wavedash). Make sure you make each of the inputs for the waveshine clearly. For example, when you press “X” or “Y” to jump out of the shine (it is unnecessarily harder to waveshine with the control stick), make sure you press the button and hold it long enough for the game to actually register a jump. Remember, since it is not necessary to short–hop for a wavedash, you do not have to brush your finger off the side of the button or move it off of the button incredibly quickly. Just focus on making sure that the game knows that you plan to jump with a decent press of your jump button of choice. This will help increase your consistency with waveshining. Remember also not to rush the transition period from the shine to the wavedash; if you temper your speed, you will be able to control the length of your wavedash (as well as perform repeated perfect wavedashes) far better and more consistently.
As a Fox player, you should take note that backwards waveshining is not the exact opposite of forwards waveshining. Indeed, for many players, the “feeling” of having to set the control stick for the wavedash in the direction opposite to the one that Fox is facing does have an impact on their consistency with the move. To deal with this seemingly subconscious feeling, a few players opt to turn around while in the shine in order to do a forwards wavedash. However, even this adjustment poses its own problems to waveshining consistency; the shine cannot be jump–canceled while reversing direction mid–shine, and as such any jump inputs during that time will not register and will keep you stuck in the shine longer than you would like to be there. Note also that the frames spent while turning around, however slight, may detract from your ability to make it to your opponent before the shine’s stun disappears. For the most part, though, this should not be too significant a problem.
Uses: Oh, the uses... The parts of the waveshine work together to produce an effect that is both interesting to see and powerful in battle. The shine that starts the waveshine is meant to crack your foe’s defenses with its obscene come–out time and single invincibility frame. The wavedash afterwards is meant to cancel your shine lag and propel you in the direction of your opponent, where you can better connect with your follow–up strike. Waveshining is a huge asset at close range and for your comboing abilities, and it is also a necessary component of Fox’s shine infinites, if you so wish to get into those.
Your best lead–in to a waveshine is the shuffled down–aerial. If you wish, you can also dash–cancel into a waveshine to your follow–up, although the close range required and lack of a protective incoming hitbox make it a comparatively riskier feat. You should take note that (particularly at higher percents and with floatier characters) only the down–aerial allows for true follow–ups after a waveshine. While a neutral–aerial technically does combo into a shine, it is the sequence of events after the shine connects that is of concern to you. A connected neutral–aerial sends your opponent slightly into the air (assuming that your hit did not meet a shield); as a result, your follow–up shine will push your foe back into the ground, severely decreasing the shine’s usual stun time and very often resulting in your opponent punishing you with anything from a grab to a crouch–canceled Smash attack. This is an easily–avoided hole in your approach game, so take special note of it and make certain that you never approach (or play) mindlessly.
You have many options open to you when you connect with your waveshine, some more practical than others. You can down–tilt out of a waveshine, which has the added bonus of having a good amount of reach and popping your foe into the air, where he can be juggled to high percents or simply finished off with an up–aerial. You can up–smash from a waveshine as prep for juggling or as a finishing blow, or you can down–smash from a waveshine if your enemy is at a higher percent and the down–smash will get him or her off the edge (if you see that it will not, you are better off with another option that you can chain into more combos or juggling). A forward–smash from a waveshine is not necessarily your best option; due to its recoil time after its initial effective hit, you will not be able to pursue your foe and continue or even begin any combos. In this case, the forward–smash generally loses its position in the waveshine sequence to the far more powerful up–smash, generally your best Smash option out of a waveshine, as well as the down–smash, which is more likely to put your opponent in a more disadvantageous position. While you should stick to the up– and down–smashes for the vast majority of waveshine Smashing that you plan to do, remember that the forward–smash can be used to hit opponents off of the edge if you are near it or if your foe has horrid horizontal recovery. You can also try shuffling neutral–aerials out of a waveshine; the button timing and coordination is a bit tricky, and you may have to reposition your hands very quickly during the course of your shuffling from the waveshine, but the end effect is worth it. You gain more distance from your short–hopped aerial while also gaining more than enough time to continue your combo and add on more damage than a Smash alone would have provided. Obviously, the back–aerial best applies during backwards waveshines, but it too has its uses in getting foes off–stage and ready for edge–guarding. A short–hopped down–aerial can lead into a series of drillshines to tack on some damage in preparation for a lethal up–smash finisher. You can even grab from a waveshine (utilizing the faster jump–canceled grab if you need some added distance to make it to your target), most often into the up–throw that will lead into more combos or juggling or occasionally into the respective throw that will get your opponent off of the edge. Generally, your two most potent and efficient follow–ups to a waveshine are the up–smash and the grab, with the down–smash thrown in if you find yourself ending up near the edge of the stage against characters with easily–exploited recoveries from below the stage, such as Ganondorf or Falcon.
12. Boost Grab [ADT12]
What it is: Canceling your dash attack into a running grab, giving you far more distance than a normal running grab (in Fox’s case, twice as much).
How to do it: Run and press “A” as you would for a dash attack, and then press “L” or “R” slightly afterwards. You will begin to do a dash attack, which will then be canceled into a running grab with double the normal distance.
Uses: Certain technical data regarding the boost grab, or “dash attack–canceled grab,” for a more unwieldy term, in relation to the other grab types can help shed some light on the boost grab’s uses as well as those of the other grabs. According to testing performed by the_suicide_fox, jump–canceled grabs possess half as much range in terms of Fox’s position as a normal running grab; a boost grab, on the other hand, possesses almost twice the range. However, during a grab, there are only 2 frames where the grab can actually connect. Normal standing grabs and jump–canceled grabs have much more range in front of Fox; his hand as it is swiping and around 3/4 of a body length register as grab areas. On the other hand, running and boosted grabs (both have the same animation) have more range behind Fox, with grabs registering from his hand backwards to the end of his tail as he finishes. Thus, a running grab in relation to a standing grab has more range in terms of position and with the actual grab. However, jump–canceled grabs have much less lag. With boosted grabs, the added distance can put you out of range of an enemy counterattack should they dodge your grab attempt.
The added distance of the boost grab is what allows it to stand out amongst the other grabs. Not only does it enable you to avoid a good number of counterattacks from missed grabs, as mentioned above, but it also allows you to string together combos with grabs where a normal grab would simply cause the combo or string to fall flat. The boost grab is also handy even from long distances; due to the lack of Fox players that actually make use of the boost grab as an integral part of their strategy, you can often grab opponents from a good distance away where they believe themselves safe from retaliation. For the most part, however, boost grabs are very rarely seen in the modern game as virtually every player opts for the greater speed and lessened lag time of jump–canceled grabs in virtually every situation.
13. PC Dropping [ADT13]
What it is: Combining leftover momentum from your walking or wavedash animation with a turn toward center stage, causing you to fall and grab the edge.
How to do it: Please see the following video by mattdotzeb:
Essentially, you walk towards a ledge and turn around (pivot) while nearing the edge; the momentum remaining from your walk animation continues to carry you toward the edge, but because you turned around to face center stage, you are able to grab the edge. This can also be done by wavedashing toward the edge and pivoting. As mattdotzeb states in the video, this can be combined with a fast–fall to get you to the edge a bit more quickly, but be careful not to hold down for too long (especially as Fox) or you will override your ledge–grab.
Uses: Named after the high–level player who popularized its use, the PC Drop is a novel form of edge–hogging that is quick, relatively easy to execute, and free of the possibility of self–destructs via accidental air–dodges that one would face while wavedashing off–stage to the edge.
14. Moonwalking [ADT14]
What it is: A state in which “[…] your character slides across the ground backwards while in the running animation” (credit to Red Shirt KRT for the explanation).
How to do it: Please see the “Moonwalk Guide” portion of the following thread, authored by Red Shirt KRT:
The following is an excerpt from the above–cited thread and provides an overview of the execution of a moonwalk (credit to Red Shirt KRT for the explanation):
“Step 1: First trigger the dash animation by smashing the control stick to the right or left.
Step 2: Next you must move the control stick from the dash position all the way to the opposite side. The trick is that you must not go through the center.
Step 3: Then you smash the control stick to the opposite side, and then back to where you started, like you are dash dancing.”
The above thread also contains a diagram of the control stick movements necessary to perform a moonwalk, also by Red Shirt KRT.
Uses: A rather situational maneuver, particularly with Fox, moonwalking essentially provides a means of amplifying your backwards momentum. It can be used to grab the edge while you are standing a decent distance away on–stage, surprising unaware opponents. With some characters, especially Falcon, the added backwards momentum can be used to place back–aerials in unexpected positions off–stage. Fox does not experience nearly the same amount of added momentum as Falcon does, but he does gain a bit. Overall, however, moonwalking does not contribute very much of consequence to Fox’s game.
15. Ledge–Canceling [ADT15]
What it is: Canceling the lag of a move by interrupting it with the animation caused by standing near an edge.
How to do it: Place and time your move such that you would essentially use your remaining momentum to slide off the edge of choice.
Please see the following video by mattdotzeb that provides a visual of the ledge–cancel executed with Falco’s Illusion:
Uses: Ledge–canceling has potential for use in combos by cutting short the initial attack’s animation and allowing you to flow seamlessly into another hit, but its most common and practical application for Fox relates to his Illusion recovery. Normally, an Illusion onto the stage leaves you vulnerable for a good deal of time; however, if you space your Illusion such that you ledge–cancel it off of a platform, you cut off this lag and can act practically instantaneously. This allows you to fast–fall to the ground, retake center stage, and catch your opponent off–guard with a falling back–aerial.
Note that you can also ledge–cancel your own hitstun by DI’ing such that you “slide off” the edge of a platform. This is difficult to do consistently, but when successful it allows you to regain your fighting stance without having to resort to jumping or teching.
16. Shield–Dropping [ADT16]
What it is: Falling out of your shield through a platform while still being able to act.
How to do it: Please see the following video by dashdancedan (submitted to the author by voorhese):
See also the following video by Xenix:
Note that executing a shield drop is more difficult when dealing with shield stun from a shielded attack.
Uses: Shield–dropping has been known for quite some time but has only fairly recently started to become popular with the community at large. With Fox, shield–dropping allows you to get back to the ground right out of your shield and quite quickly, a boon to both your movement and punishment games. This tactic is particularly useful with characters that like to trap you on platforms, particularly Marth; with shield–dropping, you can readily punish him for a mistimed up–tilt or forward–smash while also escaping the platform trap, particularly handy in combination with a buffer into shield to make your opponent’s window of opportunity still smaller. You can make use of most of your aerials to punish opponents below you after your shield–drop (the most common means of employing this tactic), although the up–aerial may be difficult to connect with both of its hitboxes. Keep in mind the option of a shield–dropped down–aerial to begin a drill shine combo on waveshine–able opponents who are standing further towards the center of the stage, or simply to set up for a shine to knock your enemy off–stage without having to worry about a crouch–cancel. You may be able to hit opponents standing on the platform with a back–aerial, but the timing is tight.
For your purposes as a Fox main, shield–dropping is quite useful in denying your opponents the chance to corner you on platforms as they control the ground beneath your precarious perch. By allowing you to escape platforms quickly and without committing to a jump, wavedash, or retreat back to the ledge, shield–dropping grants you the ability to stay mobile and reclaim territory safely while opening the possibility for punishes. Of course, other characters can utilize this technique as well to varying degrees of effectiveness; given the growing popularity of shield–dropping, you would do well to keep this in mind, anticipate this option, and react accordingly. The lowly Yoshi especially benefits from this innovative option.
17. Ledge–Teching [ADT17]
What it is: Smash DI’ing into the stage when hit at the ledge and teching the ledge, both of which combined essentially cancel the knockback from the move and prevent you from sailing away from the stage.
How to do it: Please see the following video by quinn v:
Note that you, as a Fox player, should Illusion immediately after the ledge–tech in order to grab the edge; the Illusion is necessary because it is able to turn you around to face the edge again at the start of its animation, unlike the Fire Fox.
Uses: The principal role of ledge–teching is to improve your survivability. With it, you can contend with a number of edge–guards that otherwise would send you away from the stage to your eventual demise. Thanks to the Illusion, you can grab the edge despite initially facing the opposite direction after the ledge tech. Furthermore, you do not have to perform a wall jump or put yourself at risk with a Fire Fox, nor do you have to fast–fall or extend yourself over the stage. Ledge–teching is of paramount importance to extending your stocks as many characters seek to take games from you largely via successful edge–guarding. Learn this tactic well and use it whenever possible as it can markedly lengthen your lifespan.
B. The Shine [TS0]
1. Introduction [TS1]
Fox’s down–B, affectionately known in the Smash community as “the shine,” is his defining move for high–level play. This section is devoted to the uses, properties, and abilities of Fox’s shine and how to incorporate them into your game.
2. Properties of the Shine [TS2]
Fox’s shine is among the most interesting moves in the game. At first glance, it seems to serve only to reflect projectiles back from whence they came, but upon closer examination, you will see that it can do far more than just that. Proper use of his shine will set you apart from other Fox players in your abilities, so learn the following sections well and practice consistently and intelligently.
The following link points to a gfycat of the shine as soon as it is activated. Note Fox’s full–body invincibility (the blue coloring signifies invincible areas; the absence of any yellow hurtboxes on Fox in combination with these invincible areas means that his entire body is invulnerable on the shine’s start–up frame) and the shine’s single–frame hitbox (the red area), paying particular attention to its short range as well as the slight protrusion of the hitbox behind Fox (meaning that the hitbox of Fox’s shine has slightly greater range behind him):
As shown by the link above, Fox is invincible for a single frame, the same single frame that carries the shine’s hitbox. Furthermore, the shine has a come–out time of exactly 1 frame, or 1/60 of a second, making it the fastest move in the entire game, among others; this means that the aforementioned invincibility and hitbox frame occurs instantly upon activation. As such, the shine can hit opponents right when it comes out, and thanks to its insane start time, you can instantly activate it in close–range combat, especially in combination with a crouch–cancel. When you use the shine, it will initially stop all of your horizontal movement in the air, after which you will fall at a slower rate than your usual speed if you continue to hold the shine. You can also turn around while in the shine, yet another trick with its own uses that will be discussed later in this section; however, note that you cannot jump–cancel the shine while you are in the process of turning to face the other direction. In addition, the shine also has a set knockback (meaning that it will always send the opponent the same distance on the ground regardless of their percentage but dependent upon traction as well as your opponent’s DI input). Try shining Luigi and any other character and you will see the difference. Another property of the shine is that it will always knock the opponent away from you, never towards you.
You can also do many things to get out of the shine and into virtually anything else that Fox can do. You can jump out of the shine, a technique known as jump–canceling. This will instantly cut off the shine’s animation and restore your movement (note that if you do not jump–cancel the shine, you will have to wait for it to disappear on its own, a process that takes three or four blinks of the shine, which is way too long for a Fox player). Since you can jump out of the shine, you can also short–hop, wavedash, jump–cancel grab, and jump–cancel up–smash out of it. Practice your shine follow–ups, know them well, and incorporate them into your game.
3. Using the Shine [TS3]
Below is an extensive look at the various uses of Fox’s shine and how they figure into your game plan.
a. Gaining Close–Range Control [TS31]
Thanks to the shine’s incredible start time and invincibility on its single hit frame (which can potentially “clash–cancel” one of your opponent’s moves), you can pull it out at virtually any time in melee combat. Your aim in melee combat against an aggressive opponent is to gain control using the shine. An opponent who is shined at close proximity temporarily loses control of his or her fighter while he or she is in the “hurt” animation; this serves to take the pressure off of you and heap it onto your opponent, who with control over his or her character temporarily severed is now open to your wealth of fast combo options.
Note that you can shine out–of–shield by jumping out of your shield; ideally, your shine should be done close enough to the ground such that either the game does not register you actually jumping or you can waveland back to the ground without going into your air–dodge animation. While the shine out–of–shield can be risky if your opponent spaces properly off of your shield owing to its relatively small and very short hitbox, it can very quickly turn the tables on an encounter should you connect with it, allowing you to reset the situation or transition into your offense as appropriate.
b. Shine–Spiking [TS32]
Shine–spiking is one of the most feared of options in Fox’s arsenal. To do this, simply get your opponent off the stage, jump into them, and shine (although this more often than not is easier said than done). Note that you of course can jump–cancel the shine and make your way back onto the stage (or grab onto the ledge, perhaps with the aid of a turn–around in the shine). To shine–spike most effectively, you must hit your opponent with the lower–right or lower–left portion of the shine’s hexagonal shape (as appropriate to push your opponent away from the stage); this will send them down at a 30– to 45–degree angle away from the stage. Remember that the back of Fox’s shine has a bit more range, so you may want to consider jumping off while facing the ledge (although the added range is minimal at best). A correctly performed shine–spike will push your enemy at an obscene angle too far away from the stage to recover. The shine spike cannot be meteor–canceled; however, if your opponent is light enough to fall over when shined, he or she can tech your shine should you incorrectly position yourself and send him or her into a solid surface, such as the underside of Final Destination or Fountain of Dreams, rather than away from the stage.
It is best to grab onto the ledge after shine–spiking when possible to make it more difficult for your target to return, so you can either jump off facing the ledge as stated before or turn around in the shine after shine–spiking to jump to the ledge. Shine–spiking puts your opponent in a very tough spot and you in total control since you either kill them outright, edge–hog them to their death, or make it back to the ledge before them in time to edgeguard. Shine–spiking devastates nearly every character save Yoshi, Mewtwo, Kirby, Jigglypuff, and at times Pichu and Pikachu, who may be able to Quick Attack far enough to reach the stage again (that does not mean that shine–spiking is completely useless against these characters, however). Shine–spiking is absolutely essential for a high–level Fox, especially given the prevalence of space animals in modern tournaments.
At higher levels of play, your opponents will attempt to maneuver around your shine spikes by, for example, going so far out after their second jump to do their recovery that you become reluctant to follow them out there. If you have a good feel for your adversary’s recovery habits, do not be afraid to take advantage of this situation; you would be surprised at how far your Fire Fox extends in whatever direction you so require. Do your best to follow and gain distance on them with your two jumps; you only need a single shine to connect to take off a stock, and your Fire Fox can save you from nearly anywhere off–stage (to a certain limit, of course), especially if you do not allow yourself to fall too far once your shine out of your second jump deactivates. Of course, following your opponent so far off–stage and using your double–jump presents a number of risks to your wellbeing, so first be sure that you have a good read on your enemy’s recovery and a good working knowledge of how his or her character can defend itself against incoming shine spikes.
In certain situations, you do not even need to go off–stage to land a shine spike. For example, by listening to the “ping” of enemy Illusions and timing your shine accordingly, you can kill your space animal opponent right out of his or her recovery (note that your shine has only a single hit frame, however, so your timing will need to be rather precise here). Dropping down from the ledge to shine–spike is also a very powerful technique, particularly when coupled with the invincibility frames granted by grabbing the ledge and Fire Fox stalls to refresh those frames. This can foil all manner of difficult–to–shine–spike recoveries, ranging from Peach to Donkey Kong to Marth and still others. Note that it is possible for opponents below Marth’s weight (that is, those that fall when shined) to wall–tech your shine spike if they are sent into a solid portion of the stage; thus, it is important to position yourself such that your shine sends your target away from the stage, time a follow–up aerial out of a shine–stall (to adjust the timing of your aerial as needed), or grab the ledge again with a Fire Fox. Of course, that means that characters with Marth’s weight and above (that is, those that do not fall when shined) cannot wall–tech your shine.
c. Setting Up for a Combo [TS33]
The shine is a simply amazing tool for setting up your combos. Since you can jump–cancel it and therefore do anything else that involves jumping out of it (such as wavedashing or grabbing), it serves two roles at close–range: to lower your opponent’s defenses and to stun them just long enough for you to wavedash into a combo.
With your opponent temporarily zapped by the shine, what can you do to follow up? Oftentimes, it depends on the traction of the character. If you have just shined a Luigi or the Ice Climbers, you will not be able to reach them in time to follow up adequately with your conventional options, no matter how fast and long your wavedashes are; these characters can actually be hit with a follow–up Illusion out of your shine as a true combo, a strange, risky, and highly situational maneuver at best. For these low–traction characters, think of the shine as a way to push them away from you and give yourself some room to breathe while simultaneously regaining a great deal of stage control (or shoving them off–stage entirely). As well, you should note that lighter characters (specifically, those weighing less than Marth) fall over when shined, thus preventing any true shine combos; however, this nevertheless sets up a knockdown situation, opening the possibility for a chase or even a jab reset to continue your string.
In contrast, you can have all sorts of fun with the higher–traction, heavier characters. Once you have mastered wavedashing out of the shine, or waveshining, you will have opened up an entire new world of comboing opportunities with Fox. The shine and wavedash work extremely well together. The shine, with its one–frame come–out time, stuns the foe long enough for you to follow up with something; that something is jump–canceling the shine into a wavedash toward your opponent. With a successful shine, you have disabled your foe just long enough for you to execute an attack at the end of your wavedash. See the subsection on waveshining (item 11) in the “Advanced Techniques” section for effective, powerful follow–ups to the waveshine.
While the shine can certainly help in linking combos when used properly, it can also break your strings or result in suboptimal outcomes when used improperly. For example, at center stage, if you successfully connect with a neutral–aerial that is not crouch–canceled but opt to shine afterwards, you will likely cut your string short as the shine’s stun time is greatly reduced when a heavier victim (that is, one who does not fall over when shined) is shined into the ground, allowing your opponent to act again and defend against your pressure. Furthermore, because you have put yourself into the shine, you must then escape your vaunted down–B, usually via a wavedash; while subtle, this kink in your mobility nevertheless slows you down and reduces the fluidity of your movement, which in itself can be problematic as you progress in skill and require the greatest degree of control over Fox for the greatest amount of time possible.
d. Countering Shield–Grabbing [TS34]
This is a gigantic plus for the shine. Shield–grabbing is an easy yet potentially very effective technique, and every player can do it if they know of it. Again, due to the shine’s crazy come–out speed, you can intercept an arm just as it appears from underneath its protective shield and zap the body to which it belongs, a very useful tactic, to say the least. This has the advantage of not only stopping the shield grab but also allowing you to waveshine into a combo or return to your neutral stance with your opponent in knockdown.
Keep in mind, however, that more experienced opponents will adjust to your shines from your aerials, holding up their shields past your shines and waiting for the time afterwards to retaliate (this is especially true within the context of the modern metagame, where easy openings via shield grabs are a rarity). You can respond to this in a number of ways. Should you feel confident in your technical abilities, you can continue to pound on their shield with an assortment of aerials, either shuffled out of the shine (a sort of “pillaring” of Fox’s) or full–jumped into further repetitions, until they are again forced to retreat out, which you should also try to follow to the best of your abilities. You can also make use the shine–grab in this scenario. Since you can jump–cancel both grabs and the shine, it follows that you can also jump–cancel the shine straight into a grab. Simply shine, jump with your choice of “X,” “Y,” or the control stick, and cancel that jump into a grab using “Z.” This trick is not very technically demanding and punishes very effectively for attempts to counter your shines from aerials, essentially netting you a free grab to your choice of follow–up each time that you collide with a shield if your opponent does not readily adjust. Given the power of Fox’s grab game, you will find that this mix–up is a very powerful asset indeed.
e. Edge–Guarding [TS35]
Fox’s shine also has the ability to edge–guard in a capacity similar to shine–spiking. To edge–guard with the shine, simply position yourself on the very edge of the level and activate the shine whenever your opponent nears the ledge (you may need to jump and immediately cancel your jump with a mid–air shine in order to intercept your opponent’s recovery). Note that you can also make use of the shine out of a crouch–cancel both to punish a poorly–planned aerial from the edge and also to ensure you stay close enough to land your shine. Once you have shined your foe from the ledge, you have a few options for how to proceed. You can continue to edge–guard with the shine or any other applicable move until your foe falls, or you can jump or run off the edge and finish him or her off with a lethal shine spike. You should keep in mind, however, that a sweet–spotted recovery will get around this method of edge–guarding; as such, you will likely be successful with this method only with the proper set–up or at lower levels of play, although mistakes can of course be made even in the upper echelons.
f. Stopping Horizontal and Vertical Movement [TS36]
When Fox activates his shine, it halts him in place and stops all sideways and vertical movement. Stopping your vertical movement is useful for mind games to throw off your foe’s attack timing should you need to land safely from a decent height. If you are knocked through the air, activating the shine stops all of your horizontal movement. Oftentimes, this occurs faster than the time it takes for you to wiggle out of your stun and jump. Stopping in the air with the shine in this manner does not require you to waste a jump, a very important ability, but is difficult to time properly and could worsen the situation if you are sent off–stage with downwards DI.
There are some circumstances when you are hit away from an enemy by a melee attack that there is a small window of frames when you can activate the shine at a very close proximity to the one who hit you. If you happen to find this moment of time and shine during it, you will stop Fox’s movement through the air and can then jump–cancel out of the shine and dash away to a safer place where you can plan your next move. If you shine fast enough, you may catch the attacking opponent with the shine, pushing him or her away in addition to nullifying the attack’s knockback. This is by no means something to rely upon, however, and is best kept out of your repertoire.
g. Reflecting Projectiles [TS37]
To the brand–new Fox player, this is the shine’s only use, but in the modern tournament setting, this is ironically one of the least important uses for the down–B. Reflecting a projectile with the shine involves simply activating the shine and waiting for the offending missile to crash into you. It will be sent back from whence it came with no harm done to you. This causes you to reverse direction inside the shine and also freezes you in the shine for a bit; note that during this time, you cannot jump–cancel the shine, making reflecting projectiles with the shine a bit of a hassle against faster characters that can also pressure you and capitalize on your down time in the shine.
For most opponents, your shine can throw a wrench into a great deal of their plans in that it stops most of their projectiles, providing you with a means of forcing them to come to you and your repertoire of lightning–fast moves. In the Falco match–up, some Fox players start the match with a preemptive shine in anticipation of Falco’s inevitable SHL pressure; this gives the Fox a chance to compose himself and not make a hasty mistake at the onset of a game. Should your adversary refuse to budge, you always have your trusty Blaster at your side, ready to come out with a tap of the “B” button. However, remember that you have defenses other than the shine against a select few other projectiles. For example, you can Jab or dash attack a boomerang away, catch a bomb or a turnip, cancel Sheik’s needles with blaster bolts, or stop the aerial movement of a thrown bomb with blaster bolts; you can make use of these tactics to avoid the downtime the shine has when it reflects a projectile, thus freeing you to continue to apply pressure and maneuver about the stage.
4. Infinites [TS4]
At long last, here they are, the epitome of Fox technical skill, his infinites. The theoretical perfect player could keep these going on forever, but that is highly unlikely and impractical; thus, they are only “infinite” to the point where the enemy is hit by a finishing move. There are multiple varieties of infinites at your disposal, but all have the same goal in mind: to continue the infinite until your foe is at a high enough percentage where a timely up–smash has a chance to wipe away a stock. These infinites require very precise button timing and coordination and therefore much practice, but if you can pull them off, you will become a truly ferocious Fox. Remember that most of these require a corner or wall unless otherwise noted, and some may not work on characters with lower traction since they will probably slide too far away for you to wavedash close enough to them even with perfect wavedashing. Note that wall–free infinites can work on all characters with Marth’s traction and above; any characters with tractions below that, such as Luigi and the Ice Climbers, do not allow for such infinites. Another important fact is that Fox can infinite only those characters who do not fall to the ground when shined.
However, with all of that said, it is worth mentioning that the wall–free infinites have largely been rendered obsolete by the modern safer Fox style and the widespread use of Smash DI. The bottom line is that while the pay–offs of properly–executed infinites are high, the technical precision required to achieve such a pay–off is not only very difficult but also quite risky and largely impractical; again, this is especially true in the modern metagame, where the overall improvement in DI and Smash DI has made the drill–based infinites a hefty gamble at best. In tournament settings, where nerves run high and DI is generally present as a considerable force throughout a match, most of the infinites become essentially useless, given the need for human input and the high likelihood for error. Virtually every Fox in the modern metagame will choose to waveshine a Peach into a simple grab or up–smash instead of attempting to piece together a convoluted string of high–speed inputs with a much lower chance of success. This by all accounts is the correct course of action. The principle aim of rational decision–making within the context of a high–level tournament match is to maintain consistency, and this simply cannot be done by relying upon such technically–demanding routines as the wall–free infinites.
Again, note that it is largely the wall–free, drill–based infinites that present such significant hazards to Fox players; this is largely due to the multiple hits of the drill itself, which allow for a correspondingly large number of opportunities for opposing DI and Smash DI inputs, any of which can shift your foe out of the drill and break the “infinite” in the blink of an eye (especially on characters whose bodies become “thinner” while they are being hit). In contrast, the wall–based infinites remain viable options in tournament play, although most players will settle for the simple down–waveshine infinite for the sake of consistency and ease of execution. While limited by the position of the enemy, such infinites represent the best possible compromise between technical requirements, pay–off, and consistency. However, it is worth mentioning that opportunities for the wall–based infinites are rare in the current tournament scene as only one stage, Stadium, has the required walls. As well, keep in mind that your opponent will have plenty of time to prepare a buffered wall–tech to survive an up–smash finisher from the wall–based infinites.
a. Infinite Down–Wavedash Shine (corner or wall required) [TS41]
What it is: Shining your enemy against a corner or a wall, then wavedashing down out of that shine and into another shine, repeated as necessary.
How to do it: With your foe against a corner or a wall, you shine them, and then quickly wavedash straight down. This will cancel the previous shine and allow you to transition into another one while your opponent is still in stun.
Breakdown: If you use “X” or “Y” to waveshine, you will have an exceptionally easy time with this infinite due to the fact that you will not need to move the control stick at all; you simply hold it down as the right side of the controller receives most of the action. If you wavedash with the control stick, this infinite may become unreasonably difficult for you, which is a shame since it is easily (for “X”/”Y” wavedashers, at least) the least difficult and most practical infinite of all to perform. Remember your customary up–smash finisher, either jump–canceled directly out of the shine (the novel timing of which may throw off your opponent’s DI) or after the downwards waveshine itself.
There are a few notes to keep in the back of your mind while executing this infinite. First, take care that you are not gradually pushed too far away from your hapless victim; this occurs partly because the victim’s stun animation pushes Fox backwards. At times, you may find it necessary to execute a very short wavedash towards your opponent so that your next shine does not fail to connect with any part of your victim’s body (remember that your shine does not have very much range). As well, remember that your opponents can DI and Smash DI the repetitive shines, which may allow them to squeeze out; however, you can react and reposition yourself accordingly to account for this. Because this infinite does not incorporate the drill, it requires more repetitions than a drillshine–based infinite to accumulate the same amount of damage.
In competitive play, this is generally the most common infinite that you will see owing to its ease of execution relative to the other infinites.
b. Infinite Wall Drillshine (corner or wall required) [TS42]
What it is: Trapping your foe in a corner or beside a wall with a series of shines jump–canceled into drill kicks. The jump–cancel out of the shine can be either a full–jump or a short–hop. If you full–jump the cancel, you must fast–fall the drill kick.
How to do it: Obviously, a wall or corner is required. With your opponent in position, you shine and jump–cancel that with either a full–jump or a short–hop, both of which lead into the drill kick (your down–aerial) that pins your opponent in place for another shine to restart the series. Either the drill kick or the shine can function as lead–ins to this infinite so long as your target is pinned against a suitable wall or corner.
Breakdown: You have to be quite quick at transitioning into and out of your shines and aerials to perform this infinite, but it is very much possible to perform or to lead into once its components are muscle–memoried properly. Make sure to have your fast–fall timing down, if you go that route, and not to take too long to jump–cancel your shine or go into the shine once you L–cancel the drill kick. It should be noted that this is one of the more practical infinites; however, it is more technically demanding than the down–waveshine infinite and as such is largely dismissed in competition in favor of the aforementioned alternative.
c. Infinite Jump–Canceled Shine (corner or wall required) [TS43]
What it is: There are a couple variations of this infinite, one in which you shine so quickly that you do not technically leave the ground and another in which you simply short–hop out of the shine (with or without fast–falling) into another shine.
How to do it: First, you must have a wall or corner. For the first version mentioned, after shining your enemy, you must jump–cancel that shine and immediately (and I mean immediately) shine again before your jump animation has ended. This will make it seem like Fox really has not left the ground, and you can keep shining and subsequently jump–canceling each one until either you opt to wrap things up with a finisher or your fingers fail you. For the second (far easier) version, you simply short–hop out of the shine with or without a fast–fall; however, note that the timing window to maintain the infinite is much tighter should you choose not to fast–fall the short–hop.
Breakdown: The infinite in which you do not leave the ground is immensely difficult to do, possible only in theory because of the insane speed your fingers have to move (remember that even increments of a frame or two spent actually jumping will break the infinite and tell the game to activate your first or second jump) as well as the time and corresponding endurance needed to maintain the infinite. This is the most straightforward infinite to do in terms of controls, but paradoxically it is easily the most difficult of them all. The key to sustaining this infinite for somewhat significant periods of time is to get a feel for the rhythm for jump–canceling the shine into another shine. All things considered, however, this tactic should not find its way whatsoever into any aspiring tournament Fox’s repertoire. However, the second version is quite doable, particularly with fast–falls, and allows you to adjust your position relative to your opponent such that you keep him or her pinned against the wall. Keep in mind that both of these infinites require greater amounts of time to accumulate appreciable amounts of damage compared to the drillshine version owing to the absence of the drill.
d. Infinite Drillshine (flat stages only) [TS44]
What it is: A very technically precise infinite that can bounce your foe from one end of the stage to the other when coupled with one of the two inversion techniques below.
How to do it: Shuffle a down–aerial, shine, wavedash out of the shine towards your opponent, and repeat.
Breakdown: An extremely difficult infinite to perform, this one requires proper spacing in addition to all of the timing and button coordination as well as one of the two methods of inverting the drillshine described below. Remember that this combo will not work on certain characters with lower traction who will slide too far for you to continue the combo. A good way to improve your consistency with the drillshine portion of this infinite (and, indeed, with any technical feat in the game) is to break it up into its respective pieces, the shuffled down–aerial and waveshine, and muscle–memory those to nigh–perfection, and then put them together (still thinking of them as separate entities, should you need to). Be careful not to allow your wavedash length to become so short that you cannot reach your opponent on your next repetition (controlling the spacing on this infinite during the shuffled drill kick opener and the wavedash link is oftentimes more difficult than the inputs themselves, particularly if your opponent is adept at varying his “shined” length through the use of crouch–canceling and toward and away DI). To compensate for this, be careful not to rush the transition period from the shine to the wavedash; in doing this, you will ensure that you have the time to position the control stick for the proper length wavedash. In addition, take note that you are always DI’ing yourself to the proper side of your opponent. For example, if you are executing a right–to–left drillshine, your DI’d drill kicks should always see that you land on your opponent’s right side so that your shine pushes them to the left, not to the right. If you see that you will land on the opposite side of your opponent, you should make certain to invert your drillshine (a process described below) in order to continue your combo. Also make sure to fast–fall your drill kicks so as to minimize the effect of enemy DI on them; if enough hits fail to connect due to DI or your victim’s constantly–changing hit animation, your infinite will be broken by a shield. Characters who become “thin” during their hit animations, such as Samus, are particularly likely to avoid down–aerial hits in this manner.
To make the drillshine truly infinite, you must invert the process using one of the two methods listed below since no stage extends forever. This involves taking some sort of action such that your target is pushed in the opposite direction, where you can then continue your drillshine. Note, however, that characters who are light and have high tractions at the same time (Peach is a prime example) may need only a one–way drillshine series on the larger stages to reach a damage where an up–smash is lethal if they are already decently damaged.
Again, this author cautions aspiring Fox players against making such routines the centerpiece of their game. While a high pay–off is certainly possible, the improvement of DI and the advent of Smash DI have made the wall–free drill–based infinite virtually entirely obsolete within the modern metagame. You should certainly know how to execute a drillshine (a couple repetitions can tack on a good amount of damage in and of themselves), but you should not under any circumstances waste time trying to perfect the wall–free infinite drillshine; this tactic is included in the guide largely for historical purposes only.
i. Drillshine Inversion Method 1: Wavedashing [TS441]
What it is: An inversion of the infinite drillshine in which you wavedash to the other side of the victim, causing your shine to push them in the opposite direction.
How to do it: On the wavedash portion of the drillshine, instead of wavedashing to the opponent, you wavedash past the opponent to his or her other side. Now, your shine will push them in the opposite direction, where you can continue the infinite.
Breakdown: Make sure to watch your spacing on this variant. You must make it all the way to the other side of your opponent in order for your shine to push them the other way; this requires well–executed, long wavedashes that require you to pay special attention to the angle of your control stick during the wavedash’s air–dodge component (recall that the angle closest to but not entirely straight will yield the longest wavedashes).
ii. Drillshine Inversion Method 2: Aerial DI [TS442]
What it is: Another inversion of the drillshine in which you DI to the other side of the opponent during the Drill Kick (down–aerial) portion of the infinite. At that point, your shine will send them in the other direction, ready to be drillshined again. This variant is easier to perform than the first method and also works on the two otherwise un–infinitable characters, Sheik and Ganondorf, who both slide 10 feet when shined instead of the usual 9–and–below feet; this is because this inversion method produces 11 feet of movement total (2 feet is added because of the additional aerial movement during the DI of the Drill Kick). The following videos demonstrate the use of this inversion technique on Link and Marth, respectively: https://www.youtube.com/watch?v=URMO3BaxlLA and https://www.youtube.com/watch?v=D5wSmcYDVno.
How to do it: On the Drill Kick portion of the drillshine, you must press the control stick to DI yourself during your Drill Kicks to the complete other side of your target.
Breakdown: Again, watch your DI trajectory on this one. Remember that you must have enough DI as well as enough forward momentum to make it to the complete other side of your target.
e. Infinite Forward–Reverse Waveshine (Peach, Link, and Zelda only) [TS45]
What it is: Shining one of these characters, then wavedashing to the other side of them, where you shine them again and wavedash to the other side.
How to do it: This infinite relies on a very quick forward and reverse waveshine as well as a lengthy wavedash, so you must be both quick and accurate in your execution.
Breakdown: You must perform the dual waveshines extremely quickly in order to catch these characters before their traction pulls them too far away for you to continue any longer. Do your best to perform perfect wavedashes to give yourself the best chance at clearing your opponent. While this infinite does not require too many varying inputs, the demands on the Fox player’s timing and wavedash length make this a far less desirable option than a simple waveshine or two to a grab or an up–smash.
C. Improving Your Game [IYG0]
1. Introduction [IYG1]
There is more to Fox than blaster, blaster, blaster, up–smash, random shine, blaster. When playing as Fox, you absolutely must be cognizant of the fact that even though the vulpine space animal is ranked first in the game, he is not invincible. On the contrary, when played poorly, Fox quickly becomes one of the easiest opponents in the game. The unique properties and controls of his moves make him a challenge to control well. The equally unique executions of his moves (like how directing a Fire Fox into the ground when you are standing on the ground will jet you off to the right and probably off the edge) undoubtedly kill off numerous new players due to their own unfamiliarity with Fox’s controls. The dire Master of Disaster “bonus” that comes with that unfamiliarity quickly becomes commonplace, and new players often shy away from the fast fox to more easily controlled characters such as his wingmate Falco, Sheik, or the like. To play effectively with Fox, you must realize that you cannot simply walk, run, or Fox trot up to an opponent and expect to slice through them with your amazing speed. A good Fox player is always thinking (a very, very key word) and devising ways to circumvent sturdy defenses and pull off a killer combo or lethal edge–guard. What follows are some suggestions pertaining to Fox’s forms of play and some methods to counter established forms of play and common human tactics, as well as an abstract look at what quite possibly is the most critical aspect of high–level Smash play: the mental game. A broad overview of common mistakes that Fox players commit and how to avoid them concludes this section.
a. Knowledge Is Power [IYG11]
Now, this can apply to Fox on many levels. Knowledge includes (among other things) knowing your character’s moveset and its corresponding controls, the start and lag time of your own moves, your character’s innate physics (how high does he or she jump? How fast does he or she fall?), the properties of your recovery moves and when they are best used, and the knockback power of your own attacks. However, knowledge can also apply to things other than your own character. Indeed, perhaps the best knowledge you can have is that of other characters.
With Fox, knowledge truly is power. If you know how Fox will behave in his attacks and his movements, you can better devise a plan with which to attack your opponent. On the other hand, a good Fox player must also be familiar with his opponent’s character. Familiarize yourself with the moveset of that character, his or her attacks and their respective properties (start and lag time, knockback, and so on), any verbal or visual cues that the character throws off, and his or her recovery moves. If you know absolutely nothing about what you are facing, you are unprepared. You will not know what you should do, what they will do, or how to get around it, a skill essential to a high–level Fox (and any aspiring Melee player, for that matter). You won’t know not to crouch–cancel that Peach’s down–smash. You won’t know not to fire your blaster into Ness’s PSI Magnet. You won’t know that the shine spike eats Ness’s recovery move for breakfast, lunch, and dinner. In short, you will always be caught by surprise and will rarely if ever be able to identify and capitalize on openings and opportunities, both of which can translate into a plethora of needlessly–lost stocks.
Knowledge with Fox is critical, and if you have the quick eye to go with it, so much the better. Do not let your concentration waver during the match. Keep your eyes glued to yourself and (even more so) your opponent. You need to watch him to see what he is doing or going to do and whether he creates any lag or period of distraction of which you can take advantage. Likewise, you need to watch yourself to see where you are heading after that shuffled neutral–aerial, or how high you need to jump to land that follow–up back–aerial, or where you need to tilt the control stick to sweet–spot that Fire Fox. Simply put, you must always pay attention.
Other important components of knowledge include how to strike to appropriate stages, counterpick your opponent correctly, and ban a stage in a set, if the tournament’s rules so allow. The two major factors to consider in such decisions are, quite simply, your choice of character and your opponent’s choice of character (with an eye towards the fact that your opponent may wield multiple characters). Fortunately, modern tournaments offer a much smaller array of legal stages for your consideration than in days now long past, but certain stages still remain pivotal to a number of match–ups. For example, you will do yourself a grave disservice if you absentmindedly neglect to ban Final Destination against a known Marth main. This issue is examined more closely in the match–ups section of this guide.
b. Going in with a Plan [IYG12]
You can hastily run at all the newbie players that you want. At higher levels of play, that will get you a shuffled aerial to the face. You will quickly notice that if you expect to win with Fox by relying completely on your speed via a straight frontal assault, you will be sorely disappointed over and over again. It is tough to do, but you must try to incorporate as many tricks, mind games, and mix–ups as possible into your repertoire. If you plan to run at the opponent, also plan to wavedash backwards and jump–canceled grab if you’ve caught him by surprise, or wavedash back and come in with an up–smash if he tries to oppose you.
Your Blaster is a big part of your plans in any game. It is your primary method of controlling your opponent (except Ness, Fox, Falco, and possibly Zelda; your shine will help you there). A barrage of lasers from long–range effectively says to your opponent, “Come and stop me from blaster spamming, or I’ll finish you with a single Smash attack.” Remember that blaster spamming is not “cheap”; it is an established technique in the game, one that can be remedied by (in inexperienced players’ minds) a simple hasty charge at Fox, which conveniently plays into your gloved paws. The blaster is your tool for toying with your opponent’s mind, and it can be more useful than you might at first think.
While executing your combos, one of the best things that you can do is always to think where your foe will go if you hit him with your next attack and if you miss him with your next attack. This mindset allows you to account for either situation, your success or your mistake. Watch the enemy DI, also, because that tends to throw off your usual combo routine. Also, during aerial combos, you generally should fast–fall constantly so you can get to your opponent again before he or she can recover. In addition, you should have a specified plan for how you intend to finish off your opponent while executing your combos. For example, stages with lower ceilings, such as Stadium and Yoshi’s Story, call for vertical kills via plenty of up–throws, up–smashes, up–tilts, and the always–necessary up–aerial. If horizontal kills are more of what is in store for your foe, as would be the case on such stages as Dream Land, you should use horizontal throws to push them off of the stage, edge–guarding, edge–hogging, and plenty of shine–spiking, as well as waveshines off of the stage’s edge. For characters with easily–predicted recovery moves, such as Captain Falcon and Ganondorf, you should know where they plan to direct themselves and ready an appropriate move for edge–guarding; the forward– and down–smashes are particularly useful in this capacity. Again, the prevailing idea here is to know what you are going to do, what you usually do that consistently works, and how you can adjust your routines to take advantage of particular match–ups against certain characters, on certain stages, and against certain play styles. As is always the case, adaptation and consistency are the key words here.
c. Crush Your Enemy’s Concentration [IYG13]
Playing as Fox is as much an exercise in button timing, speed, and coordination as it is a test of your own psychological warfare abilities. You as the quick Fox player need to have a coherent plan of attack for how you plan to break through your enemy’s defenses and overwhelm him or her with your characteristic back–breaking combos. However, at the same time, you need to prevent your enemy from formulating his or her own plan of attack against you. You need to force him or her to pay attention to you rather than to his or her own character and strategies during the course of the entire match. Your goal in psychological warfare with Fox can be achieved using in no small part Fox’s innate speed and ability to pressure and the unique properties of a few of his moves.
One of your goals during the course of your matches should be to disrupt your opponent’s game plan and his focus on his own character and strategies. You have more than a few ways to achieve this. Your primary method is never to stagnate during a match. You must always be doing something that appears even remotely threatening, even at long distances. For example, make ample use of Fox’s SHL whenever possible; in combination with appropriate offensive and defensive mix–ups, the SHL makes your opponent think about where you will go or what you will do after that next SHL (will you continue with it and force him to come to you? How will he stop you? Can he afford to approach you directly when you can clearly see his intent while he cannot precisely discern your next move?).
Don’t stop moving during the course of the match. If you find yourself at a stage–length stand–off with your foe, don’t stand still; that affords your opponent too much quiet time. Instead, start SHL’ing, or start dash–dancing and play mind games with a dash–cancel or reverse wavedash. You don’t want to give your opponent quiet time to think and compose his thoughts; you are Fox, and you are known in the Melee community for your trademark pressuring abilities and faster–than–lightning speed. Use these traits to your advantage, but remember to take caution in your own actions and avoid simply charging headlong into any situation as a universal answer to everything. Smart pressuring in combination with good decision–making and efficient, well–executed punishes should be your modus operandi.
A lack of repetition in your moves will spread your foe’s thoughts out over a larger mental “area” and make you less predictable. A golden rule of every fighting game on the face of the earth is not to be repetitive. The human mind learns and adapts, and it will do that for your move set and your in–game decisions. For example, your foe may notice that you have trouble L–canceling your down–aerial on shield. The next time this situation arises, he will shield–grab you, and he will do this over and over again until you either correct your flaw or change your strategy to one more suited to your abilities. Another example is your opponent’s noticing your dependence on the dash attack when he keeps his distance at higher percents. He sees that you always run at him and use that particular move as an approach for a frontal attack, as if you had no other option. Now, he can predict your move as you come at him and wavedash backwards to space himself for a grab. In such cases as these, you need to adapt to his adaptation and try a new strategy. Hopefully, you will be broad–based enough in your abilities to be able to customize your strategies in response to your opponent’s adaptation to your older ones.
Don’t be afraid to show off randomly during the course of the match if you want to or can; it serves to do more than heighten your image. It also shows your opponent that you can do something, and that he should watch out for it. In addition, it occupies your opponent’s mind with what else you may be capable of and how good you really are. For example, if you manage to land a low–percent shine spike on your opponent, he will know that if you get him off the edge, he may die at a percentage too low for him to afford if he wants to keep up with you. This puts fear into his mind and forces him to spend some mental time and energy thinking about how to prevent himself from losing another stock like that. Show off your shuffling skills during the small amount of idle time between your opponent’s stocks. SHL instead of standing still at further ranges whenever you can. All of these things and more can intimidate your opponent, and intimidation is itself a form of mind games. You should not try to hold back your skills in a match for the purpose of “fooling” your foe (note, however, that you may do well to hold back a certain read on your opponent until the final stocks of a game or the final game of a set). You will not be fooling anyone; you will simply be intentionally handicapping yourself against an opponent who may not be doing the same thing in a match where you will more than likely need those skills to survive.
d. Style: Aggressive [IYG14]
Fox and the aggressive style of play practically go hand–in–hand. Fox’s unparalleled overall speed and the minimal lag on most of his moves make him perfect for hunting down and tearing apart unwary foes. Playing aggressively with Fox is walking a thin wire, though. Some inexperienced players may think it plausible to assume that they will simply overwhelm their opponent with their character’s vicious speed and powerful finishing moves coupled with the power of the shine. However, such players quickly discover that if they step into battle with just the mindset of pure, unrefined aggression, they put themselves in a tight spot in that they will not have thought of any possible obstacles in their way (like improperly spacing their aerials) or formulated any plans on how best to maneuver past enemy defenses. To this end, you should be aware that even simple answers like a reverse wavedash to space for a forward–smash or grab can break your pressure and possibly shift advantage to your opponent, with the possible loss of a stock.
If you really want to play straight aggro with Fox, at least do it in the smartest possible fashion. Master L–canceling, fast–falling, short–hopping, timing with the shine from an L–canceled aerial (especially with the down–aerial on shield), jump–canceling grabs, wavedashing, dash–dancing, and waveshining. Granted, that list does cover a very large chunk of Fox’s game, but it simply shows how difficult playing Fox well is. The above techniques will greatly increase your speed, an absolute requirement for pure aggression, and allow you to flow from one devastating combo into another. In general, an aggro Fox must be very technically proficient in order to place the most pressure on anything from a confused opponent to a shield that appears in an attempt to slow your assault. Edge–guard aggressively and often, and always shine–spike whenever you get the chance, creating opportunities to do so with the aid of shines by the ledge and up–throws into shines. Rely on the up–aerial and up–smash for your lowest–percentage kills if you cannot manage to shine–spike. Use dash–dancing to keep your options open and wavedashing to fake out your opponent and open the way to a juggling combo. Most importantly, always keep on top of your enemy. Do not give him or her time to breathe or formulate a counter plan. Follow techs, follow wake–ups, follow jumps and air–dodges, whatever you must do to stay with them. You want your opponent’s game to be a confused mess of chaos full of options that probably will not work against your all–out, technically–sound assault.
e. Style: Control [IYG15]
Fox can also play a relatively controlling game thanks to his shine and Blaster. The basics of the aggressive style, especially shuffling aerials and wavedashing, still apply to the control style of play, but with a greater emphasis on lasers and mobility. A common start to a controlling game is an immediate wavedash backwards followed by blaster shots until your foe works his way up to you. The blaster allows you to feel out your opponent. Judging by how he reacts to the blaster fire, you can formulate an estimate of his play style and how best to control it. If you are facing a character with a potent anti–projectile ability, you may have to switch to aggro and make use of well–spaced neutral– and down–aerials.
Controlling a game with Fox involves making use of his speed, evasion, mind games, blaster, and shine. Use your maneuverability to weave around opposing defenses and work your way up to your opponent, and start taking space and adding damage with your quick neutral–aerials and grabs. Against more defense–oriented opponents, make them come to you with the blaster and stop any projectile ideas of their own with your shine. Use crouch–canceling and crouch–cancel counters to lengthen your lifespan. Mind games are a must, as with any style, complete with dash–dancing and reverse wavedashing into jump–canceled grabs. Use platforms, if available, to play a strong defense by maximizing the amount of stage space that you control. In addition, don’t be afraid to run away from a tight spot and begin firing your blaster from afar; after all, you are playing a controlling game and want your foe to do what you want him to do.
f. Style: Aggro–Control [IYG16]
The aggro–control style is a balanced blend of the two styles of aggression and control. It is best suited to the widest variety of situations that a Fox can encounter and allows you to be more flexible in your proceedings than an overzealous aggro Fox or blaster–spamming control Fox. Keep in mind that this style may not necessarily work for you, and you should play your Fox however you feel is best for you. Oftentimes, the best strategies are those you have concocted yourself.
Being an aggro–control Fox requires you to have a good amount of control over Fox’s myriad of advanced techniques, especially the art of shuffling (which should be applied to every successful Fox’s style anyway). Your goal is to adapt your game in response to your opponent’s game. For example, opponents that try to stay away from you should be cut down with blaster fire. In most cases, this will force them to come to you; now, you must switch into aggressive style and knock them off their feet with shuffled neutral–aerials and grabs. Remember that you have an equally solid defense against defense–oriented opponents. As mentioned before, your blaster aids you in controlling where your opponent is headed, and your shine serves double duty in winning you close–range priority and batting away useless enemy projectiles. For weapons such as the Links’ bombs and Peach’s turnips, practice catching them instead of always reflecting them; this saves you the time when you are stuck after you reflect something and allows you to use your opponent’s weaponry against him or her.
An aggro–control Fox can make aggression his default stance against vastly slower and larger characters (such as Bowser, Mewtwo, and Ganondorf), if he so chooses. These fighters have very few reliable answers for your lightning melee moves so long as you mix up grabs and aerials (keeping in mind the ability of the down–aerial to counter crouch–cancels) and are always mindful of your spacing. If the situation warrants it, fall back on your blaster and allow them to meander over to you, in which case you can probably easily escape or start a quick combo. Against more aggressive opponents, make ample use of reverse wavedashes to space for jump–canceled grabs and shuffled neutral–aerials.
Mix in close–range shines and aggressive style against faster opponents. Chances are that they will come to you more often and at a decent pace that can make SHL’ing less effective. The close–range shines will enable you to continue to put pressure on your foe by either disabling them long enough for a potentially lethal combo or scoring you a knockdown and setting up for a tech–chase. Naturally, faster characters are better equipped to control more of the stage more frequently, so you must be adept at playing both the defensive and offensive sides of the field; your defense allows you to survive situations in which your opponent has control, and your offense allows you to push back and avoid ceding too much of the stage to the other player.
2. Suggested Practice Regimen [IYG2]
Technical proficiency and consistency are of paramount importance with Fox; as such, if your goals are to improve your game and take your skills to the next level, it is important to have a specific, detailed plan (a “roadmap,” as it were) to guide you in this regard. The following is a suggested plan of action for technical and execution–based improvement, with consideration given to the relative importance of Fox’s techniques both for your own development and with regard to the demands of the current state of the game. Note that this is not intended to serve as a perfect, infallible prescription for improvement as each individual player’s needs will ultimately differ; rather, it is meant to give such players a framework for ultimately constructing their own practice regimen in concert with honest assessments of their own strengths and weaknesses. That said, this suggested practice regimen should address the needs of most up–and–coming Fox players as they develop their abilities and accumulate experience.
1) 20XX Melee Training Hack Pack
This Melee modification provides a number of features that prove quite useful for practicing, including infinite shields, computer opponents that DI and tech in varying manners, red flashes for missed L–cancels, and save states to practice specific scenarios and execution strings in rapid succession. Although this pack is of course not absolutely required to practice on your own, it will equip you with tools to get more out of your sessions than you otherwise could. Please see the link below for instructions on how to set up this immensely useful mod.
2) Tournament–legal stages only
It is heavily suggested to confine practice settings to the currently–accepted tournament–legal stages. See the link below for a list of these stages.
3) Focus mainly on tournament–caliber characters during execution drills
To make the best use of your time, you should generally choose tournament–level characters as your “sparring partners” on which to practice execution strings as you are most likely to see such opponents in tournament play. Naturally, most of these characters will reside in the top “S” tier of the tier list, but this is not always the case; a good number of potential tournament opponents, including Samus, Ganondorf, and Luigi, are found in the second–highest “A” tier. Of course, if you have trouble with a particular character, you should focus your efforts on improving that facet of your game.
4) At least 30 minutes of practice and execution drills daily
Consistent practice is key to cementing the muscle memory that you build during your practice sessions and making certain that you can execute Fox’s various movement options, attacks, and techniques whenever you so desire. You may wish to increase the length of your practice sessions as a tournament draws near, particularly for regional, national, and international events. While you are still early in your development, these sessions generally should focus on a single objective until you achieve an acceptable level of competency in that regard. As you progress and get a greater portion of Fox’s technical game under your fingers, your daily practice may focus more so on general movement and execution of a number of techniques and strings to cement still further your overall technical proficiency.
5) Create and follow a plan of action based upon your current execution strengths and weaknesses and your current level of play
This final consideration is the most important of all. Creating a practice plan of action will do wonders to focus your improvement efforts and to ensure that you do not overlook any foundational components of Fox’s technical game. Such a plan is meant to be individualized with respect to your current level of technical aptitude and overall level of play; this requires a detailed, honest self–examination of your game and your own respective strengths and weaknesses with regard to Melee’s myriad feats of execution.
What follows is an example of such a plan of action intended for new Fox players who are not at all familiar with the “next level” of technical skill required to play the space animal in the modern tournament scene. This plan presents a prioritized list of the essential techniques needed to function as a competent Fox player. It is intended to be completed from top to bottom and is organized in such a way that the techniques build upon base competencies established near the start of the plan. For each item in this list, you should dedicate at least half an hour to honing your abilities with that skill followed by a personal challenge to execute “x” repetitions of that technique in a row without committing an error (with the number of repetitions increased with each session). In this regard, note that you should practice the “core” competencies, located towards the top of this list, for a greater amount of time (and thus require of yourself a significantly larger number of successful repetitions) than would be spent on those towards the bottom of the list. Finally, as stated above, your personal action plan must be individualized. For example, if you are already proficient at shuffling, you can opt to begin your plan at the wavedashing section; or perhaps you experience greater difficulty with SHDL than with shuffling and waveshining, in which case the SHDL should receive a comparatively greater amount of your attention.
Suggested Plan of Action
The following plan lists Fox’s various techniques in order of importance along with various notes and clarifications. Following this plan from top to bottom and devoting adequate amounts of time to practicing the various skills (particularly those in the “Core Concepts 1” section) will allow you to set and progressively build upon a solid technical foundation.
Throughout: revisit this section regularly
- Basic recovery sweet–spots (Illusion, various Firefox angles, Firefoxes from below the stage)
- Dash–dancing (revisit regularly as you gain knowledge of each character’s effective range)
- Double–jump sweet–spot from below the ledge
- Shortened Illusions
- Shield angling
- Ledge–teching (this can be drilled by placing proximity mines on the undersides of applicable stages)
- Dash–dancing (revisit regularly as you gain knowledge of each character’s effective range)
- Double–jump sweet–spot from below the ledge
- Shortened Illusions
- Shield angling
- Ledge–teching (this can be drilled by placing proximity mines on the undersides of applicable stages)
Core Concepts 1: SHFFLing and Shine Work: absolutely essential; spend the most amount of time with this section (for example, multiple sessions at 0.5 – 1 hour per session with a high number of successive repetitions for each session under the various described conditions)
1. Individual SHFFL components (short–hop, fast–fall, L–cancel)
5. L–canceling and shuffling into shine cancels (full–jump and short–hop)
- With every aerial (with the most emphasis on your neutral–aerial, followed by your down– and back–aerials) as well as without aerials for short–hopping and fast–falling
- Practice the various L–cancel timings for connecting with a target at various heights (for example, early and late neutral–aerials), shielded and unshielded, and for missing your target. Pay close attention to the timing required to L–cancel and short–hop successfully (especially the down–aerial’s L–cancel timing). The 20XX pack is indispensable in this regard, but you can also practice against a maximum handicap Bowser with damage ratio set to 0.5. Note also that the Ice Climbers can significantly change the timing of your cancels and fast–falls if you land an aerial on them, with or without their shields.
- Include fast–falling and L–canceling full–jump aerials as well at this point, especially in the scenario of performing an aerial while jumping towards a platform.
- Practice and perfect the SHL (not the SHDL at this point) alongside your short–hop training.
2. SHFFLing- Practice the various L–cancel timings for connecting with a target at various heights (for example, early and late neutral–aerials), shielded and unshielded, and for missing your target. Pay close attention to the timing required to L–cancel and short–hop successfully (especially the down–aerial’s L–cancel timing). The 20XX pack is indispensable in this regard, but you can also practice against a maximum handicap Bowser with damage ratio set to 0.5. Note also that the Ice Climbers can significantly change the timing of your cancels and fast–falls if you land an aerial on them, with or without their shields.
- Include fast–falling and L–canceling full–jump aerials as well at this point, especially in the scenario of performing an aerial while jumping towards a platform.
- Practice and perfect the SHL (not the SHDL at this point) alongside your short–hop training.
- Combine the individual techniques in section 1 above for each of your aerials at various heights, shielded and unshielded, and for missed aerials; include the Climbers’ double shields and double hitboxes as well.
- Focus first on mastering the shuffled neutral–aerial, then your shuffled down– and back–aerials.
3. L–canceling and shuffling into shines, runs, and jabs- Focus first on mastering the shuffled neutral–aerial, then your shuffled down– and back–aerials.
- Combine the individual techniques in section 1 above for each of your aerials at various heights, shielded and unshielded, and for missed aerials; include the Climbers’ double shields and double hitboxes as well.
- Focus first on your neutral–aerial, then on your down– and back–aerials.
4. Shine cancels (full–jump and short–hop)- Focus first on your neutral–aerial, then on your down– and back–aerials.
5. L–canceling and shuffling into shine cancels (full–jump and short–hop)
- Combine the individual techniques in section 1 above for each of your aerials at various heights, shielded and unshielded, and for missed aerials; include the Climbers’ double shields and double hitboxes as well.
- Focus first on your neutral–aerial, then your down– and back–aerials.
- Spend a greater amount of time with short–hop shine cancels as opposed to full–jump shine cancels.
- Focus first on your neutral–aerial, then your down– and back–aerials.
- Spend a greater amount of time with short–hop shine cancels as opposed to full–jump shine cancels.
Core Concepts 2: Grab Game and Jump–Cancel Utilities: key to rounding out your foundation of basic technical aptitude and setting the stage for the wavedash–based section; begin practicing tech chasing during this section after mastering jump–canceled grabs
1. Jump–canceled grabs
4. Up–smash out of shield
- Pay special attention to maximizing the distance of your jump–canceled grabs.
2. Shine–grabs- Practice with scenarios similar to your SHFFL training.
3. Running jump–canceled up–smash4. Up–smash out of shield
- Make certain to consider the effects of shield stun on your timing for this maneuver.
5. Grab follow–ups- Focus largely on the common tournament characters (especially Fox, Falco, Marth, Sheik, and Puff); place special emphasis on your up– and back–aerials, mainly, as well as running jump–canceled up–smashes against the space animals.
- Spend time practicing the timing and angles required to land only the second hit of the up–aerial against various characters at various percents.
- Spend time practicing the timing and angles required to land only the second hit of the up–aerial against various characters at various percents.
Core Concepts 3: Wavedash–Based Techniques
1. Wavedashing
- Forwards and backwards, into and out of runs and dash–dancing
- Include wavedashing out of shield, wavelanding on platforms, from the ledge, and to grab the ledge
- It is recommended to practice wavedashing from the ledge (also called “ledge–dashing”) regularly due to the technique’s great utility but high price to be paid for mistakes.
2. Waveshining- Include wavedashing out of shield, wavelanding on platforms, from the ledge, and to grab the ledge
- It is recommended to practice wavedashing from the ledge (also called “ledge–dashing”) regularly due to the technique’s great utility but high price to be paid for mistakes.
- Forwards and backwards, missed and connected
3. Drill to waveshine- Forwards and backwards, missed and connected (with special attention to shielded drills’ L–cancel timings)
- Become comfortable with performing one or two drillshine repetitions, but do not devote time to perfecting wall–free infinites or repetitions in excess of two to three.
4. Waveshine follow–ups- Become comfortable with performing one or two drillshine repetitions, but do not devote time to perfecting wall–free infinites or repetitions in excess of two to three.
- Forwards and backwards
- Start with the higher–traction characters (especially Sheik, Peach, and Falcon) and work your way up to the lower–traction characters (with an emphasis particularly on Marth).
- Up–smash (in place and running jump–canceled), grabs (in place and running jump–canceled), jab resets, repeated waveshines, drillshine
Odds and Ends
1. Shine–aerial shield pressure
- Practice the various aerial timings, e.g., early versus late neutral–aerials.
2. Ledge–canceling- Focus especially on ledge–canceling your Illusion at various lengths and on various stages.
3. SHDL- For the purposes of consistency of execution, consider using the control stick for the SHDL’s short–hop.
- Start with stationary SHDL’s and proceed to retreating SHDL’s.
4. Shining out of shield- Start with stationary SHDL’s and proceed to retreating SHDL’s.
- Make certain to consider the effects of shield stun on your timing for this maneuver.
5. Shield–dropping- Make certain to consider the effects of shield stun on your timing for this maneuver.
6. Double–shining- Your goal is to be able to perform your double–shines without leaving the ground.
7. Double–shine follow–ups3. Mind Games [IYG3]
Mind games are difficult to put into concrete terms, but they are what will separate you from other players, win you games, and carry you further as a player. For a good thread on Smashboards concerning mind games, head to the following page:
http://smashboards.com/threads/da-mindgraines-an-overview-of-mindgames-a-post-the-doesnt-suck.54186/
This thread, begun by g–regulate, provides a solid start on the concept of mind games and their role in high–level Smash. Below I have outlined my own thoughts on the subject which may coincide with information also found in that same thread. I highly suggest taking some time to read through that thread if you wish to take your Smash game to the next level.
a. Know Yourself [IYG31]
As mind games are very much a part of anticipating, predicting, and following, knowing yourself, that is, how you play and what your habits are (both good and bad), can make a significant contribution to your success with both fighting off opposing mind games and creating some yourself. However, knowing your opponent is also a critical factor in the success of your own mind games as well as theirs. You will need to be aware enough to cultivate both aspects of the match.
Knowing yourself essentially boils down to being aware of how you fight, including what your favored approaches are; how you edge–guard; how you recover; how you tech and wake up; and still more. Granted, when dealing with such an abstract concept as this, being able to define your own play from your own eyes can become quite difficult, if not impossible. This caveat highlights the role of human competition; from another player’s eyes, an outside player, one who anticipates, predicts, follows, and adjusts, the flaws in your play are made flagrantly obvious. Good human competition will do all of the above in their efforts to defeat you; they will take advantage of flaws in your innate game play, how you tech, how you wake up, predictable approaches and recoveries, and more, and they will punish you for your mistakes. They will take stocks off for your predictability and your failure to adapt; as such, if you want to continue to be competitive, if you want to take your game to the next level and defeat these and more higher–level opponents, you must play good human competition as often as possible. In so doing, you will have secured the best possible means of unearthing errors in your own game, and, perhaps more importantly, you will begin to see human tendencies, almost instinctual reflexes and thought patterns, all of which you can take advantage of and use to your own benefit. That topic, however, is for the next section; for now, the focus shall be on you as a player and how your play relates to your own potential for mind games as well as the potential for mind games to be used against you.
The bottom line is that humans will show you within the game itself your own errors, including what they are and how they capitalize on them. For example, maybe you are prone to teching in place virtually every time; perhaps you have a sort of urge to get back on your feet and back into the heat of battle, as if your opponent will not be there the next moment and you must be there before that time comes. Eventually, the aware player will notice this tendency, and maybe they will follow you after they connect with that shuffled neutral–aerial, predict where you will land, wait for the in–place tech, and finish you with an up–smash, grab, or the like. This scenario plays out rather frequently with Fox and Falco players, although oftentimes the space animal player is aiming to catch his or her opponent off–guard with a shine after the in–place tech; this option, while quick, is becoming increasingly dangerous in today’s game as players become increasingly aware of the shine’s very small range and space their follow–up to compensate. In yet another scenario, perhaps you have an almost instinctual tendency to roll inward when being pressured near the ledge, away from the edge and away from the danger that being knocked off presents to your stock. Good players will follow you inward, either by running and canceling into a move as appropriate or wavedashing back with a lethal Smash or safe set–up move.
Here is still another more involved scenario dealing with an often–critical issue that many players overlook. As Fox, you fall over when shined by another Fox, obviously; however, what many players insist on doing in the heat of battle (especially in as fast–paced a match as a Fox ditto) is to continue hitting buttons as they fly through the air and subsequently land on their back; the end result of this is that the stricken Fox player will always get up with a wake–up attack, something that in the Fox ditto almost certainly leads to death or very heavy damage. Once again, the aware player will wavedash out of the shine to follow you to where you will hit the ground, hold up his or her shield, and promptly shield–grab you, which will lead to either chain throwing into a damaging combo or a simple up – smash or up – aerial to damaging up – aerial juggling. Once again, your own habits have led to your downfall as your foes take advantage of your predictability and effortlessly follow your every move.
The same thing can occur even when you switch things up in an attempt to throw off your opponent. Say that the first time Link lands a hookshot on you, you tech roll to the left. Now say that the Link calls you on that and you decide not to tech–roll in the same direction again (that would be being predictable, would it not?) but rather to tech–roll to the right; however, you are again caught with another hookshot, and this time you decide not to tech–roll either of those ways again but instead to tech in place. A well–timed up–B then sends you flailing away. What this is an example of is that predictability can still exist even as you attempt to do something different in each instance of teching, waking up, or what have you. Indeed, such an occurrence is predictability in itself; your opponent knows that you will not attempt what you have just done and no longer needs to think about that possibility but rather only the few remaining ones. Such is a very common rule governing the behavior of many human opponents: they will not try something they have just done since in their eyes that would be being predictable. You as a player must notice when you are being punished for your attempts to change things; sometimes not changing is a good thing. Perhaps you have your opponent conditioned to your tendency to tech in a different direction each time and the next time a bout of tech chasing breaks out, you instead opt to tech in the same place two or perhaps even three times in a row if you can cut it, or perhaps you opt not to tech at all and instead simply crash to the floor. All are instances of how mind games are used against you and how you can subsequently turn the tables on these mind games and use them to your advantage.
Thus, knowing your own habits and fighting them as appropriate in a match can both foster more successful mind games on your part and foil them on your foe’s part. Knowing yourself essentially allows you to “counter–read” your opponent and have a solid notion of what tendencies and habits he or she is reading for, enabling you to act contrary to their expectations as needed and thus minimize their mental power over you. With a good deal of human competition, this knowledge of yourself will become ever clearer and will manifest itself more easily and more quickly in your game play.
b. Know Your Opponent [IYG32]
The second major phase concerning mind games is not only to know yourself but also to know your opponent. Many players talk of “reading” their foes; this is in essence knowing your enemy and making use of his or her own tendencies to make your mind games successful and punish mistakes, often with fatal results. In order to do this, you must know the basic tendencies of human players as a whole as well as of your opponent in particular. Read on for more information.
For many players, especially lower–level ones, there are certain reactions that are almost instinctual. For example, when being pressured near the edge with their back facing the empty air, they may instinctively jump or roll inward in an attempt to escape; both of these are common human reactions for players who do not actively fight their natural reactions to such situations. Another example: perhaps when your foe stands up as their wake–up, they tend to spot–dodge as soon as possible in anticipation of a grab; the aware player will simply wait for the dodge and punish afterward with a grab or lethal Smash. In another instance, perhaps if you apply pressure to a certain player’s shield consistently, he or she will roll to either side in an attempt both to escape your pressure and to conserve his or her shield; you should notice this and be ready to follow in either direction with a jump–canceled grab or up–smash.
One of the most common places in which discovered habits are often lethal is in edge play, both in recovery and in getting back onto the stage itself. For example, many players will want to roll inward from the ledge, thinking that it will get them the farthest away from their opponent at the edge; or maybe he or she tends to stand up off of the edge and hold up a shield in anticipation of an attack that could send him or her back out. A reverse wavedash can punish the first instance very well, and a simple grab to a forward– or back–throw (as appropriate) could lead to lethal edge–guarding in the second. One of the most common mistakes that many players make is attacking too hastily from the ledge; the moment they grab the ledge, they want to make use of those precious few invincibility frames and return with a protective attack, whether it is a ledge–hopped knee from Falcon, a ledge–hopped down–aerial from Fox (an especially difficult habit to break, for whatever reason, and an often–lethal one at that), or other such returns. In all of these instances, it is your job to have an understanding of your opponent’s habits and tendencies and how you can best apply these to your own mind games to remove stocks.
The common thread running between combating mind games and creating them is great awareness on your part. You must have the focus to understand your own habits, to make use of them and work against them as needed, and you must be aware enough to pick up on your opponent’s habits and take advantage of the openings that they create to take stocks and win matches.
4. The Power of Spacing and Stage Control [IYG4]
The analysis of options and their respective consequences is a fundamental aspect of most any human endeavor, Melee included. From real–time strategy games to card games and beyond, awareness of options and what they can do for an individual (as well as how they can work against that same individual) is an integral part of higher–level thinking. In card games, options can vary as a function of the cards that one is dealt or draws or that are previously played. In real–time strategy games, options can vary as a function of unit composition, the results of myriad battles, positioning, or elapsed game time. In Melee, options vary largely as a function of spacing.
On the surface, spacing does not seem like all that powerful of a concept. Making the most of a move’s range or keeping the space between combatants just so very often does not yield any overt results. Damage may not be immediately dealt, stocks may not be immediately removed, and opponents may not immediately be sent off–stage as would occur if a well–timed Smash attack connected. However, what one must realize is that the power of spacing does not necessarily lie within any immediate (or even tangible) results. Rather, the beauty of spacing is that one can essentially control and manipulate the options of oneself and one’s opponent through the use of range; this includes both the range of moves and the “range” of space between opposing characters.
This kind of manipulation comes only with time. It builds off of a foundation of knowledge of the game itself, and not only knowledge of each and every move’s respective ranges but also knowledge of how both parties’ situational options vary as a function of the space between them. A simple example of this deals with Marth and the power of his tippered forward–smash. Marth players are very well aware that a forward–smash possesses its greatest knockback at its tip; this is a very overt example of the potential rewards to be reaped from proper spacing in the form of greater knockback and a possible opposing stock removed via edge–guarding (an option further down the road that was opened via proper spacing). Because of these (potential) great rewards, experienced Marth players will move and position themselves in such a way as to keep the tipper option (and its resulting edge–guarding options) open to them. On the flip side, opposing characters will move so as to remove or limit these options, whether this means staying a full stage length away with lasers or, if one is cornered near the ledge, intentionally moving towards the opposing Marth to alter the spacing between the characters and at the very least make a tippered forward–smash more difficult to land. In both cases, both parties are aware of the options that proper usage of range presents to them, and as such both move (space) themselves accordingly to manipulate these options for their own respective gain.
Let us take a look at another common situation in the Marth vs. Fox match–up that again illustrates the power of spacing (albeit perhaps in a less obvious fashion). The stage is Final Destination, and a slightly impatient Fox decides to make an approach on a dash–dancing and reverse–wavedashing Marth, who is at high percent. To do so, the Fox decides to run up and shield at random intervals, knowing that a significant portion of Marth’s game relies upon proper spacing and also knowing the disastrous consequences of Marth’s mis–spacing on a Fox’s shield. At this point, we reach a fork in the road. Assume first that the Fox properly spaces his run–in shield against the Marth’s retaliatory forward–smash (meaning that the Marth has improperly spaced his forward–smash). Now, the Marth is caught in a double bind; not only is he now in lag time from the missed Smash, but he is also within range of the Fox (a key phrase here) such that the Fox has the options of shield–grabbing and up–smashing out of shield available to him, neither of which is particularly desirable to the Marth player. Assume that the Fox fully capitalizes on the situation and chooses to up–smash out of shield; this ends the stock of the high–percentage Marth. Note how proper use of spacing by the Fox amplified his options (and their respective return) while simultaneously severely limiting (and eventually entirely removing) his opponent’s options. This is the power of proper spacing.
Let us now consider the reverse scenario, one in which the Fox mis–spaces himself and the Marth spaces properly. The Fox runs in and shields, but is too far away from the Marth to grant himself any options. While the Marth does forward–smash the shield, it is properly spaced out as a tipper, and the interplay of range, timing, and options allows the Marth to escape unscathed while the Fox is now presented with the problems not only of safely escaping his shield but also of spacing himself away from the Marth, who as a projectile–less character was looking for an opportunity to initiate close–range combat safely and on his own terms. Again, note how this use of spacing amplifies Marth’s options while at the same time restricting the Fox’s, most notably by preventing laser camping.
Still another example arises in the case of a post–juggling scenario in which your opponent is attempting to reach solid ground again to regain his composure. The lesson here is quite apparent. Put simply, if your opponent steers himself too closely to you, he grants you the option of back–airing him and possibly sending him further off–stage to his death via edge–guarding. However, if your opponent anticipates this option and moves out of range (that is, spaces himself) of any back–aerial, he has granted himself the option of returning to the stage while removing your option of the back–aerial and its concurrent edge–guarding (and, potentially, the removal of an entire stock). Take note how a simple decision like moving out of range (proper spacing) can head off the problem of being edge–guarded and thus completely avoid the problem of losing an entire stock to an easily–avoided attack. Therein lies the beauty and the power of proper spacing; the simultaneous removal of options from your opponent and the creation of your own allows you quite simply to do more and to escape punishment far more frequently.
Stage control is in the same league as spacing when it comes to option variance. Put simply, control of the stage determines a myriad of occurrences within the game, from readying an opponent for edge–guarding to preventing that same edge–guarding to limiting an opponent’s movement and escape options and still more. The essence of stage control lies within an ongoing struggle for territory, which represents the entirety of the scene of battle. For some stages in the modern tournament setting, this territory will be rather static and unchanging, as with Final Destination and Battlefield; however, other stages, such as Fountain of Dreams and Stadium, offer their own dynamic environments in which to do battle.
For the most part, stage control hinges on your opponent having his back to the edge or blast zone and you facing your opponent with the majority of the stage behind you. This is a flagrant case of nigh–complete stage control; rarely will such a situation present itself for very long, but it is this ideal for which you should aim. Note in this situation how your opponent’s options are limited; he can grab the edge and attempt a risky ledge–hop maneuver (such as a waveland or attack from the ledge), he can try to jump over or roll behind you, or he can attempt to push in with an attack or run in shield in anticipation of your own attack, all in an attempt to reclaim territory for the time being and give himself some breathing room away from the ledge. Note also how most of these options can be addressed simply by properly spacing oneself from the edge or from one’s opponent and reacting to his or her movements. It is this interplay of spacing and stage control that sets the stage (quite literally) for edge–guarding and the efficient removal of enemy stocks.
With his combination of speed, power, versatility, and a mobile projectile, Fox is a master at controlling the stage against most every character in the game save perhaps Falco. Your blaster is pivotal in dictating the opposition’s movements, especially for characters such as Marth who have little to no immediate answer to it. You must flaunt this control whenever it is advantageous to prepare for a low–percent gimp or a ledge trap that could cost your opponent a hefty amount of percent. This is done by forcing your opponent to the edge with a combination of blaster fire, properly–spaced dash–dance baits, and follow–ups off of mistakes in your adversary’s spacing or timing. Throughout this series of exchanges is the underlying message that while you can afford to give up some stage control for a short period of time in exchange for a pay–off of some sort (for instance, a reverse wavedash or dash–dance to a grab or aerial), you cannot afford to do so absentmindedly for long periods of time. For example, while you should make use of your blaster to pester Marth whenever possible, you should never do so at the expense of your own control over the neutral game; this means that you have to find a balance between forcing your opponent’s hand and reacting early enough to his response such that you can take advantage of a misstep from a more advantageous position as opposed to from right near the edge. A quote from Tai’s very informative write–up entitled “Sharpening Your Sword: Tai’s Marth Guide” (http://www.meleeitonme.com/sharpening-your-sword-tais-marth-guide/) is appropriate here and reads as follows: “YOU DO NOT NEED TO GET HIT TO GET PUNISHED. IF THE ENEMY GAINS ANY RELATIVE ADVANTAGE IN RESPONSE TO YOU DOING SOMETHING, YOU GOT PUNISHED. […] Therefore, if you do an overly committed or unnecessary action, you are effectively punishing yourself by cutting down your own options from a situation where you had many.” This applies to the previous scenario in that if you allow your enemy to encroach too far into your territory without a response, you have effectively been punished with loss of stage control even though you have not (yet) been hit; this represents a complete turn–around of your intentions for the exchange, one in which you basically punished yourself by gifting the other player the advantage of greater stage control. Always be mindful of this overarching principle when making your in–game decisions.
Just as Fox has options for dictating stage control, he likewise has options for gaining momentum and thwarting an opponent’s plans when he or she holds the majority of the stage. A Fox who remains highly mobile via a combination of dash–dances, platform wavelands, proper spacing, and fluent technicals can eventually find a hole in an opponent’s contain and break through, allowing the Fox to achieve stage control and push the opposition to the edge, where enemy options are limited and stocks are put on the line (for both parties, mind you). Similarly, Fox’s high–powered offense of shuffled neutral–aerials and shines can very easily force an opponent into his or her shield, stealing mobility from them just long enough for you to regain stage control. Keep this in mind whenever you are feeling pressured; even a single connected aerial can turn the tide of battle instantly.
Stage control is especially critical for a fast–faller such as Fox, who can very easily fall prey to outlandish combos, chain–grabs, and the resulting edge–guarding. Ideally, you will almost always want to focus play on the center of the stage as this will minimize your opponent’s opportunities for low–percent gimps. This is especially critical in tournament play, where the psychological blow that such gimps can deal is more than enough to get your enemy back into the game, regardless of how many stocks he or she is down. This, when combined with the simple fact that a stock and its potential for damage and taking opposing stocks was cut short, can very easily cost you the game. Do your utmost best to control center stage at all times, but especially against characters such as Marth and Jigglypuff who have very potent off–stage and edge–guarding games more than capable of taking a stock of their own accord. Properly spaced blaster play, dash–dancing, and properly–spaced approaches will ensure that you control the most territory for the longest period of time.
In a similar line of thought, you can maintain stage control by avoiding ill–advised decisions concerning crossing up your opponent, shielded or otherwise. At times, at the breakneck pace of most Melee matches, a player becomes so caught up in his or her offense that he or she absentmindedly crosses up the opposing fighter such that he or she inadvertently gives up a great deal of stage control (note that the implication is that the exchange is occurring relatively near a ledge). In such a scenario, while the player may have succeeded in avoiding a shield grab or navigating to the opponent’s backside, he or she is now at much greater risk of being sent off–stage should a stray aerial or out–of–shield wavedash counterattack connect. Indeed, following the logic outlined by Tai in the aforementioned excerpt, you essentially punished yourself in such a situation; now, if your opponent successfully escapes his or her shield or regains his or her neutral stance, you can quickly find yourself in a great deal of trouble as you are now fighting with your back to the ledge, which greatly magnifies the consequences of any errors you now commit. Being cognizant of your stage positioning throughout each and every game is a critical concept, the importance of which cannot be overstated; by simply choosing your positions well and acting in such a manner as to maintain those positions, you can make taking your stocks far more of a chore for your opponent while simultaneously facilitating the taking of his or her stocks.
5. Prediction and the Problem–Solution Methodology
[IYG5]
Many a time has the question “How do I predict my opponent?” been asked both on and off the forums. Try as I might, I struggled mightily at best to answer this query. Prediction (or reading) is a highly cerebral, highly abstract area of the game that cannot be actively learned so much as it is slowly but surely acquired through time and experience. What makes this situation all the more frustrating for up–and–coming players is that the ability to read opponents is absolutely essential to perform at higher levels; it is this necessity that quite frequently causes players to plateau for long periods of time until a personal epiphany of sorts finally dawns upon them and they at long last gain the power to manipulate the mental, psychological, and human aspects of the game for their own benefit. It is this, the mental game, that separates the run–of–the–mill, every–day players from the truly imposing and intimidating top–level players.
However, all of this still begs the question of “How do I predict my opponent?” I believe that part of the problem of “learning” how to predict lies within the fact that there exists no concrete organizational structure or construct for understanding the details of prediction and reading; as such, players take a glance at the concept of prediction and are simply overwhelmed in terms of how to approach such an abstract idea. In contrast, the task of learning technical feats is much less daunting as these movements exist within an organized, highly–defined construct. For example, most of the community is familiar with shuffling, what it does, its uses, and (more importantly, for the sake of this discussion) how to perform it. Its components can be broken down into readily–understandable steps which can be performed overtly before our eyes and observed many times over. With this sense of organization and encapsulation, learning these technical maneuvers becomes far less daunting a task, one that is quite accessible to the vast majority of the Melee–playing population. However, no such overt construct or hierarchy exists when dealing with the mental game; it is this fact that prevents many a player from breaking through his or her personal “wall” and ascending to the next plateau of skill, often for years on end.
The difficulty stems from grasping the nature of just what one is predicting. While one is in fact reading human decision–making, the method of doing so is so abstract that “learning” this concept becomes a chore in and of itself. What one must realize, however, is that the roots of prediction lie within what is essentially a problem–solution hierarchy. In a nutshell, throughout the course of any match, each player is presented with an ever–changing multitude of “problems”; these can range from being edge–guarded to being lasered by a far–off Fox or Falco to being trapped in one’s shield and still more. Each of these situations is a microcosm of a problem (either one–time or extended) to which the player in question must find a solution. The solutions are chosen from the player’s toolbox of options, such as any number of attacks, jumping, spot–dodging, rolling, and others. It is through these solutions that a player seeks to alleviate the pressure of the situation and thus “solve” the problem. Following this line of thinking, the opposing player can construct in his or her mind a set of options, or plausible “solutions,” for a particular situation and choose from among those opposing solutions in order to form a logical basis for prediction. This choice can be made through any number of mechanisms, be it through completely random choice (not the ideal route, of course), anticipation of a switch–up, probability of choice based on previous actions, and other considerations. In effect, the opposing player’s solution to his or her problem becomes your problem, to which you must now find a solution (that is, act on your prediction and punish accordingly).
While we have now imposed a sort of rough (at best) governing structure on prediction, this alone will not guarantee you a sudden increase in your reading abilities. Experience still plays an immeasurably huge role in this method, as it does with all instances of prediction. To be able to encapsulate a foe’s possible options in one’s mind quickly enough to decide and act upon a course of action is a skill that takes time to develop, not one that can be picked up by rote memorization or repetition of sequences of buttons. With that said, let us examine a few instances of the problem–solution methodology for prediction at work.
The scenario is as follows: a Fox ditto on Stadium with your shielding opponent’s back to the edge. You are facing your opponent and must decide upon an effective course of action. Putting yourself in your foe’s shoes, you realize that he has a set of options available to him for escaping this situation (the situation being his “problem”). For example, he can wavedash onto the ledge to steal invincibility frames and mount a comeback from there; wavedash forward out of shield into a jab, shine, or other quick move to steal close–range control from you and push inward; spot–dodge; roll inward; jump out of shield; continue shielding and wait for a faulty response on your end; and still others. Now, the possibility that he might escape your pressure and stage control with any one of these choices, his “solutions,” presents itself as a problem to you. At this point, your enemy’s possible solutions to his dilemma function as your basis of prediction. Assume that you choose to read for a jump at the ledge; this would be your solution to the possibility that your foe would attempt to solve his problem and escape your pressure. You execute a full–jump neutral–aerial and pull back out of his range, or perhaps you dash–dance away and then reverse wavedash back in to space for a full–jump back–aerial. Whatever your choice, assume that you succeed in predicting his solution to his problem and catch him out of his jump. Your correct read now puts you in a more favorable position for edge–guarding, giving you the opportunity to take his stock and thus presenting him with a new problem to solve, and so the cycle continues throughout the match.
Now assume that the same situation occurs again later in the same match. Your foe remembers that you have once before predicted his hair–trigger jump at the ledge. His problem now becomes not being read again. While the problem has changed, the solutions remain largely the same as last time; however, the jump option initially presents itself as the weaker route because you succeeded in calling it out last time. As a result, your opponent chooses a different option and opts to roll inward. At the same time that this thought process is occurring in your foe’s mind, a parallel process runs through yours. You realize that his problem lies with the fact that you previously predicted his jump; as a result, you bank on the fact that he will not choose the same option twice in a row for fear of the same punishment. This time, you count on him rolling inward to escape the pressure, and you wavedash backwards to space for the grab or up–smash, successfully catching him and removing the stock with your follow–up. You have again applied the problem–solution method, this time to catch your foe’s mix–up. Of course, no player’s prediction game is perfect, and your opponent may very well have chosen a different option. If he chose instead to wavedash forward and jab or shine, you very well may have been caught off–guard, and the tides of battle would have very quickly reversed. Note, however, that at times your solutions may cover more than one of your opponent’s solutions. For example, your wavedashing back would account for his rolling inward or pushing in with a short–range attack. Be especially wary of these situations as being able to cover multiple options at once very much aids your prediction and punishment games.
Remember also that the rock–paper–scissors nature of the game can also factor into this process. For example, most players are quite familiar with the speed of Peach’s first neutral–A slap. Imagine that you are playing a rather aggressive float–canceling Peach who has repeatedly approached you with float–canceled forward–aerials, which you have repeatedly shielded. As you attempt to jump out of your shield to escape the pressure, however, you are tied up by a slap, which brings you back down into a damaging chain grab to neutral–aerial finisher. As the match grinds on, you begin to hold your shield past the forward–aerial and subsequent slap and then wavedash out of your shield. Later on, you find that your opponent has begun forward–aerialing your shield and then proceeding immediately with a grab as a reaction to your held shield. You respond by spot–dodging out of your shield into a waveshine to up–smash. Your opponent then switches to a down–smash out of the forward–aerial and catches you crouch–canceling out of the spot–dodge. You switch things up to a light shield to cover both the slap and down–smash. Later, your opponent begins grabbing out of the forward–aerial again, and so the cycle continues. Just when these switch–ups occur will be up to you to decide and to read; indeed, calling the precise timing of opposing switch–ups is one of the greatest challenges of prediction.
Aspects of the stage itself may also play a role in influencing the problem–solution process. For example, the windmill transformation of Stadium may prompt your opponent to solve his recovery dilemma on the left side by Fire Foxing for the windmill. He may even be so crafty as to position himself at a 45–degree angle to the ledge so that you are forced to choose between his angling down at the ledge, directly at you, or up to the windmill.
State of mind is yet another consideration when applying the problem–solution method. For example, if you are down a stock or two in a match and have been on the receiving end of a barrage of hits from your opponent, you may opt to solve your problem of being hit by attacks by putting up your shield out of instinct. Your opponent, however, anticipates your solution and comes in with a grab, continuing his pressure unimpeded while simultaneously taking control of your positioning on the stage. Take care not to let fear or anxiety seize control of your decision–making during a match. Much like the habitual tech inwards at the ledge and stand–up to spot–dodge, these emotions can cause you to become more predictable than you would like and will poke innumerable holes in your game, any one of which can cost you the game.
The problem–solution method can also be applied to tech–chasing. For example, you notice that your opponent plays a particularly impatient style of Marth, one that always seems to want to get back into the fight at all costs. Your neutral–aerial approach knocks him to the ground, and the time comes for him to tech. Using what you know or “feel” about your foe to your advantage, you predict that he will tech in place as that option will give him the fastest solution to his dilemma of being knocked off his feet. You choose a jump–canceled up–smash as punishment, and it connects. Fast–forward now to the final stocks of the match, a time where nerves run high and decision–making very often suffers as a result. Your neutral–aerial approach again knocks your foe to the ground, but fear takes hold of him and he now wants to get away from you rather than jump back into the thick of things. His solution to the problem of being knocked to the ground near the end of the match is to tech away, towards the ledge. Sensing this fear, you predict his solution to his problem and give chase again with a jump–canceled up–smash that gives you the final kill and thus the match win.
“Habitual timings,” a phrase coined by Midwest Fox player voorhese, is another important consideration within the framework of prediction. Many players do not realize that their opponents can become accustomed to the very timing at which they use their attacks. This can be difficult to catch on to during the course of a match but is yet another important element of maintaining a potent offense. To the extent possible, you should be mindful of and vary the timing of your attacks, particularly in repetitive situations. For example, if you tend to preface your neutral–aerial approach with dash–dancing, take care to vary the time at which you choose to commit to the aerial; otherwise, you provide an easy trigger for your opponent to shield or space out your advance with a reverse wavedash and grab you.
From player style and the nature of the stage to the emotional state of the match and the previous success of opposing reads, any number of factors can influence both you and your opponent’s decision–making during the course of a game. The problem–solution method simply gives you a method of encapsulating the nature of prediction such that it can more easily be mentally grasped; by no means is it a sure–fire way to call out each and every one of your enemy’s decisions. However, by imposing some semblance of organization on the highly abstract nature of the mental game, I hope to provide a starting point for players seeking to incorporate this final frontier of the game into their repertoire.
6. 10 Common Mistakes in General Fox Gameplay [IYG6]
1) Full–jumping too often
The hallmark of the modern Fox is a nigh–unwavering focus on ground–based play with relatively minimal use of full–jumps. This is due in no small part to the fact that Fox’s greatest asset in the context of his entire game plan is his ground speed and maneuverability; in contrast, he is not nearly so flexible in his aerial movements. As well, it is simply far easier to punish full–jumps than short–hops and ground–based movement (again, particularly for a character like Fox with limited aerial mobility); any player who has lost a stock due to being hit out of a full–jump at the edge will know this fact all too well. Full–jumps also give your opponent more time to sneak relatively safely into your zone and find an opening. Overcoming your full–jumping instinct is quite difficult and will take a good deal of time, but it is essential to making the most of what Fox can do. By staying grounded, you keep your multitude of options open and also give yourself the speed and maneuverability to bait and punish your opponent before he or she can mount a defense or escape the situation.
Unfortunately, there is no quick and easy way to overcome undesired full–jumping tendencies; it will take a conscious, ongoing effort on your part, as is the case when making any change to a well–established part of your game. When playing practice matches, try to keep your goal of avoiding unnecessary full–jumps in the back of your mind at all times and consciously alter your play to achieve this goal whenever possible. Some players find that recording their matches and reviewing the footage at a later time is quite instructive in terms of unveiling one’s habits and could help show you what situations tend to spark your need to full–jump. Again, this will take time, but the idea is that by continuously resisting your need to full–jump in practice, you will cultivate a sort of “default” mindset that will eventually extend to your tournament matches.
2) Approaching with early full–jump neutral–aerials
As competitive Melee has become faster in general, players have, out of necessity, become more adept at taking advantage of increasingly smaller windows of opportunity. One of the easiest ways to grant your opponent one of these opportunities is to telegraph your approach, and there is no more glaring way to announce your intentions than with the painfully–long approaching early full–jump neutral–aerial in the neutral game, especially at center stage. Note the difference between this tactic, during which you are constantly moving forward into your opponent’s zone, and the full–jump pull–back neutral–aerial (a useful tactic to poke safely at opponents in the Fox ditto and against Falcon), during which you DI yourself backwards and safely out of your opponent’s zone. As soon as you start this risky move, you essentially trigger a timer in the enemy’s head that tells them that you are now committed to this move and its resulting arc of approach for a decent chunk of time. While such a maneuver may occasionally give you an opening, the approaching early full–jump neutral–aerial is vulnerable not only to simple reaction but also to crouch–canceling.
The “early” part of this maneuver is particularly important. Referring back to the aforementioned mental “timer” in your adversary’s mind, as soon as you start an aerial, the other player now knows that you are committed to that move for the next “x” frames, with “x” being a function of such factors as the height of your jump, the move itself, and how far above the ground you were when you started the move; that last factor is particularly important here owing to the neutral–aerial’s long animation, which when coupled with its use early in a full–jump loudly informs your opponent that you will essentially be in “lag” and relatively unresponsive for some time. To this end, you would do well to note the nature of the late neutral–aerial; a neutral–aerial performed later in a jump masks your intentions better and leaves your options open for longer than an earlier aerial (with the caveat that you leave yourself without a protective hitbox for a longer period of time).
As with excessive full–jumping, changing this habit will take time and perhaps more than a few lost stocks. Again, making a conscious effort to avoid this during your practice matches along with recording and later reviewing of your footage could be helpful. Objective analysis of the situation that prompted you to approach with an early full–jump neutral–aerial also may be useful; what was it that triggered you to do this, why did you do it, what did you hope to gain from it, and how could you go about achieving that same goal in a safer and more effective manner? In almost every situation, you will find that a simple extended or shuffled short–hop neutral–aerial will more than suffice without costing you so dearly.
3) Continuing an approach after connecting with neutral–aerial to shine
It is of paramount importance that you not fall into the trap of believing that it is always safe to press on after you connect with a neutral–aerial to shine (on a non–shielding opponent, that is) that does not send your opponent off–stage. While the neutral–aerial and shine taken separately on paper alone appear to make a good lead–in when combined, the end result is anything but optimal. The reason for this is that the shine’s stun time is significantly reduced when it hits an airborne opponent (the result of your lead–in neutral–aerial) and pushes them into the ground. If you try to press your supposed advantage after connected with a neutral–aerial to shine, you essentially grant your opponent an opportunity for an unearned opening on you as they can simply act out of the shine’s truncated stun time (including with grabs).
Note that this is a far more problematic situation if you wavedash out of the shine towards your opponent as you will be committed to the wavedash for just long enough to make yourself vulnerable within the enemy’s range. In contrast, you can sometimes bait a reaction out of an opponent by short–hopping or wavedashing backwards out of the shine, waiting for a response, and then advancing. Also keep in mind that you are still relatively safe should your opponent be crouch–canceling and at lower percent (therefore preventing his or her character from being lifted off of the ground to an appreciable extent by your neutral–aerial). All the same, you will not always have this luxury, and so it is important to pay attention to the other combatant’s percentage and tendency to crouch–cancel.
Overall, it is best not to get in the habit of pressing on after a connected neutral–aerial to shine as you can very easily lose track of these exceptions during the course of a match and take some very unnecessary damage. Remember that a down–aerial to shine is much safer overall (but also keeping in mind the impact of Smash DI) and that you in fact do not need to shine after each and every aerial that you land; indeed, doing so actually negatively impacts your overall mobility and ability to respond to successful hit confirms (remember that you cannot simply run directly out of a shine; once you shine, you then must commit to a jump either by itself or as a part of a wavedash).
4) Reflexively shining after an in–place tech
This tempting habit is a killer of low– and intermediate–level Foxes the world over and unfortunately is especially easy to fit into one’s routine. While this sequence can be useful in making it tougher to tech–chase you successfully (as least in theory) and can punish opponents who stand too close to your in–place tech position, keep in mind that the shine’s hitbox is rather small (that is, the move lacks an appreciable amount of range) and that the move’s hitbox lasts for only a single frame; taken together, these shortcomings allow your opponent to space out your wake–up shine and simply hit or grab you afterwards. To make matters worse, if your opponent opts for an attack rather than a grab, he or she may catch you with downwards DI as you execute your shine, a situation which could end poorly for you if you are near enough to the edge to be sent off–stage.
As with other common Fox gameplay mistakes, this one too essentially causes you to set yourself up for punishment. While sometimes useful should you see that your opponent is lazy about spacing around your in–place techs, you should as always be mindful of and use the mix–ups available to you after your tech, including simply running away, shielding, or launching a retaliatory neutral– or down–aerial out of the shine (this last option does have its risks, but it also cuts down on your vulnerability to a grab after your in–place tech).
5) Relying too excessively on up–aerials rather than back–aerials
This mistake is especially critical in today’s game, where the ability to Smash DI the initial hit of Fox’s up–aerial is relatively commonplace. Put simply, stubbornly continuing to up–aerial after your opponent has demonstrated proficiency in this technique will cost you kills and edge–guarding opportunities and may even get you hit, an especially problematic situation should you have already used your double–jump. Be on the look–out for Smash DI on your up–aerial and be ready either to switch to the back–aerial or to time and position your up–aerial to connect with only the second hit.
6) Ledge–hopping with down–aerial when your opponent has stage control
This, like the reflex shine after an in–place tech, is another very tempting tactic with increasingly less reliable pay–offs and increasingly greater risk in the modern game. While the prospect of landing a ledge–hopped down–aerial and finishing with a waveshine to up–smash is intriguing, you will quickly find that this is one of the most common causes for easy, early deaths in up–and–coming Fox players. Simply put, this maneuver gives you only a small hitbox that can be Smash DI’d away (which in itself can set you up for a punish) and costs you your second jump; these two factors taken together make it a high–risk gamble should your opponent be in neutral stance. In this (and really most) situations, your best bet is a wavedash from the edge with invincibility.
Of course, the situation is entirely different should the opponent not have stage control, as when you are edge–guarding a returning Sheik and have forced her to up–B onto the stage. Here, the down–aerial from the ledge may be a viable option, but be sure not to start the aerial too early as that will give your opponent more hits off of which to Smash DI. Also, if your opponent is at high percent, a more efficient option would be to ledge–hop an up– or back–aerial, if they are within range.
7) Trying to land full–jump falling back–aerials around center stage in the neutral game
Although this might not seem like too significant a problem at first glance, there exist more than a few issues with trying to connect with a full–jump back–aerial in this situation. First is the fact that you are essentially trying to “approach” a grounded opponent with Fox while you are in the air; needless to say, Fox’s aerial mobility is not the greatest, and your grounded opponent will more than likely be able to outmaneuver your back–aerial hitbox and grab you. Second, trying to land a back–aerial in this manner telegraphs your intention, again allowing your opponent to react and providing him or her with a good amount of time in which to do so. Furthermore, while at and around center stage, your opponent has more than enough room to space out your attack on the ground and counter appropriately; on that note, a falling full–jump back–aerial would indeed be more viable when you are pressuring your opponent at the edge and his or her movement options are constrained, but this still is not a preferred course of action.
As mentioned previously, the modern Fox is played as low to the ground as possible for as long as possible. Committing to a full–jump in the first place is not the best of options with Fox, but committing still further to a move with relatively minimal range and a longer L–cancel while falling from a decent height is not a preferred choice in the least. Again, as with the other aforementioned mistakes, this too comes down to not integrating subpar habits into your game play. It is important to know what situations trigger your habit of falling with a full–jump back–aerial and actively, consciously resisting this urge. Quite simply, any situation in which one could use a falling full–jump back–aerial could be better handled by a shuffled neutral– or down–aerial.
8) Not making use of light–shielding or shield angling
These two tactics are underused as a whole save for at the higher levels of play, particularly light–shielding (outside of the “Marth killer” edge–guard, that is). Light–shielding and shield angling are important in preventing shield pokes, which in some situations can turn the tide of an exchange if they manage to connect. In light of SleepyK’s video (https://www.youtube.com/watch?v=lzG5psgkrtg) detailing the fact that Fox’s tail, which pokes out of even a full hard shield, functions as a reliable hurtbox target, such tactics are especially important when considering the possibility of being shield–poked from below a platform. As a Fox player, you should keep in mind that you can buffer into a light shield (and hard shield, for that matter) as you recover; this is especially useful when recovering high to prevent shield pokes from below a platform while constraining the time that your opponent has to react. Note also that if you are knocked off a platform out of your light shield with your back facing off the platform, you will enter a “tumble” animation out of which you cannot immediately act; in contrast, being pushed off while facing forward off the platform will still allow you to act.
Another important feature of these tactics is that they are effective in neutralizing shield pressure, an increasingly common part of today’s game. Both light–shielding and shield angling can throw off your opponent’s L–cancel timing and grant you unexpected openings. In addition, due to the fact that hits on a light shield push you further back than those on a hard shield, you can use light–shielding to push yourself out of heavy shield pressure and get a chance to reset the encounter; this is key as it allows you to escape consistently a number of situations where you would otherwise be hit out of shield and severely punished, especially against such characters as Falco and Peach. However, note that this feature of the light shield also minimizes your opportunities to shield–grab and to attack out of shield, which is where shield angling with a hard shield excels. The use of shield angling also allows you to input shield DI easily; generally, this will benefit shield DI towards your opponent as you will likely be angling your shield in this direction in most interactions.
9) Not using down–aerial or late–hit neutral–aerials at low percents
Getting hit by a crouch–cancel counter is one of the quickest ways to deflate your offense and turn over control of an exchange to your opponent, yet it is also one of the most readily preventable; out of sheer habit, many Fox players will default to their neutral–aerial in the low–percent neutral game without paying attention to percents or the timing on their aerial, thus opening themselves to punishment. Both of these techniques are important for countering crouch–cancels and otherwise maintaining the integrity of your offense. The down–aerial itself cannot be crouch–canceled, and late–hit neutral–aerials minimize the time your opponent has to react prior to your follow–up. As well, late–hit aerials in general minimize the possibility that your opponent can put up a shield at lower percents or counter–hit you. These two seemingly minor changes to your game will do wonders for your offense and your defense as well as you will better guard yourself against crouch–cancel counters.
10) Not making use of shine–grabs
Still relatively underused by a good portion of Fox players, the shine–grab takes advantage of today’s pressure–oriented game play. The prevalence of aerial shield pressure has conditioned the community in general to shield beyond the space animals’ lead–in aerial in anticipation of a follow–up shine and further aerials; this further amplifies the effectiveness of the shine–grab, already a potent option. As well, players miss their DI on shine–grabs far more often than in other grab situations. While the shine–grab is not a perfect option, it nevertheless minimizes the number of safe shield escape opportunities for your opponent while reducing your technical workload. It also forces your opponent to consider other escape options, such as buffering a roll or spot–dodge out of shield, that you can anticipate and punish accordingly; Midwest Fox player Sveet points out the use of double–shine shield pressure as a possible mix–up, which you can use to catch opponents who begin to escape your shine–grabs. That said, the shine–grab is not the preferred option in each and every situation; specifically, when floatier characters at high percent are in shield, it is better to shine–aerial their shield as you cannot reliably convert off of an up–throw in such situations (although a down–throw tech–chase is a potential alternative as well).
III. Character Match–Ups [CMU0]
The following section presents the various match–ups that you may encounter throughout your Melee career. Here you will find general conceptual information; tips and tricks; information on suggested counterpicks, bans, and strikes; and links to videos illustrating key ideas and points of each match–up with supplementary discussions. Note that the “Counterpicks” portion refers to your counterpicks, that is, the stage(s) that you could choose for the match–up in order to gain some sort of an advantage. Similarly, the “Bans/Strikes” section refers to your bans and strikes, that is, the stage(s) that you should avoid for the match–up both when deciding which stage to ban after a win and during stage–striking for the first game of a set.
A. S Tier [ST0]
1. Fox [ST1]
As you would expect, you will need to know how to fight your own top–tier character if you plan to go anywhere in tournament play; more than a few players keep a solid Fox at the ready for certain match–ups, and you will of course encounter more than a few Fox mains in tournaments. The Fox vs. Fox match–up (also called a “ditto” or a “mirror match,” both terms referring to a match played with two of the same character) is based to a significant extent on Fox’s grab game; your kills will largely stem from extended grab combos involving chain–grabbing, juggling, and some combination of up–tilts, up– and back–aerials, and up–smashes. As such, you must know how to land grabs and execute the subsequent combos on your own character. For the most part, your grabs will stem from dodged aerial attacks (by dash–dancing or wavedash spacing, for example), especially the back–aerial; tech chases; jab resets; and knockdown situations in general, reflecting an important role for your shine in both on– and off–stage scenarios. With these considerations in mind, you will also need to minimize these same openings on your part while exploiting your opponent’s mistakes to the greatest extent possible. As well, you will need to be especially careful with being predictable on–stage (as that will lead to openings for deadly grab combos) as well as off–stage (as that will lead to lethal shine spikes out of your Illusion start–up).
Because this is a mirror match, all of the following advice can be applied in battle both by yourself and your opponent. As such, if a tactic or technique is pointed out as being particularly effective, it can likewise be helpful for your adversary. Make certain to evaluate all suggestions from these two perspectives.
The ground portion of the Fox ditto is all about landing knockdowns and grab combos while remaining as mobile and reactive as possible. As you are no doubt aware by this point, Fox has all manner of advances and lead–ins at his disposal, any one of which can lead to heavy damage if you are careless. Generally, you will have to play a somewhat more “conservative” style, especially considering that Fox falls from the shine and thus cannot fall prey to traditional shine combos (however, you will find that you would do well to minimize the number of times you are shined as this seemingly innocuous on–stage move does lead to a knockdown situation). You have a few choices to make when considering your approach in the ditto. As usual, it is crucial that you are able to wield your shuffled aerials well and make use of extended aerials to catch retreating opponents; late neutral–aerials to minimize windows for shield grabs and shield escapes and to link into a shine more reliably at low percents; and down–aerials to contend with crouch–cancels. Always keep in mind that any successful on–stage shines represent an opportunity for further punishment via a jab reset into a grab. Remember also that the jab reset can be countered via Smash DI’ing the jab itself up, which can be countered by double–jabbing. Another important point to keep in mind is that the shine itself can be Smash DI’d up, making it easier to time a tech to escape the string. Still another key piece of information, provided by Smashboards user Shai Hulud (http://smashboards.com/threads/jab-stand-up-pop-up-percentage-list.173797/), concerns the percents at which Fox will stand up as opposed to pop up into the air when jabbed from a prone position. This range runs from 82% (if jabbing shortly after a shine connects due to the added momentum from the shine still being present when the jab connects) to 84% (on a completely prone opponent, e.g., one who has been lying on the ground for some time); at these percents and above, the opposing space animal will pop up into the air instead of stand up, allowing your foe to respond due to the punch’s short hitstun. At higher percents and depending upon your opponent’s percent and DI along with the strength of the connecting neutral–aerial, you can potentially follow your neutral–aerial lead–in with a grab, up–smash, or up–aerial (this last option is generally open to you only if your foe DI’s a hard–hit neutral–aerial inwards at high percents).
Shuffled down–aerials can also be quite powerful in the Fox ditto. Their ability to neutralize crouch–cancels makes them useful in ensuring that you are not counter–shined out of your approach. As well, you can shine after a down–aerial to set up a knockdown situation and pave the way for a jab reset. You can also lead a down–aerial right into a grab, circumventing your opponent’s possible escape options from a jab reset or shine knockdown. With all of that said, while the drill is certainly a useful tool against other Foxes, you must be as cautious as ever about drilling at the front of shields; the difficulty in correctly L–canceling the drill in such situations as well as the possibility of significant damage or stock loss at the hands of a shield grab make such a play a risky endeavor. Therefore, you must pay attention to your spacing throughout the match (in this and all other regards) and DI your drill across shields when possible. Alternatively, you can use run–in shines to get low–percent knockdowns while keeping your opponent guessing during the neutral game.
While you generally should aim to stay as grounded as possible in this match–up in order to take advantage of your ground–based speed and maneuverability and to avoid being punished for missing telegraphed full–jump aerial approaches, you can still make use of full–jump neutral–aerials. This involves full–jumping and then fading away with the aerial to keep you out of reach of an easy counterattack (although be aware that your opponent can react in time and slip within your range if he or she is close enough). Such a tactic is most useful when you notice that the opposing Fox is opting to take to the air to escape your ground–based pressure and poke for openings via other routes. The full–jump fade–away neutral–aerial is also most efficacious at middle percents and beyond, where the aerial’s increased knockback and hitstun facilitate following up and also raise the likelihood that the victim will be placed into a disadvantageous position. It is crucial that you keep the “fade–away” portion of this tactic in mind at all times; this is because early full–jump neutral–aerial approaches (in contrast to fade–aways) allow your opponent a significant amount of time to react to your telegraphed attack and reposition for an easy grab. Other than this tactic, staying grounded and out of your shield is the best general course of action in the Fox ditto; this allows you to react well to any openings and also prevents your opponent from sniping your jumps (especially ill–advised, fearful double–jumps).
As mentioned previously, being able to command a strong, well–spaced approach game is key to the Fox ditto. You must know both how to advance and how to counter an advance, usually done by spacing via wavedashing or dash–dancing. For example, an overly aggressive Fox can often fall prey to simple reverse wavedashing into jump–canceled grabs, shuffling or otherwise. Your approach options can serve as powerful tools in the Fox ditto, but excessive use similar timings and spacings can open you to punishment. Choose the moments in which you advance wisely, and vary your timings accordingly while making sure to space such that you can catch retreating dash–dances and wavedashes in particular. If you opt to overextend with a neutral–aerial, consider delaying the aerial until later in your advancing short–hop. This allows you to waveland backwards in case you later reconsider the approach; provides a shorter timing cue for your opponent; and ensures that you connect low on a shield or on the unguarded opposing Fox, both of which allow you to flow into your shine without fear of a high or weak hit opening you to a shield grab or a counterattack (especially at low percents).
At this point, it is important to mention the intricacies of responding to shines (both your own as well as those of your opponent). If you connect with a shine, your thoughts should turn to exploiting the resulting knockdown to the greatest extent possible; this can involve both jab resets as well as tech chasing. Likewise, if you are shined, you must consider your subsequent actions and options carefully so that your errors do not give the enemy Fox easy openings for grabs or pre–juggling up–smashes. One of the simplest and most effective things that you can do to minimize your vulnerability when knocked down is to stop pressing buttons as you hit the ground; if you continue to hit buttons during and shortly before this time, you will wake up virtually every time with an attack, for which many wary Foxes will watch seeing as how it is not difficult at all to wait until the attack frames are finished and then respond with a grab, up–smash, or up–aerial as appropriate. Note as well that if your wake–up attack hits a shield, you again will either get shield–grabbed or up–smashed from shield. The get–up attack is also vulnerable to crouch–cancels such that you could be hit with a forward–smash counterattack. As such, you should watch for this easy opportunity to land grabs and start juggles on your foe’s end while also taking care not to fall victim to the same trap yourself. Yet another common response to a connected shine is a reverse wavedash to space yourself better should your opponent decide to roll or tech inward. In scenarios where the victim begins to stand up in place shortly after landing on the ground, many Foxes opt to run after their opponents and simply stand a bit in front of them. Many players have a natural fear of retaliation from the nearby opponent and will instinctively spot–dodge, usually into a shine to cover the dodge. You can wait for this dodge and punish accordingly, usually with a grab or appropriately–spaced up–smash.
You must also be aware of the two methods for escaping jab resets. First, you can Smash DI the jab set–up itself upwards; note that the counter to this is to jab twice. As well, if your adversary is aiming for a reset out of a shine knockdown, you can Smash DI the shine upwards and tech out; this can be done by timing your Smash DI relative to the timing of the lead–in aerial. Both of these methods can be used regardless of percent. Finally, recall that Fox naturally pops up after being jabbed while lying in a prone position at and beyond 82 – 84%, depending upon if the jab is done either after Fox has been on the ground for some time or shortly after the shine such that a portion of that move’s momentum still remains when the jab hits.
With regards to your grab game against your doppelganger, you should be aware of certain key points. First, be aware of the sheer speed with which Fox tosses opposing Foxes into the air; this is due to the character’s low weight. You can exploit this by up–throwing immediately after a grab rather than adding in knees beforehand (in general) in order to minimize your opponent’s window to input DI; that said, note that situations may arise wherein a few knees would grant you a lethal follow–up regardless of DI due to the added damage. Next, do not forget the power of your shine–grab, especially if you have succeeded in conditioning your opponent to shield after your shine. The direct counter to the shine–grab is a buffered spot–dodge or a buffered roll out of shield; while the roll can be safer and resets the situation, the spot–dodge’s timing is such that you can grab your opponent afterwards due to the interaction of the 22–frame dodge and the 30–frame standing grab animation, yielding a two–frame grab window. Note that double–shining addresses the roll and shine out–of–shield options while still allowing you to respond to the spot–dodge and potentially netting you a knockdown. Light–shielding is also another option to counteract shine–grabs, especially in combination with away shield DI, because the resulting low–traction state pushes you out of range of the grab (as well as shielded aerial pressure in general). The aforementioned shine out–of–shield is another quick maneuver that can theoretically hit on frame 4 and can be used to good effect in defusing the opposing Fox’s shield pressure while simultaneously getting a knockdown.
With respect to grab combo follow–ups, you should know that a grab at 0% combos into an up–smash or another grab regardless of DI, but do note that DI’ing the throw behind Fox makes landing these follow–ups slightly more technically demanding. An up–smash at such a percent can be followed with one to two additional up–smashes if your opponent misses his or her techs. You can also opt to go into your up–throw chain grab, discussed below, if you happen to be playing on Final Destination or Fountain of Dreams after the disappearance of a side platform. Beyond these lower percents, you can utilize a number of your moves depending on your opponent’s DI and percentage, including your up–, back–, and neutral–aerials, up–tilt, and up–smash. Your up–aerial can function as a potential kill mechanism at high percents, but be wary of Smash DI on this move, which necessitates swapping in your back–aerial. Also keep in mind that you can oftentimes put your adversary in a worse position with a back– or neutral–aerial that sends him or her off–stage than you could with an up–aerial that likely would simply reset the encounter; indeed, you would do well to note that the Fox ditto is very often decided by events at the ledge rather than above the stage. Soft–hit neutral– and forward–moving back–aerials can also figure into your higher–percent up–throw follow–ups by linking into grabs or up–smashes. On stages with lower ceilings and at appropriate percents (especially if your opponent DI’s your up–throw to the side), you can simply charge a jump–canceled up–smash for a kill if you have tacked enough damage onto your opponent. If the enemy Fox DI’s onto a platform, you can address a number of options with your aerials to cover an in–place or missed tech followed by a turn–around up–tilt, down–smash, or even a dash attack. As well, you could opt for a down–aerial reset on the platform combined with an up–tilt to cover other platform tech options. If you are on the receiving end of this reset, know that you can escape by DI’ing the drill off of the platform.
Fox’s up–throw chain grab on himself can be used to add a good chunk of damage to an opposing Fox. Assuming that you are playing on Final Destination, the chain is guaranteed from 0% until around the 50% range, at which point intentionally not DI’ing allows the victim to break the chain with a jump or a shine. For your purposes, note well that DI’ing the up–throws sideways lengthens the chain grab until around 80% and therefore is to be avoided. As well, DI’ing behind at lower percents makes landing the following grab slightly more difficult. At the escape percent, you can opt for an up–tilt out of the chain grab to lengthen the combo as appropriate, perhaps with a back–aerial to set up an edge–guard if you happen to be within the vicinity of the ledge. The following post by KirbyKaze contains a concise summary of Fox’s chain grab on both himself and his wingmate Falco: http://smashboards.com/threads/attn-fox-players.292187/#post-11682326.
In addition to all the other facets of the Fox ditto game, you must also know how to DI certain key moves correctly. For opposing up–smashes, you should DI away (that is, in the same direction that Fox is facing) to survive at high percents; however, note that DI’ing behind Fox at comparatively lower percents makes follow–ups slightly more difficult due to the added time and input required to turn in the other direction. With regard to the up–aerial, see the following post by KirbyKaze: http://smashboards.com/threads/how-to-sdi-foxs-u-throw-u-air-and-not-die.217426/#post-6430241. If you are having difficulty with consistently Smash DI’ing the up–aerial, you could start by DI’ing the move sideways (again, with an eye towards steering yourself away from a nearby side blast zone, if present, at high percents); while not optimal as you will most likely still be hit with both parts of the move, this will help minimize your vertical deaths while you work to implement Smash DI into your game. For on–stage down–smashes, you can DI upwards or attempt to DI into the ground and tech. Jabs should be Smash DI’d away to prevent an easy link to an up–smash or grab (contrast this with the upwards Smash DI used to escape the jab reset). Smash DI’ing the shine upwards facilitates teching out of what otherwise would be an easy knockdown set–up. While relatively uncommon, the forward–smash should be DI’d upwards and against the direction of the hit. With respect to the up–tilt, you can DI the upper, later part of the move (such as when the tilt is used after an up–throw) sideways in either direction, but opting for behind the opposing Fox (that is, opposite the direction that he is facing) generally makes follow–ups slightly more difficult. Contrast this with the scenario in which you are hit with the lower, earlier part of the up–tilt (such as when you miss your tech directly behind a grounded Fox). In this situation, you generally should DI in the direction that the Fox is facing to put the most distance between the two of you. If you instead DI opposite of the direction that Fox is facing (that is, entirely against the up–tilt’s natural back–to–front knockback trajectory), you will be sent more or less upwards and slightly forwards and wind up almost directly above your opponent, a prime position for an up– or back–aerial follow–up.
When the battle shifts to the off–stage arena, the Fox ditto takes on an entirely new dimension thanks to the devastating shine spikes available to the vulpine space animal. Indeed, the off–stage and edge–guarding games are the keys to securing low–percent stocks, a significant edge in any match–up. As you can imagine, landing a low–percent shine spike can tilt the game greatly in the favor of the successful Fox; you will thus need to know both how to land your opportunities for shine spikes and how to guard against this tactic. Be familiar with the timing for this “spike,” especially out of the Illusion as many players will resort to this move to allow them to recover more quickly; time your shine in relation to the Illusion’s distinctive “ping” cue and you can score more than a few low–percent kills provided that you can anticipate the position at which your opponent chooses to Illusion. This method of shine–spiking, usually stemming from a successful forward– or back–throw, is a matter of prediction, reading, and anticipation. You should never haphazardly throw yourself off–stage and hope for the best when it comes to shine–spiking (or, indeed, in any other facet of the game); have a plan for responding to your opponent, and, above all else, move with purpose both on– and off–stage. If you find yourself thrown off the stage, you must vary your decisions and make certain that you are not predictable in terms of when and where you jump and start your Illusion. Of course, taking special care when playing near the ledge and not mis–spacing your approaches will also do wonders in reducing the frequency of these types of situations.
The Fire Fox is not immune to the power of the shine spike either, although you must be more cautious with your spacing and timing in this regard due to the surrounding hitboxes. While the up–B lacks hitboxes until frame 20, the safest, easiest, and most reliable method of shining this move is with the aid of invincibility frames from the ledge when your opponent is forced to recover from below. This is best achieved with the shine as well, which you can use out of an up–throw by the ledge or to finish certain combos that have sent your adversary off–stage, depending on the other Fox’s percent and DI. With your opponent now below the stage, you can simply time a reverse wavedash or ledge stall to steal invincibility frames and use them to protect your shine spike at or near the ledge. The down–smash is another potential option for setting up such scenarios and can follow from late–hit neutral–aerials near the ledge at certain percents. That said, when dealing with higher–altitude Fire Foxes, you should generally opt for a back–aerial due to the relative ease and safety of timing and connecting this aerial in comparison with the shine; make sure that your opponent is adequately damaged such that you are able to return to the stage comfortably before him or her, however.
Recall that you (and, therefore, your opponent) can wall–tech any shines that send you into the underside of the stage. You will likely need to jump out of the wall–tech to position yourself for the subsequent Illusion recovery; you can exploit this when you are the Fox doing the edge–guarding by performing a slightly–delayed back–aerial out of your shine to catch the enemy Fox’s Illusion attempt in such situations. This possibility of teching shines on stages’ undersides (when present) makes clear that you need to position yourself whenever possible such that your victim is sent away from the stage when shined, a simple but often neglected key point.
Of course, shine–spiking is not your only method of edge–guarding another Fox. You also have your powerful back–aerial, which packs more than enough priority to tear through both the Illusion and the Fire Fox and allows you to cover multiple recovery options with its innate speed and ability to be short–hopped or full–jumped; for example, you can time a ledge–hopped back–aerial to cover an Illusion toward the ledge and still be able to react to a higher Illusion or Fire Fox. The down–smash is another potential edge–guarding option and is difficult for many players to sweet–spot against due to the nature of its hitbox; Fox’s fast–falling only magnifies its deleterious effects. However, note that this option can be ledge–teched rather easily and also puts you at risk should you mistime it or misread your opponent’s recovery; it is thus not a preferred option when the opposing Fox is recovering from below (where a shine spike with invincibility frames from the ledge would generally be a superior choice) or when your adversary still has his or her double–jump. A downward–angled forward–tilt provides similar coverage without as much risk should you miss along with providing an efficient yet deadly punish for missed double–jump ledge grabs. Note as well that the Fire Fox can be directed at various angles directly toward the ledge; depending upon the angle of the incoming up–B, you may be able to intercept it with a down–smash, forward–smash, or even a down–tilt. At times, players who are confident that they have a read on their opponents’ up–B tendencies even opt to wavedash backwards to the ledge to edge–hog the incoming Fox and force a self–destruct, although this is not a generally recommended course of action as it restricts your option coverage. However, note that you can perform a back–aerial from the ledge at such a height and timing that you can cover a Fire Fox to the ledge and still land on–stage in time to cover other options. A shuffled neutral–aerial can be used to catch Illusions, and you can also run off the ledge and double–jump back onto the stage with a non–fast–fallen neutral–aerial to cover multiple Illusion timings and altitudes. Some Foxes even opt for a down–aerial in such situations to force their opponents below the stage and set up for a shine spike. Note that you can follow these with jabs at the ledge to counter shortened Illusions and set up for a finishing shine. An up–tilt near the ledge is yet another option at Fox’s disposal in the ditto; this move can catch early, low–altitude Illusions while still allowing you to respond to other recovery choices.
The Fox ditto is a highly unforgiving match–up in multiple respects, particularly with regard to poorly–planned on–stage recoveries. The Illusion is an especially common reason for punishment after landing on the stage. You should therefore be familiar with ledge–canceling and shortening your Illusion. Shortened forward–B’s are especially useful as recovery mix–ups and cause many opponents to miss their edge–guards, especially if they are standing an appreciable distance away from the ledge as you return. Do not try to force the issue by recovering far inland with an Illusion in an attempt to hit your opponent; the most likely outcome of this situation is that your equally speedy opponent will either intercept the recovery outright with a back–aerial or be able to land a grab or up–smash before you can recover (remember that the Illusion has a total of 23 frames of landing lag, an eternity in the Fox ditto). In addition to wisely utilizing your forward–B, you must be cautious with the positioning of your Fire Fox; if you absentmindedly activate this move too close to the stage, your opponent can cut through you with a back–aerial, but if you activate it too far away, your opponent will have more time to react to your chosen direction. Varying the angles of your Fire Fox is important as appropriate to your opponent’s response and ability to cover certain options. When you succeed in grabbing the ledge, your overall best option to regain your footing is an invincible waveland from the ledge, also called a ledge–dash. While technically demanding and not without risk (indeed, a missed directional input for the wavedash will cause you to air–dodge to your doom), consistent ledge–dashes allow you to navigate away from the ledge and back towards center stage with the aid of invincibility frames from the ledge, a most welcome tool in light of Fox’s mobility and capacity to cover multiple recovery and return options safely. It is suggested that you practice ledge–dashes and implement them into your recovery game. Alternatively, you can jump from the ledge and waveland onto a close side platform, although this tactic is not as safe as a properly–executed ledge–dash.
Most of the preceding paragraphs hint at the importance of momentum in the Fox ditto, a concept that can likewise be extended to any match–up in the game. In the Fox ditto, the psychological edge granted by momentum can make all the difference in maintaining your unpredictability and optimizing your grab follow–ups. However, ensuring that momentum works in your favor is a difficult and abstract concept at best. While one can quite frequently “feel” when one is losing control of the pacing of the match, knowing how to regain this control is another matter entirely and can vary from player to player. For example, some players need to step back and regain their spacing before they can attempt to take control of the match back. Some need to switch from a defensive style to an aggressive one or vice–versa. Some need to clear their minds and weed out the single facet of their gameplay that is causing them to lose their grip on the situation, such as a predictable tech mix–up. Regardless of the preferred method of maintaining momentum, it is absolutely essential that you possess adequate knowledge of yourself as a player to be able to pinpoint what it is that is holding you back and then break through it in time to swing the match back in your favor. A common cause of lost momentum in the Fox ditto is continuously being hit by shines. While the shine itself does not do the greatest amount of damage or guarantee a follow–up, it nevertheless puts your Fox on the ground, temporarily immobile, while the opposing doppelganger for the time being has free reign over the stage and over you. The psychological impact of this loss of control and freedom of movement can very often lead one to make rash decisions (such as instantly rolling inwards when one could very well have rolled away from the opponent and escaped unharmed) that can quite quickly lead to heavy damage or the unnecessary loss of entire stocks. The bottom line is that you must know how to clear your mind and how to address those parts of your game that at that moment are causing you to forfeit control of the match; as in any other match–up in the game, it is this sense of control and confidence that can make all the difference in deciding the outcome of a set.
Overall, the main point of many commonplace maneuvers in the Fox ditto is to take advantage of predictability to open the door for kills. Remember to watch what you do and how you respond in certain situations, especially in terms of wake–ups and dealing with shine knockdowns, to avoid taking severe damage and forfeiting stocks. Since neither player can hope to win on brute force alone, especially given the absence of true shine combos, the elements of prediction are particularly important in Fox dittos. All told, as is the case with every other match–up, a strong mental game is essential to your success. Another important concept to keep in mind at all times is that the modern Fox ditto focuses largely on efficiency. Flashy and risky maneuvers are greatly downplayed in favor of the consistency, safety, and follow–ups that such moves as the neutral– and back–aerial, shine, and grabs grant. Indeed, these core moves have become the main tools for controlling space as well as the opposition’s options and movement and for punishing optimally and severely. Know how and when to use these moves and you are well on your way to becoming proficient in the Fox ditto.
Stage choice for any ditto match is in some ways irrelevant; as identical characters, both you and your opponent can take advantage of the features of the tournament–legal stages in the exact same manner, and such features affect both players to the same degree (at least theoretically). As a result, choosing your strikes, bans, and counterpicks largely is a matter of personal preference and comfort. Because you do not gain any overt advantages from any particular stage, you should counterpick and strike to stages on which you feel comfortable and ban the stage where you do not feel as confident in your skills. In short, you must play to a more individualized, personal strength; this requires adequately knowing yourself as a player, but you must also be aware of your opponent’s tendencies and preferred style of play. For example, perhaps you prefer to have more room to roam during a match, or you sense that the enemy Fox has difficulty handling a defensive keep–away game; in this case, Stadium or Dreamland would be excellent choices. In contrast, perhaps you play a more aggressive, hounding style of Fox and are comfortable with close–quarters combat, or maybe you ascertain that your opponent does not share the same sentiments; here, smaller stages such as Fountain of Dreams and Yoshi’s Story may fit the bill. Still other players wish to utilize the up–throw chain grab, or they may suspect that their competitors may not be familiar with how to respond appropriately, which would indicate Final Destination as a good pick. As you can see, stage choice in the Fox ditto depends heavily upon knowing yourself as well as your opponent; your goal, as always, is to cater to your personal strengths and to downplay those of your adversary while masking your weaknesses and magnifying those of the opposition.
Media
Leffen vs. Hax: Submitted by reddit user Winnarly, this set showcases a number of facets of the Fox ditto, ranging from edge–guarding and shine–spiking to on–stage grab combos and aerial usage. At 7:49, note how Leffen’s missed full–jump neutral–aerial approach allows Hax to move in with a neutral–aerial of his own, granting him the opening needed to finish his opponent’s last second–game stock. The early portion of the third game on Final Destination contains a few examples of how even missing an aerial against an opposing Fox can leave you vulnerable for just long enough to forfeit easy percentage or your position. For example, at 8:18, Leffen’s missed neutral–aerial approach prompts him to buffer a protective roll away, giving Hax just enough time to land a knockdown with a run–in shine and read the Swedish Fox’s inward roll for a grab (note as well how Leffen opts to DI behind Hax on the second up–throw, which allows him to escape due to an execution error; this occurs again at 8:23). Notice as well how Hax makes use of full–jump neutral–aerials in the set’s third game to control the air space and poke at Leffen at the ledge, where a successful hit could spell disaster in combination with an edge–guard; still more interesting is Leffen’s adjustment at the 10:19 mark, where he attempts to cut through the full–jump neutral–aerial with the high priority of the turn–around up–tilt. The exchange at 10:30 is especially instructive, showing the high cost of being shined near the ledge; the resulting disadvantageous position eventually leads to Leffen forfeiting a stock to another shine after being forced below the stage with a ledge–hopped down–aerial.
Silent Wolf vs. Leffen: Another reddit submission by Winnarly, this set sees these players square off in Evo 2014's semifinal pools. At 0:29, Silent Wolf sets up an up–throw with a drill, but Leffen successfully DI’s behind him, forcing a follow–up error and escaping with minimal damage. Silent Wolf Smash DI’s Leffen’s run–in shine at 1:09 (note the higher altitude at which the shined Fox is sent); this gives Silent Wolf enough time to react and land an escape tech, thus preventing any knockdown follow–ups. Note at 2:28 how Leffen times a Fire Fox ledge stall to protect his shine spike attempt with invincibility frames. At 6:55, Silent Wolf sets up a platform down–aerial reset using an up–throw and is able to connect with an up–smash due to his opponent failing to DI the drill’s multiple kicks off the platform; the Swedish Fox corrects this error very early in the set’s final game. 7:12 provides an example of the impact of percentage on the viability of jab resets; while Leffen succeeds in landing both the shine knockdown and the jab, Silent Wolf’s high percentage causes him to pop up when jabbed rather than stand up slowly. The first lost stock of the set’s final game provides a number of good learning points. First, Leffen’s unintentional shield grab allows Silent Wolf to connect a shine near the ledge, thus setting up an edge–guard and simultaneously forcing his adversary to use his double–jump. Without having to consider additional recovery timings due to the forced loss of the double–jump, Silent Wolf opts for a neutral–aerial to cover a number of Illusion timings and heights; this allows him to intercept the recovery attempt and close out the stock with well–timed back–aerials. Leffen’s seemingly innocuous double–jump at 8:34 clears the way for his opponent to run into his space with a shine, which earns Silent Wolf a knockdown, a jab reset, and a total of 52%. During this sequence, take note of Silent Wolf’s shine tech trap after the initial up–smash; the shine causes Leffen to slam into the ground earlier than would be expected for a typical up–throw to up–smash sequence, which leads to a missed tech and subsequent punishment.
Silent Wolf vs. Lucky: The 1:39 mark contains an example of the back–aerial cleanly beating the neutral–aerial, pointing to the Reverse Spin Kick’s air supremacy as well as its utility in protecting your space from aggressive neutral–aerial approaches. At 3:55, Silent Wolf punishes Lucky’s missed tech out of a neutral–aerial with a down–tilt and links that hit to a down–smash with the aid of a soft–hit back–aerial and a side platform. Shortly afterwards at 4:35, he also links an up–tilt into a lethal up–smash on Dream Land’s top platform using a soft–hit back–aerial. 4:50 provides an example of teching a shine spike on the underside of the stage; in this case, Lucky’s proximity to the ledge allows his up–B’s charge–up hitboxes to block Silent Wolf from stealing ledge invincibility frames for an easy shine spike. At 9:06, you can see a very precise Illusion ledge–cancel from Silent Wolf on Stadium’s righthand side; however, this is not a commonplace platform ledge–cancel but rather one involving the stage’s strange and counterintuitive “phantom ledge” located a short distance towards center stage.
Fiction vs. Lucky: This losers quarterfinals set between these two West Coast mainstays showcases a number of good reads, punishes, and up–aerial strings. At 9:20, notice how Fiction’s hasty full–jump back–aerial gives Lucky the timing cue to run in and grab safely. Lucky also makes excellent use of his back–aerial edge–guard for the set’s final stock; by grazing Fiction with his back–aerial while moving towards his opponent, Lucky is able to land a follow–up shine that seals the set in his favor.
Silent Wolf vs. SFAT – Do You Fox Wit It? Winners Quarterfinals and Losers Finals: At 5:02 in the winners quarterfinals set, notice how Silent Wolf’s telegraphed aerial from the side platform misses and makes him vulnerable to a grab. In a match–up as fast–paced as the Fox ditto, even such relatively miniscule details as missed aerials can cost you dearly, especially given the speed of the jump–canceled grab. Another major take–away point of this set is how both players aim to control and act from center stage; you can see that they position themselves as such during their combos and neutral game movement, and they also mix in the occasional buffered inwards roll to sneak away from the ledge. At 1:14 in the losers finals set, Silent Wolf back–throws SFAT off of the stage and fakes a chase for the shine spike; this causes SFAT to respond with a double–jump to low–altitude Illusion in anticipation of the shine, allowing Silent Wolf to double–jump back to the stage after the fake and land the finishing blow. This set also shows a number of instances of efficient edge–guards involving shine kills and edge–hogging.
SFAT vs. Lucky: The first game of this set highlights the Fox ditto’s brutal combo and punish game on Final Destination. Overall, both players succeed in landing important off–stage shines and back–aerials throughout the course of the contest, but they also each make costly errors that reflect the volatile nature of the Fox ditto.
Hax vs. Silent Wolf – Do You Fox Wit It? Winners and Grand Finals: This match–up provides a number of rousing games showcasing the technicality, speed, and precision execution of the modern Fox ditto. Starting with the winners finals set, Hax executes a shine out of shield at 0:49, complete with a waveland to reestablish his neutral game mobility, to defuse Silent Wolf’s pressure and ultimately take his opponent’s second stock. Hax’s technical errors in the third game, notably his air–dodges and the off–stage down–aerial, reflect the importance of playing quickly while still restraining oneself from inputting buttons during certain key situations, especially when cornered by the ledge. At 10:06, notice how Silent Wolf has the presence of mind to DI Hax’s down–aerial inwards towards center stage, preventing the subsequent shine from forcing him off–stage. In the fourth game of winners finals, it is important to notice during the sequence starting at 10:24 how Silent Wolf times his ledge grabs such that he can protect his back–aerial edge–guards with invincibility frames from the ledge. The final stock of winners finals brings up another key point of the Fox ditto; in the last exchange of this set, Hax’s back–aerial cuts cleanly through the opposing neutral–aerial at 14:18, putting Hax in control.
The grand finals set between these two competitors contains a number of excellent punishes, shines, and knockdown conversions. Of note is Silent Wolf’s back–throw DI trap at 6:36. To understand this trap, first consider the players’ position. At the edge of Story’s top platform, if Silent Wolf were to up–throw and Hax were to DI right (that is, in the direction that Silent Wolf is facing), Hax would escape with minimal damage; in this context, DI’ing to the right away from the platform seems to be the optimal choice. Knowing this, Silent Wolf instead opts to back–throw, which sends Hax to the left; he also throws in a knee prior to the throw itself to give Hax more time to DI. In combination with the rightwards DI originally intended for the up–throw, the left–facing back–throw’s knockback distance is reduced, permitting a follow–up soft neutral–aerial to finishing down–smash. Another very subtle but important decision occurs at 11:53, where Hax tosses in a jab after his dash attack lands to catch Silent Wolf before he can tech; this allows Hax to transition into a grab and a finishing up–smash tech chase on the platform. Throughout the set’s final game, Hax also makes use of jabs in the neutral game to interfere with his opponent’s delicate timing and movement in close–quarters situations.
Mew2King vs. Colbol: In this losers semifinals set, M2K showcases his edge–guarding prowess and potent defensive game against Florida Fox main Colbol. In contrast, Colbol opts for creative off–stage decisions, such as a shine–turned back–aerial (0:38), as well as more orthodox measures like down–angled forward–tilts (1:36). In the third game on Final Destination, note Mew2King’s execution of the chain grab and his attention to Colbol’s percent, particularly his decision to transition out of the chain with an up–tilt at around the 50% mark.
2. Falco [ST2]
Falco is among the most common answers to an opposing Fox in tournament play, and with good reason. Given competent abilities on both space animals’ parts, the Fox vs. Falco match–up is quite possibly one of the most even battles in the game, and mistakes on both sides are punished brutally (and quite often fatally). As such, you absolutely must understand how to combat an opposing Falco safely and effectively if you expect to advance in a tournament, especially given the increasing use of Falco as a “soft counter” of sorts for Fox. The match–up essentially boils down to knockdowns, chain grabs, grab combos, edge–guarding, and shine–spiking on Fox’s part and extended shine combos, SHL control (note that the bird’s blaster stuns), and potent edge–guarding on Falco’s part, including ample use of his infamous down–aerial.
An extremely disruptive obstacle for Fox against Falco is his wingmate’s characteristic SHL approach and lockdown game. In theory, it seems a perfect counter to Fox’s innate play style; it limits his freedom of movement, forces him to play more closely to Falco’s pace and tempo, and allows Falco to create numerous unfavorable and damaging openings for shine combos and edge–guarding. Indeed, until you truly understand how to combat this approach, you will find yourself believing that this match–up is all too easily in Falco’s favor due to this tactic alone. Even describing the means of avoiding this approach is somewhat abstract. In a sense, it depends in part on the Falco’s SHL “rhythm,” that is, the speed and tempo at which he fires his lasers. It is critical that you pick up on this rhythm and be able to perceive at what times it is safe to attempt a jump, platform waveland, or wavedash out of shield to clear yourself of the laser barrage and give yourself an opportunity to encroach on the Falco’s space; note that these options also require that you be cognizant of your opponent’s positioning and spacing relative to your own and how these influence which options he or she does and does not have available at certain times. You must know how to time and space your jumps and vary your approach angles from the air properly in order to avoid being trapped by an incoming laser or succumbing to bad spacing relative to the Falco upon your landing. Know from what distance and at what timings you can safely approach with neutral– and down–aerials (note also that this latter option is especially effective against opponents who make a point of crouch–cancel countering with the bird’s shine), and make certain of your aerials’ depth such that you are not so easily crouch–canceled at lower percents.
The concept of spacing yourself on the ground relative to Falco is an important consideration as well and ties somewhat into your style; while you cannot simply hastily charge forward at your opponent and hope to triumph, neither can you passively resign yourself to being hit with lasers and hoping that the Falco makes a significant mistake. You must keep just enough space between you two such that you are close enough to react in time to poorly–spaced lasers and aerials (that is, to be able to exert positional pressure upon your opponent) while simultaneously being far away enough to avoid giving up easy openings to connected lasers and aerials. Players often refer to this as the concept of “threat,” and you as the Fox player have more than enough tools and character reputation with which to exploit this; finding and maintaining the optimal distance with which to threaten Falco will be difficult, but it is essential to balancing your defensive game with the offense needed to keep pace with your opponent’s shine combos.
Do not fall into the trap of relying on your shine to reflect Falco’s SHL, except for when a good distance separates you from your opponent; granted, it will take some of the pressure off of you for a moment, but the minimal amount of stun time given to Falco, your corresponding reflection lag time, and the possibility that Falco can short–hop (intentionally or otherwise) over the reflected laser can often open you to your adversary anyway. If you are able to powershield the lasers consistently, do so instead; this is especially effective in combination with a sprint towards your opponent as you will be in a better position to exploit the surly avian’s momentary lapse in lasers. These run–in powershields allow you to close the distance between you and your opponent with some degree of safety while providing you with the opportunity to stun the enemy Falco just long enough to breach the bird’s defenses with a grab, a down–aerial to set up for a shine knockdown, or even a neutral–aerial to force a higher–percent opponent off the stage should the confrontation occur near the ledge. You will find that a powershielded laser does wonders to throw off the Falco’s timing and rhythm, oftentimes just long enough for you to work your way in and do some real damage. In addition, do your best to perceive the nature of the Falco’s approach; this is especially easy should he attempt a more linear approach and simply SHL constantly toward you into a neutral– or down–aerial once he is in range, never bothering to vary his spacing from you or his approach via reverse SHL’s or dash–dances, for instance. As well, you must do your best to avoid getting pinned in your shield, especially at the ledge; this is exactly what the Falco wants as hindering your movement and speed advantage likewise hinders your execution and ability to take advantage of any openings, and a shielded laser by the ledge can lead to Falco hurling you off–stage and edge–guarding for your stock. Furthermore, take care with resorting to jumping too often as your means of getting around lasers; the sheer amount of pressure that Falco can exert thanks to his powerful technical game and safe approach options can very quickly condition a jumping reflex in you that can be just as quickly punished with a full–jumped neutral–, back–, or down–aerial. Wavedashes out of your shield are generally a safe means of escaping your shield and can also interfere with the Falco’s spacing (including reverse wavedashes), but you can also make good use of full jumps out of shield (and also when you are not shielding) provided that your opponent does not have a read on such an option and you space yourself during the jump such that your opponent cannot simply neutral–aerial you out of the air; your full jump also becomes a more viable option with a nearby platform onto which you can waveland. Keep in mind as well that committing to a read of your double–jump puts Falco into the air for quite some time thanks to his high first jump; thus, if he misses his read, you are cleared either to run within his zoning range and challenge him (on stages without a top central platform) or move into a better position on the stage (on stages with a top central platform, onto which Falco can land after missing such an aerial without fear of immediate punishment). Note that you can also Smash DI the lasers themselves to influence your spacing relative to your opponent. If your opponent succeeds in landing two or more lasers, you likely are or will soon be in a disadvantageous position, depending upon Falco’s distance from you; keeping this in mind, you would do well to keep yourself mobile and avoid hunkering down in your shield for even the slightest amount of time.
Getting within Falco’s range involves navigating past a number of his defensive options, which can include retreating neutral–, down–, and back–aerials (you should be aware that Falco can auto–cancel his non–fast–fallen back–aerials, further restricting his window of vulnerability and making use of the move’s range to poke safely at you) as well as turn–around up–tilts, a move that resembles yours in speed and priority, as you can imagine. Falco’s up–tilt and back–aerial are major deterrents of attacking predictably from platforms and from the air while your opponent has his or her back turned to you, but keep in mind that your foe can also simply turn around and perform the up–tilt from a front–facing position as well. Fade–away down–aerials can also be problematic if you decide to press your offense due to the move’s long–lasting, large hitbox, high priority, and ability to hit you into the ground, where a follow–up down–smash can send you hurtling off–stage should you miss your tech (a very common occurrence in such situations, unfortunately). Your overarching goal in this match–up is to set up a knockdown situation and convert that opening into a grab combo and associated follow–ups; in light of Falco’s extensive shine combos and his edge–guarding prowess, you absolutely must make the most of each and every one of these opportunities. With that said, the shine is easily your preferred follow–up out of your lead–in aerials, despite the fact that Falco cannot be shine comboed; not only does it net you a knockdown, but it also provides a reliable answer to the bird’s crouch–cancel game.
You can utilize your jab for resets after a shine knockdown, but you should be cautious about using them in close–quarters combat; recall that this low–knockback move can be readily crouch–canceled into a shine if you are too close to Falco when you jab, a tremendously costly and easily avoided mistake in this match–up, and you can even be hit with an aerial or grabbed if you jab from further distances. Another key piece of information, provided by Smashboards user Shai Hulud (http://smashboards.com/threads/jab-stand-up-pop-up-percentage-list.173797/), concerns the percents at which Falco will stand up as opposed to pop up into the air when jabbed from a prone position. This range runs from 52% (if jabbing shortly after a shine connects due to the added momentum from the shine still being present when the jab connects) to 55% (on a completely prone opponent, e.g., one who has been lying on the ground for some time); at these percents and above, the opposing space animal will pop up into the air instead of stand up, allowing your foe to respond due to the punch’s short hitstun. As you can see, you cannot always rely upon the jab reset to set the stage for your grabs and punishes. Besides these key percents, you should also keep in mind that your opponent can Smash DI the initial jab up to escape (which you can counter by adding in a second jab) or Smash DI the lead–in shine itself up to facilitate a tech escape, both regardless of percent (remember that your shine slams lighter opponents, that is, those who fall when shined, into the ground rather than causing them to glide away from you; this is also the reason why these same characters can tech your shine on the underside of the stage while heavier characters cannot do the same). When you do earn a knockdown, you can chase with a combination of your aerials and your jump–canceled grab. Your neutral– and back–aerials as tech chase options are useful in forcing Falco off–stage, while your up–aerial functions as a powerful launcher that can set up for further juggling, other aerials, an up–smash, or a grab.
While your grab is certainly a pivotal tool against Falco, landing this grab may be tricky, especially given his SHL and shine, but it must be done if you hope to even the playing field. However, also keep in mind that attempting to force grabs in this match–up can very easily end your stock. The modern metagame is characterized by an overall increase in technicality; as such, even relatively inexperienced Falco players are usually proficient in L–canceling through shields and into shines, especially against a character as commonplace in tournament play as Fox. While more difficult than relying on jab resets to set up for your grabs, you can take advantage of aerials high on your shield with shield grabs, if you notice a tendency for execution errors in this regard. Generally, you should concentrate instead on setting up grabs via successful jab resets, tech chases, and wake–up reads, as well as by out–spacing aerial approaches and taking advantage of the resulting lag of the missed move.
Once you have succeeded in grabbing your feathery opponent, do not hesitate to chain–grab Falco as long as your can with your up–throw (out of jump–canceled grabs, of course), especially if you are playing on Final Destination. KirbyKaze provides a concise summary of Fox’s chain grab against Falco in the following post: http://smashboards.com/threads/attn-fox-players.292187/#post-11682326; note particularly the guaranteed percent range of 0 – 55% with no or slight DI and the extension to around 80% with away DI as well as the use of the up–tilt at the escape percent to transition out of the chain grab. The following post by Druggedfox contains a concise overview of Fox’s chain grab and associated follow–ups on the bird: http://smashboards.com/threads/fox-advice-questions-topic.98202/page-790#post-17776560. On platform stages, you may opt to toss the bird off–stage instead of allowing the platform to break up the chain, noting that such a tactic also may magnify the throw’s knockback by exploiting the DI meant to get your opponent onto a platform. That said, you could also make use of the platforms for tech chases and even down–aerial resets, should you so desire. Your chain grabs can be supplemented with up–tilts into re–grabs, shuffled neutral–aerials, and back–aerials (including soft–hit back–aerials to lengthen your follow–up). If you choose the simple up–throw to up–smash route from 0%, take care to time your subsequent up–smash well; if you up–smash too early and he techs in place, he will catch you with a shine. The tech in–place to shine is another common attempt to set up for a combo owing to its significant speed; however, this option can be accounted for with a bit of awareness and proper spacing (remember that the single–frame hitbox of Falco’s shine possesses even less range than does your shine, with greater range in the back; for reference, see the following freeze–frame: http://gfycat.com/CostlyGratefulHydatidtapeworm#?frameNum=0).
If you land a grab at notably high percents, you should choose to finish the stock outright with a back–aerial or a well–timed charged up–smash (make sure that your opponent is not at such a high percent that they can jump out of this option, however; note that this is a more viable follow–up if your opponent DI’s your up–throw entirely to the side and less so if they do not DI or DI straight up). Your up–aerial is another viable option, but be wary of the ever–present threat of the Smash DI escape (unless you are proficient in connecting only with the aerial’s second hit) and the fact that Falco is not especially weak to vertical kills; that said, you can often squeeze in a few up–aerial juggles to tack on a good deal of percent, especially on platform stages where you can pursue further and make use of other options as well. At higher percents, be sure to consider whether or not your up–smash will kill because a non–lethal up–smash at such percents usually does little more than to reset the encounter, especially in light of your wingmate’s protective back– and down–aerials and descending laser (be wary of this option in particular as it is a favorite of Falco players when you are closing in on them but are still out of range of their back–aerial or are approaching from the front). If you land a grab near the ledge and your opponent either does not DI with your back to the ledge or DI’s slightly away from center stage, you can also up–throw into a shine or double–shine to force your opponent beneath the stage and into a disadvantageous position, allowing you to prepare for an edge–guard. As well, be on the lookout for get–up attack errors from your opponent; these are caused by continued button presses as he or she is in the process of hitting the ground and are a major and easily–exploited opening (note that you can crouch–cancel Falco’s get–up attack until around 90% into a forward–smash). You should note the focus on getting Falco off the stage; while the bird’s on–stage game is very powerful, he can forfeit stocks at very low percents and with comparatively less resistance should you execute your edge–guards and shine spikes well. Following a similar line of thought, consider that Falco is one of the few characters who can consistently match and even exceed your damage output; as a result, you cannot afford to compete with the pugnacious pilot on these terms for every stock. Your back–aerial is also an excellent method of forcing the bird off–stage once you have added on enough damage.
Of course, you must not forget about Falco’s ever–present shine combos, a major advantage that Falco possesses over Fox, especially in light of the vulpine space animal’s fast–faller physics. Falco can initiate his shine combos in a number of ways; a crouch–canceled attack, very close–range laser, up–throw, connected down– or neutral–aerial; missed DI on a lower–percent up–tilt; and shining out of shield (an indicator of either poorly–spaced aerials or hitting too high on the shield) are among such methods, all of which you will need to avoid to prevent handing your foe an opening for a lengthy, damaging punish. As this list makes readily apparent, avoiding lead–ins to Falco’s shine will test your timing, spacing, and DI capabilities, an achievable (to at least an appreciable degree) but strenuous task. To start, should an aerial connect with your shield at anything but the highest of points, you must resist the urge to shield–grab; it is a reasonable assumption that all tournament Falco players in the modern era can easily L–cancel through your shield and into a shine, and your standing grab does not begin until frame 7. If you are being pressured in your shield, you have a number of options available to you to escape. For example, you can shine out of your shield if your opponent is not spacing his aerials well (again, keep in mind the limited range of your shine); this is a quick option (theoretically executable at frame 4) and gives you a knockdown that could allow you to turn the situation around, but it is vulnerable to Falco’s double–shine mix–up. You can also make use of your light shield in combination with away shield DI, which will push you out of the pressure and enable your escape via a wavedash; this option is generally the safest and allows you to reset the situation, but it also costs you the opportunity to apply your own pressure in response. That said, you can try tilting your light (or hard) shield upwards; this could cause your opponent to mistime a fast–fall or L–cancel earlier in the pressure string, allowing you to respond with a more offensively–oriented option before you are pushed too far out of range.
As well, you can buffer a roll (which becomes invincible on frame 4) or even a spot–dodge (which becomes invincible on frame 2) out of your shield stun. Of these two options, the spot–dodge is riskier as you will remain in the same position afterwards and will thus be vulnerable to a follow–up neutral– or down–aerial. However, spot–dodging into a grab counters Falco’s shine–grab; this is because Fox’s spot–dodge ends in 22 frames while Falco’s grab ends in 30 frames, leaving 2 free frames during which you can squeeze in your standing grab, which begins on frame 7. In comparison, the buffered roll away is safer, especially in light of Falco’s slower running speed, but it does cost you a shot at responding with aggression of your own. Finally, you can attempt an up–smash out of shield, although this is by far the riskiest option as it is certainly the slowest; recall that your up–smash’s hitbox begins on frame 7 but also that this tactic requires an additional frame spent during the jump component, thus delaying the hitbox until frame 8. Alternatively, you can also neutral–aerial out of your shield, which can theoretically begin on frame 7 if performed in a frame–perfect manner. The escape option of choice varies with your opponent’s action and spacing off of your shield, with the implicit understanding that the bird has his own counters to your shield escapes. As derived from information posted by Smashboards user Mogwai (http://smashboards.com/threads/falco-matchup-thread-updated-with-2011-pp-fox-stuff.260699/), if your opponent is at a very close range and thus able to connect with his own shines, you can shine, spot–dodge, or roll out (with the opposing counters of double shines for your shine and roll as well as shine to neutral– or down–aerial for your spot–dodge); and if they are further away, you can up–smash or neutral–aerial out or possibly grab due to the short range of Falco’s shine (with the opposing counters of shine–grabs and fade–away neutral–aerials). Note that you can grab your opponent when he or she wavedashes down out of the double shine sequence, but not if he or she is able to continue the sequence beyond two shines without actually leaving the ground (a rather difficult feat in the heat of a match) or if he or she double–jumps away. As well, you can buffer roll out of delayed aerial pressure. With regard to Falco’s up–throw, according to Smashboards user voorhese, you generally should DI this behind the bird; this makes his follow–ups, which could include the aforementioned shine but also his forward–smash and neutral–aerial, more difficult to land. That said, be aware that it is possible to set yourself up for a lethal down–aerial if you DI the up–throw off–stage in such a manner when grabbed near the ledge at certain percents. Note that you can also Smash DI the lasers that Falco shoots during this throw. You should also note that Falco can reset you with a laser (as well as his jab), again setting up for a shine, forward–smash, or a similar option.
Despite the most concerted of efforts, you will not always be so fortunate as to shield your opponent’s aerials or shines at all times. Fortunately, you do have a few subtle but important answers to follow–ups even at this stage. For example, you can take advantage of your “stunned” animation when you are hit with a down–aerial at a low percent as well as the shine hitbox’s limited range by Smash DI’ing the down–aerial away; this shifts Fox and his hurtboxes away and causes the shine to miss if your opponent does not adjust in time with a down–tilt or a grab. You can also DI the shine itself. To this end, note that you cannot “react” to the shine in the usual sense of the word due to its instantaneous start–up; instead, you will need to be able to anticipate when a shine is coming and time your DI input accordingly, a task that is very much possible given the “cues” provided by Falco’s common shine set–ups, such as the down– and neutral–aerials. According to Smashboards user Little England, you can avoid Falco’s down–aerial follow–up after a low–percent shine by Smash DI’ing the initial shine upwards. In addition, you can generally make following up a shine quite difficult for the bird by DI’ing the shine down and away; this will ensure that you are kept at a low altitude that allows you to tech more quickly, and the downwards and away components put you at awkward positions at equally awkward times for follow–ups. You can also crouch–cancel shines at lower percents and attempt to roll or tech away, a potential escape option if your opponent instinctively wavedashes out in a certain direction in anticipation of the start of his or her combo. You should not, however, DI fully to either side as this facilitates Falco’s follow–up combos. Furthermore, make certain that you mix up which directions you choose to DI the shine; DI’ing in the same direction facilitates your opponent’s follow–ups and helps him or her get into a rhythm. You should also be wary of opponents who attempt to shine you while you are off–stage (for example, at the end of a combo that has forced you into that position); in this scenario, if you do not DI the shine, you are popped up into a finishing down–aerial. It is essential that you are able to implement all of these solutions into your gameplay if you aim to fight Falco on level terms; on both flat terrain and platforms (a favorite of Falco players owing to shine wavelands that extend their combos and post–down–aerial tech chases with down– and forward–smashes and up–tilts), Fox’s wingmate has the tools to put significant dents in your stock count in short order. A final note on this topic concerns the interesting effect of “staling” on Falco’s shine. According to Lovage (see the following link: https://www.youtube.com/watch?v=bfBoQLZQuhc&t=7m3s), if Falco has used his shine to the point that it has “staled” to less than 7% damage (note that the shine in the provided link does 6% to Fiction), the victim will experience a sort of “anti–gravity” effect such that he or she will be sent upwards but will be in a neutral airborne stance rather than a stunned stance; this temporarily but significantly alters the character’s aerial momentum physics and allows him or her to act after the shine connects. Finally, you must be aware that you can DI the bird’s down–aerial sideways such that you are sent at a more diagonal trajectory rather than (relatively) straight downwards; this is important for better enabling your ledge techs and also for improving your chances at surviving a down–aerial from high above and relatively near the stage.
Hitting your techs is another important yet easily overlooked method of lessening the pain of Falco’s shine combos. This can be difficult owing to the speed at which you are repeatedly slammed into the ground, but it will become easier once you are familiar with the positions at which the bird can use his down–aerial. This is key because you should time your tech attempts with respect to this aerial; keep in mind that attempting to spam your tech button of choice only worsens the situation by preventing you from teching should you input a command too early. Failure to tech opens you to easy up–tilt, shine, down–smash, and down–tilt follow–ups, so you must make a concerted effort to land these whenever the opportunity presents itself. Falco players especially favor down–smashing after a retaliatory down–aerial during the neutral game as many players miss their tech in such situations, setting up for a kill or an edge–guard. On the topic of teching, note that Fox cannot tech Falco’s down–throw in the NTSC version of Melee because he does not enter a “knocked down” state as a result of the throw; this allows your opponent to down–throw into a down–smash on platforms at appropriate percents to cover your DI out of the down–throw, but you can shine out of the throw before Falco can act.
Needless to say, off–stage play can get quite ugly on both sides of this match–up. Falco can execute lethal edge–guards on Fox via his down–aerial, down–smash, or back–aerial, and SHL’s fired off–stage can clip your double–jump and control your recovery angle, forcing you to recover from below the stage. On the other hand, you also have your own down–smash, a potent back–aerial, and Fox’s devastating shine spike, a significant advantage against his fellow fast–faller. If you are knocked off–stage, take care to time your jumps (using strategic shine–stalls as necessary) so that an incoming laser does not rob you of your double–jump. If you are hit with a laser while within range of the stage but without your double–jump and are rising from below the stage (for example, after being down–smashed off–stage), keep in mind that you can Illusion repeatedly until the move is able to activate against the follow–up lasers; this could be a preferable course of action because going into an up–B in such positions will only elicit more blaster fire, and the margin of error on your recovery from below could be slim. Double–jumping early is a particularly risky endeavor against Falco thanks to his down–aerial; recall that this move is a high–priority true spike with a long duration of action (from frames 5 – 24), a combination that spells trouble for ill–advised decisions near the ledge when approaching from below the bird. Be wary of Falco’s back–throw into an off–stage , down–angled forward–tilt as well; this sequence can clip you out of your early double–jump and put you entirely at the mercy of your opponent. Being proficient in ledge teching will benefit you greatly in this match–up should you be forced to recover from below; you should be comfortable with Illusion ledge–teching both the down–aerial and the down–smash.
As with other match–ups, you must take special care not to get pinned in your shield near the edge. While Falco’s grab game is not nearly as potent as yours, a simple forward– or back–throw still gets you off of the stage and into a position to be edge–guarded. Laser into forward–throw is a relatively common sequence when Falco has you pinned near the ledge, as is laser into forward–tilt. Furthermore, keep in mind that it is possible for your opponent to follow a connected shine near the ledge with a lethal down–aerial finisher. Note also that Falco can link his back–throw into his forward–throw if you DI the back–throw inwards; DI’ing in such a manner is a common automatic reaction when near the ledge (with the underlying intent to minimize the distance sent away from the stage), but you should note that you can DI the back–throw away to prevent this follow–up in the ever–pivotal lower percentage ranges without sending yourself too far off–stage.
As usual, utilizing the full range of your recovery mix–ups is important for holding onto your stocks. Ledge–canceled Illusions, double–jumps straight to a ledge grab, and safe Fire Fox angles both high and to the ledge should all be incorporated in various sequences to avoid becoming predictable on your recovery. As well, SleepyK’s video regarding guaranteed shield pokes on a fully–shielded Fox (https://www.youtube.com/watch?v=lzG5psgkrtg) reinforces the value of buffering into a light shield should you land on a platform during your recovery. If your opponent manages to clip your tail or the back of your foot with a shine, you are a simple waveland and aerial away from sacrificing the stock that you managed to save. Keep this in mind while making your way back to the stage.
Edge–guarding Falco successfully depends on your timing and shine–spiking prowess, particularly given the horrendous range of his up–B. A down–smash at the ledge can catch returning forward–B’s (the Falco Phantasm) and Fire Birds with lethal results (especially Phantasms, with a bit of timing relative to their “ping” cues), as can your up–tilt. However, you can cover a greater number of options more safely by timing rising neutral– and back–aerials appropriately; the neutral–aerial is especially useful in this regard as it can lead to a finishing shine spike if it even so much as grazes the returning bird with its fast, long–lasting, and easily–timed hitbox. Your down–aerial can be used in a similar manner. Take note that facing with your back pointed off–stage gives you the options of your up–tilt, back–aerial, and reverse wavedash to the ledge, all of which taken together can cover a variety of recovery heights and timings. On the topic of Falco’s forward–B, you should note that it is faster than yours both in terms of when forward movement begins and when its hitbox begins. Specifically, Falco begins moving at frame 17 (compared to frame 21 for Fox) and can hit you from frames 18 – 21 (in comparison to frames 22 – 25 with Fox); this is important to understand in order to time your edge–guards successfully while avoiding the Phantasm’s meteor spike property. Generally, you can facilitate successful edge–guards by forcing Falco below the stage and forcing him either to use his double–jump or to start his extremely vulnerable up–B. You can do this with the aforementioned rising neutral– and down–aerials; a shine out of an aerial string; or even a drill to down–smash, an innovative sequence that can take some practice to get the correct timing under your fingers but nevertheless constitutes a true combo that can put your foe in a highly disadvantageous position.
Simply put, any off–stage Fire Birds performed too close to your position, whether above or below the stage, should translate to a lost stock; without a charge–up hitbox with which to contend, the Fire Bird is all too easy to punish with a simple and lethal shine spike or a double–jump rising back–aerial, depending upon such factors as the Falco’s positioning relative to yours and how much time you have to react. The shine is the preferred option overall due to the angle at which it sends the avian; in contrast, a back–aerial on a high charging up–B gives your opponent another chance to recover high off of proper DI. As well, depending on the bird’s relative positioning and percentage, you may put yourself in the unfortunate position of attempting to recover from below while your opponent recovers high before you with the aid of the Phantasm. The significant vulnerability of this option is the main reason that you should aim to force Falco below the stage by any means necessary. Make sure to cover the faster and more troublesome Phantasm first; this frees up some time for you to anticipate and punish any ill–advised up–B’s. You can also shine Falco out of his forward–B, again aided by timing your shine in relation to the “ping” cue, but do note the greater risk of attempting this when off–stage due to the Phantasm’s greater speed and meteor spike. Any Fire Birds initiated too close to the stage should be met with a shine spike. Also keep in mind that Falco can shorten his Phantasm just as you can shorten your Illusion; be wary of this mix–up as it is a surprisingly effective means of varying the avian’s recovery.
Should you allow Falco to regain the ledge, be wary of the options that he then has at his disposal. He can, for instance, ledge–hop into double lasers to clear space for himself if you are standing somewhat further inwards; note that this tactic is very risky if you are near the ledge due to its vulnerability to a shine out of shield, especially problematic for the Falco player as the ledge–hop costs him or her a double–jump. Your opponent can also opt to wavedash onto the stage (generally the most common option), which you can readily space against. Ledge–canceling the bird’s Phantasm is yet another option at the disposal of the Falco player, along with ledge–hopping into a down– or neutral–aerial.
Counterpicks
Yoshi’s Story: Story is an excellent pick against defensive Falcos and for aggressive Foxes; in both scenarios, the stage’s small size and close blast zones accelerate your kill rate while maximizing your ability to chase, corner, and knock down your opponent. The stage’s underside also provides you with a solid surface on which to tech Falco’s edge–guarding options. However, do note that the bird can also make use of Story’s features, particularly by stringing together combos on its platforms, the efficacy of which is enhanced by the close side blast zones.
Pokemon Stadium: As desirable a stage as ever, Stadium provides a low ceiling to cater to an aggressive style by facilitating early vertical kills as well as an appreciable amount of room that serves defensive play well. In addition, the transformations generally favor the Fox player. That said, you should be aware that Stadium’s ledges and lack of a central top platform do make your recovery more difficult and riskier. If you are having trouble handling an aggressive Falco or are yourself an innately defensive Fox, you may opt for Dream Land over Stadium, with the understanding that your vertical kills will be compromised and your opponent will likewise benefit from the stage’s ample space, although you do gain a top platform there. Similarly, more defensively–oriented Falcos sometimes opt to counterpick to Dream Land themselves to give them additional breathing room against pressure–heavy, aggressive Foxes.
Bans/Strikes
Final Destination: While not nearly the “hard” counterpick that it once was, Final Destination nevertheless should be a choice ban for most Fox players unless they are particularly confident in their ability to DI Falco’s shine combos, avoid shines in general, and land and execute chain grabs. Note also that you do not have any platforms with which to maneuver around your opponent’s SHL fire. At higher levels of play, Falco’s natural advantages here are diluted while Fox’s largely remain intact; otherwise, FD is a more than reasonable choice for your stage ban.
Fountain of Dreams: Fountain is yet another hotly–contested stage in this match–up. While it does not merit the use of a ban to the same degree as Final Destination, Fountain of Dreams can cause you some distress with its high ceiling, close side blast zones, and unique platforms, which your opponent can readily control with his down–aerial and waveland shine combos. That said, some Fox players are also comfortable here; the vulpine space animal can also utilize the platforms well as both offensive and recovery options, and he can set up off–stage kills that nullify Fountain’s high ceiling. This stage also provides a solid underside for use in ledge teching.
Media
Lucky (Fox) vs. Westballz – The Big House 4: A submission by reddit user ContemplativeOctopus, this losers side, top eight set showcases a number of crucial facets of this match–up, including the power of Fox’s down–aerial against his partner pilot (although the exchange at 9:44 also presents the perils of inadvertently hitting a shield with this move). Lucky also does well throughout the set in avoiding Westballz’s up–tilt set–ups and maintaining control of his surroundings with well–placed neutral–aerials to box out the Falco player. 3:25 provides yet another example of the importance of DI’ing the bird’s seemingly innocuous up–throw; by following a forward–facing trajectory, Lucky sets himself up for a killer down–aerial from Westballz. At 6:52, notice Lucky’s choice of the neutral–aerial to punish the spot–dodges. While a jump–canceled grab out of his dash dance was also a possible option, you should note that Fox’s grab has only two active frames (7 – 8 for the standing grab and 12 – 13 for the dash grab) compared to the much more generous timing window of the neutral–aerial; in light of the threat of a shine immediately after Falco’s spot–dodge, choosing the safer yet still effective aerial option is generally the correct choice in such a scenario. At 7:24, Lucky spaces his neutral–aerial after connecting with Westballz’s shield such that Westballz cannot easily connect with an out–of–shield shine. Another important point to take away from this set is Lucky’s use of full–jumps; he makes use of them to avoid the Falco’s up–tilts and auto–cancel back–aerial walls and also to escape ledge traps, all while avoiding punishment by jumping only after Westballz has committed to or telegraphed his choice of an option.
Leffen (Fox) vs. Mango – The Big House 4: Submitted by reddit user Winnarly, this match provides an example of how a Fox should handle Falco’s laser game. You should notice how Leffen aims to maintain just enough distance between Mango and himself such that he is close enough to punish any openings or successful powershields yet is still far enough away to dodge incoming attacks and aggressive mix–ups. As well, he makes use of jumps, run–in powershields, wavedashes and shines out of shield, and wavelands onto platforms to work his way around Falco’s SHL pressure. Also pay close attention to how Leffen utilizes full–jump down–aerials to breach Mango’s defenses from above; when spaced to account for defensive up–tilts, your down–aerial can set up for a knockdown via shine or an outright grab, as Leffen demonstrates at 7:42. The sequence starting at 0:36 draws attention to the caution required when deciding whether or not to pursue Falco off–stage for a shine spike; in this instance, Leffen misses his shine and his meteor spiked by the Phantasm, which leads to a lethal down–aerial despite the successful meteor cancel. At 3:06, Mango opts for a double ledge–hopped laser return; however, the lasers are too high, allowing Leffen to duck under them and shine the hapless Falco off–stage to set up a game–ending back–aerial edge–guard. In the set’s final game, Toph adds insightful comments regarding how Mango DI’s the up–throw chain grab as well as the value of shortening the Illusion against Falco’s down–smash edge–guard. The aerial at 9:32 is particularly instructive in terms of giving up openings for out–of–shield shines, which Leffen was spacing well against up until this point; you should notice how high up on the shield that the Fox player’s neutral–aerial connects, giving his opponent an easy cue for the subsequent shine punish. The Swedish Fox also misses his DI on Mango’s up–throws, repeatedly ending up in front of Falco and being hit with aerials as a result.
Leffen (Fox) vs. Mango – The Big House 4: Submitted by reddit user Winnarly, this match provides an example of how a Fox should handle Falco’s laser game. You should notice how Leffen aims to maintain just enough distance between Mango and himself such that he is close enough to punish any openings or successful powershields yet is still far enough away to dodge incoming attacks and aggressive mix–ups. As well, he makes use of jumps, run–in powershields, wavedashes and shines out of shield, and wavelands onto platforms to work his way around Falco’s SHL pressure. Also pay close attention to how Leffen utilizes full–jump down–aerials to breach Mango’s defenses from above; when spaced to account for defensive up–tilts, your down–aerial can set up for a knockdown via shine or an outright grab, as Leffen demonstrates at 7:42. The sequence starting at 0:36 draws attention to the caution required when deciding whether or not to pursue Falco off–stage for a shine spike; in this instance, Leffen misses his shine and his meteor spiked by the Phantasm, which leads to a lethal down–aerial despite the successful meteor cancel. At 3:06, Mango opts for a double ledge–hopped laser return; however, the lasers are too high, allowing Leffen to duck under them and shine the hapless Falco off–stage to set up a game–ending back–aerial edge–guard. In the set’s final game, Toph adds insightful comments regarding how Mango DI’s the up–throw chain grab as well as the value of shortening the Illusion against Falco’s down–smash edge–guard. The aerial at 9:32 is particularly instructive in terms of giving up openings for out–of–shield shines, which Leffen was spacing well against up until this point; you should notice how high up on the shield that the Fox player’s neutral–aerial connects, giving his opponent an easy cue for the subsequent shine punish. The Swedish Fox also misses his DI on Mango’s up–throws, repeatedly ending up in front of Falco and being hit with aerials as a result.
Leffen (Fox) vs. PPMD: Leffen’s outstanding opening combo in this set merits closer examination. Notice how he times the last two up–aerials in this series such that only the second hit connects; this circumvents the problem of Smash DI on the weaker initial hit, maintaining the combo and lengthening the punish.
Mango (Fox) vs. PPMD: The first game of this MLG Anaheim 2014 winners semifinals clash sees Mango utilizing Battlefield’s platforms for Illusion ledge–cancels, making his recovery far safer and more difficult to punish. Take note of the final stock, in which the Fox player utilizes down–smashes to place the opposing Falco into a greatly disadvantageous position below the stage, forcing PPMD to use his double–jump and thus opening himself for a lethal, simple shine spike. Another important point is how Mango’s away Smash DI on Falco’s down–aerial at 4:25 causes the follow–up shine to miss, paving the way for this finishing sequence. Mango DI’s well in general throughout this set on moves ranging from down–aerials to shines and even dash attacks.
Hax (Fox) vs. PPMD: PPMD exhibits a wide range of Falco’s punish options against Hax here, making ample use of the bird’s vaunted down–aerial to land low–percent kills in all manner of situations.
Hax (Fox) vs. Zhu: This Justice 4 losers finals set provides a good example of a Falco played with a more patient, measured pace. As with the Leffen vs. Mango set, notice the distance at which Hax spaces himself from Zhu, just close enough to threaten but far enough away to keep his defensive and retreating options open. In multiple instances throughout this set, Zhu utilizes a descending laser at a short distance above the ground to cover his landing without having to commit to an aerial, often supplemented with a dash attack as a set–up. At 0:48, note how Hax’s high, inwards–moving back–aerial on Zhu’s shield allows Zhu to land a shine. The final stock of the second game highlights how you can follow up with a lethal shine a string or move that sends a higher–percent Falco off–stage. At 10:26, notice how Hax’s early–start, full–jumped neutral–aerial causes him to connect high with a weaker hitbox, opening himself to Falco’s shine counter.
Hax (Fox) vs. PPMD: PPMD showcases Falco’s unnerving SHL control over the ground game in combination with dash–dances, wavedashes, and strategic shields to set up for an out–of–shield shine. On Fox’s end of the battle, Hax shows the potential of run–in powershields, landing aerials off of the miniscule amount of stun from the powershielded enemy laser.
Colbol (Fox) vs. PPMD: Colbol exhibits excellent recovery mix–ups and execution against PPMD’s fearsome Falco in this MLG Anaheim 2014 set. Note particularly his use of shine stalls to enable him to time his off–stage double–jumps between PPMD’s lasers. However, the Falco player makes good use of his FD counterpick, trouncing Colbol with an especially efficient last–stock kill.
SFAT (Fox) vs. Mango: At 1:22, notice how Mango angles his shield upward; this in combination with SFAT’s very high falling back–aerial allows the Falco player to land a shine out of his shield. As commentators D1 and Prog point out, SFAT also makes good use of drillshines to counter crouch–cancels and give himself opportunities when Mango is at low percents. They also point out how Mango utilizes top platforms to cover his full–jump aerials, preventing the opposing Fox from easily taking advantage of misses or landing lag.
3. Sheik [ST3]
Though Sheik usage is somewhat on the decline in the contemporary scene, you absolutely must still consider her a potential threat in tournament play. As with every other character, Sheik has her own ways of punishing sloppy play on your part and removing stocks because of your mistakes. However, you too have more than a few options against Sheik. Indeed, most players believe that Fox holds at least some degree of an advantage against the ninja. With careful play, minimization of successful opposing grabs and edge–guards, and more than a few shine combos and grabs of his own, Fox can consistently come out on top in this match–up. The fact that Fox has two powerful counterpick options at his disposal, Final Destination and Pokemon Stadium, gives him a decided upper hand in best–of–three sets regardless of which stage the Sheik player bans.
Both Sheik and Fox have their own respective major tools in this match–up. Sheik has her reliable forward–aerial kill mechanism (the infamous “slap” that is further empowered by the various methods by which she can lead into this move); tilt combos (including the simple yet effective forward–tilt to forward–aerial); jabs to set up down–smashes, grabs, or tilts; needle–cancel set–ups, especially on platform stages such as Battlefield; a devastating tech chase game; and various off–stage and edge–guard options in her needles, down–smash, and back–aerial. On the other side of the match–up, Fox has his powerful shuffled neutral– and down–aerial approaches; shine spikes; the usual up–throw to up–aerial or up–tilt (which also does an excellent job of warding off Sheik’s aerial assaults); vertical kills via up–aerials and up–smashes; and shine combos that link into his finishers, among others. Overall, your biggest ace in this match–up is your shine combo capability; with a strong technical game backed by equally strong shine follow–ups, you can inflict heavy damage and set up for kills on Sheik from virtually any percent, granting yourself all manner of options and openings while keeping yourself relatively safe from the ninja.
With such options on both sides, it follows that ground combat between Fox and Sheik often becomes quite heated, a battle of spacing, prediction, and comboing. Because of her lack of a traditional approach and the requisite low short–hop, the majority of Sheiks opt to play defensively and prod for openings for grabs and knockdowns. Granted, you could very well employ a defensive style yourself backed by plenty of blaster fire, but your most powerful options come from strong offensive gameplay when the time permits. Sheik will attempt to space out your approaches with reverse wavedashes into set–up jabs, down–smashes (which can tear through your advances more often than you would think thanks to the move’s frame–5 initial hitbox and her legs’ invincibility on frame 5), and grabs. If you sense excessive use of such tactics, you can likewise space your approach to compensate for your opponent’s retreat by overextending your short–hop or run; after opening up your enemy with a shine, down–aerial, or neutral–aerial, you can employ a significant number of options to punish the ninja severely depending upon your lead–in choice. Your up–throw to up–aerial(s) is a key finisher in this match–up and can follow from a shine or immediately after a drill. An important note to keep in mind is that you cannot combo an up–throw at 0% into either an up–aerial or an up–smash. However, up–tilt does combo if your opponent does not DI, and you can also combo a full–jump back– or neutral–aerial at these percents (for these options, make certain that you place the aerial and execute your jump such that you land far enough away from Sheik to avoid a counterattack or that you can fast–fall into a shine to guard yourself). Fortunately, up–throw to up–aerial begins comboing at relatively low percents, making it a versatile sequence both for adding on damage at the start of your adversary’s stocks and for finishing those same stocks (although be mindful of the possibility of Smash DI and the corresponding need to swap in your back–aerial). At relatively low and middle percents, you can also opt for back– and neutral–aerials out of your up–throws to tack on more damage and keep the Sheik within your grasp, better setting the stage for a lethal grab to up–aerial finisher; such a strategy can be especially deadly on platform stages and with judicious use of soft–hit aerials. Be wary at lower percents of Sheik’s crouch–cancel game; between her grab and her down–smash, she can make you pay for neglecting to factor this into your game plan, so make good use of your down–aerial to shines and grabs at low percents.
Once you succeed in sending your opponent airborne via an up–aerial or up–smash, you still must be cautious about your method of following up. Keep in mind that she possesses a very fast and long–lasting neutral–aerial (with hitboxes from frames 3 – 30) to protect her underside as well as a quick back–aerial (with hitboxes from frames 4 – 19) that easily outranges yours and is equally as fast. Assuming you choose to take to the air and pursue with a full–jump back–aerial, your best bet is to approach from her front as your back–aerial can readily contend with her forward–aerial and the small, weak side hitboxes of her neutral– and back–aerials. However, do not forget about the powerful anti–aerial priority of your up–tilt; this move in particular gives Sheik players fits as it readily cleaves through her aerials while also functioning as a set–up for an up–aerial at higher percents. Depending upon the Sheik’s percentage and DI, your neutral–aerial can string into a number of other options, including an up–tilt, further neutral–aerials, a grab, or an up–smash. The neutral–aerial is especially useful when following your opponent after he or she DI’s your up–aerial towards a platform and can be timed to connect with a weaker hit in order to set up for an up–smash.
Shine combos are your single largest advantage in this match–up thanks in no small part to Sheik’s traction. Each grounded shine that you connect should lead into a damaging or lethal follow–up courtesy of your grab game or an up–smash (the preferred option at high percents, of course), as appropriate, along with additional waveshines should the stag’s length permit this. Always remember to avoid pursuing if you connect with a shine after your neutral–aerial at all but the lowest of percents (owing to the greatly reduced shine stun time when landing from an aerial shine). Note that you can intentionally add in the neutral–aerial to shine approach should you see that your opponent tends to spam moves during it (especially the down–smash) in order to get them to open themselves to you; after wavedashing away, coming back in with a grab or a down–aerial to kick off a shine combo does wonders as punishment for this type of bait. As well, be adept at utilizing your down–aerial to give yourself a clean lead–in to your shine follow–ups. Remember also to make use of late aerials to minimize the efficacy of Sheik’s crouch–cancels, swapping in grabs and your down–aerial as needed to combat this facet of her game. Your waveshine to down–smash can also see a good deal of use against the nimble ninja as a set–up for your edge–guarding options, discussed below; indeed, this may be the preferred shine combo follow–up at percents too low for your up–aerial or up–smash to kill but still high enough to shove your adversary far enough away to allow you to set up your edge–guard.
While Sheik’s ground game is decidedly more linear than yours, you nevertheless must be wary of a number of her options in this facet of her game. One of these is Sheik’s needle cancel and its use as a set–up thanks to its auto–cancel property, especially on platform stages. Take care not to wander aimlessly into the roughly 45–degree angle through which her needles fly as she descends from her jump or runs off a platform. Note when your foe has a great deal of needles charged, and be particularly careful when you see a jump or a waveland onto a platform as these can signal a desire to needle–cancel into a jab or grab to set up a tech chase. Besides needle canceling, you should also be mindful of Sheik’s quick forward–tilt, a move that hits on frame 5 and that can set up for her vaunted forward–aerial finisher. This move can be somewhat problematic, but you do possess the speed and mobility to maneuver around it, bait it out, and punish it. You can also run up and shield if you sense your opponent becoming predictable with this move, buffering your shield DI towards your opponent to counteract his or her spacing on your shield to an extent and giving you a better shot at landing a grab, up–smash, or shuffled down–aerial. A similar strategy can be used to draw out shielded dash attacks in the neutral game. Of course, you must be cautious with executing this stratagem due to the strength of Sheik’s grab and tech chase game, but it can certainly pay dividends when utilized properly. Your down–tilt can also come in handy when grappling with the ninja in close quarters; when you are at low percents, you can crouch–cancel into this move and set your opponent up for an up–aerial or two should you catch him or her unawares, especially handy if the Sheik is attempting to wall you out with forward–tilts. You can even crouch–cancel certain moves into an up–smash, an especially brutal punish for Sheik’s defensive neutral–aerials.
Shield play against Sheik is a bit tricky due to the innate flow of her moves. Ideally, you would rather not get stuck in your shield against Sheik; should she connect with it, usually with a falling forward–aerial, she can follow quickly and effortlessly into a sequence of jab, tilt, down–smash, and grab mix–ups that can be difficult to break. In this situation, it would behoove you to be familiar with the pattern of your opponent’s pressure. The down–smash can be particularly obnoxious when attempting to act out of your shield afterwards due to its multiple hitboxes and instances of shield stun, as can the up–tilt for similar reasons. If you have hard–shielded the down–smash, you do have an opportunity to wavedash out to a grab or shine, or you can shuffle a down–aerial out of your shield and begin a shine combo in that manner. If you predict a jab and hold your shield accordingly, you may be able to squeeze in a shield grab, but your timing still must be rather on point as Sheik’s initial jab has a short total animation time (17 frames) in addition to the sheer speed of its hitbox. Keep in mind that the ninja can also space shuffled auto–canceled forward–aerials on your shield, a surprisingly fast sequence that simultaneously keeps your opponent rather safe. However, at times the Sheik may not opt to pound on your shield all at once. Two common follow–ups to a shielded aerial are a simple spot–dodge that could clear the Sheik for a down–smash (especially if you try for a shield grab) and a quick jab that could prep you for a grab, tilt, or down–smash. Note that the ninja’s first Jab hits on frame 2, so you should not even entertain the notion of trying to outpace it out of your shield. Of course, you can adjust accordingly to such tactics (especially the spot–dodge) by waiting a bit after the aerial and answering with a grab or shuffled down–aerial. Another option is to avoid getting stuck in your shield in the first place by not standing in one place as the Sheik falls and by anticipating fall angles with a combination of dash–dance spacing and wavedashes. You should also be wary of shield hits directly into grabs, yet another mix–up in such situations meant to exploit your holding your shield in anticipation of a follow–up attack. Sheik’s naturally flowing moveset allows her to condition in her opponents a tendency to rely on the shield to combat her efficient aggression; she can use this conditioned shield as an easy lead–in to a safe grab after connecting with said shield. It is this sort of rock–paper–scissors play of which you must be aware in order to escape punishment. If you are able to familiarize yourself with your enemy’s preferred options and patterns in these situations, you can even turn the tables by predicting the mix–up and punishing accordingly.
Your shield play on Sheik largely consists of being able to shine through that shield safely from your shuffled aerial approach and leading that shine into your usual destructive shine combos. As is customary against all opponents, you cannot afford to give Sheik easy openings by something as simple as a shield grab; you should indeed be able to punish quite effectively for reliance on this tactic. Place your aerials low and deep into your opponent’s shield to ensure that you are not grabbed, and space them well, being particularly mindful of crossing up the shield with your down–aerial and not risking its fickle L–cancel timing on the front of Sheik’s sizable shield. It is especially important that you be aware that Sheik can neutral–aerial out of her shield as an escape method if your pressure is not clean enough (recall that this move’s hitbox starts on frame 3) and also that you can bait and punish this same option should your opponent become predictable. Shine–grabs are as useful as ever in this match–up, especially in light of Sheik’s vulnerability to your up–throw follow–ups.
Similar to Falcon, Sheik seeks to land a grab or otherwise get a knockdown on you to set up for her powerful tech chasing game. Sheik’s down–throw combined with post–throw wavedash spacing and the speed of her dash attack and grab allow her to follow your techs largely on reaction, racking up damage while setting up for a kill. Adding in her down–smash paints a still more grim picture; due to its speed and multiple hits, she can utilize this move to punish tech in–place shines and spot–dodges and may be able to escape after meeting with a shield if the multiple instances of shield stun throw off your escape timing. She can also make use of her up–smash during her tech chases, which can set up for a re–grab or a forward–aerial, depending on your percent. All of this drives home the point that you must do everything within your power to prevent Sheik from grabbing you. Stay as grounded as possible; avoid full–jump approaches; hit shields low with your neutral– and back–aerials; cross up shields with your down–aerial; and aim first to land safely if you find yourself high in the air rather than trying to connect an aerial on the Sheik waiting in neutral stance below you. If you do fall into a tech chase, you must be able to hone in on and change your teching patterns as well as the direction in which you DI the down–throw as this can serve as a subtle tell of which direction you plan to tech. You can try shining after a tech to constrain your opponent’s window to land another grab, but know that this will work against you if he or she opts for a down–smash. If you anticipate a non–grab follow–up, you can buffer into a shield, or you can try buffering into a roll. The occasional intentional non–tech could serve as a mix–up to get you out of the chase, but be wary of its vulnerability to both the down–smash and jab resets (recall that it is possible to Smash DI the single jab to escape and also that your opponent can add in another jab to catch you out of your attempted escape). If you are hit with a dash attack, DI away to prevent easy forward–aerial follow–ups. If you are hit with a down–smash or a forward–aerial, you should generally DI entirely upwards.
On the topic of DI’ing Sheik’s forward–aerial, you should be aware that upwards DI will generally be the “survival” direction of choice as this will shorten the distance you are sent due to the resulting trajectory’s angle. However, this DI is not advisable when you are at high percents such that you will lose the stock as a direct result of this aerial’s knockback; this is because even the “more favorable” knockback trajectory granted by upwards DI on this move will not prevent you from careening off into a blast zone. In such scenarios, if you are able to, it is generally preferred to DI downwards and attempt to tech the stage (of course, this assumes that you are still close enough to the stage’s surface when the forward–aerial connects that you can reach a solid surface in the first place).
The edge–guarding game in this match–up is yet another facet of the battle that can make or break you, especially if your opponent lands a grab near the ledge at a low percent. As you can imagine, your top–tier competitor has a myriad of options to finish your stocks, both on– and off–stage. For example, Sheik can make use of her needles to alter the angle of your return, forcing you to come from beneath the stage at a less favorable angle, which she can punish with a down–smash at the ledge (which you can ledge tech) or by running off and intercepting you with her quick forward–aerial. Illusioning at Sheik is also a gamble since she can answer that with a down–smash; a single needle; a run–off to a non–fast–fallen, double–jump neutral–aerial; or even a forward–tilt to a lethal forward–aerial should you miss the DI on the tilt. This last option is also an efficient means of taking your stock if you Fire Fox upwards and attempt to fall down to the ledge, so be wary of this and do your best to weave around to the ledge during your descent, if you can. Sheik’s ledge–dropped back–aerial is especially powerful given its range and power; make sure to DI this option upwards and against so that you survive and are able to choose from a wider array of recovery options from your now–loftier position. If you drop too low for a Fire Fox and are within the angle of Sheik’s needles, she can simply needle you downwards and grab the ledge as you fall a bit too far to return. She can also needle you out of your second jump, a most disadvantageous position for you. As usual, you would do well to mix up your various recovery options frequently, including incorporating Fire Foxes to the ledge and shortened Illusions, and to be well versed in ledge teching and ledge–canceled Illusions. You should also keep in mind your shine–stalled jumps to change the timing and angle of your jumps and interfere with any plans to clip you with needles.
All told, you should do your best to focus play on the center of the stage, especially in light of your powerful neutral game options and your opponent’s equally imposing edge–guarding arsenal. With a character as mobile and versatile as Sheik, you simply cannot afford to take unnecessary risks near the ledge. Indeed, even something as simple as a back– or forward–throw off–stage could lead to your demise thanks to the ninja’s multitude of options; keep this in mind when considering how and when to approach your opponent. For similar reasons, you should play it safe when your opponent is repeatedly up–B stalling on the ledge (called the “Shino stall” after the Japanese player who popularized its use) and retreat back rather than attempt to work around the invincible teleport and its dangerous hitbox. Do not be afraid to revert to a defensive, blaster–based style to tack on damage and prompt Sheik to close the distance between the two of you.
That said, you also have more than a few of your own options when Sheik is off the stage. Overall, the most effective method for edge–guarding Sheik involves simply grabbing the ledge and stalling through her up–B’s hitbox with a timed roll or stand–up such that you force your opponent to recover above or onto the stage, or alternatively onto a platform. From there, you can punish as appropriate with an up–smash, back–aerial, or up–aerial. Again, note that she need not up–B onto the stage; she can also opt to vanish onto a platform or straight up (this choice allows her to fall to the ledge if you are caught off–guard by it). If you are able to react in time to your opponent up–B’ing straight up by the ledge, you can charge a down–smash to cover the ledge as well as a bit of the stage in case they reappear further inwards; with an adequately–damaged adversary, this leads to an easy stock due to the relatively poor horizontal and vertical range on Sheik’s recovery along with her aerial immobility following the vanish. If your adversary tries to fall directly to the ledge, you can simply continue to hold the ledge if you react in time. All things, considered, it is important to edge–guard Sheik in this manner because the invincibility frames during her up–B and its “jump” animation (frames 18 – 55, although the up–B’s invincibility seems strangely fickle during the teleport itself when interacting with hitboxes) in combination with her double–jump grant her a very secure method of grabbing the ledge from below. Another important consideration is not to allow your opponent to refresh his or her double–jump by landing on the stage if you can intercept the Sheik beforehand. Note that your opponent can toss needles at you while he or she is returning from above (or he or she can use a double–jump) so that you are turned around to face off the stage (that is, in the direction of the hit), preventing you from facing the correct direction needed to wavedash or short–hop backwards to the ledge; you can respond by positioning yourself out of the needles’ angle of entry or by shielding the needles and wavedashing out to the ledge. Shine–spiking is another option open to you provided you can land an off–stage shine; Sheik’s forward–aerial, like Marth’s, is often used to intercept shine spike attempts, as is a rising up–aerial to defend recoveries from below the stage (note that this option is vulnerable to a bait and subsequent shine spike). Ledge–dropped back–aerials with invincibility frames are as useful an option as ever when your opponent is recovering from a high position.
Counterpicks
Final Destination: A popular ban for Sheik players, FD even further restricts her recovery game by denying her access to platforms, which also limits her needle–cancel opportunities. As well, the uninterrupted length of the stage allows Fox to abuse shine combos to a greater extent than on most other stages and also to harass Sheik more effectively once he knocks her airborne.
Pokemon Stadium: Stadium remains as viable a counterpick option as ever against Sheik thanks to its low ceiling along with its horizontal length, which allows you to survive your opponent’s forward – aerials more reliably and play the blaster keep–away game to augment your offense.
Yoshi’s Story: A good option for more aggressive Foxes owing to its small size, this stage’s low ceiling and platforms enhance your vertical punishment game. However, its closer sides also improve the lethality of Sheik’s forward–aerial, and she can also make use of the platforms herself with needle canceling. All things considered, Story is not as powerful a counterpick against Sheik as Stadium or FD, but it certainly is a viable stage for Fox players who seek to keep the pressure on their opponents.
Bans/Strikes
Fountain of Dreams: With a high ceiling, side platforms, and close side blast zones, Fountain provides Sheik with a number of important advantages while reducing your vertical kill potential and stifling your speed and mobility.
Dream Land: Dream Land’s high ceiling improves Sheik’s survivability against your vertical kill mechanisms, and its side platforms offer her a few additional recovery options. That said, note that you need not necessarily focus on vertical kills at all times; with your waveshine to down–smash and subsequent edge–guarding, you can also take stocks at the ledge or accumulate enough damage to earn a vertical kill regardless of the stage or opposing DI. The stage’s sheer size also allows you a great deal of room with which to abuse a blaster–based keep–away style. Furthermore, your recovery benefits from Dream Land’s platforms as well.
Media
Lucky (Fox) vs. Mew2King: In this Kings of Cali 4 losers semifinals set, Mew2King highlights Sheik’s edge–guard and off–stage options as well as her neutral–aerial’s ability to cut off mistimed follow–ups with a quick counterattack. The disastrous second game, in particular, showcases how quickly this match–up can spiral out of control should the Fox player become predictable or overzealous while off–stage or near the ledge in general.
SFAT (Fox) vs. Flash: Flash, a Sheik sensation from Japan, showcases Sheik’s punish game in this second–round pools set; note the use of the down–aerial to extend his combos and add on enough percent to ensure lethal forward–aerials along with strategic needle usage to clip SFAT’s jumps and low Fire Foxes. On SFAT’s end, pay close attention to how he chooses back– and neutral–aerial follow–ups from his lower–percent up–throws; this is done to build damage more effectively by keeping Flash’s Sheik within his comboing range (as opposed to an up–aerial, which would either allow Flash to DI off–stage or send him too high for a reliable follow–up), which then permits SFAT to transition to the up–aerial as his finisher.
Fiction (Fox) vs. Shroomed: Shroomed combines shield–dropping with Sheik’s up–, forward–, and back–aerials in this set, a novel tactic that permits him to escape Fox’s platform pressure while simultaneously setting up for a follow–up or platform tech chase. The ending exchange of the first game is especially intriguing. After light–shielding Fiction’s approaching neutral–aerial and subsequent shine, Shroomed switches to a hard shield to block the Fox’s next neutral–aerial; because this move connects high on his shield and he is now in a hard shield, Shroomed successfully shield–grabs Fiction without fear of being pushed out of range, which would have occurred had he continued to hold the light shield.
SFAT (Fox) vs. Shroomed – Bay Area Monthlies #2: At 1:38, notice how SFAT counters Shroomed’s falling neutral–aerial with an up–tilt, which cleanly beats the incoming move and gives the Fox player an opening to string together a damaging punishment. Other important points include how Shroomed utilizes Sheik’s jab, forward–tilt, and neutral–aerial to pin SFAT into his shield and to land knockdowns. However, SFAT implements Fox’s edge–guarding game against Sheik quite well throughout the set, grabbing the ledge and timing his get–up option to force his opponent to recover onto the stage and setting up for a punish.
Weon – X (Fox) vs. KirbyKaze: Canada’s KirbyKaze provides a masterful display of the power of Sheik’s tech chase game, needles, and off–stage play in this winners semifinals set.
Silent Wolf (Fox) vs. Ice: In this Evo 2013 set, Silent Wolf plays a balanced style that earns him opportunities for punishes. He also responds well to Ice’s attempted set–ups, Smash DI’ing out of a jab reset and buffer rolling out of an up–tilt trap. On Ice’s end, the German Sheik player makes good use of the neutral–aerial out of shield as well as the ninja’s platform and needle–cancel options. Early in the set’s final game, note how few answers Sheik has for Fox’s back–aerial when she is descending towards the stage while facing forwards.
4. Marth [ST4]
Many players will turn to Marth as their answer to a Fox in tournament play. In more than a few ways, this approach is entirely logical; Marth has range, an up–throw chain grab, strong ways to punish predictability and improper DI, and powerful aerial and edge games, along with excellent speed and maneuverability courtesy of his dash–dance and wavedash. However, such players would do well to factor in Fox’s own advantages in the match–up; these include vertical kills, numerous lead–ins for kill mechanisms (including shine combos), speed to penetrate Marth’s range, and projectile baiting courtesy of the laser. When coupled with proper DI and your ability to play both the offensive and defensive sides of the style spectrum, Fox can more often than not hold the advantage in this match–up, however slight.
As stated above, one of your most effective tools in this match–up is the correct use of your various styles of play. For the Marth vs. Fox match–up, you generally should rely on a more defensive, patient style rather than on an offensive, aggressive style. The reasons for this rest mainly on Marth’s numerous answers to your offensive game in the form of his range and ability to space out your advances easily via dash–dances and reverse wavedashes, both of which can lead to deadly jump–canceled grabs (do not forget Marth’s astonishing range on his grabs, as well). As such, you can effectively turn the tables on Marth’s own game of waiting by waiting him out yourself. On larger stages, you can make use of far–off blaster fire via your SHL and/or SHDL, dash–dancing, and wavedashes to control your spacing from Marth and force him to come to you lest he accumulate too much damage from your oncoming lasers. So long as an adequate distance separates you from your opponent and the size of the stage permits it, continue blasting the swordsman until you see or create an opening punishable by a jump–canceled grab or aerial. You can facilitate your attempts to throw off Marth’s aerial spacing by simply running towards him and shielding at opportune moments; such a maneuver oftentimes destroys the Marth player’s timing as well as his ability to control his distance from you. Furthermore, you can also buffer inwards shield DI simply by continuing to hold the control stick toward your opponent throughout the time that you are shielding; this pushes you toward Marth should he hit your shield, giving you a better shot at getting within his range. Once an aerial connects with your shield from what you feel is a safe distance, you can answer in kind with a shield grab or an up–smash from shield followed by the requisite aerial juggling that characterizes this match–up. That said, be careful with trying to force this or any other opening as the sheer speed of Marth’s aerials (particularly his forward–aerial, which hits on frame 4 and has a 7–frame L–cancel) allows him to L–cancel through shields and into spot–dodges or a dash, buying him enough time during your lag to answer with a potentially–lethal grab.
Of course, the ground game against the Fire Emblem swordsman is not nearly as clear–cut as the above would seem to imply. Keep in mind that while he lacks a projectile of his own, Marth is also not inhibited in terms of his own movements while you are firing at him. Unlike Fox’s wingmate Falco, your blaster does not stun; as such, Marth still has the means to control his range from you thanks largely to his fluid dash–dancing and wavedashes. As you try to create an opening, you must also be thinking of the possible options that Marth has as the distance between you fluctuates. Make certain not to underestimate the range on a dash–canceled down–tilt, for example, or especially on a jump–canceled grab, as that will lead into his up–throw chain grab at low percents which may remove a stock if you are not careful. His dash–canceled down–tilt is especially potent during the neutral game, where he can use it to poke relatively safely at you (thanks to the move’s numerous IASA frames) and either open you up for a grab outright or create a knockdown situation. As a result of this, you must be cautious with excessively dash–dancing around a Marth who has the distance to perform a dash–canceled down–tilt.
Many Marths will attempt to stay as close to you as possible by slight adjustments in the range of their dash–dance to weave in and out of your range; they will try to bait you into spot–dodging or full–jumping, which they can readily punish by waiting and answering afterward with a grab or forward–aerial set–up. Your best answer is to control your own spacing well enough that you do not give Marth the opportunity to close in on your own space to such an extent that he has these options open to him. You must remain patient and wait for your chance to punish, just as the Marth player is doing; if you become too brash and hurry into an attack, you may find yourself on the receiving end of a chain grab to a lethal tipper or edge–guarding. More than anything, this match–up is all about patience on both ends as well as elaborate spacing and prediction. If you can avoid rushing foolishly into Marth’s range, you will hold the upper hand for the majority of the match. As well, try to position yourself below and to the back of Marth as often as possible; this limits the control that he can exert upon you with his extremely fast forward–aerial, which can very often come out quickly enough to swat you away as you attempt to continue a combo or advance upon him. You would also do well to restrain yourself from trying to descend on a Marth who is in the neutral stance; if you try to approach him from above, you are almost guaranteed to be hit with his fast, high–priority up–tilt, which itself can lead into all manner of follow–ups. This same move can cause problems if he tippers it near the ledge with his back facing off–stage; this sets you up for a finishing, lethal down–aerial. Needless to say, you must strive to approach Marth either from below or at his level and never try to force the issue from above while the swordsman is parked under a platform or to charge too hastily at him while he is hovering around the ledge.
In terms of actually inflicting damage on Marth, you have more than a few options at your disposal. You can punish bad spacing and high aerials with shield grabs or up–smashes from your shield, as discussed earlier. Your down–aerial also functions as a powerful set–up for your shine, which you can link into either a grab to up–aerials or immediately into an up–smash (the preferred option when Marth is at higher percents not conducive to up–throw follow–ups). You may not always be able to keep right on top of the Marth thanks to his excellent mobility, but should you be able to do so, you can often land a few shuffled neutral– or down–aerials into your shine set–up or even a jump–canceled grab. Your grabs should nearly always lead to up–throws and Fox’s usual up–aerial juggling, which can inflict heavy damage on the swordsman, particularly in combination with falling full–jump lasers should he DI out of your range after a hit. Remember your back–aerial response in case your opponent is adept at Smash DI’ing your up–aerial’s initial hit (alternatively, you could also time the up–aerial such that it connects with only the second hit). Should you grab him at high percents, you can also wait for the Marth’s second jump after the throw and position yourself at his back to give you the greatest chance of landing your follow–up safely. As with other floatier characters, if you connect a neutral–aerial at high percents while your opponent is DI’ing inward, you may be able to connect with an up–aerial afterwards. Similarly, you can link soft–hit aerials into follow–ups, including grabs and up–smashes. You can also chain neutral–aerials into each other or into an up–smash finisher given repeated survival DI at comparatively lower percents. All things considered, your up–throw to up–aerial(s) is key in this match–up for both racking up damage and finishing stocks; as such, you must be comfortable in both executing this maneuver and giving yourself opportunities to land the opening grab (especially out of your wave– and drillshines). As well, remember that you can drill to grab as well; this is important to keep in mind in situations where a shine would essentially reset the confrontation and cost you an opening, such as landing a drill while Marth is on a platform. With all that said, you must also be wary of the fact that Marth can forward–aerial you as you jump at him for the up–aerial at certain lower percents and if you are too slow on your execution; this mistake could make you vulnerable to a grab. A similar situation arises if you up–throw your opponent and he or she DI’s such that you opt for a back–aerial; if the Marth is at a low percent, he can forward–aerial you after your back–aerial connects due to the low stun time and knockback distance at low percents, again gifting him an easy grab.
Of course, Marth has his own ways of forcing an opening at your expense. He has the means to control his movement and spacing quite effectively with his dash–dance and wavedash; his range only serves to compound this problem. He can also corner you with a series of aerials and down–tilts, pinning you in your shield until an aerial or grab can sneak through and open you to him. Grabs and forward–aerials out of your own aerials are not all that uncommon, especially given the speed and range of Marth’s moves and the bad angles of approach that his spacing methods can produce. In addition, Marth’s lightning–quick forward–aerial has the range and the speed to catch you long enough for a grab or forward–smash to reach you. On that note, you should be aware that the swordsman can double forward–aerial in a single short–hop; generally, however, this is avoided in modern–day play due to its vulnerability to crouch–canceling. Modern–day Marths tend to perform delayed forward–aerials out of their short–hops, which gives them time to respond to your actions, hits lower on any shields that may pop up (thus increasing the safety of their pressure game), and sets up a bait of sorts for impatient Fox players who believe they can charge the airborne, forward–facing Marth with impunity. Another important note to keep in mind is that Marth can down–throw you near the ledge to set up for either a turn–around down–tilt to cover your away options and push you off–stage or for a re–grab if you tech or roll inwards back towards him.
Being able to shine through shields is essential to claiming victory against Marth; you simply cannot afford to hand your opponent easy kills by simple shield grab set–ups on your part. Keep your aerials deep into Marth’s shield whenever possible (but also be aware that Marth’s head quickly becomes exposed as his hard shield shrinks). Incorrect DI will also extinguish your stocks very quickly in this match–up, including survival DI when it is not appropriate. Keep in mind your powerful follow–ups to a successful grounded shine, namely your jump–canceled grabs and up–smashes (be careful not to take too much time executing this latter option on your follow–up or you will be met with a shield). Note that many Marth players will hold their shields past your post–aerial shines in an attempt to look for safe escape routes, so be sure to integrate shine–grabs into your repertoire. While a successful Jab could conceivably prep your opponent for an up–smash or a grab, you should know that Marth can readily crouch–cancel the move and grab you (even at higher percents); as such, your own grabs and down–aerials are much safer set–up options overall than your Jab.
As with virtually every other match–up, this one too requires that you avoid being grabbed whenever possible; this is due in no small part to Marth’s up–throw chain grab on Fox, which can inflict a good deal of damage on the vulpine space animal at the very least or even set up for a tipper or an edge–guard. According to information provided by Smashboards member RaynEX, it is best not to DI to either side during this chain grab as this in fact lengthens the chain until 80%; in contrast, if you do not DI, you have the option to shine out as early as 20% (note that you also could theoretically jump out, but this is not recommended due to the risk of being hit by and thus losing your second jump to an up–tilt or forward–smash). However, this is not a guaranteed escape by any means; to continue the grab combo, your opponent can opt to pivot re–grab in this percentage range (which allows him or her to avoid your shine), or he or she can up–tilt, which also beats out your shine option. The up–tilt could set up a tech chase situation should you miss your tech (a very common occurrence in such an exchange), so you must be on your toes during the chain grab. You generally should DI Marth’s up–tilts behind his back (that is, the same direction in which he swings his sword) as this will put you further away from him and thus in a better position to escape; be aware that if you DI this move against the direction of his sword (for example, to his front), you will be sent in a straight upwards trajectory that sets up for still more up–tilts at low percents. Marth can continue to combo out of the chain grab itself with up–aerials to re–grabs, and he can finish the continuation combo in a number of ways as well depending upon your percentage and DI, including with a tippered forward–smash. Again, while you will take damage no matter what once you are grabbed, DI’ing properly (especially avoiding sideways DI on the throws themselves) will lessen the percentage you gain and prevent you from setting yourself up for a tippered forward–smash. On the topic of grabs, be aware that Marth can back–throw to forward–smash you as a reliable high–percent finisher.
DI’ing Marth’s up–tilt is a topic that merits further examination. Unknown522 provides a concise overview of this topic in a handy Smashboards post at http://smashboards.com/threads/fox-advice-questions-topic.98202/page-796#post-18441660. In general terms, unknown522 recommends Smash DI’ing behind Marth (that is, in the same direction that he swings his sword during the up–tilt) if you are hit with the front part of this move; this generally puts you far enough away from your opponent so as to disallow easy follow–ups. However, he clarifies that this DI direction is not a good couse of action near the edge of the stage, a position at which you will set yourself up for a lethal down–aerial spike or a tippered forward–smash. The Canadian Fox player adds that you should at times DI away from your adversary (that is, against the direction that he swings his sword) such that you are sent straight up, usually at the center–stage position; this sends you at too high an altitude for the Marth player to set up an edge–guard or tippered forward–smash and generally forces him or her to settle for up–aerials that tack on damage but do not readily link into a finishing string (particularly if you also Smash DI these up–aerials upwards, which cuts these combos short).
You must also be careful with your DI on his forward–aerials. Note that if you continuously DI these inwards while you are off–stage, your opponent can combo into a lethal down–aerial (the infamous “Ken combo”), a true spike that thus cannot be meteor–canceled. As such, in this situation, it is best to DI the forward–aerials away. However, RaynEX provides a reminder not to DI the forward–aerials away at very high percentages such that you would essentially kill yourself; in that situation, it is best to force your opponent to execute the down–aerial since you have no other viable options in such a situation.
Generally, if you can avoid grabs (especially being grabbed by the ledge), you will likewise avoid Marth’s characteristic low–percent kills and take control of the match with your powerful vertical killing ability. Always keep in mind that Marth has a much more difficult time finishing your stock should you stave off his low–percent gimps while you have significantly more options at your disposal across a comparatively broader range of percents. You must also be able to DI effectively to avoid other low–percent kills at the hands of the forward–smash. Remember that the most effective survival DI is (ideally) perpendicular to the angle of the attack which has connected with you. In more practical terms, you should DI Marth’s forward–smash up and against the hit to minimize the distance it sends you off–stage by countering the attack’s horizontal knockback component with your DI’s vertical and against components. For example, DI’ing a forward–smash on the right side of a stage would entail DI’ing with the control stick in the “northwest” position; in this manner, the “upwards” and “against” portions of the DI detract from the forward–smash’s horizontal knockback length by substituting a more upwards movement for the horizontal knockback “path” of the forward–smash.
The impact of the structure of certain stages, in particular the various heights of certain stages’ side platforms, cannot be ignored in light of Marth’s up–tilt and forward–smash. Battlefield and Yoshi’s Story provide static side platforms at heights suitable for Marth to stand under and be able to tipper his forward–smash and up–tilt with little difficulty. From such positions, the swordsman can also down–aerial or forward–smash (potentially tippered) you if his up–tilt sends you off–stage. The platforms on the neutral version of Stadium also pose similar problems, although Marth cannot connect with a lethal down–aerial follow–up there. Dream Land’s higher side platforms prevent tippered forward–smashes but still permit tippered up–tilts. Such scenarios are important to keep in mind when contemplating your recovery options. Recovering to a higher central platform is a good general stratagem against the swordsman, but this option will not always be available to you. Ledge–canceled Illusions on the side platforms are another viable alternative. If you are up–B’ing to a platform, always remember that you can fast–fall out of your Fire Fox and buffer a light shield while you are falling to the platform; this ensures that your full light shield pops up as soon as possible, forcing your opponent to be quite precise with any moves thrown your way from below while protecting you from shield pokes on your feet or tail. When making use of your light shield in this manner, you will want to land out of your up–B closer to the inside edge of the platform; this is because you will be facing forward during your light shield, keeping you out of the falling “stunned” state that otherwise would occur should you be knocked out of your shield and off the platform with your back facing the edge of that platform. Note that you can still grab the ledge below you if you fall off the platform in this manner. Another option to keep in mind is buffering a jump out of a shield using up on the C–stick. In addition to your light shield buffer, you can also crouch–cancel Marth’s up–tilts when you are at lower percents and then jump away. If you are at a percent such that you can no longer crouch–cancel, you can instead Smash DI an up–tilt downwards and tech in place while buffering into a light shield (with or without an additional buffered jump out); while this does not provide guaranteed protection from a follow–up timed up–tilt, it does present your opponent with a series of tighter timing windows that gives you a decent chance of escaping if the Marth mistimes his response.
The edge and off–stage games against Marth are particularly important to your success in this match–up. The Marth player will look for kills mainly in these situations since he has few other truly effective methods of finishing your stocks at the low percents he requires to keep pace with your suite of punishment options and openers. You, on the other hand, must know how to avoid losing stocks at low percents to Marth’s edge–guarding, one of his most significant aces against you. Make certain not to be predictable in your recoveries, alternating the angles of your Firefox and the lengths of your Illusions and switching the two methods as you deem necessary. Know how to sweet–spot your Illusion as well as your Firefox to avoid essentially handing your stock to the Marth should you be put into a position to recover low. You should also be well versed in ledge teching for such situations. In addition, know that Marth can quite often kill you out of your Fire Fox, as can most other characters, by following you out and hitting you with a forward– or down–aerial, or even a neutral–B (this is also sometimes used in edge–guarding as it can cover horizontal recovery options while still giving your opponent the option to use an up–tilt to cover the airspace above him). The Marth can also answer your Fire Foxes from below by hanging on the ledge and ledge–hopping into a down–aerial to spike you to your death, all the more reason to acquaint yourself with ledge teching. Furthermore, if you find yourself falling towards the stage while above it, many players will wait for your air–dodge onto the stage; you will most likely do this out of fear of the waiting Marth, thinking that he will forward–smash you unless you air–dodge when in reality he is simply waiting for your air–dodge to allow him to punish you without fear of any other options or escape methods. Be mindful of this mindgame and adjust accordingly.
Marth’s most commonly used options at the ledge include the combination of his Jab and his down–tilt, both of which possess the speed and knockback properties necessary to allow him to cover multiple recovery options with lethal results in a safe fashion. His Jab can knock you out of your Illusion and covers the area in front of Marth as well as slightly above and in front of his head (http://gfycat.com/ValuableBlackChuckwalla#?frameNum=6). If he connects with this move (or its follow–up jab if necessary to prevent you from grabbing the ledge or to catch a shortened Illusion), he can then follow you off–stage and swipe you to your death with a forward–aerial. If he misses, he experiences little lag afterwards and can likely react in time to your chosen recovery option. The down–tilt is a very potent edge–guarding option thanks to its brutal knockback trajectory on the vulpine fast–faller as well as its sheer speed (note that its IASA frames start as early as frame 20); if Marth sweet–spots his down–tilt on your recovery, you could die outright, and if he sour–spots it, he has time to react and finish you with an off–stage forward–aerial. You must also keep in mind that the Fire Emblem swordsman can forward–throw you off–stage and follow into a down–tilt to force you to act from a lower position relative to the stage. As well, if you shorten an Illusion that is directed at the ledge, you can cause Marth potentially to miss his down–tilt.
If you are in a position such that you must recover from below with your Fire Fox, expect your opponent to stand at the edge and Counter; this move’s generous timing window (on frames 5 – 29) and its innate protective effects allow your opponent to knock you away from the stage easily and safely, setting up for a non–tippered forward–aerial (so that you are dragged downwards rather than knocked upwards). While quite difficult, it is possible to sweet–spot against the Counter from below as well as to ledge tech it; however, it is best to take the route of least resistance when available and Fire Fox up in such a way as to dodge the Countering Marth (although keep in mind that Counter’s trigger box does protrude in front of as well as in back of the swordsman to an appreciable extent). Marth can also opt to drop off the ledge and swat you away with a back–aerial if you start an up–B below the stage and within his range. With this variety of efficient, effective edge–guarding options, it should come as no surprise that you should generally attempt to recover high against Marth whenever possible, ideally to the topmost platform, if one is available (all the more reason to ban Final Destination).
When you do regain the edge, be sure not to ledge–hop into an attack (the down–aerial is the most common option chosen for this offense) as soon as you can; Marth players (indeed, virtually every player, for that matter) anticipate and punish this with a simple reverse wavedash to forward–smash, which often leads to a lost stock on your part due to using your second jump. You should instead regain the stage by varying the timings at which you get up from the edge (best done by performing one of Fox’s various invincibility stalls) and by perfecting your invincible ledge wavelands. The beauty of the invincible ledge waveland lies not only in its safety (assuming proper execution) but also in the fact that it gives you an excellent chance of retaking center stage.
You have more than a few options yourself when you are the one doing the edge–guarding. For example, you can opt for a crouch–cancel down–smash if your foe is recovering from below; coupled with an edge–hog, this will be enough to take the stock of a sufficiently–damaged opponent. You can also time a reverse wavedash or even a short–hop to grab the ledge such that you force your opponent to land on the stage, opening them for a punish. Remember that you can avoid his up–B’s hitbox by going behind the swordsman; this is also an important fact to keep in mind when considering a shine spike at the apex of Marth’s up–B at the ledge. While the Fire Fox stall is conceivably an option in these situations, it generally is not recommended due to the cost of an error; if you mistime your stall or make an execution mistake, the incoming Marth’s up–B will clip you and put you below the stage. If the Marth is recovering while above the stage, you can wait and punish with a ledge–dropped back–aerial, complete with invincibility frames from the ledge. You can also make use of your shine–turned back–aerial in such situations; the speed, range, and angle of this maneuver are often difficult for an off–stage Marth to handle (Marth’s vaunted forward–aerial starts its hitbox at the upper portion of his body, leaving his lower body vulnerable for the first 2 hitbox frames). Remember that many players will try to air–dodge onto the stage out of fear of your ledge–dropped attack; as such, also remember to account for this dodge when appropriate and punish accordingly. You can also shine–spike the swordsman should he forward–B stall in a poor position; however, be cautious of Marths who conserve their double–jump and retaliate with a forward–aerial. It is not recommended to attempt to shine Marth directly out of his up–B as he is moving. However, if your opponent miscalculates and pokes over the stage during a recovery attempt, a shine followed by an edge–hog would be a very efficient means of finishing his or her stock; to that end, you should be aware of the up–B’s frame data, noting that the move has hitboxes only on frames 5 – 10 (with frame 5 being invincible). You can also bait particularly panicky adversaries into a shine spike should you throw them off–stage. If you can get a read on a tendency to double–jump into a defensive aerial, you can shield after your throw, blocking their aerial and opening them to your shine; thanks to Marth’s rather subpar horizontal recovery, this while likely be enough to end the stock, especially in combination with an edge–hog.
Fox also has a very unique and rather easily–executed edge–guarding option against Marth ominously named “the Marth killer.” This innovative tactic makes use of the fact that a character will move a certain distance if his or her light shield is hit with an attack; when combined with Fox’s fast–falling properties and the nature of the swordsman’s recovery, it creates what is essentially a lose–lose situation for the Marth and offers a very, very high likelihood of a lethal edge–guard in the space animal’s favor. In a nutshell, this technique involves positioning oneself on the very tip of the ledge (most easily done by rolling towards the ledge at a distance shorter than the length of Fox’s roll) and full light–shielding while holding the light shield completely straight away from the stage. The easiest way to perform the correctly–angled full light shield is to hold “Z” and away from the stage on the control stick during the rolling animation (that is, buffering these inputs) such that you come out of the roll with the light shield at its full size and with the proper angle. The end result of this is that a Marth coming from below with an up–B return will first hit the tip of your light shield and push you onto the edge, which you will then hold for the remainder of Marth’s recovery, causing him to plummet to his death if chose a sweet–spot or slightly higher position at which to start his up–B.
Essentially, the nature of this technique forces Marth into a dually disadvantageous position. If he attempts to sweet–spot the ledge with his up–B, he will more than likely lose his stock. If he up–B’s higher in an attempt to knock you out of your light shield and land on–stage, you will grab the edge and thus almost instantly escape the shield, allowing you to ledge–drop back– or up–aerial him; note that you should choose the back–aerial at percents that the up–aerial will not be lethal so that you can set up another such edge–guarding situation. With that said, however, the light shield edge–guard is not a flawless strategy. For example, Marth has the option of saving his jump until he nears the ledge and either jumping to grab the ledge or forward–aerialing your light shield as he moves on–stage, at which point he now possesses stage control. He can also simply jump or air–dodge on–stage as a mix–up. In addition, he can jump up with his neutral–aerial, the first hit of which will knock you out of the shield and the second hit of which will bat you away from the edge. It is also possible (although rather unlikely) for your opponent to perform a pixel–perfect sweet–spot of the ledge (a “true” sweet–spot, essentially, that accounts for the size and position of the up–B’s hitbox), but such a maneuver is incredibly difficult to execute consistently and has an extremely small margin of error. A far more likely situation involves your adversary up–B’ing such that he or she is too far away to connect with your light shield but still close enough to be able to float to the ledge; all the same, you can react to this by simply wavedashing or short–hopping out of your shield to the ledge. These caveats aside, you certainly should acquaint yourself with this tactic and its simple execution as it will net you more than its fair share of opposing stocks.
Counterpicks
Dream Land: This stage’s higher ceiling does extend Marth’s vertical life to an extent. However, Dream Land’s higher platforms constitute a significant problem for the swordsman; the side platforms prevent easy forward–smash tippers, and the central platform provides Fox with a high recovery option, making life difficult for the edge–guard–seeking Marth.
Yoshi’s Story: Story’s low ceiling lets you score earlier kills on Marth while its underside allows you ample surface area on which to tech should you be forced to recover from a low position. The platforms do offer you additional recovery options (particularly via ledge–canceled Illusions), but be wary of tippered forward–smashes and up–tilts to off–stage down–aerial finishers.
Pokemon Stadium: While Marth can make use of the platforms on Stadium’s neutral transformation, Stadium’s lower ceiling once again augments your vertical kills, a significant ace in this match–up thanks to your up–throw to up–aerials and waveshine or drillshine to up–smash. The length of the stage also gives you more room to roam without fear of constantly being cornered at the ledge as well as the possibility of wall–based infinites.
Bans/Strikes
Final Destination: FD is generally the preferred ban against Marth owing to his chain grab and the associated combos as well as the lack of an upper platform for recovery purposes.
Fountain of Dreams: Fountain’s platform structure hinders your ability to maneuver around Marth effectively while its high ceiling and close horizontal blast zones lengthen Marth’s stocks while shortening yours.
Battlefield: Battlefield’s static side platforms are placed at such a height that Marth can easily connect with tippered forward–smashes and up–tilts. As well, he can combo up–tilt into a lethal down–aerial off the side platforms. The stage’s ledges and lack of a solid underside also make some facets of your recovery game more difficult. That said, Battlefield does provide you with the option of a top central platform onto which to recover, offering you a chance to extend your stocks and force your opponent to execute for longer periods of time.
Media
Hax (Fox) vs. Mew2King: The Zenith 2014 grand finals between these two high–powered players provides an excellent overview of both sides of the match–up in terms of punishes, openings, and edge–guarding, along with great commentary. In the first set’s second game, you should notice how Hax’s slight DI behind Mew2King on Marth’s up–throws makes following up just difficult enough to force an execution error, a key tactic on Final Destination. Note also Hax’s emphasis on drills, which serve both to combat Marth’s crouch–cancel game and to set up drillshine follow–ups. The third game showcases Marth’s characteristic back–breaking chain grabs and grab–based combos on Final Destination. Hax’s shine spike to seal the first set is especially instructive. Note how he positions himself over and behind the hitbox of the incoming up–B, which allows him to time the shine without fear of being hit. In the second set, however, M2K brings Marth’s lethal edge–guarding and off–stage games to bear on Hax’s faltering Fox.
Mango (Fox) vs. Mew2King – The Big House 4, Grand Finals: The first important item to notice throughout these sets is Mango’s overall focus on landing grabs and shines. At 2:41 in the first set, you can see how the shine devastates Marth’s recovery should he be caught without a double–jump; here, Mango shines M2K out of his hasty double–jump, completing the kill with a ledge–hog. At 12:07, Mango utilizes a run–in shield to defend himself from the descending Marth’s back–aerial while simultaneously putting himself within the swordsman’s range and thus setting up for a shine combo. The end of the first set sees Mango surviving to 160%, highlighting Marth’s problems with finishing off high–percent Foxes (especially on Dream Land). M2K kicks off the second set by taking the opposing stock with a Countered Fire Fox and forward–aerial chase. At 0:27 in the second set, Mango connects with a down–smash out of a waveshine, knocking M2K off–stage and tacking on enough damage for a subsequent up–smash punish to be lethal. At 0:45, you should notice how Mango’s missed falling full–jump back–aerial (and later an up–aerial) allows his opponent to land a grab. At 7:26, the Fox player avoids a retaliatory forward–aerial after his low–percent up–throw to back–aerial by performing his aerial while moving forward but timing it such that he connects with the closer side of Marth’s character model; the end result is that Marth turns in the direction of the hit while Mango crosses over to what is now Marth’s backside.
Mango (Fox) vs. Mew2King – SKTAR 3, Losers Finals: At 8:40, you can see that Mango crouch–cancels M2K’s attack to prevent himself from being knocked off–stage. D1 and Prog together point out a number of intricate details of the match–up in the final games of this set, touching upon such topics as DI and the reason that Mew2King faces a specific direction while using Marth’s up–tilt.
Mango (Fox) vs. Mew2King – Revival of Melee 7, Winners Finals: This pair of games is included as an example of the power of Marth on Final Destination as well as the array of combo options that the swordsman wields. Note also Mango’s DI on the off–stage forward–throw such that he avoids M2K’s follow–up down–tilt.
Leffen (Fox) vs. Mew2King: Early in this Big House winners finals set, Leffen makes use of Fox’s down–tilt as a ranged launcher against Marth, countering his tendency to stay at a distance while prepping him for juggling at the same time. At 1:44, you should notice how M2K’s up–tilt cleanly cuts through Leffen’s attempt at a falling neutral–aerial. Later, at the 2:01 mark, Mew2King successfully navigates around the “Marth killer” by up–B’ing just out of range of the light shield and falling to the ledge. At the end of the first game, the Marth player opts for a down–aerial out of shield, a moderately quick escape option whose hitboxes begin at frame 6 that also covers a good amount of space while allowing Marth to retreat. As an aside, the down–aerial can also set you up for a grab at very low percents because you are stunned in place for a lengthy period of time rather than knocked down or away; this situation arises at 8:44.
SFAT (Fox) vs. PewPewU – Get Smashed at the Foundry #14: SFAT starts off with a very quick shine spike on the hapless Marth of PewPewU, again emphasizing the down–B’s ability to take stocks at very low percents given the proper setting. At 1:03, PewPewU’s up–throw tosses SFAT onto the side platform; taking advantage of his low percent, the Fox player crouch–cancels his opponent’s follow–up that otherwise would have launched him into the air for a longer string, more damage, and a far less favorable position. In the second game, SFAT maneuvers around the ledge–drop down–aerial edge–guard and executes a clean waveland from the ledge to retake the stage while also catching his adversary with an up–smash. A point of interest in the third game is when SFAT attempts to down–aerial reset PewPewU on a platform at 6:14; because he connects with too many hits from the down–aerial, he allows the Marth player numerous opportunities to Smash DI, thus giving him enough horizontal movement to float off the platform and out of the reset trap.
SFAT (Fox) vs. PewPewU – Do You Fox Wit It?: A nail–biter of a set between these players, this late losers bracket match offers a glimpse of many important yet subtle aspects of this match–up. For example, at 2:25, note how SFAT resists the urge to shine instinctively after landing his down–aerial on the platform, instead wisely opting to grab after the drill. Late in the set’s final game, a similar situation arises, but SFAT instead opts to try for a jab to up–smash; this in combination with an execution error allows his opponent to put up a shield in time, costing SFAT a tremendous opportunity. At 2:41, PewPewU’s forward–B stall fools SFAT into letting go of the ledge early, allowing the Marth player to recover safely.
Silent Wolf (Fox) vs. PewPewU: Silent Wolf shows how Fox can land critical off–stage shines against Marth and time his get–up from the ledge to stall through the swordsman’s up–B, ending stocks at quite low percents. However, PewPewU makes use of Marth’s neutral–aerial to contend with the priority and angle of attack of Fox’s incoming shuffled aerials as well as his forward–aerial to interrupt Silent Wolf’s strings when possible.
Lucky (Fox) vs. PewPewU: In this winners quarterfinals set, PewPewU utilizes Marth’s forward–B to good effect to finish off Lucky’s stocks when the Fox player survives to high percents; one of the commentators states that such a tactic can be countered by crouch–canceling the initial two weaker hits of the forward–B, opening Marth to a counterattack. Both players exhibit numerous facets of their characters’ punish games throughout this tense set.
5. Jigglypuff [ST5]
Jigglypuff may not be the most common of tournament characters, but she nevertheless packs her fair share of power when wielded correctly. With proper spacing and timing, her powerful, high–priority aerial game, including her characteristic back–aerial “wall of pain,” allows her to hold some degree of control over the match. In addition, Jigglypuff can very easily take advantage of your recovery, dragging you down to your death with neutral–aerials or simply batting you away with a well–placed back–aerial. The Fox player also must be aware of Jigglypuff’s arsenal of Rest combos, which severely punish you for any botched spacing, missed shuffles or L–cancels, predictable or missed techs, or missed DI. Furthermore, Puff falls when shined and thus cannot be shine comboed; is naturally floaty, which puts her out of range of up–throw follow–ups at high percents; and has an additional five (fortunately short) jumps off–stage along with her rising Pound technique, which allow her to hound you relentlessly in the open air and snipe your recovery. These facts may seem to paint a grim picture of this match–up; indeed, if not played correctly, this match–up can cause Fox more problems than one may at first anticipate. Fortunately, the space animal has the tools to combat the balloon–like Pokemon; by paying attention to your opponent’s percent, holding center stage, and executing your up–throw to up–aerial at optimal times, you can make the Puff player’s life quite difficult.
Ground play against Jigglypuff can become somewhat unnerving at times. You will need to exercise a bit of patience in this match–up; running headlong into her spaced back–aerial “wall of pain” is not the wisest of decisions and will allow your opponent at the very least to tack on easy damage that you otherwise could have avoided with some simple thought and patience. Given her flagrant air superiority, you would do well to keep yourself as grounded and mobile as possible for as long as possible; trying to maneuver around Puff in the air with your immobile full–jumps could land you in a good deal of trouble fairly quickly. On that note, the video at http://gfycat.com/ShortLazyHammerheadshark provides a view of the imposing hitbox of Puff’s back–aerial, which hits on frames 9 – 12 and extends well away from her body and her foot as well; needless to say, this move is a mainstay in the Pokemon’s offensive and defensive arsenal, and you will lose if you continuously challenge it head–on. Keep just enough distance between yourself and the enemy Puff so that you are out of range of her wall of pain and still have the proximity to run in and punish when appropriate. If you can sense a pattern or a rhythm to your opponent’s aerial wall, you can time your dash–dances to weave in and out of her range until you find a suitable moment to glide in with a jump–canceled grab (to set up your up–aerial kills) or possibly even an up–smash at percents where up–throw follow–ups are not feasible. You can also time a run–in shield with a wavedash escape to work your way within her range with relative safety. That said, these are often not the easiest of tasks; the speed and range of properly–spaced back–aerials in combination with Puff’s horizontal aerial maneuverability can make safely encroaching on her space a chore at best.
Should a back–aerial connect with your shield, you must resist the temptation to shield–grab or up–smash out of shield automatically; correct spacing will see that your hand grabs nothing and your up–smash hits only air as your opponent moves away, opening you to another quick back–aerial or even a grab. Of course, if you are able to force your opponent to connect with your run–in shield at a close range, you can take advantage with a grab or, preferably, an up–smash out of your shield, an extremely useful punisher in this match–up should the proper situation arise. Be aware that Puff can make use of descending neutral–aerials during the neutral game; these provide a long–lasting hitbox beneath the Pokemon that she can use to stun you just long enough to land a grab. She can also make use of her down–aerial to set up for an up–smash or a grab due to the aerial’s unusually long–lasting hit stun; in this scenario, you can Smash DI the drill and buffered roll out or even jab if you escape early enough. These options in combination with her off–putting horizontal movement make the neutral game against Puff an entirely different affair compared to your exchanges with almost every other character in the game; as such, it will take time and experience for you to be able to see the openings in Jiggly’s game as well as the times of vulnerability in your own game.
Landing a grab is of paramount importance in this match–up. You can most often do this via dash–dancing and grabbing Puff as she lands from an aerial or if she misses a move, but you can also land grabs via soft–hit neutral–aerials and shine–grabs. Shine–grabs can be particularly effective as many players neglect to DI while they are in their shields, netting you a much easier follow–up. In addition, you can mix in drill grabs should you catch your opponent on the ground. When you do land a grab, your usual up–throw to up–aerial is your main kill option (at the proper percents, that is). Depending upon such factors as the stage’s ceiling height as well as your opponent’s DI on the aerial itself, a connected up–aerial as early as around 50 – 65% (before the throw) constitutes a lethal blow; it is imperative that you pay close attention to your opponent’s percentage and not tack on too much additional damage with lasers or other aerials because Puff will then float out of range of your up–aerial at the resulting higher percents, costing you your most efficient and safe vertical kill mechanism and forcing you to prod for generally riskier openings with smaller windows of opportunity. Watch for attempts to Smash DI your up–aerial so that your more powerful kick misses; it is possible to time your up–aerial such that you only hit with the second hit, circumventing this trick. This part of the match–up in particular gives Fox players fits as they are accustomed to having more leeway in their decision–making with regard to punishes and associated percents; however uncreative this algorithmic approach to the Jigglypuff match–up is, it is doubtless the most efficient and efficacious and will save you countless headaches while costing your opponent numerous stocks.
A few additional notes concerning the up–throw in this match–up are worth mentioning here. Note that the time required for Fox to up–throw a character (that is, the length of his throwing animation) is directly proportional to that character’s weight; as such, Fox hurls the exceedingly light Jigglypuff into the air at high speeds, requiring you to react just as quickly afterwards to land your up–aerial in time. As well, you generally should not knee your opponent prior to the throw as this serves only to give him or her more time to input DI, potentially complicating the execution of your follow–up; that said, occasionally a knee or two could bring Puff into the lethal range of your up–aerial and thus would be a reasonable decision. All things considered, you must transition from the grab to the throw itself as quickly as possible, followed by acting after the throw animation as quickly as possible.
Naturally, grabs lose their effectiveness at higher percents due to Puff’s floatiness, although you can attempt a down–throw to tech–chase with an up–smash. At these upper percents, you can try to connect with a falling up–aerial or a neutral– or back–aerial to finish the job. Soft–hit neutral–aerials can also be useful (particularly when full–jumped onto a platform) for linking into an up–smash finisher, as can jabs out of your drill at higher percents, an especially useful combo when Puff is favoring her wavedash to space against you. At high percents, you can jab into a back–aerial or even down–aerial into an up–tilt as a kill mechanism. All that said, it is critical that you do not allow your opponent to reach higher percents on a consistent basis; doing so makes it needlessly difficult to land your killing blow, especially when proper spacing and shield play make use of your jump–canceled and out–of–shield up–smash a risky proposition. On the topic of Jigglypuff’s shield, you should be aware that she dies should her shield break, unlike every other character; with this knowledge and some technical prowess, you may opt to punish shield–favoring Puffs with a series of shuffled aerials, including up–aerials that could poke her shield and net you a kill themselves at higher percents.
Overall, your style for this match–up should be a relatively balanced blend of offense and defense. Make use of blaster fire to get Puff to the critical kill percents for an up–throw to up–aerial while ensuring that you do not give up too much space on the stage. One of Puff’s principal methods of winning this battle is to obtain and maintain stage control with her aerial game, especially the powerful back–aerial; should you play too passively and give up too much real estate to your opponent, you will quickly find yourself pushed to the ledge with your options constrained, precisely the position that the Pokemon needs to set up a lethal edge–guard or gimp. Both sides of this match–up thrive on low–percent kills, you with your vertical kills and Jigglypuff with her various Rest set–ups and off–stage gimps; as such, you must take care not to pour the blaster fire on too heavily lest you make your opponent unnecessarily difficult to finish. As well, if your excessively defensive play permits Puff to put you into shield at an inopportune moment, she can opt to land into a grab (that is, without a preceding aerial, a mix–up to exploit your shielding in expectation of an aerial) to toss you off–stage. If you choose to be aggressive, make certain that your execution and spacing are both up to par as a low–percent up–throw when coupled with missed DI could spell a lost stock for you. You can fight Jigglypuff’s aerial game to some extent with your back–aerial, but her greater aerial maneuverability could allow her to space out your aerial and retaliate as she sees fit should you leave yourself in a poor position. Unknown522 of Smashboards highlights another powerful option of Fox’s in his up–tilt, a quick and high–priority move which, he states, can combo during lower and middle percents into your up–aerial and can kill at around 90 – 100%. Additionally, note that you do not necessarily lose all follow–up options off of your shine even though you cannot truly shine combo Puff; the shine could get you a knockdown against the Pokemon that you can punish with a tech chase or wake–up prediction.
Other than Jigglypuff’s wall of pain, her Rest is an integral part of her game plan against you as a fast–falling space animal. You would do well to keep in mind just how vulnerable Jigglypuff is after using her Rest; she is rendered completely helpless as she gradually wakes up, with the entire animation lasting 249 frames (or 4.15 seconds) and consisting of the hitbox on only the first frame (at the very center of Puff’s body) and whole–body invincibility from frames 1 – 26. Note that her up–throw is far from her only method of setting up a Rest. She can also lead in with an up–tilt (should you miss your sideways DI on the tilt); a properly L–canceled down–aerial; a neutral–aerial; a falling up–aerial; a crouch–cancel; out of a jab reset; out of her shield, should you connect with a sufficiently laggy move; out of a down–throw in combination with no or inwards DI; and from platform tech– and wake–up chases, among others. This last method is of particular interest as far as stages are concerned. You must take care on platform stages not to be predictable on your get–up should you land on a platform; it is no great task for your opponent to float to your level and land a Rest given that the move hits on frame 1.
That said, being able to DI Puff’s up–throw consistently is essential in this match–up. If you happen to run into the front of your opponent’s shield in some manner, you generally should hold left or right as soon as you can to DI the up–throw; remember that, like you, your opponent aims to toss you as soon as possible after the grab lands to minimize your window to input the DI. It is especially critical to understand that upwards–against DI is in fact not always the ideal choice when it comes to being hit with a Rest. This is because an excessive up component on your DI could cause you to die upwards from a Rest (a “star KO” animation that lasts the duration of Puff’s wake–up animation, thus allowing her to escape unpunished) that you could have survived and recovered from with slightly more horizontal DI. RaynEX of Smashboards provides the following solution to this situation: by initially Smash DI’ing the Rest upwards and against and then sliding the control stick past the left vertex and down to the corresponding downwards and against direction, you can prevent vertical Rest kills. However, you will find that most players will opt simply to DI the Rest entirely sideways, except for on their last stock, of course; while this guarantees their death, it also guarantees that they are not star KO’d, which could still occur with improper execution of the aforementioned strategy. Thus, RaynEX’s suggestion would generally be most appropriate for a Rest on your last stock (where you obviously must make an effort to survive) or on a larger stage such as Dream Land, the size of which reduces the chances of a star KO provided that you are at a very low percent when the Rest connects. Note also that the use of intentionally poor DI means that you can remove a last–stock Puff’s Rest option entirely if you are up a stock and also make certain before losing that second–to–last stock to damage the Pokemon to the extent that you can kill her immediately when you return with your final life. Of course, proper execution of this line of thought depends upon your knowing just when a Rest set–up has been performed and when the Rest itself is coming; keep in mind that while horizontal DI is appropriate in the circumstances described above, it is anything but correct when you are hit with a forward–smash, back–aerial, or the like.
As a potential Rest punish, Miggz of Smashboards recommends a barrage of standing lasers to an appropriate kill percent followed by a charged up–smash released just as Puff awakens. This requires very little technical precision and virtually guarantees the kill at certain percents by not relying on an up–throw or up–aerial, both of which afford your opponent opportunities to DI to make a follow–up more difficult, as in the case of the throw, or to escape a lethal hit, as in the case of the up–aerial. However, due to the time required, this tactic should be reserved for missed Rests. A variant of the aforementioned punish is lasering into a grab and up–throw to up–aerial, although you must be aware of the impact of DI and Smash DI on this choice. Note that if you survive a Rest with appropriate DI and make it back to the stage (using your Illusion as the Fire Fox’s charge–up costs you far too much time), you likely will not have the time to punish Puff, hence the use of intentionally poor DI outside of last–stock scenarios. Comboing an up–aerial into another up–aerial represents yet another potential option and is a useful tactic in combination with lasers to tack on more damage than an up–throw to up–aerial would or when you are too short on time to punish reliably with an up–smash; however, this sequence should not be chosen if your opponent is at a percentage such that you cannot connect with the second up–aerial. You can also simply charge an up–smash, especially useful after intentionally DI’ing yourself to a quick death. Another potential option, although more timing–intensive and more situational due to the influences of DI and percentage, is a neutral–aerial into a grab followed by an up–throw and up–aerial.
Edge–guarding and general edge play represent very common sources of frustration for Fox players in this match–up. For example, Puff’s innate floatiness and horizontal aerial maneuverability allow her to reach out from the ledge with a neutral–aerial and then weave back to grab the ledge again, safely out of your range and further protected by a few invincibility frames. If you wander to the edge after she has grabbed onto the stage, she can Sing–cancel from the ledge by cutting off her Sing animation with a ledge grab, putting you to sleep long enough to land an easy Rest at the stage’s edge. You simply cannot afford to make such careless mistakes in this match–up and still expect to triumph. As such, take care not to be lured or forced into excessive edge play with the floaty Pokemon; rather, always force your enemy to you with an appropriate amount of blaster fire and more than a little patience, remembering to focus the action of the fight largely in the center of the stage while still holding on to enough stage control yourself such that you are not cornered at the ledge. You also must not allow Puff to grab you near the ledge, as with virtually every other match–up. Interestingly, Jigglypuff’s forward–throw is the only throw in the game that can be Smash DI’d. If your opponent is prone to Pounding from the ledge, see if you can punish him or her with an up–smash from your shield (note that many players also attempt to Pound out of their aerial “tumbling” animation in an effort to catch you off–guard; they should meet a similar fate for their predictability, but be careful of Pound’s long, 16–frame hitbox if you are not acting out of your shield).
Jigglypuff’s floatiness, aerial maneuverability, and corresponding options from the ledge make edge–guarding her a chore. An opponent who knows how to DI will not die horizontally very often with Jigglypuff, so your primary focus should be vertical kills via up–throw to up–aerials and the occasional successful up–smash out of shield. The shine spike is largely impractical in this match–up thanks to Puff’s five additional jumps off–stage and her ability to protect herself with aerials, although it is entirely possible to land enough off–stage shines (returning to the stage each time) so as to exhaust Jigglypuff’s jumps; however, keep in mind that her rising Pound enables her to gain altitude gradually. If you can time your back–aerial around your opponent’s jumps and defensive aerials, you may be able to land a finishing blow at higher percents, but be careful not to miss or your foe could float underneath you and punish you with an aerial of his or her own. Generally, your goal is to play this match–up such that you resort to horizontal and edge–guarding kills as infrequently as possible.
Jigglypuff, on the other hand, can edge–guard you quite well, even if she chooses to remain on the stage. Her down– and forward–smashes are particularly effective in this regard, and even her dash attack is a viable option as it possesses a relatively long–standing hitbox and startlingly high knockback. She can also make use of her forward– and down–tilts while at the ledge. It is interesting to note that Puff’s down–smash grants her legs invincibility during its hit frames on frames 9 – 10. More experienced players will follow any successful on–stage hits or throws with off–stage aerials, thanks to the Pokemon’s numerous jumps. Your Illusion and Firefox start–ups will meet with back–aerials or a series of descending neutral–aerials to drag you too far down to recover. If you make it back on stage with Puff in your vicinity, she can Pound you to send you back off the stage for another round. If your opponent reads your double–jump, you can be carried away from the stage in a series of back–aerials. These options make it clear that you must vary your recovery options regularly and make smart decisions while in such disadvantageous positions; a simple back–aerial on your jump back Illusion is all that is needed to end your stock. Generally, you should recover high against Puff when possible as low recoveries provide her with too much time and too many options to punish your return in a lethal manner.
Counterpicks
Final Destination: Fox can make good use of FD’s long, flat expanse to maneuver about Puff on the ground. As well, the lack of platforms can benefit Fox as it removes platform tech–chase scenarios from the Pokemon’s repertoire (note that Puff lacks a chain grab on Fox). Furthermore, Final Destination does not have a terribly high ceiling and so does not impinge upon your vertical kills, another big plus for your game plan.
Pokemon Stadium: As powerful a counterpick option as ever, Stadium grants you a low ceiling that allows for kills on Jigglypuff at even lower percents while its horizontal length offers you sufficient room to navigate around your opponent’s aerial game and avoid being trapped at the ledge.
Yoshi’s Story: Story’s low ceiling greatly enhances your vertical kill capabilities. However, you must protect yourself well as the smaller stage also allows Puff to force you towards a ledge more easily, and she can make use of the platforms for up–throw tech reads. At the same time, the stage’s small size and its close side blast zones combine to maximize your Rest punishes, a major plus in light of this stage’s low ceiling.
Bans/Strikes
Dream Land: Dream Land’s high ceiling extends Puff’s stocks to an appreciable extent, especially in combination with proper DI. However, its size also magnifies the efficacy of your Blaster game and gives you more space away from ledges along with platforms for use as escape routes (although these same platforms could prove troublesome should Puff up–throw you onto one of them in preparation for a tech read) as well as platforms for use while recovering.
Fountain of Dreams: Once again, Fountain slightly extends your floaty opponent’s stocks with its high ceiling. As well, its structure and smaller size throw a wrench into your mobility and evasion games, allowing Puff to track your movements and corner you more often.
Media
Lucky (Fox) vs. Hungrybox: In this Big House 4 set, Lucky makes sure to maintain some degree of stage control at all times, constantly trying to hold center stage and staying mobile to ward off Hungrybox’s attempts to corner him at the ledge. Pay close attention to the manner in which Lucky DI’s Rests such that he is able to re–spawn as quickly as possible and thus punish Puff to the greatest possible extent. He also makes excellent use of run–in shields to guard his attempts to maneuver within Hungrybox’s range as well as to protect himself while reclaiming on–stage positioning. Observe also Lucky’s use of back–aerials to combat Puff’s aerial game when he decides to go on the offensive. On the other side of the match–up, note Hungrybox’s use of Puff’s spaced back–aerial “wall of pain” as well as the up–tilt in various situations, including after landing without an aerial, as a potential lead–in option for his Rests.
Leffen (Fox) vs. Hungrybox: Leffen does well in avoiding Hungrybox’s ledge pressure in this set by focusing the fight on center stage whenever possible. He also makes good use of Fox’s up–tilt, abusing its anti–aerial priority along with its capability to set up for an up– or back–aerial (especially in the set’s final game). For the third game, Hungrybox counterpicks to Dream Land, taking advantage of its high ceiling to improve his survivability as well as its platforms to set up for Rest tech reads.
Mango (Fox) vs. Hungrybox – MLG Anaheim 2014: Mango takes special care to optimize his up–aerial punishes by racking up just enough percent to reach the window where an up–throw can lead to a lethal finisher. On that note, note how Mango utilizes run–in shields to create a safe grab opportunity against the Puff’s dash attack, finishing the opposing stock from a mere 59%. Hungrybox makes a concerted effort to counter the up–aerial follow–up by Smash DI’ing the initial hit such that he moves out of range of the lethal follow–up.
Mango (Fox) vs. Hungrybox – Get on My Level: In this set, Mango makes good use of falling up–aerials, including one that catches Hungrybox’s up–smash out of shield response to his shrunken shield. Commentary by Toph and DJ Nintendo also adds to the match quite well and provides a number of facts and tips about the match–up.
Mew2King (Fox) vs. Hungrybox: As in Mango’s set cited above, Mew2King focuses on landing grabs once Puff reaches the critical up–aerial kill percents. He also makes use of soft–hit neutral– and back–aerials to set up for his grabs.
Colbol (Fox) vs. Hungrybox: Colbol lands a number of key upper–percent up–smashes in this set thanks to his speed and fluid movement. In the second game on Hungrybox’s Dream Land counterpick, the stage’s immense size works against the Puff player by allowing Colbol to survive a Rest on Colbol’s last stock. In game four, the Fox player makes use of his Yoshi’s Story counterpick to finish the Pokemon’s stocks with up–aerials out of up–throws at exceedingly low percents. In the set’s final game, Colbol survives Hungrybox’s gimp attempt on his second–to–last stock with a key tech on the side of Fountain.
6. Peach [ST6]
Peach is yet another common tournament–viable character with whom you should be familiar. Her powerful down–smash (even more damaging when crouch–canceled) gives her a solid move on which to rely for kills and punishment; her priority and float–canceling (abbreviated “FC”) grant her the tools she needs to compete with Fox’s speed and power; her turnips give her an excellent means of setting her opponents up for whatever she deems most effective at the time and can also be used during edge–guarding; and her ability to chain–throw Fox for significant percentages can brutally punish any Fox player who is not at the peak of his or her technical game. Furthermore, her edge–guarding capabilities, further augmented by strategic use of her float, also give her strong off–stage options to combat Fox. That said, Fox does have more than a few of his own methods of harshly punishing Peach in the form of extended shine combos and vertical kills. Indeed, Peach’s traction and weight make her an ideal shine combo target, and her tendency to die vertically only improves the effectiveness of such tactics. She also has problems handling blaster–based keep–away strategies, hence many Peach players’ aversion to the use of Dream Land against defensively–oriented Foxes. All things considered, both Peach and Fox can do heavy amounts of damage to each other in relatively short order. It is especially important that you keep your technical game polished and up to par as execution mistakes against Peach could lead to your quick demise via down–smashes and chain grabs.
On–stage play in the Fox vs. Peach match–up can get quite heated. First off, you will need to pay special attention to your aerial spacing; Peach’s wavedash and dash–dance may not be the longest in the game, but they nevertheless grant her the ability to fine–tune her positioning relative to yours and set you up to be grabbed (usually into a series of up–throw chains with a finishing neutral–aerial) or dash–attacked and set up for a grab or aerial. In addition, many Peach players will make use of her crouch–cancel to punish sloppy L–cancel and shine transitions on your part; if you botch either of these, you may be hit with a down–smash, which you also may or may not accidentally crouch–cancel should you still be holding down after your fast–falling or attempt to shine. Again, watch your spacing on the ground, especially once you decide to advance with a shuffled neutral– or down–aerial, making sure to overshoot when necessary to catch your opponent’s retreat. Do not forget that Peach has a significant chain throw with her up–throw on you; this runs from approximately 21 – 96% guaranteed (assuming no input mistakes, that is) on no DI, with an extension to 104 – 106% if the Peach can land a pivot grab. This is the main reason that Final Destination is best avoided when considering your ban and counterpick options. As you can see, the chain throw is quite damaging, and your opponent can finish this with either a neutral–aerial or an up–smash. Thankfully, DI’ing a finishing neutral–aerial is not too tall of an order in the slightest and can usually get you back on–stage, bruised and battered but still alive, or at the very least force your opponent to execute his or her edge–guard properly. DI’ing to the side prevents your opponent from landing the stronger up–smash follow–up, and you may be able to induce an error by DI’ing slightly behind your opponent. Peach’s crouch–cancel game is another significant force in this match–up thanks to both her grab and her down–smash. To that end, you must be conscious of how you perform your neutral–aerials (make sure to execute them later, or deeper into her character model, at low percents), and you should keep your down–aerial in mind as well (while also keeping in mind the possibility of Smash DI on your drill) along with your grab game. Remember that you can use your Blaster to damage Peach and reduce her crouch–cancel window.
As usual, you will need to be well versed in the use of your neutral–aerial in this match–up. Should you connect at a relatively low percent and your opponent does not crouch–cancel, you can follow with an up–tilt that sets up very nicely for an up–aerial or two. The same follow–up can be performed if you graze your opponent with a neutral–aerial at higher percents (that is, you connect with the “soft” hit instead of the “hard” sweet–spotted hit) or if they DI your neutral–aerial upwards and inwards in an attempt to survive at higher percents. At middle percents, you may be able to chain a few shuffled neutral–aerials on the Peach player, depending on his or her DI, a solid and simple means of tacking on damage. Somewhat higher percents combined with Peach’s own physics allow you to follow a connected neutral–aerial with a running jump–canceled up–smash or an up–aerial, often for the stock. At still higher percents, you may even be able to find a use for Fox’s often–neglected forward–aerial (or its first hit, at least) as a substitute for the neutral–aerial once the neutral–aerial’s knockback and Peach’s damage disallow any kind of real follow–up; simply shuffle the forward–aerial and connect with its very first hit, which will allow you to follow with your jump–canceled running up–smash. Needless to say, you should avoid using the forward–aerial at all but the highest percents; it does not L–cancel or stun nearly as well as any of Fox’s other aerials, and you will be punished for using this rather situational move incorrectly.
Your throws lose some of their effectiveness in this match–up thanks mainly to Peach’s floatiness; this allows her to float or neutral–aerial out of your throws at certain percents. At low and middle percents, should you land a grab (most likely from a baited down–smash or out of a waveshine), your usual up–throw to up–aerial routine may be able to net you an admirable amount of damage. However, you will find that Fox will begin to throw Peach too high at higher percents to allow any such follow–up. This of course does not discount the possibility of your following her through the air and forcing her into a position where you can connect with an aerial. For example, you can bait her to air–dodge and follow her descent either with an up–aerial or an up–smash as she nears the ground (with the up–smash, however, be sure to activate it when you are sure that your victim is in the effective area of the attack, that is, not on the outermost perimeter of the circle created by Fox as he performs the attack). At higher percents, begin to switch out the up–throw for a heavier emphasis on your waveshine openers to a lethal up–smash. You can also try mixing in a down–throw here and there to set up a tech chase opportunity should you notice a pattern to your foe’s techs.
If you prefer, you can take a more defensive stance in this match–up, attempting to lure Peach in with SHL or SHDL blaster fire and looking for openings, usually most obvious once she misses a down–smash from a float–canceled aerial. Such a tactic is especially troublesome for your opponent on Dream Land as you have more than enough room along with platforms on that stage to maintain your keep–away game for quite some time while also prodding for openings. As you would with any other opponent when taking the defensive route, make certain not to allow the Peach player to advance too far into your own “territory,” so to speak; you will need to control the space around you so that Peach cannot create easy openings with a turnip, dash attack, or float cancel while following your retreat. Punish shielded dash attacks with your up–smash from shield at high percents, or take the opportunity to start a shine combo with a shuffled drill from shield if you still need to tack on damage. Generally, you will likely need to play defensively for a good portion of the match. Peach’s aerials, priority, crouch–cancel game, and float–canceling make her into a veritable fortress around which you must carefully and skillfully dance. As well, she can fence you in at the ledge with her FC aerial pressure, particularly her long–lasting and high–priority FC’ed back–aerial, the hitbox of which lasts from frames 6 – 22. Fortunately, your blaster fire can safely add on the damage needed to take Peach out of her crouch–cancel counter percents, enabling a greater degree of your offense and punishment game.
You will quickly find that you will need to take advantage of each and every opening that Peach creates to keep pace with her punishment game. She is not the slowest of opponents, especially with her float–canceling factored in, and she does possess the tools to punish your mistakes severely, especially if you are prone to crouch–canceling. You will need to train yourself to avoid intentional crouch–canceling in all but the most opportune of moments against the princess, a few examples of which can be seen in some of the videos provided in the media section; when used well, it could earn you an up–smash kill, but it may also allow the Peach player to rack up a good 50+% on you with a single down–smash, which could very well then throw you off the stage and hand a stock to your opponent with the subsequent edge–guarding. This is also an excellent reason not to jump hastily at a Peach when she is on a platform above you, besides the fact that her legs are invincible on frames 3 – 24 of the 39–frame move; if she calls your jump with a down–smash, you will take heavy damage. Note that you can also wait to bait this out of your opponent and then safely punish afterwards. In light of the power of Peach’s down–smash and its tendency to deplete your shield to the point that the attack either snipes your feet or breaks your shield outright, you should heavily consider implementing light–shielding into your game; this will allow you to escape the smash’s inherent shield pressure and reset the encounter without suffering a hit each and every time that Peach connects with your shield.
On the topic of shielding, you must be especially careful to stay out of your shield during confrontations whenever possible. Thanks to the interplay of Peach’s float–cancel, her first jab (which hits on frame 2), her down–smash, and her grab, she has a number of options and mix–ups on your shield that could lead to any number of disadvantageous situations on your end. For example, if your opponent FC forward–aerials your shield, he or she can jab you out of your response if you try to jump or wavedash out, setting you up for a grab. If you opt to stay in shield, he or she can FC the aerial into a down–smash to wear down, break, or poke your shield. Your foe can also go right into a grab out of Peach’s float–canceled aerial if he or she is feeling particularly secure in his or her read on your choice of options. Toggling to light shield in combination with shield DI away from Peach will keep you safe from shield pokes while pushing you safely out of the pressure. It may also push you out of range of an in–place grab, forcing Peach to spend a bit of time moving forward to snag you. Note that you can then wavedash or buffered roll out of the shield to reset the situation. However, keep in mind that the most significant advantage of the light shield, that is, pushing you out of pressure, also can act as a downside in that you will not be in as strong a position to take advantage of your opponent’s execution mistakes or predictability on their mix–ups.
The aggressive Fox must be careful in this match–up and must have a very strong backing of technical ability. Against a character who can chain–throw you for quite some time and where an incorrect shuffle or missed shine can often lead into a devastating down–smash, you must expect no less of yourself. If you do choose to go the aggressive route, make certain that you know how to apply pressure continuously to Peach and not allow her to escape from your onslaught. Keep just enough space between you two such that Peach cannot comfortably begin her turnip game but also not so close that she can easily charge into you with a dash attack. As always, be wary of her reverse wavedashes to space out your approach, and know that you must adjust your own offensive spacing as appropriate to avoid being punished. You should also be keenly aware of the princess’s neutral–aerial counterattack; because this move is quite fast (its hitbox starts on frame 3, a single frame faster than yours), Peach can catch you out of the air with it if you hit her at lower percents and remain within her range before landing. If Peach hunkers down in her shield, make sure to space and time your aerials well such that a neutral–aerial counterattack does not swat you away. The princess can also make use of her up–B out of shield, a more situational option but nevertheless a viable one thanks to the up–B’s frame 6 hitboxes around Peach’s head; as with Samus, if you can predict this option, you can make your opponent pay dearly with an out–of–shield option of your own. If the Peach goes on the offensive, watch for her common follow–ups from FC’ed aerials (most commonly her forward–aerial, but also her back–aerial when the situation presents itself), which include quick slap set–ups and down–smashes. Again, you should not underestimate the sheer speed of Peach’s initial jab (or slap, as it were). This move is indeed among the fastest moves in the game with a hitbox at frame 2; as such, it does a wonderful job of disrupting your technical game or slowing you down just long enough for Peach to pull off a grab or down–smash. As well, be aware that more experienced Peach players will begin grabbing after float–canceling an aerial into your shield if you tend to hold your shield past the aerial in anticipation of the slap.
Your follow–ups to successful grounded shines in this match–up should consist largely of repeated waveshines (preferred over repeated drillshines due to the complicating factor of Smash DI) into an up–smash for a vertical kill, generally your most efficient means of finishing Peach’s stocks. Take care with jabbing after your aerials in this match–up; Peach, despite her floatiness, does have a potent crouch–cancel counter game thanks in no small part to her down–smash (making attempts to shine after a Jab as a “safety” move especially dangerous) and her down–tilt, which could set you up for any number of things that the Peach has in mind. Be consistent in your follow–ups, and do not run into her shield should you sense your technical game slipping in the least. Indeed, you should always be wary of connecting with Peach’s shield at all; her neutral–aerial’s sheer speed (remember, its hitbox starts at frame 3) and priority grant her a potent shield escape option that can simultaneously stuff any approach that you make from above her head, and she can also FC both her neutral– and forward–aerials out of her shield for a startlingly fast counterattack if she shields a laggier move, such as a hasty up–smash. If you are grabbed, at least make sure that you DI Peach’s finishing aerial correctly to give yourself a better chance at returning with your stock still marginally intact or that you DI onto a platform, if available, to cut off the chain grab.
As with all match–ups, be careful when playing around the ledge with Peach. Between her down–smash, down–tilt, turnips, and float–canceling ability, she has more than enough tools to send you to an early demise. Peaches are especially fond of FC’ing a forward–aerial right at the edge in order to hit just a bit below the stage and snipe you out of what you initially thought was a sweet–spotted recovery. If you choose the wrong position to charge a Fire Fox, Peach can simply float off–stage and finish you with a neutral–, back–, or forward–aerial. As well, more devious Peach players will float right below the ledge and wait for your Illusion there with a neutral–aerial. Furthermore, should she be armed with a turnip, Peach can snipe you out of the air and then float into a neutral–aerial to finish you off. Another common tactic employed by the princess is to float just over the ledge and catch your recovery with her down–aerial, a long–lasting move with four separate sets of hitboxes; if you fail to DI this attack downwards and away, Peach can lift you up into a neutral–aerial. It is important to keep in mind that if you are able to recover to a top platform, you can make matters more difficult for the relatively immobile Peach as she has trouble reacting to such a tactic in time.
On the flipside, you generally cannot be nearly as ambitious or aggressive with your edge–guarding. To start you should be focusing play on the center of the stage with a healthy dose of blaster fire. Furthermore, edge–guarding is not your primary means of killing Peach; your vertical KO’ing prowess usually surpasses anything that you could hope to accomplish via edge–guarding. That said, Peach’s recovery does have some weaknesses that you can abuse. For example, if you can force Peach to up–B just slightly above the level of the stage, you can quite often shine her from below (her up–B loses the hitbox on her body as she nears the top of its trajectory) or down–smash her and force her just low enough that she cannot grab the ledge. Keep in mind that her parasol can grab the ledge for her as well; as such, when you edge–hog Peach, make sure that you roll up from the ledge so that you are still “grabbing” the edge while Peach is within distance of it. Keep in mind that the princess can repeatedly open and close her parasol, allowing her to manipulate her recovery angles using fast–falls along with her horizontal aerial mobility. She can also make use of this ability during the on–stage game, dragging you down into a down–smash by capitalizing on your fast–falling physics, although the opportunities for this type of combo are relatively few and far between. You should also make a mental note of when she has her double–jump; notice that her double–jump comes along with a prolonged, distinctive verbal cue that will clue you in as to when she does and does not have this option. Other than that, however, edge–guarding Peach largely consists of timing and spacing back–aerials well. While this is certainly not the most efficient means of killing Peach, it nevertheless can net you a KO or two at high percents or if your opponent misses his or her DI. As well, be aware that your opponent can float just out of range of your back–aerial but at a very enticing angle; this is an attempt to get you to commit to the aerial so that he or she is cleared to move in with a float–canceled forward–aerial and retake the stage. Be patient, and restrain yourself from recklessly throwing yourself off–stage at Peach. You should also notice that Peach does not have the option of an invincible waveland from the ledge after she grabs the ledge; thus you can often trap her at the ledge for quite some time and tack on percent simply by landing stray aerials.
Counterpicks
Pokemon Stadium: Generally your most powerful pick in this match–up, Stadium’s low ceiling once again comes to your aid by greatly improving your vertical lethality. Along with additional surfaces onto which you can recover and ledge–cancel your Illusions, the stage also provides enough room for you to maneuver around Peach without being forced to engage her near the ledge repeatedly. If the situation arises, you can also execute a wall–based infinite on this stage.
Yoshi’s Story: Again, low ceilings are your allies against the floaty princess; Yoshi’s Story is certainly no exception to this. This stage also possesses a central platform, improving your recovery prospects, along with side platforms for use in DI’ing onto out of chain grabs, ledge–canceling Illusions, or escaping corner pressure. The combination of Story’s low ceiling and small size favors an aggressive style of Fox play.
Bans/Strikes
Final Destination: Easily your ban and strike of choice against the princess, you should be well aware of Peach’s lengthy chain grab on you that is fully enabled by FD. The lack of platforms also restricts your mobility and recovery options, although the stage’s flat expanse does augment your waveshine game, especially in conjunction with its acceptable ceiling height.
Dream Land: Peaches make use of this stage’s high ceiling to improve their vertical survivability. However, as the fast and mobile Fox, you are far better equipped to take advantage of the main stage’s wide expanse and high platforms with your keep–away blaster game. Peach simply has no reliable answers to your superior speed here, especially in combination with the high top platform, and your incessant blaster fire somewhat mitigates her high ceiling advantage.
Fountain of Dreams: A high ceiling in combination with a design geared toward close–quarters combat means that Peach will live longer while being able to chase and catch you more effectively, not the best of situations for your space animal. As well, should the platform(s) disappear, Fountain then provides an FD–like landscape that Peach can exploit with her up–throw chain grab.
Fountain of Dreams: A high ceiling in combination with a design geared toward close–quarters combat means that Peach will live longer while being able to chase and catch you more effectively, not the best of situations for your space animal. As well, should the platform(s) disappear, Fountain then provides an FD–like landscape that Peach can exploit with her up–throw chain grab.
Media
Mango (Fox) vs. Armada – The Big House 4, Losers Semis: Note Mango’s frequent use of the back–aerial to contend with Armada’s high–priority aerial arsenal. He also takes great care to avoid Peach’s out–of–shield neutral–aerial counterattack in part by selective use of his shield and in part by moving around Armada in such a way as to avoid the attack’s unique trajectory. At 2:55, Mango demonstrates how to use shine spikes against Peach in conjunction with a timed edge–hog. The Fox player takes the Swedish Peach’s final first–game stock with a devastating drillshine series from one end of Battlefield to the other, showcasing the power of this option should the Fox be able to execute it; note especially how he DI’s himself during the drill such that Armada does not end up behind him but instead continues to be pushed forward. Throughout the set, Mango makes certain to stay mobile and out of his shield to the greatest extent possible, minimizing Armada’s opportunities for easy openings. On the Peach player’s end, you should pay attention to how he incorporates turnips, down–smashes, and strategically–positioned floating aerials to address Fox’s various recovery options. In particular, notice how Armada throws his turnips in such a way as to cover the faster Illusion option, giving him more time to react to any subsequent Fire Fox attempts.
Mango (Fox) vs. Armada – Kings of Cali 4, Grand Finals: Early on in the first set, note how Armada opts for grabs immediately after he hits Mango’s shield with an aerial, taking advantage of prolonged use of the shield in anticipation of further hits. At the start of his third stock, Mango takes heavy damage after Armada crouch–cancels his high falling back–aerial at 3%, stringing the resulting down–smash into a dash attack and up–aerial tech chases for 74%. At 5:52, the Peach player prods Fox’s shield with a back–aerial, prompting him to jump out and reading the shield escape with an up–aerial that leads to a forward–aerial finisher. Armada finishes game two of the second set with a turnip to knock Mango out of his charging up–B, forcing him to fall into the Swedish Peach’s neutral–aerial finisher. In the next game, Mango converts a number of soft–hit neutral–aerials into lethal up–smashes, made all the more powerful by Story’s low ceiling.
Leffen (Fox) vs. Armada – The Big House 4, Winners Semis: In contrast to Mango, Leffen employs a more laser–oriented game plan against the Swedish Peach, tacking on enough damage to reduce the viability of Armada’s crouch–cancel game. At the end of the first game, Leffen makes good use of an up–smash out of a crouch–cancel in a relatively safe situation where the Peach could not immediately follow up with a down–smash. At the end of the set’s second game, Leffen forces Armada into an air–dodge using an up–aerial, which he then follows up with a lethal up–smash.
Hax (Fox) vs. Armada – The Big House 4, Losers Quarters: The first game of this set showcases not only Peach’s ability to contain Fox by the ledge with her aerial priority and quick hitboxes but also how Fox should respond; as Scar points out, Hax does well to resist the urge to shield in such situations, keeping himself mobile and better able to seize opportunities to escape. Armada highlights Peach’s potent punishes against Fox throughout this set.
Hax (Fox) vs. Armada – Justice 4, Winners Finals: Hax makes use of effective off–stage shines in this set. Near the end of the first game, you can see an example of Armada neutral–aerialing out of Hax’s low–percent up–throw. Notice how Hax loses his last stock in the third game; by shining Armada out of the end of his neutral–aerial while Armada was still airborne, Hax inadvertently gave his opponent a chance to react due to the cut stun time caused by the shine pushing Armada into the ground.
Mew2King (Fox) vs. Armada: Mew2King opts for a defensive, SHL– and SHDL–heavy style in this tense SKTAR 3 losers semis match, adding significant amounts of damage to Armada while fishing for and executing far more deadly combos and up–throw follow–ups. Note how Armada chooses the smaller Battlefield as his counterpick rather than Dream Land as he so often does, recognizing that the larger stage and its higher platforms would prove troublesome in combination with M2K’s keep–away style and Fox’s superior speed.
Hax (Fox) vs. Armada – SKTAR 3, Winners Quarters: Like M2K, Hax plays a defensive style against the Swedish Peach in this set, complete with plenty of SHDL fire. Interestingly, Hax chooses to counterpick to Final Destination, and he does make some use of its long, flat terrain when chaining together various waveshine combos; however, Armada likewise exploits this same feature with Peach’s up–throw chain grab on the vulpine space animal.
7. Captain Falcon [ST7]
There is no question in the vast majority of experienced players’ minds that Fox does quite well against Falcon, and more than a little evidence exists to support this belief. As a fellow fast–faller, Falcon falls prey to a large assortment of aerial combos and juggling, both of which you have in spades. Furthermore, Falcon’s recovery is among the most predictable and easily–punished in the game, shine spike or otherwise. As if that were not enough, Falcon’s traction is absolutely perfect for your plethora of destructive shine combos, anything from the classic waveshine to up–smash to drillshine repetitions and even waveshines to down–smash. Your aerial arsenal, especially your neutral– and back–aerials, also gives Falcon fits as he has a difficult time successfully challenging these moves. Of course, this does not mean that you can declare this match–up a veritable auto–win; despite his shortcomings, Falcon does have his plusses in his speed, lethal forward–aerial (the Smash community’s beloved “knee”), comboing ability, and tech–chasing game. Know, however, that you as Fox nevertheless possess a notable upper hand on Falcon (so long as you play well, of course).
Ground play in the Fox vs. Falcon match–up amounts to much that is characteristic of each character. Falcon will make use of his lengthy dash–dance to grant himself mobility and fluidity; he can utilize this to anticipate and punish your approach or techs or to fool you into spot–dodging and punish you accordingly, most often with a jump–canceled grab to his tech–following game. Falcon’s wavedash is not the most significant in the game, but Falcon players nevertheless make use of it to attempt to retreat from an incoming advance, to space after an aerial, or to escape their shields more safely. Take note that your opponent will spend a good deal of time in his shield in this match–up should you apply a suitable amount of pressure; as such, you will need to deny him or her the safe shield escapes that he or she so desperately craves. If your adversary favors holding the shield for long periods of time, you can take advantage with a shine–grab followed by whichever throw will get Falcon off–stage or an up–throw to your follow–ups at lower–middle and higher percents. It is worth mentioning at this point that while Falcon is a fellow fast–faller, his greater weight causes your up–throw animation to last longer, allowing him to jump out of your up–throw follow–ups at low percents.
Most Falcons will opt for a down–aerial out of their shields as a hybrid escape and set–up option. Should this aerial connect when you are grounded, you will either be stunned for quite some time (as will occur at very, very low percents to the extent that Falcon can safely grab you), or you will be popped up into the air with quite a good deal of hit stun until either the Falcon connects with a knee at higher percents or starts a tech–chase off of a knockdown. It is this down–aerial out of shield that catches many inexperienced Foxes off–guard in this match–up and is also one of the main reasons why you must be careful when shining Falcon’s shield. Because of the nature of this move’s animation, Captain Falcon shrinks the size of his hurtbox when he draws up his legs at the aerial’s start, putting him out of range of your single–frame shine hitbox and allowing him to counter afterwards with the move’s relatively slow hitbox. This fact in combination with the timing cue provided by your shine is the reason why Falcon can so often down–aerial unaware Foxes out of his shield. As such, you must make sure to exploit every instance of shielding on your opponent’s end whenever possible by executing well–timed aerials and grabs and by not leaving yourself open by dash–dancing excessively within range of an out–of–shield option. If you do end up at the front of your opponent’s shield, you can shine–neutral–aerial to break down the shield and force a reaction, or you can shine–grab and go for a follow–up or edge–guard if you are near a ledge. If you can cross up Falcon’s shield or otherwise end up behind him, you should forego the shine as you will not need to worry about shield grabs and can instead time repeated aerials deep into the opposing shield to provoke an escape attempt. As well, by omitting shines in this position, you are better able to counter Falcon’s down–aerial out of shield by not providing the shine’s visual and timing cue. Furthermore, you should avoid shining and then wavedashing across your opponent’s shield (which gives him or her enough down time to down–aerial out of shield) or wavedashing out of the shine away from the front of the shield (this could allow your opponent to grab you out of the wavedash before you slide out of range, especially if you start the wavedash in close proximity to your opponent).
Be wary also of Falcon’s rather lengthy advance; thanks to his tremendous amount of horizontal momentum, his short–hop covers a good deal of distance, and he can oftentimes charge in with a shuffled neutral–aerial (his main form of approach) or knee when you least expect it. As a result, you need to monitor your spacing from Falcon continuously and try to anticipate when he will advance (assuming a rather defensive style on your part, of course). If he connects with a neutral–aerial, he can follow into a grab to lead into his tech–chasing game of jump–canceled grabs, down–aerials, and forward–B (the Raptor Boost), or he can follow into further aerials (including his versatile up–aerial) leading into a lethal knee finisher, especially if you should miss your tech upon landing. His forward–B can be especially problematic in that it can cover multiple tech options at once should Falcon position himself appropriately relative to your landing point. Note also that shield–grabbing the forward–B can be tricky as it seems to “auto–space” itself off of your shield; you can counteract this by shield DI’ing toward your opponent to push yourself within range to land your grab. Keep in mind that you can crouch–cancel Falcon’s neutral–aerial at low percents and punish him if he mis–spaces the aerial. As well, you should be aware that Falcon can space his neutral–aerial such that he hits you as your approaching neutral–aerial ends; in this situation, he essentially short–hops during his shuffle over the remainder of your aerial’s hitbox as you descend, catching you with his own aerial, if you do not start your neutral–aerial close enough to him.
Furthermore, thanks to his lightning–quick running speed, Falcon can very easily react to linear approaches (especially full–jumped approaching neutral–aerials), run away to space himself for a grab or aerial, and then return fire with his attack of choice; you will find that this is one of the racer’s primary means of breaking your momentum and seizing control of the match. Fortunately, this can very easily be prevented. One of the most straightforward solutions is first to remove approaching full–jump neutral–aerials from your general repertoire. Another is being mindful of Falcon’s possible routes of escape; this entails assessing the degree of your opponent’s stage control, which reflects how much ground he could conceivably use for his retreat. More aggressive Foxes will want to apply sufficient dash–dance and spaced neutral–aerial pressure with the aim of cutting off Falcon’s stage control and as a result lessening the viability of his escape options; this usually involves pushing Falcon nearly entirely to the edge of the stage, where he is more often than not forced to shield or jump to contend with the pressure of your shuffled neutral–aerials. From here, a simple aerial or grab will place Falcon in the perfect position to be edge–guarded for his stock. When making use of this stage control–oriented strategy, however, always be aware of opposing options that do not involve only running away, that is, more offensively–oriented mix–ups. For example, some Falcons will cut their retreat short with a surprise back– or down–aerial, either of which can net your foe a knockdown, opening you to the Captain’s tech–chasing game, or an immediate set–up for an up–aerial or knee. As well, something as simple as a neutral–aerial or a properly–timed shield can throw off your timing and again force you to forfeit control of the situation. All told, you simply cannot afford to give up your advantages in this match–up through something as easily prevented as getting grabbed from missed aerial approaches. Always remember that the seemingly insignificant amount of lag frames from your L–canceled neutral–aerial approaches is all that the speedy Falcon needs to poke holes in your gameplay. You are not, never have been, and never will be completely safe during any of your approaches, shuffling or otherwise.
A significant portion of maintaining your advantage in this match–up involves not falling prey to Falcon’s tech–chasing game, which is quite potent in itself and is far and away the core method by which he can build damage and take your stocks. This facet of the match–up involves a number of Falcon’s moves, particularly his neutral–, forward–, and down–aerials and his grab (note that he can safely re–grab you out of a tech chase on reaction to continue building percent). However, keep in mind that he can set up a tech–chase situation with any move that gets him a knockdown on you, including his back–aerial and his “gentleman” (the first three hits of his jab–jab–knee combo without the follow–up rapid punches). Most often, however, he will lead with his neutral–aerial into a grab. At upper–middle percents and up, if you miss your tech out of the Captain’s neutral– or back–aerials, he can land an easy knee on you. As well, be aware that Falcon can cover space after he misses a specific tech read by neutral–aerialing immediately afterwards; if you try to act during that time, you will run into your opponent’s move and essentially set yourself up for punishment. On the topic of the gentleman, if Falcon neutral–aerials your shield, you should not attempt to shield grab afterwards. Note that his neutral–aerial’s L–cancel cuts the lag down to 7 frames (the same as yours) and his initial jab hits on frame 3 (1 frame slower than yours), while your standing grab starts at frame 7; this in combination with proper spacing ensures that you either miss your grab entirely or that he intercepts you with the gentleman and potentially gets an easy knockdown opening.
It is thus especially important not to be predictable on the get–up and perhaps even more so to cease hitting buttons as you fall; if you constantly get up with an attack, you will find yourself eating more than your fair share of Falcon’s infamous knee. Vary the direction of your techs, and make sure to throw in some delayed get–ups and non–techs if you sense yourself becoming predictable or falling into your opponent’s rhythm. Remember that a predicted tech more often than not leads to Falcon’s usual knee finisher either directly or with a preceding set–up move such as his down–aerial or forward–B. If you find that your opponent is favoring re–grabs during the tech chase and is also standing too close to your in–tech position, you can shine after your tech to catch him before he grabs you if he is a bit slow with the follow–up; however, note that such in–place shines will be quite detrimental if your adversary opts instead for an aerial, especially a knee, which could send you plummeting downward off–stage if he catches you with downwards DI while you are trying to shine, or if he or she stands just out of range of your shine while waiting for the re–grab.
On the topic of DI’ing the knee, you should be aware that upwards DI will generally be the “survival” direction of choice as this will shorten the distance you are sent due to the resulting trajectory’s angle. However, this DI is not advisable when you are at high percents such that you will lose the stock as a direct result of the knee’s knockback; this is because even the “more favorable” knockback trajectory granted by upwards DI on this move will not prevent you from careening off into a blast zone. In such scenarios, if you are able to, it is generally preferred to DI downwards and attempt to tech the stage (of course, this assumes that you are still close enough to the stage’s surface when the knee connects that you can reach a solid surface in the first place).
If you stand up in place or if you see the Falcon dash–dancing right next to you, you must resist the impulse to spot–dodge; spot–dodging in such instances represents predictability on your part and can be punished (often lethally) by any number of his offensive options. Spot–dodging is generally a poor option at best in this match–up due to Falcon’s innate speed and the nature of his moves, especially his neutral– and down–aerials; protecting yourself and your space with a neutral–aerial is a far safer and far more efficacious option. Also keep in mind that the Captain need not read your tech to land a killing blow off of a grab at high percents; he can simply up–throw you and follow with a knee or forward–smash, for instance. If you can effectively fight your own predictability and dampen Falcon’s tech punishment game by minimizing his opportunities for grabs and knockdowns, you will remove his most powerful tools against you. Do not take his tech–following lightly as its success or failure will decide who takes the game; you do have a number of advantages in this match–up, but not to the extent that you can play stupidly and still hope to triumph (always keep this in mind against every opposing character, not just Falcon).
That said, you have more than a few lethal tools at your disposal to combat Captain Falcon; most of them focus on a sound technical game and a safe, mobile ground game. Yet again, you will need to be able to shine through shields here should you connect with the front of the racer’s shield; shield grabs open you to Falcon’s tech–chasing, a situation you would do well to avoid. Being able to punish shield–grabbing effectively also puts Falcon at the mercy of your shine combos, easily a major advantage you have over him. Indeed, your fast, high–priority shuffled neutral–aerial approach can force Falcon into his shield at the blink of an eye, so you will most certainly need to be able to contend with his shield game quite frequently. To that end, you must choose the moments at which you commit to an aerial well; account for both Falcon’s running speed and the amount of stage behind him when you decide to start a neutral–aerial such that he cannot simply dash–dance out of your approach’s range and come back in with a grab. In a similar line of thought, it is important when you have forced Falcon to the ledge not to position your neutral–aerial such that you reach the ledge with the end of the descending portion of the shuffle; this could cause you to miss your opponent with the move’s hitbox, giving him just enough free space to hop over you and simultaneously counter with a back– or down–aerial. If the down–aerial slams you into the ground and Falcon jab resets you at the ledge, you have a high chance of losing your stock outright to a knee unless you are at a low percent, in which case you will still be vulnerable to a successful edge–guard. As a side note, be aware that you can meteor–cancel Falcon’s down–aerial with the exception of the so–called “nipple spike,” which involves connecting with the highest of the move’s three hitboxes and results in a true spike (although implementing this is extraordinarily difficult).
During the neutral game, you can also make use of full–jump fade–away neutral–aerials; such an aerial cleaves through a great deal of Falcon’s options, including his own neutral–aerial, while keeping you safe with the fade–away to space out of your opponent’s range. Remember that your opponent will be leaving the ground repeatedly in some manner throughout the course of the match; as such, a neutral–aerial performed in this manner can catch him or her out of the start of a shuffle or a full–jump, putting the racer at your mercy. This tactic can also be used at the ledge to punish panic full–jumps meant to serve as an escape route from your pressure. While efficacious, it is possible for Falcon to space his neutral–aerial such that its second hit trades with your aerial; at the same time, however, this is much more difficult to time and execute properly than your simple fade–away neutral–aerial. Another important facet of the neutral game is to keep yourself either level with or below Falcon; if you play on platforms above him too frequently, a grounded Falcon can hound you from below with his up–aerials that could either shove you off–stage or lead directly into an off–stage knee. As well, as with all other match–ups, you cannot allow your opponent to pin you by the ledge with aerials; if needed, you can mix in run–in shields to throw off the Falcon’s timing or cancels and work your way in, but be wary as this does make you more vulnerable to a grab mix–up.
Your style in this match–up should be focused on precise, technical aggression, with a very heavy emphasis on proper offensive spacing and properly–executed shine combos to set up for lower–percentage edge–guarding. You should always be keeping pressure of some kind on Falcon lest you give him time to recuperate and buy time for an advance. While it is not impossible to utilize your SHL or SHDL in this match–up, you should do so only when a great distance separates the two of you; because of Falcon’s great speed and horizontal momentum as well as the fact that you lack a true hitbox during your blaster fire, using the SHL or SHDL too close to your opponent gives him or her a free opening. As such, rely on your bread–and–butter shuffled neutral–aerial as your preferred approach option due to its strong front–facing hitbox that can readily plow through Falcon’s aerials. Should it connect and successfully lift Falcon off the ground, string together more neutral–aerials as percentage and DI allows, finishing with up–tilts or grabs to back–aerials (the preferred option when near the ledge to set up for an edge–guard) or to up–smashes or up–aerials (the preferred option at high percents to take the stock efficiently). Indeed, the modern Fox’s play style against Falcon consists of a majority of neutral–aerials with a slight splash of shines (largely in response to connecting with a shield rather than with the intent of starting lengthy waveshine combos, although shine combos certainly do still make an appearance) and comparatively few down–aerials. Such sentiments are due to the fact that the single hit frame of your shine and the very slight amount of time spent wavedashing or jumping out of the shine are all that your opponent really needs to find an opening; as such, the constant pressure of properly–executed shuffled neutral–aerials, when combined with their general priority over Falcon’s moveset and your ability to run out of them immediately to space yourself for another volley, is your best choice for covering your enemy’s options while also keeping yourself relatively safe from counterattacks.
Should your neutral–aerial connect, you can follow up with anything from a grab to another neutral–aerial to an up–smash, depending upon opposing DI and percentage. The overarching idea here is not to force your approach with the idea that you are virtually invincible while advancing; on the contrary, you are anything but untouchable. Falcon’s speed and shuffle game allow him a multitude of options out of his shield, ranging from the knee to a down–, neutral–, or back–aerial, any one of which can cause or very quickly lead to your demise. As such, do not be reckless when Falcon shields. Keep up your shield pressure, but also be able to pick up on and predict shield escape options such as rolls, jumps, and aerials. Likewise, do not insist upon repeatedly pounding a shield with aerials if a simple grab will more than suffice (especially when you have your opponent cornered at the ledge). If you find yourself cornered, you can carve out some space for yourself with the help of your shuffled back–aerial, which beats Falcon’s aerials more reliably and cleanly than your neutral–aerial. Your up–tilt can be used in a similar regard. As usual, you generally must avoid full–jumping or rolling inward when at the ledge as Falcon can very easily cover each of these with his aerial arsenal and ground speed.
Of course, all of this is not to say that you cannot make use of your down–aerial to good effect in this match–up. Recall that this aerial is your main lead–in to your shine combos, which are particularly devastating to the high–traction Falcon. Your down–aerial can be especially useful as a reset option on platforms or as a tech–chase option to prep your adversary for a shine combo. Each of your connected shines can potentially lead into an up–smash (a preferred option when Falcon is at quite high percents), a jump–canceled grab (a good option in general to tack on damage via juggling but also useful when near the ledge), or a drillshine to set up for a series of waveshines to a down–smash finisher that forces Falcon below the stage, a prime position to exploit with your edge–guarding options. Your up–smashes can lead into further juggling, a back–aerial (obviously the aerial of choice when near the edge), or a neutral–aerial to keep the string going. If you have the technical prowess to perform repeated waveshines, you may want to make this your favored choice from a shine; not only can this inflict decent damage on Falcon, it also drags him closer to the edge where a timely down–smash or throw can get him off–stage and put him at the mercy of your shine and ledge–hopped back–aerials. Indeed, the down–smash should be your preferred attack out of a waveshine when near the ledge; the low angle of this attack forces your fast–falling foe to use his second jump and up–B to recover from below, a position from which he is far more easily edge–guarded, while prohibiting his use of the off–stage Falcon Kick to regain his second jump. Indeed, Falcon prefers to be hit high into the air thanks to his significant resistance to vertical kills; an up–smash out of a waveshine near the ledge is thus not the optimal choice as it gives Falcon the added maneuverability of being able to save his second jump (or regain it with his down–B) and use it to grab the ledge, a far safer course of action than recovering with the up–B below a waiting Fox.
Edge–guarding Falcon is not one of the most difficult endeavors, and it allows you to steal stocks quite easily from the unlucky racer. You will find that Falcon in fact has excellent vertical longevity; as such, you should focus on taking stocks via edge–guarding and setting up such situations to prevent your opponent from extending his or her stocks and thus being able to prod for additional potentially lethal openings and mistakes on your end. You have all manner of tools from which to choose for your edge game, ranging from your down– and forward–smashes to your shine and back–aerial (especially from the ledge), but remember that any option that sends Falcon downwards will generally be preferable to one that sends him upwards. A single shine connected off–stage likely will translate to a lost stock for Falcon, but be aware that he can fend you off with his useful up–aerial out of a double–jump. Also be aware that he can double–jump into a knee such that he covers his jump to the ledge, that is, his knee will end just as he is able to grab the ledge. If Falcon is approaching the stage from above, he may also attempt to keep you at bay with a descending knee, so take care not to jump absent–mindedly into it; fortunately, your back–aerial does an excellent job of controlling air space in general, especially when you have the rest of the stage behind you as an insurance policy. On the topic of your back–aerial, keep in mind that you can run off and shine–turn into a back–aerial to catch Falcon out of the air should he attempt to double–jump back to the ledge while too close to the stage. As well, this maneuver has the added bonus of stuffing or trading with any defensive aerials your opponent tosses out while attempting to return. Furthermore, it also provides a long–lasting hitbox that either sends your opponent a good distance away from the stage (with a sweet–spot) or puts him or her in stun just long enough for you to retake your on–stage position and continue the edge–guard (with a sour–spot). While the racer is quite vulnerable while falling after an up–B, you must be aware that he possesses a great deal of horizontal maneuverability during his descent; he can use this aerial mobility to swerve out of range of your attacks and also to make you miss a ledge–dropped back–aerial, so his recovery is not entirely freely punished in this regard. Generally, though, you can simply wait and punish Falcon appropriately as he approaches the stage from above regardless of his chosen option thanks to your speed and back–aerial. Depending on your level of confidence in your spacing, you can also actively pursue Falcon off–stage with your back–aerials when he is above the level of the stage. Of course, he can also ledge–tech your lower–altitude edge–guards, yet another option of which to be aware when you see your adversary move into a sweet–spot position; this makes the shine an even more attractive option against the Captain’s recovery from below. Note that, like Ganondorf, Falcon’s up–B cannot grab you when you are hanging from the ledge; however, it can grab you if you drop from the ledge, as you would when attempting to time a back–aerial, although this is only a concern if you mistime your edge–guarding option. Because of this property of Falcon’s up–B, you can opt to edge–guard him in a manner somewhat similar to Sheik, depending upon the position at which his controller activates this recovery move, by holding the ledge and forcing him to recover onto the stage. This keeps you safe from any “stage spikes” caused by mistiming a punish on a recovery from below the stage while still giving you the time to punish out of a ledge–dash or below–100% stand–up from the ledge. However, keep in mind that your opponent will regain his or her double–jump should you be unable to intercept the recovery before the racer lands on–stage; that said, this downside is less pronounced at high percents, where an up–smash will finish the stock regardless.
A Falcon who has grabbed the ledge will often come up with a ledge–hopped up–, neutral–, or forward–aerial, all of which possess startling speed and, for the forward–aerial, lethal power. The knee from the ledge is a particularly desirable option when Falcon is doing the edge–guarding as it almost guarantees a kill when reversed at the ledge. If your opponent becomes predictable in terms of his ledge return, you can punish with a reverse wavedash to a grab or neutral–aerial. Keep in mind that many players will buffer a roll after these options as a means of working their way inwards while cornering you against the ledge should you fail to react in time; this too can be predicted and punished accordingly. Falcon also has an excellent waveland from the ledge that he can execute with the associated invincibility frames; this in combination with his speed allows him to retake the stage quickly and safely should he manage to grab the ledge. He can also fake you out and make you flinch by jumping inwards from the ledge but then wavelanding back to the ledge; if you throw out a foolhardy laggy move during this time, he can then waveland onto the stage and punish you as he sees fit.
Falcon of course has his own tools for edge–guarding you. One of these is his down–tilt, which can catch you out of your Illusion and set you up for a lethal knee, as well as his up–tilt, which is fast enough to punish sloppy recoveries with a horrendous knockback angle that is not particularly responsive to good DI while still giving him time to react to your next move. His back–aerial also figures prominently into his edge–guarding game. He can also use his first jump to short–hop off–stage with a non–fast–fallen knee, which covers a number of timing windows for your Illusion, and then jump back onto the stage with an up–aerial to cover later windows. Should you land on–stage from an Illusion within his range, expect to eat a knee; in this regard, you will find shortening and ledge–canceling your Illusion to be most helpful. Falcon can also combo you off–stage and finish with an off–stage up–aerial or knee; such strings are possible when you repeatedly survival DI inwards. When returning, take care not to jump hastily into an incoming aerial or tilt. Your opponent may also try to trick you during your get–up from ledge by delaying his descent long enough for a falling knee to crunch into you. As well, you must be careful about where you position yourself for your Fire Fox or your Illusion; if you are predictable in this regard (or simply too close to the stage), Falcon can jump off–stage and knock you out of the air with an up–aerial or even a knee. Similarly, if you are predictable in positioning your recoveries further away from the stage, a soft–hit knee will be all that the Captain requires to take your stock. Falcon can also place his knee from the ledge such that it sends you in the reverse direction, that is, in the direction with the nearest blast zone; this situation arises when you attempt to land onto the stage near the ledge and is a very common means of finishing an edge–guard in this match–up. All told, this match–up, like all others, rewards you for maintaining your unpredictability both on– and off–stage as well as for being able to tech hits at the ledge.
Counterpicks
Fountain of Dreams: Traditionally considered a horrendous stage for Falcon, this is likely to be your opponent’s choice for a stage ban in the set. Its design and platform structure favor close–quarters combat and gimp Falcon’s maneuverability, forcing him to confront your high–speed, high–priority aerial arsenal and edge–guarding game far more often than he would like. The higher ceiling means little against Fox as the space animal has more than enough tools to end Falcon’s stocks via edge–guarding alone.
Yoshi’s Story: Story is similar to Fountain with regard to its smaller size forcing more frequent bouts of close–quarters combat but with the added bonus of a lower ceiling. However, the close side blast zones do improve Falcon’s horizontal kills, most notably stemming from his knee.
Pokemon Stadium: The ever–present Stadium gives you space along with a lower ceiling to improve your vertical kills against Falcon somewhat (although they are still generally not preferred to the lower–percent kills you can get at the ledge). Note also the temporary walls that enable your wall–based shine infinites should you catch your opponent in that most unfortunate of positions.
Final Destination: Once considered a solid Falcon stage, Final Destination has since begun to favor Fox somewhat thanks to the improved punishment game of the modern vulpine space animal. Without platforms onto which to escape, the Captain is at a severe disadvantage should you corner him by the ledge or catch him out of the air. Your up–throw combos also receive a boost. Similarly, he is forced to confront you head–on at all times, making your aerial game all the more potent, especially in the case of a successful down–aerial to start off a series of waveshines to the ledge and subsequent edge–guarding. That said, FD does provide Falcon with a good deal of room, and he can punish you all the same should you miss an approach. As well, you will need to keep yourself as grounded as possible for as long as possible as Falcon’s running speed grants him the ability to meet you at your landing position with an aerial or grab.
Ban/Strike
Dream Land: Falcon prefers stages with plenty of room to roam where he himself cannot be readily cornered at the ledge along with far–off blast zones to augment his vertical survivability and recovery in combination with proper DI. Dream Land grants both of these wishes, and the fact that his own speed dilutes your defensive keep–away game here makes it all the more beneficial for the racer.
Media
Leffen (Fox) vs. Gravy: At around 0:23, note how Leffen utilizes a shuffled back–aerial to defuse Gravy’s neutral–aerial pressure. Throughout the set, you can see how Falcon struggles against Fox’s well–spaced aerials and how damaging the space animal’s combos can be against him, shine–based or otherwise. In the first game, Leffen strings together an impressive series of aerials and up–tilts across Battlefield’s platforms, making sure not to reflexively shine in order to maintain the combo. He also uses the shine to break up Gravy’s re–grab tech chase. At 4:13, Gravy executes a ledge–hop reverse knee as Leffen descends to the stage out of his up–B, taking that stock handily. Starting at 5:10, the Swedish Fox player links a number of up–aerials together by timing them such that only the second hit connects, ensuring that Smash DI does not interfere with the combo. Overall, you should notice how Leffen stays as grounded as possible, going to the platforms generally only to continue a combo or to avoid Gravy’s re–spawn invincibility with the aid of a light shield on the top platform.
Lucky (Fox) vs. Gahtzu: Lucky starts this Big House 4 set off with a rocky performance in game one; Gahtzu punishes him with knees for spot–dodges as well as missed techs, sending the fast–falling Fox to his doom. The set’s final game shows Falcon’s longevity on Dream Land when he is hit by moves with a strong vertical component. Notice also how Gahtzu uses Falcon’s back–aerial to attempt a counterattack out of his retreats.
Mango (Fox) vs. Wizzrobe: On Mango’s first stock of the set, notice how Wizzrobe punishes him for going into a waveshine around Falcon’s shield; the down time is just long enough for Wizzrobe to connect with a knee. At 0:16, Mango is slow to escape his shine, allowing Wizzrobe to land a grab and convert the resulting tech chase (which incorporates a forward–B for greater option coverage) into a lethal knee. As well, Mango makes use of the shine–grab to take advantage of the Falcon player’s shields.
Lucky (Fox) vs. S2J – Super Smash Sundays #23, Winners Semis: In the set’s first game, Lucky makes good use of Fox’s down–smash to exploit the nature of Falcon’s recovery and efficiently remove stocks. At 2:32, you can see an example of the dangers of waveshining across Falcon; S2J gains just enough lag time from the wavedash to squeeze in a down–aerial. Also of note is Lucky’s DI on the back–aerial at 2:57 and the up–aerial at around 3:00; his DI has just enough of each component (vertical and horizontal) to prevent easy follow–ups without killing Lucky directly (which would occur with excess horizontal DI) or setting up for a knee or up–aerial (which would occur with excess vertical DI). Pay particular attention to Lucky’s last stock in the first game. To start, a neutral–aerial high on S2J’s shield gives him an opening via a shield grab. Then, after being read with a down–aerial, Lucky reflexively shines, hoping to catch S2J’s re–grab attempt in time; however, the Falcon player positions himself just out of range of the shine but still close enough to land another grab and take it from there.
Lucky (Fox) vs. S2J – Super Smash Sundays #23, Grand Finals: Early in the set, you can see how attempting to shield grab Falcon after a neutral–aerial results in an knockdown situation thanks to his gentleman. In the first game of the second set, Lucky begins punishing S2J’s down–aerials out of shield with up–tilts, which easily beat the much slower down–aerial. In the third game of the second set, note how Lucky opts to up–smash out of the waveshine ending near the ledge rather than a down–smash; this was due to S2J’s relatively low percent, which would have allowed him to double–jump to the ledge safely before Lucky could set up an edge–guard.
Lucky (Fox) vs. S2J – Super Smash Sundays #20, Winners Finals: S2J showcases Falcon’s brutal tech chase game in this set. On Lucky’s end, the Fox player highlights the space animal’s powerful punish game and waveshine combos on Final Destination.
Kels (Fox) vs. Darkrain: The first game of this set contains a number of situations where Darkrain’s gentleman intercepts Kels’ attempted action. Darkrain also does well in escaping follow–ups after a neutral–aerial shine lead–in. At around 3:18, Darkrain is able to land a down–aerial out of shield after Kels hits his shield with a high–lag forward–aerial and then attempts to follow up with a jab, whose small hitbox misses Falcon’s now–shrunken down–aerial hurtbox. At 7:50, Darkrain is able to land a shield grab after crouch–canceling Kels’ high, low–percent back–aerial and grabbing Kels out of his attempted inward waveshine. Throughout the first set, you should notice the multiple shine spikes that the Fox player lands, some of which follow after he clips Falcon’s double–jump with a back–aerial. At 8:58, Darkrain jumps over Kels’ get–up shine with the help of the down–aerial’s shrunken hurtbox. You should also notice a number of situations wherein Kels crosses up Darkrain’s shield with a neutral–aerial (importantly, without going into a waveshine) and then times a back–aerial that catches the Falcon player’s down–aerial out of his shield.
Hax (Fox) vs. SilentSpectre: In this second–round pools set, Hax abuses the speed and priority advantages Fox holds over Falcon with his up–tilt, neutral–aerial, and back–aerial. Note also how the Fox player is careful to space himself such that he avoids the Captain’s own neutral–aerial, using the window created by the missed aerial to launch his own counterattack. Another important point is how quickly spot–dodging can get you into trouble in this match–up; for instance, Hax forfeits his second–to–last stock in the first game by making himself vulnerable to SilentSpectre’s knee with a flinch spot–dodge.
SFAT (Fox) vs. Hax: SFAT’s drill– and waveshine–based punishes net him large chunks of percent in the first game of this Big House 3 losers quarterfinals set. He also demonstrates Fox’s capabilities on Final Destination and focuses throughout the set on efficient, simple edge–guards consisting of back–aerials, down–smashes, and shines.
8. Ice Climbers [ST8]
Once considered only above–average characters relatively early in Melee’s competitive life, the Ice Climbers have since seen a revolution in their level of play and in their overall metagame. With a unique double shield defense, powerful and efficient smashes and aerials, good longevity (for the most part), a speedy means of getting around, and a myriad of lethal grab combos, the IC’s have become one of the most powerful characters in the game, especially when in the right hands. Be wary in this match–up as even seemingly innocuous, minute mistakes can end up costing you entire stocks. Both Fox and the IC’s can do horrendous things to each other in rather short order; as such, the match hinges largely on which player can successfully and consistently execute his or her main punishes. For you, this involves heavy use of your shine and efficiently killing Nana at every available opportunity. For your opponent, this involves landing and executing extended desynch grab combos.
Successfully taking on an experienced IC’s player requires some preparation ahead of time on your part. You absolutely must be acquainted with perfectly shuffling through double shields and into your follow–ups each and every time. Some time spent in Training Mode practicing on a Starman–toting IC’s computer will save you much aggravation later on and will prevent you from giving your opponent far too many easy openings by such easy means as a shield grab, which in this match–up can very well mean the loss of a stock or, at the very least, a significant chunk of damage. You can also simulate shields outside of Training Mode with a damage ratio of 0.5 and a maximum handicap setting for the Climbers. Take time to practice shuffling through unshielded IC’s as well because the double connected hits of your neutral–aerial in particular will alter the timing of the shuffle itself. Another means of coping with the Climbers’ double shield defense involves delaying your lead–in aerial such that it hits the center part (or lower) of the shield; indeed, if you hit any shield too high, you risk letting your opponent out of shield stun before you can act again, which opens you to shield grabs. Once you get your shuffles and associated follow–ups well under your fingers, you can begin to focus on the more detail–oriented aspects of the match.
A battle with a well–versed Ice Climbers player can involve far more effort than you may at first think. Chances are that your opponent will adopt a rather defensive stance given the Climbers’ move set in relation to yours, making use of wavedashes out of their double shield to maneuver about the arena and to throw off your aerial– and ground–based spacing; this is precisely why you must have shuffling through double shields well under your fingers. Keep in mind that grabbing the IC’s, though very much possible, is not exactly the wisest course of action; for example, you may end up grabbing the partner instead of the lead Climber, inadvertently opening yourself to your opponent, or you may succeed in grabbing the lead IC and eat a Smash or grab from the remaining one (remember that your opponent still controls the other Climber when the two are in close proximity), which will be all the more painful if you are caught without suitable DI. As such, you will need to maneuver yourself in such a manner as to cut off the Climbers’ route of escape. Try to pin them against the ledge and to connect a shine there to take control of the match. If you are having trouble getting the correct spacing relative to the IC’s due to their wavedashing, simply force them to you with your blaster fire; as you do so, however, be wary of a deceptively quick wavedash forward, usually into a jab to slow you down just long enough for a down–smash or grab to connect. The Climbers can also wavedash into an up–tilt, the multiple hits of which can tack on a sizeable chunk of damage should you miss your DI. Furthermore, be wary of the Climbers’ back–aerial; it auto–cancels, providing them with a safe advancing option as well as the option to trick you with a false timing window by spacing a back–aerial on your shield and then down– or forward–smashing you out of the shield escape that you erroneously thought would allow you to punish the move’s virtually nonexistent landing lag. The IC’s can also opt to approach with a shuffled forward–aerial; if this connects, chances are that you will slam into the floor and miss your tech, setting up for a down–smash. It is important to remember to DI down–smashes upwards and forward–smashes upwards and against. However, if you can force your opponent to retreat back into his shields, you may be able to score a separating hit or shine on the secondary Climber before his or her shield activates; note that there is a six–frame lag period between when the lead Climber performs a move or option of some sort and when the secondary Climber executes it.
Your approach in this match–up must be more cautious than usual thanks in no small part to the ever–present threat of lethal grab combos. Remember that the Ice Climbers’ lengthy wavedash grants them a deceptively high rate of speed on the ground. This quick means of transportation also allows your opponent to react easily to your spacing relative to him, a particularly important attribute when you are attempting to close in while searching for an opening. It is for this reason that you should generally minimize your full–jumping in the neutral game; full–jumps, especially when paired with missed aerials (especially your back–aerial), will give your opponent just enough time to wavedash or dash–dance into your space and connect with a down–smash, dash attack, grab, or a read of your jump with a back–aerial, any of which could lead to your early demise. Always remember to use your falling back–aerials sparingly and safely (for example, when you have your adversary backed up against the ledge such that his movement options are constrained) as an open–field miss during the neutral game will almost certainly open you to your foe for just the amount of time that he or she needs. If your opponent does make you flinch with a full–jump, make sure to DI your fall in relation to your opponent so as not to fall prey to a spaced down–smash or grab on the ground below you; wavelanding is quite useful in this regard as it may give you just enough distance to dodge an incoming attack or grab (but be wary of continuing to hold away lest you be hit with horrendous DI). While it is important to have some measure of caution about full–jumping, do not forget that you can make use of full–jump–in shines followed by a jump–cancel to waveland onto a platform; when you choose your angles correctly, this maneuver allows you to prod for openings without committing to an aerial or landing in the general vicinity of your opponent. Nevertheless, the Climbers do have some means of anti–aerial defense in their up–aerial and up–tilt; be wary of both of these options, particularly the up–tilt as it can lead into a grab or a down–smash, and use your full–jumps and aerials wisely and in combination with platforms whenever possible. Your full–jumps can be a useful tool against the Climbers as they would prefer to play an entirely ground–based game given the chance, but you cannot jump or land carelessly all the same.
Your goal during your approach is to get the IC’s off of their wavedashing feet and into your control in some manner, either by forcing them into the air or off the stage. You will achieve this latter goal most effectively through your shine, with which you can force your opponent off–stage as well as separate the Climbers. Note here for future reference that use of the jab as a follow–up should be minimized against the IC’s at all but the highest percents (and even more so when the Climbers are together); their crouch–cancel counter game is very powerful given their grab game and their down–smash. Note that even a lone IC can do some damage off of a crouch–cancel down–smash or a grab into a down–smash tech–chase. Thus, to reiterate, the shine is your key to victory in this match–up. You must know how to connect your shine and how best to follow it up, preferably in such a manner as to remove the partner IC or to kill the lead one all at once, a feat not all that uncommon for a smart and well–versed Fox. For example, you can perform run–in shines with the aid of dash–canceling or jumping and then immediately shining, followed by a wavedash or short–hop out; pressuring your opponent in this manner may allow you to connect an easy shine without the need of an aerial attack approach or the subsequent worry of correctly L–canceling and also keeps your opponent guessing as to whether or not you will commit to an aerial in the first place. Be cognizant of this maneuver’s low range as well as adjustments made on your opponent’s part to swat you away before you close the gap.
If your opponent is not favoring his shields excessively (or if you are confident in your ability to L–cancel your down–aerial through one to two shields, depending on whether or not you space your aerial such that you hit the other shield), you can make use of your down–aerial at low and middle percents to land a shine free of the worry of crouch–canceling. If your opponent continues to hold his shield when you are at his back, you can continue to pressure his shield with shine–aerials; note, however that the Climbers’ up–aerial is quite effective at combating your full–jump drill, so you should shuffle these aerials rather than full–jumping them. Always keep in mind that you can DI yourself during your drill such that you land between the IC’s; this causes your follow–up shine to send the Climbers in opposite directions, giving you an opportunity to force the partner IC off the stage and end his or her “stock” with a quick shine or back–aerial out of his or her second jump (you will notice that the percentage displayed on the screen reflects that of only the lead Ice Climber; you cannot know the partner’s damage, although it still accumulates and affects the character in the same manner as any other combatant). While you do hold a decided advantage in this situation, always make sure to watch your back and avoid laggy Smash attacks as the lead IC will do his best to defend his partner; if you are not careful, you could inadvertently leave yourself open to a grab or a poorly–DI’d down–smash. If you can, knock the other Climber away in some manner to give yourself some breathing room and make going off stage for the finishing shine or aerial on the secondary IC safer.
Making use of platforms is yet another way that you can control the flow of the match quite convincingly (and also is precisely the reason why the IC’s so adore Final Destination). While the Climbers command a great deal of speed and mobility on long, flat surfaces, these attributes are significantly hampered on small platforms. They also lack the means to attack a platform position safely without taking themselves off the ground or separating themselves. As such, playing patiently around platforms, including properly spacing yourself so as to cut down on the Ice Climbers’ aerial options (notably their up– and back–aerials), and baiting your opponent into jumping up to attack you can have a tremendous impact on the match. Your overall superior speed allows you subsequently to position yourself below your foe, where you can pelt him with up– and back–aerials while keeping yourself safe from grabs. Keeping yourself mobile while on platforms also gives you a potent answer to your opponent’s re–spawn invincibility. Overall, the message here is that you should always remember to take advantage of a stage’s architecture for your gain and your opponent’s loss, especially when facing a character with such limitations as the IC’s.
Once you have connected with shines and aerials such that the low–traction Climbers are knocked off–stage, you can then proceed to take control of the match. It is common knowledge that the IC’s are most powerful when both are in action; their moves’ strength is effectively doubled, and they also have access to their impressive repertoire of lethal grab combos, which can go from 0% to death if you are not smart about dealing with or avoiding them. As such, your goal against the IC’s is to kill the secondary Climber whenever possible and at the earliest opportunity; this robs your opponent of his or her dangerous grab combos. The best tool to accomplish this task is your trusty shine, in combination with back–aerials. Thanks to the computer–controlled Climber’s dim AI, this can be as easy as jumping into your target, hitting down–B, and turning to jump to an edge–hog. Keep in mind that should you shine the IC’s such that they are moving together and the main Climber then grabs the ledge, the partner’s AI will have him or her double–jump instantaneously should that Climber slide completely off–stage, although it is possible for your adversary to react in time and get his lead mountaineer off the ledge in time for his partner to grab it. As well, the on–stage IC can “catch” the off–stage IC by using the up–B if the two are within a certain distance from each other. Another important exploit of the secondary Climber’s AI is prompting him or her to do a ledge attack by standing close to him or her as he or she grabs the ledge; this makes him or her still more vulnerable to your gimping options, be it another shine or (if the lead Climber is not in the vicinity and the partner is at higher percents) an up–smash out of your shield. If the Climbers are together when knocked off–stage, you will need to compensate for your opponent’s defensive options, which can include an early forward– or up–B to recover while intercepting your jump or even a simple air–dodge. In these situations, staying on–stage is generally your best bet as you can react to any of your opponent’s chosen options without the risk of being gimped yourself. Again, your main focus is usually to eliminate the partner Climber first, but that is not to say that you should forfeit opportunities to end the lead IC’s stock if they present themselves. Needless to say, the shine is your single greatest advantage against the IC’s and should be the centerpiece of your game plan against them. Although the remaining IC can put up somewhat of a fight (largely via down– and back–throws to tech–chase down–smashes and the reliable up–throw to dash attack to re–grab or down–smash), it is far less concerning than what the dual IC’s can do with their powerful desynch grab combos. Furthermore, the solo Climber has only a single viable recovery option, the forward–B, as he or she loses the full up–B and its hitbox as well; thus, if you force the surviving IC below the stage, you need not worry about being hit off the ledge by this move should your opponent jump to the ledge.
In edge–guarding situations involving both Ice Climbers, you must be aware of the deceptive vertical recovery potential of their forward–B as well as the nature of their up–B. During the up–B, the secondary Climber is invincible from frames 5 through 59 and has its own hitbox from frames 17 through 59. These frames cover the portion of the move during which the partner is rising (he or she enters the falling state at frame 60); thus, it is not a wise idea to challenge the partner Climber during the Belay. The lead IC, in contrast, has no such defenses, but he or she is often guarded by the other IC as the two sail through the air together. Use this information to plan your punishment of the up–B. Often, you may be able to force the main Climber out of range long enough to get rid of his or her partner.
If you are the one being edge–guarded, watch out for down– and forward–smashes and be ready to ledge–tech as appropriate. The Ice Climbers can also fire Ice Blocks at you from on–stage to snipe your recovery at certain positions or put up a Blizzard wall at the ledge to catch your recovery. They also wield a number of desynch edge–guards, including some where the secondary Climber holds the ledge while the main one remains on stage to react to your recovery option as appropriate. If you are in a position to recover high to a central platform, it will usually be your best option, particularly when combined with a fast–fall and a buffer into light shield.
Of course, you will not always be so lucky as never to get grabbed against the IC’s when they are together and synched; when you do, you must instantly shift gears and focus on escaping the grab itself before too much damage can be done. At low percents, the simplest way to do this is to mash buttons and rotate the control stick as quickly as you can; your controller will not appreciate it, but your stock will thank you. At a bit higher percents, you will need to be more subtle. You must be able to DI out of the Climbers’ down–aerial “infinite” grab combo variations, and you must also be able to DI the standard forward– and up–smash finishers. According to Fly_Amanita’s guide in Smashboards’ Ice Climbers forum, to escape the down–aerial grab combos, Fox players can Smash DI down and away from the IC’s and buffer a roll (by holding “L” or ”R” while holding the C–stick away); the Smash DI’s away component moves you further away from your opponent during the down–aerial’s hit stun, the C–stick’s away input provides automatic Smash DI away on the down–aerial, and the down component allows you to reach the ground and buffer the roll. Similarly, according to phanna (in the thread located at http://smashboards.com/threads/every-character-chain-grab-guide.81784/), Fox players can also hold the control stick down and away while holding the C–stick away; foregoing the buffer roll puts more pressure on you to react in time but also circumvents the downtime spent rolling. With that said, you must also be on the lookout for the forward–smash mix–up, a tactic meant to anticipate and exploit your Smash DI to escape the “infinite,” while you are DI’ing in this manner; if you are DI’ing down and away when your foe switches to the forward–smash finisher, you will greatly magnify the attack’s knockback and the severity of its knockback angle, likely killing yourself immediately. Experienced IC’s players will know this and will alternate their grab combos as they see fit; you likewise must adjust. Fortunately, coping with the forward–smash finisher itself is relatively easy; simply remember the basic idea that DI’ing upwards and against the hit will increase the hit’s vertical knockback trajectory (from the upwards component of your DI) while decreasing its horizontal knockback trajectory (from the upwards and against components of your DI).
While you can easily escape from the down–aerial chain grabs, the Climbers do possess a true infinite grab combo. Named “Wobbling” after the player who popularized its use, this involves alternating grab hits from the lead IC with a suitable intervening move from the partner, most commonly down– or forward–tilts, the end result of which is that the victim is locked in the grab due to the continuous stun state from the rhythmic alternating hits. Wobbling can continue until a suitable percentage has been reached, at which point the infinite is ended with a Smash attack of the Ice Climbers’ choosing, most commonly the down–smash. This highly controversial tactic has been the focus of a great deal of debate throughout the Smash community for quite some time and continues to be a heated topic, so much so that it has been banned in tournament play at certain events (although the interpretation of what actually constitutes Wobbling is left to the tournament organizer’s discretion, as is the severity of the punishment and when to apply it). While Wobbling is inescapable beyond the 40 – 50% range if done correctly, it nevertheless has a few limitations on its use. For one, the Climbers must be together (that is, both alive and within range) or able to join up before the target escapes. As well, the victim must possess enough percentage to continue with the alternating hits; it is entirely possible to rotate and button–mash out of the lead–in grab below the aforementioned range. Beyond those stipulations, Wobbling can be performed on any stage and in any position; this is especially true with regard to the modern tournament ruleset, which has done away with stage–based hazards, such as Brinstar’s acid. This tactic makes it all the more clear that avoiding grabs in this match–up is of paramount importance in taking home the win against the Climbers.
The Ice Climbers also have another nigh–inescapable chain grab termed the “hand–off.” According to Wobbles’ thread on this topic (located at http://smashboards.com/threads/ledge-chain-grabbing-the-handoff-faq.216589/), the hand–off chain grab makes use of the the AI’s tendency to throw opponents off of the nearest edge when the Climbers are near said edge along with their ability to re–grab the opponent out of specific throws without the victim moving anywhere. By grabbing an opponent with the lead IC while near an edge (including the edge of a platform) and facing that edge while down–throwing, the IC’s player can have his or her partner re–grab the target before they leave the ground. Because the partner is near an edge in front of her, he or she will forward–throw, allowing the main IC to land another grab, repeating the cycle. Per Wobbles’ post, this tactic is subject to a few constraints, such as the influence of hidden “ledges” that cause the secondary Climber to back–throw on Pokemon Stadium and the need to have room to move forward to execute the hand–off on certain characters, Fox included; this latter constraint comes into play on Dream Land, except for its top platform, due to Whispy Woods’ blowing pushing the Climbers towards the stage’s edge to the point that the partner IC cannot land a re–grab. As well, if the grabbed character is at low percent and the AI does not immediately throw him or her, the potential victim can mash out. However, barring those situations, the hand–off cannot be escaped, can be performed from 0%, and can be finished with a lethal Smash.
Needless to say, the Climbers have a number of permutations of their grab combos, although it is most important to know how to escape the down–aerial chain grab to prevent losing unnecessary stocks and taking unnecessary damage. With the other grab combos, simply ensure you DI the finishing hit correctly. On the topic of proper DI, keep an eye out for the main IC up–throwing you into the partner’s charged forward–smash, which will likely hit you backwards, a trap for the typical “correct” forward–throw DI; this situation requires you to reverse your usual DI direction. As well, if your opponent tosses in a Blizzard (or catches you with one in the neutral game via a desych), Smash DI upwards and jump out when possible. The Climbers also have a variety of desynch–related tactics that are beyond the scope of this section to cover in their entirety; experience in the match–up is the key to becoming familiar with these possible options (some more practical than others) and how to address them. Again, proper DI is a major component of mitigating their impact on your stocks’ wellbeing.
Since two Ice Climbers occupy the battlefield with you, your fight is not quite over once you have removed the secondary IC. Granted, the remaining IC (usually called “Sopo” in the community as Popo is the main Climber in the IC’s default color set) is severely lacking in power and threat in comparison to when the two are together; his solo Smashes are essentially half as powerful, he loses the benefits of the dual shield and (far more importantly) of dual–IC grab combos, and he cannot gain altitude with his up–B . However, despite all of these losses, Sopo still has some semblance of a game plan against you, especially if you play sloppily and overconfidently. With the majority of his grab combo game removed (with the exception of up–throw to dash attack), the lone IC will focus heavily on tech–following and prediction. He will attempt to land grabs to set up for punishment via down– and forward–smashes, and he will attempt to space out your approach with wavedashes and counter with dash attacks into down–smashes, all of which can be surprisingly effective. He can also make use of his abrupt back–throw, which could cause you to miss your tech and thus set up for a down–smash. As such, you still must continue to pay attention to your techs and get–ups, being careful not to fall into simple, easily–avoided traps involving reverse wavedash fake–outs or charged–Smash stalls as you recover your fighting stance. Being predictable and foolhardy at this stage of the match can still get you killed even though you may sense that victory is easily within your grasp.
Force the Sopo to you with blaster fire if you are having trouble finding an easy opening or need to tack on some damage to reduce the Climber’s crouch–canceling efficacy. Of course, you can also switch to an aggressive stance. Follow connected drills with a jab into an up–smash at high percents or into a grab and up–aerials at lower percents where the IC down–aerial cannot beat you to the punch. Note that you can crouch–cancel up–smash the down–aerial, or you can simply maneuver around it with a back–aerial as its hitbox does not cover the top of the move’s animation. Connected neutral–aerials can also lead into jump–canceled up–smashes given the right percentage, DI, and strength of the connecting hitbox. If a shine would send the lone IC off–stage, shine from your lead–in aerial and edge–guard with back–aerials or shine spikes from there. Remember that you now only need to watch for your opponent’s forward–B as a recovery option and that you can simply hold the ledge through Sopo’s up–B as it lacks a hitbox. If the lone Climber ends up below the ledge, even with his jump, he has no answers for a drop–down shine spike with invincibility frames from the ledge.
Counterpicks
Yoshi’s Story: Story’s short length raises the likelihood that an on–stage shine will send the Climbers off–stage, at the very least presenting a possible opportunity for a Nana gimp, and lets you hound them mercilessly during your re–spawn invincibility. The low ceiling also augments your vertical kills while the platforms improve your maneuverability and allow you to threaten the Climbers from numerous angles of approach.
Pokemon Stadium: Still as solid a stage as ever for Fox, you can make good use of the transformations and their respective platforms with your superior speed and maneuverability. As well, should you land a grab on Sopo, this stage increases the likelihood of a lethal up–aerial follow–up. However, you should note that Stadium’s length forces you to land a few more shines on average to get the Climbers off–stage.
Bans/Strikes
Final Destination: Your best option for a ban and stage strike against an IC’s main, Final Destination gives the mountaineers all the room they need to abuse their wavedash and grab game free of the worry of platforms. Due to the horizontal length of FD, Fox also must land more shines on average to get the secondary Climber off the stage and set up for a gimp.
Fountain of Dreams: The structure of Fountain crimps your characteristic mobility and allows the Climbers to control space more effectively. As well, the higher ceiling enhances their vertical survivability while the closer side blast zones augment their horizontal grab combo finishers. That said, the smaller size of the stage itself makes it more likely that a shine will send one of the Climbers off–stage.
Media
Mango (Fox) vs. Wobbles: The Evo 2013 grand finals battle between Mango’s Fox and Wobbles’ Ice Climbers provides a definitive, high–level overview of the match–up. Mango utilizes the gamut of Fox’s options, including platform play, late aerials, drillshines, and shine spikes. On the other hand, Wobbles makes use of the Climbers’ devastating grab game (including his signature Wobbling in combination with jab resets) along with their down–smash and various desynch options. Notably, around 9:30, Mango grabs Popo while Nana is in the process of jumping back to the stage and forward–throws Popo into his partner; the resulting knockback catches Nana out of her double–jump and causes her to plummet helplessly to her doom. Take note also of Mango’s inwards Smash DI on Wobbles’ Blizzard edge–guard at 18:38, which allows Mango to grab the ledge with a Fire Fox. As well, at around the 24–minute mark, Mango successfully DI’s out of a down–aerial grab combo.
Silent Wolf (Fox) vs. Fly Amanita: This Kings of Cali 3 set highlights Fox’s shine and punish game on the IC’s; various desynch options; the Climbers’ hand–off grab combo; as well as exceptional Sopo play, culminating in a lesson never to let down your guard even in the most advantageous of situations.
Fiction (Fox) vs. Fly Amanita – Super Smash Sundays #22: Fiction utilizes Dream Land’s size and platforms to maneuver around Fly’s Climbers and make his shine pressure safer while exploiting Nana’s poor AI. Fly, however, exhibits excellent control over his Sopo and his grab and desynch combos, including DI tricks involving Nana’s forward–smash. At 6:35, Fly shows how the Climbers can make use of teamwork during edge–guarding, having Nana grab the ledge while the main IC stays on–stage to react to Fiction’s recovery choice. In the set’s final game, Fly takes Fiction’s first stock with the help of a jab reset, a hand–off grab combo, and double–team edge–guarding, showcasing the Climbers’ capabilities in the neutral as well as ledge games. Around the 10–minute mark, note how Fiction’s double–shine (during which he uses his double–jump) and subsequent sour–spot back–aerial on Nana give Popo just enough time to dash in and land a grab; however, Fiction successfully Smash DI’s and buffers a roll out of the down–aerial chain grab.
Fiction (Fox) vs. Fly Amanita – Super Smash Sundays #19: Fiction puts on a clinic on shine–gimping Nana in this winners finals set.
Fiction (Fox) vs. Fly Amanita – Super Smash Sundays 1/26/2014: Fiction again showcases Fox’s Nana–hunting capabilities in this set. A more distinctive scenario arises around the 5:19 mark, where Fly throws Fiction off the stage and puts out a Blizzard, anticipating an early double–jump; Fiction Smash DI’s the multiple hits of the Blizzard inward such that he remains close enough to the stage to grab the ledge out of a Fire Fox, entirely preventing the lone Climber’s possible edge–guard follow–up.
SFAT (Fox) vs. Fly Amanita: At around 0:15, note how SFAT’s missed falling back–aerial leaves him vulnerable to a well–timed dash attack. Later, after taking out Fly’s first Nana, SFAT takes advantage of the solitary Climber with a drill grab, which gives him an opening for a lethal up–aerial without having to execute a more difficult jump–canceled grab out of a waveshine on the low–traction IC’s. Also notice Fly’s use of the auto–canceled back–aerial into down–smash, catching SFAT by surprise as he attempts to act out of his shield on a nonexistent timing window.
Hax (Fox) vs. Chudat: Hax starts the set off strong on Dream Land, combining efficient shine gimps on Nana with platform work to keep himself safe and allow him to choose when and how to engage Chu. However, Chu makes a comeback by landing key grabs and punishing with Wobbling; note how he sets up one of these Wobbling sessions with a combined Nana up–aerial and Popo up–tilt to catch Hax out of the air as the Fox player attempts to descend onto the Climbers from a platform.
Hax (Fox) vs. Nintendude: Hax again utilizes Dream Land’s size and platform structure quite well in this SKTAR 3 set, but Nintendude has some tricks of his own with various Blizzard and Ice Block desynchs to encroach upon Fox’s space and poke for openings.
Wenbobular (Fox) vs. Trail: In the first game of this Big House 4 set, Trail makes use of the Climbers’ jab and Blizzard desynchs in the neutral game to open Wenbobular’s Fox for punishment.
Swiftbass (Fox) vs. Chudat: Barely even five seconds into the match, Swiftbass does well in positioning his down–aerial such that his follow–up shine sends Chu’s Climbers in opposite directions, although he fails to convert this into a Nana kill. At 0:18, take note of how Swiftbass attempts to take advantage of the desynched Nana by up–smashing her; however, Chu’s Popo is within range and is able to punish this laggy decision with his back–aerial, eventually taking an early–percent stock as a result. This situation may have ended differently had Swiftbass opted to shine Nana off–stage followed by a protective short–hop back–aerial out of the shine to ward off Chu. Note how Swiftbass takes advantage of the top platform to constrain Chu’s options while the IC’s are in their re–spawn invincibility. Chu also makes use of Wobbling in this set to make the absolute most of his grabs. Meanwhile, the Fox player lands some efficient Nana gimps through the use of shine spikes in combination with a turn while in the shine to edge–hog the hapless Climber.
B. A Tier [AT0]
1. Dr. Mario [AT1]
Dr. Mario is an interesting match–up, to say the least. As Fox, you do hold the advantage, for the most part. However, as usual, you must be careful not to become too careless against Doc; like every other character, he has a few tools of his own to punish sloppy play on your part, including his Cape, chain–throws, and the infamous back–aerial drag–down that is perfectly suited for taking advantage of your recovery. As well, you will need to perfect your neutral–aerial shuffling game in order not to fall prey to Doc’s rather potent crouch–cancel counter game. Furthermore, you can count on having to maneuver through a barrage of Doc’s patented pills when at further distances or attempting to land your edge–guard as your opponent is descending towards the stage; this has been termed the “pill rush” and can be somewhat obnoxious. If you can avoid handing your opponent easy stocks with sloppy edge play and spacing, you can ride your shine combos, powerful approaches, and edge–guards to victory over the deadly doctor.
Ground play in this match–up sees you holding a slight majority of the cards. Doc’s traction leaves him open to your destructive shine combos (although keep in mind that opposing DI and Smash DI inputs can influence the distance at which he is shined), although your up–throw is not nearly as reliable a set–up as it is against other fighters. As well, properly–timed aerial–shine sequences will outpace any attempts to counter out of crouch–cancels, making following up from your connected hits all too easy. That said, there are a few tricks of which you should be aware. For example, be wary of jabbing from your aerials as this will play directly into Doc’s potent crouch–cancel at all but the most excessive of percents; you will almost assuredly be hit with a high–powered down–smash or even grabbed if your jab is crouch–canceled. As such, stick to your trusty shine follow–ups, particularly out of your down–aerial, to keep yourself safe and tack on damage until your neutral–aerials become more reliable and more likely to lift the doctor off of the ground. You should DI Doc’s down–smashes upwards. As with other opponents who favor crouch–canceling, do your best not to delay your follow–up shine in the slightest and not to hit Doc too high; at lower percents, you want your neutral–aerials to connect as low as possible such that your shine has a greater likelihood of clanking with or beating out your opponent’s response. Doc can also combat your aerial approaches with his surprisingly potent up–tilt, which hits as early as frame 4 and plants a sizable hitbox in front of and then above the plumber–doctor. If your shield pressure is weak, Doc can also up–smash out of his shield to turn the tables and either get a knockdown or a follow–up depending on your percent; the up–smash itself hits from frames 9 through 11, but its invincibility on these same frames (on the doctor’s head) is the most worrisome aspect of the move. Furthermore, keep in mind that Doc can approach and cover space using auto–canceled up–aerials; if you are not aware of the auto–cancel, you may find yourself being punished while prodding for nonexistent openings in the neutral game. Note as well that his up–aerial can combo repeatedly into itself should you DI inwards, and it can also lead into a down–smash, forward–aerial, or forward–smash finisher. His quick back–aerial can also be auto–canceled.
With regard to your up–throw, you must be aware that you will not get nearly the same quality of punishes out of your Star Blaster as on other characters; thanks to his physics, Doc can jump out of or neutral–aerial your up–aerial (note that his neutral–aerial’s hitbox starts on frame 3 and that this aerial in fact becomes more powerful over time). He can also guard his descent relatively well with his down–aerial. With this information in mind, make your default follow–up from connected shines at high percents a quick jump–canceled up–smash to take the stock immediately. You can also take advantage of Dr. Mario’s relatively poor vertical recovery game by waveshining into a down–smash such that he is sent off–stage in adequate stun (the implication here is that your opponent is at least at upper–middle percents and near the ledge following the waveshine). Any grabs you land near the edge should be used to toss your opponent off–stage in preparation for edge–guarding. Of course, you can up–throw your opponent, wait for a response, and punish accordingly with spaced back–aerials, but you can generally do more damage and take stocks at lower percents via effective edge–guarding or vertical kills via waveshine up–smashes.
While you are attempting to approach Doc, keep in mind that he has two main options with which to combat your advance: his wavedash and his characteristic “pill rush” game. Although not the longest in the game, Doc’s wavedash nevertheless serves as a means to bolster his defensive game with reverse wavedashes into grabs and down– or forward–smashes, especially in response to poorly–spaced and predictably–timed offensives on your part. Note that Doc players normally will not take an offensive stance toward your Fox; as such, you should always keep in mind the possible need to advance just a bit further before you begin a shuffled aerial approach in order to compensate for any opposing wavedash repositioning. As with Falcon, you would do well to push your foe to the edge as you approach, cutting off his routes of escape and restricting his options. As for the “pill rush,” the last thing that you want to do is to resort to your shine to reflect the pills; indeed, doing this will play directly into your opponent’s hands as you will be temporarily frozen in your shine due to reflection stun while Doc is descending upon you with his choice of a follow–up. Instead, you can simply plow through the pharmaceuticals with your neutral–aerials and even your dash attack. During the neutral game, you also want to be mindful of more aggressive changes in style used as a mix–up of sorts; for instance, Doc can opt to begin wavedashing in with his quick jab to stun you long enough for a grab or down–smash to connect.
As with most other match–ups, you do not want to get grabbed against Doc. Keep in mind that his up– and down–throws can both be chained on the fast–falling Fox, giving him an easy option to tack on significant damage. According to SmashMac’s Dr. Mario character match–up guide, Doc can reliably chain–throw Fox from 20 – 60% with his up–throw (and potentially starting from 0%, although the execution is far more demanding) and from 100 – 150% with his down–throw. According to a post by Magus420 on this topic (http://smashboards.com/threads/doct...sion-miniscule-update-8d.218357/#post-6492650), the overall percent ranges for each throw include 0 – 65% for the up–throw and 55 – 200+% for the down–throw. Your best bet against Doc’s chain grab is to try to induce an error by DI’ing slightly behind him such that it is ambiguous whether or not he needs to turn around to land the next grab. At high percents (in the range of 95 – 115%, per SmashMac’s guide), Dr. Mario can also opt for an up–throw to a forward–aerial; DI the throw behind Doc in this situation to force him to turn around if he wants to land the forward–aerial, further constraining his window to complete the combo. He can also use his abrupt down–throw into a down–smash, a very quick sequence that could make inputting your DI in time difficult.
Careful use of your shield game can give you some very powerful options against Doc. Botched spacing on his part, for example, should almost always be punished with an up–smash from your shield. If you find your shield being pressured, a quick shuffled down–aerial can very quickly shift control of the situation to you, especially in combination with a shine. If your adversary connects with your shield, be aware of the possibility of a jab (which hits on frame 2) to catch your reaction and set you up for a grab or a down–smash. Generally, however, Doc players will opt to extend their neutral–aerials to cross up your shield as their aerials’ L–cancels are not terribly quick themselves and connecting with your shield without any forward momentum would leave them wide open for a shield grab.
The edge game against Doc is often where many Fox players go terribly wrong. Horror stories of the Fox–slaying power of Doc’s Cape and his innovative falling back–aerial drag–down are not uncommon among many players. Obviously, it is essential that you become well–acquainted with sweet–spotting and optimally positioning both of your recovery options, especially the Fire Fox. To this end, it is important to note that the hitbox of Dr. Mario’s “Super Sheet” reaches below the sheet itself to a much greater extent than the Cape of his counterpart Mario, as shown by the following: http://gfycat.com/TidyGracefulAnole; this makes successfully sweet–spotting a Fire Fox from below the stage quite risky and technically precise. Doc can of course make use of this move off–stage as well, jumping out to intercept your Fire Fox as it begins to propel you towards the stage. You will thus need to be exceedingly careful when recovering from below against Dr. Mario. If you are in a position such that you must up–B from below the stage, aim it straight upwards so that your opponent’s Cape only turns you around in the area rather than sending you jetting off away from the stage. However, he can Cape you while you are falling after your up–B as well to prevent you from grabbing the ledge. Of course, Doc can also Cape your Illusion during its start–up, which turns you around and thus sends you in the opposite direction, although this is not nearly as common a scenario. If Doc Capes you during the Illusion itself, you enter a stunned animation and can tech upon hitting a surface (including ledge–teching). Again, being unpredictable in your recovery, as always, is key to keeping your stocks in good shape.
In addition, be careful of falling prey to low–percent kills via Dr. Mario’s falling back–aerial drag–down; in this off–stage maneuver, your foe makes use of his slower falling rate and your fast–falling to hit you multiple times with a series of back–aerials, following you as you gradually descend lower and lower until you can no longer return while he sweet–spots with an up–B. If you activate a Fire Fox too near the level, you will leave yourself blatantly open to this maneuver and will probably lose a stock to it and the subsequent edge–guarding and edge–hogging. This technique can also begin on–stage provided that the two of you are very near an edge, in which case Doc can begin with a single short–hopped back–aerial and wavedash off–stage to follow you downwards. For this reason and still more, you must be cautious around edges with Doc just as much as you are with predictability in your returns. Do not let your opponent dictate the focus of the battle at the edges of the stage; apply pressure, utilize blaster fire, and make use of your platform maneuvers to keep the battle concentrated at the center of the stage whenever possible.
Your strongest method of punishing an off–stage Doc is your shine spike, made all the more apparent by the doctor’s mediocre recovery. However, that is not to say that you should underestimate the speed and priority of his up–B; indeed, its hitboxes run from frames 3 through 21 with an invincibility frame on the first hitbox frame. Rather than attempting to directly challenge the up–B from on–stage, a far safer option is to steal invincibility frames from the edge and then go for the shine spike or stall to force an on–stage recovery and punish from there. Take note that many Doc players will up–B early or use an up–aerial as defensive mechanisms out of utter fear of the shine; use these tendencies to your advantage and wait for your foe to make him– or herself vulnerable. As your opponent runs out of stall and recovery options, you can simply wait for the down–B stall and send him back out with a back–aerial or a shine. Another interesting scenario arises when Doc is recovering from a high altitude. As he descends towards the stage, your opponent will toss pills aimed at the ledge to keep it clear as he approaches; in combination with a double–jump to grab the ledge and proper spacing relative to you, this can keep him safe from your attempts to pursue him off–stage. However, you can take advantage of his incoming pills by making use of the “Marth killer” light shield trick (that is, a light shield angled straight away from the stage) as he fires his last pill needed to guard his recovery; the pill will knock you onto the ledge, granting you the invincibility frames needed to punish his recovery safely with a back–aerial. Once you see that your opponent has used his double–jump, it is only a matter of time before he loses that stock. Should he grab the ledge, however, Doc can waveland on–stage with invincibility and may then hold the advantage in terms of stage control if he makes his way behind you, so tread cautiously.
Counterpicks
Pokemon Stadium: Stadium’s low ceiling magnifies your vertical kills still further, making your drillshine up–smashes all the more powerful an option. However, note that the neutral version’s lack of a central platform does improve Doc’s odds when going toe–to–toe with you in the neutral game as he need not worry about pursuing a far more maneuverable opponent through the air.
Yoshi’s Story: Again, low ceilings make your up–smash kills and their associated lead–ins even stronger than they already are. While Yoshi’s Story does improve Dr. Mario’s horizontal kills due to its closer side blast zones, it also provides you with a central platform for use in harassing your opponent during the neutral game and for recovery purposes.
Dream Land: A somewhat counterintuitive counterpick due to its far–off vertical and horizontal blast zones, Dream Land’s significant size and high central platform favor a keep–away, opportunistic play style augmented with plenty of blaster fire to ensure Doc’s crouch–cancel counter window is as small as possible. The platforms also make life more difficult for your adversary in terms of edge–guarding while Dream Land’s size also improves your survivability (keep in mind that you need not always take stocks via vertical kill mechanisms thanks to your shine and back–aerial, an important fact of which to remain aware should you take the battle to this stage).
Bans/Strikes
Final Destination: Your go–to ban and strike in this match–up, the lack of platforms completely opens up Doc’s chain grab game while also forcing you to confront him head on at all times.
Fountain of Dreams: A high ceiling, closer side blast zones, and a structure that puts somewhat of a kink in Fox’s usual movement patterns make Fountain of Dreams a viable counterpick against the space animal.
Media
Mango (Fox) vs. Shroomed: Submitted by Smashboards user Yeester, this Kings of Cali 2 set showcases numerous aspects of the Fox–Doc match–up. Early on, you can see Shroomed making use of pills to guard the ledge as he descends toward it during high recoveries, preventing Mango from setting up a stronger edge–guarding position. At around the 2:12 mark, Doc’s infamous crouch–cancel counter down–smash makes an appearance and sets up for a forward–smash finisher. Note as well Shroomed’s use of early up–B to intercept Mango’s attempted shine as well as his use of Doc’s up–smash in an attempt to set up for a forward–aerial. Shroomed takes the match to Final Destination for the set’s second game, making use of the platform–free stage to string together combos, including a series of up–aerials to a forward–aerial finisher. On Mango’s third stock, Shroomed catches his second jump with a full–jump down–aerial, linking it with a last–second up–aerial to a damaging down–smash, all the more reason to stay as grounded as possible. Doc’s up–throw to forward–aerial makes an appearance in game three and takes Mango’s second and second–to–last stocks. Throughout the set, note how Shroomed utilizes pills sparingly but in key situations, such as while returning to the stage or to cover his advance.
Leffen (Fox) vs. Shroomed – The Big House 4: As the set begins, Leffen gives up an easy opening to Shroomed by attempting to follow after a shine on an airborne opponent, which gives his opponent the actionable frames to dodge his grab and answer with a down–smash. Pay particular attention to how Leffen closes out the first game. By timing his ledge grab relative to the time at which Shroomed aims a pill towards the ledge, Leffen gains the invincibility frames necessary to back–aerial safely through the pill and into the incoming Dr. Mario. He finishes the edge–guard with a simple shine after Shroomed’s last–ditch down–B stall. Near the start of the second game, Leffen opts for an up–throw after a low–percent grab about a quarter–stage length away from the ledge, waiting for Shroomed to near the ground and then punishing with a back–aerial. Later, he makes use of Fox’s blaster game to shrink Doc’s crouch–cancel counter window with added damage. Another key point of this match–up can be seen during Leffen’s recovery on his first stock of the second game. Having been put in a position below the stage, he opts to Fire Fox straight up; with this decision, Shroomed’s Cape is not able to send him in the opposite direction but instead merely turns him around and tacks on some damage, forcing the Doc player to land another hit (usually a forward–smash). In the final game, Leffen makes greater use of Fox’s defensive, reactionary style with heavy SHDL fire, prompting Shroomed to act before he loses potential openings via crouch–cancels. The Doc player also showcases the trademark pill rush game in combination with offensive options, particularly on Leffen’s third stock in the third game, where a bouncing pill gives Shroomed just enough hitstun to land a forward–aerial from beneath the platform and eventually leads into a Cape edge–guard.
Leffen (Fox) vs. Shroomed – Evo 2013: Shroomed exhibits Doc’s potent combo game against Fox in this set. The commentary by D1 and Prog also adds nicely to the information presented.
SFAT (Fox) vs. Shroomed – Get Smashed at the Foundry #15, Grand Finals Set 1: At 8:03, SFAT utilizes the light shield edge–guard; while not immediately lethal in this instance, it does prompt Shroomed to air–dodge inwards to protect himself from the incoming follow–up. Note again SFAT’s use of the completely vertical Fire Fox to negate Doc’s Cape edge–guard as well as his decision to Illusion to the top platform. The power of Fox’s down–aerial and shines is also made apparent in this game.
SFAT (Fox) vs. Shroomed – Get Smashed at the Foundry #15, Grand Finals Set 2: In this continuation set, SFAT makes the most of Fox’s drillshine to link into up–smashes safely. He also exhibits excellent decision–making while edge–guarding Doc, opting for shines whenever possible to exploit the plumber–doctor’s poor recovery. Also noteworthy is SFAT’s light–shielding on the top platform to protect himself during Shroomed’s re–spawn invincibility; this guards Fox from any stray aerial hits while taking advantage of Doc’s slow aerial maneuverability such that you can simply react to any attempts to land on the platform for a grab.
SFAT (Fox) vs. Shroomed – NWM 6: Early in this set, note how SFAT DI’s Doc’s up–aerials from below the platform down to prevent any follow–ups. To take Shroomed’s second stock, SFAT opts to forward–smash through the incoming pill and into the descending Doc, who used his double–jump firing that very pill. Toph also clarifies the execution of the light shield edge–guard, emphasizing that the shield is to be held straight away from the stage and not angled downwards in any way, which would cause you to fall uselessly off the ledge when the shield is hit.
Lucky (Fox) vs. Shroomed – Pat’s House 2: The fourth game of this set shows some of Doc’s capabilities on Final Destination, namely his damaging chain grab and the greater edge–guarding consistency gained by a lack of platform options for Fox’s recovery. Notice Lucky’s greater use of run–in shines on FD, which minimizes the timing cues that Shroomed could otherwise have used to out–space incoming aerials. Lucky’s counterpick, Dream Land, highlights Doc’s difficulties in dealing with a speedy, defensive Fox whose game plan is further bolstered by a large stage and a high central platform.
Lucky (Fox) vs. Shroomed – Kings of Cali 3: Shroomed’s play here highlights Doc’s recovery options and his edge–guarding options, particularly the forward–tilt. He also makes use of the “Amsah tech” to extend his stock still further. On the other side of the match–up, Lucky executes drillshines well and maneuvers around Doc’s pills while off–stage quite fluently.
2. Pikachu [AT2]
Fox’s match–up against Pikachu is a rather dynamic affair despite the gap in tiers between the combatants. While you can do significant damage to the iconic pocket monster with your up–aerials, up–tilt, up–smash, and on–stage neutral game, Pikachu can severely punish you off of grabs (which he can use to combo into an up–smash that is even more powerful than yours) and has multiple ways to end your stock quickly via edge–guards and return without much fuss thanks to his impressive recovery. As well, the unique properties of his up–aerial grant him not only a means of lifting you off the ground from 0% but also a strong out–of–shield option that sets up for combos or further juggling (especially when done with Pikachu’s back facing towards you) and that can spike you at a horrendous angle to your demise (Pikachu’s infamous “tail spike” hitboxes of his up–aerial). He also has a reliable neutral–aerial approach that he can use to cover significant distances or cross up your shield along with an up–throw chain grab that starts as soon as the 10% range and that can combo directly into his lethal up–smash.
Your overall game plan against Pikachu is really rather simple and rests largely on your grabs. Dash in with quick jump–canceled grabs at opportune moments and catch Pikachu as he lands from an aerial or after you space his advance out with reverse wavedashes or dash–dances; as always, follow up with your up–throw to up–aerial routine, making sure to watch for Smash DI on your up–aerial’s first hit and switching to back–aerials as appropriate. You can also land grabs from your aerials; a down–aerial or low– to middle–percent neutral–aerial (if not crouch–canceled) can be followed with a grab. Shine–grabs can be useful should you catch your opponent in shield as another means of setting up your up–aerials. Note that Pikachu’s shield is rather subpar despite his small size; as such, watch for light shields and shield angling, noting the impact these have on the timing of your aerials and always being cautious to perform aerials deep into your adversary’s shield. This is important not only to ward off shield grabs but also to guard yourself against his speedy up–aerial out of shield, a certain hitbox of which hits you upwards even from 0% and sets you up for punishment, most commonly in the form of grab combos or an up–smash.
Because Pikachu falls when shined, you cannot count on true shine combos as you could for other heavier characters. This makes it all the more important that you recognize in time when your neutral–aerial approach has successfully lifted Pikachu off the ground and restrain yourself from shining afterwards, which would cut your potential string off and also give Pikachu a chance to tech out due to the shine pushing him into the ground; instead, continue the resulting combo with further neutral–aerials, up–tilts, up–aerials, and up–smashes once you put your opponent into the proper position. All told, you should aim to kill Pikachu vertically as his innate physics and excellent recovery grant him a significant degree of horizontal longevity.
As for your opponent, look for his neutral game to consist of extended neutral–aerials (done both to cover your retreat options and to account for the possibility of a shield) and dash–canceled down–tilts. Note that your adversary can follow his neutral–aerials with an immediate full–jump up–aerial to pop you up for further follow–ups; this is especially troublesome when attempting to escape your shield should your opponent land near you, so make sure to anticipate this additional aerial. You should also be aware of the sheer speed of some of Pikachus’s aerials; both his up– and neutral–aerials start on frame 3 (for reference, this is 1 frame faster than your vaunted neutral–aerial). To address your full–jump and higher–altitude movements, Pikachu can utilize his up– and forward–aerials. The electric rat’s up–aerial can also trade with your down–aerial and even content with your neutral–aerial approach when spaced just so. As well, be on the lookout for Pikachu’s jump–canceled grabs, which open the door for his up–smash and up–throw chain grab; he can also force a wake–up with his head butt should you miss a tech, which also sets up for a grab. You would do well to keep in mind that the pocket monster’s up–smash outdoes yours in terms of pure power at its sweet–spot and also can be followed with a Thunder to give Pikachu one last shot at finishing your stock out of the combo. However, the more pressing issue in the grand scheme of this match–up is that Pikachu does possess a fair number of damaging combos on you involving his up–throw, up–tilt, up–aerial, and up–smash, combos that are further enabled by his speed and mobility. While you should not hesitate to force him to you with some blaster fire if you are having trouble spotting an opening or are wary of contesting him at the ledge (as you certainly should be), take note of the distance that he can cover with his extended neutral–aerial approach and position yourself accordingly so he cannot snipe you out of your SHL or SHDL.
Ultimately, games in this match–up are decided by events at the ledge. All things considered, Pikachu’s on–stage game is not quite on the same level as yours; however, his edge–guarding and off–stage game are incredibly strong thanks to his aerials, relative falling speed, and (especially) his amazing recovery game. To start, Pikachu can harass your recovery from on–stage with his Thunder Jolts, which can knock you out of either your Illusion or your Fire Fox, constrain your off–stage positioning, and put you at the mercy of his numerous other options. If you recover towards the ledge, your opponent can aim an appropriately–angled forward–tilt to stop your forward progress and set you up for a finishing blow, usually either a falling down– or neutral–aerial, depending on your position. The rodent can also neutral–aerial or headbutt you out of your Illusion. Finally, he can go for his up–aerial “tail spike,” which if it connects virtually guarantees your death. Because of all of this, you are in grave danger should you be sent off–stage or grabbed the ledge; Pikachu’s back–throw is especially adept at sending you off–stage because of the added distance he travels during the throw animation itself.
Your edge–guarding game against Pikachu must be more reserved, needless to say. The most efficient method is to grab the ledge and time your get–up and associated stalls such that you force the electrical rodent to recover onto the stage and proceed from there with an up–smash, grab, or up–aerial as the situation dictates. You can also time back–aerials, but this is not the preferred option overall due to Pikachu’s horizontal survivability. However, according to Smashboards user N64’s Pikachu guide, the pocket monster’s hurtboxes do become enlarged (albeit only for a select few frames) at the end of each portion of the Quick Attack unless your opponent sweet–spots the ledge from above, temporarily increasing the likelihood that you can connect with a back–aerial. As well, this guide adds that Pikachu cannot perform both portions of the up–B in the same direction with the exception of going straight upwards twice in a row, although executing this is “extremely difficult and unreliable.” On Pikachu’s end, between his second jump, up–aerial, forward–aerial, Thunder Jolt, and myriad possible angles of his Quick Attack (which he can activate twice), your opponent has a number of possible mix–ups during his recovery and tools with which to protect the ledge during his return. It is imperative that you account for these, particularly when he has his second jump, so that you can continue to hold the ledge and force him on–stage.
Counterpicks
Pokemon Stadium: While the low ceiling benefits both parties’ vertical kills in this match–up, you do gain platforms onto which to DI to cut short Pikachu’s chain grab as well as a few recovery options via ledge–canceled Illusions and certain features of Stadium’s transformations.
Bans/Strikes
Final Destination: Easily your go–to ban in this match–up and a definite strike, Final Destination fully enables Pikachu’s up–throw chain grab, which begins as early as the 10% range, can last until around 100%, and leads into a deadly up–smash finisher.
Fountain of Dreams: While Fountain’s high ceiling does adversely impact vertical kills, Pikachu’s game plan here does not revolve around this win mechanism but rather kills via edge–guarding. The smaller size of the stage itself raises the likelihood that you will be sent off–stage from combos and stray hits while Pikachu’s recovery is as lengthy as ever and can see him safely back to the stage even from far below Fountain.
Media
Kels (Fox) vs. Axe: The first and second games of this Big House 4 set show a number of facets of this match–up. Early in the opening game, Kels makes use of Fox’s drill to set up for a grab and also counters Axe’s mis–spaced neutral–aerial approach on Axe’s third stock with a grab as well. At around 2:15, Pikachu’s tail spike makes an appearance, in this instance setting up for a finishing edge–guard via a forward–smash. Take note of Kels’ edge–guarding on Axe’s penultimate stock, where he holds the ledge (including dissipating a Thunder Jolt early with a back–aerial), forcing Axe to recover on–stage and opening him for an up–smash finisher. In the second game, Axe trades an up–aerial out of his shield with Kels’ incoming down–aerial and then resets Kels with a headbutt after a short chase, setting up for an up–smash that ultimately leads to a lethal edge–guard.
Mango (Fox) vs. Axe: To start this Evo 2013 match, Axe makes use of Pikachu’s characteristic tail spike to set up a forward–smash finisher. As the first game progresses, note how Mango punishes Axe’s cross–up neutral–aerials on Mango’s shield with well–timed aerials and wavedash–grabs. As well, pay attention to how Mango makes sure to DI onto a platform when Axe up–throws him at higher percents; this forces Axe to make an additional tech read for the up–smash kill rather than simply transitioning into the move out of the up–throw itself.
Colbol (Fox) vs. Axe: Colbol showcases the power and reliability of Fox’s drill grab in this set along with an off–stage shine stall to throw off Axe’s attempt to time his edge–guard. Again, note the manner in which Fox can edge–guard Pikachu by holding the ledge and punishing the pocket monster’s on–stage recovery as appropriate.
SFAT (Fox) vs. Axe: In the first game’s final stock, Axe makes use of an up–aerial out of a shield drop as SFAT attempts to descend on him with an aerial (unfortunately out of his double–jump), setting up for a finishing off–stage tail spike. Throughout this set, SFAT makes good use of up–aerial follow–ups as well as edge–hogging to combat Pikachu’s recovery.
Lovage (Fox) vs. Axe: Take note of how Lovage times his ledge grabs and get–ups from the ledge in order to punish Pikachu’s recovery. Lovage also does an excellent job towards this set’s end of varying his own recovery options and keeping Axe guessing.
3. Samus [AT3]
Samus, although not quite up to par with the top–tier fighters, is nevertheless quite a formidable character when used correctly. Her wavedashing allows for excellent spacing, especially with respect to your approach when combined with her down– and forward–smash. Her horizontal recovery is simply obscene, and her innate physics and powerful neutral–aerial diminish the effectiveness of your classic up–throw to up–aerial routine. As well, Samus can play a potent projectile set–up game with her missiles and Charge Shot; with these, she can constrain your movement, guard her descent, or control your positioning while you are off–stage. Furthermore, the bounty hunter possesses a very potent crouch–cancel counter game in her down–tilt and down–smash (especially this latter option) which when coupled with technical mistakes on your part and edge–guarding on hers can often end more than a few of your stocks. She also possesses a notable aerial arsenal as well; you should note that all of her L–canceled aerials have the same amount of lag as your L–canceled neutral–aerial at seven frames. However, being the veritable toolbox character that he is, Fox has his own answers to Samus’s game which can tilt the match–up in his favor to a certain extent.
First off, it is especially critical in this match–up that you perfect your shuffling game, which includes paying close attention to your opponent’s percentage and adjusting the timing of your aerials as appropriate; any missed L–cancels or fast–falls will almost certainly see you hit with a down–smash out of a crouch–cancel and possibly sent off–stage. You will quickly realize that crouch–canceling is an integral part of a well–played Samus’s game; as such, you must do everything in your technical power to diminish or entirely remove this advantage as it will be all too prevalent in any Fox vs. Samus match–up. Keep in mind that you can delay your aerials so that they connect when you are only slightly above the ground; this gives you more stun during which to escape should you notice that your opponent is favoring his crouch–cancels, and it also minimizes the chances that an up–B out of shield will catch you before you can shield or shine should you connect with a shielding Samus. Should Samus catch you in your shield, she can space repeated single–jabs to poke you out or catch your attempted escape, at which point you will likely eat a down– or forward–smash; toggling to a light shield and wavedashing away once you are out of her range is a relatively safe answer to this tactic that also does not open you to a read of your full jump, roll, or spot–dodge. Samus can also opt to bomb your shield repeatedly should you give her the time to run entirely within your range; this shrinks the shield at a rather quick rate while also affording the bounty hunter some aerial mix–ups.
Next, you must make certain that you are able to follow effectively out of your connected shines. You certainly should not always auto–pilot a jump–canceled grab from your waveshine in this match–up as your up–throw is not nearly as potent a set–up in this match–up as it is in others. For instance, Samus will at higher percents simply float upwards far out of your reach, or her speedy and powerful neutral–aerial (the hitbox of which begins on frame 5) will simply swat you out of the sky with its sizeable lower hitboxes before your up–aerial connects. She can even lay a bomb in the air and catch you out of a mistimed jump approach, or she can simply escape with a double–jump. Thus, you should generally focus on simple waveshines to up–smashes as your finisher of choice should you connect a shine on a high–percentage Samus. Of course, down–throw tech–chases are also another option to give yourself kill opportunities off of reads on a high–percentage, shield–favoring adversary. Generally, it is best to avoid using your neutral–aerial as a lead–in for any shine combos; since the neutral–aerial lifts Samus slightly off the ground (assuming that she is not crouch–canceling, of course), your shine will hit her while she is airborne, which will push her into the ground and cut the shine’s stun time short, thus allowing Samus to sneak out a down–smash despite your speed. Note that this is a more common scenario beyond lower percents. However, this is not to say that your neutral–aerial should not see use in this match–up. On the contrary; late neutral–aerials at lower percents and neutral–aerials deep into Samus’s shield will keep you safe while applying pressure free of the worry of a Smash DI–based escape. Furthermore, if your opponent ever misses a crouch–cancel on a neutral–aerial, you can link more neutral–aerials into up–tilts, up–aerials, and up–smashes for devastating chunks of damage. As well, note that, as with other floatier characters, you can oftentimes follow Samus from a connected neutral–aerial straight into a jump–canceled up–smash, depending on opposing DI and percentage and the strength of your connecting aerial.
Shuffled down–aerials can function as relatively reliable lead–ins to that lethal up–smash. Note, however, that both Smash DI and your opponent’s naturally “thin” stun animation could allow Samus to escape your drill and counterattack; you can compensate for these with your own DI to control the positioning of your down–aerial as well as with proper spacing of your down–aerial such that you connect with fewer of its hits prior to landing (thus reducing your opponent’s opportunities to Smash DI out). The down–aerial is a potentially powerful tool in this match–up, but you must be aware of your opponent’s proficiency with DI and Smash DI and gauge this aerial’s effectiveness over time. If you still are troubled by Samus’s crouching, you have another viable answer in falling up–aerials, an innovative means of both countering crouch–canceling (except at quite low percents) and finishing off your foe at high percents. However, you absolutely must be able to anticipate your opponent’s movements and options on the ground should you opt for falling up–aerials; Samus’s quick and lengthy wavedash grants her appreciable mobility on the ground, and her up–B and up–aerial out of shield can catch you out of the air above her.
Spacing and angles of approach are also of critical importance in this match–up; Samus’s projectile game, wavedash, and crouch–canceling all can make successful approaches via head–on shuffle assaults difficult, requiring you to adjust accordingly. If you are having trouble breaking through her defenses, make use of your SHL and superior speed and mobility to tack on damage and reduce Samus’s window for easy crouch–cancel counters. As you probe for approach openings, be careful about accidentally steering yourself into a recently–fired missile, and be especially mindful if your opponent is prone to wavedashing backward in response to your advances. A wavedash of proper length can allow the Samus both to dodge your incoming aerial and to retaliate with her down– and forward–smashes. You will need to throw some variations into the timing of your approach as the match wears on, mixing in dash–dancing and changing the points at which you commit to an aerial. When you do connect with your aerial, punish as best as you can, especially if you see that you have lifted Samus off the ground; if you do force her into an airborne position, maximize your damage output with further neutral–aerials and up–tilts to up–smashes, up–aerials, and back–aerials as appropriate for her DI and percentage, taking care to avoid shining during such times as it will knock her back down to the ground and end your string prematurely.
Be especially mindful of your shuffles into Samus’s shield; her up–B (the Screw Attack) out of shield is very quick and functions as a very reliable shield escape move that takes advantage of any flaws in your technical game. It also can be difficult to punish afterwards due to its (potentially) lengthy stun time and the distance that it carries Samus. At this point, it is instructive to examine the up–B’s frame data prior to discussing your possible solutions to this dilemma. First, note that a grounded up–B is invincible from frames 1 through 5, with its first of many hitboxes lasting from frames 4 through 7; thus, the first two hitbox frames of a grounded up–B are invincible. This is in contrast to an aerial up–B (e.g., during Samus’s recovery), which is invincible from frames 1 through 3 and has its first hitbox at frame 4. The grounded up–B has a series of separate hitboxes lasting from frames 4 through 29, with a total of 49 frames in its animation; while obnoxious, this supposed strength of the Screw Attack offers you multiple avenues of escape and a number of opportunities to turn the tables on your opponent.
With that said, you have a few solutions to this up–B out of shield problem. For one, you can simply forego hitting her shield entirely and simply grab her and try to make do with a chase after an up– or down–throw. If your opponent stays in shield too long without light–shielding or angling his or her shield downwards, you could also poke at Samus’s exposed feet with your down–tilt and follow with an up–aerial as chances are good that your opponent will miss his DI in this situation. As well, you can hit her shield as low as possible with your aerials (although repeatedly launching an offensive on Samus’s shield is not at all recommended). You can also intentionally bait an up–B escape by buffering into your shield from your L–cancel so that you more often than not shield the up–B’s initial hitboxes and thus are clear to pursue with an up–smash or up–aerial. A more interesting route to take is to DI the initial hit frames into the ground and immediately tech; although this of course is not nearly as technically forgiving a solution as buffering into a shield, it does allow you ample time to respond without having to worry about escaping your shield. Furthermore, you can DI out of the hitboxes during the Screw Attack as well if you miss this initial input. If you do choose the buffered shield route, be wary of players who will switch in shield grabs instead of out–of–shield up–B’s; although the bounty hunter does not have lengthy grab–based combos on Fox, she nevertheless gains an easy opportunity for a follow–up of some sort, such as a neutral– or back–aerial from an up–throw or a down– or forward–smash tech–chase from a down–throw, depending on your DI and percent.
You will see Samus’s forward–tilt figure prominently into her neutral game, especially when you are at higher percents such that it gives her a tool to poke you off–stage relatively safely; if you can pick up a trend in your opponent’s use of this move, you can run in with a shield and punish with an up–smash out of shield if you are within range. You can also punish even a spaced forward–tilt on your shield with a wavedash out to a waveshine and up–smash, although the timing can be tight. Remember also to be cautious when attempting to follow Samus’s descent. Her bombs grant her an excellent means of suddenly changing her aerial path and tangling you up in the air, allowing her an easy avenue of escape. As well, Samus can guard herself effectively with a falling neutral–aerial, which places large hitboxes beneath her. You can attempt to follow her with up–aerials and the like, but her added aerial movement and aerial attacks, especially the neutral–aerial, will make this difficult; it is best to wait until your opponent nears the ground, at which point Samus has a few less options, or wait until she uses her second jump and then take it from there. Be careful with using her second jump while pursuing her in the air; do this only if you are at a decided advantage in stage position, stock count, or percent (such that a rogue hit would not send you far enough off–stage for her to set up an edge–guard). Note that Samus can still missile–cancel near the ground to intercept you at the last second. Furthermore, whenever you are attempting to predict Samus in the air, always keep in mind the possibility of a missile–cancel and whether your position relative to her will put you in the path of that missile as you descend to earth. Your neutral–aerial does cut through her missiles, a fact which you could use to your advantage should the proper situation arise.
Edge–guarding Samus is tricky at times; she has a very versatile recovery between her up–B, Grappling Beam, and bombs, and her physics allow her to survive horizontally for quite some time. Obviously, you generally should not attempt to jump far out and pursue a bomb–jumping Samus (although more enterprising players do infrequently try to “steal” her bomb–jump recovery by intentionally jumping into her off–stage bombs). Wait for her to near the stage, where you have more safe options yourself. You can stall on the ledge and see if you can force your opponent to recover above you after he or she grapples onto the side of the stage, in which case a waveland to up–smash (or ledge–hopped up–aerial, if Samus lands near enough and is adequately damaged) may be in order. You can also time a fall into a shine spike as Samus grapples the stage; though not the easiest of kill methods, it is nevertheless quite effective should she not sweet–spot the Grappling Beam and thus be forced to enter a flipping animation rather than rise straight up to grab the ledge. She will also be forced into a flipping animation should she sweet–spot the beam on the ledge but then attempt to rise up to the ledge while you are still holding it. Also keep in mind that Samus cannot use her Grappling Beam again until she stands on–stage, nor can she latch onto the stage if she is too close to the stage when she begins the beam. She can of course use the beam as a last–ditch effort out of an air–dodge done outside of a recovery situation, but the subsequent landing lag is substantial. If she does regain the ledge, watch for a ledge–dropped forward–aerial into a down–smash, a classic Samus return countermeasure that could toss you off–stage and enable the Samus player’s edge–guarding game. You can, however, shield through the forward–aerial and the down–smash into an up–smash out of shield, but do not forget about the down–smash follow–up or you may well end up being edge–guarded instead; if you are hit with a down–smash at any time, remember to DI it upwards to minimize the chance that it could send you off–stage (although this could also set up for a follow–up aerial from Samus). In addition, many players will opt to use that Charge Shot that they have been holding from the ledge as a sort of surprise for you; keep this possibility in mind when guarding the ledge as it is a very common option for a ledge–hanging Samus. Still another quite common and relatively safe option is Samus’s quick and long waveland from the ledge into a down–smash, forward–smash, or forward–tilt.
Samus has many options at her own disposal with which to edge–guard you. She can, for example, down–tilt, forward–smash (which she can angle in the same manner as your forward–tilt), or down–smash you out of your recovery, all of which you can ledge–tech, or she can spike you with a well–positioned down–aerial, which you can meteor–cancel. A well–timed forward–smash can also catch you in your vulnerable frames as you climb up from the ledge, so be wary of your predictability in that regard and practice your invincible wavelands from the ledge to perfection. Her up–tilt is yet another viable means of edge–guarding Fox and is particularly difficult to tech. She can also simply run off–stage and fall into you with a neutral–aerial should you place yourself within her range, a relatively safe and consistent edge–guard that has a very high chance of ending your stock prematurely; you must DI this aerial upwards and against to maximize your chances of returning successfully. For these reasons, it is generally best to recover high against Samus and force her either to intercept your fast–fall or navigate to a central platform in time. You must also be cognizant of your position off–stage when you decide to begin an Illusion or Fire Fox; incorrect positioning can put you directly in the path of a missile or Charge Shot. Furthermore, if you take too long to set up your recovery, Samus can snipe you out of the air and force you to recover from a lower position with a Homing Missile. What all of this should tell you is that, as with every other match–up in the game, repeatedly playing around the edge with Samus could cause your stocks to melt away; instead, use heavy blaster fire and your superior speed and maneuverability to concentrate play in the center of the stage, from which low–percentage gimps are far less likely to occur.
Counterpicks
Pokemon Stadium: Vertical kills are the bane of Samus’s existence, and only one other stage amplifies your prowess in that regard on the same level as Stadium. As well, Stadium’s transformations and the non–transformed version grant you additional recovery options and platforms off of which to ledge–cancel your Illusions. The missile–cancel–enabling platforms are a small price to pay for the various other advantages Fox gains here.
Final Destination: A strong counterpick against a Samus player who heavily favors up–B’s, the lack of platforms on FD reduces the relative safety of the out–of–shield Screw Attack but also removes some of your recovery options. However, your opponent also loses platform tech–chase opportunities.
Yoshi’s Story: Story’s very low ceiling greatly increases your vertical knockout capabilities. In addition, the Shy Guys can (infrequently) interfere with projectiles fired from on–stage, and the cloud platform grants you another recovery option. Again, Samus can make use of the side platforms for her missile–canceling, but this in no way outweighs your advantage here.
Battlefield: Although not as much of a “hard” counterpick against Samus as Stadium and Story, Battlefield does make Samus’s recovery more involved for your opponent given the small ledge and lack of a substantial underside as well as the threat of being shined under the stage itself. While the ceiling is not nearly as low as the first two stages discussed above, you do gain platforms here for use in recovery mix–ups.
Bans/Strikes
Fountain of Dreams: Although closer in terms of the side blast zones than Dream Land, Fountain of Dreams nevertheless offers Samus a high ceiling, a smaller stage area for her to control, and an underside that permits recoveries from even the very bottom of the stage.
Dream Land: In keeping with Samus’s propensity for losing stocks to vertical kill moves, Dream Land greatly enhances both her vertical and horizontal survivability. However, it also provides you with both the room and the platforms to play a keep–away game with your Blaster as well as a high central platform for use in recovering.
Media
Mango (Fox) vs. Duck: Almost as soon as this set begins, Mango makes use of the buffered shield from L–cancel to counter Duck’s up–B out of shield. He then punishes a down–smash on his shield with a wavedash to up–smash, an effective and efficient choice against Samus both to take advantage of her tendency to die upwards and to get her off of her feet. Mango also makes frequent use of run–in shields to work his way within Samus’s range, exploiting her poor grab game. Note also Mango’s use of the down–tilt (to shield–poke Samus’s exposed feet) and his high recoveries, when the opportunity presents itself. Duck shows some of the bounty hunter’s edge–guard options with the up–tilt and off–stage missiles.
Col Bol (Fox) vs. Duck: This set from The Big House 4 shows a variety of punishes, edge–guards, and recoveries on both sides of the match–up. Duck also completes a Charge Shot tech–chase off of a forward–tilt to take the second game. DJ Nintendo’s commentary provides additional information and is especially insightful due to his use of both of these characters.
Hax (Fox) vs. Plup – Evo 2014: Hax begins this set by abusing Dream Land’s size and high central platform in combination with Fox’s speed and blaster fire, but Plup adjusts over time with greater use of projectiles and pressure at the ledge.
Hax (Fox) vs. Plup – The Big House 4: This Big House 4 set shows Hax making the most of Fox’s powerful and efficient vertical kills against Samus. The ending sequence of the first game is especially instructive. To begin his shine to up–smash string, Hax opts to short–hop into Samus and shine rather than starting with a down–aerial, thus circumventing the issue of Smash DI on the drill’s multiple hits that could have provided Plup with an escape option. As well, before doing the first of the two up–aerials to take advantage of Plup’s shield drop, Hax takes invincibility frames from the ledge to safeguard himself against any counterattacks.
Weon – X (Fox) vs. Duck: Duck highlights Samus’s edge–guarding game once again here. Toph’s commentary also adds a great deal of relevant information.
SFAT (Fox) vs. HugS: HugS utilizes Samus’s projectiles to augment his edge–guarding in this set. Meanwhile, SFAT showcases numerous recovery mix–ups as well as the downwards DI to tech on the initial hit of Samus’s up–B in the set’s final game.
Fiction (Fox) vs. HugS: Fiction exhibits good use of the shine in this set and also implements baits and waits for Samus’s up–B and her double–jump escape. The commentary also adds a good deal of insight to this match–up.
Fiction (Fox) vs. Plup: Plup shows the potency of Samus’s edge–guarding game against Fox in this Apex 2014 set. At 5:06, Fiction’s shield DI on Plup’s high up–B gives him the positioning needed for a lethal sweet–spot up–smash out of his shield.
DJ Nintendo (Fox) vs. Darrell: Note Darrell’s use of Samus’s platform missile–canceling game in this set, particularly in the opening game on Battlefield, to cover his advances, along with his liberal use of crouch–cancel counters. As well, Toph’s commentary adds a number of useful facts about the match–up.
Lucky (Fox) vs. HugS: Lucky utilizes Fox’s platform mobility and shine punishes quite well in this set.
4. Ganondorf [AT4]
Though much less of a force in modern tournament play than in earlier days, Ganondorfs still surface every now and then. He is by no means, however, a reliable answer to Fox. Much like Falcon, Ganondorf suffers from a subpar recovery, and he lacks the outright speed and comparatively safer punish game of Falcon that give the racer a chance to keep up with Fox. In addition, Ganondorf is far more of a target than Falcon in terms of both speed and size, and his traction leaves him vulnerable to shine combos and links to lethal shine spikes. Of course, though Fox may hold the advantage in this match–up, you cannot afford to rest easy. Like Falcon, Ganondorf also has a potent tech–following game with an effective forward–, back–, and down–aerial. As well, his jab, among the faster moves in the game with a hitbox from frames 3 through 5, gives him a solid follow–up to shuffled aerials, should he choose to advance, as well as a means of setting up a knockdown punish should the Jab connect and you miss your tech. Bad DI on your part also can lead to your death at surprisingly low percentages, as can sloppy play around edges. Take your advantages in stride, but not to the extent that you become so careless as to lose a strong match–up on your part.
While Ganondorf is certainly a more limited character than your top–tier Fox, he does have some interesting aspects about his character of which you should be aware. First, he can auto–cancel both his up– and back–aerials. Second, he can perform either one of these aerials in a non–fast–fallen short–hop and then double–jump immediately afterwards into another up– or back–aerial or a forward–aerial; note that his second jump is not very high and so he covers only a slightly higher area with the second aerial. Third, because of his short second jump, he can stall on the ledge using invincibility frames simply by timing a drop down and a double–jump to re–grab the ledge. Fourth, he can use his down–B (the Wizard’s Foot) while off–stage to regain his second jump. Fifth, he can in fact make use of his neutral–aerial in his (rather truncated) combos. Finally, he has a very potent wavedash game; this fact alone influences your interactions with Dorf both on the stage and at the ledge. Note that your opponent can make use of platforms in combination with wavedashes to move appreciable distances quickly and smoothly, escaping from disadvantageous positions and lashing out with surprising falling aerials. As well, on level terrain, Ganondorf can waveland from a jump or double–jump to put him within range to connect a jab or, more commonly, a forward–tilt. Furthermore, he can waveland onto the stage from the ledge with a jab or forward–tilt, putting you on the defensive just long enough for him to retake some stage control.
Your default stance against Ganondorf should be one of general aggression. Pursue your slower opponent mercilessly with shuffled neutral– and down–aerials, with each and every drillshine linking into a jump–canceled grab to up–aerials, a jump–canceled up–smash, or even a down–smash to set up an edge–guard. Remember as usual not to shine after your connected (that is, non–shielded) neutral–aerials to optimize your follow–ups and prevent your adversary from escaping due to truncated shine stun time. When you begin to pressure Ganondorf’s shield, watch for and anticipate a roll, jump, or wavedash out and follow as appropriate. If you keep on top of your foe with your aerials and shines, you can and will shut out a vast portion of his options, particularly if you do not flub L–cancels or shuffles through shields. Shine–neutral–aerial on Dorf’s shield robs him off a number of escape options and is especially dangerous near a ledge at upper–middle percents and up, where it can cleanly transition into an edge–guard should you connect. On that note, you can very easily force the Gerudo King into his shield with the threat of your mobility and fast approaches, so take advantage of this fact and grab him whenever possible. Note that Dorf’s weight slows the speed at which Fox up–throws him, so he can quite readily jump out of your up–throw; be prepared to wait for his second jump and punish with an up– or back–aerial as appropriate. Always keep in mind that a Ganondorf who is being pressured may often opt to roll, so take care to predict and punish as you see fit. Again, be constantly aggressive with your follow–ups. If you get Ganondorf into the air, for example, try to bait out a second jump or air dodge and then juggle from there, preferably such that he ends up off–stage; be wary of his back– and up–aerials to cover his descent. Your foe’s crouch–cancel counter game can at times be effective with his down–tilt, down–B, jab, and grab, but for the most part you should not worry about such heavy emphasis on this area; your down–aerial readily addresses this part of your opponent’s game and is made all the more effective by Dorf’s size.
You should not allow the Ganondorf enough time and space to set up a defense or slow down your offensive momentum. That is, at no point in the match should there be a large expanse of space between the two of you. If this happens, you have allowed your opponent to create a defensive position that, when combined with reverse wavedashes for spacing and reverse short–hops into aerials (especially his back– and up–aerials, both of which pack enough power and speed to grant Dorf some breathing room), may be difficult to break safely. Furthermore, a far–off Ganondorf has one more option with which to play mindgames: his down–B, a seemingly innocuous, high–lag move that nevertheless carries with it a certain “surprise” factor; indeed, you will be surprised at how often this will connect in heated play when used as a very infrequent mix–up, often with amazing strength (especially since you may be caught with your guard down and thus without suitable DI). However, the down–B issue can be solved quite easily simply by watching for its distinctive start–up animation; the move also lacks a hitbox until frame 14, an eternity on the battlefield against Fox. Indeed, if you feel that you are playing a rather impatient opponent, you can even space yourself from Dorf on purpose in order to bait this high–lag attack when your opponent becomes increasingly desperate to land a kill. Dorf’s down–B can also allow him to cross platforms on such stages as Battlefield, so know that it also functions as a last–ditch escape tactic when he is under pressure from below. Furthermore, he can use it both to read a tech on one of the platforms and to put himself out of your range should he miss. If you do allow space between the two of you, first try to pressure your opponent into coming to you with a dose of SHL fire, steadily trying to work your way in with the help of dash–dances and run–in shield baits. Once you have gotten a hold of your opponent again, do not let go until you have either removed a stock or inflicted a good deal of damage. A timid Fox in this match–up will give the powerful Gerudo King the time and positioning that he needs to create a plan of attack, which can be more effective than you may at first think.
Like Falcon, Ganondorf thrives on a strong tech–following and prediction game. Unlike Falcon, however, he lacks the speed to land grabs reliably and consistently. If you are predictable in your get–ups, rest assured that you will be punished harshly by some combination of down–, forward–, and back–aerials and down– and side–B’s, each of which is perfectly capable of leading to your often–early demise (especially with incorrect DI; remember that your DI for the most part should be upwards and against the connecting hit, such as Dorf’s forward–aerial). Be especially cautious about Dorf’s side–B as it has a pull–back portion of the animation that could cause you to miss your approach, and it also can out–space your shield grab should you shield it (shield DI’ing inwards will improve your ability to punish the side–B). Work on your predictability, mixing up the direction of each of your techs with the occasional intentional no–tech, and pay particular attention to your shuffles through shields; Ganondorf can also set up a tech–chase bout out of grabs via his down–throw, so the fewer opportunities that you hand him, the better. He can also use his up–throw as a set–up tool when you are at higher percents. Keep your aerials low and deep into his shield, and be wary of shield angling. Interestingly, Ganondorf does indeed have a chain grab on Fox with his down–throw that leads from approximately 34% to death via a down–B, but the timing required to react to DI and re–grab is exquisitely sensitive and extremely difficult, according to a post by Magus420 (http://smashboards.com/threads/the-...de-update-12-31-06-falco-cg-vids-added.85582/); you are thus virtually guaranteed not to see this chain grab during the course of tournament play. If you do find yourself being followed and predicted, try to anticipate the eventual finisher of choice and DI it correctly; as in most other instances, bad DI on your part can open the door to Ganondorf’s low–percentage kills by sending you sailing off–stage, a scenario he must set up in order to keep pace with your neutral game dominance.
As mentioned before, maintain your strong offensive game at all costs and do not allow your foe to space you out; furthermore, do not hesitate on your approach for a great deal of time as this will allow Ganondorf to turn the situation around to a certain extent and possibly put you on the defensive with shuffled aerial approaches into his quick jab. Fortunately, Dorf has very few answers if you simply hold your shield through the jab and shield–grab or up–smash afterwards (assuming you are in range) or time a shuffled aerial or escape wavedash out of your shield. Note that more experienced Ganondorf players will attempt to predict the moment at which you escape your shield and follow you with the appropriate punishment. Your foe can also bait you out of your shield with repeated jabs followed by a shuffled up–aerial to intercept your escape. However, note that Dorf can switch in a grab directly out of his aerial if he senses that you favor holding your shield through the jab; although this is not his safest overall option, it nevertheless can function as a powerful mix–up, particularly if you adversary waits until a crucial moment in the match to make such a play. The vast majority of the time, however, it is you who will be pounding on Ganondorf’s shield with neutral–aerials (down–aerials are also a possible option and are especially useful since you can start up a shine combo, but they can be difficult to L–cancel consistently through shields). Of course, you can also make use of shine–grabs, which are particularly useful should you have your foe cornered by the ledge; in this case, simply transition into whichever throw will get Dorf off–stage and proceed with your edge–guarding from there.
Generally, if you can avoid running into your opponent’s counter–spaced aerials (for a more defensively–oriented Dorf) or backing yourself into a corner (for a more offensively–oriented Dorf), you can govern the circumstances and thus the outcome of every interaction. Another important point to keep in mind is to keep yourself either level with or below Ganondorf; you will find that he can readily control the air space above him using his up–aerial, which auto–cancels, covers a good deal of space, and packs a punch. This is one reason why he has such a difficult time with Final Destination as it forces the majority of exchanges to occur at the same level and cuts down on his wavedash game due to the lack of platforms.
Edge play in this match-up very often decides stocks on both ends, something that you as Fox should be especially wary of should you lack the ability to DI correctly and consistently; on that end, you absolutely will lose stocks at early percents should you miss your DI on one of Dorf’s aerials, in which case you almost certainly will be sent off–stage. As always, you should sweet–spot whenever possible, taking care not to run haphazardly into a flurry of fade–away forward–aerials or back–aerials while making your return to the stage’s center. Keep in mind that the Gerudo King has more than a few methods of punishing you while you are off the stage. He can, for example, punish your Firefox charge–up animation with a well–aimed up– or forward–aerial, or he can spike your attempt at a below–stage Fire Fox with his down–aerial; note that this aerial can be meteor–canceled (with the exception of the “nipple spike” hitbox, which is the topmost of the move’s three hitboxes, although this generally is not a concern as making use of it, particularly in an edge–guarding situation, is very difficult), although the timing can be difficult. The reverse up–aerial, which has gone by such names as the “Eddie spike” and the “Tipman spike” after different eras’ major Ganondorf mains, is also quite potent against your recovery; it can plow through with stunning speed and range when you least expect it, sending you gradually down and away from the stage to your doom. Note also that Ganondorf can down–tilt and jab you out of your Illusions with a bit of timing, giving him more time and more options to edge–guard you. As always, switch up your recovery as the situation dictates, and watch your DI at all times lest you lose a stock at surprisingly low percents. You should also be wary of charging your Fire Fox too close to the stage as this permits Dorf to jump off–stage with his potent back– and forward–aerials. The message here, as with all match–ups, is not to magnify your weakness off–stage by constantly playing around the edge. You are the only character with a projectile in this fight; use this and your far superior speed and pressure game to your advantage and focus the fight on the center of the stage, particularly at lower percents when Dorf needs to gimp your recovery to stay even with you.
Of course, you have more than your fair share of tools to edge–guard the unfortunate Ganondorf and his lackluster recovery. To begin, note that Ganondorf’s up–B cannot grab you when you are hanging on the ledge; if you drop from the ledge and miss your back–aerial or shine, you can then be grabbed since you are no longer hanging on the ledge. Because of this property of Dorf’s up–B, you can opt to edge–guard him in a manner somewhat similar to Sheik, depending upon the position at which his controller activates this recovery move, by holding the ledge and forcing him to recover onto the stage. This keeps you safe from any “stage spikes” caused by mistiming a punish on a recovery from below the stage while still giving you the time to punish out of a ledge–dash or below–100% stand–up from the ledge. However, keep in mind that your opponent will regain his or her double–jump should you be unable to intercept the recovery before the Gerudo king lands on–stage; that said, this downside is less pronounced at high percents, where an up–smash will finish the stock regardless. A ledge–dropped or shine–turned back–aerial does do wonders to tack on damage or force a down–B at higher percents. However, a simple shine spike, especially with invincibility frames from the ledge, ends your foe’s stock right then and there and is the preferred method to finish Ganondorf as he can survive upwards hits for quite some time with proper DI while he cannot wall–tech your shine; you should take care, however, to anticipate a rising up–aerial from your enemy in an attempt to knock you away long enough for him to regain the stage. Note that the shine spike finisher is especially effective given the means by which you can follow into it, that is, a simple drillshine or waveshine to carry your hapless foe into a down–smash at the ledge; be sure to account for your opponent’s percent before performing this maneuver as a down–smash on a low–percentage Dorf won’t give you the knockback or stun time to set up an edge–guard. While you could also make use of your forward–smash, remember that this will send Ganondorf upwards (unless you connect with its sour–spot), which is precisely where he wants to be sent as it sets him up to regain his second jump with a comparatively safe down–B further away from you. It is worth repeating that Dorf prefers to be hit above the stage, where he can use his down–B to regain his second jump and gain more options to secure a safe landing zone. At the same time, note that his off–stage down–B presents an opportunity for a punish as there is no way for him to change its length; it will always last for the same amount of time and travel the same distance, allowing you to predict his destination and intercept accordingly. For the most part, it is usually only a matter of time before an off–stage Ganondorf, like Falcon, succumbs to his subpar recovery and loses a stock; the most variation that your opponent can put into his recovery is manipulating the angles of approach of Ganondorf’s recovery with a bit of control stick work while in the air and perhaps changing its timing when combined with aerial down–B’s. Should he grab the ledge, be wary of his waveland on–stage; it is surprisingly quick, and he can very easily transition into a jab, forward–tilt, or even a down–B out of it.
Counterpicks
Final Destination: This stage’s lack of platforms make it an absolute nightmare for Ganondorf when faced with your overwhelmingly superior speed and maneuverability advantages. Recall that he does have a down–throw chain grab on you, but his opportunities to land grabs are relatively few and far between, and the execution on the chain grab is difficult once you begin mixing up your DI. All things considered, this will likely be your opponent’s stage ban.
Pokemon Stadium: A low ceiling augments your vertical kills while the stage’s decent horizontal length somewhat reduces Dorf’s killing ability.
Bans/Strikes
Yoshi’s Story: Although Yoshi’s Story grants you the advantage of a lower ceiling, Ganondorf gains closer side blast zones, which enhance his horizontally–focused kills. He can also make use of the platforms with his wavedash game. This can be a potentially tenuous counterpick choice for Dorf as it opens up your vertical kill game while still permitting you your shine–based kills.
Battlefield: Similar to Story albeit with a higher ceiling, Battlefield’s platform structure does wonders for Ganondorf’s movement thanks to his lengthy wavelands.
Dream Land: This stage’s immense size improves the Gerudo King’s vertical and horizontal survivability and gives him more leeway in terms of when a shine will send him off–stage; of course, this also detracts from his moves’ lethality, but he does gain platforms on which to maneuver with his wavelands while his up–aerial makes your platform game relatively more risky than usual. Dream Land gives you all the more reason to focus on shine spikes.
Media
SFAT (Fox) vs. Kage: Kage makes use of tech–chase down–aerials as set–ups for forward– and back–aerials, and he also mixes in the occasional down–B into his neutral game repertoire to keep SFAT on his toes. On the last stock of the first game, Kage lands a pair of key grabs out of crouch–canceled neutral–aerials to set up his finishing edge–guard. Near the start of the second game, SFAT punishes a shielded forward–aerial with an up–smash out of his shield, leading to a significant chunk of damage. Take note in the second game of how Kage utilizes the Jab to contend with Fox’s high–speed approaches and poke at his opponent during the neutral game and out of forward wavelands.
Fiction (Fox) vs. Bizzaro Flame: In this set’s first game, Fiction punishes Bizzaro’s off–stage down–B and subsequent up–B attempts efficiently with back–aerials and shines. At 4:51, note Bizzaro’s DI on Fiction’s high descending down–aerial; due to the fact that Fiction had no appreciable forward momentum of his own with which to follow the DI, Bizzaro escapes and is able to put up his shield. The manner in which Fiction takes his opponent’s second–to–last stock is especially indicative of the control that Fox exerts over this match–up in general; a combination of shines, a shine–turned back–aerial read on Dorf’s off–stage double–jump, and a simple edge–hog ends the hapless Gerudo’s stock at a mere 39%.
Weon – X (Fox) vs. Kage: Take note of Kage’s use of his Jab early in the set after an auto–canceled up–aerial, which tricks Weon–X into acting on a supposed window of opportunity. The Canadian Dorf player also makes good use of his up–aerials to challenge Weon–X’s Fox when the space animal is above him. However, Weon–X does well in taking Kage’s second stock efficiently with a waveshine to down–smash at the ledge and subsequent edge–guarding. At 3:18 in the second game, pay particular attention to how Kage is able to jab Weon–X out of his advance following a neutral–aerial to shine string; this is due to the shine’s stun being canceled as a result of Dorf being sent into the ground by the shine. Weon–X makes an excellent choice to close out his opponent’s second stock by intercepting Kage with a dash attack before he is able to fall to the ledge, setting up for a lethal up–smash off of the lack of DI. Also of note in this match is the situation created when Fox up–throws Ganondorf; as Toph points out, Weon–X waits after the throw for Kage’s double–jump escape, but Kage instead falls with an aerial to catch the now–vulnerable Fox player.
Connor (Fox) vs. Bizzaro Flame: Bizzaro showcases Ganondorf’s waveland game in this set, particularly from the ledge. The Crimson Blur’s commentary also adds a number of useful observations and facts about this match–up.
5. Luigi [AT5]
The quirky Italian plumber, however strange he may seem, does have a surprisingly effective game plan against the top–tier Fox. Due to the unique interplay of Fox’s and Luigi’s respective falling speeds as well as the properties of Luigi’s moves, the green plumber can catch Fox in some rather lengthy and damaging juggles should you miss key DI inputs; add to this the fact that he is more than capable of finishing with a powerful down– or forward–aerial and you could have a problem on your hands. Furthermore, his high priority and good maneuverability via wavedashing also lend him additional weapons with which to combat Fox. However, with a bit of smart play and more than a little shining, you can take advantage of Luigi’s unique features, namely his extremely poor horizontal range on his up–B and his very low traction, to tilt the match–up in your favor.
Luigi’s unique physics grant him a few innovative tools for use against Fox. For example, he has the ability to use two aerials in a single short–hop (but not two neutral–aerials due to their long duration); as such, you should be wary of attempting to shield–grab Luigi after the first aerial connects with your shield as you very well may be hit with the second, which will set you up for further punishment (especially if it is a neutral–aerial and you miss your DI). Wait for both aerials before trying to plot your next move around Luigi’s follow–up jab, spot–dodge, or up–tilt. Note that your opponent can also do one aerial in a short–hop and then waveland as a mix–up, possibly into a grab or another move. As well, Luigi can chain–grab Fox with the aid of his wavedash via up–throws, and he can potentially finish this with a powerful sweet–spotted up–B. Once again, not getting grabbed is in your best interest in this match–up; properly spacing your back–aerials and not flailing about in a desperate bid to land an aerial approach will aid in this regard. Due to the speed of his throw animations, Luigi can catch you with poor DI more often than you would like. As well, at 0%, your opponent can combo up–throw into a down–smash, a very quick sequence that could set up a knockdown situation should you miss your tech due to its rapidity.
Another strange trick of Luigi’s is how he incorporates his down–B (the Luigi Tornado) into his on–stage ground game. This move can propel the plumber toward you at a startlingly high speed and can in fact set up for a knockdown read. Note also that the move has two hitboxes, one from frames 6 to 29 and a second at frame 43. Another quite interesting feature of Luigi’s down–B is that the plumber will fall while performing the move unless he first uses the down–B while grounded; therefore, if he has not done this prior to an attempt to recover, he cannot use the Tornado as an off–stage stall tactic without self–destructing. However, according to research conducted by OkamiBW, when the Luigi player is plugged into the fourth player slot, he can start the match with a charged down–B on certain combinations of stages and characters (the compiled research can be found at the following URL: http://smashboards.com/threads/luigis-down-b-starting-charged.292168/#post-12768689); in terms of tournament–legal stages, he will start with a charged down–B against Fox on Pokemon Stadium and Final Destination.
The ground game with Luigi can be somewhat odd at times. His quick, long wavedash grants him a good deal of maneuverability and also enables him to pursue your techs and get–ups as he sees fit, while his corresponding low traction disallows all of your usual shine follow–ups (except for the unique option of the Illusion, which is not generally a recommended course of action). Be aware of the range and speed of Luigi’s wavedash into forward–tilt approach; its hitbox begins on frame 4, and it provides your enemy with a chance to set up an edge–guard should the move knock you off–stage. Another important point in this match–up is to avoid the instinct to rely on your up–throw to up–aerial routine; Luigi’s floatiness and high–priority aerials, especially his neutral– and down–aerials, can and will beat out your incoming up–aerial quite frequently. The plumber’s neutral–aerial is especially troublesome as its hitbox begins very quickly on frame 3. Of course, you can wait for or lure out Luigi’s aerial and then proceed from there if your timing is on par, but trying to combat Luigi in the air while you yourself are airborne is a comparatively risky proposition. When you can connect a shine near the edge, do so and take advantage of Luigi’s predictable recovery with either a quick shine spike (with invincibility from a ledge grab) or the requisite edge–guarding back–aerial to fight off your enemy’s defensive aerials and followed by shines.
Your down–aerial is also especially useful in this match–up, not only in countering Luigi’s crouch–cancel down–smashes but also in safely setting up for a shine follow–up, especially useful if you are positioned such that your opponent is sent off–stage. As well, your up–tilt also packs enough priority to contend with Luigi’s aerial arsenal and can likewise set up for lethal up–aerials; however, note that timing around his defensive aerials may be difficult, so you would do well only to attempt this when you are at comparatively low percents and in a position such that a trade would not knock you off–stage.
During the course of your edge–guarding, keep the possibility of misfires in the back of your mind, and also be certain to keep track of when Luigi has his double–jump, not only because of the added recovery and stall option but also because of the improved defensive options he gains off–stage in combination with his aerials and floatiness. In addition, be wary of Luigi’s slow falling speed, which may allow him to stall near the edge with a jump and bat you off with a forward– or up–aerial if you mistime your ledge grab or hang without invincibility for too long. Note that he can also aim Fireballs at you as he returns (unlike his brother Mario’s projectiles, Luigi’s Fireballs travel in a straight line). In this instance, you can make use of the Fire Fox ledge stall to regain your invincibility frames and punish the Luigi as he descends with a shine. All told, your back–aerial and shine together constitute the backbone of your game plan against Luigi. Your back–aerial’s speed and priority match up very nicely against Luigi’s aerial repertoire, and a single on–stage shine can hand complete stage control over to you and set up an edge–guard. Always keep in mind that your shine is the key to ending your opponent’s stocks early; excessive reliance on back–aerials while edge–guarding without the support of your shines grants the plumber too many opportunities to make his way back to the stage or punish an execution miscue on your part. Luigi’s inability to wall–tech your shine due to his high weight and your ability to shine out of a crouch–cancel further enhance the lethality of your shine spikes.
As with virtually all other match–ups, take care not to play excessively around edges unless you possess control of the battlefield. With your ability to seize control of the field and your shine spike, you wield the more consistent methods of finishing your opponent’s stocks early; as such, your foe will be looking for low–percentage gimp kills via off–stage back– and down–aerials. Focus play at the center of the stage to deny him or her these opportunities. As well, be aware that many Luigi players will panic when sent off–stage due to their poor horizontal range on their up–B; as such, they will attempt to anticipate your shine spikes with early up–B’s and up– or forward–aerials, for which you should be prepared and for which you should wait and punish accordingly.
Counterpicks
Pokemon Stadium: Stadium’s low ceiling magnifies your vertical kills, and its size provides you with just the right amount of room while still not markedly hampering your horizontal shine spike kills.
Yoshi’s Story: Somewhat of a double–edged sword due to its close side blast zones, Yoshi’s Story nevertheless offers a low ceiling and a small stage that allows you multiple opportunities to shine Luigi off–stage and land low–percent kills.
Bans/Strikes
Final Destination: Without platforms to worry about, Luigi is free to pursue you with his lengthy wavedashes and can string together a good deal of damage via extended combos.
Dream Land: A large stage that improves Luigi’s survivability, its length also allows Luigi to be shined from certain positions without being sent off the stage. However, you do gain a high central platform for use in recovering as well as additional platforms for maneuverability and launching your offense.
Media
Fiction (Fox) vs. Eddy Mexico: Quite early in the first game, Eddy utilizes Luigi’s crouch–cancel off a sour–spotted back–aerial to connect with a down–smash. Note Luigi’s tech chase game with his wavedash down–smashes and how Eddy utilizes his fast forward–tilt when Fiction is at high percents in an attempt to poke him off–stage safely. Other important points of this match–up include how Luigi’s neutral–aerial readily links to numerous other follow–ups should you miss your DI as well as how the green plumber’s quick, high–priority aerials afford him a solid defense while descending back to the stage. In the second game at the end of Eddy’s second stock, notice that his off–stage down–B causes him to plummet downwards because he had not previously done the move on–stage (some players refer to this as “charging” the down–B) and he was not plugged into the fourth player slot while on Pokemon Stadium or Final Destination; generally, Luigi players opt to “charge” the Tornado either between their opponent’s stocks or as they descend from the invincibility platform at the start of their next stock.
SFAT (Fox) vs. Vudujin: The first game of this set showcases some of Luigi’s damaging combos on Final Destination along with the pre–charged down–B quirk. SFAT makes good use of ledge–grab invincibility frames in this game to take Vudujin’s first stock at the edge. At 4:44, SFAT’s up–tilt cuts cleanly through Vudujin’s incoming neutral–aerial. The Luigi player also makes an effort at a down–B mix–up late in his third stock to get a knockdown. Early in game two, pay attention to how Vudujin hits SFAT with a neutral–aerial counter after SFAT’s neutral–aerial approach lifts him off the ground at a low percent. He also catches the Fox’s wavedash out of shield with Luigi’s double–aerial short–hop at 8:38 and mixes in more frequent on–stage down–B’s to catch the mobile kitsune out of his dash dance and, occasionally, out of aerials.
SFAT (Fox) vs. Abate: This Big House 4 set shows the utility of Fox’s drillshine in regaining stage control and safely racking up damage on Luigi relatively free of the worry of crouch–cancel down–smashes. SFAT also does well in finishing the green plumber’s stocks at relatively early percents between well–placed up–smashes and shine spikes, a key to the match–up.
Mango (Fox) vs. Abate – SWEET XIII: Mango highlights the raw power of the combination of Fox’s back–aerial and shine in controlling Luigi at the edge and ultimately removing stocks efficiently. Note also Mango’s aggressive use of the shine off–stage to make the most of Luigi’s disadvantageous position.
Mango (Fox) vs. Abate – SoM V: Once again, Mango shows how to punish Luigi’s recovery optimally with shines, including crouch–cancel shines. Take note at the 4–minute mark that Mango’s shine–grab misses Luigi due to the fact that Luigi slides out of range as a result of his low traction and the hits on his shield; however, he does successfully land shine–grabs in the set’s second game.
Colbol (Fox) vs. Abate: Colbol shows the priority of Fox’s up–tilt in this set’s second game, proper methods of edge–guarding Luigi, and exceptional (albeit risky) spacing around Luigi’s neutral–aerial counter with his own up–aerials.
6. Mario [AT6]
Though considered by many to be a “run–of–the–mill” character, Mario in fact has a rather interesting match–up with Fox. He has two chain throws on Fox (technically, however, Mario only has one true chain throw overall, that is, he must switch at a certain percentage from the up–throw to the down–throw in order to continue the chain); rather low traction that when combined with DI on your shine can allow him to escape your follow–ups if you are not quick enough; a neutral–aerial which gives him an out to your up–throw to up–aerials; good edge–guard options in his Cape, back–aerial, and down–smash; and physics that can allow him to live for some time with proper DI. You may need some time to become comfortable with this match–up; despite Mario’s generally–accepted “average” status, he has more tools with which to combat the top–tier Fox than many would at first believe.
You can very well choose either an offensive or a defensive style against Mario. If you choose the offensive route, make use of your down–aerials into shines to set up your follow–ups and get around Mario’s crouch–cancel game. Note that it is difficult to up–aerial Mario after an up–throw due to the interplay of his weight and his neutral–aerial; remember that you can lure out or wait for Mario’s defensive neutral–aerial against your up–aerial and recommence your juggling when it has finished, just as you can attempt to follow his double–jump, but be wary of defensive down–aerials that take advantage of the move’s surprisingly elongated lower hitboxes. If your opponent is adept at DI’ing your shine away, you may opt to jab out of your aerials at high percents for easier set–ups into up–smashes and aerials, according to your opponent’s DI. However, still keep in mind that drillshine to up–smash and to whichever grab direction will put Mario off–stage can net you kills reliably. Your neutral–aerials can chain into your other moves rather reliably, including your neutral– and up–aerials and your up–smash, depending on your opponent’s DI, percentage, and the strength of the connecting move; do your best to avoid shining after every neutral–aerial out of pure muscle memory as this will cost you follow–ups and could make you vulnerable should you be within range when Mario lands from your aerial shine. Be careful to compensate for Mario’s reverse wavedash responses to your incoming attacks; a mistake in spacing here may set you up for a grab or a down–smash.
If you are grabbed, prepare to be chain–thrown for some percent and comboed with some combination of up–tilts, up–smashes, and up–aerials. Remember to DI Mario’s concluding hit to give yourself a shot at returning; DI his forward–smash upwards and against and his down–smash upwards, being especially cognizant of this latter option as it hits very quickly (on frame 5 for its front hitbox compared to frame 12 for his forward–smash). With regard to Mario’s down–throw, be aware that DI’ing the throw to either side at low and middle percents will set you up for Mario’s sweet–spotted forward–smash whereas no DI will prevent effective follow–ups; Scar mentions this in the set between A Rookie’s Mario and Fiction provided below. Mario’s main offensive options consist of his long–lasting neutral–aerial (especially useful for the plumber when incorporated into a cross–up) and auto–canceled up–aerials. He can also perform full–jump down–aerials and squeeze in a falling up–aerial afterwards, a sequence whose timing and counterintuitive nature can catch inexperienced Fox players off guard.
A defensive route in this match–up should see you pelting Mario with plenty of mobile SHL fire (keeping his mind that he has projectiles of his own), waiting for and punishing his approach or approaching yourself once you maneuver yourself to within striking distance of your foe (you should be careful here not to underestimate the length of your own shuffle approach so as to give yourself the most opportunities in this regard as possible). Mario’s slower falling speed enables you to shield–grab easily any improperly–spaced aerials with which your opponent does not cross up your shield. An up–smash out–of–shield is also a powerful answer here. If you constantly space yourself away from your opponent, you may find that he or she will begin using Fireballs in combination with Mario’s aerial maneuverability to pressure you into adopting a more offensive style, much like Doc’s pill rushing. Your superior speed and aerial firepower should see you through this technique, however; simply take care not to space yourself such that a falling Fireball sets you up for a grab or down–smash.
Whichever route that you take, remember as always not to play sloppily around edges. In fact, you may very well choose to restrict the fight to the middle of the arena, luring Mario in with blaster fire, if you do not trust your own play at the edge. Sweet–spot each and every one of your returns to avoid succumbing to easy Cape and down–smash kills, but keep in mind also that Mario can follow and anticipate your recovery angles with off–stage back–aerials as well. As such, simple sweet–spotting often is not enough; as with other match–ups, you will need to vary your return as needed. As well, keep in mind that a Caped Fire Fox that is aimed straight upwards only turns you around and tacks on some damage, forcing your opponent to land a follow–up move to prevent you from swerving back on–stage or grabbing the ledge; keep this in mind when recovering from below with your up–B.
When you are the one doing the edge–guarding, try to land a shine spike when the opportunity presents itself; although Mario’s physics can grant him a lengthy lifespan when combined with good DI and ledge teching, he too falls to the power of your shine. In this regard, you may choose to Fire Fox stall on the edge until Mario nears you and then utilize those invincibility frames to shine through his up–B, a difficult task to perform without invincibility; indeed, many players will opt for an early returning up–B or an up–aerial to defend themselves from your incoming shine. Keep in mind that between his Cape, down–B, and a conserved double–jump, Mario does have a number of stalling options himself.
Ledge–hopped back–aerials can also be a powerful means of knocking Mario back out over the abyss, but you will have to contend with Fireballs meant to protect the plumber’s recovery route. To get around these protective projectiles, you can set yourself up by the ledge in a light shield just as you would for the “Marth killer”; from this position, Mario’s incoming Fireball will knock you onto the ledge, giving you the invincibility frames to counter Mario’s next Fireball or up–B. Keep in mind that this trick is meant for when Mario is recovering high relative to the stage and is attempting to defend himself and keep the edge clear with his Fireballs; if you try this against a low recovery, his up–B’s numerous hitboxes will knock you out of the shield and then hit you afterwards.
An additional note concerning Mario’s up–B is relevant on stages such as Yoshi’s Story that have a solid wall running underneath the stage. On such stages, he can execute a glitch near the end of his up–B whereby he is temporarily knocked out of the immobile animation frames of the jump, which allows him to use another up–B to reach the stage. To combat this trick, always shine Mario away from the stage as opposed to into it.
Counterpicks
Pokemon Stadium: The low ceiling greatly amplifies your vertical kills, and certain transformations can make edge–guarding you more of a chore. With your ability to control the stage and dictate the terms of virtually every interaction, Mario will have quite the time trying to keep up with your rate of taking stocks.
Yoshi’s Story: While Mario does gain his double up–B glitch here, Story’s low ceiling and central platform benefit your vertical kill and recovery games, respectively, while Mario gains very little in comparison that Fox’s mobility and neutral game dominance cannot address.
Dream Land: Dream Land does lengthen your foe’s vertical lifespan, but you gain more than enough room to maneuver around Mario and control the stage. The poor plumber simply cannot reliably cover the high central platform on reaction alone, and the stage’s sheer size likewise deflates his horizontal kills while leaving your main option, the shine, intact.
Bans/Strikes
Final Destination: As usual, FD opens up Mario’s grab game and forces you to confront him on level ground at all times. The lack of platforms also reduces your number of options for recovery, enhancing the viability of his edge–guards with the Cape, neutral–, and back–aerials.
Fountain of Dreams: This stage’s combination of a high ceiling and relatively close side blast zones detract from your knock–out opportunities while enhancing those of your adversary. The central platform is also not so high as to force Mario to commit to edge–guards ahead of time, unlike Dream Land.
Media
SFAT (Fox) vs. Mango: Note how SFAT opts to throw Mario off–stage when he is near an edge rather to attempt any up–throw follow–ups. He also makes liberal use of Fox’s down–aerial to prevent any crouch–cancel counters from Mario’s grab and down–smash. Pay close attention to SFAT’s use of the buffered light shield edge–guard option against the plumber at 8:55; this causes Mango’s protective Fireball to knock SFAT onto the ledge, thus granting him invincibility frames that allow him to stall safely through Mario’s up–B and punish his landing on–stage with a stand–up up–smash.
Fiction (Fox) vs. A Rookie: A Rookie exhibits masterful control over Mario’s recovery and stalling options in this set.
Alex19 (Fox) vs. A Rookie: Game two of this set contains Mario’s double up–B glitch during a recovery on Yoshi’s Story. Alex19 makes good use of Fox’s drillshine to rack up safe damage throughout the set.
Lucky (Fox) vs. A Rookie: Lucky kicks off this set with a crouch–cancel shine on A Rookie’s double–jump aerial from the ledge, a situational but lethal option. While Lucky does make good use of Fox’s shine in the first game, A Rookie answers with his down–throw set–ups for down–smashes, the sheer speed of which at times catches the Fox player with poor DI.
Silent Wolf (Fox) vs. A Rookie: Silent Wolf shows how Fox can play both the offensive and defensive sides of the field in this set. On Mario’s end, A Rookie showcases the plumber’s off–stage back–aerial and Cape edge–guards.
C. B Tier [BT0]
1. Young Link [BT1]
Link’s youthful counterpart is in many ways far more of an annoyance to Fox than his adult form. For example, while Link is easily shine–comboed, Young Link falls when shined, necessitating tech– and get–up–chasing and prediction in combination with jab resets. As well, Young Link’s greater speed and smaller size facilitate his highly–mobile projectile game, which does an excellent job of setting up any number of characters for Young Link’s chosen follow–up. Vertical kills, pressure, and prediction will see you through this match–up. On the other hand, being predictable yourself and being too hasty in your advance could set you up for a fall to Young Link.
You should aim for a generally aggressive style against Young Link. Doing so first requires that you navigate through his barrage of projectiles (preferably without the use of your shine to reflect the incoming objects, in which case you would inadvertently give him the opening and the time that he needs to put you into position). As with the older Link, try to grab bombs and to knock boomerangs away with dash attacks and forward–tilts (be wary of spacing for the angled boomerang, however). Go for grabs as your opponent lands, waiting for a spot–dodge, if needed, and follow with juggling up–aerials. Your connected shines and aerials should follow into jabs and then into grabs and up–smashes, as your adversary’s percentage dictates; shines should be emphasized at lower percents to circumvent any attempts at crouch–cancel counter down–smashes. Note also that you can “combo” from a shine if the Young Link crouch–cancels your shine, as with the other characters who fall when shined. Drill kicks are also effective openers on Young Link, flowing well into a jab or a grab, if your foe does not react in time. On his end, Young Link will look to hold his position with his quick neutral–aerial and jabs, poking with his numerous projectiles and mobility until he can set up a favorable situation for his down–smash, dash attack, up–aerials, or neutral–aerials. As well, should he manage to land a grab (likely from a tech–chase), his down–throw can set up for a down–smash should you miss your tech, and his up–throw can set up for combos involving his up–tilts and aerials based on your DI.
Again, however, all of this requires that you first make it through Young Link’s projectiles. Watch your own angles of entry as well as his, noting when you sight an exploitable opening upon which you can apply pressure. Predictability on your part will likewise cost you the match; Young Link’s down–smash is an especially potent means of punishing you for this. You can try crouch–canceling to combat its knockback and return fire with an up–smash, if you are within range. At lower percents, you will find that it is safer to shine out of your aerials rather than jab due to the possibility of a down–smash counter out of a crouch–cancel; if you choose to go this route, read your foe’s response or force a get–up with a jab reset and follow with jump–canceled grabs to up– and back–aerials as needed to account for Smash DI on your up–aerials. Shining after your aerial approach is especially useful if your opponent insists upon mashing buttons in an attempt to eke an attack out of a crouch–cancel as this will cause him or her to wake up with an easily–punished attack.
Edge–guarding Young Link is in some ways akin to edge–guarding his older counterpart; both can live for some time with proper DI, both have respectable recoveries between their up–B’s and Hookshots, and both have potent off–stage disruption options in their projectiles. Expect to be pelted with bombs and boomerangs as the Young Link returns, depending on his angle of entry. As with the adult version, you can punish non–sweet–spotted Hookshots with a quick drop–down shine spike or non–sweet–spotted up–B’s with a crouch–canceled down–smash. Also like his older form, Young Link goes into a flip animation should he not sweet–spot his Hookshot or if he attempts to rise up to the ledge while you are still holding it; cannot latch onto the stage if he is too close to it when he begins a Hookshot; and cannot use his Hookshot again until he steps on–stage. He is also able to Hookshot during and for a short period after his air–dodge should you force this situation after a neutral game exchange; however, it lacks the range of Link’s Hookshot and puts your opponent in a good deal of landing lag afterwards. Remember also that with invincibility frames from the edge you can readily shine through your opponent’s up–B, a useful option in conjunction with a well–timed Fire Fox stall.
Of course, Young Link has his own options with which to edge–guard you. Projectiles hurled from the stage can influence the angle of your return, especially when combined with Fox’s fast–falling, and a simple down–tilt can lead to death should you miss your meteor cancel. Work on your sweet–spotting, especially from below by grating the Fire Fox on the side of the stage, and your ledge–teching for such occasions. Due to his long–lasting neutral–aerial, Young Link can also jump off–stage and knock you out of your recovery option should you initiate the move within his range. All things considered, your opponent must land his edge–guards on you at every opportunity in order to keep the stocks close; with proper DI, you can survive for quite some time against the young Hylian’s on–stage hits out of the neutral game while he cannot say the same for your powerful finishers, on– or off–stage.
Counterpicks
Final Destination: Without chain grabs to take advantage of or platforms to supplement his hit–and–run projectile game, your opponent once again will have difficulty keeping pace with your combos and up–throw follow–ups. In this match–up, when possible, FD is your go–to stage.
Yoshi’s Story: Between this stage’s low ceiling and your own speed and maneuverability, Young Link will have fits trying to keep up with your myriad kill mechanisms. Furthermore, both the Shy Guys and cloud platform can aid your recovery by occasionally interfering with projectiles fired at you off–stage and providing another landing spot, respectively.
Bans/Strikes
Dream Land: Dream Land combines a large stage with platforms and a high ceiling, an ideal setting for Young Link to poke at you with his projectiles while enhancing his vertical survivability. He also has the additional recovery option of latching onto the underside of the stage with his Hookshot.
Fountain of Dreams: Although not as desirable a stage as Dream Land, Fountain nevertheless provides platforms, a high ceiling, and an underside that can be grappled onto with the Hookshot.
Media
Toph (Fox) vs. Laijin: Take note in the first game of this set how Toph positions his Fire Fox recovery to avoid Laijin’s off–stage neutral–aerials. Notice also Young Link’s hit–and–run game plan that combines his speed and mobility with his various projectiles to set Fox up for aerials and edge–guards.
Hazz (Fox) vs. D20: In this game, D20 makes good use of Young Link’s projectile set–ups both on– and off–stage.
2. Link [BT2]
Hyrule’s famed hero truly does not have the greatest of match–ups against Fox. Poor Link’s high traction makes him absolutely perfect for all manner of shine combos, including repetitive waveshines and drillshines, and his defensive projectile game succumbs to Fox’s innate mobility and speed as well as Fox’s own defensive game play. Of course, all of this does not guarantee an easy match–up against the Hylian hero. Link’s unique moveset, namely his ranged grab thanks to his Hookshot and his ever–popular up–B, grant him a powerful tech– and get–up punishment game, and his neutral–aerial and up–B can net him a good deal of off–stage kills via edge–guarding. Nevertheless, if you play to your own strengths in this match–up (especially your aggressive options), you will find that you hold a decided upper hand here.
Although this match is not entirely one–sided as some would at first believe, Fox nevertheless does hold a significant advantage. Part of the reasoning for this lies in the fact that Link does not have solid answers to a change–up in Fox’s play style; that is, a Fox could very well adopt a defensive or offensive style against Link and still expect admirable results regardless of his choice. Choosing the defensive route obviously entails heavy use of your blaster to lure Link to you, as usual; you should keep at a good enough distance that the Link cannot easily surprise you with an approach, but you should also be close enough that you can take advantage of any mistake with pure speed (that is, your shuffled down– and neutral–aerial lead–ins). Combat Link’s own projectile game, which is sure to make an appearance as an attempt to answer your defensive style with hitboxes to constrain your freedom of movement, by batting bombs from the air with blaster fire or simply catching them and knocking boomerangs away with dash attacks (keep in mind that connecting with an incoming boomerang cancels the animation of your dash attack and allows you more than enough time to respond). Take advantage of mistakes with your usual neutral– or down–aerial lead–in. Neutral–aerials that lift Link off of the ground should be converted into sizeable chunks of damage, and down–aerials should be linked into your wide array of shine combos. Waveshine Link off the stage, perform some drillshine reps, or stick to a simple wave– or drillshine to a grab and up–aerials. Regardless of your route of choice, watch for Smash DI on your shine and be prepared to adjust your wavedash’s length or your own DI on your down–aerial to catch your opponent again. Note that you may need to perform perfect wavedashes at times to catch Link depending on how he DI’s your shine; get used to adjusting your positioning in the middle of your shine combos to compensate for enemy DI and you will greatly magnify your ability to follow your opponent during your combos and be able to put together some rather destructive sequences.
An aggressive route in this match–up has its own merits as well, although a few more items need to be taken into consideration. As the aggressor here, you are bound to run into more than a few shields from the opposing Link. As usual, you must perfect your shuffles and L–cancels to remove Link’s grabs from the picture entirely as they are his easiest route to his tech–following game, which can be surprisingly effective given his moveset; expect to see down–smashes, additional grabs based upon your positioning relative to Link, and up–B’s as finishers, especially near edges (where your get–up options are more limited) and at high percents off of a down–throw. Given all of this, you must as always be cautious about your predictability; too many mistakes in this regard will give Link opportunities to punish you for easily–remedied mistakes, and he does have the tools with which to accomplish this. All of that aside, your aggressive style should likewise put great strain on your opponent and allow you to take advantage of his myriad shortcomings in the worst ways possible. Shuffle through shields and into shines, punishing with your usual repertoire of drillshines, shine–grabs, and waveshines into grabs, up–smashes, and waveshine chains. If your opponent holds his shield past your follow–up shine, you can opt to continue to neutral–aerial pressure his shield out of shine (the preferable option if your opponent manages to survive to percentages that prohibit easy up–throw follow–ups) or simply shine–grab him to set up for up–aerials. If you find your own shield under attack, break out with a shine or an up–smash from shield if Link has spaced poorly. However, be aware that Link can catch a shield escape or shield grab attempt with his Jab and punish you from there.
A shuffled down–aerial out of your shield also does wonders to turn the tables on an offensive Link as it provides an inroad to your shine combos, truly the key to your damage output advantage in this match–up. Note that you may want to be careful with full–jumping your down–aerials out of your shield after it has been hit as an L–cancel into Link’s up–tilt may beat out your incoming aerial and set you up for more than you may at first think. If you happen to end up behind Link’s shield from one of your aerials (for example, after a cross–up neutral–aerial), be cautious about going into an up–tilt immediately afterwards; if you are predictable in the timings for the tilt, your opponent can simply wait and escape his or her shield or catch you with an out–of–shield up–B. However, when properly timed, this cross–up can be useful to beat out any attempted attack from Link’s shield; connecting with Link allows you to turn the tables on your opponent and set him up for some damaging aerial juggling. Your neutral–aerial is perhaps still more key to your offense. Its sheer speed and priority permit you to place immense pressure upon Link in combination with your other mix–ups, your running speed, your shine, and your jabs (at high percents). However, keep in mind that Link possesses a neutral–aerial of his own, and it wields a considerable amount of speed and priority as well. He will make use of this to keep you out of his space and to knock you out of any foolhardy full–jumps as well as to defend his descents from your aerials and interrupt up–throw follow–ups. Do not underestimate the utility of this move, both in the neutral game as well as off–stage. Your aggression may also force Link to air–dodge should you send him airborne; in such situations, Link can Hookshot out of and for a short period after his air–dodge, allowing him to cover his descent just long enough to land (albeit with a significant amount of punishable lag afterwards). Note that Link players use a similar trick during his recovery.
Off–stage play in this match–up can get ugly at times for you. Link’s plethora of projectiles when fired from the stage can manipulate your recovery options in Link’s favor, forcing you to come from undesirable or easily–punished angles, for instance. Fortunately, while the charge–up of your Fire Fox is vulnerable to projectile snipes, the move itself can plow through Link’s items once it begins moving. You must be able to sweet–spot consistently (especially from below the stage with your Fire Fox, as your fast–falling when combined with a projectile from Link will often put you there) in order to avoid losing stocks at surprisingly low percentages to a “spike” from an opposing up–B. Be cautious about where you choose to recover from as well; remember that Link’s physics allow him to fall off the stage or ledge–hop into a neutral–aerial aimed at your recovery, which could either kill you outright or force you to return at an undesirable angle. As well, Link can make use of his down–tilt at the edge, certain hitboxes of which act as meteor hits (and thus can be meteor–canceled). All of this is all the more reason to focus play in the center of the stage, usually with the aid of your trusty Blaster; Fox dominates the majority of the neutral game in this match–up, and Link simply cannot keep pace with the damage output of your aerials and shine combos without a few lower–percent edge–guard kills.
On your end, edge–guarding Link is not quite as simple as you would like it to be. Off–stage and ledge–hopped projectiles can interrupt or stall your attempts to hold the edge and give Link just enough time to sweet–spot the edge with a Hookshot and/or an up–B. Likewise, the up–B’s hitbox does a good job of batting away incoming attacks from above, making Link's sweet–spot troublesome for you (you should note that the move leaves his lower body relatively exposed). Note that Link must sweet–spot his Hookshot to be able to ascend directly to and grab the ledge quickly without going into a flip animation; if he does not do so, he is left open for a good deal of time while flipping, more than enough opportunity for a shine spike. He also enters this flipping animation should he sweet–spot the ledge but then attempt to rise upwards for the grab while you are still holding the ledge. Also note that Link can use his Hookshot only once during a recovery attempt. This means that he must touch the stage’s surface to be able to Hookshot again; for example, he cannot latch onto the stage with a Hookshot, grab the ledge, and then drop to Hookshot the stage again. He also cannot latch onto the stage if he is too close once he starts his Hookshot. You can of course stall through Link’s lengthy recovery with the Fire Fox stall and can also properly time your stall to gain invincibility frames from the ledge with which to shine Link out of his up–B, or you can simply shine Link as his Hookshot latches onto the stage. None of these routes is particularly easy when compared to your answers to other characters’ recoveries, so you should focus on killing Link vertically with your shine and grab lead–ins to the up–smash and up–aerial. Should you send your opponent a great distance off–stage, do not become complacent and hop off of the edge in anticipation of your kill. Skilled Link players can perform what is called a “bomb jump” by throwing a bomb upwards while off–stage and up–B’ing into it, riding the explosion and their restored up–B option back to the stage. Be wary of this tactic, and never be so arrogant as to assume that you have gotten the kill before you see a stock disappear from the screen.
Counterpicks
Pokemon Stadium: The low ceiling serves Fox well here in conjunction with his shine combos and grab follow–ups.
Final Destination: Without a true chain grab on Fox, Link cannot capitalize on Final Destination’s platform–free design, which also restricts his own movement and escape options. Furthermore, the stage’s unimpeded flat terrain gives Fox free reign once he lands a single grounded shine on the hapless Hylian.
Bans/Strikes
Fountain of Dreams: Fountain’s high ceiling minimizes the impact of your vertical kills to an extent while its walls below the ledge offer Link more targets for his Hookshot recovery should he not be in a position to sweet–spot.
Yoshi’s Story: Link players will likely take you to Yoshi’s Story should you ban Fountain, which provides a similar structural advantage for his Hookshot recovery but comes with the relative caveat of a far lower ceiling. Note, however, that your opponent can also make use of this fact and Story’s closer side blast zones to score earlier kills.
Media
Connor (Fox) vs. Germ: Take notice of Germ’s use of projectiles and Link’s neutral–aerial to control space and influence Fox’s approach and escape options. Germ also makes sure to have a bomb in hand whenever possible both on– and off–stage. Besides serving as a handy projectile, bombs can cancel the knockback of your moves and substitute it with their own weaker knockback as well as grant Link another chance at an up–B should they detonate at opportune times, enhancing Link’s survivability.
Mike Haze (Fox) vs. Germ: This set highlights Link’s edge–guarding capabilities against Fox as well as his bomb jump in the second game and his down–throw to up–B at high percents. Mike Haze showcases Fox’s shine combos here as well.
Lucky (Fox) vs. J666: J666 exhibits excellent Smash DI on Lucky’s down–aerial in this set, complicating the follow–up game and offering some protection from shine combo start–ups.
Tang (Fox) vs. Germ: Tang punishes Germ’s Hookshot recovery efficiently and effectively in the first game of this set and makes use of Fox’s extended shine combos on FD.
3. Donkey Kong [BT3]
I would like to thank Smashboards user NJzFinest and the members of the Donkey Kong forums for their contributions to this section. NJzFinest was particularly instrumental in providing input on stage selection on both sides of this match–up.
DK is yet another example of a lower–tiered character who still manages to have a somewhat viable plan for potential Fox opponents. Virtually all of DK’s game against you revolves around his grab combos, which involve chain–throwing, up–aerials, and finishing aerial neutral–B’s that can oftentimes take you from 0% to death if you are not careful with your DI. Thankfully, DK’s sheer bulk and traction as well as his subpar shield leave him quite vulnerable to your shine set–ups and combos. Furthermore, with properly–spaced shuffling and shining through shields, you can largely annul DK’s grab combos and tilt the match–up in your favor.
Like the match–up against the IC’s, the integrity of your stocks in this match–up rests on your ability not to be grabbed. Granted, DK may have only one truly reliable route of removing your stocks, but that route can be surprisingly potent should you give him too many opportunities to utilize it. As such, you must sharpen your shines through shields and your approach spacing, should you opt for a more aggressive, pressuring style against the ape; such a method of play is entirely appropriate against DK as it takes advantage of his poor hard shield coverage. Make sure to refine your shine combos as well as you are certain to have multiple chances to use them in your offensive game against DK. It is especially important to remember not to commit to a waveshine advance after neutral–aerial lead–ins as the cancelled shine stun time could allow DK to grab you. A connected shine can lead into any number of follow–ups, including more waveshines, up–smash, or even down–smash should you be near the edge; thanks to DK’s rather straightforward recovery and its relatively poor vertical height, a down–smash at the stage’s edge can set up for a lethal edge–guard on your part. Your grab game can also be quite effective against Donkey Kong, albeit more so at higher percents where he cannot as easily jump out; up–throw to up–aerials or a back–aerial can kill or set up an edge–guard in such circumstances. If you land a grab to up–throw at earlier percents, you can wait for or bait out a double–jump or defensive back– or neutral–aerial and follow from there.
Unlike the IC’s, however, DK suffers from a lack of efficient transportation, i.e., a wavedash on par with the Climbers’. As such, DK's primary means of grabbing you consist of simple shield grabs (which you are to prevent at all times and at all costs), spacing out your approach via reverse wavedashes and dash–dances, back–aerial into a turn–around grab, and predicting your get–ups and techs. Your ground game against DK can very well take either an offensive or a defensive route; DK lacks reliable answers to both your projectile baits and your technical offensive game. As always, blaster luring will allow you to force an advance out of an opponent on whom you cannot seem to advance safely. Space your shuffled approaches carefully, leading as appropriate into additional neutral–aerials or an up–smash (if you manage to lift DK off of the ground) or a shine (if you lead with a down–aerial). Remember that your down–aerial is especially worrisome for DK, who relies on his crouch–cancel game to land grabs and who is quite susceptible to your shine combos. Interestingly, it is possible for DK to counter your neutral– and down–aerial approaches with his dash attack once you have committed to the aerial; this can result in a trade that places DK in a position to land a grab, so you cannot afford to become predictable in your approach timings.
Be careful as well not to fall too often for DK’s highly effective back–aerial, a strong, high–speed attack that could keep you at bay for some time if you cannot find an answer to it; if you are having trouble moving in on DK due to this attack, fall back and force DK to switch gears with a dose of blaster fire. Due to the sheer speed of DK’s back–aerial, you should focus on approaching him from the front when juggling him. Do keep in mind that your opponent can use a slight charge of his Giant Punch while in the air to turn around, should the situation require it. If your opponent grabs you, do your best either to rotate out of the grab, DI the chain throws to throw off your opponent, or DI the up–aerials or Giant Punch finisher; remember that the up–aerials should be DI’d fully to the side while the Giant Punch should be DI’d upwards and against or upwards. You should also note that your opponent can use the direction that DK is facing while in his Cargo Throw (prior to the actual throw itself when he is carrying you on his back) as a DI trap. According to the Smashboards thread titled “Guide to Donkey Kong,” begun by NJzFinest, the direction that DK is facing while carrying you on his back affects where in relation to DK you are sent as a result of your DI off of his throw; for example, if you are DI’ing left because your enemy is facing left during the Cargo Throw (which would put you further away from DK when he up–throws you), he can turn to the right before throwing you, which when combined with your left DI would put you in a position closer to DK than if you were to DI right, facilitating his grab game follow–ups. Again, your primary aim in this match–up is to prevent any of these grab combos from occurring at all; always keep in mind that they are DK’s primary and most effective route to victory against you.
Another move of which you should be wary is DK’s up–B, his Spinning Kong. While certainly a long–lasting move, the Spinning Kong hits as early as frame 3 and also grants DK invincibility on frames 3 through 5 (the same as the initial hitbox) when performed on the ground, most commonly seen as an out–of–shield option. Thus, like Bowser, the comparatively lower–tiered ape possesses a fast, effective, and rather strong answer to your shield pressure, particularly if you are trying to fall directly down on him while he is in shield. The sheer speed and power of DK’s out–of–shield up–B catches more than a few inexperienced Fox players off–guard; you must be aware of this option and tighten up your shield pressure and spacing in response. Note that you can also bait this move out of your opponent, particularly if you have conditioned him or her to up–B out–of–shield frequently during the course of a match. Note that DK can maneuver during his grounded up–B to grab the ledge out of it.
Edge–guarding DK may involve a good deal of properly–spaced back–aerials from the ledge to combat his up–B return; note that an aerial up–B grants invincibility to DK’s entire body on frames 2 through 5 and to his arms on frames 11 through 42 (with a total move duration of 84 frames), so you must be careful in placing your back–aerials. If you plan to shine–spike DK, chances are that you will need to use invincibility frames from the ledge and drop down onto DK as he approaches you. A more efficient course of action would be to take advantage of DK’s lack of vertical recovery; this can be done using a down–smash, including out of a waveshine(s) to the end of the stage. If DK tries to up–B to the ledge, you can also time a roll from the ledge to stall through his recovery.
DK may choose to edge–guard you with such options as his back–aerial, down–tilt, forward–tilt, and even his up–B (again, keep in mind its numerous invincibility frames). It is worth repeating here that these unique attributes of the up–B also grant DK a tool with which to punish your overhead approaches. If you focus excessively on attacking DK from above, he can time his up–B to swat you out of the air just as you connect with him. The same situation can arise if you insist upon attacking the monkey’s shield with improperly–spaced aerials, at which times he can up–B out–of–shield to grant himself some breathing room. These situations can quickly become disastrous on your end should the Spinning Kong connect as he may catch you while you are holding down for a fast–fall or a down–aerial, leading to horrendous DI that can kill you outright in combination with his up–B’s power. As well, be wary of DK’s startlingly fast below–100 ledge attack; if you are positioned near the edge just so, you may find yourself off–stage and in a rather precarious position. This ledge attack also can be used while you are trying to land on the stage to push you back off of the ledge and set up another edge–guard opportunity for DK.
Counterpick
Yoshi’s Story: While Story’s low ceiling also favors DK’s up–aerial kills, it is far more devastating in combination with your shine combo set–ups. Given the fact that you generally are far more able to create such opportunities than DK, this stage in fact favors Fox overall.
Bans/Strikes
Final Destination: Easily your preferred ban in this stage and the first stage to strike, FD completely opens up DK’s grab–based combo game thanks to the lack of platforms. This is the only stage where the monkey’s punish game can consistently go toe–to–toe with yours.
Pokemon Stadium: While this stage is also advantageous to you thanks to its low ceiling, Pokemon Stadium’s transformations can split you two apart long enough for your opponent to charge his Giant Punch fully prior to the next tussle. However, this should not be banned instead of Final Destination.
Dream Land: Dream Land’s high ceiling negates your vertical kills along with your opponent’s, but its size allows for relatively lengthy DK combos all the same.
Media
Hax (Fox) vs. Green Ranger: Note Green Ranger’s use of back–aerials and dash–dancing to give himself opportunities to land a grab on Hax’s speedy Fox, as well as his use of split–second Giant Punch charges to turn himself around while in the air. Meanwhile, Hax makes excellent use of Fox’s combo and pressure games, executing long waveshine strings and finishing as appropriate, including with down–smash to set up an edge–guard on the hapless DK.
Swiftbass (Fox) vs. Phish–It: Swiftbass edge–guards DK well in this game, opting for down–smashes at the edge to prey on the monkey’s lack of vertical recovery. Phish–It uses an up–B out of his shield at around 2:05 to clear the space around him and reset the situation.
Mew2King (Fox) vs. Bum: This game on FD from MLG Long Island 2007 illustrates DK’s dangerous grab combo game against Fox. Notice how Bum makes use of his down–tilt and down–B to interfere with Fox’s ground–based movement. Take particular note of how Bum punishes Mew2King’s attempted descent onto him with the initial hit of his up–B at 0:55 and 1:54.
4. Yoshi [BT4]
Although Yoshi is certainly not the most common character to run into in tournament play (especially at the higher levels), you should have some semblance of a game plan for the occasional enterprising player who decides to throw his or her Yoshi your way. In particular, look for Yoshi’s potent crouch–cancel counter game with his down–smash and down–tilt, both of which can send your fast–falling Fox off–stage at hideous angles that can make recovering a chore. As well, be aware that Yoshi does possess a powerful aerial arsenal when combined with his startlingly–fast double–jump cancel and the unique “armor” on his second jump. Because of this armor, you must be wary of trying to combat Yoshi’s aerial approaches with your own; his unique physics will allow him to shrug off your own aerials at anything other than high percents, and trading blows with any opponent is never a good idea with Fox, no matter your DI. In particular, be careful not to run into the dinosaur’s potent neutral–aerial as well as his up–aerial, which when DJC’d can do wonders for your opponent’s juggling and combo games. Be cognizant of the fact that Yoshi can in fact put a great deal of pressure on your shield using his DJC’d aerials; you may find switching to a light shield to be an effective way of resetting such interactions. As well, he can approach from strange angles using a DJC forward–aerial, particularly in combination with platforms. His down–throw also can function as a lead–in to his DJC combos, although Yoshi does not have the easiest of times grabbing Fox, to say the very least. However, if you can force the Yoshi player to shield, you will have complete control of the situation as the dinosaur cannot escape his shield as other characters can; for this reason, Yoshi players will often light–shield (which is visually indistinguishable from his hard shield) and count on you hitting their shield to push them out of your pressure.
It is imperative that you keep in mind that Yoshi is one of the higher–traction characters; as such, you would do well to utilize your shine combos as much as possible. To that end, your down–aerial is especially problematic for Yoshi, who relies heavily on his crouch–cancel counter and “parry” game to open up your defenses. Your customary drillshine to up–smash is as effective as ever (be mindful of crouch–canceling at lower percents, however). A couple drillshine repetitions can also help even up the percentages or bring Yoshi in range for a vertical kill via an up–smash. Whenever you choose to lead in with a neutral–aerial, keep in mind your opponent’s propensity for crouch–canceling and use late neutral–aerials to account for this. You should also be more cautious about using your neutral–aerial at lower percents in general as Yoshi can make use of his double–jump armor to plow through your aerial with an aerial of his own. Be sure to compensate for Yoshi’s reverse wavedashes by extending your aerial or running forward more than usual before executing your short–hop. Another important fact to keep in mind at all times against Yoshi is that you cannot reliably combo up–throw into up–aerial on him; this is because Yoshi’s heavy weight extends the time that is required for Fox to throw him, oftentimes giving the dinosaur enough time either to jump out or to protect himself with his neutral–aerial.
As always, do your best not to be predictable; a tech–following down–smash can quickly and easily shift control of the match to your opponent as you are tossed off–stage at a nasty angle (DI the down–smash upwards to minimize its knockback length and ease this harsh angle). Remember that Yoshi’s wavedash, although not the longest in the game, nevertheless allows him to fine–tune his positioning as he sees fit, whether in anticipation of your approach or in some form of a mind game or a bait, possibly giving him an opportunity to launch a counteroffensive. Overall, you could very well take either an aggressive or a defensive stance in this match–up, usually depending on the whims of your opponent’s style (although the lower–tier Yoshi is more likely to be played defensively and opportunistically against the versatile and powerful Fox). However, smaller stages generally demand a greater degree of aggression on your part in order to secure the win as you simply have less room with which to work a blaster–based game.
In keeping with every other match–up in the game, be careful around edges as you are just as vulnerable to Yoshi’s gimps as you are to those of any other character; again, your Blaster and superior speed will generally enable you to focus the fight at the center of the stage, where your vertical kills can come into play. As a final note, your normally–lethal shine spike loses its potency in this match–up due to Yoshi’s unique double–jump “armor”; as such, focus on ledge–hopped, sweet–spotted back–aerials for edge–guarding (although not so much at the lower percents as you could very well be hit immediately with a neutral–aerial counter out of armor). To facilitate your edge–guarding, tack on damage with your Blaster as your foe returns to the stage; this brings Yoshi closer to the higher percentages where your back–aerials can break his armor and hit him out of his double–jump, forcing him to attempt an air–dodge or Egg Roll to regain the stage.
Yoshi has a number of options to edge–guard you effectively. His down–tilt and down–smash both can cause you a good deal of grief, although you can readily ledge–tech these; his forward–smash and dash attack can both be used to intercept an oncoming Illusion; and his Egg Toss from the ledge can snipe you out of the air, forcing you to recover from a less favorable position. He can also repeatedly toss eggs from and then regrab the ledge out of the Egg Toss if he is the one attempting to regain his on–stage footing; this allows him to harass you relatively safely while carving out some space for him to get back onto the stage itself. Note that the knockback of Yoshi’s down–tilt is set (that is, it does not vary with percentage); as such, your opponent can use this move to set up an edge–guard situation when you are at low percents should you be sent off–stage.
Counterpicks
Pokemon Stadium: Stadium’s low ceiling amplifies your vertical kills against Yoshi, especially useful in combination with an up–smash finisher from your waveshines and drillshines.
Yoshi’s Story: Ironically, Yoshi’s Story can favor Fox in more than a few ways. This stage’s low ceiling allows you to take your opponent’s stocks more quickly, although note that the close side blast zones also improve Yoshi’s horizontal kills. As well, the Shy Guys can interfere with any eggs tossed off–stage in your direction, aiding your recovery.
Bans/Strikes
Final Destination: As with numerous other characters, Yoshi can string together impressive combos on this stage, thanks in no small part to his DJC game. FD should be your ban of choice in this match–up.
Fountain of Dreams: Yoshi’s survival is enhanced on this stage due to its high ceiling. Its platform structure and relatively close–quarters design allow Yoshi to control space and combo while constraining Fox’s movement and escape options.
Media
Mango (Fox) vs. aMSa – MLG Anaheim 2014: Here, aMSa makes use of Yoshi’s “parry” technique to create openings in Mango’s offense. Mango, on the other hand, utilizes shuffled down–aerials and run–in shines to crack aMSa’s defense without fear of crouch–cancel counters. Yoshi’s DJC combos on Fox also make an appearance on Final Destination.
Mango (Fox) vs. aMSa – Kings of Cali 4: This set contains a number of exchanges involving Yoshi’s double–jump armor and “parry” and his neutral–aerial counter.
Fiction (Fox) vs. aMSa: The first game of this set reveals the efficacy of Yoshi’s Egg Toss when used as an edge–guarding tool. In game three, aMSa utilizes Yoshi’s down–B from the stage’s ground level to punish Fiction’s in–place wake–up on a platform. Note also how Yoshi can use that down–B to grab the ledge quickly from high above the stage.
Mew2King (Fox) vs. aMSa: This game highlights an interesting down–B finisher by aMSa as well as a jab reset to set up for Yoshi’s DJC combos.
SFAT (Fox) vs. aMSa: In this Apex 2014 Salty Suite exhibition match, aMSa showcases Yoshi’s DJC game, Egg Toss from the ledge, shield–drop aerials, and fluid cross–platform wavedashes. Note SFAT’s use of waveshine combos, which are particularly devastating to Yoshi given his reliance on crouch–cancels.
Lucky (Fox) vs. aMSa – Kings of Cali 4: Lovage provides an explanation of Yoshi’s “parry” early on in this losers quarterfinals set. As well, you can see aMSa’s use of the light shield to escape certain unfavorable situations.
Lucky (Fox) vs. aMSa – Apex 2014 Salty Suite: This Salty Suite exhibition match shows the power of Fox’s down–aerial as a reliable opener for his combo game on Yoshi.
Colbol (Fox) vs. aMSa: In this Apex 2014 set, Colbol makes excellent use of Fox’s back–aerial as a means of breaking Yoshi’s double–jump armor during his recovery.
Silent Wolf (Fox) vs. aMSa: Silent Wolf showcases Fox’s combo and drillshine game against Yoshi here while aMSa utilizes Yoshi’s unique double–jump “armor” to turn the tables on Fox’s offense. Commentators D1 and prog together provide a number of insights regarding the match–up and Yoshi in particular.
5. Zelda [BT5]
To begin this section, I thank the residents of the Zelda forum at Smashboards, Cosmo in particular, for their informative writings on the subject of the Fox–Zelda match–up. They were particularly instrumental in fleshing out the discussion of the viable stages for each character, especially the post by Cosmo located at the following URL: http://smashboards.com/threads/the-secret-zelda-strats-discussionzone.266327/page-9#post-11035597.
Unfortunate Zelda has the bad luck of having high traction, a glaring disadvantage in the face of your shine combos. Furthermore, Zelda herself is quite floaty; this fact when combined with your shine combos and various lead–ins to up–smashes further disadvantages Zelda in this match–up. However, Zelda, despite her numerous shortcomings in this match–up, does have more than a few strong combos on you as well as her characteristic “lightning kick” forward– and back–aerials, both of which can end your stock surprisingly early (especially when combined with poor DI). It is important to keep in mind that she can use either of these aerials twice in a single short–hop thanks to her floatiness, similar to Luigi, and that her back–aerial is the faster of the two, with a hitbox starting at frame 5 as opposed to frame 8.
Your approach on Zelda is standard fare, for the most part. Lacking an efficient projectile weapon as well as a degree of speed high enough to compete with your own, Zelda is generally vulnerable to your technical offensive when initiated at opportune moments (she does possess a rather resolute defensive game). Lead in with your characteristic down– and neutral–aerial advances into shines and jabs; make sure to be cautious at low percents as Zelda can crouch–cancel non–delayed neutral–aerials and jabs. Shines are your ideal follow–ups to your down–aerial approach, given Zelda’s traction; each connected shine should lead either to an up–smash or a series of drillshines to tack on damage for an up–smash finisher. Note that your opponent can Smash DI your drill (to force you to pay attention to your spacing as you move through the air) and your shine (to vary the distance at which the shine sends Zelda). It is also possible to combo your neutral–aerial into an up–smash if your opponent survival DI’s or you connect just so with a soft hit of the neutral–aerial. Note that up–aerials after an up–throw do not reliably combo on Zelda; however, you can still make use of your up–throw to put Zelda above you in preparation for a read–based up–aerial before she navigates her way to the ground. To this end, shine–grabs can allow you to break down Zelda’s defense and get her out of her shield and into the air, at which point you can dash–dance below her to position yourself optimally for a follow–up. A simple but oft–neglected facet of proper positioning in such situations is to approach from the side where you have the greatest amount of stage behind you; this is done to account for the possibility that your opponent may be able to hit you out of the air before you are able to connect with him or her, in which case you will have minimized the chances that you will be sent far off–stage or killed outright.
However, you should also keep in mind your option of playing a defensive game. Zelda has no answer for your SHL (or SHDL, if the stage and distance between you permits it) in combination with your speed and maneuverability. As well, Zelda lacks reliable options against your dash–dance. By making use of both of these facts, you can dictate virtually every exchange of the fight, carefully choosing when to approach and when to hold back; this allows you to build up your opponent’s percentage with safe blaster fire from afar until you can set up a finishing aerial, up–smash, or edge–guard situation.
For the vast majority of the match, Zelda must play defensively against Fox. She will rely on her shield (both hard and light), her crouch–cancel, and her up–smash out–of–shield to defuse your aerial pressure (shuffled aerials out of shines make the use of this counter–option difficult for the Zelda player, as does proper spacing off of her shield and crouch–canceling the up–smash as a mix–up). As a side note, you can Smash DI the weak hits of Zelda’s up– and forward–smashes to escape the move in all versions of Melee except for 1.0. You can very readily force your opponent to shield with something as simple as a well–spaced dash–dance; this requires spacing your movements such that you are out of range of a dash attack but still close enough to threaten your adversary. As usual, it is best to stay out of your shield as Zelda can chain–grab you at low percents with her up–throw; DI’ing far behind her at middle percents seems to make it more difficult for her to follow up effectively off of this throw. In addition, her grabs can start off combos that can lead to a forward– or back–aerial or outright link to one of those aerials, depending upon your DI and percent.
Take care to end Zelda’s stock as early as you can to cut down on her chances of landing a successful forward– or back–aerial, both of which pack a punch as well as some range; their range in particular, when coupled with Zelda’s floatiness, can enable her to sneak in kicks should you underestimate their range or misjudge the distance between you two. Too many “empty” jumps from your opponent should prompt a jump–canceled up–smash from you to punish Zelda’s descent. Again, remember to focus your attacks on your vertical kills using up–smash from your shine and jab lead–ins. Furthermore, try not to forget your out–of–shield up–smash as a punishment for badly–spaced aerials; you can increase the likelihood of this error by running in close to a descending Zelda and holding up your shield, but be wary of adjustments to this maneuver in the form of empty lands and wavelands. You should also notice that your opponent must space the lightning kicks correctly in order to connect with their respective sweet–spots; the “sour–spot” of these moves, which is closer to Zelda’s body and thus farther away from the magical sparkle around her foot, carries a virtually negligible amount of stun and knockback power.
Edge–guarding Zelda can be difficult given the distance covered by her up–B and the fact that your opponent will opt not to use an in–game tag, which would telegraph the direction of her teleport. Patience is key here as you may need to execute a number of maneuvers to take the stock at the edge, or you may need to settle for a high–percent back–aerial kill. If you force Zelda to recover such that she must appear above the stage for a period of time (for example, by timing a ledge grab or a Fire Fox ledge stall), you can usually make it to her in time to land a running jump–canceled up–smash before she can hit the ground. As usual, you must pay particular attention to your recovery. Zelda’s down–smash is an especially potent tool and sends you at a horrendous angle should it connect and you miss your ledge tech. She can also make use of her neutral–B to cut through your recovery move of choice. Recovering high to a central platform can prove problematic for the sluggish Zelda, however.
Counterpicks
Dream Land: While Zelda does survive vertically for longer periods of time here, this stage also negates her horizontal kill game; provides platforms for use in escaping chain grabs, navigating around Zelda, and recovering; and is large enough that you can relatively easily accumulate damage with your highly–mobile blaster game.
Pokemon Stadium: Stadium’s combination of a low ceiling and an ample amount of stage space for your Fox to roam make life for Zelda rather difficult.
Final Destination: Although FD’s lack of platforms does open up Zelda’s chain grab game, consider that she can rarely if ever directly create those openings, forcing her to rely largely on technical mistakes on your end. As well, this stage’s platform–free design also hampers Zelda in that it cuts down on her options to land safely when she is sent into the air. Furthermore, you as Fox have more than a few means to control the positioning of the fight (both yours and your opponent’s), allowing you to play an effective blaster–based keep–away game here as well. Final Destination’s ceiling is also not particularly high, preserving your low–percentage vertical kills.
Ban/Strike
Fountain of Dreams: Fountain’s high ceiling reduces your vertical kill potential while the relatively close side blast zones augment your opponent’s horizontal kills. As well, the stage’s platforms and the smaller size of the stage itself can restrict your movement and allow Zelda to cover more of your escape routes.
Media
Kels (Fox) vs. The Lake: This match features Fox’s characteristic drillshine up–smash finisher as well as an excellent use of Fox’s down–tilt at 1:38 to hit under Zelda’s shield and prep her for a lethal up–aerial.
Kels (Fox) vs. Cosmo: These matches, the first two of a losers finals set, showcase the full spectrum of Fox play against Zelda, from offensive pressure with shines and aerials to defensive patience with lasers and dash–dances. Kels manages to break Cosmo’s shield in the first game on Final Destination, a significant hazard for Zelda should you succeed in trapping her with your aerial pressure game. Cosmo, on the other hand, makes use of Zelda’s defensive options, her up–throw set–ups, and Fountain of Dreams as his counterpick.
6. Roy [BT6]
Marth’s fellow swordsman can pack more of a punch against Fox than you may at first realize (at least on Final Destination). Although inferior in many respects to Marth, Roy nevertheless possesses good maneuverability in his dash–dance; a relatively powerful yet counterintuitive sweet spot to his sword; a versatile and quick down–tilt that can prep you for all manner of follow–ups and whose animation can be cut off quite quickly (a common poking tool for Roy in the neutral game); and chain grabs via his up–throw that can follow into some damaging (and potentially lethal) combos courtesy of his down–tilt, up–aerial, and forward–smash. Since you cannot rely as much on your shine lead–ins in this match–up as you can with Marth, you may need to play a bit of barebones Fox to take home the win here.
Although Roy may seem superficially to be a “clone” of Marth, you must adjust your style in some respects while playing him. For instance, unlike Marth, Roy falls from the shine; as such, you lose your easy shine lead–ins against him as well as your true shine combos. As a result, you will need to implement tech–chasing and wake–up prediction whenever you land a shine on Roy, anticipating his in–place get–ups, spot–dodges, and techs with a grab, jump–canceled up–smash, or even shuffled aerials. Keep in mind your jab resets and drill to grab as well. Being able to predict and to follow your opponent from your shine will compensate to a certain extent for the loss of your shine combos in this match–up, which, although unnerving, certainly is not the end of the world.
Should you land a grab, rely on your classic up–throw to up–aerial routine to tack on damage and to prep for a kill; note that you will need to wait at high percents for your foe’s double–jump escape and follow him through the air as appropriate. As with Marth, force your opponent to you with blaster fire if you cannot see an opening past his dash–dance and wavedash spacing; remember that Roy will try to space out your aerial approach with both of these in order to land a spaced down–tilt or a jump–canceled grab, both of which can prep you for some rather painful follow-ups. Follow attempts to retreat with your quick jump–canceled grabs and down–aerials, and be careful not to fall into any aerials from Roy’s fast–fallen jumps meant to space out your approach. Be especially careful with the spacing of your back–aerial, which if mis–spaced on a shield will result in a shield–grab and a damaging grab combo. You must mind your percents and neutral–aerial timings as well in this match–up as Roy can use his crouch–cancel to set up for a grab at low percents.
During the neutral game, your opponent generally will be aiming for a grab or a dash–cancel into a down–tilt cut off by dash–dancing (note that while Roy’s down–tilt animation can last as long as 57 frames, it is interruptible as soon as frame 20 by another non–shield action). He can also mix in the first hit of his side–B as a means of stunning you just long enough for him to open you up for a grab. If you are grabbed in this match–up, expect to be chain–thrown for some time and then taken into a combo involving shuffled up–aerials into a finisher forward–smash, which you must be prepared to DI correctly. Similarly, a down–tilt will set you up for grabs or forward–aerials, which in turn can then set you up for the aforementioned grab combo. In either case, refine your DI against the concluding forward–smash and try to mix up your DI on the chain grab itself to attempt to throw off your opponent and escape. Roy can also make use of his side–B (the Double–Edged Dance), particularly the third forward/neutral component, as a kill mechanism.
For off–stage play, you could go for a shine spike timed to coincide with the hitbox–free portions of Roy’s up–B; note that his recovery has multiple hitboxes on frames 9 – 21 and that he can grab the edge as soon as frame 32, so there is a bit of time there to squeeze in a shine, particularly as a punish for a missed sweet–spot out of your crouch–cancel. Alternatively, you could Fire Fox ledge stall through his up–B, either forcing him to land above you and punishing from there with ledge–hopped attacks or simply causing his death outright if your opponent fails to adjust; however, note that Roy can stall using his side–B to vary the timings on his recovery. If you are the one doing the recovering, make certain as always to sweet–spot so as not to fall victim to timed forward–smashes or Counters (Roy’s more consistent and thus preferred option) from the stage. You may also want to be careful with aiming your Illusion return directly at Roy; a crouch–cancel on this low–power attack could allow him to take advantage of your landing lag with a grab, forward–smash, or down–tilt. As mentioned previously, Roy’s Counter, like Marth’s, also sees play as a reliable means of edge–guarding; the generous timing window, invincibility to the triggering hit, and surprising knockback combine to provide him with a consistent means of ending your stock off–stage should you recover into it. As a result, you may wish to opt for high recoveries in this match–up, particularly given the fact that Roy cannot abuse his forward–aerial during an airborne chase nearly as well as Marth can.
Counterpicks
Pokemon Stadium: Stadium’s low ceiling and various platforms do well in reducing your kill percents while robbing Roy of his grab combos in many situations.
Dream Land: While this stage’s high ceiling does allow Roy to survive your up–aerials until higher percents than normal, his horizontal kill game is likewise compromised. As well, Dream Land’s platforms provide you with an escape route should Roy land a grab along with additional recovery options. Note that you need not always aim for a vertical kill; your shine and edge–guarding games are more than enough to take your opponent’s stocks of their own accord.
Bans/Strikes
Final Destination: FD highlights the effectiveness of Roy’s up–throw chain grab and the associated combos; it is generally regarded as his best stage in this match–up and truly the only stage where he can keep pace with your grab and laser punish game.
Fountain of Dreams: This stage’s platforms afford Roy some movement options without compromising his game plan in any appreciable fashion. As well, Fountain’s higher ceiling reduces the viability of your vertical kills while the closer side blast zones augment his forward–smash finishes. Furthermore, should either of the side platforms disappear, that portion of the stage essentially becomes a miniature Final Destination, allowing Roy to implement his chain grab combos relatively unimpeded.
Media
Mojo (Fox) vs. Sethlon: In the second game of this winners quarterfinals set, Sethlon showcases FD and the boost that it provides to Roy’s chain grab and combo game on Fox. Note the drill grab at the very start of the match as well as Roy’s grab off of a crouch–canceled Jab immediately afterwards. Sethlon also makes very good use of Roy’s interrupted down–tilt during the neutral game to interrupt his opponent’s dash–dance and transition into a combo or forward–smash. In the set’s final game starting at 10:48, you can see the problems that Dream Land’s size and high platforms cause when Roy is attempting to edge–guard Fox.
7. Mewtwo [BT7]
The lower–tier Mewtwo has quite a difficult time against Fox. Even with his DJC combos (which are at their best only if you do not DI in the slightest), down–tilt (which can stun you just long enough to open you for a grab), forward–tilt, and neutral–aerial, you have very little to fear from Mewtwo, all things considered. Aim for vertical kills against the light and floaty Mewtwo with set–ups from jabs at high percents and jab resets from connected shines. Predict Mewtwo’s lengthy roll if your opponent resorts to it to escape your shield pressure and follow with a jump–canceled grab to up–aerials or a jump–canceled up–smash for quick kills. Your pressure game can be as potent as ever against Mewtwo, but you should be careful of his reverse wavedashes (used to space for a grab). You can make use of down–aerials for general set–ups at all percents (and free of the worry of crouch–canceling, although see the notes from Taj below) and neutral–aerials for higher percent set–ups for up–smashes. Be wary of Mewtwo players’ generally defensive style; more often than not, they will bait out and wait for a hasty approach with plenty of reverse wavedashes, for which you should be compensating by overshooting your advance as needed. Also be cautious of trying to descend directly on a shielding Mewtwo from high above; like Zelda, Mewtwo can make use of his up–smash out–of–shield to catch you out of the air and defuse your pressure, in addition to escaping his shield with a quick wavedash.
A potential obstacle to your approach on Mewtwo is his own neutral–aerial, which packs a number of hitboxes but relatively poor priority. You may find your opponent using this to move in on you when he can; space yourself out whenever possible and land grabs as Mewtwo lands from his missed aerial. Also be aware that Mewtwo does have his own comboes thanks to his ability to DJC and your fast–faller physics; look especially for DJC’ed neutral– and forward–aerials on Mewtwo’s approach, and keep in mind that flawed DI on your part can keep you in these combos for a good deal of damage. Your opponent may also make use of grabs at low percents out of a crouch–cancel, all the more reason for you to rely on your own grabs in this match–up. In addition, be wary of your opponent when he has a charged Shadow Ball, Mewtwo’s projectile. Like Samus’s Charge Shot, an instance of predictability in your tech or wake–up patterns could allow Mewtwo to land a hit with this and get you off–stage, especially with poor DI. He can also catch you out of your charging Fire Fox with it should you misplace yourself. As well, Mewtwo can cover his advance with Shadow Balls, as suggested by Taj in his Smashboards thread titled “Taj’s Character Match–Up Discussion.” When your foe feels that he has built up enough percentage, he or she may aim to take your stock out of a grab with an up–throw preceded by multiple grab–hits; DI the throw itself entirely to the side to reduce its killing potential.
Taj writes that the majority of his openings on Foxes arise from flubbed drillshines; this is because Mewtwo’s greater height and lower traction throw off many Fox players’ innate timing on their down–aerial, causing them to miss their L–cancels and fall into a grab. As such, you may opt to start your down–aerial later so that your opponent has fewer hits off of which to Smash DI. Note that you can also incorporate drills into grabs should the drill connect with your non–shielding foe. Taj adds that it is important that Mewtwo make use of his down–tilt to break Fox’s attempts at grabs; however, he also states that Fox can utilize well–executed dash–dances to bait out Mewtwo’s grabs and counter with grabs of his own and the usual up–aerial follow–ups. With regard to Mewtwo’s edge–guarding game, Taj writes that the Pokemon’s options against Fox can consist of off–stage back–aerials and Teleports to the ledge, which when timed properly will steal the ledge from you and take your stock. Mewtwo’s recovery is actually quite good in terms of both range and versatility, so you should focus on the on–stage grab and laser game to obtain your kills. On the topic of Mewtwo’s recovery, it is interesting to note that Mewtwo players will intentionally choose not to use a tag in–game (similar to Sheik players) as it would give away the position of their air–dodge and, more importantly, their up–B recovery. Overall, focus on your vertical kills and your lead–ins for them (especially jump–canceled grabs and shine–grabs), and do not play sloppily or predictably (especially near the edge) lest you fall into a DJC combo or have your recovery down– or forward–smashed.
A unique feature of this match–up is Mewtwo’s pull–through glitch on Battlefield. From the edge, if Mewtwo lands a Confusion (his side–B), his victim may be pulled straight through Battlefield’s lower platform and end up beneath the stage. Although this is not the most common of occurrences, knowing this in the first place will prevent you from losing stocks in the most ridiculous of fashions to a move which you did not even understand. Your opponent may opt to counterpick you to this stage as a result of this rather obscure maneuver. While not always immediately lethal, getting pulled underneath Battlefield nevertheless puts you in a poor position, forcing you to use your double–jump and go into an up–B at an easily–foreseen angle.
Counterpicks
Pokemon Stadium: Ironic, yes, but Stadium is not the greatest of stages for Mewtwo thanks largely to its low ceiling, leading to even earlier kills from your jump–canceled grabs.
Yoshi’s Story: In keeping with the vertical kill motif, Story also aids your grab follow–up cause.
Ban/Strike
Final Destination: Easily your ban of choice against Mewtwo, FD’s lack of platforms enables lengthy combos from the Pokemon, giving him the tools he so sorely needs to keep pace with Fox’s game.
Media
SFAT (Fox) vs. Taj: Note here SFAT’s focus on landing grabs and up–aerials. You should notice in particular the final stock of the first game, where SFAT is careful to keep Taj’s Mewtwo at a percent where he can still reliably connect with his up–aerial out of an up–throw.
Lucky (Fox) vs. Taj 2: This match illustrates Mewtwo’s pull–through glitch on Battlefield at 1:10.
Lucky (Fox) vs. Taj 3: Here, Taj showcases Mewtwo’s grab game on Final Destination as well as the use of down–tilts as an opener and the Teleport ledge steal.
8. Mr. Game & Watch [BT8]
The strange Mr. Game & Watch has a good deal of tools up his sleeve with which to combat the top–tier Fox despite his comparatively meager tier position. These include a solid crouch–cancel counter game courtesy of his down–tilt (which likewise provides an excellent set–up on Fox for Game & Watch’s next move), numerous combos (some of which can go to death or to quite high damages if not DI’d properly) thanks in no small part to Fox’s innate physics, and the inability to be caught in shine comboes (that is, he falls down when shined and thus breaks any true shine combos). Indeed, if you are not careful, you may find your top–tier character succumbing to the surprisingly effective Game & Watch; Foxes inexperienced in the match–up can be caught off–guard by his noteworthy wavedash, combo game, and long–lasting hitboxes. Fortunately, you as always have more than a few tools and tricks of your own to earn you victory in the end, particularly your grab game and the ever–present up–throw to up–aerial.
First off, note that the exceedingly light and floaty Game & Watch is extremely vulnerable to your plethora of vertical kill options. As such, focus the vast majority of your play around landing a lethal up–smash or prepping your foe for deadly up–aerials. You can, for instance, catch G&W after he misses an aerial with a quick jump–canceled grab or up–smash, either of which can become lethal at quite low percents. You can also kill off of botched spacing thanks to your up–smash out of shield; simply running within range of G&W’s forward–aerial approach and holding up your shield could throw off his spacing and give you the time to land that killer Smash, which if it does not kill your opponent immediately will still prep him for up–aerial follow–ups or falling lasers. On a related note, take note of the fact that your up–throw animation is especially quick when throwing G&W due to his very low weight, so be ready to follow up so that you make the best use of the available stun time. As well, according to Qerb, G&W is the only character who can tech a platform when he is directly level with that platform (as opposed to all the other characters, who can tech only when they actually hit the platform’s surface); this could catch Foxes inexperienced at this match–up off–guard as it does markedly change the usual mindset and timing for following up off of a platform.
Of course, these early kills are most often easier said than done. G&W can and will likely choose to play a rather restrained and defensive style with a combination of reverse wavedash baiting and crouch–canceling, which you can answer with a dose of blaster fire and well–planned down–aerial approaches. You should be cautious not to run headlong into too many badly–planned approaches on G&W; his wavedash is lengthy enough to afford him an efficient means of spacing out your aerials, and his ever–present down–tilt can very easily set you up for any number of follow–ups, especially out of a crouch–cancel. As such, pay particular attention to the effective range of your neutral– and down–aerials, spacing yourself via dash–dances and reverse wavedashes on your approach and always keeping in the back of your mind the possibility of a retreating wavedash from G&W as a response when you do decide to go on the offensive. With your speed, dash–dance, and blaster fire all of use in drawing an approach out of your opponent, you can create more than a few opportunities for your damaging up–throw to up–aerials by focusing largely on a defensive, bait–and–punish style against Game & Watch; note that G&W has no reliable answers for a patient, defensive Fox who waits for him to toss out a relatively unsafe move, such as a mis–spaced forward–aerial or a hasty jab, and punishes with a grab. As well, note that Mr. Game & Watch in fact cannot L–cancel his neutral–, up–, and back–aerials. However, Smashboards user Ya Boy GP adds that the back–aerial, while incredibly laggy (on the order of 18 frames), does possess a hitbox on the first frame that the paper–thin character lands; as such, GP recommends to be more patient when punishing a back–aerial than you would be for a forward–aerial, which can be L–canceled. G&W’s down–aerial has a similar property; its grounded hit grants a hitbox on the first two frames.
Especially at low percents, phase out your jabs from aerials in favor of the shine; although G&W does fall from the shine, you cannot afford to hand him any easy openings on you by something as simple as a crouch–cancel counter with a down–tilt. Yet again, good following and prediction abilities on your part can turn this supposed “advantage” of G&W’s into a boon for your game as you land a good number of damaging grab and up–aerial combos off of shine knock–downs; remember that you only need so many openings on the paper–thin Game & Watch to score a vertical kill, your principal goal in this match–up. As always, however, be wary of low–percentage crouch–cancel counters throughout the match; adjust with shine follow–ups, grabs, down–aerials, and late neutral–aerial lead–ins as appropriate. You can also safely grab out of your down–aerial; this tactic is especially devastating against Game & Watch as it negates his crouch–cancel game while giving you an opening for a potentially deadly up–aerial or two.
As always, your shines from aerials and through shields must be spot on in this match–up to remove any easy openings on your part for Game & Watch to exploit. A grab from him can lead into quite an effective combo that can include still more grabs (note that he can chain–grab you using both his up– and down–throws, as appropriate), down–tilts, and neutral–aerials, which themselves pack a good deal of power. If your opponent likes to hold up his or her shield past your shine, jump–cancel the shine directly into a grab and a quick up–throw. A shine into shuffled neutral– and up–aerials can apply excellent pressure to G&W’s subpar shield and allow you a strong opening to punish, often with lethal results; shine–aerial shield pressure is especially effective should your opponent manage to survive to higher percents that mitigate your up–throw follow–ups. Your up–tilt is especially adept at breaking down shields, should you make it to the backside of the offending shield; note that it is difficult for Game & Watch to punish you from this position owing to his relatively slow back–aerial, which interestingly enough also cannot be L–canceled (along with his neutral– and up–aerials). As well, it is highly possible to “shield poke” G&W’s head with a full–jump falling up–aerial, a maneuver which could end his stock at a surprisingly low percentage. More experienced players, however, will substitute the larger light shield instead of Game & Watch’s infinitesimal hard shield; attempt to wavedash out of their shield to escape your aerial pressure (this in particular makes the falling full–jump up–aerial a bit risky on your part and requires you to anticipate your opponent’s next move so that you are not grabbed should you miss the aerial); or go for a crouch–cancel counter at very low percents. With an upper–middle and high–percent Game & Watch, your neutral–aerial can link into an up–smash, depending on your opponent’s DI and the strength of the aerial when it connects.
Off–stage play in this match–up is the usual standard fare. Vary your recovery with shortened and ledge–canceled Illusions and angled Fire Foxes. Recovering low can be tricky due to his handy down–tilt, which functions as an effective and safe means of edge–guarding you. You will need to sharpen your sweet–spotting and ledge–teching skills to minimize any easy off–stage kills from G&W should you be forced to recover low. Also keep in mind that G&W can readily punish you for poorly–spaced recoveries by going off–stage with a neutral– or forward–aerial. His neutral–aerial is especially effective thanks to the size and power of its hitbox.
On your end, it may take a bit of time to become acclimated to G&W’s rather lengthy recovery. An effective answer to his low sweet–spot position and great height on his up–B is a simple Fire Fox stall on the ledge, timed to coincide with the start of his up–B. You will either hold the ledge through your unwitting foe’s recovery; force him or her to elevate above the stage, in which case you can intercept with a back– or up–aerial; or land a shine spike with the help of invincibility from the ledge. As well, you can make use of your crouch–cancel into shine at the ledge as a means of edge–guarding G&W; while his up–B’s vertical reach is impressive, its horizontal distance is far less so, making it weak to the shine. Similarly, you can also time a roll from the ledge through your Game & Watch’s up–B ledge grab window. Your down–smash is another option for edge–guarding G&W. Remember that while you can of course actively pursue G&W off–stage in order to land a shine, his floatiness and relatively high–priority aerials (particularly his up– and forward–aerials) do afford him some degree of protection; be patient and wait for your opponent to commit to a nervous defensive aerial before you commit to an off–stage chase for the spike.
Counterpicks
Pokemon Stadium: Thanks to its low ceiling, Stadium is once again the counterpick of choice. This offensive boost in combination with Pokemon Stadium’s horizontal length, which magnifies the efficacy of a defensive dash–dancing bait game, present the Game & Watch player with quite a mountain to climb.
Yoshi’s Story: As usual, Story’s low ceiling augments your already–potent vertical kills against Game & Watch. In addition, its shallow depth forces the G&W player to be still more precise with his or her up–B recovery; due to the move’s significant vertical recovery component in combination with the threat of losing a stock as a result of dropping too low in an effort to sweet–spot, this stage can present problems for your opponent’s return game. Note also the downward–sloping ledges that further augment your edge–guarding capabilities.
Battlefield: Battlefield’s structure allows you to escape chain grabs more reliably, squeeze in an extra up–aerial here and there in combination with the stage’s platforms, and recover more effectively thanks to its high central platform. Furthermore, the open area underneath battlefield also augments your shine spike game as G&W has no answer once he is shined beneath the stage.
Bans/Strikes
Final Destination: Your best bet for a stage ban in this match–up, FD allows Game & Watch to extend his combos while robbing you of any platforms you otherwise could have used to break his punishes and chain grabs. The ceiling is also not terribly low, and the good amount of space under Final Destination aids G&W’s recovery.
Fountain of Dreams: A high ceiling and deep bottom blast zone both extend your opponent’s life here. Fountain’s structure and smaller stage size also hamper your mobility and defensive, keep–away style.
Media
GP (Fox) vs. Qerb: In this KTAR XI pools set, GP showcases the power of Fox’s dash–dance bait game against the unfortunate Mr. Game & Watch. Note how the Fox player waits patiently for his opponent to miss an unsafe move (for example, a hasty forward–aerial) and then punishes with a quick up–throw (without pummels) to one or more up–aerials as appropriate; the efficacy of such tactics is made readily apparent on Qerb’s counterpick of Final Destination, where the use of a patient playstyle mitigates the G&W player’s opportunities for grabs. Another important takeaway from this set is how GP links soft–hit aerials to Fox’s kill moves; examples of this can be seen at 0:25 and 1:24. At 1:09, notice how a run–in shield catches Qerb’s forward–aerial, allowing the Fox player to punish with an up–smash thanks to the resulting poor spacing and down–time.
L (Fox) vs. Qerb: Qerb draws attention to Game & Watch’s defensive play near the edge along with the edge–guarding tools at G&W’s disposal. In the second game, you should notice that Qerb often makes use of the up–tilt to cut off L’s neutral–aerial approaches as well as the Jab to stun the opposing Fox just long enough to take advantage of the opening. Smashboards user Ya Boy GP adds an interesting note concerning G&W’s up–tilt. This move lacks a “cooldown” period after its hit frames, that is, its hitboxes and the move’s animation itself all end simultaneously on frame 29 (specifically, the hitboxes run from frames 9 – 29); as such, there is no true down–time that you can easily exploit. However, Ya Boy GP suggests punishing with a grab if you are within range and in front of your opponent; this is because the up–tilt’s hitbox moves behind Game & Watch later in the move’s animation. GP also adds that the Jab has a good deal of down–time (10 – 11 frames, depending on whether or not the move’s single IASA frame is utilized) and that jab into grab thus is not a true combo and can be escaped with a buffered roll. On the other side of the match–up, L makes good use of grabs and down–aerials early in the set to nullify Game & Watch’s crouch–cancel counter game.
DJ Nintendo (Fox) vs. Qerb: DJ Nintendo’s defensive style causes Qerb problems in this set as Game & Watch has no reliable, effective answer for Fox’s mobility, particularly on platforms. Notice how Qerb guards himself against follow–ups by using up–tilts after his aerials, especially when Fox is on a platform above him.
ZeRo (Fox) vs. Qerb: This set is particularly instructive in that it shows quite drastically the impact of a change in play style. From two games down in this winners finals set, ZeRo gradually switches from an approach– and shine–heavy game plan to a defensive, baiting, laser– and grab–focused style that proves quite effective against the hapless Game & Watch.
Mike Haze (Fox) vs. The Phenom: This set highlights G&W’s off–stage capabilities against Fox’s recovery as well as his vulnerability to your vertical kills. Take note of Phenom’s use of the down–tilt as a combo starter off of missed DI.
D. F Tier [FT0]
1. Ness [FT1]
The obscure kid from the “Earthbound” series has more up his sleeve than some would believe. Armed with double–jump–canceling and a high–priority, high–speed forward–aerial, among other assets (including the intriguing but largely impractical “yo–yo glitch”), Ness has a bevy of damaging combo options open to him against the fast–falling Fox. Yet again, Fox’s shine serves as his ace in this match–up; capable of setting up painful grab and drillshine combos as well as punishing Ness’s recovery, Fox’s versatile down–B will once again pave your way to victory.
Although he may not appear as such, Ness actually wields quite a bit of speed between his aerials and his double–jump–canceling (from here on abbreviated “DJC”). Indeed, it is this ability of Ness’s that grants him a surprising degree of comboing ability on you; look out for repeated DJC’ed up–aerials out of grabs, for instance, or DJC'ed forward–aerials as a quick means of approaching or a safe means of retreating (do not underestimate the range or priority of Ness’s forward–aerial). DJC’ed aerials out of Ness’s shield also serve as a means of punishment for shielded up–smashes and the like; an out–of–shield DJC’ed down– or back–aerial is especially painful. Your DI has to be on point to avoid taking a good deal of extra damage from Ness’s DJC combos. Naturally, you aim to prevent Ness from landing his grabs, thus denying him a significant chunk of his set–up game; as always, have your shines and jabs from aerials well under your fingers (with an emphasis on shines at lower percents due to the possibility of crouch–cancel counters), and be careful with spacing your approach as even Ness’s subpar wavedash will enable him to avoid your approach and counter as he sees fit. Note that Ness can reset you with his quick down–tilt or his jab if you miss your tech within his range, setting you up for a grab. Another easily–missed opening on which Ness can capitalize is your coming down with a full–jump in his vicinity; thanks to the speed and low hitbox of his DJC’s, he can sneak in as you near the ground and land a move. Keep in mind, however, that DJC’ing obviously costs Ness his double–jump; as such, if you manage to hit Ness off–stage out of a DJC, you can finish his stock early via a shine spike or jumping into the “head” portion of his PK Thunder. Listen for the “twinkle” sound effect that Ness’s second jump produces to give yourself an idea of when you can punish him in this manner.
While your neutral–aerial is still an effective approach option, you must be careful with trying to contest Ness’s forward–aerial directly as you will not come out on top very frequently. Owing to the danger of Ness’s grab game, late neutral–aerials are preferred to minimize your opponent’s opening for a grab out of a crouch–cancel. Also, keep in mind your down–aerial as an effective opener, given the fact that Ness does not fall when shined. If you do land a shine or a higher–percent jab, forego attempting an extended shine combo and instead go right into a simple up–smash or a jump–canceled grab to an up–throw and up–aerials; your grab game is as potent as ever in this match–up, and you’ll find that you can take more than a few stocks simply by waiting for easy grab openings, such as poorly–spaced falling aerials or botched L–cancels. A back–aerial out of this set–up may be in order if you are near the edge or if Ness is Smash DI’ing your up–aerial; from there, you can exploit Ness’s recovery with your shine spikes (or even simply by intentionally getting hit by the PK Thunder itself, which causes it to disappear unless you connect with its “tail”). Even here, however, normally a position of total control for you, you must be cautious; keep in mind that Ness can in fact maneuver his PK Thunder such that it will form a sort of “net” around him and effectively cancel your shine’s aerial knockback. Although it is not the easiest of maneuvers to pull off, simply be aware that Ness does indeed have some methods, however obscure, of combating your shine spike. Of course, you can always use your ledge–dropped back–aerials, forcing Ness to land above you via your Fire Fox ledge–stall and punishing from there. A vertical kill with an up–smash may be in order at higher percents when your grabs lose effectiveness as set–ups or your opponent’s DI is allowing him or her to survive too long horizontally.
Counterpicks
Pokemon Stadium: Stadium’s low ceiling, platforms, and length amplify your vertical kills while downplaying your opponent’s horizontal knock–outs. The stage’s structure also lacks any sides that Ness can ride to aid his recovery.
Dream Land: While this stage’s high ceiling somewhat negates your vertical kills, its sheer length minimizes Ness’s horizontal kills while leaving a major option of yours, shine–spiking, relatively unscathed. The structure of the stage also interferes with Ness’s ability to ride the side of the stage during his recovery. Finally, Dream Land’s high central platform provides you a convenient means of escape and recovery that Ness cannot quickly and reliably cover on reaction.
Yoshi’s Story: An interesting stage in this match–up, the Shy Guys on Story can at times interfere with Ness’s recovery by absorbing his PK Thunder; this will cause him to plummet in lag to his death unless he is saved by the cloud, which itself can interfere with his recovery in other ways. While your vertical killing gains a boost here, keep in mind that Ness’s horizontal kills are also buffed by the close side blast zones.
Ban/Strike
Final Destination: Easily your best ban in this match–up, Final Destination’s platform–free structure opens up Ness’s combo game while restricting your options for escape.
Media
Codi (Fox) vs. Mofo: Note Ness’s damaging combos off of his grabs, particularly the down–tilt reset early in the first game that sets Codi up for a grab. Also pay attention to how getting hit off–stage out of his DJC costs Mofo the first game. At the end of the second game, you can see that Codi’s landing with an aerial from a full–jump within Mofo’s range allows Mofo to back into him with a DJC’ed back–aerial.
2. Bowser [FT2]
As a character who occupies one of the lowest positions in the tier list and who is seriously lacking in both speed and a truly effective, efficient approach, Bowser at first may not elicit much of a response from you, a player of the top–tier Fox. However, what this one match–up may teach you is that while having confidence in your character is key to your success on the battlefield, being overly confident to the point of arrogance can often lead to your defeat in an otherwise excellent match–up for you. Granted, Bowser does lack in speed, evasion, and combo options, but he does have more than a few noteworthy tools against Fox, especially an extremely powerful out–of–shield and counter game courtesy of his up–B (called the Whirling Fortress) and a very potent edge–guarding game thanks to his down– and forward–tilts; taken together, his up–B and edge–guarding are the staples of Bowser’s entire game plan against you and are the only truly effective, consistent means by which he can oppose you. As such, you should adjust your style continuously, wavering between aggression and defensive blaster–luring and punishing, according to your opponent’s style, which unless he is provoked should consist mainly of defensive play with more aggression near the edge for edge–guarding purposes. Most of all, however, do not allow yourself to become overly confident and simply chalk this match up to an auto–win for your top–tier character; you will quickly find as you grow in experience that such an attitude will lead to sloppy, reckless play on your part and many losses in match–ups which you truly should have won. Confidence is a strong asset, certainly, but arrogance can easily become an even more potent liability.
The ground game against Bowser can be trickier than you may at first be willing to believe. Thanks to his out–of–shield up–B and the unique properties of the Fortress itself (most notably invincibility on frames 1–4 when performed on the ground), Bowser is perhaps the only character who truly has a safe, relatively reliable answer to your approach when he is in shield; indeed, with good timing on your opponent’s part, you may find that a good portion of your aerial lead–ins on Bowser’s shield are countered by the out–of–shield Fortress (keep in mind that your shine only grants you invincibility on its first frame; here again, the Fortress outclasses you). As a result, even “perfect” shuffles into shines on your part can lead to counters on your approach by simple out–of–shield Fortresses. For these reasons, Bowser can catch Fox players inexperienced in the match–up very much off–guard; if you opt to attack Bowser’s shield, make certain that your aerials are spaced well and are as late (that is, connect with the shield close to the ground) as possible and that you transition into your follow–up option as quickly as possible.
If you find that you cannot take control via your signature approaches, switch gears to a more defensive, blaster–luring style; although Bowser has a potent, reliable answer to your aggressive strategies, he has little if anything to offer as a similarly efficacious counter to your own defensive projectile baiting and countering other than a flimsy advance on his part consisting of shuffled forward–aerials. You should examine your opponent over time and see if you can predict or read his approach in response to your blaster fire, that is, whether he runs up and stops with a shield to lure out an aerial, comes straight in with a forward–aerial attempt each time, or some other option. Adjust your spacing with reverse wavedashes and dash–dancing, returning fire with your shuffled aerials and jump–canceled grabs. Note that your classic up–throw to up–aerial routine can in fact still be effective here (especially given your opponent’s size and his reliance on shields), although Bowser can double–jump out even at low percents; you must wait for or bait out Bowser’s double–jump to be able to connect reliably with an up–throw follow–up.
Successful mindgames are also key to Bowser’s success over you. Watch for delayed aerials from Bowser’s descents as well as his innovative Koopa Klaw aerial grab, an especially potent and disorienting mix–up tool of Bowser’s against inexperienced Foxes. You should not stay in one place shielding in anticipation of a simple aerial from Bowser due to this; a throw from the Klaw can function as either a set–up or as a kill mechanism in and of itself when combined with poor DI. Even shielding on platforms above Bowser is risky; unless you can foresee the Klaw (which you should), you will be grabbed from your perch and put into Bowser’s control. As well, take a moment to think if you find yourself pressed against the edge; one of Bowser’s most potent means of putting you in a disadvantageous position is reading one of your jumps with a full–jump forward–aerial, so be particularly cautious when choosing your method of escape; this is yet another example of the importance of staying as grounded as possible for as long as possible. In addition, seasoned Bowser players will make use of a rather surprising mindgame involving his down–throw; because many players will assume from the rather sluggish animation of this throw that they can tech away and escape any tech reads in time, more crafty opponents will anticipate this thought process and immediately run towards that position, ready with another grab or a dash attack. Still another trick involves waiting for your second jump and punishing with a well–timed up–aerial. Finally, Bowser possesses a unique ability of his very own called flame–canceling. Although possible only in version 1.0, flame–canceling allows the dragon turtle to start his neutral–B fire breath without the usual lengthy start–up animation; he can use this to defend himself as he nears the ground or to gain a foothold on the stage out of a ledge hop, among other uses. Keep your wits about you at all times, and be ready for this and other tricks.
Thankfully, your shine combos work quite well on Bowser thanks to his traction. However, you should be aware that the shine’s stun time on an aerial opponent is less than on a grounded opponent; as such, down–aerials and not neutral–aerials should be your lead–ins for shine combos against Bowser, who can and will Fortress out of your string if he is hit with an aerial shine from a neutral–aerial. Link a few drillshine reps to tack on a good deal of damage and to prep for a lethal up–smash or up–aerials via a grab, adjusting your wavedash length as needed in response to enemy DI and Smash DI; Bowser’s large character model makes following DI a bit easier than it would be against other characters. If you successfully connect with a shine or jab (preferably a shine since Bowser’s next most viable option against your offense is crouch–canceling), up–smashes (at upper–middle percents and beyond) and grabs should be your top priority, not necessarily technically–demanding extended shine combos. Simple and effective is the name of the game against Bowser, who likewise possesses a simple and effective answer to your approach in his up–B. Of course, take care not to forget entirely about your neutral–aerial; indeed, if your enemy insists upon survival DI’ing this aerial, you can often chain it into itself or an up–aerial, as percentage dictates. Your neutral–aerial also becomes a still more potent option if you manage to lift Bowser off the ground, particularly on platform stages that allow you to follow into an up–smash.
The edge game with Bowser is where you need to be especially careful; indeed, other than forward– and up–aerial follow–ups from a Fortress launcher, the vast majority of Bowser’s kills on Fox will come at the edge, often stemming from some degree of prediction on your opponent’s part (and thus predictability on yours). For example, if Bowser grabs and down–throws you, he will expect you to tech away (for the most part) and follow in that direction for another grab; if this next grab gets you off–stage, you have just handed control of the match entirely to your opponent until you can regain your footing on–stage. As always, vary your recovery as needed among your suite of options, including angled Fire Foxes (care should be taken with these due to the range on Bowser’s forward– and down–tilts; watch your entry angles in relation to Bowser and compensate as appropriate), shortened Illusions, and the occasional head–on Illusion or Firefox to throw off your foe. If you are simply thrown off–stage at lower percents, take care not to use your recovery choice at the same time or at the same position consistently; a good Bowser will follow you off–stage and punish your moment of immobility with a well–placed forward–aerial and then Fortress back to the ledge, leading either to your immediate death or your imminent death via edge–guarding. Be wary as well of Bowser’s below–100 edge attack, which packs a surprising amount of speed and range and could very well knock you off your feet long enough for your opponent to gain a foothold on–stage (or even knock you off–stage, should you be positioned and damaged just so). Bowser can also hit you out of your attempts to double–jump to grab the ledge from below using his fire breath, putting you below the stage and setting up for a back–aerial edge–guard. As well, Bowser can Fortress to grab the ledge from either a platform or from a position near the ledge, an important timing consideration to keep in mind during your recovery. Clearly, the last thing that you want to do is to hand your opponent easy low–percent kills. Bowser does have the ability to go blow–for–blow with you, especially horizontally speaking with good DI, so a war of attrition is not a good route against the bottom–tier dragon turtle. As a result, you cannot permit low–percent deaths on your part; focus on finishing Bowser as early as you can with vertical kills, and be sure to focus play at the center of the stage as much as you can.
Of course, you have your own options should you get Bowser off–stage in search of a horizontal kill. Ledge–dropped back–aerials are good choices to combat Bowser’s recovery, but you must be careful with your spacing as the Fortress possesses a good deal of priority, even in the face of your back–aerials; note that you can time your back–aerials from the ledge such that you temporarily retain some invincibility during the aerial from grabbing the edge. Botched attempts to sweet–spot can be punished with a down–, forward–, or even an up–smash. If you wish to shine–spike Bowser for the quick one–hit kill (especially effective against him due to his recovery’s lack of vertical range), do so only with invincibility frames from the ledge as you will rarely if ever be able to shine safely through the high–priority Fortress and its large hitbox when completely off–stage. Steal the required invincibility frames from the ledge with a Fire Fox stall and then shine through your opponent’s recovery as he nears the edge. Simply stalling completely through the recovery in combination with a roll from the ledge is also an option should you note a tendency to go for the edge. Note also that Bowser has a quick means of making his way down to the ledge when he is high above the stage; he can use his down–B (the Bowser Bomb) to plummet to the earth and grab a ledge directly below him from the front.
Counterpicks
Pokemon Stadium: A low ceiling and structures that allow you additional recovery options prove irksome for Bowser players.
Dream Land: This stage’s size does extend Bowser’s vertical lifespan, but it also allows you to run circles around your opponent and pelt him with Blaster fire until you choose to strike from any number of angles.
Final Destination: Here, Bowser is robbed of any potential platform options and will struggle to land safely once you lift him into the air around center stage.
Bans/Strikes
Yoshi’s Story: Story’s structure grants Bowser some additional Fortress–related options between the side platforms and the nearby ledge. For example, after an out–of–shield Fortress against your approach, he can retreat back to and grab the stage’s edge and return with his quick below–100% ledge attack. He can also jump onto one of the platforms from the edge and fall through with a quick forward–aerial. Story’s closer sides also enhance his horizontal killing capability (a boon for him in combination with his Klaw against shielding opponents on platforms). However, your vertical kills are likewise augmented on this stage.
Fountain of Dreams: Another plausible counterpick for Bowser’s benefit, Fountain has a relatively high ceiling and a number of platforms of which Bowser can make use.
Battlefield: Although not preferred as much as Story and perhaps Fountain, Battlefield again provides Bowser with platforms for use with various Fortress tactics.
Media
Unknown522 (Fox) vs. DJ Nintendo: Take note of the very first stock of the second game showcasing a number of Bowser’s edge–guarding options against Fox. The second stock of that game shows a number of uses of the Koopa Klaw. Game three of this set shows Bowser effectively edge–guarding Fox with his below–100% ledge attack. This set is instructive in that it shows that even the top–tier Fox is not invincible against low–tier adversaries; to the contrary, lack of experience with a certain match–up and overconfidence can very quickly lead to your demise, especially when combined with the pressure of playing in a tournament setting.
Milk Man (Fox) vs. DJ Nintendo: Here again you can see how Bowser’s Koopa Klaw fits into his game plan and punishes you for shielding in his vicinity. Note how Milk Man waits for his up–throw follow–up rather than trying to land an up– or back–aerial immediately as Fox would be able to do in most other match–ups.
3. Pichu [FT3]
Strangely enough, the lowly Pichu has a better match–up against Fox than many may at first believe, relatively speaking. Granted, his self–damaging moves do exaggerate his tendency to be killed vertically, and he lacks greatly in range, but his up–smash, up–tilt, forward–smash, and throws all grant him combo and kill options against the fast–falling Fox. Pichu’s neutral–aerial approach is relatively solid when DI'd behind his opponent and can even buffer into a roll to facilitate his escape, and he is not exactly lacking in the speed department to boot. Expect up–smashes and jump–canceled grabs to punish you for predictability, both of which can lead into Pichu’s combos or chain grabs via his up–throw. Since Pichu falls from your shine, base your game largely on grab and up–smash set–ups from jabs and tech– and wake–up following (if you choose to shine from an aerial, that is). Drill to grab is also a potential set–up that circumvents Pichu’s falling from your shine. Your up–throw to up–aerials can devastate Pichu and kill at relatively low percents even with DI, particularly if you can chain multiple up–aerials.
As for the edge game, look for Pichu’s forward–smash to make an appearance against your recovery as well as off–stage neutral–aerials steered into your charging Fire Fox. As always, sweet–spot your recovery and DI whatever comes from your opponent on-stage; of special note is the process of DI’ing Pichu’s forward–smash, which you should in fact DI towards the pocket monster rather than away in order to escape the far more powerful tip of the move (indeed, DI’ing inward can very well push you out of the move’s hitbox entirely, freeing you for retaliation); note that such DI is possible only in version 1.0 of Melee, not in later versions. For your edge–guarding purposes, try out your down–smash or down–tilt to punish missed sweet–spots. You can also stall through Pichu’s recovery with your Fire Fox, causing him either to fall to his death by mistake or forcing him to land on–stage, where you can proceed as you see fit. Furthermore, your ledge–hopped back–aerials are also potent tools when it comes to edge–guarding the yellow rodent.
Counterpicks
Pokemon Stadium: A low ceiling equates to early kills on your part. As well, Stadium’s various transformations give you a few additional recovery options, a key boost as Pichu cannot hope to match you in the neutral game.
Yoshi’s Story: Again, Story’s low ceiling amplifies your already devastating vertical kill mechanisms against Pichu. Its static platforms also allow you a means of escaping his chain grab.
Bans/Strikes
Final Destination: Eliminating this stage from your opponent’s counterpick choices prevents him or her from abusing its lack of platforms with Pichu’s chain grab.
Dream Land: This stage’s high ceiling and significant length allow Pichu to survive longer than usual against you. However, its high central platform also provides you with another recovery option.
Media
Rubyiris (Fox) vs. Nicknyte: These matches highlight some of Pichu’s edge–guarding and combo options against Fox as well as the potency of Fox’s grab game against the lowly Pokemon.
4. Kirby [FT4]
A rarity in high–level tournament play, Kirby is nevertheless a quirky character who may throw you off at the onset. Look for vertical kills here, remembering to make use of your neutral– and down–aerial to jab and jump–canceled up–smash or grab. It is important to note that since Kirby falls from the shine, you should make more use of the jab as a set–up than you normally would; if you do shine from an aerial, switch into a tech– and wake–up–following mindset and try to land a jump–canceled grab into your ever–effective up–aerials. Keep in mind that you can also safely grab out of a down–aerial as a set–up in this match–up. You should not underestimate Kirby’s aerials, especially his deceptively–lengthy forward–aerial and potent back–aerial, which he can use in his own version of the “wall of pain.” If you can space out Kirby’s approach with a reverse wavedash or timed dash–dancing, you should make landing a jump–canceled grab into up–aerials your highest priority as that is the easiest and most effective means of finishing your foe; however, keep in mind the possibility of Smash DI on your up–aerial and the need to switch to a back–aerial as appropriate. The shine–grab can be quite useful in this match–up as well because you can quite easily force Kirby into his shield with either positional or aerial pressure. Vertical kills should be your priority in this match–up; with proper DI and his five additional jumps, Kirby can live horizontally for quite some time, but this cannot be said for his vertical survivability.
At higher percents, naturally, make landing a jab as a set–up your goal as DI and high damage will put Kirby very much out of your reach. If you prefer, you can also attempt to land a finisher out of a down–throw tech–chase when Kirby is at high percents. If you are having trouble getting through your opponent’s aerials, especially the back–aerial, make use of run–in shields and your up–tilt. If Kirby manages to grab you, teching away is usually the preferred course of action as this prohibits the sluggish Kirby from optimally tech–chasing you. Overall, much like the Jigglypuff match–up, land your grabs when you can, kill at the lowest percents that you can, and be wary of your recovery; Kirby, like every other character in the game, has his own methods of interfering with your return, including especially his off–stage aerials (which are made still more potent by his multiple jumps) and his down–tilt at the edge.
An interesting note in this match–up stems from Kirby’s characteristic “vacuum” ability. While it is well known that Kirby can copy one of his opponent’s special abilities (in your case, your stun–free Blaster) using this move, certain more innovative Kirby players will use this for a more surprising purpose: suicide kills. Simply put, should your opponent be up a stock or wish to end the game quickly, he or she will attempt to suck you in from the ledge by ledge–hopping into the vacuum. Attempts at this maneuver can easily be seen through with a bit of foresight and presence of mind, but if you do happen to be sucked in, you should not attempt to rotate out to escape (unless you are at a relatively low percentage, of course); doing so will still likely end your stock (especially given your fast–falling nature) while allowing Kirby to return on–stage with his multiple jumps and up–B. He can also make use of his forward– and back–throws for suicide kills. As is the case with every other match–up in the game, you can rob Kirby of his sorely–needed low–percentage gimps by constraining the fight to center stage with a bit of patience and a good deal of blaster fire.
Counterpicks
Pokemon Stadium: As viable as ever, Stadium gives you just enough room to roam around along with a low ceiling to get the most out of your vertical kill mechanisms. As usual, however, do not expect to be permitted to go here in a best–of–three set very often, if ever.
Yoshi’s Story: With its very low ceiling, this stage can quickly spell trouble for Kirby. Keep in mind that you should be more wary than usual of playing around the edge due to Kirby’s suicide tactics; this concept is still more important on this stage owing to its smaller size.
Final Destination: Without a chain grab and the associated lengthy combos, Kirby cannot take advantage of FD nearly as well as multiple other characters can. As well, he has a difficult time landing safely once you have forced him above you.
Bans/Strikes
Dream Land: A large stage both horizontally and (more importantly) vertically, Dream Land mitigates your vertical killing prowess but does afford you a great deal of room to maneuver around Kirby, allowing you to attack from multiple angles.
Fountain of Dreams: A stage with a deceptively high ceiling, Fountain’s unique platform mechanics can also throw a wrench into your usual movement patterns if you are not well–versed in playing on this stage.
Media
Kels (Fox) vs. RRR: Note Kels’ focus on landing grabs and up–aerials at appropriate percents out of shine wake–ups; he makes sure not to allow the Kirby to get to such high percents that landing his up–aerial follow–ups is made needlessly difficult or impossible. Also pay attention to how he generally keeps the action in the middle of the stage and resists the urge to approach Kirby at the edge.
IV. Beyond the Bracket [BTB0]
A. Single–Player Mode [SPM0]
Please see the following compilation by Treklink256 for world record scores and videos (current as of the last update in 2014) related to Fox’s Break the Targets, Home Run Contest, Event Matches, Training Mode, Multi–Man Melee, Timed Melee, Endless Melee, Cruel Melee, Classic Mode, Adventure Mode, and All–Star Mode.
B. Fox’s Hidden Taunt [FHT0]
Fox’s hidden taunt can only be done on Corneria and Venom, his signature stages. The taunt can be done on any section of either level, but you must make sure that you are in a secure location while executing it; if you are hit while Fox is in the starting animation for the taunt, you will not be able to do it. You can only do the hidden taunt once per match.
Once you have found a secure location, you must simply press down on the control pad for a single frame, which is 1/60 of a second. The popular method of pressing left, right, and down repeatedly and in quick succession is in fact incorrect; it simply became the widespread method of doing the hidden taunt due to the fact that in the middle of all of that pressing, the pad would slip very slightly up or down, eventually getting down to register in a single frame and setting off the taunt.
If you succeed, Fox will kneel down, each hand in a fist, his left fist shaking. He will then stand up and salute with his left hand, and Falco, Peppy, and Slippy will appear as if there is communication going on between the Star Fox team members. Each member’s face will appear at the bottom of the screen along with his written dialogue, just as they did in the Star Fox games. The advice that they give is mostly useless. Peppy will spout off random “advice” related to Arwing control at times, or he will inform you among other things that you can jump by pressing “X” or “Y” or pushing up on the control stick.
V. References and Resources [RR0]
Below is a list of helpful resources to further your Melee game, Fox or otherwise. Topics include Fox–specific information, general information, general advanced topics, and technical data and information.
Fox–Specific Information
1. Fox Hitboxes and Frame Data (SuperDoodleMan, Stratocaster, and X1-12):
http://smashboards.com/threads/complete-fox-hitboxes-and-frame-data.285177/
GIF’s of hit– and hurtbox views of Fox’s moves. To examine a move frame by frame, copy the corresponding GIF’s location and enter it on http://gfycat.com/ under “Fetch a URL.”
2. Fox Advice/Questions Topic (Silent Wolf and multiple other contributors):
http://smashboards.com/threads/fox-advice-questions-topic.98202/
This thread, updated virtually every day, contains a plethora of questions posed by aspiring Fox players and answered by the more experienced members of the community. If you have a question about Fox that needs to be answered, this is the place to post it.
3. Ultimate Fox Thread! Guides on Fox (Silent Wolf and multiple other contributors):
http://smashboards.com/threads/ultimate-fox-thread-guides-on-fox.111305/
A compilation housed in the Fox forum, this thread includes links to a wide variety of informative Fox–related posts.
4. Fox’s Jab Stand–Up/Pop–Up Percentage List (Shai Hulud):
http://smashboards.com/threads/jab-stand-up-pop-up-percentage-list.173797/
5. Fox’s Up–Throw Chain Grab (KirbyKaze):
http://smashboards.com/threads/attn-fox-players.292187/#post-11682326
6. Shield Pressure Research Project (SCOTU):
http://smashboards.com/threads/shield-pressure-research-project-updated-8-13-07-now-with-color.109595/
Technical information concerning the frame data underlying various Fox shield pressure schemes.
7. Shield Pressure Frame Data (KirbyKaze):
http://smashboards.com/threads/shield-pressure-frame-data.278616/
Additional analyses by KirbyKaze of Fox’s shield pressure methods.
8. Multi–Shine Frame Data (Kadano):
http://smashboards.com/threads/falco-discussion-thread.256826/page-517#post-15662726
9. How Pre–Ledgegrab Body States Affect Your Ledgedash Timing (Kadano):
http://smashboards.com/threads/how-pre-ledgegrab-body-states-affect-your-ledgedash-timing.346128/
General Information
10. 2014 SSBM Compendium of Knowledge (compiled by Stratocaster):
http://smashboards.com/threads/2014-ssbm-compendium-of-knowledge-updated-1-2-14.339520/
This is the recommended starting point for players beginning to delve into the depths of higher–level Melee gameplay. The 2014 SSBM Compendium of Knowledge is an extensive compilation of links to useful threads covering a broad range of topics useful for beginners and advanced players alike. Also included is a link to a list of definitions of commonly–used terms in the competitive Melee community.
11. SSBM: Advanced How to Play Tutorial Video (Wak):
https://www.youtube.com/watch?v=vckV2MJgBzo
An extremely useful resource for players new to the rigor of higher–level Melee, this video provides concise explanations and accompanying footage of the game’s various advanced techniques.
12. The Official Everything Thread (multiple contributors):
http://smashboards.com/threads/the-...e-basics-how-to-improve-frame-data-etc.97603/
Similar to the 2014 SSBM Compendium of Knowledge, this too provides links to a number of resources covering a range of topics.
13. Drastic Improvement (Umbreon):
http://smashboards.com/threads/drastic-improvement.311129/
This insightful work by long–time Melee player Umbreon provides guidance in a number of facets of the game, from the mental and abstract to more concrete recommendations with regard to character selection, how to learn optimally, and even how to play doubles.
14. Tips and Tricks – Tech Chasing (Little England):
https://www.youtube.com/watch?v=OkMsQGlcrgU
A concise and accessible overview of the finer points of tech chasing accompanied by in–game footage to demonstrate key concepts.
15. TechChaseTrainer:http://reactiontraining.herokuapp.com/
A handy site for training your reaction time and ability to respond in tech chase scenarios.
16. Smash Lounge (PewPewU et al.):
http://smashlounge.com/
A good source for gifs, images, and other visual representations of the techniques and characters of Melee, including gifs showing moves’ hit– and hurtboxes.
17. Sharpening Your Sword: Tai’s Marth Guide (Tai):
http://www.meleeitonme.com/sharpening-your-sword-tais-marth-guide/
Although directed primarily at Marth players, Tai’s writings also explain and clarify a number of fundamental topics that form the basis for higher–level play, such as spacing, threatening, and the concept of positional advantage.
18. How to Improve – A Compilation (Binx and multiple other contributors):
http://smashboards.com/threads/how-to-improve-a-compilation.106060/
This is a large compendium of upper–level posts and essays concerning how to improve as a player; these writings analyze the game as it plays out not only technically but mentally as well.
General Advanced Topics
19. A Guide to DI, Smash DI, C–Stick DI, Teching, and Crouch Cancelling (Doraki):
http://smashboards.com/threads/a-guide-to-di-smash-di-c-stick-di-teching-and-crouch-cancelling-updated.60218/
A very informative, neat, and organized thread on the more specific aspects of directional influence, a critical part of high–level SSBM play. This post is truly a must–read for every aspiring tournament–level player.
20. DI Tutorial (Ken):
https://www.youtube.com/watch?v=DKMyDkWzOcQ
In collaboration with Simna, Ken provides an excellent tutorial on the concept and execution of directional influence, complete with in–game footage and a handy view of the corresponding controller inputs.
21. How to SDI Fox’s U–Throw U–Air and Not Die (KirbyKaze):
http://smashboards.com/threads/how-to-sdi-foxs-u-throw-u-air-and-not-die.217426/#post-6430241
22. Ledge–Cancelling Example (mattdotzeb):
https://www.youtube.com/watch?v=B36UqF8bITE
A short example of Falco’s Phantasm ledge–cancel, which is performed in the same manner as Fox’s Illusion ledge–cancel.
23. Metagain: Shield DI (Kurtis Trainor):
https://www.youtube.com/watch?v=GqNP9JOufqE
A succinct overview of shield DI and its potential uses during battle.
24. Shield Dropping (dashdancedan):
http://www.youtube.com/watch?v=qQA7vbttZkQ
Submitted by voorhese, this video explains the various methods of performing shield drops and also shows applications of this tactic (practical and otherwise) with numerous characters, Fox included.
25. Shield Dropping Tutorial (Xenix):
https://www.youtube.com/watch?v=--214R3R5qw
A quick explanation of how to execute a shield drop, accompanied by visual aids.
26. Stratocaster’s Hitbox System (Stratocaster and multiple other contributors):
http://smashboards.com/threads/stratocasters-hitbox-system-complete-or-is-it.283973/
Links to GIF’s of hit– and hurtbox views of each character’s moves. To examine a move frame by frame, copy the corresponding GIF’s location and enter it on http://gfycat.com/ under “Fetch a URL.”
27. The 20XX Melee Training Hack Pack (achilles1515 and multiple other contributors):
http://smashboards.com/threads/the-...re-alt-stages-costumes-new-debug-menu.351221/
The future of Melee training is brought to the present by this ambitious hack pack. This thread also includes links to assist with preparing your console and setting up the pack itself.
28. DA MINDGRAINES: An Overview of Mindgames (g-regulate):
http://smashboards.com/threads/da-mindgraines-an-overview-of-mindgames-a-post-the-doesnt-suck.54186/
A solid yet succinct start on the concept of mind games and their role in high–level play.
29. PC Drops (mattdotzeb):
https://www.youtube.com/watch?v=KUKdtLxjtS0
Technical Data and Information
30. Melee Mechanics (Kadano):
http://smashboards.com/threads/video-guides-melee-mechanics-–-5-videos-online.362547/
A series of video guides providing technical assessments of Melee’s fundamental underlying mechanics. I especially recommend the videos about hitlag and DI, tumble and jump buffering, and teching and advanced DI.
31. Powershielding Mechanics and Z + Digital Powershielding (Kadano):
http://smashboards.com/threads/official-ask-anyone-frame-things-thread.313889/page-17#post-18512581
A post by Kadano detailing the intricacies of powershielding, including a very intriguing powershield technique, currently termed the “Z + digital powershield,” discovered by tauKhan.
32. Throw, Tech, and Get–Up Frame Data (Magus420):
http://smashboards.com/threads/detailed-throws-techs-and-getups-frame-data.206469/
33. Hitlag and Shield Stun Frame Data (phanna, SCOTU):
http://smashboards.com/threads/frames-of-hitlag-and-shield-stun-12-chars-done.111814/
34. Frame Advantage on Block (KirbyKaze):
http://smashboards.com/threads/frame-advantage-on-block.309694/
35. Staling Mechanics (tauKhan):
http://smashboards.com/threads/fox-advice-questions-topic.98202/page-790#post-17810450
36. Knockback, Launch Speed, Hitstun, Hitlag, and Shieldstun Calculation (Strong Bad):
http://smashboards.com/threads/tool...dstun-calculation-v1-11.324878/#post-14651043
This thread contains a tool for calculating the above named attributes and also provides the formulas underlying these calculations.
VI. Closing Words [CW0]
With that, this guide to Melee’s vulpine space animal has reached its conclusion. During its steady compilation, I have encountered numerous people who were instrumental to the creation of this guide; as such, I wish to give proper thanks to these individuals.
Special thanks to Hoefler for being the sole inspiration for this guide. Without you and your great interest in Smash and for playing as Fox, I would have had no reason to spill out all of this knowledge that has accrued between Smashboards and myself.
Special thanks to Lanceinthepants, Little England, Goosefactor, KSO, ‘Fro, ac_burito, Jayford, NJzFinest, kirkq, Mr H, iamthemicrowave, Iggy, Rin10–10, DracoFox, BunBun, voorhese, ShineDEX, Faithkeeper, ParanoidPuma, WarHippy, Lavos, DeezNutZ, CNN, Maus, and all members of the Purdue Smash community both past and present for providing a strong, friendly, and supportive community and for keeping this magnificent game alive.
Special thanks to HoChiMinhTrail, Vro, Kels, tink, BIG C, GOTS, pen2, Eddie, Zjiin, and all of my regular sparring partners past and present, without whose help I would never have reached my current level of play.
Special thanks to the Midwest Smash community for all the fun, competition, and tournaments over the years.
Voorhese for the concept of “habitual timings,” input and clarifications on Falco’s throw game and its association with various DI directions, submission of a video on shield–dropping, and submission of a video that clarified the window for a successful L–cancel.
Little England for his tech chasing tutorial video, for providing input on stages for the Ness match–up, and for adding that Fox can Smash DI Falco’s shine up to avoid a down–aerial follow–up.
Lanceinthepants for assistance with searching for videos (particularly for the Ness match–up) and for informing me of SleepyK’s video demonstrating the guaranteed shield poke on Fox.
NJzFinest for providing input on the DK and Roy match–ups.
ORLY for input on counterpicks against Bowser.
Sveet for adding the use of double–shine pressure as a mix–up with shine–grabs.
Frootloop for adding the mistake of aiming short–hop neutral–aerials at the front of enemy dash–dances or at the empty space between the players’ dash–dances.
Winnarly for his submissions via reddit of Leffen vs. Mango from The Big House 4; Leffen vs. Hax from MLG Anaheim 2014; and Silent Wolf vs. Leffen from Evo 2014.
Yeester for the submission via Smashboards of Mango vs. Shroomed from Kings of Cali 2.
ContemplativeOctopus for the submission via reddit of Lucky vs. Westballz from The Big House 4.
Ya Boy GP for numerous contributions to the Mr. Game & Watch section.
Cosmo and the contributing members of Smashboards’ Zelda forum for their informative posts on the topic of Fox vs. Zelda.
PPMD and Mogwai for their information on stages and out–of–shield options in the Fox vs. Falco match–up (available at http://smashboards.com/threads/falco-matchup-thread-updated-with-2011-pp-fox-stuff.260699/).
Druggedfox for information on the down–aerial and linking it to an up–smash (http://smashboards.com/threads/fox-advice-questions-topic.98202/page-791#post-17951619) as well as his overview of chain–grab follow–ups on Falco (http://smashboards.com/threads/fox-advice-questions-topic.98202/page-790#post-17776560).
RaynEX for material on the Fox vs. Marth match–up (available at http://smashboards.com/threads/fox-match-up-topic-week-3-sheik.233521/page-2#post-7424252).
OkamiBW for his research on Luigi’s pre–charged down–B.
Sunny! for information regarding the down–aerial to down–smash (available at http://smashboards.com/threads/fox-advice-questions-topic.98202/page-791#post-17951223).
The Smash community’s video makers, writers, and contributors of all forms, including the contributing members of Smashboards’ character–specific forums.
Kofi Osei of YouTube for his summary and explanation of which characters can and cannot wall–tech Fox’s shine.
Red Shirt KRT for his moonwalking diagram and associated information (available at http://smashboards.com/threads/capt...eset-frame-data-and-moonwalking-guide.222781/).
Treklink256 for his compilation of single–player world record scores and videos (available at http://allisbrawl.com/forum/topic.aspx?id=15408&page=1).
Unknown522, RaynEX, and Miggz for their contributions to the Jigglypuff match–up section.
Mew2King and all those who helped him for discovering, recording, and organizing that obscene amount of data for the benefit of the Smash community. The entire “The Physics of Fox” section couldn’t exist without you guys.
SuperDoodleMan for his extensive data on Fox’s frames.
Stilettotrap/dizzy for his additions to the Jab, Straight, Rapid Kick, forward–tilt, forward–smash (including an alternate way to adjust wavedash length), neutral–aerial, forward–aerial, crouch–canceling (especially on this topic), and Fox–trotting sections, as well as for clarifications on the drill shine infinites and input on combos.
The_suicide_fox for his additions of the infinite stall trick using the Fire Fox and the boost grab, along with various technical data regarding the boost grab.
Shmooguy for having the first Fox guide that I have seen on Smashboards. Good job!
Umbreon for providing specific help in clarifying issues with the Jab, forward–tilt, and inverse drill shine methods one and two, as well as input on the Fox vs. Falco match–up regarding the role of wavedashing backward for positioning while under SHL fire.
Barogrei for his observation that the shine cannot be jump–canceled while reversing direction mid–shine and for informing me of a type of wall jump that still conserves the second jump. This interesting trick has been more closely examined by Doraki, who has termed it “ledge wall–jumping,” in the following thread: http://smashboards.com/threads/ledge-walljumping.57759/. You can view the ledge wall–jump in the following video: https://www.youtube.com/watch?v=nMk4Z3bnaK0.
DDRKirby(ISQ) for providing much–needed clarification regarding the Fox trot.
Eclipsing Binary for clarifying that the hidden taunt is done by pressing down on the control pad for one frame.
TheCape and noob-lube69 for their respective additions of the “ShineStall” and “Infinite Lube Stall,” both of which refer to stalling on the ledge with invincibility by dropping into a shine and jump–canceling it into a Fire Fox to grab the ledge again, allowing for further repetitions.
All the members of Smashboards for being so informative in even the most minute details of the game and for putting up with me randomly browsing through the forums and threads with my zero posts back in the day. You guys were instrumental in clarifying the tiny details about Fox’s game and Melee in general of which I was unsure.
The players themselves, especially those whom I have had the honor of going up against in tournament play. I thank you once again for any contributions you may have made, be they direct or indirect; for enabling me to improve as a player; and for keeping this great game alive after all this time.
Finally, Nintendo and HAL Laboratory for making such a deep, amazing game that still has us all riveted after so many years.
---
And so concludes this guide on Melee’s Fox McCloud. Feel free to email or PM me with your thoughts; I would love to see any comments or critiques whatsoever since so much work has gone into it. Thank you once again to all of the above individuals and parties who were so critical to the making of this guide. Finally, I thank you, the reader, for taking the time to read this work; I wish you the best of luck in your competitive Smash career and any other endeavors you undertake.
- CKit
---
“This guide is so incredible
I owe my Fox to this guide
Thank you, I love you.”
- JFox